Search the Community
Showing results for tags 'tool'.
-
Version 1.2.1
119 downloads
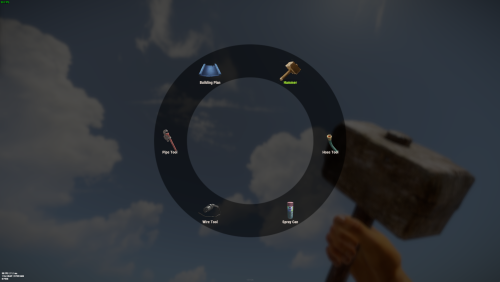
Allows you to quickly switch between available tools (configured in the config) by pressing the E key a menu will open in which the player can select the tool he needs. Commands: /give_mt - will give you the Multi Tool works only if you an admin. give_mt steamid in the server console will give the Multi Tool to a target player. You can change the Multi Tool skin in the config file. If you want to hide some tools or make them available only if play have permission you also can do this in the config file. Also you can enable unlimited resources for Building Blan used via Multi Tool. DEFAULT CONFIG$7.99- 19 comments
- 4 reviews
-
- 3
-

-
- #multi-tool
- #tool
- (and 2 more)
-

Version 0.1.4
49 downloads
What is it? A nice user-friendly warning system Usage When someone is breaking rules or trolling others just warn them, you can also set a command that will be executed through server console that will get executed upon reachin certain amount of warnings (can be configured in cfg) Permissions warnmenu.use -- Gives you full control to operate the WarnMenu Chat command /warn -- Opens the WarnMenu /warn "Name/SteamID" "Warning reason" -- Warns the specified player with your reason /warnmenu.save -- Force the plugin to write the data from memory to the data file /wmessage <NameOrID | * > <message> - Shows a gametip message (Doesn't count as a warning) to specific player or to all players when you put * instead of the name Data files All Data files can be located at: \oxide\data\WarnMenu\warns There you can find all the warnings for each player Features WarnMenu features * Online Tab - In this tab you can easily select any online player that you want to warn * Search All Tab - Once you open this tab, there you can see all the players and browse in them * Find player Tab - When you click on the button you will be able to search for a specific player using his Name or SteamID Warn Types * CUI-Based - A CUI warning message will pop-up on player's screen when he gets warned * Chat-Based - A chat message will pop-up in player's chat when he gets warned Executable commands * On reaching certain amount of warnings, you can make the server execute a command on a player(configurable in cfg) F.e.: "1": "say {0} just reached 1 warning! SHAME on him!", "3": "kick {0} Kicked for reaching 3 warnings", Localization { "Syntax": "Commands:\n/report (Opens Reporter GUI)", "CUI Online": "Online Players", "CUI Player": "Player: {0}", "CUI SteamID": "SteamID64: {0}", "CUI Warnings": "Warnings: <color=#8f1919>{0}</color>", "CUI NewWarn": "New\nWarning", "CUI WarningID": "Warning ID: {0}", "CUI WarnedBy": "Warned by: {0}", "CUI Date": "Date: {0}", "CUI Reason": "Reason: \n{0}", "CUI Remove": "Remove", "CUI Close": "close", "CUI Warn": "Warn", "CUI WarnAddMenuPlayer": "Warning for\n<color=#d43939>{0}</color>", "CUI SearchAll": "Search All", "CUI SelectPlayer": "Select a player to warn:", "CUI Find": "Find player", "CUI Find2": "Select", "CUI Find3": "Find player:\n(steamID/Name)", "CUI CantFindPlayer": "Couldn't find the player\nsearching argument: {0}", "CUI FoundPlayer": "Found player: {0}", "CUI Refresh": "Refresh", "CantFindPlayer": "Couldn't find that player", "WarnMessage": "Warned: <color=#8f1919>{0}</color>\nReason: {1}", "JoinMessage": "{0} has joined with <color=#8f1919>{1}</color> warnings", "WarnReceive": "You have received a <color=#8f1919>warning</color>\nBy: {0}\nReason: {1}", "CUI WarnReceive": "<color=#8f1919>Warning</color>\nreceived", "CUI WarnReceive2": "By: {0}\nReason: {1}" } Configuration { "Announce on join with warnings?(to admins)": true, "Execute commands on reaching count:": { "Enabled?": true, "(Format: 5 : mute {0}) where 5 is number of warns and {0} is player's id": { "5": "say {0} just reached 5 warnings! SHAME on him!", "7": "example.command {0}", "10": "example.command {0}" } }, "Warn message settings": { "Text-based warn message?": true, "CUI-based warn message?": true, "How long until CUI message gets removed (secs)": 5.0 } }$10.00 -

Version 1.0.7
71 downloads
Compliment your in game economy system by allowing players to repair weapons using their currency. Economy Repair offers a solution that lets players repair their damaged weapons using in-game currency of your choice. With this plugin, your worn-out AKs, tools, and gear can be repaired through a simple new option in the repair bench, making sure you're always prepared for the next battle! Key Features: Multiple Currency Support: Use popular Rust plugins like Economics or ServerRewards to pay for repairs using your in-game currency. You can even set up custom item-based currencies for repairs! Condition Loss: Condition loss can be disabled, or the scale of it modified. VIP Discounts: Offer VIP players reduced repair costs, providing an extra incentive for premium members of your community. Customizable Repair Costs: Tailor the repair prices for different items, ensuring fair costs for everything from weapons to tools. Repair cost can be set globally, and per item. Clean UI: Enjoy a sleek almost vanilla like repair button that appears when interacting with a repair bench. Instantly know the cost to restore your item and confirm the repair with just a click. Repair Blacklist: Administrators can blacklist certain items from being repaired, maintaining control over game balance and preventing unintended item restorations. How It Works: 1. Interact with a repair bench. 2. Insert item normally into the repair bench 3. See the cost, click the repair button! Economy Repair is your perfect choice for expanding the usefulness of economy on your server. Keep your equipment in top shape without the hassle of searching through boxes to try and find the correct components. PERMISSIONS: economyrepair.use - Required to see and use the economy repair option economyrepair.VIP - Required for VIP discount feature CONFIG EXAMPLE: { "Default Max Repair Cost": 100.0, // default repair cost for all items "Reduce Durability On Repair": true, // should the item lose durability if repaired with currency? "Durability Loss Scaling Factor": 1.0, // play with this to increase/reduce how much durability is lost "Currency System (Economics, ServerRewards, Item, TCBank)": "Economics", //which currency system to use "VIP Discount Percentage": 0.0, // percentage discount for players with VIP permission "Currency Item": { // If using "Item" as currency, specify item details here "ItemID": 0, "SkinID": 0, "Display Name": "Currency" }, "Custom Repair Costs": { // customize repair cost for individual items "hatchet": 50.0, "pickaxe": 75.0 }, "Repair Blacklist": [ // list of items which cannot be repaired using currency "minigun", "fuse" ], "Blacklisted SkinIDs": [ 3380502905, 987654321 ], "Debug Messages Enabled": false } LANG EXAMPLE: { "RepairCostLabel": "Economy Repair: {0} {1}", "CurrencyLabel": "$", "RepairButtonLabel": "Repair", "NoValidItem": "No valid item to repair.", "MaxDurability": "This item is already at full durability.", "NotEnoughCurrency": "You do not have enough {0} to repair this item.", "RepairSuccess": "Item successfully repaired.", "RepairFailed": "Failed to repair the item. Please try again.", "ItemBlacklisted": "This item cannot be repaired." }$7.98 -
Version 5.0.0
34 downloads
MyCommands Description The MyCommands plugin displays a modern, scrollable user interface (UI) that provides players with categorized commands and real-time search functionality. Who doesn't know that feeling - you have a lot of possibilities on your server, but players can't remember all the commands. With this plugin, it becomes easy to navigate and use commands via a visual interface. Administrators can define categories, commands, and descriptions. Features: Categorized commands: Commands are grouped into collapsible categories to make navigation easier for players. Example categories include House, Bells, Tools, Admin, and Economy. Real-time search functionality: Players can search for specific commands using the integrated search bar with instant results. Modern scrollable UI: Clean, modern interface with smooth scrolling for better user experience. Command descriptions: Each command includes a helpful description that appears in an information tooltip. Info tooltips: Click the blue "i" button next to any command to see its description in a modern popup. User-friendly interface: The UI provides a clear presentation of commands with options to expand or collapse categories. Customizable commands: Administrators can add new commands, categories, or descriptions, or edit existing ones in the configuration. Close button: The UI can be closed with a simple click on the close button. Direct command execution: Players can execute commands directly from the UI without entering them manually in the chat. Automatic UI closing: When a command is executed, the UI automatically closes. Search window: Separate search results window that appears alongside the main interface. Permission-based access: Only players with the correct permission can access the command interface. as off (v.4.4.0) Customizable colors: Adjust your colors in the config. Command: Set your own command Commands: /mycommands - Opens the main command interface Permissions: mycommands.use - Players need this permission to open the UI, search commands, and execute commands. This permission can be assigned to special user groups. Config: The configuration uses a comprehensive JSON system that is automatically created on first load if no configuration exists. You can edit it to adapt it to your server needs. The config includes both command categories and detailed descriptions. { "Command": "mycommands", "Categories": { "House": [ "/myhouse", "/rename", "/removehouse", "/findhouse" ], "Bells": [ "/addbell", "/setbell" ], "Tools": [ "/skinbox", "/cupboard", "/test1", "/test2", "/test3", "/teller" ], "Admin": [ "/god", "/vanish", "/fly", "/noclip", "/teleport" ], "Economy": [ "/shop", "/sell", "/buy", "/balance", "/pay" ] }, "CommandDescriptions": { "/myhouse": "Teleport to your house location", "/rename": "Rename your house or building", "/removehouse": "Remove your house from the system", "/findhouse": "Find the location of your house", "/addbell": "Add a bell to your building", "/setbell": "Configure bell settings", "/skinbox": "Open the skin selection interface", "/cupboard": "Manage your tool cupboard", "/test1": "Test command #1 for debugging", "/test2": "Test command #2 for debugging", "/test3": "Test command #3 for debugging", "/teller": "Access bank teller functions", "/god": "Toggle god mode (admin only)", "/vanish": "Become invisible to other players", "/fly": "Toggle fly mode for admins", "/noclip": "Toggle noclip through walls", "/teleport": "Teleport to coordinates or player", "/shop": "Open the main shop interface", "/sell": "Sell items from your inventory", "/buy": "Purchase items from the shop", "/balance": "Check your current balance", "/pay": "Send money to another player" }, "CategoryPermissions": { "House": "public", "Bells": "public", "Tools": "public", "Admin": "admin", "Economy": "public" }, "Colors": { "MainPanel": "#1A1A1AF2", "HeaderPanel": "#333333FF", "CloseButton": "#CC3333FF", "SearchPanel": "#1F1F1FFF", "SearchLabel": "#CCE6FFFF", "InputField": "#050505FF", "InputText": "#FFFFFFFF", "InputPlaceholder": "#808099FF", "ClearButton": "#B33333FF", "CategoryButton": "#4D9933FF", "CategoryButtonText": "#FFFFFFFF", "CommandButton": "#666666FF", "CommandButtonText": "#E6E6E6FF", "InfoButton": "#3380CCFF", "InfoButtonText": "#FFFFFFFF", "TooltipPanel": "#1A1A1AF2", "TooltipHeader": "#3380CCFF", "TooltipContent": "#0D0D0DE6", "TooltipText": "#E6E6E6FF", "NoResultsText": "#B3B3B3FF", "SearchResultsText": "#80E680FF", "ScrollbarHandle": "#808080FF", "ScrollbarTrack": "#333333FF" } } load, run, enjoy$16.99 -
![More information about "Build Tools [grade/remove/skins]"](https://codefling.com/uploads/monthly_2025_12/v4final.thumb.gif.45df50b470fa522f43059acab6ad0e1e.gif)
Version 1.5.45
4,522 downloads
Introducing a feature-rich plugin that will take your in-game building experience to new heights - Build Tools! This plugin is not just a tool, it is the key to creating incredible builds and will make the processes of upgrading, removing and even downgrading buildings easy and fun! !ATTENTION! After the last update of the game, the additional slot does not work Features of Build Tools Beautiful user interface: Our plugin has a lovely and easy-to-use interface that makes building tasks smooth and functional; Bar progress display: Keep track of your building progress with a clear progress bar, so you can see your upgrades easily; Upgrade of the entire building at once: You can make them stronger and more secure quickly; Interface customization: Personalize the user interface to match your preferences and workflow. Returning an item to remove: Don't worry about losing items when removing structures; our plugin ensures you get them back; Returning items with condition as in the game: Items are returned to the same condition as in the game, with the option to set their condition as a percentage; Blocked list items for remove: You can specify which items should not be removed for precise construction control. Ability to use icons both from the game and your own Work with Clans/Friends/NoEscape Building Skins (+ automatic parsing command) Downgrade: Make structure downgrades simple and adapt your base to changing needs with just a few clicks Edit config via in-game interface (no JSON editing required) Commands /up [1-4] - enable upgrading mode /up all - allows you to upgrade the entire building at once /remove - enable removing mode /remove all - allows you to remove the building at once /down - enable downgrading mode /down all - allows you to downgrade building at once buildtools.parse.skins – allows parsing new building skins from the game + images to them /bskin – open settings menu Permissions buildtools.all – allows you to upgrade/remove the entire building at once buildtools.free – allows you to upgrade buildings for free buildtools.edit – allows you to enable edit mode buildtools.vision – allows you to toggle the remove mode on in the vision mode Video Hooks object canDowngrade(BasePlayer player, BaseEntity entity) object canRemove(BasePlayer player, BaseEntity entity) object CanBuildToolsGiveRefund(BasePlayer player, BaseEntity entity) FAQ Q: Where can I see an example of a config? A: Config$21.95- 328 comments
- 16 reviews
-
- 8
-
-

-
- #building
- #foundation
- (and 27 more)
-
Version 0.9.8
63 downloads
NexusCheatRadar is a lightweight admin-focused anti-cheat intelligence tool for Rust that detects ESP, no-recoil, and aimbot behavior, and reports findings to Discord . ## Overview NexusCheatRadar is a non-intrusive, intelligence-based anti-cheat designed for admin awareness . It detects suspicious player behavior, correlates signals into a risk score, and reports actionable intelligence to Discord . --- ## Core Features ### Detection - ESP behavior detection (line-of-sight and awareness patterns) - No-Recoil detection (aim variance consistency) - Aimbot detection (snap and alignment confirmation) -Steam Name Change Alearts ### Intelligence System - Unified Risk Score (0–100) (currently under maintenance) - Risk decay over time to prevent one-off false positives - Persistent risk memory across server restarts - Steam account intelligence enrichment ### Reporting - Discord webhook alerts - Unified threat assessment summaries - Branded Discord embeds (Nexus logo by default) ### Design Philosophy - No auto-bans - No forced punishments - Admin-controlled moderation - Performance-safe for live servers --- ## Commands /ncr .........Toggle radar /ncr.radar .......Toggle radar /ncr.strip.......... Toggle radar UI strip /ncr.lookup......username or steam id.. Lookup a player /ncr.reset ...........username or steam id Reset a player's NCR history /ncr.test ........... aimbot/norecoil/esp Send test Discord webhook --- ## How To Use 1. Grant the permission to trusted admins 2. Configure your Discord webhook in the config file 3. Toggle radar using `/ncr` 4. Observe players naturally during gameplay 5. Review Discord alerts and unified risk scores 6. Take manual action when needed --- ## Configuration The plugin generates the following file: config/NexusCheatRadar.json All detection thresholds, decay rates, and Discord settings are configurable. Default values are conservative and safe for live servers. --- ## Compatibility - Oxide / uMod - Carbon - High-population servers - No dependencies --- ## Known Limitations (Carbon) Radar name text size is fixed by the Carbon engine and cannot be reliably scaled. This is an engine limitation, not a plugin bug. --- ## Support When requesting support, please include: - Your configuration file - Relevant console output - The detection type involved (ESP, No-Recoil, or Aimbot) ════════════════════════════════════════════════════════════ IMPORTANT NOTES (COMMON “IT DOESN’T WORK” ISSUES) ════════════════════════════════════════════════════════════ 1) “My ESP alerts are not posting to Discord” If you enable Unified Threat AND suppression, individual ESP/NoRecoil/Aimbot webhooks can be suppressed. Config: "Risk Aggregation" • Use Unified Threat Webhook Reports = true/false • Suppress Individual Type Webhooks When Unified Is Enabled = true/false :contentReference[oaicite:12]{index=12} If suppressed, you may ONLY see reports in the Threat webhook channel (and only if the overall risk meets your minimum). :contentReference[oaicite:13]{index=13} 2) “/ncr commands do nothing” You are not a real server admin (IsAdmin/authlevel). These commands check admin status. :contentReference[oaicite:14]{index=14} 3) “ESP test works but live ESP doesn’t” That means Discord is wired correctly. Live ESP requires the scoring gates (distance/FOV/hits/cooldowns) to be met. Also check if Unified Threat suppression is enabled (see #1). :contentReference[oaicite:15]{index=15} ════════════════════════════════════════════════════════════ RECOMMENDED “FIRST-TIME SETUP” CHECKLIST ════════════════════════════════════════════════════════════ 1) Set Discord Webhooks -> Enabled = true 2) Paste at least ESP Webhook + No-Recoil Webhook + Aimbot Webhook 3) oxide.reload NexusCheatRadar 4) Run: /ncr.test esp, /ncr.test norecoil, /ncr.test aimbot 5) Run: ncr (turn on the radar) 6) avoid leaving detect sleepers on in the esp section as it can causes false positives tailor the configurations how you like but document what you change before changing it so you can always go back always check the config$14.99 -
.thumb.png.dae6f99f5e11e84c837371ae0801a3a2.png)
Version 0.6.5
238 downloads
ABOUT UPGRADER : Allows players to upgrade various item categories, including weapons, armor, and tools, each with unique upgrade options. Extensive configuration options for server admins to adjust : What items will be upgradable (Only items what you chose to put in config will have upgrades ) What upgrades will item have ( you dont need to put all upgrades on item ,only what upgrades you chose for a item) Upgrade costs (you can put what ever custom/default item,and amount for cost) Levels (you can choose how much upgrade will have levels) Values of upgrades (you can choose value of each upgrade ,example "damage" Lv1 2% damage, Lv2 5%) There is a easy way to control your upgrades , all about items can be done in UI. Adding,removing items can be done by UI. You can modify items true UI : upgrade types, levels ,values ,cost . In chosing cost there is also custom category tab , you need to add those items in config at bottom of config file ! There is Inspection button where you can see stats of upgraded item in inventory. UPGRADES : Each category have their own upgrades : Wepons : Armor : Tools : Damage, Defense, GatherYield, MagazineSize, Durability, Durability, Durability, RadiationProtection, Deforestation, LifeSteal, ResurrectionChance InstantMine, CritChance, RestoreItems Smelting InstaReload Each category have RenameName of a item . HOW TO USE : Simple put Upgrader.cs to your plugin folder . Add/remove items from config or true UI . Chose upgrades for items (levels,cost,values) . In Game : Add permissions. When player put item in Repair Bench he will see Upgrade button . UI will open with upgrades. Inspection button is below belt inventory ,when player click on it it will open inspection mode ,so he will be able to see item upgrades in small UI. INFOPANEL : Admins can change text in config file for a ServerName and Info . For more explanations to player or what ever text you need . DIAMONDS : 4 custom items (diamonds) .They can be used for cost of upgrades. You can chose stacksize ,where they will spawn(lootboxes),chance to spawn in boxes ,and amount. You can change theirs DisplayName , SkinId . You can use them or not ,its a option . COMMANDS : Chat Command : /additem ( it opens Ui where you can modify upgrades ) Chat Command : /giveupgradeditem [playerID/name] <itemUID> ( when you upgrade item ,you can see his UID in DataFile ! ) Console Command : giveupgradeditem [playerID/name] <itemUID> Chat Command : /givediamond "name" "amount" Console Command - wipeupgradedata PERMISSION SYSTEM/COMMANDS : upgrader.button - allow to see button in repair bench for upgrade upgrader.weapon - allow weapon upgrades upgrader.armor - allow armor upgrades upgrader.tool - allow tool upgrades upgrader.bypasscost - free upgrades upgrader.diamondgive - allow to use command /givediamond "name" "amount" upgrader.additem - allow to use command /additem upgrader.giveitem - allow to use command /giveupgradeditem [playerID/name] <itemUID> console command - giveupgradeditem [playerID/name] <itemUID> CONFIG EXAMPLE : Upgrader.json DATA : There is data file what stores upgrades of items. You can delete data items with command in console . Console Command - wipeupgradedata API : [HookMethod("API_HasUpgrades")] public bool API_HasUpgrades(Item item) [HookMethod("API_GetUpgrades")] public Dictionary<string, int> API_GetUpgrades(Item item) [HookMethod("API_ApplyUpgrades")] public void API_ApplyUpgrades(Item item, Dictionary<string, int> upgrades)$20.00 -

Version 0.1.4
203 downloads
A plugin for collecting game statistics with database support, compatible with both SQL and web API methods. This functionality empowers website owners to display the desired statistics from the database on their sites. Moreover, it offers the capability to send data via API, which proves highly beneficial in scenarios where your gaming server and database reside on separate machines and the database restricts connections beyond localhost. Please note that an instruction manual will be included in the downloaded file and it is imperative for users to read it thoroughly. Collecting(The full list is available below in the section Collected Data) : Server information; Team information; Clan information(in future); Feedback(F7) information; Report(F7) information; Player information. Sending data through: direct MySQL; via API(POST query) to MySQL. { "Unique ID of the current server": 0, "Database upload method. 0 - disabled, 1 - via API, 2 - via MySQL": 1, "Interval in seconds at which an attempt to load changes into the database will occur": 300.0, "Is it worth logging messages to the console when uploading to the database?": true, "API - Service URL": "https://site.com/ExtendedStats/index.php", "API - Service access key": "GlBRw-elM6v-gjko3-cxSDk-Tsy7B", "MySQL - Host": "localhost", "MySQL - Port": 3306, "MySQL - Database name": "db_playrust", "MySQL - Username": "root", "MySQL - Password": "root", "Database table name - Servers": "db_servers", "Database table name - Teams": "db_teams", "Database table name - Clans": "db_clans", "Database table name - Feedbacks": "db_feedbacks", "Database table name - Reports": "db_reports", "Database table name - Players": "db_players", "Database table name - Players Balances": "db_players_balances", "Database table name - Players Stats": "db_players_stats", "Database table name - Players Farms": "db_players_farms", "Database table name - Players Gambling": "db_players_gambling", "Database table name - Players Kills": "db_players_kills", "Database table name - Players Explosions": "db_players_explosions", "Database table name - Players Raids": "db_players_raids", "Is it worth clearing saved statistics when a wipe is detected?": true, "Is it worth clearing the database when a wipe is detected?": true, "List of statistic categories to clear when a wipe is detected. Leave empty to recreate defaults": [ "players", "teams", "clans", "feedbacks", "reports" ], "Dictionary of display names for deployable entities by key": {}, "Wipe ID": null, "Version": { "Major": 0, "Minor": 1, "Patch": 4 } } ServerData: ServerName ServerIdentity ServerIP ServerPort QueryPort ServerDescription ServerHeader ServerURL ServerTime ServerTags GameTags MaxPlayers ServerEntities ServerFPS ServerAvgFPS ServerUptime ServerMap MapSize MapSeed FirstSave LastSave WipeID ServerVersion ServerProtocol RconPort RconPassword TeamData: TeamID TeamName CreatorID LeaderID TeamMembers ClanData(Temporarily not working) : ClanID ClanName CreatorID LeaderID ClanMembers FeedbackData(Since the corresponding Oxide hook has shifted, not all types of feedback are processed) : ID UserID Subject Type Message Time ReportData: ID UserID TargetID TargetName Subject Type Message Time PlayerData: Info: UserID DisplayName Flags Language GroupsList TeamID ClanID BanReason Connection: PlayedTime - requires the PlaytimeTracker/PlayTimeRewards plugins IdleTime - requires the PlaytimeTracker/PlayTimeRewards plugins Connections Ping FirstConnectionIP LastConnectionIP FirstConnectionDate LastConnectionDate Balance: Balance - requires the Economics plugin BankBalance - requires the BankSystem plugin Points - requires the ServerRewards plugin Experience Reputation - requires the ReputationMaster plugin Statistics: TimeAlive - updates only after the player's death TimeSleeping - updates only after the player's death DistanceWalked - updates only after the player's death DistanceRun - updates only after the player's death TimeWilderness - updates only after the player's death TimeInBase - updates only after the player's death TimeInMonument - updates only after the player's death TimeSwimming - updates only after the player's death TimeFlying - updates only after the player's death TimeBoating - updates only after the player's death TimeDriving - updates only after the player's death Wounded WoundsInflicted WoundAssisted WoundRecovered DamageInflicted DamageTaken - updates only after the player's death Healed - updates only after the player's death ShotsFired - updates only after the player's death ShotsHit ExcavatorStarts BearTrapInflicted BearTrapSteps MineInflicted MineSteps HandcuffsApplied Handcuffed PhoneCalls PhoneCallsTimeout MissionsStarted MissionsSucceeded MissionsFailed DeployedsList MonumentsList - requires the MonumentsWatcher plugin Farming: Barrels UnderWaterCrates ShreddedEntities DetectResourceFlags GreenDoors BlueDoors RedDoors FishAttempts Guts Supplies ExcavatorSupplies Chinooks Surveys ChickensHatched ChickenEggs BeehiveXP Blueprints CraftList GatherList RecycleList BuyerPurchaseList BuyerSpentList SellerSalesList SellerRevenueList CratesList FishList Gambling: BWG_Spins BWG_WinSpins BWG_SpendScraps BWG_WinScraps Slot_Spins Slot_WinSpins Slot_SpendScraps Slot_WinScraps Poker_Games - Placeholder Poker_WinGames - Placeholder Poker_SpendScraps - Placeholder Poker_WinScraps - Placeholder BlackJ_Games BlackJ_WinGames BlackJ_StandoffGames BlackJ_SpendScraps BlackJ_WinScraps RPS_Wins RPS_Losses RPS_Draws Kills: Kills FriendlyKills Deaths Suicides Beehives Chickens FarmChickens Snakes Boars Stags Horses Wolves Bears Polarbears Panthers Tigers Crocodiles Sharks PlayerNPCs Scientists Zombies Patrols Bradleys KillVehicles: PedalBikes MotorBikes Cars RowBoats RHIBs SubmarinesSolo SubmarinesDuo Tugs MiniHelis AttackHelis ScrapHelis Balloons Trains TrainWagons TrainCabooses Snowmobiles Ballistas BatteringRams Catapults SiegeTowers HitParts KillParts KillWeapons Explosions: Rockets RocketsHV RocketsIncendiary RocketsSmoke RocketsMissile RocketsMLRS Torpedoes ExplosiveAmmo Ammo40mmExplosive Ammo40mmSmoke GrenadesF1 GrenadesMolotov GrenadesFlash GrenadesSmoke GrenadesBean SatchelCharges C4Explosives PropaneBombs FireBombs Raids: Cupboards Doors Windows Foundations Ceilings Walls Doorways WindowFrames Stairs Hatches ExtWoodenGates ExtWoodenWalls ExtStoneGates ExtStoneWalls ExtIceWalls ExtIceShortWalls RaidedConstructionsList RaidedDeployableConstructionsList RaidableBases: RBEasy RBMedium RBHard RBExpert RBNightmare$19.99 -
Version 1.4.1
3,659 downloads
Manage your Rust server easier and more efficiently with the AdminMenu plugin. Track players, interact with them, edit their data and permissions, as well as change server convars and manage plugins. Features: Menu retains its state after closing, you won't lose everything you did before. Ability to fully translate the menu into any language. Large range of permissions for each action, will allow you to flexibly customize the admin menu for each group of administrators. Quick menu that allows you to perform quick actions Full list of players with the ability to filter by online, offline, admins and moderators. Also has a frame of different colors depending on the level of authorization. Wide range of information and actions for the selected player. Editing convars with search. Has a complete list of editable convars with descriptions for some of them. Extensive issue menu by category, with easy management of name, skin and amount (manual, +1, +100, +1000, +10000). Plugin management menu. It is possible to reload, unload or load a plugin easily and quickly. Updates occur in real time. Ability to create your own custom buttons that execute several commands Quick Start: You install the plugin in the plugins folder. Give yourself the adminmenu.fullaccess permission. Commands, use one of your choice, one for the player and one for the admin group: o.grant user [name or steamid] adminmenu.fullaccess o.grant group admin adminmenu.fullaccess Press the X button (swap seat button) or type adminmenu in the console. Enjoy Useful stuff: You can quickly open a player in the admin menu. To do this, point at the player and press X. You don't have to hover over the player exactly, you will be able to open players within a certain radius of the place you are looking at. CUSTOM BUTTONS Custom buttons are buttons that when pressed will execute commands on behalf of the administrator, commands can be several, below will be the details. At the moment, custom buttons can be created in two places: in the quick menu and in the menu when selecting a player. These places are separated in the config. Button Fields: "Execution as server" - Call the command on behalf of the server, not the administrator "Label" - Text that will be on the button, for each such inscription creates a field in the lang file, accordingly you can translate this text into several languages. "Commands" - Array of commands that will be executed on behalf of the administrator. Chat commands require a special entry, see examples. "Permission"- permission to display and use the button. You need to write the permission that will be after "adminmenu.". Example: if you enter the permission "test" the permission will be adminmenu.test "Position" - The location for the button, the first number is responsible for the row number, the second for the position within the row, starts from 0.There are limits of locations, if you have gone beyond the limit - the button will not be displayed. Common Tags: {adminUID} - administrator's id. {position} - administrator coordinates (underfoot) {view_position} - the position where the administrator is looking (can be used for spawning or something similar) {view_direction_forward} - forward view direction of the administrator {view_direction_backward} - the direction the administrator is looking backwards {view_direction_left} - direction of the administrator’s view to the left {view_direction_right} - administrator’s view direction to the right Tags for target only: {steamid}, {steamID}, {userID}, {STEAMID}, {USERID} - mean the same thing, namely the id of the selected player. {target_position} - target coordinates (underfoot) Example of commands: chat.say \"/{chat command}\" vanish ban {steamID} teleport {steamID} {adminUID} More information about the grant menu: The grant menu includes the full list of items including hidden items as well as custom items created by the CustomItemDefinitions library. The menu can be accessed from the navigation or from the menu of the selected player. When issuing itself has categories. Search works in any registry by any part of the name or short name. Has a page system at any stage. More information about the buttons in the Quick Menu: [Teleport to 0 0 0] - Teleport to coordinates 0 0 0. Requires adminmenu.quickmenu.teleportto000 permission [Teleport to Deathpoint] - Teleport to your deathpoint. Requires adminmenu.quickmenu.teleporttodeath permission [Teleport to Spawn point] - Teleport to a random spawn point. Requires adminmenu.quickmenu.teleporttospawnpoint permission [Kill Self] - Kill Self, kills even when immortal. Does not require permission. [Heal Self] - Fully heal yourself. Requires adminmenu.quickmenu.healself permission [Call Heli] - Call Helicopter to yourself (arrives in time). Requires adminmenu.quickmenu.helicall permission [Spawn Bradley] - Spawn bradley on yourself. Requires adminmenu.quickmenu.spawnbradley permission More information about the buttons in the menu of the selected player: [Teleport Self To] - Teleport yourself to the selected player. Requires adminmenu.userinfo.teleportselfto permission [Teleport To Self] - Teleport the selected player to yourself. Requires adminmenu.userinfo.teleporttoself permission [Teleport To Auth] - Teleportation to random authorization (TC). Requires adminmenu.userinfo.teleporttoauth permission [Teleport to Deathpoint] - Teleportation to a player's deathpoint. Requires adminmenu.userinfo.teleporttodeath permission [Heal] - Full healing, including metabolism. Requires adminmenu.userinfo.fullheal permission [Heal 50%] - Half healing. Requires adminmenu.userinfo.halfheal permission. [View Inventory] - View and edit player's inventory. Requires adminmenu.userinfo.viewinv permission [Strip Inventory] - Clear player's inventory. Requires adminmenu.userinfo.stripinventory permission [Unlock Blueprints] - Unlock all Blueprints. Requires adminmenu.userinfo.unlockblueprints permission [Revoke Blueprints] - Reset all Blueprints. Requires adminmenu.userinfo.revokeblueprints permission. [Kill] - Kill a player. Requires adminmenu.userinfo.kill permission [Kick] - Kick a player. Requires adminmenu.userinfo.kick permission [Ban] - Ban a player. Requires adminmenu.userinfo.ban permission More information about the buttons in the menu of the selected group: [Remove Group] - Remove group, has confirmation. Requires adminmenu.groupinfo.removegroup permission [Clone Group] - Clone group with the ability to copy users. Requires adminmenu.groupinfo.clonegroup permission Permissions: adminmenu.use - Ability to use admin menu with basic set. Open tab quick menu (each button has its own permission, without permissions is present only kill yourself button) and the list of players. adminmenu.fullaccess - Full access to all functions without the need for each permission, includes also adminmenu.use. It is recommended to give only to the main administrators. adminmenu.quickmenu.teleportto000 - Access to the button in the quick menu, teleportation to coordinates 0 0 0 0. adminmenu.quickmenu.teleporttodeath - Access to the button in the quick menu, teleportation to the point of your death. adminmenu.quickmenu.teleporttospawnpoint - Access to the button in the quick menu, teleportation to a random spawn point. adminmenu.quickmenu.healself - Access button in quickmenu, heal yourself completely. adminmenu.quickmenu.helicall - Access to the button in the quick menu, call a helicopter to yourself (arrives in time). adminmenu.quickmenu.spawnbradley - Access button in quickmenu, spawn bradley. adminmenu.userinfo.teleportselfto - Access to the button in the menu of the selected player, teleportation to the selected player. adminmenu.userinfo.teleporttoself - Access to the button in the menu of the selected player, teleport the selected player to himself. adminmenu.userinfo.teleporttoauth - Access to the button in the menu of the selected player, teleportation to random authorization (TC). adminmenu.userinfo.teleporttodeath - Access to the button in the menu of the selected player, teleportation to the place of death of the player. adminmenu.userinfo.fullheal - Access to the button in the menu of the selected player, full healing, including metabolism. adminmenu.userinfo.halfheal - Access to the button in the menu of the selected player, half healing. adminmenu.userinfo.viewinv - Access to the button in the selected player's menu, view and edit the player's inventory. adminmenu.userinfo.stripinventory - Access to the button in the menu of the selected player, clear the player's inventory. adminmenu.userinfo.unlockblueprints - Access the button in the menu of the selected player, unlock all drafts. adminmenu.userinfo.revokeblueprints - Access to the button in the menu of the selected player, reset all drafts. adminmenu.userinfo.kill - Access the button in the selected player's menu to kill the player. adminmenu.userinfo.kick - Access the button in the selected player's menu to kick the player. adminmenu.userinfo.ban - Access to the button in the menu of the selected player, ban the player. adminmenu.groupinfo.removegroup - Access to the button in the menu of the selected group, the ability to remove the group. adminmenu.groupinfo.clonegroup - Access to the button in the menu of the selected group, the ability to clone the group. adminmenu.convars - View and edit convars. adminmenu.permissionmanager - View and edit permissions in groups, player groups, create, delete and clone groups (requires additional permissions from these buttons). adminmenu.pluginmanager - Access to plugin management, reloading, unloading, loading plugins. adminmenu.give - Access to give resources, as well as yourself and the selected player.$30.00 -
Version 1.1.0
38 downloads
With just one tap, you can fully repair your base blocks and base items—no more having to tap repeatedly! Includes permission support and is optimized for top performance, with rotation & demolition support! Features * One Tap Repairs - Supports Base Blocks & Base Items & Vehicles, etc * Rotation - Re-Enables Base Blocks for easy native rotation again! * Demolition - Re-Enables Base Blocks for easy native demolition again! Permissions betterhammer.use ( required to do full 1 tap hit repairs with hammer & to use any features/functions )$4.99 -

Version 2.4.0
8 downloads
CarbonCleaner Short description Finds orphaned files in `carbon/config/`, `carbon/data/`, and `carbon/lang/` based on the installed/loaded plugins and provides a sleek in-game CUI for selecting and deleting them. Features - Matching logic (plugin detection) - Reads plugin base names from `carbon/plugins` (`*.cs`) **and** from the Carbon runtime (loaded plugins). - Base names `Admin` and `CorePlugin` are always treated as present. - Scan areas - config: Top-level `*.json` and top-level folders whose base name does not correspond to a plugin. - data: Top-level files (except `*.data`/`*.db`) and top-level folders without a plugin match. - lang: `lang/<LOCALE>/*.json` whose base name does not correspond to a plugin. - UI (CUI) - Three columns: CONFIG, DATA, LANG with count, file size, and checkboxes. - Select All for CONFIG/DATA, language sections can be expanded/collapsed for LANG. - Delete button shows number of selections; after deletion, automatic rescan. - Secure deletion - Deletes only within the `carbon/` root (path is validated). - Supports files **and** folders (recursively). - Backup - You have the option to decide whether you want to back up individual files.. > Note: `*.data` and `*.db` in the **data** root are **not** listed as orphaned (are skipped). This protects runtime databases. Commands In-Game (Chat) - `/carboncleaner` — Opens the UI (requires permission). Server console - `carboncleaner.scan` — Shows number/size of hits. - `carboncleaner.delete “<relativePath>|<relativePath>|...”` Example: `carboncleaner.delete “config/Old.json|data/OldFolder|lang/en/Old.json”` Deletes the specified relative paths under `carbon/`. Permissions - `carboncleaner.admin` — required for all functions (chat/UI).$8.99 -

Version 2.0.9
80,999 downloads
Convenient GUI manager for player and group permissions. Allows assignment of player permissions. (online or sleeping) Allows assignment of group permissions. Allows one-click removal of all players from a group. (group page - "Remove All") Allows adding/removing a player from groups. Supports unlimited plugins/permissions/groups Up to 60 plugins per-page. Up to 40 permissions per-page. Up to 40 user groups per-page Allows for local and sql backup and recall of all permissions or groups. Permissions. permissionsmanager.allowed - Allows players to use GUI. Plugin can be used with this permission, or by any Admin : Auth Level 2. Chat commands. /perms data - Backup and restore permissions and/or groups - local data file and/or SQL. ** /perms OR /perms player - Opens GUI player list, allowing a player to be chosen. /perms group - Opens GUI group list, allowing a group to be chosen. /perms player <playername> - Opens permissions GUI for the specified player. /perms group <groupname> - Opens permissions GUI for the specified group. Console commands. EmptyGroup <groupname> - Removes all players from the specified group. Configuration. Global. Chat - Title colour Chat - Message colour GUI - Label colour GUI - On colour GUI - Off colour GUI - AllPerPage - Sets All/None option to per-page, or per plugin. Options - GUI Transparency 0-1 Options - Plugin BlockList - ex. "playerranks,botspawn" Block list must be lower case, comma separated, no spaces, and no final comma, as above. Useful tool for picking CUI colours - RGB Decimal - Take the RGB Normalized decimal output, and remove all commas. ** Please note that with data backups : SQL saving is accumulative - Saving adds current permissions/group data to whatever was already saved. Local data file saving is not accumulative. It overwrites any existing backup with the current server permissions/groups. FAQ. Q: I'm trying to revoke permission(Y) for a player, but it says "Inherited". A: The player is in a group(X) which is also granted permission(Y). Solution: Revoke permission (Y) from group(X) or remove the player from group(X). Q: I removed a player from group(X), but they still have permission(Y). A: This is the opposite of the above. This player must have been independently granted permission(Y) at some time. Solution: Revoke permission(Y) from the player.Free- 221 comments
- 34 reviews
-
- 39
-
-
-
- #permissions
- #admin
- (and 7 more)
-

Version 1.0.3
177 downloads
Death tracker is an administration tool that allows server admins to restore player items via rcon or in-game, in the event a player dies for reasons beyond their control. The plugin will detail: The location of the death (grid + coordinate). The damage type that the player took. Whether they were connected to the server or not. Who killed them (along with the userid). The date and time of the death. The players inventory, item backpack contents, and their backpack plugin contents (if they dropped). Admins can select items from the UI to see more details about the item such as the items condition, amount, ammo, armor slots and other parameters (such as buffs from ItemPerks). You can also toggle whether the item will be restored from this menu, allowing you to exclude certain items from being restored if required. In order to use the following commands in game, you must have the deathtracker.admin permission. Command: dt Use: Access the DeathTracker restore menu in-game. Command: dt.,rcon deaths <userid> Use: Returns information for each death stored for the specified player. Command: dt.rcon query <userid> <index> Use: Returns detailed information about the specified death for the player at the specified index (item lists etc). Command: dt.rcon restore <userid> <index> Use: Restores the items to the specified player from the specified index.$14.99 -

Version 1.0.2
9 downloads
xPermissionManager A modern, intuitive, and powerful permission management tool for Rust servers. xPermissionManager provides a complete visual interface for managing user and group permissions directly ingame. No more console commands, guesswork, or digging through permission lists. Everything is organized, accessible, and easy to control through an straight forward UI. Whether you're adjusting a single permission, overseeing full group structures, or assigning temporary access, xPermissionManager gives server owners a fast and efficient possibility to do so. Plugin Preview (Video) Full Permission Control Grant or revoke any permission from groups or individual players. Timed Permission System Assign temporary permissions that automatically expire (e.g., 30m, 1h, 1d, 1w, custom durations). Timed Group Memberships Add players to groups for a limited time - Perfect for kits, VIP, special events or whatever. Comprehensive UI A clean and intuitive interface for browsing permissions, switching groups, managing users, and applying timed access. User & Group Browsing View all available groups, check individual player permissions, and toggle them instantly. Clear Feedback Every change is acknowledged with clear messages to help admins avoid mistakes. Permission xpermissionmanager.use // Allows a player to open and use the xPermissionManager UI Chat Commands /xpm /xpmuser <name or steamID> /xpmtimed /xpmgroups /xpm [Opens the Permission Manager UI] PERMISSION OR ADMIN REQUIRED /xpmuser <name or steamID> [Opens the UI for managing a specific player’s permissions/groups] PERMISSION OR ADMIN REQUIRED /xpmtimed [Shows all active timed permissions for a player. Includes remaining duration and whether they came from a group] /xpmgroups [Shows all active timed group memberships for a player] Console Commands </> API$11.99-
- 1
-

-
- #permission
- #manager
- (and 20 more)
-

Version 1.0.5
83 downloads
Enables administrators to perform administrative actions anonymously, hiding their profile when they use in-game chat as well as within the game environment, displaying 'ADMIN' instead of their nickname above their character. Commands /aa - Admin Anon Enable /aa - Admin Anon Disable Permissions adminanon.use - Enables anonymity in the game. Permission Recommendation: We recommend adding the permission to the individual user rather than to a group. For example, grant the permission to John Doe directly, not to the "admin" group (even if John Doe belongs to that group). Change Color This plugin allows Rust admins to hide their identity in the chat. To change the username color for the "ADMIN" group, configure the "admin" group in BetterChat. Changes in BetterChat will automatically reflect in the plugin. Steps: 1. Open BetterChat Configuration: Locate and edit BetterChat.json. 2. Edit the "admin" group: Change the username color for the "admin" group. 3. Save and Apply Changes: Save and reload BetterChat & AdminAnon (Just in case) Change avatar admin ? Changing the admin's avatar is unnecessary for this plugin, as its purpose is to hide the admin's identity, not to impersonate another player. Configuration { "Stay Anonymous After Reconnecting": false, "Properties": [ { "Name": "ADMIN", "Better Chat Group": "admin", "Required Permission": "adminanon.use" } ] } Data (example) { "PlayerData": { "76561198196941415": { "Groups": [ "admin", "default" ], "Name": "ADMIN", "Better Chat Group": "admin", "Required Permission": "adminanon.use" } } } Language (EN) { "No Permission": "<size=12>You don't have permission to use this command</size>", "No Profile Permission": "<size=12>You don't have permission to use this profile</size>", "Admin Anon Enabled": "<size=12>Admin Anon has been <color=#00fa9a>ENABLED</color></size>", "Admin Anon Disabled": "<size=12>Admin Anon has been <color=#00fa9a>DISABLED</color></size>", "Admin Anon Changed": "<size=12>Fake identity has changed to <color=#00fa9a>{0}</color></size>", "Requested Fake Identify Not Found": "<size=12>Requested fake identity is not found</size>", "No Fake Identities Available": "<size=12>No fake identities available</size></size>", "Fake Identify Not Found": "<size=12>Fake identity is not found</size>", "Data Corrupted Up": "<size=12>Data is corrupt</size>" }$6.00 -

Version 1.0.2
5 downloads
xCrosshair xCrosshair is a customizable crosshair system for Rust servers, giving players full control over their personal reticle/crosshair through an ingame UI menu. With multiple built-in shapes, color presets, HEX input support, outlines, and adjustable visual parameters, each player can design a crosshair that fits their preferred style. Features 7 crosshair shapes Full customization options Size Thickness Alpha/Transparency Outline toggle RGB/HEX color selection Quick-use color presets Per-player saved settings Chat Commands /crosshair - Opens the crosshair settings menu /ch - Opens the crosshair settings menu Permission xcrosshair.use - This permission is needed to use the crosshair. Preview ^ Sorry for bad video quality.$12.99 -
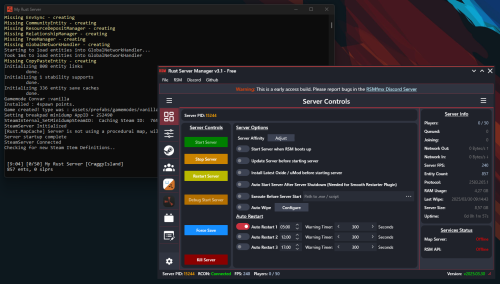
Version 2025.12.23
4,356 downloads
Rust Server Manager (RMSfmx) is a tool that allows you to create and manage dedicated Rust servers. RSMfmx was a paid tool that has recently become free and open source. Freatures: Modern Graphical Interface Server Info Panel Graphical Server Config Editor Graphical Server Installer Graphical Player Manager OxideMod / uMod Installer and Configuration CarbonMod Installer and Configuration Plugin Manager (Install, Configure and manage) Chats Logger Auto Restart Map Server (Self host custom Maps) Rest API to interface with RSM.Free- 10 comments
- 3 reviews
-
- 11
-
-
-
- #rsm
- #rust server manager
- (and 5 more)
-
Version 1.7.2
43,073 downloads
The easiest and fastest way to build a Rust server Functions: Server Config Installer Wipe Manager Custom Map Support - Server Config: Here you can set up all the settings for your server. Server Name Server Tag Server Description Server URL Server Logo URL Map Size Map Seed Generate Maps Seed MAX Player RCON Password Server Port Query Port RCON Port App Port Game Mode Custom Map - Installer: Here you can easily install your server and mods. Install or Update your Server Verify your server files Install or Update Oxide (Detects new version) Install or Update Carbon (Detects new version) Install or Update RustEdit (for Custom Map Users) Install or Update Discord Extension (to run Discord Plugins) - Wipe Manager: Here you can easily Wipe your Server Full Wipe Blueprints Map Oxide Data Backpacks Logs Player Deaths Player Identities Player Stats Player Tokens New Map Seed on Wipe HowTo: - Start Rust Server Tool as Admin - Install Server - Make your settings and save - Start Server That's allFree- 193 comments
- 18 reviews
-
- 27
-
-
-
- #server
- #installer
- (and 7 more)
-
![More information about "Discord2Ptero [Power Controls]"](https://codefling.com/uploads/monthly_2024_09/DALLE2024-09-2300_50.34-Amodernlogodesignfeaturingpowercontroliconssuchasapowerbuttontoggleswitchandothercontrolsymbols.Thedesignshouldbeminimalisti.thumb.webp.7c7713dbb551e2135b1490d3625a604d.webp)
Version 1.0.0
119 downloads
Discord2Ptero allows you to start, kill, restart or save your Rust servers straight from a Discord channel. 1. Create a client API key @ https://your.pterodactyl.link/account/api and place it in .env file - application key will NOT work! 2. Include link to https://your.pterodactyl.link/account/api in .env file (no trailing slash) 3. Add bot token, channel IDs etc... to .env file 4. Add servers to servers.json (you can find server ID under 'UUID / Docker Container ID' in server details) 5. Enjoy! Requires a Python bot environment & full administration access on a Pterodactyl panel to functionFree- 2 comments
-
- 1
-
-
- #pterodactyl
- #tool
- (and 5 more)
-
Version 1.0.5
27 downloads
Are you tired of having to change configurations and plugins manually on multiple Rust servers that run the same configurations? (eg. a mirrored US and EU version of your server) Then this is just what you are looking for! Introducing RustSyncBot—your ultimate solution for seamless server synchronization. Designed with ease of use in mind, RustSyncBot is an easy-to-install Pterodactyl egg that effortlessly keeps your game servers in sync across multiple machines. Whether you're running a network of Rust servers or any other setup requiring consistency across servers, RustSyncBot is here to simplify your workflow. With RustSyncBot, you can easily specify the directories and files that need to be mirrored from a main server to one or more secondary servers. The bot’s robust configuration options allow you to manage multiple pairs of servers, ensuring your server network stays perfectly synchronized at all times. Key Features: Easy Installation: Install and set up within minutes with our user-friendly Pterodactyl egg. Seamless Synchronization: Automatically sync specified directories and files from your main server to secondary servers. Multi-Server Management: Configure multiple server pairs to maintain consistency across your entire server setup. Efficiency Boost: Streamline your server management, making it easier than ever to run the same server setup across multiple servers. RustSyncBot takes the hassle out of server synchronization, letting you focus on what matters most—delivering an exceptional gaming experience to your community. Tested and working with "BotReaper Python Discord Bot" node. You just need to modify the "APP PY FILE" to be "main.py" instead of "app.py" Pterodactyl is NOT needed, you can run this bot through normal python on any server or even windows machine with python installed! Installation Instructions: How to install: 1. Create a new server using the provided egg called "egg-rust-sync-bot.json". 2. Upload the "rustsyncbot.zip" archive to the server's Files section. Once uploaded, you can unzip the file or trigger a reinstall in the server's Settings section. 3. Navigate to the Files section and modify the .env file if you would like to change the sync time (default 120 seconds) (do not set it too low, as then you will have alot of network requests often, test and set to your needs) 4. Navigate to the config directory and look through the "example.yaml" file, you will need to setup your configuration files to connect to your servers, specify what files/folders you would like to sync (I recommend using https://yamlchecker.com/ OR https://jsonformatter.org/yaml-formatter/ to verify that your syntax is correct) 5. Start the server. All dependencies will be installed on startup, and bot will automatically start. (The bot will ONLY copy files that have a newer modified date from server_1 over to server_2. so make sure your files are the latest version on server_1) 6. Leave server running, bot will recheck files based on the SYNC_INTERVAL you have set in the .env file NOTE: All directories/files are RELATIVE to the starting location of your SFTP login. this means that you should NOT put /home/container/ before each of your folder/file locations I have made a tool to help with generating the correct information for the configuration. It can be found at: https://rustsync.rustvideo.com/ Sample Configuration: # MAIN server server_1_name: Server 1 Display Name server_1_url: ip:port # eg 192.168.1.1:2022 using sftp://domain.com:2022 "should" work also server_1_user: username.shortcode server_1_pass: panelpassword server_1_sftp: True # do not change, for future functionality # SECONDARY server server_2_name: Server 2 Display Name server_2_url: ip:port # eg 192.168.1.1:2022 using sftp://domain.com:2022 "should" work also server_2_user: username.shortcode server_2_pass: panelpassword server_2_sftp: True # do not change, for future functionality delete_missing_remote: True # set to True or False. if it is missing, it defaults to True for backwards compatability # directories for the bot to keep in sync CASE SENSITIVE # directories are listed as key/pair. where the key is the directory on the main server, and value is the directory # on the secondary server eg. # oxide/plugins: carbon/plugins # # will sync the directory of oxide/plugins on server_1 to the carbon/plugins directory on server_2 # you can use trailing slashes and preceding slashes. eg. # /oxide/plugins , /oxide/plugins/, and oxide/plugins are all valid options # CASE SENSITIVE directories_to_sync: oxide/plugins: oxide/plugins oxide/config: oxide/configs oxide/data/copypaste: oxide/data/copypaste # files for the bot to keep in sync CASE SENSITIVE # files are listed as key/pair. where the key is the location on the main server, and value is the location on the secondary server # eg. # oxide/plugins/ZoneManager.cs carbon/plugins/ZoneManager.cs # # will sync the individual file of "oxide/plugins/ZoneManager.cs" on server_1 to the location of "carbon/plugins/ZoneManager.cs" on server_2 # CASE SENSITIVE files_to_sync: steam_appid.txt: steam_appid.txt # directories for the sync bot to ignore, it will ignore these directories if the path is found within the sync, eg, if you are syncing carbon/data, it will # ignore the following # - carbon/data/AdminMenu # CASE SENSITIVE directories_to_ignore: - carbon/data/AdminMenu - carbon/data/Shop - carbon/data/Backpacks # files for the sync bot to ignore, it will ignore these files if the path is found within the sync, eg, if you are syncing carbon/config, it will # ignore the following # - carbon/configs/AbandonedBases.json # CASE SENSITIVE files_to_ignore: - carbon/configs/AbandonedBases.json - carbon/configs/RaidableBases.json$10.00- 4 comments
- 2 reviews
-
- 1
-
-
- #sync
- #pterodactyl egg
- (and 7 more)
-
Version 1.0.0
27 downloads
SkinFinder is an admin tool with which you can pull the SkinID of certain objects. The nice side effect is that the short name and the NetID are also displayed. More Free Plugins: If you are looking for more useful free plugins, please have a look at my Discord, you only have to choose the Flash role when you join. Support Discord Permission: To use the plugin, you need the .use permission. skinfinder.use load, run, enjoyFree -
Version 1.1.4
336 downloads
This is a tool I made as I found CUI to be very difficult when beginning to make Rust Plugins. This tool allows you to make any type of UI in unity, and export it to Rust Format, using this tool allows you to go back and make any minor adjustments needed as everything is saved in the project file. Never leave your self guessing on how far you can go with UI, this tool will allow you to make super sleek looking UI in just minutes! Features Create Panels, Images, Labels, Buttons, and Input Fields Pick one of the four fonts and get a preview live Use any sprite from rust, and directory auto set by exporter UI Materials, be able to test UI with materials live Auto Custom Image Uploader, exporter will upload your image to imgur and the exporter will put the link in the proper section Export UI from Unity to Rust Automatic Offset/Anchor Support, no longer need to fight with numbers in your head Automatic conversion for Font Size, Text Alignment, etc Installation Download Unity 2021.1.5f1 Extract the zip file to a spot you would like to keep the tool Find the ImgurToken.txt in the same folder as the UI scene, follow instructions in the file. Open the project file in the folder that you extracted, and navigate to the top find Rust -> Download Sprites and follow the instructions After that you are all done, now its time to get creative and make some killer UI Notes for those who purchase: - When using custom images, please put them in a custom folder in the assets folder. - Make sure you set your game tab to 1920x1080 otherwise your scene view will look all wonky - Make sure that you are on the right unity version, and if you are showing unity errors google them before contacting me. - Rust CUI Input Fields do not have a background or placeholder text, to add a background use a panel. View an example, and if that's not enough check out the video below! Advanced UI made in minutes$45.00 -

Version 1.0.1
13 downloads
CodeFling Creator Bot is a Discord bot, written in Python using Discord.py. The bot monitors users specified in the config and using the CodeFling API, sends notifications to Discord for various actions: - New Releases (Plugins, Maps, Tools etc) - Plugin/Release Updates - New Comments/Discussion Posts - New Reviews - New Private Messages The bot is lightweight and written with efficiency and reliability in mind. It makes only the API calls it needs and stores data in an SQLite database for use later. When guild members use the bot commands, the data is pulled from the local database and doesn’t make extra calls to the API, which means you don’t need to worry about rate limiting or getting banned by the API. The bot polls the API looking for new content at set periods as set in the config, notifying about new content and then updating the database with new data. PLEASE NOTE: Requires Python 3.6 or higher. README: CodeFling Creator Bot 1.0.1 Discord Bot by ZEODE ========================================== Minimum requirements: Python 3.6 or higher Dependacies: Discord.py aiohttp Using pip: pip install -U discord.py pip install -U aiohttp The -U flag just means “upgrade to the latest version if already installed.” Using apt: apt install python3-discord apt install python3-aiohttp This file explains each configuration option in config.json *************** DEFAULT CONFIG FILE IS CREATED ON FIRST RUN *************** DISCORD SETTINGS ---------------- Make sure your Discord bot has at least "Send Messages", "Read Message History" and "Embed Links" permissions. bot_token: Your Discord bot token from the Discord Developer Portal. Get it from: https://discord.com/developers/applications release_channel_id: Discord channel ID where file release/update notifications will be posted. To get channel ID: Enable Developer Mode in Discord settings, right-click channel, "Copy ID" purchase_channel_id: Discord channel ID for purchase notifications (recommend private channel). Shows when someone buys one of your paid plugins. support_channel_id: Discord channel ID for support request notifications. HOPEFULLY COMING SOON - Currently the API endpoints do not provide the necessary information to provide this (I have asked for it, so watch this space). comments_channel_id: Discord channel ID for comment/discussion notifications. Shows when users comment on your files (excludes file author replies). downloads_channel_id: Discord channel ID for file downloads notifications (recommend private channel). Shows when users download your files. reviews_channel_id: Discord channel ID for file review notifications. Shows when users review a monitored file. messages_channel_id: Discord channel ID for user message notifications (recommend private channel). Notifys when a monitored user receives a message on CodeFling. commands_channel_id: Discord channel ID for people to use bot commands. People can use bot ! commands here, all user messages can be cleaned automatically, see below. admin_commands_channel_id: Channel for users with the bot admin role to use admin commands away from public channels All normal commands also work here for bot admin role users to use here too clean_commands_channel: If true, users messages are automatically deleted shortly after they are sent to the channel. max_number_files_to_list: Number of files to return when users use the "!list plugins" command bot_admin_role_id: Users need this role to use the admin only commands ping_release_channel: If this is true, new releases or updates to files will be notified with the @everyone tag NOTE: - Leaving any of the channel IDs blank will disable notifications for those actions - Although there are separate channels for each type in the config, this is just for anyone wanting this, if you want you can put the same channel ID in more than one channel config CODEFLING SETTINGS ------------------ monitored_users: Dictionary of Codefling user IDs and their API tokens. Format: "user_id": "api_token" How to get your User ID: - Visit your Codefling profile - Hover over or click on "See my activity" - Your user ID is in the URL: https://codefling.com/profile/USER_ID-username/content/ - Copy just the numbers, without the "-username" part How to get API Token: - Visit: https://codefling.com/settings/apps/ - Click "Add App" > "Creator API" - Select "All" under scopes - Copy the access token to paste in your config Example: "monitored_users": { "user_id_1": "your_api_token_here", "user_id_2": "another_api_token" } Note: Each user needs to use their own API token. poll_interval_seconds: How often (in seconds) the bot checks Codefling for new content. Default: 120 (2 minutes) Suggested values: ____________________________________________________________________________________ | Type | Safe poll interval | Notes | | ----------------------- | ------------------ | ----------------------------------- | | Light use (1–2 authors) | 60 s | Feels instant, safe if few requests | | Medium (3–5 authors) | 120 s | Recommended default | | Heavy use (5+ authors) | 300 s | Low strain, good scaling | | Massive / strict API | 600 – 900 s | Extremely safe | |_________________________|____________________|_____________________________________| Note: Too frequent polling may hit API rate limits. retention_days: How many days of historical data to track and store. Default: 7 days The bot will: - Only notify about content within this time window - Automatically clean up older data daily - On first run, load existing content from this period Recommended values: - 7 days (minimal storage) - Recommended - 30 days (balanced) - 90 days (extended history) NOTE: Monitored resource/file data is kept indefinitely for users !stats !list commands etc, but the bot will only look for new actions within this period to send notifications to Discord or not. This maintains speed and performance so the bot isn't retreiving more data than is necessary with each API call. In most cases, 7 days should be more than sufficient for all use cases. LOGGING SETTINGS ---------------- timestamp_date_format: The format for timestamps in the console/log output. Availble: - %d - %m - %y e.g: %d-%m-%y would make something like 30-10-25 timestamp_time_format: Specify the format for the timestamp. - 12h - 24h log_file_path: Set the path to the OPTIONAL log file. If left blank, no log file will be used. API OPTIONS ----------- Note: You can usually leave this as is and it will work absolutely fine. max_attempts: How many times to try an API request if it fails before giving up on that attempt Useful for occasional CloudFare errors/timeouts timeout_seconds: How long to wait before retrying a API request due to timeout config_version: DO NOT EDIT THIS COMMANDS ------------------ NOTE: Commands by users do not query the CodeFling API every time. They only retreive data from the SQLite database, so you don't have to worry about rate limiting or banning from users abusing the commands on Discord. This also means it is much quicker with results. The database is updated with all the info every time the API is queried as per the poll rate in the config only. Non-Admin Commands: !help Lists all available commands !stats [username] Get own stats without parameter if you are monitored by the bot or get stats for the user specified !list files List all files monitored by the plugin (config option to limit results) !list authors List all file authors/devs monitored by the bot !file <FileName> / !file <file_id> Give information about that file Admin Commands: !user add <user_id> <api_token> Add the specified user ID and API token to the bot, save in the config and begin monitoring !user remove <user_id> Stops monitoring and removes the specified user ID from the bot and config !rotate Immediately rotate the log file and begin a new blank log file (rotated files saved in logs/) !cleardb Immediately clear the SQLite database and re-seed a new database (ALL DATA WILL BE CLEARED) !test <review|download|purchase|comment|message> Send a test notification to Discord for the most recent entry of the given type !test <file> [new|updated] Send a test notification to Discord for the most recent entry for files/releases, using the new or updated parameter accordingly/ FIRST RUN BEHAVIOR ------------------ On first run, the bot will: 1. Create a SQLite database (codefling_bot.db) 2. Load/Cache all users existing files. 3. Load/Cache all existing content from the last N days (retention_days) 4. DOES NOT send any notifications for existing content 5. Only notify about NEW content after initialization On subsequent runs: 1. Check for content created while bot was offline 2. Send notifications for missed content 3. Continue normal monitoring TROUBLESHOOTING --------------- No notifications appearing: - Verify channel IDs are correct - Check bot has "Send Messages", "Read Message History" and "Embed Links" permissions - Confirm API tokens are valid and have correct scopes Getting rate limited: - Increase poll_interval_seconds value - Default 300 seconds (5 minutes) should be safe Bot sends old notifications on startup: - This is normal if content was created while bot was offline - Bot catches up on missed content within retention period - On first run, no old notifications should appear SUPPORT ------- For issues with the bot, check console output for error messages. Get more support in my Discord: https://discord.gg/jnyg3FvDnc For Codefling API issues, see: https://codefling.com/developers$14.99- 1 review
-
- 1
-
-
- #discord
- #discordbot
- (and 8 more)
-

Version 1.2.1
40 downloads
TheFunGun Unleash absolute chaos by launching vehicles out of a snowball gun. No ammo required. Just point, click, and behold the absurdity. Prerequisites Just a snowball gun in hand — ammo is optional, but style is mandatory. Chat Commands *You can open the gui menu with middle mouse click if you have the snowball gun in hand* /fungun - open fungun GUI menu /cargun – sedan /rhibgun – RHIB /fireballgun - Spawn a home made fireball /boatgun – rowboat /snowgun – snowmobile /sharkgun – shark corpse (yep.) /minigun – minicopter /sidecar – motorbike with a sidecar /motor – motorbike (no sidecar) /tuggun – tugboat /pedalgun – pedal bike /randgun – random vehicles (pure mayhem) /rocketgun - HV rockets /watergun - water ball / splash Permissions TheFunGun.BoatGun.Use TheFunGun.BypassCooldown TheFunGun.CarGun.Use TheFunGun.FireballGun.Use TheFunGun.MiniGun.Use TheFunGun.Motor.Use TheFunGun.Pedal.Use TheFunGun.RandGun.Use TheFunGun.RhibGun.Use TheFunGun.RocketGun.Use TheFunGun.SharkGun.Use TheFunGun.SideCar.Use TheFunGun.SnowGun.Use TheFunGun.TugGun.Use TheFunGun.WaterGun.Use Caveats Despawn timer matters — long timers = more clutter Too many vehicles = server lag = sad face Keep it ridiculous, but responsible Configuration { "Despawn Timer": 5.0, "Velocity": 235.0, "Cooldown": 1.0, "Rocket Damage": 0.0 "Close Menu After Selection": false } Localization { "randGunEnable": "<color=#ffc34d>TheFunGun</color>: Random Gun <color=#36802d>Enabled</color>", "randGunDisable": "<color=#ffc34d>TheFunGun</color>: Random Gun <color=#ff6666>Disabled</color>", "noPermission": "<color=#ffc34d>TheFunGun</color>: You do not have permission to use this command", "Cooldown": "<color=#ffc34d>TheFunGun</color>: You are on a {0} second cooldown." } Customizable localization entries for each gun are available in the config file. Special Thanks Big shoutout to unboxingman for helping make this ridiculous idea a working reality. Support Join us on the Dark Side Development Discord. We live for this kind of madness. Legal Copyright © 2025 Lincoln This plugin, The Fun Gun, is the intellectual property of Lincoln. The plugin may not be copied, modified, merged, published, or redistributed without the explicit permission of the creator, Lincoln. Permission is granted solely for personal use on a Rust server that you own or manage. Commercial use, sharing with third parties, or distribution on multiple servers is strictly prohibited without prior consent from the creator. Disclaimer of Warranty and Liability: This plugin is provided "as is" without any express or implied warranties. The creator disclaims any liability for damages, including but not limited to server malfunctions, data loss, or other issues arising from the use of this software. Use of the plugin is at your own risk.$5.99 -

Version 1.0.2
1,285 downloads
BIG THANKS! to Ted Pommes for featuring the map and explaining how to use it! This is a visual guide for viewing the topology for individual biomes. Load this up as a map, and explore each island as they populate depending on the splat/topology used. Server Details: 74.91.27.186:28015 Server Info: Has fauxadmin to allow players to fly around and look at each topology/splat/biome reference.Free


.thumb.png.ccf8a947948c9eb1445ad21a7931247b.png)