-
-
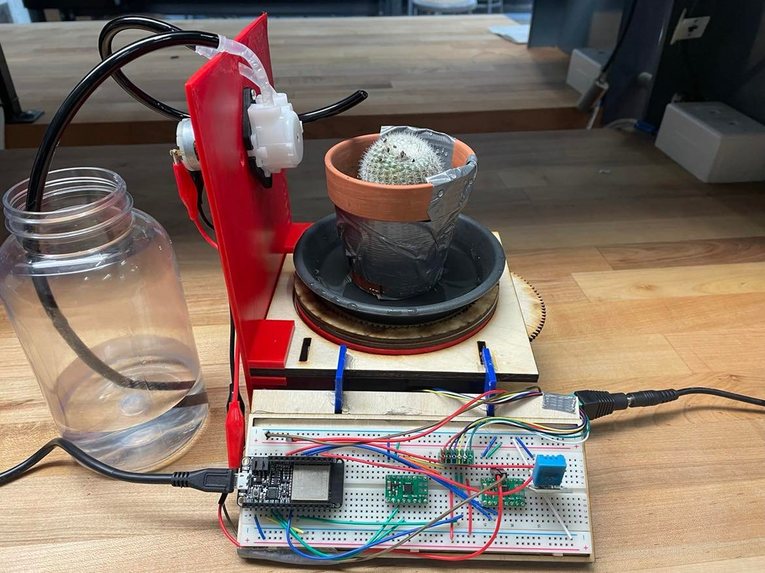
Full Assembly 1
-
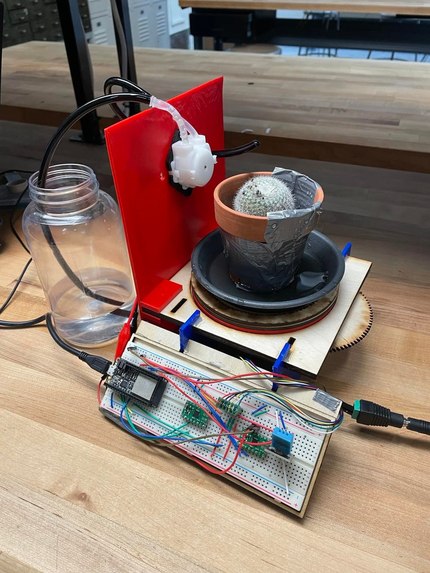
Full Assembly 2
-
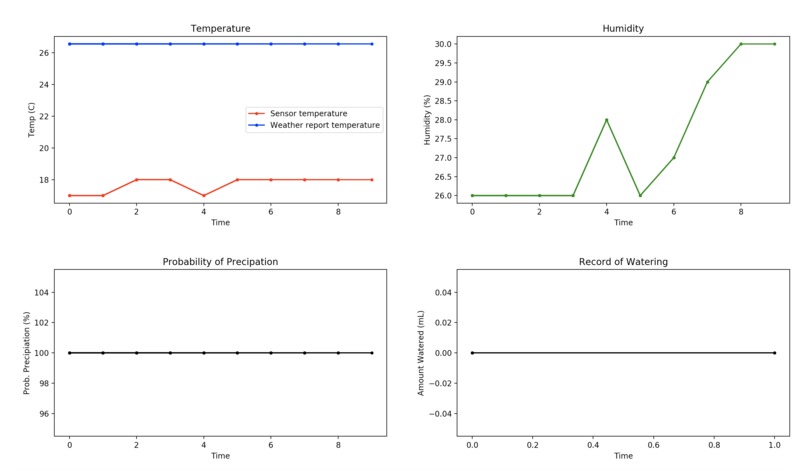
Datalogger Function


Inspiration
Taking care of other living things is hard [citation needed]. In the case of plants, a consistent routine is necessary to give the plant what it needs, these needs differ by plant, and long term planning is required to keep it alive even when away. As such, there exists a market for taking care of plants automatically. There are many current products to meet this need, but they all fall short in different ways. One possibility is slow-drip mechanisms that slowly dispense water into a plant’s pot. However, this cannot be changed to account for the plant’s individual needs, and the amount of water it can store is not high enough to be able to keep a plant alive for an extended vacation. Alternatively, there exist timed plant watering devices that water a plant every day. However, limited adjustability in timing and access to data means that this strategy is restricted in other ways. Our product exceeds the utility of all these other devices, while also providing invaluable logged data and water tracking to the user. Given the utility of our device, and the fact that on the order of 33 million households participate in indoor gardening/houseplant ownership, paired with the fact that our product likely could be sold for somewhere on the order of $20 (and likely much less were we to manufacture this at scale), the expected number of users could very well be in the millions of households. All these factors considered, we believe this project can fill a definitive niche in the market as it currently stands.
What it does
Put simply, our project is an automatic plant caretaker: it intelligently and effectively cares for a single plant by watering it according to a combination of the plant’s needs and environmental effects. The Auto-Farmer dispenses water by means of a peristaltic pump, while rotating the plant to give an even watering. The amount of water dispensed is a function of the plant’s individual needs as specified by the owner, the environment (temperature, humidity), and the weather forecast (rain chance, foreseen temperature, etc.) The watering is either done automatically every t seconds (where t is defined by the user, generally once per day is sufficient), or when the user presses a button on an app. Lastly, continuously during operation, the device sends information to the user to help them keep track of watering trends, environmental patterns, and other long-term effects on their plants. With this system of sensors and effectors, combined with the ability to keep the user informed, the Auto-Farmer makes the home gardening experience much more easy and enjoyable.
How To Use It
User Interface Mechanical Setup:
- Place the Auto-Farmer where the plant is intended to be kept (taking care to provide appropriately decide on lighting, indoor/outdoor, etc according to the specific plant)
- Put the potted plant on the turntable. There is a wall around the table to help better center the pot on the table and allow for even watering centered on the stem.
- Fill the water reservoir, then place the long end of the peristaltic pump tubing inside it (with its end touching the bottom of the reservoir to minimize refilling).
Electrical/Software Setup:
- In the source code for the Auto-Farmer, input the desired parameters for the plant’s individual water need (cactuses need less than ferns, for instance), the watering period (default should be 1 day between watering), sensor VS weather report weight (weight the sensor higher if inside, the weather report more if outside), data report period (amount of time between logging a data point), and calibrated “seconds-per-mL” pump constant (optional, but allows to precisely tune the device to the specific pump hardware on hand)
- In the source code, input the latitude and longitude of the place in which you live in the lat and lon sections (Note: In a consumer product, we’d likely build a database or user interface to make this selection easier; for demonstration purposes, we have pre-loaded latitude/longitude data for Berkeley).
- Connect the computer on which the source code is being run to the ESP32, use shell49 to interface with the ESP32, and connect it to the internet
The source code can be copied to the ESP32 using the cp command, or if preferred it can simply be run while connected to the computer (running while connected to the computer will allow for status printouts, but those can also be seen using the MQTT protocol). The commands to set up the ESP32 and the Auto-Farmer program are as follows:
>>>shell49
>>>run boot.py
>>>run source_code.py
If you would like to remotely monitor your plant, run the following command to open the data plotter once the other scripts are running (note you can do this on any Internet-connected computer where the data plotter script exists; it gets data through the MQTT protocol from the Auto-Farmer):
>>>run data_plotter.pyIf you would like to remotely water your plant manually, use the provided IFTTT application on any device to do so (press the button).
Actuation
Turntable DC Motor:
In order to evenly water the plant, we considered many ideas, including sprinkler heads, a moving water dispenser, or letting water seep in through the bottom of a pot. The design we decided on, however, uses a turntable under the plant to allow for the water to be dispensed in a circular pattern around the plant’s stem. To actuate this turntable, we used the Pololu Micro Metal Gearmotor (lab kit standard-issue) with its corresponding H-bridge motor controller. The motor controller--despite being an H-bridge--is simply used as a voltage regulator, as we do not need bidirectionality in our application. We also experimented with PWM signals to regulate speed of the turntable motor, but eventually we realized that given the gearing, we were unlikely to need anything less than full power at any given time. As such, all following calculations will be using the motor run at maximum power, as in practice this is how we run our device. When unloaded, the motor we used runs at 410 RPM with a current of 100 mA. However, this was significantly too fast for our purposes, so we decided to gear it down with a 25:1 gear ratio for a new speed of 16.4 RPM (0.27 rev/sec). With a 1.3 Kg*cm max torque with the ungeared motor, we now could get a 1.3 * 25 = 32.5 Kg*cm max torque which, given the radius of the platform’s 6.3 cm radius, could allow for a 5.16 Kg lateral force on the rotating platform (much less than the plant weighs, even if the force were directed completely sideways and off-center). In total, for each day of operation--assuming the plant is watered once a day for 5 minutes (far more than most plants will ever need)--the motor draws 300s*0.1A*12V = 360 Watt*seconds = 360 J per day of operation, only drawing 1.2 Watts at any given time [Pololu]. This is a negligible amount of power compared to the amount households use (~30 KWH per day), which easily fits our design criteria [US Energy Information Administration].
Peristaltic Pump:
To transport water from the reservoir to the plant, we initially considered two options: a solenoid+siphon system, and a pump. Through experimentation, we quickly found that the solenoid+siphon system would require a sizable build envelope to build up sufficient pressure head for our desired flow rate through the solenoid valve, and so we opted for a pump instead. Specifically, we were looking for a compact and robust pump, which could reliably and precisely deliver relatively small quantities of water at a time. For that purpose, the Adafruit 12V peristaltic pump was perfect. Essentially, the pump converts rotary motion from the motor into liquid flow by progressively squeezing an interior hose, pushing small “packets” of water through the system and out the other side. In this way, no moving components actually ever come into contact with the liquid itself, resulting in uncontaminated water, and zero mineral buildup/wear from the liquid-pump interface. Requiring 200-300 mA at 12V (thus requiring between 2.4 and 3.6 Watts during operation), the pump is capable of pumping up to 100 mL/minute [Adafruit], though that value is somewhat variable from pump to pump, and required calibration on our part. Taken together, this actuator checks off all the boxes: adequate and reliable flow rate, enough pressure head to pull water out of the reservoir and into the potted plant, small size for a compact device, and minimal wear/need for repair.
Sensing
The sensor our project uses is the DHT11 Humidity and Temperature sensor from Adafruit. This sensor detects both humidity and temperature and sends them down a single serial line. According to the datasheet, the sensor outputs a temperature between 0 and 50 degrees Celsius with an accuracy of ±2 degrees, and a humidity between 20% and 90% with an accuracy of ±5%. The resolution of the sensor is 1, so an integer value is returned for both temperature and humidity, while the repeatability of the sensor is ±1%. While this is definitely on the lower end in performance, our device does not rely on precise measurements, only general tendencies of the outdoor weather/indoor microclimate, so this sensor was deemed adequate.
The more important benefit of the sensor is its low cost (around $4) and low power consumption. Before a reading is needed, the sensor’s pull up resistor gives it an output equal to its 5V VDD input. However, the residual current flowing through in this standby-state is ~100 uA, requiring negligible input power. When a reading is needed, the sensor outputs a 40 bit signal: 16 bit temperature reading, 16 bit humidity reading, and 8 bit validation (checksum). Note however that only 8 bits of each of the temperature and humidity readings are integral (as opposed to another 8 bits of decimal data, which are always zero due to hardware limitations), thus explaining the low resolution despite having many more available bits in each serial data package to work with. After this data is sent, the sensor resumes lower power mode, only having been in high power (active) mode for 160 μs (the start of the signal is a short low-followed-by-high voltage signal to indicate that the data transmission is starting) + 40 * 50 μs (each of the bits has a 50 μs low-voltage signal directly preceding it) for a total of 2.16 ms [D-Robotics]. With this low power consumption and low cost, combined with the ability to read both temperature and humidity , this sensor was the perfect one for our needs.
Software
In designing the software to control the vehicle, care was taken to appropriately divide the processing between onboard and offboard computing. Of course, as a general principle, onboard computing can operate with far less latency, but has very limited computing power; offboard computers are the exact opposite. For our purposes, we have very limited computation (a few simple arithmetic operations every time it waters a plant), with the longest-latency operation being an Internet access (which would be necessary to interface with MQTT anyways). What’s more, in a real deployment of this device we’d only realistically need to do computations once every couple minutes (and likely much longer than that). In that case, speed is not a huge concern, especially compared with the latency and potential failure point of relying on an external host computer. As such, we deemed that offboard computing would be unnecessary, and that it made more sense to do the computation on board.
The software codebase for the device consists of five main components: one that makes sensor readings/Internet accesses (onboard), one that calculates quantity of water and waters the plant (onboard), one that logs data periodically and sends it to the cloud (onboard), one that interfaces with an IFTTT manual control option (onboard), and one that receives data from the cloud and plots it in a user-friendly interface to allow for monitoring of environmental data and watering trends (offboard). These are outlined in more detail below:
Data Collection
To access the data from the DHT sensor, we simply used the built-in DHT class in ESP32 micropython to interpret the serial data into temperature and humidity readings. To access Internet weather data, on the other hand, is a far more involved task. Because of the difficulties reading IFTTT weather data, we opted to use OpenWeatherMap, an open source weather data API. Essentially, we made accounts, received uniquely identifying “keys”, and then used these to grab data from OpenWeatherMap’s sources given our input latitude and longitude. The site then returned a massive JSON file containing weather data for the next seven days which we subsequently turned into an equally massive multi-layer hashmap. Finally, we indexed into the hashmap using commands like data[“daily”][“0”][“pop”] where “data” is the name of the outer map, “daily” means we search for daily data as opposed to weekly or hourly data, “0” for the index of the day, and ”pop” for probability of precipitation. Notably, because we only pull this data when the data-tracker requires, power consumption/computation is not much of a concern (we use interrupts instead of constant polling).
Watering Logic
In order to properly leverage all the data that our device is collecting, both from the sensors and from the Internet, an intelligently-designed watering logic was developed. First, we enumerate the inputs for our function:
- W: Nominal Amount of water per period*
- K: Sensor-Internet Bias parameter*
- sensor_temp: Sensor Temperature
- humidity: Sensor Humidity
- curr_temp: Today’s Weather Report Temperature
- curr_prec: Today’s Weather Report Probability of Precipitation (POP)
- tom_temp: Tomorrow’s Weather Report Temperature
- tom_prec: Tomorrow’s Weather Report Probability of Precipitation (POP)
- User-specified parameter, see the “USER INTERFACE” section for more details.
Essentially, the function is a product of linear functions of each of these parameters, which is used to weight the nominal amount of water W. The whole function takes this form (comments inserted below each line for design justification):
avg_temp = K*sensor_temp + (1-K)*(curr_temp+tom_temp)/2
- First, we take a simple average of today’s and tomorrow’s weather forecast temperature
- Next, we take a weighted (specified by K) average of the sensor-read temperature and that average weather forecast term
avg_prec = 1 - (1-curr_prec)*(1-tom_prec)
- Calculate the probability that there will be precipitation either today or tomorrow.
weight = (avg_temp/30 + 1/3) * (1-avg_prec) * (1.5-0.01*humidity)
- Note: When weights = 1, all conditions are nominal (20°C, 0% POP, 50% humidity)
- Water more when it’s hotter: For the temperature weight factor T, we want T = 1 at 20°C and T = 1.5 at T = 35°C, linearly interpolate between those two points
- Water less when it’s more likely to precipitate: For the POP weight factor P, we want P = 1 at 0% POP and P = 0 at 100% POP, linearly interpolate between those two points
- Water less when it’s more humid: For the humidity weight factor H, we want H = 1 at 50% humidity and H = 1.5 at 0% humidity, linearly interpolate between those two points
water_amount = weight * W
- Weight the nominal amount of water by the product of the weights calculated in the previous line.
This water_amount quantity we calculate is then converted into a time to run the peristaltic pump at full power, which has been calibrated with volumetric flow rate testing. Thus, the plant has received a dose of water, based on plant-specific factors (ie how much water a plant should nominally receive, as well as how frequently it should be watered), real-time environmental factors (eg temperature, humidity), and forecasted weather (ie next-day temperature and precipitation). With the automatic timer, this quantity will be delivered periodically for as long as the device is on.
Data Logging
Besides watering the plant, the device also packages the data it collects from sensing hardware and the Internet weather report, and sends it into the cloud via its data logging functionality. Specifically, the device tracks and logs sensor-read temperature/humidity, current Internet-provided temperature/POP, and future Internet-provided temperature/POP. The ESP32 code is equipped with a timer, which makes a sensor reading and accesses Internet weather data every datalogging period (a user-defined amount of time), and sends it to an MQTT channel to be processed. Additionally, at each watering stage, a sensor reading/Internet request is made, and that data, along with the amount watered, is also packaged and sent to the same MQTT data channel.
IFTTT-Powered Manual Control
To implement a manual plant-watering functionality, we simply use a separate MQTT command channel to issue commands to water. Every time a command is received, an interrupt is triggered, which immediately delivers the recommended dose of water (as determined by the same logic as laid out in the “Watering Logic” section above), This event also overrides the next automatic watering event, before resuming with the automatic watering cycle after another period. For a user-friendly interface, sending this manual-watering MQTT signal is simply triggered by the push of a button on the IFTTT app.
External Data Plotting
Once that data is sent to the MQTT feed, a separate script, untethered from the ESP32, processes that data and plots it in a user-friendly interface. Through these real-time updating plots, a user can track the conditions the plant is experiencing, as well as the amount of water the plant has received over time. This enables intelligent tweaking of the user-defined parameters, allowing for maximized customizability of the care one can provide for one’s plant.
Our design relies quite heavily on the Adafruit MQTT broker (using it for both manual commands and for data-logging/status reports) and Internet access for weather reports. As such, latency is a primary concern. Empirically, based on our network configuration setup, we experienced delays of around 5-7 seconds for a MQTT message to propagate from the IFTTT app, through to the MQTT feed, and then trigger an ESP32 interrupt. The Internet access to weather data takes 2-3 seconds on top of that. Overall, given that it is not critical to water absolutely instantaneously in this application, these delays are perfectly serviceable for our purposes. The device’s utility lies mainly in its long-term planning and data records, as opposed to instant response to external stimuli, making it the perfect application for these intuitive and user-friendly MQTT/IFTTT software tools.
What's next for AutoFarmer
Overall, the part of the code that could be improved the most is the watering logic algorithm. In its current state, many of the parameters must be input by the user, and adjustment factors are based mostly on an overall average of so-called “nominal conditions”. As such, this algorithm would need to undergo serious review and user testing to ensure that the prescribed watering dose is appropriate and sensible, given the input data. For better results, it may likely be worthwhile to compile a database of plant preferred watering cycles/quantities (which could be accessed from the cloud upon setup), to make the user experience as straightforward and intuitive as possible. Other future extensions include refining the watering logic, utilizing more future weather data points, and adding additional sensor functionality (e.g. soil moisture sensor).
Conclusion
While taking care of plants is often a fun and relaxing hobby, it can also be equal parts drudgery and frustration, especially when it comes to meeting many varied plants’ needs. With its economical design and intelligent software, the Auto-Farmer takes the work out of home gardening and allows the user to focus on the more interesting parts of gardening. The actuators allows for the plants to be watered effectively even when the owner is not attentive or present, the sensor/weather data allows for a highly tailored watering for the plants, and the data logging gives the plant owner a much more informed perspective on keeping their plants healthy and happy, both in the short- and long-term. From the avid plant connoisseur to the simple tasteful desk-plant owner, we sincerely hope you consider the Auto-Farmer for your plant caretaking needs.
Built With
- esp32
- ifttt
- micropython
- mqtt
- openweathermap

Log in or sign up for Devpost to join the conversation.