-
-

NFT-Me Initial Interface
-
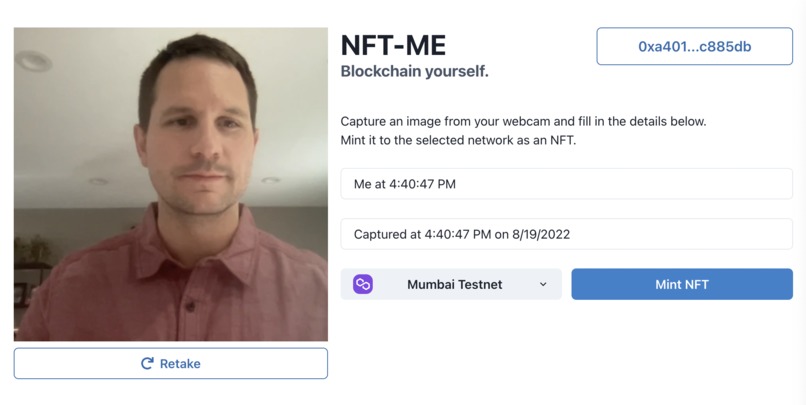
NFT-Me Mint Interface
-
Minting Process


Inspiration
As a developer getting started in web3 and NFTs, I'm in constant need of sample NFTs to work with.
Building applications that involve trading and selling NFTs requires a large collection of NFTs to develop and test the app's functionality. Generating unique NFTs in this quantity, on-demand, can be a challenge.
NFT-Me is my solution for quickly and easily minting new NFTs. It provides a simple interface that allows users to capture selfie images with their webcam, and mint them as NFTs with one click.
See a working version of NFT-Me here.
Problems Solved
This project streamlines the NFT creation process in a number of ways:
Imagery: Selfie images are captured with your webcam. No more uploading images or creating pieces of digital art - unique images are captured on-demand directly in the browser.
IPFS: NFT images are best hosted on a distributed file system like IPFS. NFT-Me automatically uploads selfies to IPFS so they are securely stored and always accessible.
Metadata: Edit the NFT's name and description details within the browser. These details, along with the image URI, are automatically formatted to the ERC-721 standard and uploaded to IPFS.
Chain Selection: A version of the NFT-Me token contract exists on multiple chains. Users can select which chain they want to mint to, and simply sign a Metamask transaction to complete the minting.
What it does
NFT-Me is a browser-based application that allows users to easily create NFTs from selfie images captured by their webcam.
The application, and the token contracts it works with, enable users to take pictures, define their metadata, host them on IPFS, and mint them as NFTs on a selected network.
NFTs are minted to an NFT-Me token contract deployed to either the Polygon Mainnet or the Mumbai Testnet:
- Polygon Mainnet: 0x8B4902b93127C9117AD6951A8a4bC8a1Eee306cB
- Mumbai Testnet: 0xdf18dFc9222C639a03898B2Cf2995eB215D3BA06
Source code for the token contract can be viewed here.
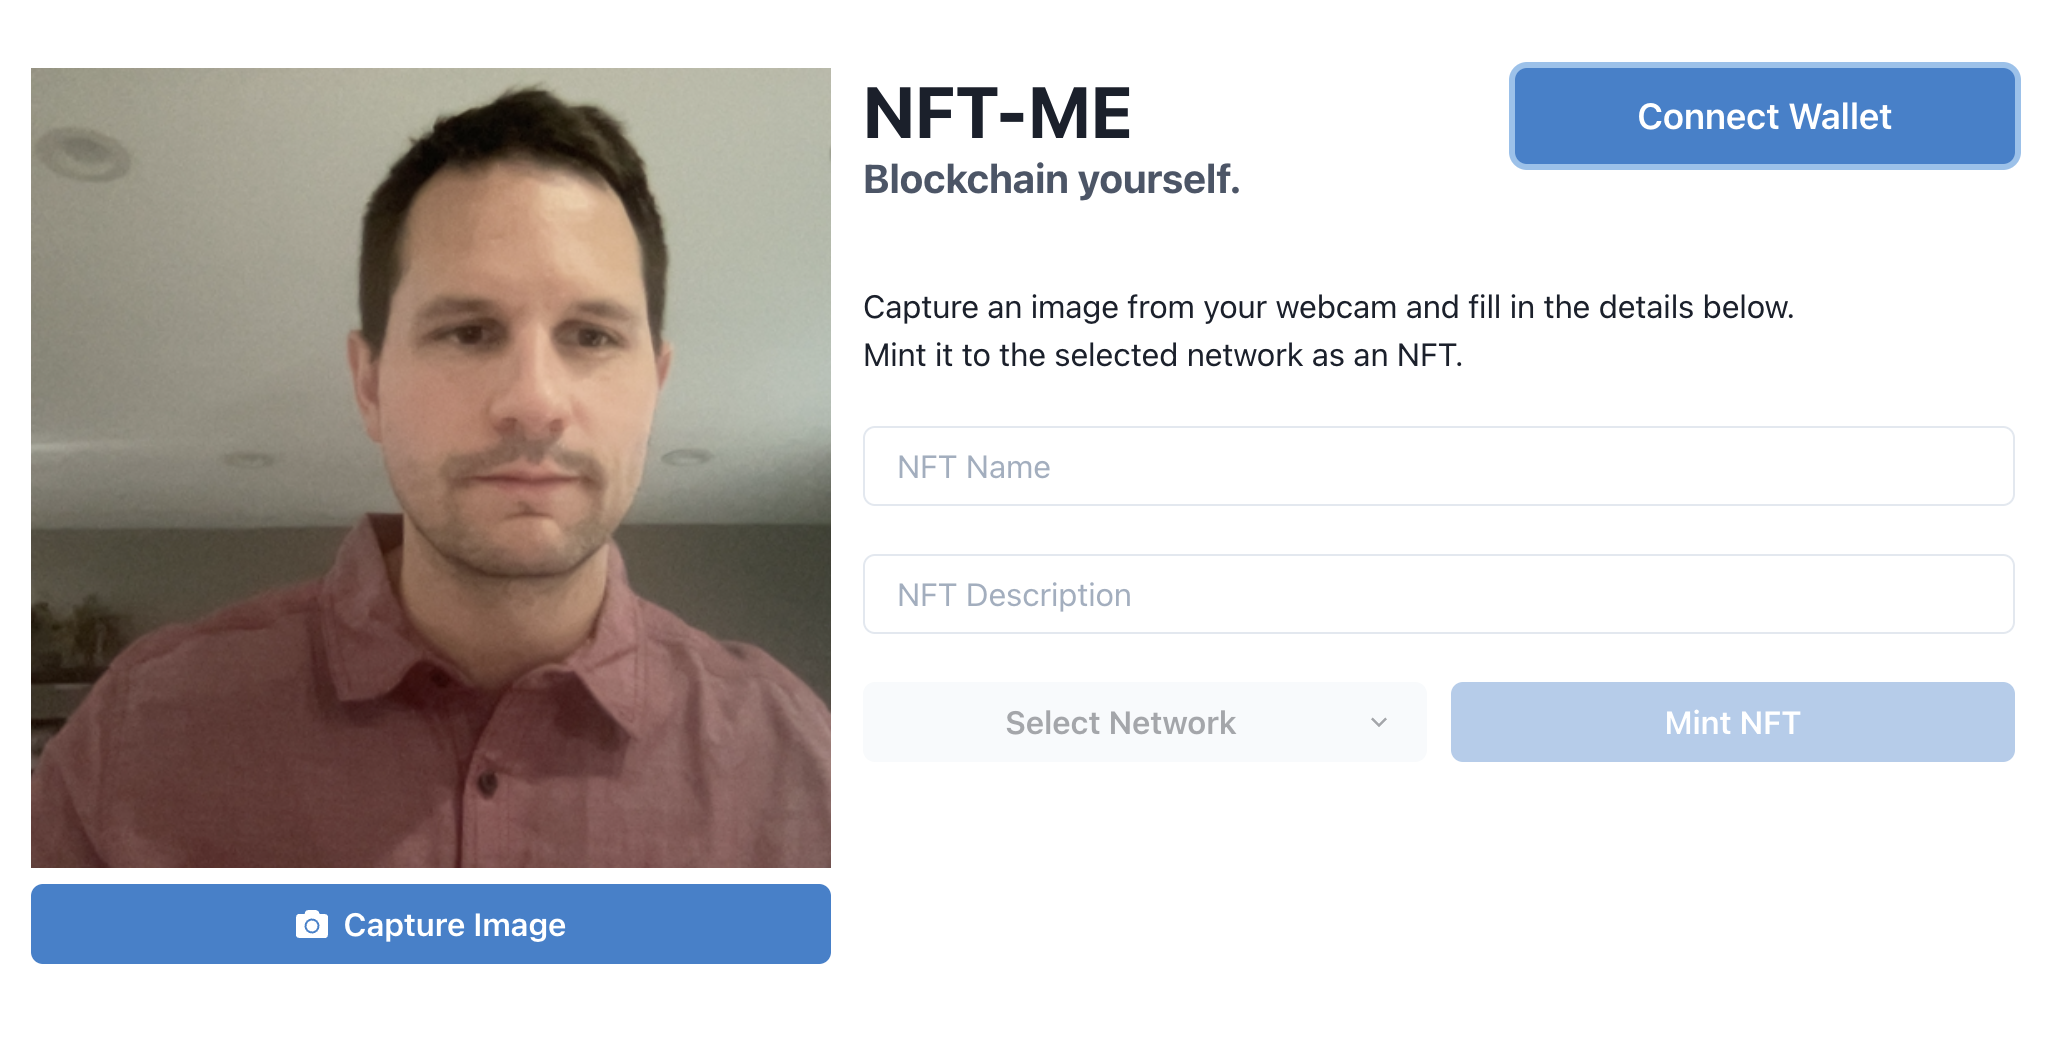
Browsing to NFT-Me, users will see the above interface, which is designed to guide them through a minting workflow:
1) First, the user is prompted to connect their wallet to the application and sign an authentication message using MetaMask. Once connected, their wallet address will be displayed.
2) Next, the user is guided to capture a selfie using their computer's webcam by clicking the 'Capture' button. If the image doesn't look good, users can click 'Retake' to capture again.
Each time a selfie is captured, the Name and Description fields are enabled and populated with values that incorporate the date and time. These fields can be edited to include any text the user wants.

3) Next, the user selects which network the NFT will be minted to - Polygon Mainnet or Mumbai Testnet. Metamask will switch to the selected network if it is not already connected to it.
4) Finally, the user clicks 'Mint NFT' to begin the minting process. A popup shows the progress as the image and metadata are uploaded to IPFS, and the user will be prompted by Metamask to sign a minting transaction on the NFT-Me token contract.
Once minting is complete, users are provided links to view the NFT on OpenSea, and view the minting transaction on the block explorer.
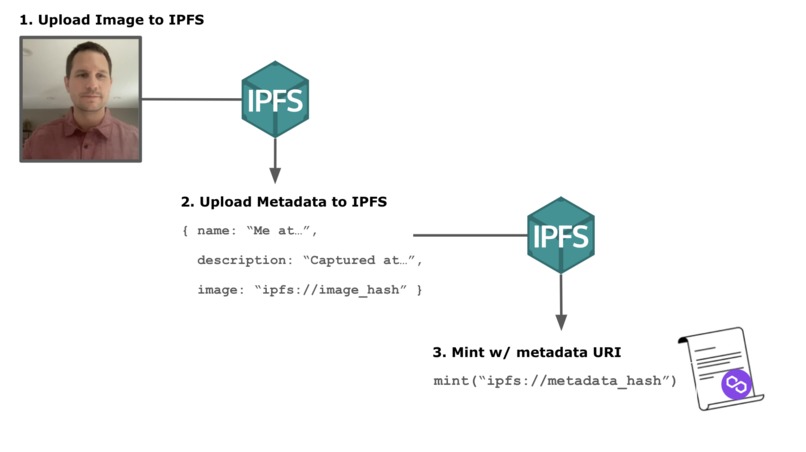
Minting Process
Minting an NFT requires that its image and metadata are hosted online, and that the metadata URI is associated with the NFT's token ID on the contract.
NFT-Me performs the following steps during the minting process:
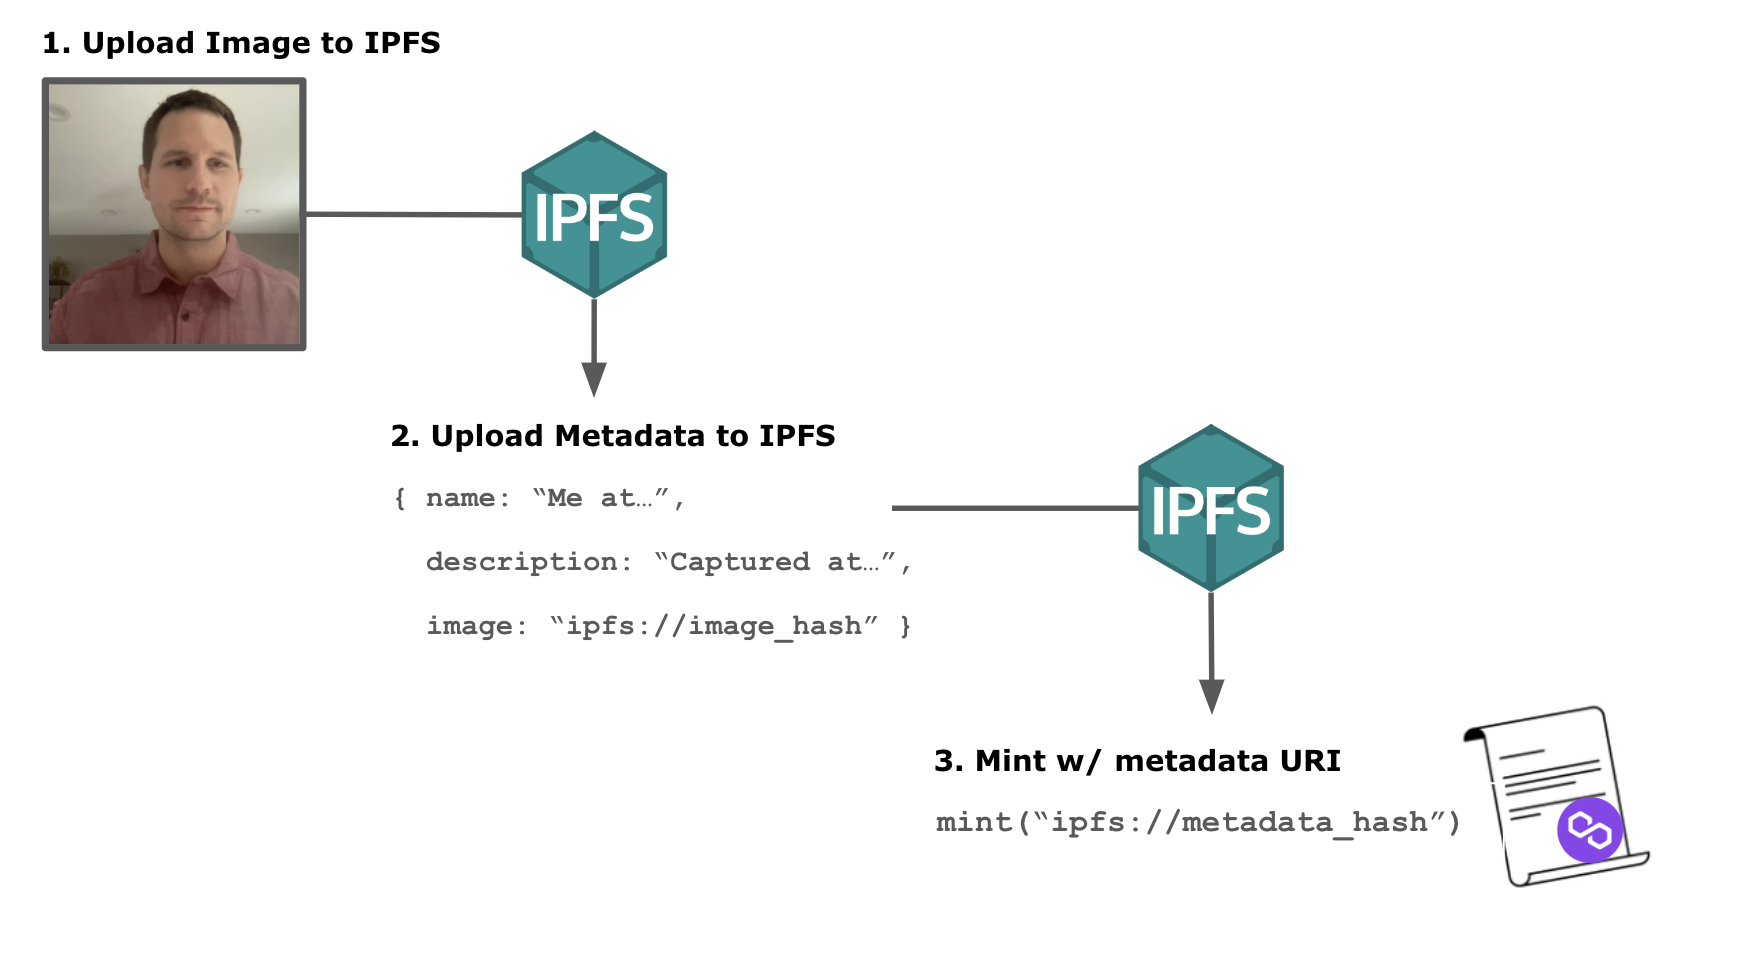
1) Upload Image to IPFS: The captured selfie is uploaded to IPFS. When the upload is complete, a URI pointing to the image is returned. This URI contains the unique hash value for the image. Ex. ipfs://image_hash.
2) Upload Metadata to IPFS: The name and description text, along with the image URI are formatted into a JSON object according to the ERC-721 metadata standard. This JSON object is uploaded to IPFS, and its unique URI is returned.
3) Mint token with Metadata: The metadata URI is passed into a call to the contract's public mint function. This function creates a new token ID with the caller as its owner, and associates the metadata URI with it.
How we built it
The project consists of two parts - a smart contract which defines an NFT-Me token, and a web-frontend that interacts with it.
Smart Contract
The contract was developed using Truffle, a Node.js framework for building, testing, and deploying smart contracts.
OpenZeppelin's contract library was used as a starting point for contract development. This library contains well-tested implementations of the ERC-721 standard that all valid NFT contracts must comply with.
The NFT-Me contract (source code) was adapted to include a public mint function, which can be called by any address to create a new token. This function takes in a URI pointing to the new token's metadata, and is the function that is called by the frontend during the minting process.
Truffle was used to compile and deploy the contract to the Polygon Mainnet and Mumbai Testnet. Details of the contracts (including addresses and ABIs) are copied to the web-frontend's source code so it can interact with the contracts on-chain.
Web Frontend
React.js was used as a development framework for the web-frontend that the user interacts with.
The Chakra-UI library provides standardized components (buttons, dropdowns, inputs, etc.) used in the interface. The react-webcam library provides functionality to access the browser's webcam.
The web3 capabilities of the frontend - such as connecting a MetaMask wallet, uploading files to IPFS, and sending transactions - are provided by the Moralis react library.
A working version of the frontend is hosted on Netlify here.
Challenges we ran into
The largest challenge I ran into was working on both the backend contract and frontend webapp together. These are completed in different languages (Solidity for the contract, JS for the frontend), and the frontend setup depends on the contract's details.
For the frontend to interact with the contract, it needs to know the specifics of the contract, including its address, and ABI defining what functions the contract includes. This meant that development was a two step process - the contract must be completed and deployed first, and the details of the deployed contract must be passed to the frontend for usage.
This process required that with every change to the contract, updated details would need to be pushed to the frontend. Working this requirement into the development workflow was new to me.
Accomplishments that we're proud of
I'm proud of the design of the interface. I believe it is intuative to use, and that users can easily follow the steps of connecting a wallet, capturing an image, and minting an NFT without detailed instructions.
This is an accomplishment for me, because as a programmer who codes, design is not my strongest talent. I spent a lot of time reworking the size, placement, and text of the components until they presented a design that worked well.
I'm also proud of the error handling within the app. There are a lot of new scenarios that need to be handled when working with web3 - the user not having Metamask installed, not being connected to the correct network, or having transactions fail. Or the user not allowing webcam access.
I worked hard to anticipate many of these scenarios so that if something goes wrong, the app catches it and notifies the user gracefully in the form of a popup message. This prevents the app from crashing and leads to a better user experience.
What we learned
During the course of this project I learned to use a handful of development libraries which I had never worked with before.
The react-webcam library has its own API for capturing images and handling image data, the chakra-ui library was an introduction to styling inside react components, and the Moralis library introduced many web3 functions that were new to me. Learning how each of these worked together has helped me as a developer.
I also learned more about working with the Polygon and Mumbai blockchains. Previously my experience has been with Ethereum and its testnets. It was interesting to learn exactly how similar Polygon is to Ethereum for developers.
All of the tools I've used for Solidity contract development, testing, and deployment on Ethereum were directly usable with Polygon.
For example, using Truffle to deploy a contract simply required defining the Polygon network details in the configuration file - and it worked exactly the same as with the Ethereum maininet. Verifying the contract code and viewing it on the blockchain explorer were the same as well.
What's next for NFT-Me
I'd like to grow NFT-Me by adding new chains that NFTs can be minted to. Also, adding a gallery page within the app would allow users to see all the selfies that other users have minted.
Providing another method for image generation would be interesting as well. Instead of using a webcam to collect images, the user could be prompted to draw an image on an HTML canvas.

Log in or sign up for Devpost to join the conversation.