Model Context Protocol gateway & proxy - unify REST, MCP, and A2A with federation, virtual servers, retries, security, and an optional admin UI.

![]()
![]()
![]()
![]()
![]()
![]()
![]()
![]()


ContextForge MCP Gateway is a feature-rich gateway, proxy and MCP Registry that federates MCP and REST services - unifying discovery, auth, rate-limiting, observability, virtual servers, multi-transport protocols, and an optional Admin UI into one clean endpoint for your AI clients. It runs as a fully compliant MCP server, deployable via PyPI or Docker, and scales to multi-cluster environments on Kubernetes with Redis-backed federation and caching.
- Overview & Goals
- Quick Start - PyPI
- Quick Start - Containers
- VS Code Dev Container
- Installation
- Upgrading
- Configuration
- Running
- Cloud Deployment
- API Reference
- Testing
- Project Structure
- Development
- Troubleshooting
- Contributing
| Resource | Description |
|---|---|
| 5-Minute Setup | Get started fast — uvx, Docker, Compose, or local dev |
| Getting Help | Support options, FAQ, community channels |
| Issue Guide | How to file bugs, request features, contribute |
| Full Documentation | Complete guides, tutorials, API reference |
ContextForge is a gateway, registry, and proxy that sits in front of any Model Context Protocol (MCP) server, A2A server or REST API-exposing a unified endpoint for all your AI clients. See the project roadmap for more details.
It currently supports:
- Federation across multiple MCP and REST services
- A2A (Agent-to-Agent) integration for external AI agents (OpenAI, Anthropic, custom)
- gRPC-to-MCP translation via automatic reflection-based service discovery
- Virtualization of legacy APIs as MCP-compliant tools and servers
- Transport over HTTP, JSON-RPC, WebSocket, SSE (with configurable keepalive), stdio and streamable-HTTP
- An Admin UI for real-time management, configuration, and log monitoring (with airgapped deployment support)
- Built-in auth, retries, and rate-limiting with user-scoped OAuth tokens and unconditional X-Upstream-Authorization header support
- OpenTelemetry observability with Phoenix, Jaeger, Zipkin, and other OTLP backends
- Scalable deployments via Docker or PyPI, Redis-backed caching, and multi-cluster federation

For a list of upcoming features, check out the ContextForge Roadmap
🔌 Gateway Layer with Protocol Flexibility
- Sits in front of any MCP server or REST API
- Lets you choose your MCP protocol version (e.g.,
2025-06-18) - Exposes a single, unified interface for diverse backends
🧩 Virtualization of REST/gRPC Services
- Wraps non-MCP services as virtual MCP servers
- Registers tools, prompts, and resources with minimal configuration
- gRPC-to-MCP translation via server reflection protocol
- Automatic service discovery and method introspection
🔁 REST-to-MCP Tool Adapter
-
Adapts REST APIs into tools with:
- Automatic JSON Schema extraction
- Support for headers, tokens, and custom auth
- Retry, timeout, and rate-limit policies
🧠 Unified Registries
- Prompts: Jinja2 templates, multimodal support, rollback/versioning
- Resources: URI-based access, MIME detection, caching, SSE updates
- Tools: Native or adapted, with input validation and concurrency controls
📈 Admin UI, Observability & Dev Experience
- Admin UI built with HTMX + Alpine.js
- Real-time log viewer with filtering, search, and export capabilities
- Auth: Basic, JWT, or custom schemes
- Structured logs, health endpoints, metrics
- 400+ tests, Makefile targets, live reload, pre-commit hooks
🔍 OpenTelemetry Observability
- Vendor-agnostic tracing with OpenTelemetry (OTLP) protocol support
- Multiple backend support: Phoenix (LLM-focused), Jaeger, Zipkin, Tempo, DataDog, New Relic
- Distributed tracing across federated gateways and services
- Automatic instrumentation of tools, prompts, resources, and gateway operations
- LLM-specific metrics: Token usage, costs, model performance
- Zero-overhead when disabled with graceful degradation
See Observability Documentation for setup guides with Phoenix, Jaeger, and other backends.
ContextForge is published on PyPI as mcp-contextforge-gateway.
TLDR;: (single command using uv)
# Quick start with environment variables
BASIC_AUTH_PASSWORD=pass \
MCPGATEWAY_UI_ENABLED=true \
MCPGATEWAY_ADMIN_API_ENABLED=true \
[email protected] \
PLATFORM_ADMIN_PASSWORD=changeme \
PLATFORM_ADMIN_FULL_NAME="Platform Administrator" \
uvx --from mcp-contextforge-gateway mcpgateway --host 0.0.0.0 --port 4444

# Or better: use the provided .env.example
cp .env.example .env
# Edit .env to customize your settings
uvx --from mcp-contextforge-gateway mcpgateway --host 0.0.0.0 --port 4444
📋 Prerequisites
- Python ≥ 3.10 (3.11 recommended)
- curl + jq - only for the last smoke-test step
# 1️⃣  Isolated env + install from pypi
mkdir mcpgateway && cd mcpgateway
python3 -m venv .venv && source .venv/bin/activate
pip install --upgrade pip
pip install mcp-contextforge-gateway

# 2️⃣  Copy and customize the configuration
# Download the example environment file
curl -O https://raw.githubusercontent.com/IBM/mcp-context-forge/main/.env.example
cp .env.example .env
# Edit .env to customize your settings (especially passwords!)

# Or set environment variables directly:
export MCPGATEWAY_UI_ENABLED=true
export MCPGATEWAY_ADMIN_API_ENABLED=true
export [email protected]
export PLATFORM_ADMIN_PASSWORD=changeme
export PLATFORM_ADMIN_FULL_NAME="Platform Administrator"

BASIC_AUTH_PASSWORD=pass JWT_SECRET_KEY=my-test-key \
  mcpgateway --host 0.0.0.0 --port 4444 &   # admin/pass

# 3️⃣  Generate a bearer token & smoke-test the API
export MCPGATEWAY_BEARER_TOKEN=$(python3 -m mcpgateway.utils.create_jwt_token \
    --username [email protected] --exp 10080 --secret my-test-key)

curl -s -H "Authorization: Bearer $MCPGATEWAY_BEARER_TOKEN" \
     http://127.0.0.1:4444/version | jq
Windows (PowerShell) quick-start
# 1️⃣  Isolated env + install from PyPI
mkdir mcpgateway ; cd mcpgateway
python3 -m venv .venv ; .\.venv\Scripts\Activate.ps1
pip install --upgrade pip
pip install mcp-contextforge-gateway

# 2️⃣  Copy and customize the configuration
# Download the example environment file
Invoke-WebRequest -Uri "https://raw.githubusercontent.com/IBM/mcp-context-forge/main/.env.example" -OutFile ".env.example"
Copy-Item .env.example .env
# Edit .env to customize your settings

# Or set environment variables (session-only)
$Env:MCPGATEWAY_UI_ENABLED        = "true"
$Env:MCPGATEWAY_ADMIN_API_ENABLED = "true"
# Note: Basic auth for API is disabled by default (API_ALLOW_BASIC_AUTH=false)
$Env:JWT_SECRET_KEY               = "my-test-key"
$Env:PLATFORM_ADMIN_EMAIL         = "[email protected]"
$Env:PLATFORM_ADMIN_PASSWORD      = "changeme"
$Env:PLATFORM_ADMIN_FULL_NAME     = "Platform Administrator"

# 3️⃣  Launch the gateway
mcpgateway.exe --host 0.0.0.0 --port 4444

#   Optional: background it
# Start-Process -FilePath "mcpgateway.exe" -ArgumentList "--host 0.0.0.0 --port 4444"

# 4️⃣  Bearer token and smoke-test
$Env:MCPGATEWAY_BEARER_TOKEN = python3 -m mcpgateway.utils.create_jwt_token `
    --username admin@example.com --exp 10080 --secret my-test-key

curl -s -H "Authorization: Bearer $Env:MCPGATEWAY_BEARER_TOKEN" `
     http://127.0.0.1:4444/version | jq
⚡ Alternative: uv (faster)
# 1️⃣  Isolated env + install from PyPI using uv
mkdir mcpgateway ; cd mcpgateway
uv venv
.\.venv\Scripts\activate
uv pip install mcp-contextforge-gateway

# Continue with steps 2️⃣-4️⃣ above...
More configuration
Copy .env.example to .env and tweak any of the settings (or use them as env variables).
🚀 End-to-end demo (register a local MCP server)
# 1️⃣ Spin up the sample GO MCP time server using mcpgateway.translate & docker (replace docker with podman if needed)
python3 -m mcpgateway.translate \
--stdio "docker run --rm -i ghcr.io/ibm/fast-time-server:latest -transport=stdio" \
--expose-sse \
--port 8003
# Or using the official mcp-server-git using uvx:
pip install uv # to install uvx, if not already installed
python3 -m mcpgateway.translate --stdio "uvx mcp-server-git" --expose-sse --port 9000
# Alternative: running the local binary
# cd mcp-servers/go/fast-time-server; make build
# python3 -m mcpgateway.translate --stdio "./dist/fast-time-server -transport=stdio" --expose-sse --port 8002
# NEW: Expose via multiple protocols simultaneously!
python3 -m mcpgateway.translate \
--stdio "uvx mcp-server-git" \
--expose-sse \
--expose-streamable-http \
--port 9000
# Now accessible via both /sse (SSE) and /mcp (streamable HTTP) endpoints
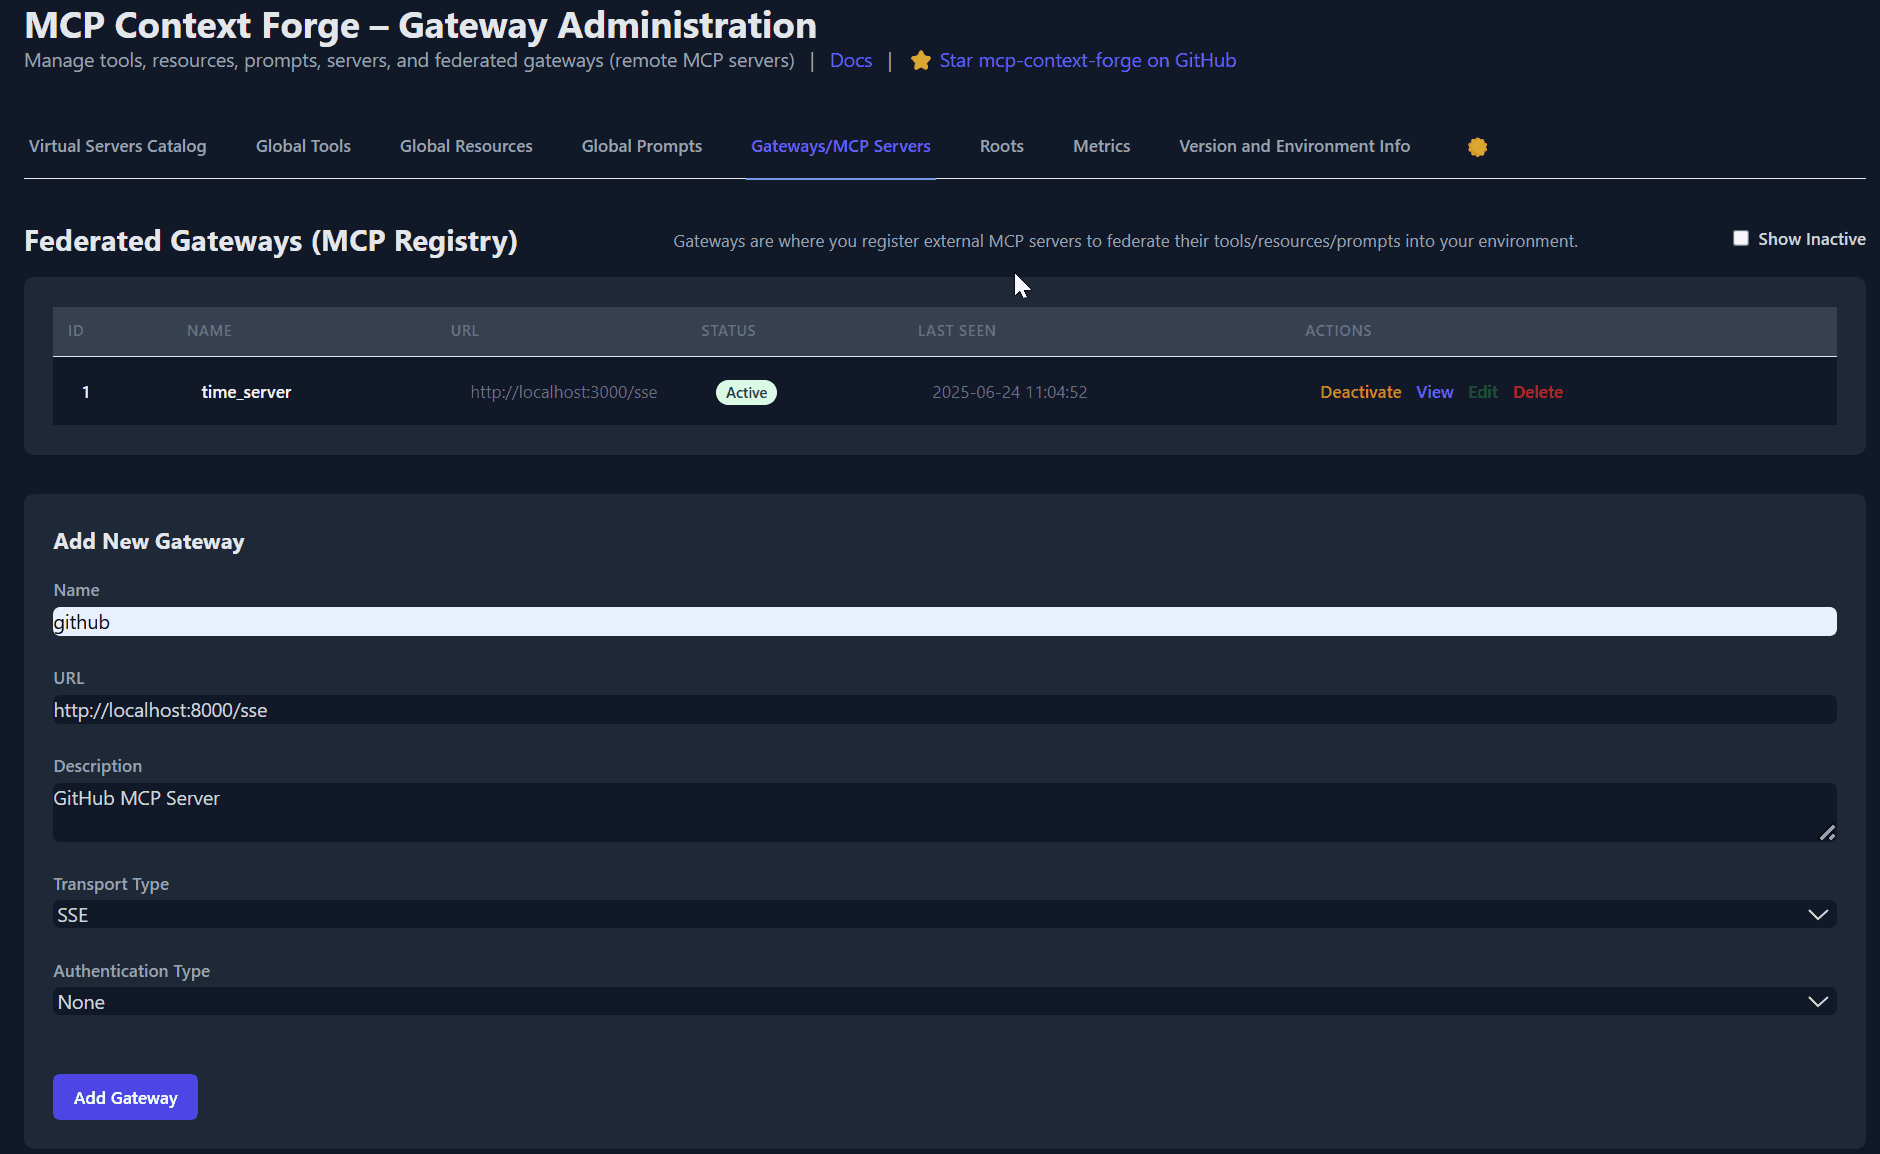
# 2️⃣ Register it with the gateway
curl -s -X POST -H "Authorization: Bearer $MCPGATEWAY_BEARER_TOKEN" \
-H "Content-Type: application/json" \
-d '{"name":"fast_time","url":"http://localhost:8003/sse"}' \
http://localhost:4444/gateways
# 3️⃣ Verify tool catalog
curl -s -H "Authorization: Bearer $MCPGATEWAY_BEARER_TOKEN" http://localhost:4444/tools | jq
# 4️⃣ Create a *virtual server* bundling those tools. Use the ID of tools from the tool catalog (Step #3) and pass them in the associatedTools list.
curl -s -X POST -H "Authorization: Bearer $MCPGATEWAY_BEARER_TOKEN" \
-H "Content-Type: application/json" \
-d '{"server":{"name":"time_server","description":"Fast time tools","associated_tools":[<ID_OF_TOOLS>]}}' \
http://localhost:4444/servers | jq
# Example curl
curl -s -X POST -H "Authorization: Bearer $MCPGATEWAY_BEARER_TOKEN"
-H "Content-Type: application/json"
-d '{"server":{"name":"time_server","description":"Fast time tools","associated_tools":["6018ca46d32a4ac6b4c054c13a1726a2"]}}' \
http://localhost:4444/servers | jq
# 5️⃣ List servers (should now include the UUID of the newly created virtual server)
curl -s -H "Authorization: Bearer $MCPGATEWAY_BEARER_TOKEN" http://localhost:4444/servers | jq
# 6️⃣ Client HTTP endpoint. Inspect it interactively with the MCP Inspector CLI (or use any MCP client)
npx -y @modelcontextprotocol/inspector
# Transport Type: Streamable HTTP, URL: http://localhost:4444/servers/UUID_OF_SERVER_1/mcp, Header Name: "Authorization", Bearer Token🖧 Using the stdio wrapper (mcpgateway-wrapper)
export MCP_AUTH="Bearer ${MCPGATEWAY_BEARER_TOKEN}"
export MCP_SERVER_URL=http://localhost:4444/servers/UUID_OF_SERVER_1/mcp
python3 -m mcpgateway.wrapper  # Ctrl-C to exit
You can also run it with uv or inside Docker/Podman - see the Containers section above.
In MCP Inspector, define MCP_AUTH and MCP_SERVER_URL env variables, and select python3 as the Command, and -m mcpgateway.wrapper as Arguments.
echo $PWD/.venv/bin/python3 # Using the Python3 full path ensures you have a working venv
export MCP_SERVER_URL='http://localhost:4444/servers/UUID_OF_SERVER_1/mcp'
export MCP_AUTH="Bearer ${MCPGATEWAY_BEARER_TOKEN}"
npx -y @modelcontextprotocol/inspector
or
Pass the url and auth as arguments (no need to set environment variables)
npx -y @modelcontextprotocol/inspector
command as `python`
Arguments as `-m mcpgateway.wrapper --url "http://localhost:4444/servers/UUID_OF_SERVER_1/mcp" --auth "Bearer <your token>"`
When using a MCP Client such as Claude with stdio:
{
  "mcpServers": {
    "mcpgateway-wrapper": {
      "command": "python",
      "args": ["-m", "mcpgateway.wrapper"],
      "env": {
        "MCP_AUTH": "Bearer your-token-here",
        "MCP_SERVER_URL": "http://localhost:4444/servers/UUID_OF_SERVER_1",
        "MCP_TOOL_CALL_TIMEOUT": "120"
      }
    }
  }
}Use the official OCI image from GHCR with Docker or Podman. Please note: Currently, arm64 is not supported on production. If you are e.g. running on MacOS with Apple Silicon chips (M1, M2, etc), you can run the containers using Rosetta or install via PyPi instead.
Get a full stack running with MariaDB and Redis in under 30 seconds:
# Clone and start the stack
git clone https://github.com/IBM/mcp-context-forge.git
cd mcp-context-forge

# Start with MariaDB (recommended for production)
docker compose up -d

# Or start with PostgreSQL
# Uncomment postgres in docker-compose.yml and comment mariadb section
# docker compose up -d

# Check status
docker compose ps

# View logs
docker compose logs -f gateway

# Access Admin UI: http://localhost:4444/admin (login with PLATFORM_ADMIN_EMAIL/PASSWORD)
# Generate API token
docker compose exec gateway python3 -m mcpgateway.utils.create_jwt_token \
  --username [email protected] --exp 10080 --secret my-test-key
What you get:
- 🗄️ MariaDB 10.6 - Production-ready database with 36+ tables
- 🚀 MCP Gateway - Full-featured gateway with Admin UI
- 📊 Redis - High-performance caching and session storage
- 🔧 Admin Tools - pgAdmin, Redis Insight for database management
- 🌐 Nginx Proxy - Caching reverse proxy (optional)
Enable HTTPS (optional):
# Start with TLS enabled (auto-generates self-signed certs)
make compose-tls

# Access via HTTPS: https://localhost:8443/admin
# Or use your own certificates:
mkdir -p certs && cp your-cert.pem certs/cert.pem && cp your-key.pem certs/key.pem
make compose-tlsDeploy to Kubernetes with enterprise-grade features:
# Add Helm repository (when available)
# helm repo add mcp-context-forge https://ibm.github.io/mcp-context-forge
# helm repo update

# For now, use local chart
git clone https://github.com/IBM/mcp-context-forge.git
cd mcp-context-forge/charts/mcp-stack

# Install with MariaDB
helm install mcp-gateway . \
  --set mcpContextForge.secret.PLATFORM_ADMIN_EMAIL=admin@yourcompany.com \
  --set mcpContextForge.secret.PLATFORM_ADMIN_PASSWORD=changeme \
  --set mcpContextForge.secret.JWT_SECRET_KEY=your-secret-key \
  --set postgres.enabled=false \
  --set mariadb.enabled=true

# Or install with PostgreSQL (default)
helm install mcp-gateway . \
  --set mcpContextForge.secret.PLATFORM_ADMIN_EMAIL=admin@yourcompany.com \
  --set mcpContextForge.secret.PLATFORM_ADMIN_PASSWORD=changeme \
  --set mcpContextForge.secret.JWT_SECRET_KEY=your-secret-key

# Check deployment status
kubectl get pods -l app.kubernetes.io/name=mcp-context-forge

# Port forward to access Admin UI
kubectl port-forward svc/mcp-gateway-mcp-context-forge 4444:80
# Access: http://localhost:4444/admin

# Generate API token
kubectl exec deployment/mcp-gateway-mcp-context-forge -- \
  python3 -m mcpgateway.utils.create_jwt_token \
  --username [email protected] --exp 10080 --secret your-secret-key
Enterprise Features:
- 🔄 Auto-scaling - HPA with CPU/memory targets
- 🗄️ Database Choice - PostgreSQL, MariaDB, or MySQL
- 📊 Observability - Prometheus metrics, OpenTelemetry tracing
- 🔒 Security - RBAC, network policies, secret management
- 🚀 High Availability - Multi-replica deployments with Redis clustering
- 📈 Monitoring - Built-in Grafana dashboards and alerting
docker run -d --name mcpgateway \
  -p 4444:4444 \
  -e MCPGATEWAY_UI_ENABLED=true \
  -e MCPGATEWAY_ADMIN_API_ENABLED=true \
  -e HOST=0.0.0.0 \
  -e JWT_SECRET_KEY=my-test-key \
  -e AUTH_REQUIRED=true \
  -e [email protected] \
  -e PLATFORM_ADMIN_PASSWORD=changeme \
  -e PLATFORM_ADMIN_FULL_NAME="Platform Administrator" \
  -e DATABASE_URL=sqlite:///./mcp.db \
  -e SECURE_COOKIES=false \
  ghcr.io/ibm/mcp-context-forge:1.0.0-BETA-2

# Tail logs and generate API key
docker logs -f mcpgateway
docker run --rm -it ghcr.io/ibm/mcp-context-forge:1.0.0-BETA-2 \
  python3 -m mcpgateway.utils.create_jwt_token --username [email protected] --exp 10080 --secret my-test-key
Browse to http://localhost:4444/admin and login with PLATFORM_ADMIN_EMAIL / PLATFORM_ADMIN_PASSWORD.
Advanced: Persistent storage, host networking, airgapped
Persist SQLite database:
mkdir -p $(pwd)/data && touch $(pwd)/data/mcp.db && chmod 777 $(pwd)/data
docker run -d --name mcpgateway --restart unless-stopped \
  -p 4444:4444 -v $(pwd)/data:/data \
  -e DATABASE_URL=sqlite:////data/mcp.db \
  -e MCPGATEWAY_UI_ENABLED=true -e MCPGATEWAY_ADMIN_API_ENABLED=true \
  -e HOST=0.0.0.0 -e JWT_SECRET_KEY=my-test-key \
  -e [email protected] -e PLATFORM_ADMIN_PASSWORD=changeme \
  ghcr.io/ibm/mcp-context-forge:1.0.0-BETA-2
Host networking (access local MCP servers):
docker run -d --name mcpgateway --network=host \
  -v $(pwd)/data:/data -e DATABASE_URL=sqlite:////data/mcp.db \
  -e MCPGATEWAY_UI_ENABLED=true -e HOST=0.0.0.0 -e PORT=4444 \
  ghcr.io/ibm/mcp-context-forge:1.0.0-BETA-2
Airgapped deployment (no internet):
docker build -f Containerfile.lite -t mcpgateway:airgapped .
docker run -d --name mcpgateway -p 4444:4444 \
  -e MCPGATEWAY_UI_AIRGAPPED=true -e MCPGATEWAY_UI_ENABLED=true \
  -e HOST=0.0.0.0 -e JWT_SECRET_KEY=my-test-key \
mcpgateway:airgappedpodman run -d --name mcpgateway \
-p 4444:4444 -e HOST=0.0.0.0 -e DATABASE_URL=sqlite:///./mcp.db \
ghcr.io/ibm/mcp-context-forge:1.0.0-BETA-2Advanced: Persistent storage, host networking
Persist SQLite:
mkdir -p $(pwd)/data && chmod 777 $(pwd)/data
podman run -d --name mcpgateway --restart=on-failure \
  -p 4444:4444 -v $(pwd)/data:/data \
  -e DATABASE_URL=sqlite:////data/mcp.db \
  ghcr.io/ibm/mcp-context-forge:1.0.0-BETA-2
Host networking:
podman run -d --name mcpgateway --network=host \
  -v $(pwd)/data:/data -e DATABASE_URL=sqlite:////data/mcp.db \
  ghcr.io/ibm/mcp-context-forge:1.0.0-BETA-2
✏️ Docker/Podman tips
-
.env files - Put all the
-e FOO=lines into a file and replace them with--env-file .env. See the provided .env.example for reference. -
Pinned tags - Use an explicit version (e.g.
1.0.0-BETA-2) instead oflatestfor reproducible builds. -
JWT tokens - Generate one in the running container:
docker exec mcpgateway python3 -m mcpgateway.utils.create_jwt_token --username [email protected] --exp 10080 --secret my-test-key
-
Upgrades - Stop, remove, and rerun with the same
-v $(pwd)/data:/datamount; your DB and config stay intact.
🚑 Smoke-test the running container
curl -s -H "Authorization: Bearer $MCPGATEWAY_BEARER_TOKEN" \
     http://localhost:4444/health | jq
curl -s -H "Authorization: Bearer $MCPGATEWAY_BEARER_TOKEN" \
     http://localhost:4444/tools | jq
curl -s -H "Authorization: Bearer $MCPGATEWAY_BEARER_TOKEN" \
     http://localhost:4444/version | jq
🖧 Running the MCP Gateway stdio wrapper
The mcpgateway.wrapper lets you connect to the gateway over stdio while keeping JWT authentication. You should run this from the MCP Client. The example below is just for testing.
# Set environment variables
export MCPGATEWAY_BEARER_TOKEN=$(python3 -m mcpgateway.utils.create_jwt_token --username [email protected] --exp 10080 --secret my-test-key)
export MCP_AUTH="Bearer ${MCPGATEWAY_BEARER_TOKEN}"
export MCP_SERVER_URL='http://localhost:4444/servers/UUID_OF_SERVER_1/mcp'
export MCP_TOOL_CALL_TIMEOUT=120
export MCP_WRAPPER_LOG_LEVEL=DEBUG  # or OFF to disable logging

docker run --rm -i \
  -e MCP_AUTH=$MCP_AUTH \
  -e MCP_SERVER_URL=http://host.docker.internal:4444/servers/UUID_OF_SERVER_1/mcp \
  -e MCP_TOOL_CALL_TIMEOUT=120 \
  -e MCP_WRAPPER_LOG_LEVEL=DEBUG \
  ghcr.io/ibm/mcp-context-forge:1.0.0-BETA-2 \
python3 -m mcpgateway.wrapperClone the repo and open in VS Code—it will detect .devcontainer and prompt to "Reopen in Container". The container includes Python 3.11, Docker CLI, and all project dependencies.
For detailed setup, workflows, and GitHub Codespaces instructions, see Developer Onboarding.
make venv install          # create .venv + install deps
make serve                 # gunicorn on :4444
Alternative: UV or pip
# UV (faster)
uv venv && source .venv/bin/activate
uv pip install -e '.[dev]'

# pip
python3 -m venv .venv && source .venv/bin/activate
pip install -e ".[dev]"
PostgreSQL adapter setup
Install the psycopg driver for PostgreSQL:
# Install system dependencies first
# Debian/Ubuntu: sudo apt-get install libpq-dev
# macOS: brew install libpq

uv pip install 'psycopg[binary]'   # dev (pre-built wheels)
# or: uv pip install 'psycopg[c]'  # production (requires compiler)
Connection URL format:
DATABASE_URL=postgresql+psycopg://user:password@localhost:5432/mcpQuick Postgres container:
docker run --name mcp-postgres \
  -e POSTGRES_USER=postgres -e POSTGRES_PASSWORD=mysecretpassword \
-e POSTGRES_DB=mcp -p 5432:5432 -d postgresFor upgrade instructions, migration guides, and rollback procedures, see:
- Upgrade Guide — General upgrade procedures
- CHANGELOG.md — Version history and breaking changes
- MIGRATION-0.7.0.md — Multi-tenancy migration (v0.6.x → v0.7.x)
⚠️ If any required.envvariable is missing or invalid, the gateway will fail fast at startup with a validation error via Pydantic.
Copy the provided .env.example to .env and update the security-sensitive values below.
These variables have insecure defaults and must be changed before production deployment:
| Variable | Description | Default | Action Required |
|---|---|---|---|
JWT_SECRET_KEY |
Secret key for signing JWT tokens (32+ chars) | my-test-key |
Generate with openssl rand -hex 32 |
AUTH_ENCRYPTION_SECRET |
Passphrase for encrypting stored credentials | my-test-salt |
Generate with openssl rand -hex 32 |
BASIC_AUTH_USER |
Username for HTTP Basic auth | admin |
Change for production |
BASIC_AUTH_PASSWORD |
Password for HTTP Basic auth | changeme |
Set a strong password |
PLATFORM_ADMIN_EMAIL |
Email for bootstrap admin user | [email protected] |
Use real admin email |
PLATFORM_ADMIN_PASSWORD |
Password for bootstrap admin user | changeme |
Set a strong password |
PLATFORM_ADMIN_FULL_NAME |
Display name for bootstrap admin | Admin User |
Set admin name |
These settings are enabled by default for security—only disable for backward compatibility:
| Variable | Description | Default |
|---|---|---|
REQUIRE_JTI |
Require JTI claim in tokens for revocation support | true |
REQUIRE_TOKEN_EXPIRATION |
Require exp claim in tokens | true |
PUBLIC_REGISTRATION_ENABLED |
Allow public user self-registration | false |
These values differ from code defaults to provide a working local/dev setup:
| Variable | Description | Default |
|---|---|---|
HOST |
Bind address | 0.0.0.0 |
MCPGATEWAY_UI_ENABLED |
Enable Admin UI dashboard | true |
MCPGATEWAY_ADMIN_API_ENABLED |
Enable Admin API endpoints | true |
DATABASE_URL |
SQLAlchemy connection URL | sqlite:///./mcp.db |
SECURE_COOKIES |
Set false for HTTP (non-HTTPS) dev |
true |
For the complete list of 300+ environment variables organized by category (authentication, caching, SSO, observability, etc.), see the Configuration Reference.
| Command | Server | Port | Database | Use Case |
|---|---|---|---|---|
make dev |
Uvicorn | 8000 | SQLite | Development (single instance, auto-reload) |
make serve |
Gunicorn | 4444 | SQLite | Production single-node (multi-worker) |
make serve-ssl |
Gunicorn | 4444 | SQLite | Production single-node with HTTPS |
make compose-up |
Docker Compose + Nginx | 8080 | PostgreSQL + Redis | Full stack (3 replicas, load-balanced) |
make testing-up |
Docker Compose + Nginx | 8080 | PostgreSQL + Redis | Testing environment |
make dev                 # Uvicorn on :8000 with auto-reload and SQLite
# or
./run.sh --reload --log debug --workers 2
run.shis a wrapper arounduvicornthat loads.env, supports reload, and passes arguments to the server.
Key flags:
| Flag | Purpose | Example |
|---|---|---|
-e, --env FILE |
load env-file | --env prod.env |
-H, --host |
bind address | --host 127.0.0.1 |
-p, --port |
listen port | --port 8080 |
-w, --workers |
gunicorn workers | --workers 4 |
-r, --reload |
auto-reload | --reload |
make serve               # Gunicorn on :4444 with multiple workers
make serve-ssl # Gunicorn behind HTTPS on :4444 (uses ./certs)make compose-up # Start full stack: PostgreSQL, Redis, 3 gateway replicas, Nginx on :8080
make compose-logs # Tail logs from all services
make compose-down # Stop the stackuvicorn mcpgateway.main:app --host 0.0.0.0 --port 4444 --workers 4MCP Gateway can be deployed to any major cloud platform:
| Platform | Guide |
|---|---|
| AWS | ECS/EKS Deployment |
| Azure | AKS Deployment |
| Google Cloud | Cloud Run |
| IBM Cloud | Code Engine |
| Kubernetes | Helm Charts |
| OpenShift | OpenShift Deployment |
For comprehensive deployment guides, see Deployment Documentation.
Interactive API documentation is available when the server is running:
- Swagger UI — Try API calls directly in your browser
- ReDoc — Browse the complete endpoint reference
Quick Authentication:
# Generate a JWT token
export TOKEN=$(python3 -m mcpgateway.utils.create_jwt_token \
  --username [email protected] --exp 10080 --secret my-test-key)

# Test API access
curl -H "Authorization: Bearer $TOKEN" http://localhost:4444/health
For comprehensive curl examples covering all endpoints, see the API Usage Guide.
make test            # Run unit tests
make lint            # Run all linters
make doctest         # Run doctests
make coverage        # Generate coverage report
See Doctest Coverage Guide for documentation testing details.
mcpgateway/          # Core FastAPI application
├── main.py          # Entry point
├── config.py        # Pydantic Settings configuration
├── db.py            # SQLAlchemy ORM models
├── schemas.py       # Pydantic validation schemas
├── services/        # Business logic layer (50+ services)
├── routers/         # HTTP endpoint definitions
├── middleware/      # Cross-cutting concerns
└── transports/      # SSE, WebSocket, stdio, streamable HTTP

tests/               # Test suite (400+ tests)
docs/docs/           # Full documentation (MkDocs)
charts/              # Kubernetes/Helm charts
plugins/             # Plugin framework and implementations
For complete structure, see CONTRIBUTING.md or run tree -L 2.
make dev             # Dev server with auto-reload (:8000)
make test            # Run test suite
make lint            # Run all linters
make coverage        # Generate coverage report
Run make to see all 75+ available targets.
For development workflows, see:
Common issues and solutions:
| Issue | Quick Fix |
|---|---|
| SQLite "disk I/O error" on macOS | Avoid iCloud-synced directories; use ~/mcp-context-forge/data |
| Port 4444 not accessible on WSL2 | Configure WSL integration in Docker Desktop |
| Gateway exits immediately | Copy .env.example to .env and configure required vars |
ModuleNotFoundError |
Run make install-dev |
For detailed troubleshooting guides, see Troubleshooting Documentation.
- Fork the repo, create a feature branch.
- Run
make lintand fix any issues. - Keep
make testgreen. - Open a PR with signed commits (
git commit -s).
See CONTRIBUTING.md for full guidelines and Issue Guide #2502 for how to file bugs, request features, and find issues to work on.
A complete changelog can be found here: CHANGELOG.md
Licensed under the Apache License 2.0 - see LICENSE
- Mihai Criveti - Distinguished Engineer, Agentic AI
Special thanks to our contributors for helping us improve ContextForge:


