Search models, users, collections, and posts
For You
Trending
Household
Toys & Games
Tools
Hobby & DIY
3D Printer
Art
Miniatures
Props & Cosplays
Fashion
Generative 3D Model
Education
Laser & Cut


Custom Wall Panels in Seconds


Contests
All Contests
Cup Holder Design Contest
Ends in 38 days
169 models
$300 Bambu Lab Gift Card
GIF
3D
Hosted By Creator: @Stag3D – Spring Play Challenge Design Contest
Ends in 3 days
745 models
Transfer of the host's MakerWorld points equivalent to $200
GIF
GIF
GIF
3D

GIF
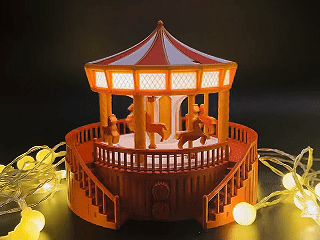
Behind the Scenes: Motorized Double Ring Carousel(model link: https://makerworld.com/en/models/2798526-the-double-ring-carousel-motorized#profileId-3112952)The Engineering Behind the Double Ring Motorized Carousel When MakerWorld announced the Rechargeable Power Kit Challenge, I knew exactly what I wanted to build: a classic, motorized carousel.
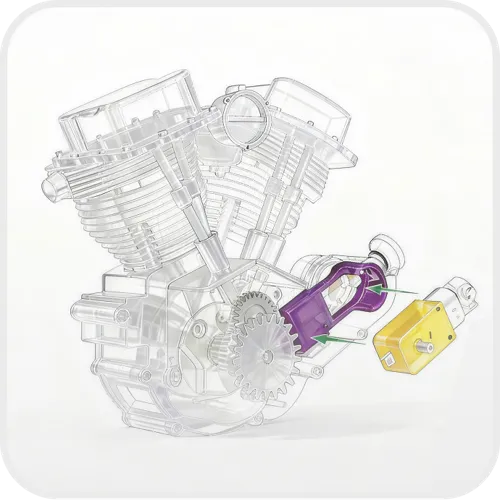
The inspiration sparked from a cardboard prototype I built recently, which used three gears to drive two rings in opposite directions while creating a galloping motion for the horses. With that mechanical concept already in my head, I dove straight into CAD the moment my power kit arrived. Nailing the Base & Gear Mechanics To ensure perfect fitment, I imported the official 3D models of the electronics directly into my workspace. This allowed me to map out the tolerances precisely, and the massive base piece actually succeeded on its very first test print!The internal mechanisms, however, required some serious iteration: Tolerance Tweaks: My initial 0.15mm gear gap caused catching when the Z-seams aligned. Opening that gap to 0.2mm resulted in a smoother rotation. Gear Redesign: During early testing, I noticed the gears were binding. My solution was adding a secondary layer to the central gears to prevent direct friction between specific components, which instantly freed up the movement.The Big Problem: Weight vs. The N20 Motor As I moved up to the canopy, I hit a massive engineering roadblock. The upper assembly was simply too heavy (around 264 grams) for the N20 Worm Gear Motor. Since the challenge requires using the provided kit, brute-forcing it with a bigger motor simply wasn't an option.I knew a thrust bearing would absorb the downward load, letting the motor focus entirely on rotational torque. When I couldn't find a Maker's Supply bearing large enough to fit my existing geometry, I decided to engineer my own. By printing a custom track and dropping in ten 6mm Stainless Steel Balls (FA001), I created a “frictionless” base that carried the canopy's weight effortlessly. The Hard Choice: Form vs. Function With the main body spinning beautifully, I faced one final hurdle. The moment I placed the horses onto their wavy tracks, the motor stalled out. It just couldn't overcome the combined friction and the vertical lift required to push the horses up the slope.
I tried everything: lubricating the tracks, widening tolerances, and printing at the absolute lowest layer heights. When nothing worked, I had to make a tough decision. Rather than delivering a stuttering, unreliable model, I scrapped the vertical motion and locked the horses in place. 1: Only wavy track2: Wavy track and bearing3 (Final Version): Only bearing
Engineering is all about problem-solving and compromise. While I had to let go of one feature, it guaranteed a flawless, continuous spin for the final piece. After countless hours of troubleshooting, seeing this carousel light up and spin smoothly on my desk is incredibly rewarding!

17