. // See http://yabtb.blogspot.com/2012/01/trim-blogger-popular-post-snippets.html jQuery('.popular-posts ul li .item-snippet').each(function(){ var txt=jQuery(this).text().substr(0,40); var j=txt.lastIndexOf(' '); if(j>42) jQuery(this).text(txt.substr(0,j).replace(/[?,!\.-:;]*$/,'...')); }); //]]>

Live Moss Centerpiece DIY

13 comments:
Image
A better title for this should be something like:
The Secret Life of Moss

Moss is one of those strange and wonderful plants that we often see on a hike 
in a dark woodlands area

It also may be growing on the side of an old shed or an old tree stump.
It is not a fungus and is actually beneficial to most gardens 
so if you have some enjoy it!

It is a plant in the simplest of forms lacking roots and leaves
It reproduces by sending out spores from little stem like blades that grow on top of the clumps.
Image
In my never ending search for interesting plants
 moss is currently at the top of the list!

It is usually associated with terrariums but personally I love it unadorned and out in the open 
where you can brush your hand along the top.

So for this project I started with a simple large wood vessel 
and 3 one gallon bags of live moss


Image

Image
I had this shipped from a grower but most floral supply stores carry this and occasionally you can find it at the nursery.
As you can see it was harvested right from the forest floor.
Moss is sort of like living compost 

Image
Many of the tutorials that I looked at recommended gravel as the base for your moss garden but I tried to mimic the actual material the moss would have been found on: 
a combination of pine needles, small sticks and leaves and a mix of decomposing soil .

Image

Image
To support the soil and keep things tidy 
I started by gathering some large plastic trash bags and forming them into a nice mound.

Image
Staple your plastic or use heavy duty duck tape

Image

Image
I soaked my rich soil well, played a layer over the top of the plastic and then carefully unfolded and stretched the moss 
along the top and down into the edges of the bowl

Image

Image
This is my first attempt and it looks rather one dimensional
but even simple projects are a learning curve!
Image
 The arrangement above is wonderful and my next bowl will contain more varieties and shapes
Image
Here is Martha with her moss gardens in beautiful antique Faux Bois bowls she uses throughout her home at Skylands
Image
I added a few little ceramic mushrooms...just for fun
Image

Image

Image
The only real requirement to keep your moss alive is an occasional spritz of water 
and somewhat low light
So even for those that are convinced they have 
a brown thumb 
 you can do this!
Image

Hope you give this a try...
it's a really an easy and  relaxing one hour project...
and the perfect way to start your early fall decorating!

xo


Project Design: More Chair Craziness

15 comments:
Image
Were Baaaaack!!!!
More Project Design 
featuring chairs

In case you missed it read 
part one here


Image

First off....this upholstery thing that some people do for a living is much harder 
than it looks
And it requires an odd assortment of tools, like webbing stretchers and tack pullers which 
on face value seem silly but are invaluable when you get into the nitty-gritty
of chair re-working.
I have the blisters to prove it!
Image
This project took much longer than I thought it would and much of the extra time was spent getting the chair into a condition where someone could actually sit in it.
Something to consider if your buying a chair that will be deconstructed.
I think the only thing holding this chair together was the upholstery fabric.
Image
 I spent hours, pulling out staples and tacks. 

What a job.

Image
 Here you get a bit of an idea as to how much junk was nailed onto the chair frame
Image
 There were also areas that were compromised because of the age of this chair which I suspect is 
mid 1850's based on the square nails, the hand turned legs and the hardware.
Image
 Every thing needed extra bracing and re-gluing, which is pretty easy to do 
but is really time consuming
Image

Image
 Interestingly the springs were in really good shape.
I sanded all of the exposed wood and scrubbed the entire chair with 
mild soap and water.  
A favorite detail on this chair is the old steel bracing which goes around the entire base of the chair.
The little feet are pretty cute too.
Image
 Finally the wood was reconditioned using Watco Danish oil which is a combination 
of penetrating oil and varnish. 
 It really doesn't look like vanish and dries with just a slight sheen.
The areas that had old existing varnish brightened up 
and the newly sanded wood took on a sightly darker rustic finish.  
Image
 The only actually upholstery left when I was done prepping 
was the webbing along the interior back and this 
interesting padding along the front filled with horse hair. 

Image
Initially I wanted to use burlap and unbleached muslin for this project.
I also purchased some simple pale mattress ticking fabric
Here are some chairs for inspiration:
Image

Image

Image


Image

Image
I think it was important to  keep the chair back open so you could actually see the "bones" and structure of the old wood and webbing 

Image
 The seat was redone with a new burlap covering over the springs
Image
 I wanted a tall cushy seat so I started with good quality natural cotton filler, topped with smooth 
Dacron.  All of the materials I special ordered not really knowing exactly how much I needed or if I was getting the right stuff.  
But it all worked out pretty well actually
Image
After messing around with all of the fabric options,
 I finally chose..... 

Image
This bright blue Indian Kantha quilt for the covering.
 Here are a few of the details:
Image
 The front edge was quilted using upholstery thread
Image
 I left the top cushion more "pillow" like and added extra batting to the edges.
Little details like quilting stitches and threads are exposed.

Image

Image

Image

 So here is what happened after the seat was done....I couldn't get the back fabric the way I wanted it.
I tried burlap and muslin and nothing looked right.

So for now I just left it.
The back will require some sewing to get it right and I will share the finished chair in a few weeks when I have it completed
Image

Image
Some final thoughts:

 I know enough about upholstery work to maybe take on something similar...then again: )

I also  have a great appreciation all those projects I had my upholstery team work on and seriously doubt I could ever have gotten them to remove all of those staples and tacks!


Don't forget to check out the other awesome chair projects


And have a great weekend 
Can you believe summer is almost over?


SaveSave

Project Design: Exceptionally Clever Chairs

6 comments:
Image


Image
Are you a chair lover?

Image


How about vintage fabric and old flea market finds?
Chairs with classic style and soul?

Image
Over the years I've slipped covered
upholstered, painted, designed and re-used just about
anything and everything I could think of in order to make a chair
more than just a place to sit.

Image
When I was asked to participate in a little design challenge called:
 The Exceptionally Clever Chair Project, 

I jumped right in!

Image
My last chair project was quite a few months ago,
  and as fate often works, this is just the right time to get really creative
 and come up with something, interesting and unique to do with an old chair.

But wait....what can I use for inspiration?

How about a quick peek at a whole lot of crazy and a whole bunch of chairs.  
And yes, they are all a bit of fun and there is a ton of them!

Image
Seriously, I think if it were not for chairs 
I would have never had a thing to blog about!

~ Classic wing chairs using vintage duvet covers and grain sack seats~

By the way...I no longer own a single one of these chairs....and that's a lot of chairs.


Image
   ~ Pretty pair of antique Bergere chairs with monogrammed grain sack seats~

This was my first grain sack project finished back in 2007
and one of my first posts about old chairs and vintage fabric

Image
~Simple white slip covers over inexpensive catalog chairs~
So easy but I liked these so much 
and recommend this idea for everyone.
Image
 My chair projects seemed to cover the gamut
~large comfy upholstered seats~
Image
 ~ wicker and wood~
Here is a pretty tea stained Bennison,
accessorized with a rag rug pillow
Image
 Sometimes the inside chairs found a home out side 
and visa versa
Image
Image
~white rockers and sweet tea~
Image
And the chairs best friend, the pillow, is always near by.
Who isn't a pillow lover?
(I am probably a pillow hoarder ; )
Image
 Of course there was rust...no worries for me.
And clearly comfort was not a top priority (at least in this case)
Image
 Chairs often came home with me from the flea market
like free kittens
Image
And of course there were the dreaded grain sacks,
 that invaded every corner of my creative being only to be used once again...
after I'd sworn off ever buying another one   :))


Image
New became old 
and old became new
These were new chairs from Noir furniture 
which I re-worked with white linen and Yes ~UGH ~grain sacks 
but
~ I love this chair~

Image

~Navajo rug scraps with an old leather club chair~
 this chair is wonderful!

Image
~chairs that swing~

 Most of my chairs were usually allowed to sit quite contentedly for at least a week or two 
before abruptly being moved from their current location...swapped out, to a new room, hung on ropes and chains, pushed into a corner, sent to the upholsterer, stripped down, questioned about their background and loved unconditionally.
  
Or banished to the apple orchard like they were in time out!
Image
I used these wicker chairs both inside and out until the seats caved in.
And I love them still
Image
 Lots of
~kitchen chairs~
Image
the occasional 
~bathroom chair~
Image
 Chairs as props for flowers, fruit and garden birds
Image
I definitely have a thing for garden chairs
Image

Image
 ~Chairs for tea~
Image
 ~and lunching~ 
Image
Chairs from Maine to California and all places in between 
found their way into my homes
Image
Image
 Sometimes the chairs were frilly
and a bit more feminine
Image
Yet I might actually really prefer the simple spare 
humble chairs the most

Image
Image
This chair found its way into a Sewing Magazine....on creative things to do with vintage quilts.
I love this chair and I remember taking this photo. 

 I was sitting there, reading a book and thinking what a great chair this is.  
Click

Image
 ~Chairs for the beach~
Image
~ really old chairs from foreign countries~
Image
 Sometimes the chairs were painted
and sometimes I stripped them back to the original
mottled, weird and wonderful old paint from years past

Image
I experimented with milk paint, stippling, oil, wax, stripper, sponges, sanders, 
wire brushes and power washers hoping to find what I liked in the end

And usually, after oh about 10 re-dos, 
 the chairs felt right with their new cushions and colors

Image
But for all the fussing and moving and restoring 
every chair seemed to tell a story that made them seem special... more that just a seat.
And often that story was there when I brought the chair home.

Maybe a story about a quaint cafe in the city

Image
 Or a little house in the country
with gardens and sunshine,
a big dog and lots of roses
Image
~Fabric from friends ~
for cushions and lampshades

Image
And often my chairs came full circle 
to the place where they may have started out their chair life...
in front of a big window 
warmed by morning sun
Image

Here I sit, uncomfortably
ready to make a chair into something interesting
 ...what kind of chair should I choose?
Image
Is it possible to love a chair at first sight?  I think so!
Something with old wood 
and a pretty frame
maybe a little burlap and batting

Image
It the simple quality of these chairs that really appeals to me right now.

And I will do this chair project by myself and not include an upholsterer.

Is she crazy!  Of course I am!


And often, more often than not,  we need to give new projects a shot right?
just because 

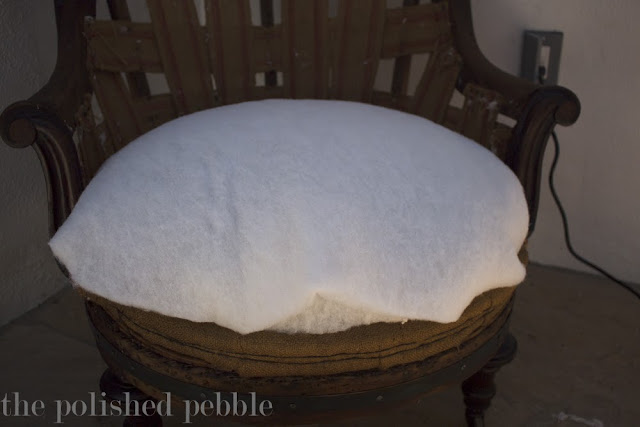
OK...so close your eyes
Image
 TA DA!
Ok not much to look at but here is what I like about this chair
Image
 Very graceful arms

Image
 A pretty straight back

Image
And wonderful old turned feet with little casters

(are we smitten?)

So I will attempt so make this into something that maybe...just maybe 
someone might want to sit in

Pop by again on Friday for a reveal (or an oh no/OMG moment)....
wish me luck ok?

And please take a peek at the other creative bloggers 
working their magic on the humble chair


Thanks for stopping by!!!


ps  don't forget to check out my daily pics on Instagram ;)


Image