Track the weather during your visitors' sessions and see how temperature, rain or wind influence traffic, behaviour and conversions.
Features
- 11 weather dimensions: Condition, Cloud, Temperature, Felt temperature, Humidity, Pressure, Precipitation, UV, Visibility, Wind direction and Wind speed, each with its own report, segment and API method, in the Visitors > Weather section.
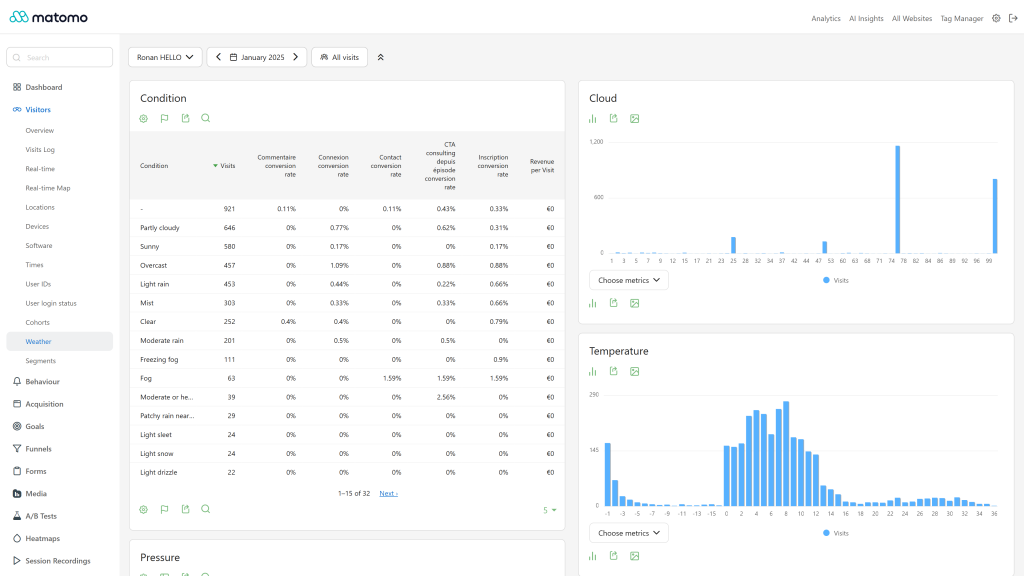
- Goals and ecommerce on every dimension: conversion rate, conversions and revenue broken down by weather. Weather is also stored with each conversion.
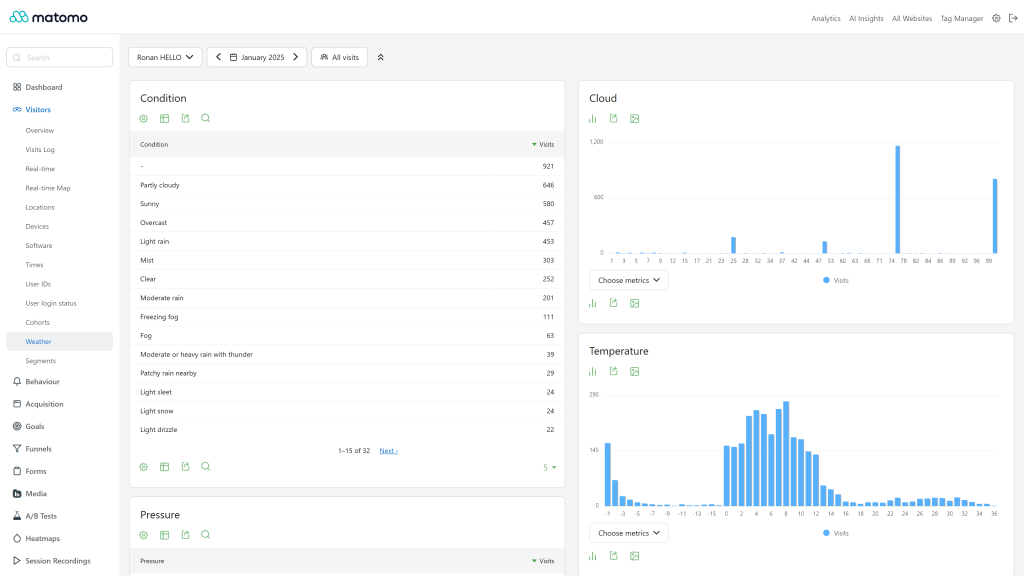
- Readable reports: bar charts with numeric ordering for scale reports, top 15 rows plus "Others" for Condition and Wind direction.
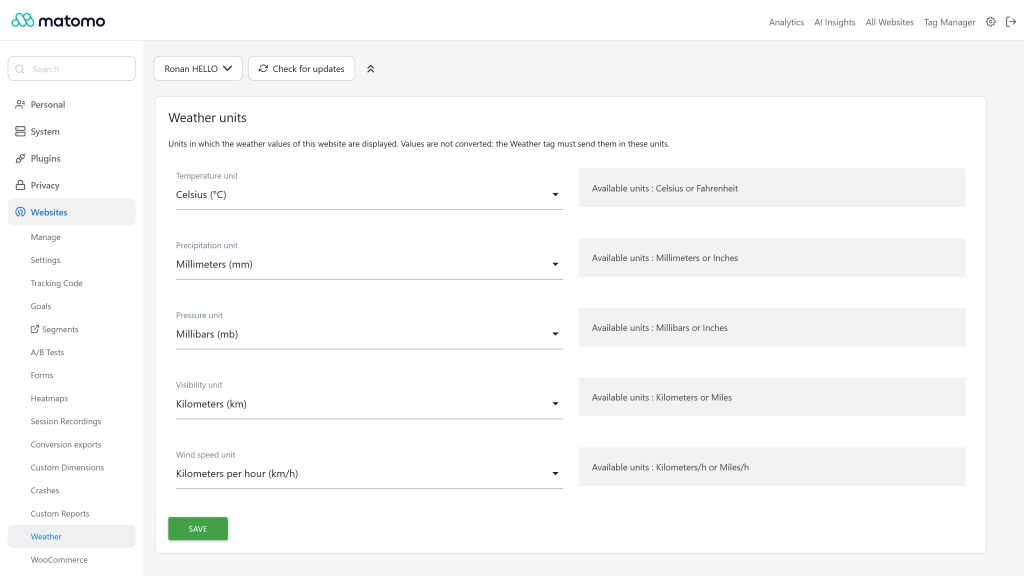
- Units per website: choose °C/°F, mm/in, mb/inHg, km/mi and km/h/mph on the Administration > Websites > Weather page. Values are not converted: the Weather tag must send them in these units.
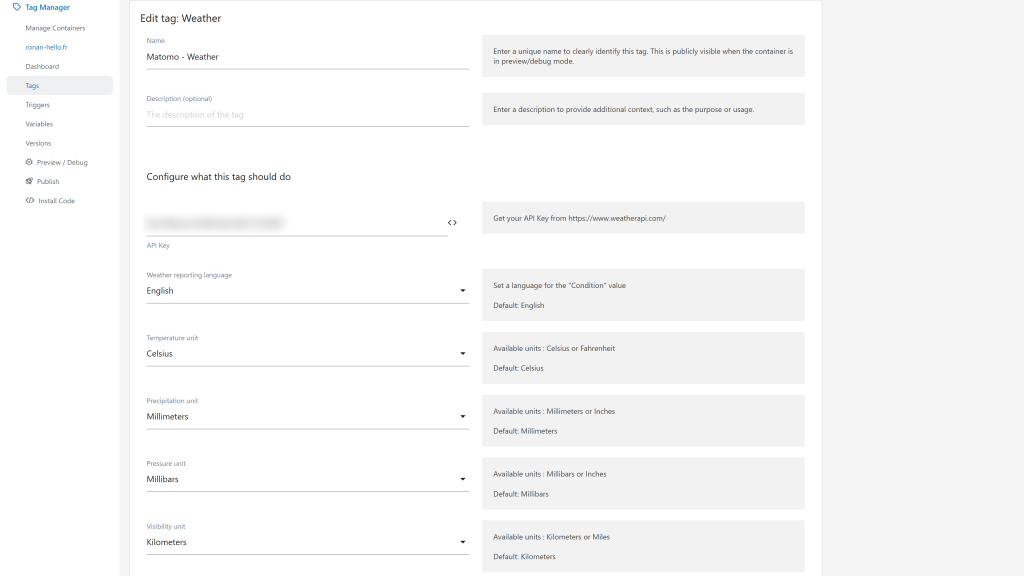
- Matomo Tag Manager template: a ready-to-use Weather tag (Openmost category) that calls WeatherAPI with your key, in the language and units of your choice, once per browser session.
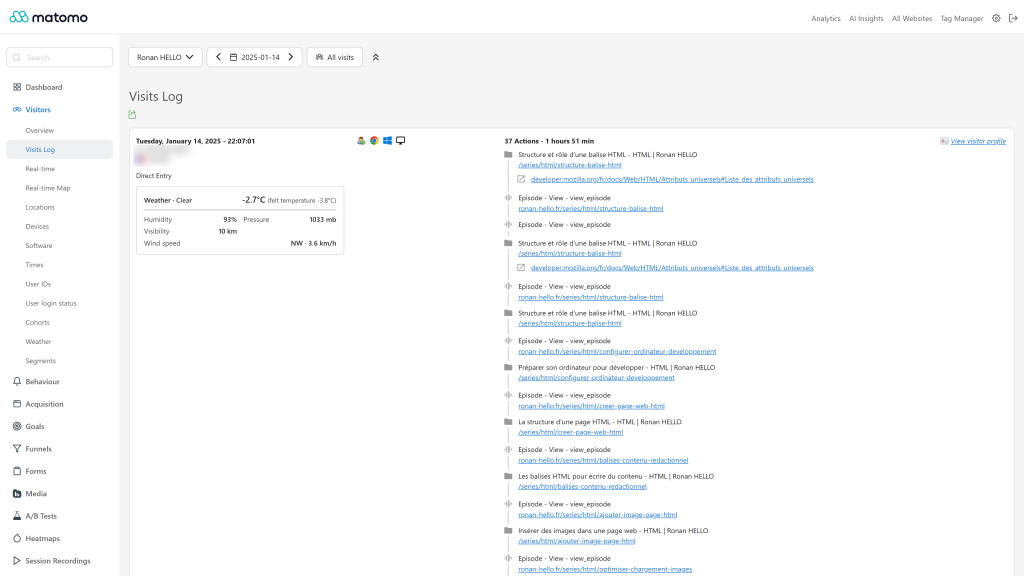
- Visitor log card: the weather of each visit with its units, following Matomo's light and dark themes.
- Validated tracking: out-of-range or malformed values are dropped when tracking.
- Classic tracking code supported: push the values yourself with
_paq.push(['WeatherReports.setWeather', ...]) if you do not use Tag Manager.
- Available in 13 languages.
Requirements
- Matomo 5.0.0 or later, below 6.0.0
- A WeatherAPI API key (the free plan includes 1 million calls per month)
- Matomo Tag Manager (optional, recommended)
Installation / Configuration
- Install the plugin from the Matomo Marketplace, or upload it to
plugins/WeatherReports, then activate it. Matomo adds the weather_* columns to the visit and conversion tables.
- Set the units of each website in Administration > Websites > Weather (website admin access).
- In Matomo Tag Manager, add the Weather tag, enter your WeatherAPI key, choose the language and the same units as the website, and publish the container. Without Tag Manager, use the classic code snippet from the documentation.
After a plugin update, republish your Tag Manager container to serve the latest Weather tag.
Before you deactivate or uninstall the plugin, delete the Weather tags of your containers, or keep the TagManagerExtended plugin active. Matomo Tag Manager cannot display a tag whose template comes from a disabled plugin, the tags list of the container then stays on "Loading data".
Privacy and data
- The Weather tag calls WeatherAPI from the visitor's browser, so WeatherAPI receives the visitor IP to find the local weather.
- No other third-party service is contacted. Mention WeatherAPI in your privacy policy.
- The WeatherAPI key is part of the Tag Manager tag, so it is visible in your website code.
Need help with Matomo?
Openmost is an official Matomo Implementation Partner. We connect Matomo to external data sources and the rest of your stack with Matomo integrations built on official APIs, with documented and privacy-checked data flows.
-
Conversion rate by weather condition
-
Weather card in the visits log
-
Weather reports temperature cloud and condition
-
Weather tag in Tag Manager
-
Weather units per website
1- Install the plugin from the marketplace or via GitHub
Install this plugin from the Marketplace as super user or download the plugin and install it on your server from FTP in
the /plugins folder.
Upon activation, this plugin will automatically update the structure of your database's log_visit and
log_conversion tables by adding 11 new columns prefixed weather_ for the new dimensions.
Then set the units of each website in Administration → Websites → Weather (admin access to the website needed). Use
the same units in the Weather tag or in your snippet: values are stored as sent, they are not converted.
2 - Fetch data on your website
This plugin retrieves weather data from WeatherAPI and sends it to your Matomo
instance as Weather reports. Because data only needs to be retrieved once per visit, the snippet uses a sessionStorage
flag to avoid duplicate requests. The flag is purged when the browser is closed.
You'll need to generate your own API key (Free plan is up to 1 Million calls per month).
Replace XXXXXXXXXXXXXXXXXXXXXXXXXXXXXXX with your API key and adjust the language if necessary.
WeatherAPI's q=auto:ip lets the API auto-detect the visitor's IP from the request, so no third-party IP-lookup
service is required.
2 - 1 With Matomo Tag Manager (Recommended)
Use the Weather custom Tag in Matomo Tag Manager (in the Openmost section). Set your API key, choose units
and language, and publish a new container version.
Upgrading from a previous version of the plugin? The published container is a static JS file
built at publish time, so any improvements to the bundled tag template (the Weather tag) only
take effect once you republish your container. If you skip this step the older tag JS keeps
serving, for example, the ipapi.co lookup that was removed in v5.2.0 will keep firing until
you republish.
2 - 2 OR with Matomo classic code (only if you don't use Matomo Tag Manager)
Implement the _paq.push(['WeatherReports.setWeather']) method on your website using the following snippet.
Upgrading from a previous version? This snippet has been simplified, ipapi.co is no longer
needed (WeatherAPI auto-detects the IP via q=auto:ip). Replace the old snippet on your site
with the one below to drop the third-party lookup.
<!-- Openmost WeatherReports code for Matomo -->
<script>
    (async function () {
        const apiKey = "XXXXXXXXXXXXXXXXXXXXXXXXXXXXXXX";
        const lang = "en"; // see https://www.weatherapi.com/docs/

        if (!apiKey || sessionStorage.getItem("matomoWeather")) return;

        try {
            const response = await fetch(
                `https://api.weatherapi.com/v1/current.json?key=${encodeURIComponent(apiKey)}&q=auto:ip&aqi=no&lang=${encodeURIComponent(lang)}`
            );
            if (!response.ok) return;
            const data = await response.json();
            const weather = data && data.current;
            if (!weather) return;

            _paq.push(["WeatherReports.setWeather",
                weather.cloud,                       // Cloud
                weather.condition && weather.condition.text, // Condition
                weather.feelslike_c,                 // Felt temperature in °C (use feelslike_f for °F)
                weather.humidity,                    // Humidity
                weather.precip_mm,                   // Precipitation in mm (use precip_in for inches)
                weather.pressure_mb,                 // Pressure in mb (use pressure_in for inches)
                weather.temp_c,                      // Temperature in °C (use temp_f for °F)
                weather.uv,                          // UV
                weather.vis_km,                      // Visibility in km (use vis_miles for miles)
                weather.wind_dir,                    // Wind direction (compass)
                weather.wind_kph                     // Wind speed in km/h (use wind_mph for mph)
            ]);

            try { sessionStorage.setItem("matomoWeather", JSON.stringify(weather)); } catch (_) {}
        } catch (_) { /* swallow network errors */ }
    })();
</script>
<!-- End Openmost WeatherReports code for Matomo -->
Optional: resolve the visitor IP via Matomo
If you sit behind a CDN/proxy and q=auto:ip can't see the real client IP, the plugin exposes a small public
endpoint that returns the IP as Matomo resolves it (honouring proxy_client_headers from your config.ini.php):
GET {matomoUrl}/index.php?module=WeatherReports&action=getUserIp
→ {"ip": "203.0.113.5"}
You can then call WeatherAPI with q=<that_ip> instead of auto:ip.
3 - Enjoy new reports and features
You will find the different reports in the Weather section of the Matomo Visitors menu.
These reports support Matomo's automatic archiving CRON for better performance (recommended).
Dimensions, segments and API methods:
| Dimension name   | Type   | Segment name           | API method                        | Tracking HTTP API parameter |
|------------------|--------|------------------------|-----------------------------------|-----------------------------|
| Condition        | string | weatherCondition       | WeatherReports.getCondition       | weather_condition           |
| Cloud            | int    | weatherCloud           | WeatherReports.getCloud           | weather_cloud               |
| Temperature      | float  | weatherTemperature     | WeatherReports.getTemperature     | weather_temperature         |
| Felt temperature | float  | weatherFeltTemperature | WeatherReports.getFeltTemperature | weather_felt_temperature    |
| Pressure         | float  | weatherPressure        | WeatherReports.getPressure        | weather_pressure            |
| Precipitation    | float  | weatherPrecipitation   | WeatherReports.getPrecipitation   | weather_precipitation       |
| Humidity         | int    | weatherHumidity        | WeatherReports.getHumidity        | weather_humidity            |
| Uv               | float  | weatherUv              | WeatherReports.getUv              | weather_uv                  |
| Visibility       | float  | weatherVisibility      | WeatherReports.getVisibility      | weather_visibility          |
| Wind direction   | string | weatherWindDirection   | WeatherReports.getWindDirection   | weather_wind_direction      |
| Wind speed       | float  | weatherWindSpeed       | WeatherReports.getWindSpeed       | weather_wind_speed          |
Privacy note
This plugin asks WeatherAPI for the current weather at the visitor's IP. The IP is therefore shared with WeatherAPI
(or whichever weather provider you configure). Make sure your privacy policy mentions this. The plugin no longer
calls any third-party IP-geolocation service.
Example WeatherAPI response
{
  "last_updated": "2026-05-06 20:00",
  "temp_c": 13.2, "temp_f": 55.8,
  "is_day": 1,
  "condition": { "text": "Overcast", "code": 1009 },
  "wind_mph": 6, "wind_kph": 9.7, "wind_degree": 346, "wind_dir": "NNW",
  "pressure_mb": 1011, "pressure_in": 29.85,
  "precip_mm": 0.08, "precip_in": 0,
  "humidity": 67, "cloud": 100,
  "feelslike_c": 12.5, "feelslike_f": 54.5,
  "vis_km": 10, "vis_miles": 6,
  "uv": 0
}
How do I install this plugin?
This plugin is available in the official Matomo Marketplace. Install it the same way as any other
plugin:
- Go to the administration panel.
- Open Marketplace → Plugins.
- Search for WeatherReports, then install and activate.
- Follow the setup documentation to wire up the data-collection snippet.
Can I use a weather API other than WeatherAPI?
Yes, the plugin only cares about the values pushed via _paq.push(['WeatherReports.setWeather', …]).
Any source that fits that contract works. We recommend WeatherAPI
because it has a free 1M-call tier and we test against its payload, but you're free to swap it.
Do the reports support goals and conversions?
Yes, every weather report supports goal metrics and ecommerce conversions. When you select a
goal in the report's metric switcher, you get conversion rate, conversions and revenue broken down
by the weather dimension. Weather is also persisted on log_conversion, so historical conversions
remain pinned to the weather they were tracked under.
Do I need to republish my Matomo Tag Manager container after a plugin update?
Yes, if the bundled Weather tag template changes. Matomo Tag Manager bakes the tag template
into the published container JS file at publish time, so the older JS keeps serving until you
publish a new version. v5.2.0, for example, removed the ipapi.co IP lookup, that change only
takes effect after a republish.
Is the plugin active for all Matomo users on my instance?
Yes, once you activate it, every user with access to the visitor reports can see Weather reports
and segments.
Where are the per-site unit settings?
In Administration → Websites → Weather (website admin access), choose the website with the site
selector. Set Temperature (°C/°F), Precipitation (mm/in), Pressure (mb/inHg), Visibility (km/mi) and
Wind speed (km/h/mph) per site. The visitor log uses these units;
report values are stored in whatever unit you tracked them with.
How do I run the test suite?
./vendor/bin/phpunit -c plugins/WeatherReports/phpunit.xml --testsuite "WeatherReports Unit"
How can I contribute to this plugin?
Open an issue or pull request on
github.com/openmost/WeatherReports. Any contribution is welcome, bug reports, translations, doc improvements, or features.
How long will this plugin be maintained?
As long as possible. We use it on our own Matomo instances, so issues and fixes are typically
addressed quickly.