2D Vector in C++: A Practical Guide With Methods

2D Vector in C++: Methods Explained

If you have learned about dynamic arrays, you already know how useful they are for storing data that can change in size. “2D Vectors in C++” works similarly but is safer and easier to use. 

A 2D vector is simply a vector that stores another vector, which helps us represent data in rows and columns, just like a matrix. This makes them a better choice for students, especially in exams and practical coding. 

In this article, we will understand the basics of 2D vectors and then look at simple examples to make the concept clear and easy to remember.

TL; DR: 2D Vector In C++ 

Aspect

Summary

Concept

A 2D vector in C++ is a vector of vectors, where each inner vector represents a row. Unlike 2D arrays, its size can change, which makes it suitable for dynamic problems.

Memory Behavior

2D vectors use dynamic memory allocation, meaning rows may not be stored in continuous memory. This design improves flexibility but requires careful indexing.

Exam Usage

2D vectors are commonly used in exams when the problem mentions user-defined size, dynamic input, or matrix-like operations.

Common Pitfalls

Students often confuse row size with column size and assume all rows are equal. Incorrect loop limits and uninitialized vectors are the most common causes.

Best Practice

Always initialize the 2D vector properly before accessing elements and use row-wise traversal logic.

What Is A Vector In C++ Programming Language?

A C++ vector is a dynamic container provided by the Standard Template Library (STL) that stores elements in a continuous memory location. Unlike arrays, vectors automatically resize when elements are added or removed, which helps students avoid memory management errors. 

				
					// Example Of Single Vector Declaration
vector<int> v1 = {1, 2, 3, 4}; // Initializer List Method
vector<int> v2{1, 2, 3, 4}; // Uniform Initialization Method
vector<int> v3(10, 5); // Ten Times 5 Will Add
return 0;


From a learning and exam perspective, vectors are preferred because they are safer, flexible, and widely used in real-world C++ applications. Understanding vectors also builds a strong foundation for data structures and competitive programming.

What Is A 2D Vector In C++? Read Below

A two-dimensional vector is the extended version of a single-dimensional vector. In the two-dimensional vector, the vector concept is used. One is used for making the row & another is used for making the column. It is the same concept just like the 2D array Data Structures in other Programming Languages.

				
					// Example Of Normal 2D Vector Declaration Process
vector<vector<int>> v; // 2D Vector Initialization


Just, the difference is that the two-dimensional vector is dynamic. That is the reason, it is more convenient to use. Whenever any elements are deleted or inserted into the 2D vector, it will automatically resize itself.

2D Vector Cpp

Why Students Get Confused With 2D Vectors In C++?

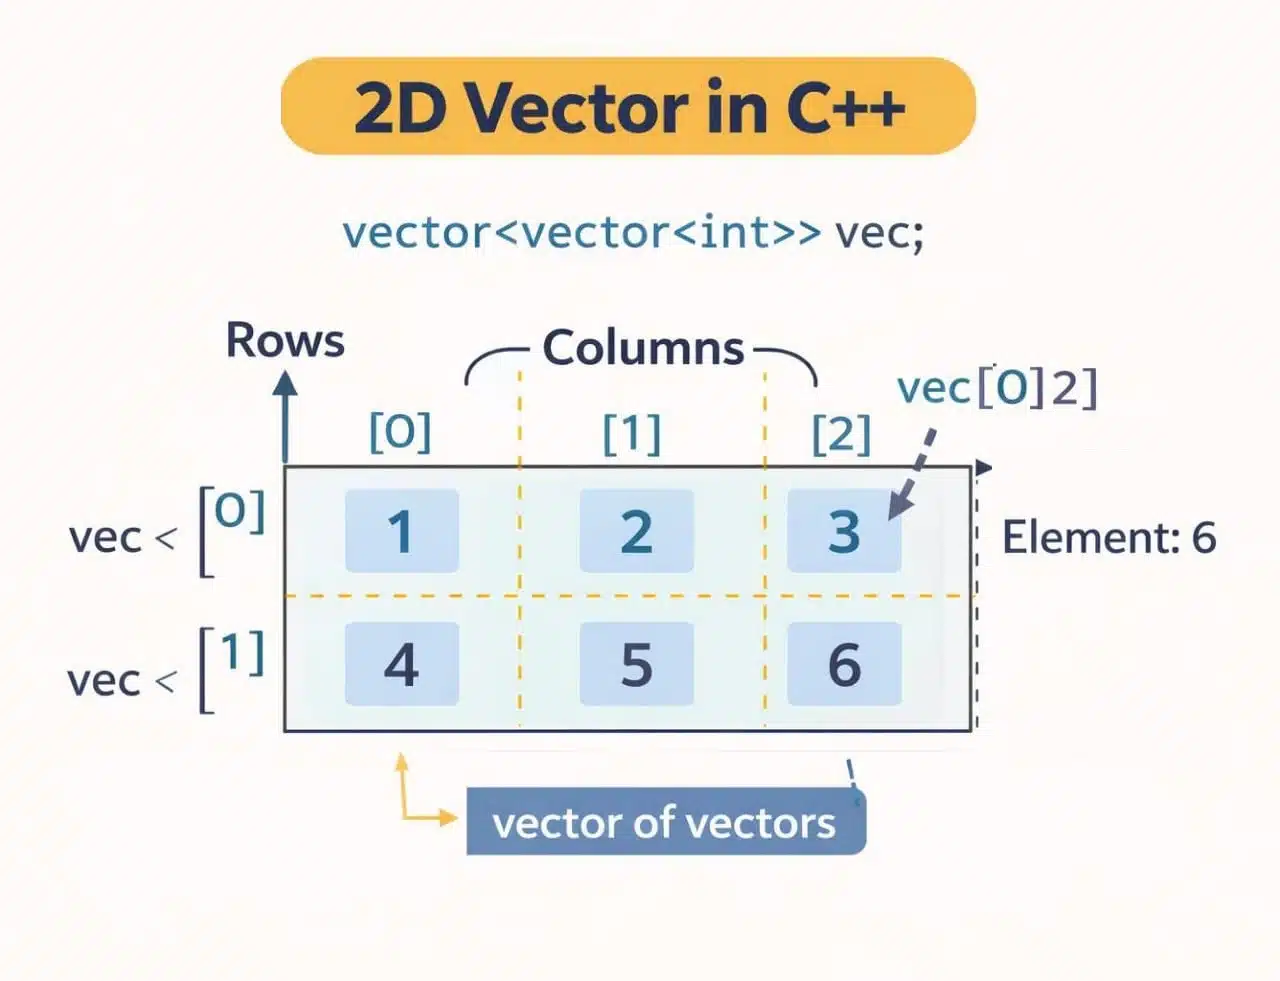
  • Students often do not clearly understand that a 2D vector is actually a vector of vectors, not a single block of memory like a 2D array.
  • Many beginners mix up row size and column size, which leads to incorrect loop conditions and runtime errors.
  • Students assume all rows must have the same number of columns, which is not always true in a 2D vector.
  • The syntax vector<vector<int>> looks complex at first, especially for students who are new to STL.
  • Learners struggle with dynamic resizing because they are used to fixed-size arrays in exams and textbooks.

Comparison Table Between The 2D Vector And 2D Array:

We have seen many times that students often confuse a 2D Array and a 2D Vector in exams. This confusion occurs just because they were unaware of the differences between these two.

To help you out with assignments and homework, here is a comparison table between 2D Vector and 2D Array.

Criteria

2D Array

2D Vector

Size

Fixed

Dynamic

Memory

Continuous

Dynamic

Resizing

Impossible

Possible

Safety

Lower

Higher

Flexibility

Limited

High

Exam-Use

Basic

Preferred

How To Declare 2D Vector In CPP?

There are mainly three methods present to declare the 2D vector in C++. One of them has already been demonstrated in the above code snippet. 

There are two more methods present by which we can declare the 2D vector.

  • 2D Vector Initialization With Value:

In this method, the 2D vector is initialized directly with predefined values. This means you don’t have to insert elements later; everything is set up at the time of declaration itself.

Before initializing a 2D vector, make sure to include the required Standard Template Library (STL) headers in your program, especially the <vector> header file.

				
					// Example Of 2D Vector Declaration Along With Data
#include<vector>
#include<iostream> 
using namespace std;
int main()
{
	vector<vector<int>> v{{1, 2, 3},{4, 5, 6}};
	return 0;
}


Here, using the above syntax we will declare a 2D vector int which will collect some values. We will use the braces to indicate the row & column elements inside of the 2D vector.

  • 2D Vector Initialization With Row & Column Values:

In this approach, the 2D vector is not declared in the usual way by listing its elements. Instead, the size of the vector is defined by specifying the number of rows and columns. This makes it easier to create a matrix-like structure without manually adding values at the beginning.

				
					public class Main
{
	public static void main(String[] args) {
System.out.println("Printing Started Untill Encounter Of Break: ");
int n= 8;
for (int i = 1; i < n; i++) { // Starting A For Loop
if (i == 5){ //Condition To Implement Break Statements
                System.out.println("--Encountered Break--");
                break; // Break Statement
            }
System.out.println(i); // Printing Data
        }
	}
}


In the above case, the row & column data are declared in a separate variable. Now, we will use two different vector int concepts to declare the overall 2D vectors in C++ programming language. But it is quite difficult to declare.

What Is The Process To Traverse Through 2D Vector In C++? How To Print A 2D Vector In CPP?

Traversing through the two-dimensional vector is a very simple process to execute. It is like going through the 2D array. Like the 2D array, we should declare the nested for loop to traverse in the 2D vector. But we should declare one first.

Code for declaration:

				
					#include<vector> 
#include<iostream> 
using namespace std;
int main()
{
	vector<vector<int>> zap{{20, 07},{23, 20}}; // Initialization Of Vector Inside Vector
    cout << "Traversal Of 2D Vector: " << endl;
    for (int i = 0; i < zap.size(); i++) // Outer For Loop For Displaying Vector
    {
        for (int j = 0; j < zap[i].size(); j++) // Inner Loop For Displaying Vector
            cout << zap[i][j] << " ";
        cout << endl;
    }
	return 0;
}


Steps of The Program: 

  • At first, the Vector Header File Libraries will be included in the program.
  • A sample vector along with the data will be provided in the program.
  • Two nested loops will be declared. There will be the Outer & Inner Loop.
  • The Outer Loop will consider the row, and the Inner Loop will print every element there.

Output: 

Traverse Through 2D Vector In C++

As this is a traversing operation or in simple words, we are going to print the 2D Vector in C++, the necessary result will be in front of us. As it is a print operation, the data that we have provided in the 2D Vector will be printed.

Sorting and traversing a 2D vector can sometimes be tricky, especially for beginners. If you’re struggling with your C++ assignments, our experts at C++ Homework Help can assist you.

C++ homework help Online

How To Sort 2D Vector In CPP?

In the CPP 2D Vector, there is no particular sorting algorithm present. Some of the sorting algorithms sort a single Row or a single Column that sometimes fail to fulfill the purpose of sorting. So, you are going to make a program to sort the CPP 2D Vector entirely, not any single Row and Column.

However, sorting techniques like Bubble Sort and Quick Sort in C++ can help achieve the desired order.


#include <iostream>
#include <vector>
#include <algorithm>
using namespace std;

int main() {
    vector<vector<int>> zap = {{7, 8, 9},{4, 5, 6},{1, 2, 3}}; // Unsorted 2D Vector
    
    sort(zap.begin(), zap.end()); // Sorting The 2D Vector

    // Printing The 2D Vector
    cout << "Sorted 2D vector:" << endl;
    for (int i = 0; i < zap.size(); i++) // Outer For Loop For Displaying Vector
    {
        for (int j = 0; j < zap[i].size(); j++) // Inner Loop For Displaying Vector
            cout << zap[i][j] << " ";
        cout << endl;
    }


    return 0;
}


Steps of The Program: 

  • At first, the Vector & Algorithm Header Files are taken into the program for further use by libraries.
  • A 2D Vector is declared along with some values in different order.
  • Now, the Sort() function will be used. It will check the order from the Beginning to the End of the 2D Vector. It will make it in a sorted manner.
  • Now, we are going to Traverse or Print the values in the 2D Vector as we have discussed earlier.

Output:

Sort Vector Output

From the above output, it should become clear to us the way to Sort 2D Vector in C++ Programming Language. You can see the values that are in the random order are now in the proper manner. So, the purpose of the above program is fulfilled with the Sort() Function.

What Are The Major Operations Can Be Done On 2D Vectors In C++?

The above discussion will be enough to clear your basic doubts related to the 2D vectors in C++ programming language. Now, we should understand some of the major operations that can be done on the 2D vectors. They are the following:

  1. Insert Vector’s Elements Using push_back() Method
  2. Remove Elements Using pop_back() Method
  3. Find Any Element Using the at() function.
  4. Get the Total Number of Elements Using size() Function.
  5. Check whether the Vector is Empty or not using the empty() Function.

Let us know all of them one by one briefly.

  • How To Insert Vector’s Elements Using Push_back() Method?

The push_back() is the built-in function present with the standard template library for doing operations on the 2D vector. It is an operation that can be done with the help of another vector. One vector data will be inserted inside of another vector.

The same operation can be done with the default value. It is like the append operation that adds some data into the empty container one by one. Using the method, in one empty vector, we will insert data from another vector.

General Syntax: new-vector-name.push_back(old-vector-name);

Code To Implement Use Of The Push_back() Method:


#include<vector> 
#include<iostream> 
using namespace std;
int main()
{
    vector<vector<int>> zap; // 2D Vector Initialization
    vector<int> one = {20, 07, 20, 23}; // 1D Vector Initialization With Values
    zap.push_back(one); // Pushing The Data


    cout << "The 2D Vector Data Is: ";
    for (int i = 0; i < zap.size(); i++) // Outer For Loop For Displaying Vector
    {
        for (int j = 0; j < zap[i].size(); j++) // Inner For Loop For Displaying Vector
            cout << zap[i][j] << ",";
    }
    return 0;
}


Steps Of The Program:

  1. At first, the declaration of the 2D vector will be done without providing any value to it.
  2. Now, one simple single-dimensional vector will be declared where some values will be provided.
  3. Now, we will share the value of that single vector with that 2D vector. That is the reason, the single vector name is present inside of the braces for copying purposes.
  4. Now, we will traverse the 2D vector to print the values from it. It will print all the elements of it.

Output:

Use Of The Push_back() Method Output

From the above output, we can see that the insertion into the second vector is done from the first vector. Here, the vector dimensions are irrelevant because the first vectors assign values to the second vector without error.

  • How To Remove Elements Using Pop_back() Method?

Just like the inbuilt function present to add elements inside of a dynamic array or 2D vector, there is also one inbuilt function present that helps in removing elements. That is known as the pop_back() method. And it can be used for other two-dimensional objects also.

Here, the complete play is executed with the vector index number or integral index. The zero index number represents the number of int rows present in the program. The zero index is for the first row, the first index is for the second row & the second index is for the third row.

General Syntax: vector-name[index-number].pop_back();

Code To Implement Use Of The Pop_back() Method:

				
					#include<vector> 
#include<iostream> 
using namespace std;
int main()
{
    vector<vector<int>> zap{{20, 07},{23, 20}}; // Initialization Of Vector Inside Vector
    cout << "Original 2D Vector: ";
    for (int i = 0; i < zap.size(); i++) // Outer For Loop For Displaying Vector
    {
        for (int j = 0; j < zap[i].size(); j++) // Inner Loop For Displaying Vector
            cout << zap[i][j] << " ";
    }
    cout << endl;
    zap[0].pop_back(); // Removing Last Element Of First Row
    zap[1].pop_back(); // Removing Last Element Of Second Row
    cout << "2D Vector After Element Removing: "<< endl;
    for (int i = 0; i < zap.size(); i++) // Outer For Loop For Displaying Vector
    {
        for (int j = 0; j < zap[i].size(); j++) // Inner For Loop For Displaying Vector
            cout << zap[i][j] << endl;
    }
    return 0;
}


Steps Of The Program:

  1. Here, the implementation of the two-dimensional vector will be done along with providing some values that are used in creating matrices.
  2. Now, we traverse through the two-dimensional vector & print all the default values that have been provided.
  3. Now, we will use the above basic syntax for removing elements one by one. First, the last element of the first row will be removed. Then, the last element of the second row will be removed in the same manner.
  4. Now, the data will be again printed inside the console. In the result data, the removed elements will not be present.

Output:

Use Of The Pop_back() Method Output

From the above output, we can see that with the removal of elements from the data structures, the two-dimensional vector works properly. In the first case, it prints all the data. And in the second case, after removing elements the remaining data is printed.

  • How To Find Elements Using At() Method In CPP 2D Vector? 

The at() function is the inbuilt function that comes with the Vector Library. We have to use the at() Function in the same way, we were doing things previously. The use of the at() function is as easy as you can think. 

Syntax: vector-name.at(Row Number).at(Column Number)

Code To Implement At() Function In The 2D Vector of C++ Programming Language: 


#include <iostream>
#include <vector>
using namespace std;

int main() {
    vector<vector<int>> zap = {{1, 2, 3},{4, 5, 6}}; // Creating A 2D Vector

    // Accessing Elements Using AT() Operation
    int e = zap.at(0).at(1); 
    cout << "Row 0 & Column 1 Element: " << e; // Print The Result

    return 0;
}


Steps of the Program: 

  • Declare one 2D Vector in the program along with some values previously.
  • Use the above syntax & get the element number stored in one variable.
  • Print the variable to get the actual result we want.

Output: 

Webp- 3- At() Function Output

From the above output, we can see that the value is coming as the 2. Here, we are going to access the element at row 1, column 2, so we are getting the result as 2. We have to remember that the indexing starts from 0.

  • How To Find Total Elements Using Size() Method In CPP 2D Vector? 

The Size() function is the important function. Using this function, you can get the number of elements from the Row as well as the Columns. To get the total number of elements in one Vector, we have to use one trick to get.

Syntax for Row: Vector-Name.size

Syntax for Column: Vector-Name.at(Row Number).size()

Code to Demonstrate The Use Of Size Function To Get Size Of Ideal 2D Vector:


#include <iostream>
#include <vector>
using namespace std;
int main() {
    vector<vector<int>> zap = {{1, 2, 3},{4, 5, 6}}; // Creating A 2D Vector
    int r = zap.size(); // Row Number
    int c = zap.at(0).size(); // Column Number
    cout << "Number of Rows: " << r << endl; // Print The Row Result
    cout << "Number of Columns: " << c << endl; // Print The Column Result
    cout << "Total Elements: " << r*c;
    return 0;
}


Steps of The Program: 

  • Here, the 2D Vector along with some values will be declared in the program.
  • Now, using the above values, we are going to take the number of elements in Row & Column.
  • And as the Vector is Ideal, we will multiply the values to get the total numbers.
  • We will print each value in the program.

Output: 

Size() Function Output

From the above output, it should become clear that the Size() Function will be the best to get the number of elements present in the 2D Vector. Here, the Number of Rows is 2 & Number of Columns is 3. So, there are a total of Six Elements are present.

  • How To Find Empty Status Using Empty() In CPP 2D Vector? 

Like every data structure, there is a also function present to check whether any 2D Vector is empty or not in the C++ Programming Language. The use of the Empty() Function is the easiest among other operations we discussed so far.

Syntax: Vector-Name.empty()

C++ Program to Define The Use of the Empty() Function For 2D Vector:


#include <iostream>
#include <vector>
using namespace std;
int main() {
    vector<vector<int>> zap = {{1, 2, 3},{4, 5, 6}}; // Creating A 2D Vector

    if (zap.empty()) // If 2D Vector Is Empty
        cout << "The 2D Vector Is Empty" << endl;
    else // If 2D Vector Is Not Empty
        cout << "The 2D Vector Is Not Empty" << endl;
    return 0;
}


Steps of The Program: 

  • The 2D Vector is declared along with some values to check the Empty() Function.
  • Now, we will use the If-Else Statement.
  • Using the above syntax, if the Vector is empty one data will be displayed.
  • Otherwise, the Not Present Data will come.

Output: 

 Empty() Function Output

From the above output, we can see that the Not Empty Result is coming to the window. In this case, there are certain values are present in the Vector. That is the reason, the If Statement doesn’t execute here & the Else statement gets fulfilled.

Real Assignment Question: Creating A 2D Vector With User-Defined Size

From our expertise, we can tell you that apart from different operations in C++ 2D Vector, another important question you may expect in your lab exam is to create a 2D vector with a user-defined size.

It frequently appears in practical exams and competitive programming questions as it is quite out-of-the-box. Here is the implementation process for this question.


#include <iostream>
#include <vector>
using namespace std;

int main() 
{
    int rows, cols;

    // Taking The Row Number
    cout << "Enter Number Of Rows: ";
    cin >> rows;

    // Taking The Column Number
    cout << "Enter number of columns: ";
    cin >> cols;

    // Creating A 2D Matrix Using Vector
    vector<vector<int>> matrix(rows, vector<int>(cols));

    cout << "Enter The Matrix Elements Row-Wise:\n";
    for (int i = 0; i < rows; i++)
        for (int j = 0; j < cols; j++)
            cin >> matrix[i][j];

    cout << "\nEntered Matrix Is:\n";
    for (int i = 0; i < rows; i++)
    {
        for (int j = 0; j < cols; j++)
            cout << matrix[i][j] << " ";
        cout << endl;
    }
    return 0;
}


The program first asks the user to enter the number of rows for the matrix. Then it asks for the number of columns.

A 2D vector (matrix) is created using the given rows and columns. The user is asked to enter the matrix elements row by row. Finally, the program displays the matrix so the user can verify the input.

Creating A 2D Vector With User-Defined Size Output

This approach is exam-safe, clean, and easy to debug. This is the most reliable method for handling 2D vectors in student assignments.

Common Mistakes Students Make With 2D Vectors In Exams:

Most errors with 2D vectors are not advanced mistakes. They are small logical issues that students repeatedly face during exams, labs, and assignments. To avoid making them in your exam, go through the following list.

  • Sometimes, students access the elements of a 2D vector before initializing its size, which often causes runtime errors.
  • Often, students use incorrect loop limits, such as using column size for rows or vice versa.
  • Many times, students assume that the vector.size() gives the total number of elements instead of just the number of rows.
  • We have seen many times that students use push_back() incorrectly and end up with extra rows or missing columns.
  • Sometimes, without checking the vector[i].size(), students write nested loops, which causes crashes in jagged 2D vectors.

Conclusion:

As we saw, it is very important to understand the “2D vectors in C++” concept.

We all think that the Data Structures array concept is superior among all list-like concepts. But the concept like vector, we forget to use. That is the reason, there is a more problems we face while finding a solution to a simple program.

It is advisable to clear the basic concept of the C++ programming language. In this topic also, some very basic concepts we have used like the insertion of the header files. If you don’t know the basics & background of such a thing, your knowledge is not going to be so deep that will matter for your future.

Key Takeaways: 

  • Vector works like a dynamic array concept where the size can be changed over time.
  • Using the List Method & Uniform Method, we can declare a 2D vector in C++.
  • We can directly provide values or insert them using the Row & Columns.
  • Traversing or Printing of Vector can only be done with the help of the loops.
  • The Sort() function from the Algorithm is used to sort vectors in any order.
  • We can insert Vector’s Elements using push_back() method
  • We can remove elements using the pop_back() method
  • To Find Any Element in Vector the at() function will be used.
  • We can get the total number of elements using the size() function.
  • We can check whether the vector is empty or not using the empty() function.

If you’re interested in real-world applications of vectors, check out these C++ project ideas to build hands-on experience with 2D vector operations.

Frequently Asked Questions

Is a 2D vector stored in memory the same way as a 2D array in C++?

No, a 2D vector is not stored in memory the same way as a 2D array. A 2D array uses a continuous block of memory, while a 2D vector uses dynamic memory allocation. This design makes 2D vectors more flexible but slightly less cache-friendly compared to traditional 2D arrays.

Yes, a 2D vector can have rows of different sizes, and this is one of its biggest advantages. Such a structure is commonly called a jagged or irregular 2D vector. This feature is especially useful in real-world problems like graph representations or uneven datasets.

A program usually crashes when a 2D vector element is accessed outside its valid range. This often happens when the vector is not properly initialized, loop conditions are incorrect, or the student assumes fixed column sizes.