For January 2026, we welcome Omar Abou Mrad as our DSF member of the month! ⭐

Omar is a helper in the Django Discord server, he has helped and continuously help folks around the world in their Django journey! He is part of the Discord Staff Team. He has been a DSF member since June 2024.
You can learn more about Omar by visiting Omar's website and his GitHub Profile.
Let’s spend some time getting to know Omar better!
Hello! My name is Omar Abou Mrad, a 47-year-old husband to a beautiful wife and father of three teenage boys. I’m from Lebanon (Middle East), have a Computer Science background, and currently work as a Technical Lead on a day-to-day basis. I’m mostly high on life and quite enthusiastic about technology, sports, food, and much more!
I love learning new things and I love helping people. Most of my friends, acquaintances, and generally people online know me as Xterm.
xterm is simply the terminal emulator for the X Window System. I first encountered it back in the mid to late 90s when I started using Redhat 2.0 operating system. things weren’t easy to set up back then, and the terminal was where you spent most of your time.
Nevertheless, I had to wait months (or was it years?) on end for the nickname "Xterm" to expire on Freenode back in mid 2000s, before I snatched and registered it.
Alas, I did! Xterm, c'est moi! >:-]
We landed on Django (~1.1) fairly early at work, as we wanted to use Python with an ORM while building websites for different clients. The real challenge came when we took on a project responsible for managing operations, traceability, and reporting at a pipe-manufacturing company.
By that time, most of the team was already well-versed in Django (~1.6), and we went head-on into building one of the most complicated applications we had done to date, everything from the back office to operators’ devices connected to a Django-powered system.
Since then, most of our projects have been built with Django at the core.
We love Django.
I've used a multitude of frameworks professionally before Django, primarily in Java (EE, SeamFramework, ...) and .NET (ASP.NET, ASP.NET MVC) as well as sampling different frameworks for educational purposes.
I suppose if I could snap my fingers and get things to exist in django it wouldn't be something new as much as it is official support of:
But since we're finger-snapping things to existence, it would be awesome if every component of django (core, orm, templates, forms, "all") could be installed separately in such a way that you could cherry pick what you want to install, so we could dismiss those pesky (cough) arguments (cough) about Django being bulky.
I'm involved in numerous projects currently at work, most of which are based on Django, but the one I'm working right now consists of doing integrations and synchronizations with SAP HANA for different modules, in different applications.
It's quite the challenge, which makes it twice the fun.
I would like to mention that I'm extremely thankful for any and all core and 3rd Party libraries out there!
In no particular order:
First and foremost, I want to highlight what an excellent staff team we have on the Official Django Discord. While I don’t feel I hold a candle to what the rest of the team does daily, we complement each other very well.
To me, being a good helper means:
Imagine you're having a discussion with a djangonaut friend or colleague about some data modeling, or answering some question or concern they have, or reviewing some ORM code in a repository on github, or helping someone on IRC, Slack, Discord, the forums... or simply you want to do some quick ORM experiment but not disturb your current project.
The most common ways people deal with this, is by having a throw-away project that they add models to, generate migrations, open the shell, run the queries they want, reset the db if needed, copy the models and the shell code into some code sharing site, then send the link to the recipient. Not to mention needing to store the code they experiment with in either separate scripts or management commands so they can have them as references for later.
I loved what DDT gave me with the queries transparency, I loved experimenting in the shell with shell_plus --print-sql and I needed to share things online. All of this was cumbersome and that’s when DryORM came into existence, simplifying the entire process into a single code snippet.
The need grew massively when I became a helper on Official Django Discord and noticed we (Staff) could greatly benefit from having this tool not only to assist others, but share knowledge among ourselves. While I never truly wanted to go public with it, I was encouraged by my peers on Discord to share it and since then, they've been extremely supportive and assisted in its evolution.
The unexpected thing however, was for DryORM to be used in the official code tracker, or the forums, or even in Github PRs! Ever since, I've decided to put a lot of focus and effort on having features that can support the django contributors in their quest evolve Django.
So here's a shout-out to everyone that use DryORM!
Yes, I am and thank you! I think the application has reached a point where new feature releases will slow down, so it’s entering more of a maintenance phase now, which I can manage.
Hopefully soon we'll have the discord bot executing ORM snippet :-]
Oh wow, not working, what's that like! :-]
Early mornings are usually reserved for weight training.\ Followed by a long, full workday.\ Then escorting and watching the kids at practice.\ Evenings are spent with my wife.\ Late nights are either light gaming or some tech-related reading and prototyping.\
Weekends look very similar, just with many more kids sports matches!
I want to thank everyone who helped make Django what it is today.
If you’re reading this and aren’t yet part of the Discord community, I invite you to join us! You’ll find many like-minded people to discuss your interests with. Whether you’re there to help, get help, or just hang around, it’s a fun place to be.
Thank you for doing the interview, Omar!
Today we've issued the 5.2.10 and 6.0.1 bugfix releases.
The release packages and checksums are available from our downloads page, as well as from the Python Package Index.
The PGP key ID used for these releases is Jacob Walls: 131403F4D16D8DC7
For December 2025, we welcome Clifford Gama as our DSF member of the month! ⭐
Clifford contributed to Django core with more than 5 PRs merged in few months! He is part of the Triage and Review Team. He has been a DSF member since October 2024.
You can learn more about Clifford by visiting Clifford's website and his GitHub Profile.
Let’s spend some time getting to know Clifford better!
I'm Clifford. I hold a Bachelor's degree in Mechanical Engineering from the University of Zimbabwe.
During my first year in college, I was also exploring open online courses on EDx and I came across CS50's introduction to web development. After watching the introductory lecture -- which introduced me to git and GitHub -- I discovered Django's excellent documentation and got started on the polls tutorial. The docs were so comprehensive and helpful I never felt the need to return to CS50. (I generally prefer comprehensive first-hand, written learning material over summaries and videos.)
At the time, I had already experimented with flask, but I guess mainly because I didn't know SQL and because flask didn't have an ORM, I never quite picked it up. With Django I felt like I was taking a learning fast-track where I'd learn everything I needed in one go!
And that's how I started using Django.
At the moment, I’ve been focusing on improving my core skills in preparation for remote work, so I haven’t been starting new projects because of that.
That said, I’ve been working on a client project involving generating large, image-heavy PDFs with WeasyPrint, where I’ve been investigating performance bottlenecks and ways to speed up generation time, which was previously around 30 minutes 😱.
I’ve been reading Boost Your Git DX by Adam Johnson and learning how to boost my Git and shell developer experience, which has been a great read. Aside from that, inspired by some blogs and talks by Haki Benita, I am also learning about software design and performance. Additionally, I am working on improving my general fluency in Python.
I am not familiar with any other frameworks, but if I had magic powers I'd add production-grade static-file serving in Django.
The ORM, Wagtail and Django's admin.
I started contributing to Django in August last year, which is when I discovered the community, which was a real game changer for me. Python was my first course at university, and I loved it because it was creative and there was no limit to what I could build with it.
Whenever I saw a problem in another course that could be solved programmatically, I jumped at it. My proudest project from that time was building an NxN matrix determinant calculator after learning about recursion and spotting the opportunity in an algebra class.
After COVID lockdown, I gave programming up for a while. With more time on my hands, I found myself prioritizing programming over core courses, so I took a break. Last year, I returned to it when I faced a problem that I could only solve with Django. My goal was simply to build an app quickly and go back to being a non-programmer, but along the way I thought I found a bug in Django, filed a ticket, and ended up writing a documentation PR. That’s when I really discovered the Django community.
What attracted me most was that contributions are held to high standards, but experienced developers are always ready to help you reach them. Contributing was collaborative, pushing everyone to do their best. It was a learning opportunity too good to pass up.
About the time after I contributed my first PR, I started looking at open tickets to find more to work on, and keep on learning.
Sometimes a ticket was awaiting triage, in which case the first step was to triage it before assigning it to working on it, and sometimes the ticket I wanted was already taken, in which case I'd look at the PR if available. Reviewing a PR can be a faster way to learn about a particular part of the codebase, because someone has already done most of the investigative part of work, so I reviewed PRs as well.
After a while I got an invitation from Sarah Boyce, one of the fellows, to join the team. I didn't even know that I could join before I got the invitation, so I was thrilled!
It’s been rewarding. I’ve gained familiarity with the Django codebase and real experience collaborating with others, which already exceeds what I expected when I started contributing.
One unexpected highlight was forming a friendship through one of the first PRs I reviewed.
SiHyun Lee and I are now both part of the triage and review team, and I’m grateful for that connection.
My main hobby is storytelling in a broad sense. In fact, it was a key reason I returned to programming after a long break. I enjoy discovering enduring stories from different cultures, times, and media—ranging from the deeply personal and literary to the distant and philosophical. I recently watched two Japanese classics and found I quite love them. I wrote about one of the films on my blog, and I also get to practice my Japanese, which I’ve been learning on Duolingo for about two years. I also enjoy playing speed chess.
If there’s an issue you care about, or one that touches a part of the codebase you’re familiar with or curious about, jump in. Tickets aren’t always available to work on, but reviews always are, and they’re open to everyone. Reviewing helps PRs move faster, including your own if you have any open, sharpens your understanding of a component, and often clarifies the problem itself.
As Simon Charette puts it:
“Triaging issues and spending time understanding them is often more valuable than landing code itself as it strengthen our common understanding of the problem and allow us to build a consistent experience accross the diverse interfaces Django provides.”
And you can put it on your CV!
I’m grateful to everyone who contributes to making every part of Django what it is. I’m particularly thankful to whoever nominated me to be the DSF Member of the month.
I am optimistic about the future of Django. Django 6.1 is already shaping up with new features, and there are new projects like Django Bolt coming up.
Happy new year 🎊!
Thank you for doing the interview, Clifford and happy new year to the Django community 💚!
As we wrap up another strong year for the Django community, we wanted to share an update and a thank you. This year, we raised our fundraising goal from $200,000 to $300,000, and we are excited to say we are now over 88% of the way there. That puts us firmly in the home stretch, and a little more support will help us close the gap and reach 100%.
So why the higher goal this year? We expanded the Django Fellows program to include a third Fellow. In August, we welcomed Jacob Tyler Walls as our newest Django Fellow. That extra capacity gives the team more flexibility and resilience, whether someone is taking parental leave, time off around holidays, or stepping away briefly for other reasons. It also makes it easier for Fellows to attend more Django events and stay connected with the community, all while keeping the project running smoothly without putting too much pressure on any one person.
We are also preparing to raise funds for an executive director role early next year. That work is coming soon, but right now, the priority is finishing this year strong.
We want to say a sincere thank you to our existing sponsors and to everyone who has donated so far. Your support directly funds stable Django releases, security work, community programs, and the long-term health of the framework. If you or your organization have end-of-year matching funds or a giving program, this is a great moment to put them to use and help push us past the finish line.
If you would like to help us reach that final stretch, you can find all the details on our fundraising page
Other ways to support Django:
Thank you for helping support Django and the people who make it possible. We are incredibly grateful for this community and everything you do to keep Django strong.
We extend our gratitude to Thibaud Colas and Sarah Abderemane, who are completing their terms on the board. Their contributions shaped the foundation in meaningful ways, and the following highlights only scratch the surface of their work.
Thibaud served as President in 2025 and Secretary in 2024. He was instrumental in governance improvements, the Django CNA initiative, election administration, and creating our first annual report. He also led our birthday campaign and helped with the creation of several new working groups this year. His thoughtful leadership helped the board navigate complex decisions.
Sarah served as Vice President in 2025 and contributed significantly to our outreach efforts, working group coordination, and membership management. She also served as a point of contact for the Django CNA initiative alongside Thibaud.
Both Thibaud and Sarah did too many things to list here. They were amazing ambassadors for the DSF, representing the board at many conferences and events. They will be deeply missed, and we are happy to have their continued membership and guidance in our many working groups.
On behalf of the board, thank you both for your commitment to Django and the DSF. The community is better for your service.
Thank you to Tom Carrick and Jacob Kaplan-Moss for their service as officers in 2025.
Tom served as Secretary, keeping our meetings organized and our records in order. Jacob served as Treasurer, providing careful stewardship of the foundation's finances. Their dedication helped guide the DSF through another successful year.
We welcome Priya Pahwa and Ryan Cheley to the board, and congratulate Jacob Kaplan-Moss on his re-election.
The board unanimously elected our officers for 2026:
I'm honored to serve as President for 2026. The DSF has important work ahead, and I'm looking forward to building on the foundation that previous boards have established.
Our monthly board meeting minutes may be found at dsf-minutes, and December's minutes are available.
If you have a great idea for the upcoming year or feel something needs our attention, please reach out to us via our Contact the DSF page. We're always open to hearing from you.
The Code of Conduct working group received 4 reports and met 12 times in 2025. This transparency report is a brief account of how those reports were handled. This year’s number is lower than previous years in part because of the formation of the Online Community Working Group which handles moderation on our official spaces and has been able to act directly on smaller scale infractions. In some cases we received additional reporting while investigating initial reports, but have not counted those as separate instances.
This working group conducts business in several ways. It has online meetings, typically once per month. It also discusses issues in a Slack channel, but most cases are handled in the meetings. The group welcomed three new members this year: Ariane Djeupang, Natalia Bidart, and Priya Pahwa. Natalia was selected by the new Online Communities Working Group as their liaison to the Code of Conduct Working group; Ariane and Priya were elected by the working group. The group also saw Jay Miller step down this year. We all want to thank Jay for his continued role in our community and for all the work he did with the Code of Conduct group.
It was the group’s intention to work with a consultant to update our Code of Conduct and processes. We reached out to two consultants to help with that work, but unfortunately we weren’t able to engage either to get that work completed. We hope to progress with that in 2026. In the meantime, we made a few internal process tweaks - creating up a new “ask CoC” channel with key stakeholders to discuss moderation and CoC enforcement, and having our team set up as moderators in GitHub until we find a better model.
Two reports from late 2024 carried into this year. Two reports resulted in suspensions from the relevant platforms. Another was shared with local event organizers.
Finally, this section provides a brief summary of the kinds of cases that were handled:
The Online Community Working Group has introduced a new GitHub repository designed to manage and track ideas, suggestions, and improvements across Django's various online community platforms.
Primarily inspired by the rollout of the New Features repository, the Online Community Working Group has launched their own version that works in conjunction with the Online Community Working Group Ideas GitHub project to provide a mechanism to gather feedback, suggestions, and ideas from across the online community and track their progression.
The primary aim is to help better align Django's presence across multiple online platforms by providing:
If you have an idea or a suggestion for any of Django's online community platforms (such as the Forum, Discord, or elsewhere), the process starts by creating an issue in the new repository.
You'll be asked to summarise the idea, and answer a couple of short questions regarding which platform it applies to and the rationale behind your idea.
The suggestion will be visible on the public board, and people will be able to react to the idea with emoji responses as a quick measure of support, or provide longer-form answers as comments on the issue.
The Online Community Working Group will review, triage, and respond to all suggestions, before deciding whether or how they can be implemented across the community.
Note that we're not asking that you stop using any mechanisms in place within the particular community you're a part of currently—the Discord #suggestions channel is not going away, for example. However, we may ask that a suggestion or idea flagged within a particular platform be raised via this new GitHub repo instead, in order increase its visibility, apply it to multiple communities, or simply better track its resolution.
The Online Community Working Group was relatively recently set up, with the aim of improving the experience for members of all Django's communities online. This new repository takes a first step in that direction. Check out the repository at django/online-community-working-group on GitHub to learn more and start helping shape Django's truly excellent community presence online.

In accordance with our security release policy, the Django team is issuing releases for Django 5.2.9, Django 5.1.15, and Django 4.2.27. These releases address the security issues detailed below. We encourage all users of Django to upgrade as soon as possible.
FilteredRelation was subject to SQL injection in column aliases, using a suitably crafted dictionary, with dictionary expansion, as the **kwargs passed to QuerySet.annotate() or QuerySet.alias() on PostgreSQL.
Thanks to Stackered for the report.
This issue has severity "high" according to the Django security policy.
Algorithmic complexity in django.core.serializers.xml_serializer.getInnerText() allowed a remote attacker to cause a potential denial-of-service triggering CPU and memory exhaustion via specially crafted XML input submitted to a service that invokes XML Deserializer. The vulnerability resulted from repeated string concatenation while recursively collecting text nodes, which produced superlinear computation resulting in service degradation or outage.
Thanks to Seokchan Yoon (https://ch4n3.kr/) for the report.
This issue has severity "moderate" according to the Django security policy.
Patches to resolve the issue have been applied to Django's main, 6.0 (currently at release candidate status), 5.2, 5.1, and 4.2 branches. The patches may be obtained from the following changesets.
The PGP key ID used for this release is Natalia Bidart: 2EE82A8D9470983E
As always, we ask that potential security issues be reported via private email to security@djangoproject.com, and not via Django's Trac instance, nor via the Django Forum. Please see our security policies for further information.
The 2026 DSF Board Election has closed, and the following candidates have been elected:
They will all serve two years for their term.
Directors elected for the 2025 DSF Board - Abigail Gbadago, Jeff Triplett, Paolo Melchiorre, Tom Carrick - are continuing with one year left to serve on the board.
Therefore, the combined 2026 DSF Board of Directors are:
* Elected to a two year term

Congratulations to our winners, and a huge thank you to our departing board members Sarah Abderemane and Thibaud Colas.
Thank you again to everyone who nominated themselves. Even if you were not successful, you gave our community the chance to make their voices heard in who they wanted to represent them.
an exposition on the great utility of using the parent-index method of representing trees in J.
This is similar, but with K and less comprehensive: https://github.com/JohnEarnest/ok/blob/gh-pages/docs/Trees.md
Since the invention of AVL trees in 1962, many kinds of binary search trees have been proposed. Notable are red-black trees, in which bottom-up rebalancing after an insertion or deletion takes O(1) amortized time and O(1) rotations worst-case. But the design space of balanced trees has not been fully explored. We continue the exploration. Our contributions are three. We systematically study the use of ranks and rank differences to define height-based balance in binary trees. Different invariants on rank differences yield AVL trees, red-black trees, and other kinds of balanced trees. By relaxing AVL trees, we obtain a new kind of balanced binary tree, the weak AVL tree, abbreviated wavl tree, whose properties we develop. Bottom-up rebalancing after an insertion or deletion takes O(1) amortized time and at most two rotations, improving the three or more rotations per deletion needed in all other kinds of balanced trees of which we are aware. The height bound of a wavl tree degrades gracefully from that of an AVL tree as the number of deletions increases, and is never worse than that of a red-black tree. Wavl trees also support top-down, fixed look-ahead rebalancing in O(1) amortized time. Finally, we use exponential potential functions to prove that in wavl trees rebalancing steps occur exponentially infrequently in rank. Thus most of the rebalancing is at the bottom of the tree, which is crucial in concurrent applications and in those in which rotations take time that depends on the subtree size.


Note that this does assume some prior transformer architecture knowledge, but if you know how attention works then you should at least be able to get the overall idea.
I did an experiment to train Qwen2.5-Coder-7B on a niche diagraming language, and the model was able to generate syntactically correct code 86% of the time.
This post outlined the process and decisions I took during the training process. I think it might be helpful to share it here to get feedback, since I know there is a lot I did wrong along the road and could learn from the feedback of many people here.
Paper Abstract: Large language models (LLMs) are increasingly used as evaluators in lieu of humans. While scalable, their judgments are noisy due to imperfect specificity and sensitivity of LLMs, leading to biased accuracy estimates. Although bias-correction methods exist, they are underutilized in LLM research and typically assume exact knowledge of the model's specificity and sensitivity. Furthermore, in general we only have estimates of these values and it is not well known how to properly construct confidence intervals using only estimates. This work presents a simple plug-in framework that corrects such bias and constructs confidence intervals reflecting uncertainty from both test and calibration dataset, enabling practical and statistically sound LLM-based evaluation. Additionally, to reduce uncertainty in the accuracy estimate, we introduce an adaptive algorithm that efficiently allocates calibration sample sizes.


I built a small Python CLI and library called “elf” based on the workflow I have used for Advent of Code over the past few years. It automates common AoC tasks and provides a typed API for scripting.
Features:
• Cached puzzle input fetching
• Safe answer submission with guardrails and guess history
• Private leaderboard retrieval (table, JSON, or typed models)
• Cross-platform support (macOS, Linux, Windows)
• Built with Typer, Rich, httpx, and Pydantic
PyPI: https://pypi.org/project/elf
Feedback is welcome.

Hi,
I have done some looking around on the Django documentation regarding backporting and it seems like new features are not typically backported. In my particular case, I was looking to backport the recent addition of Haitian Creole to version 5.2, as we are using the Arches (GH archesproject/arches) platform to catalog elements of Haitian cultural heritage. I have created a fork of 5.2 which patches in the linked fix and am using that in our implementation. Of course, it would be ideal to upstream the language support if possible, especially since Django 6.0 was only just released (congrats!).
All this to say, I wanted to confirm that I was reading the policy correctly, and that I should not create a ticket and PR to backport the addition of Haitian Creole to 5.2.
Thanks for your time!
3 posts - 2 participants
Hey Team at Django,
Here I am seeking your support for contribution. How should I start.
Thanks,
Ashutosh
2 posts - 2 participants
Not sure if correct place to post, and this will be an incredible dumb question, but.. how do I know if my async ORM funcs are actually running in async?
Do I need a specific dB backend engine?
Can I log a specific property of the db.connection ?
I ask because it appears as though my ORM funcs like aget() are being called as just get().
Im using a profiler to help debug some performance issues and noticed I never see a Django function call of aget I only ever seen get().
Perhaps this is expected behaviour, but hence I was curious if I could know for sure they’re running in async.
My setup is uvicorn with Django ninja API, and a view marked async with aget() call inside.
2 posts - 2 participants
Hi Django translation team,
I’m Ehsan, and I’d love to help translate Django documentation into Persian (fa). I saw that the Persian translation is currently at 0%, and I’m eager to start contributing.
I’ve created an account on Transifex and requested to join the Persian (fa) translation team.
Could you please add me to the Persian translation team so I can start helping?
Thanks a lot!
Ehsan
1 post - 1 participant
I have this idea for a change to the CSRF protection, but looking for someone to point out the security hole(s) in it I’m failing to find myself:
The tl;dr is that I think requests that don’t send cookies should be automatically exempted from CSRF protection.
In its current incarnation, CsrfMiddleware protects all requests if they’re using one of the unsafe (RFC 9110) methods. This creates some friction when you have a Django project that uses both “browser” type views (cookie-based authentication) and “API” type views (Authorization header based authentication, typically using the Bearer authentication scheme); The API type views have to be explicitly exempted from protection, and it’s impossible for the same view to support both authentication schemes.
But seeing as the absence of cookies would mean there’s nothing to really ‘forge’, couldn’t it make sense to simply accept the request if no cookies are present? That should make supporting things like Bearer tokens for views work out of the box. Is there a security problem to this I’m missing?
I am aware of Implement Modern CSRF Protection · Issue #98 · django/new-features · GitHub, which is a radically different approach; if that ends up being implemented, my suggestion here isn’t relevant, although mine should maintain exactly the same browser support as the current does.
2 posts - 2 participants
Hi everyone, I’m Sneha from India. I’m learning Django as part of my journey to become a Python-based full-stack developer, and I want to start contributing to Django step by step.
I’ve been reading the documentation and exploring the codebase, but I’m not sure which beginner-friendly areas or tickets are good starting points. Any guidance or suggestions would be really helpful. Thank you!
2 posts - 2 participants
Over on the discord server we have had more than a few people excited and then confused about the new tasks framework coming in Django 6.0. The confusion mainly comes from mismatched expectations from those that have not been following the development of the feature and what precisely is available in 6.0. This has resulted in myself and others explaining that the main point of what is being introduced in 6.0 is for third-party packages to adopt the API and any normal devs would need a third-party package (eg django-tasks) to actually have a background task.
My suggestion for the 6.X release cycle (at least) would be to call out the need for a third-party package at the top of the docs page on tasks if a developer wants to have actual background tasks operated by a worker. This is likely a callout to django-tasks, but other packages could then be highlighted as they become available (I’m aware chancy has this as an unreleased feature)
3 posts - 3 participants
Hi everyone, I’m Krishna from India.
I want to start contributing to Django and prepare for GSoC 2026.
Can anyone guide me towards beginner-friendly tickets?
2 posts - 2 participants
I would like to reopen ticket 30515, but according to this. I shouldn’t.
However, I would like to reopen the discussion, to perhaps redecide on closing the ticket as wontfix.
There seems to be some indications that there are use cases where django.shortcuts.redirect is impractical and django.shortcuts.resolve_url is the right tool to use.
For my own part, I am implementing SSO login on multiple products where I work, and for this resolve_url has proven the right tool. That is after I discovered it, after I had already implemented something similar myself.
Using resolve_url has made my code simpler, by making it much easier to get the actual URL behind settings like e.g. LOGIN_REDIRECT_URL, and LOGIN_URL, that may be a path or a name, depending on how the project is setup. In some of my code I have to process resolved URLs, and may not even redirect to it. Also in testing, resolve_url has proven useful to e.g. verify that redirection headers are set to the correct value.
Now review is dragging along long enough that I can write this post, and all because resolve_url is not documented along with the other shortcuts.
1 post - 1 participant
The topic page for Models has a paragraph which says:
Once you have defined your models, you need to tell Django you’re going to use those models. Do this by editing your settings file and changing the
INSTALLED_APPSsetting to add the name of the module that contains yourmodels.py.
While it is technically correct that a package is a special type of module, might it be more helpful to say “… name of the package that contains …”?
If folks agree, I’d be happy to create a ticket and a PR.
1 post - 1 participant
Fine-tuning & Reinforcement Learning for LLMs. 🦥 Train OpenAI gpt-oss, Qwen3, Llama 4, DeepSeek-R1, Gemma 3, TTS 2x faster with 70% less VRAM.


Notebooks are beginner friendly. Read our guide. Add your dataset, click "Run All", and export your finetuned model to GGUF, Ollama, vLLM or Hugging Face.
Unsloth supports Free Notebooks Performance Memory use| gpt-oss (20B) | ▶️ Start for free | 1.5x faster | 70% less |
| Gemma 3n (4B) | ▶️ Start for free | 1.5x faster | 50% less |
| Qwen3 (14B) | ▶️ Start for free | 2x faster | 70% less |
| Qwen3 (4B): GRPO | ▶️ Start for free | 2x faster | 80% less |
| Gemma 3 (4B) | ▶️ Start for free | 1.6x faster | 60% less |
| Phi-4 (14B) | ▶️ Start for free | 2x faster | 70% less |
| Llama 3.2 Vision (11B) | ▶️ Start for free | 2x faster | 50% less |
| Llama 3.1 (8B) | ▶️ Start for free | 2x faster | 70% less |
| Mistral v0.3 (7B) | ▶️ Start for free | 2.2x faster | 75% less |
| Orpheus-TTS (3B) | ▶️ Start for free | 1.5x faster | 50% less |
pip install unsloth
For Windows install instructions, see here.
sesame/csm-1b and STT openai/whisper-large-v3.full_finetuning = True, 8-bit with load_in_8bit = True.📣 Introducing Unsloth Dynamic 4-bit Quantization! We dynamically opt not to quantize certain parameters and this greatly increases accuracy while only using <10% more VRAM than BnB 4-bit. See our collection on Hugging Face here.
📣 Llama 4 by Meta, including Scout & Maverick are now supported.
📣 Phi-4 by Microsoft: We also fixed bugs in Phi-4 and uploaded GGUFs, 4-bit.
📣 Vision models now supported! Llama 3.2 Vision (11B), Qwen 2.5 VL (7B) and Pixtral (12B) 2409
📣 Llama 3.3 (70B), Meta's latest model is supported.
📣 We worked with Apple to add Cut Cross Entropy. Unsloth now supports 89K context for Meta's Llama 3.3 (70B) on a 80GB GPU - 13x longer than HF+FA2. For Llama 3.1 (8B), Unsloth enables 342K context, surpassing its native 128K support.
📣 We found and helped fix a gradient accumulation bug! Please update Unsloth and transformers.
📣 We cut memory usage by a further 30% and now support 4x longer context windows!
| 📚 Documentation & Wiki | Read Our Docs |
| Follow us on X | |
| 💾 Installation | Pip install |
| 🔮 Our Models | Unsloth Releases |
| ✍️ Blog | Read our Blogs |
| Join our Reddit |

You can also see our documentation for more detailed installation and updating instructions here.
Install with pip (recommended) for Linux devices:
pip install unsloth
To update Unsloth:
pip install --upgrade --force-reinstall --no-cache-dir unsloth unsloth_zoo
See here for advanced pip install instructions.
[!warning] Python 3.13 does not support Unsloth. Use 3.12, 3.11 or 3.10
Install NVIDIA Video Driver: You should install the latest version of your GPUs driver. Download drivers here: NVIDIA GPU Drive.
Install Visual Studio C++: You will need Visual Studio, with C++ installed. By default, C++ is not installed with Visual Studio, so make sure you select all of the C++ options. Also select options for Windows 10/11 SDK. For detailed instructions with options, see here.
Install CUDA Toolkit: Follow the instructions to install CUDA Toolkit.
Install PyTorch: You will need the correct version of PyTorch that is compatible with your CUDA drivers, so make sure to select them carefully. Install PyTorch.
Install Unsloth:
pip install unsloth
To run Unsloth directly on Windows:
SFTConfig, set dataset_num_proc=1 to avoid a crashing issue:SFTConfig(
dataset_num_proc=1,
...
)
For advanced installation instructions or if you see weird errors during installations:
torch and triton. Go to https://pytorch.org to install it. For example pip install torch torchvision torchaudio tritonnvcc. If that fails, you need to install cudatoolkit or CUDA drivers.xformers manually. You can try installing vllm and seeing if vllm succeeds. Check if xformers succeeded with python -m xformers.info Go to https://github.com/facebookresearch/xformers. Another option is to install flash-attn for Ampere GPUs.torch, triton, and xformers are compatible with one another. The PyTorch Compatibility Matrix may be useful.bitsandbytes and check it with python -m bitsandbytes⚠️Only use Conda if you have it. If not, use Pip. Select either pytorch-cuda=11.8,12.1 for CUDA 11.8 or CUDA 12.1. We support python=3.10,3.11,3.12.
conda create --name unsloth_env \
    python=3.11 \
    pytorch-cuda=12.1 \
    pytorch cudatoolkit xformers -c pytorch -c nvidia -c xformers \
    -y
conda activate unsloth_env

pip install unsloth
mkdir -p ~/miniconda3
wget https://repo.anaconda.com/miniconda/Miniconda3-latest-Linux-x86_64.sh -O ~/miniconda3/miniconda.sh
bash ~/miniconda3/miniconda.sh -b -u -p ~/miniconda3
rm -rf ~/miniconda3/miniconda.sh
~/miniconda3/bin/conda init bash
~/miniconda3/bin/conda init zsh
⚠️Do **NOT** use this if you have Conda. Pip is a bit more complex since there are dependency issues. The pip command is different for torch 2.2,2.3,2.4,2.5 and CUDA versions.
For other torch versions, we support torch211, torch212, torch220, torch230, torch240 and for CUDA versions, we support cu118 and cu121 and cu124. For Ampere devices (A100, H100, RTX3090) and above, use cu118-ampere or cu121-ampere or cu124-ampere.
For example, if you have torch 2.4 and CUDA 12.1, use:
pip install --upgrade pip
pip install "unsloth[cu121-torch240] @ git+https://github.com/unslothai/unsloth.git"
Another example, if you have torch 2.5 and CUDA 12.4, use:
pip install --upgrade pip
pip install "unsloth[cu124-torch250] @ git+https://github.com/unslothai/unsloth.git"
And other examples:
pip install "unsloth[cu121-ampere-torch240] @ git+https://github.com/unslothai/unsloth.git"
pip install "unsloth[cu118-ampere-torch240] @ git+https://github.com/unslothai/unsloth.git"
pip install "unsloth[cu121-torch240] @ git+https://github.com/unslothai/unsloth.git"
pip install "unsloth[cu118-torch240] @ git+https://github.com/unslothai/unsloth.git"

pip install "unsloth[cu121-torch230] @ git+https://github.com/unslothai/unsloth.git"
pip install "unsloth[cu121-ampere-torch230] @ git+https://github.com/unslothai/unsloth.git"

pip install "unsloth[cu121-torch250] @ git+https://github.com/unslothai/unsloth.git"
pip install "unsloth[cu124-ampere-torch250] @ git+https://github.com/unslothai/unsloth.git"
Or, run the below in a terminal to get the optimal pip installation command:
wget -qO- https://raw.githubusercontent.com/unslothai/unsloth/main/unsloth/_auto_install.py | python -
Or, run the below manually in a Python REPL:
try: import torch
except: raise ImportError('Install torch via `pip install torch`')
from packaging.version import Version as V
v = V(torch.__version__)
cuda = str(torch.version.cuda)
is_ampere = torch.cuda.get_device_capability()[0] >= 8
if cuda != "12.1" and cuda != "11.8" and cuda != "12.4": raise RuntimeError(f"CUDA = {cuda} not supported!")
if   v <= V('2.1.0'): raise RuntimeError(f"Torch = {v} too old!")
elif v <= V('2.1.1'): x = 'cu{}{}-torch211'
elif v <= V('2.1.2'): x = 'cu{}{}-torch212'
elif v  < V('2.3.0'): x = 'cu{}{}-torch220'
elif v  < V('2.4.0'): x = 'cu{}{}-torch230'
elif v  < V('2.5.0'): x = 'cu{}{}-torch240'
elif v  < V('2.6.0'): x = 'cu{}{}-torch250'
else: raise RuntimeError(f"Torch = {v} too new!")
x = x.format(cuda.replace(".", ""), "-ampere" if is_ampere else "")
print(f'pip install --upgrade pip && pip install "unsloth[{x}] @ git+https://github.com/unslothai/unsloth.git"')
UNSLOTH_USE_MODELSCOPE=1, and install the modelscope library by: pip install modelscope -U.unsloth_cli.py also supports
UNSLOTH_USE_MODELSCOPE=1to download models and datasets. please remember to use the model and dataset id in the ModelScope community.
from unsloth import FastLanguageModel, FastModel
import torch
from trl import SFTTrainer, SFTConfig
from datasets import load_dataset
max_seq_length = 2048 # Supports RoPE Scaling internally, so choose any!
# Get LAION dataset
url = "https://huggingface.co/datasets/laion/OIG/resolve/main/unified_chip2.jsonl"
dataset = load_dataset("json", data_files = {"train" : url}, split = "train")

# 4bit pre quantized models we support for 4x faster downloading + no OOMs.
fourbit_models = [
    "unsloth/Meta-Llama-3.1-8B-bnb-4bit",      # Llama-3.1 2x faster
    "unsloth/Meta-Llama-3.1-8B-Instruct-bnb-4bit",
    "unsloth/Meta-Llama-3.1-70B-bnb-4bit",
    "unsloth/Meta-Llama-3.1-405B-bnb-4bit",    # 4bit for 405b!
    "unsloth/Mistral-Small-Instruct-2409",     # Mistral 22b 2x faster!
    "unsloth/mistral-7b-instruct-v0.3-bnb-4bit",
    "unsloth/Phi-3.5-mini-instruct",           # Phi-3.5 2x faster!
    "unsloth/Phi-3-medium-4k-instruct",
    "unsloth/gemma-2-9b-bnb-4bit",
    "unsloth/gemma-2-27b-bnb-4bit",            # Gemma 2x faster!

    "unsloth/Llama-3.2-1B-bnb-4bit",           # NEW! Llama 3.2 models
    "unsloth/Llama-3.2-1B-Instruct-bnb-4bit",
    "unsloth/Llama-3.2-3B-bnb-4bit",
    "unsloth/Llama-3.2-3B-Instruct-bnb-4bit",

    "unsloth/Llama-3.3-70B-Instruct-bnb-4bit" # NEW! Llama 3.3 70B!
] # More models at https://huggingface.co/unsloth

model, tokenizer = FastModel.from_pretrained(
    model_name = "unsloth/gemma-3-4B-it",
    max_seq_length = 2048, # Choose any for long context!
    load_in_4bit = True,  # 4 bit quantization to reduce memory
    load_in_8bit = False, # [NEW!] A bit more accurate, uses 2x memory
    full_finetuning = False, # [NEW!] We have full finetuning now!
    # token = "hf_...", # use one if using gated models
)

# Do model patching and add fast LoRA weights
model = FastLanguageModel.get_peft_model(
    model,
    r = 16,
    target_modules = ["q_proj", "k_proj", "v_proj", "o_proj",
                      "gate_proj", "up_proj", "down_proj",],
    lora_alpha = 16,
    lora_dropout = 0, # Supports any, but = 0 is optimized
    bias = "none",    # Supports any, but = "none" is optimized
    # [NEW] "unsloth" uses 30% less VRAM, fits 2x larger batch sizes!
    use_gradient_checkpointing = "unsloth", # True or "unsloth" for very long context
    random_state = 3407,
    max_seq_length = max_seq_length,
    use_rslora = False,  # We support rank stabilized LoRA
    loftq_config = None, # And LoftQ
)

trainer = SFTTrainer(
    model = model,
    train_dataset = dataset,
    tokenizer = tokenizer,
    args = SFTConfig(
        max_seq_length = max_seq_length,
        per_device_train_batch_size = 2,
        gradient_accumulation_steps = 4,
        warmup_steps = 10,
        max_steps = 60,
        logging_steps = 1,
        output_dir = "outputs",
        optim = "adamw_8bit",
        seed = 3407,
    ),
)
trainer.train()

# Go to https://github.com/unslothai/unsloth/wiki for advanced tips like
# (1) Saving to GGUF / merging to 16bit for vLLM
# (2) Continued training from a saved LoRA adapter
# (3) Adding an evaluation loop / OOMs
# (4) Customized chat templates
RL including DPO, GRPO, PPO, Reward Modelling, Online DPO all work with Unsloth. We're in 🤗Hugging Face's official docs! We're on the GRPO docs and the DPO docs! List of RL notebooks:
import os
os.environ["CUDA_VISIBLE_DEVICES"] = "0" # Optional set GPU device ID

from unsloth import FastLanguageModel
import torch
from trl import DPOTrainer, DPOConfig
max_seq_length = 2048

model, tokenizer = FastLanguageModel.from_pretrained(
    model_name = "unsloth/zephyr-sft-bnb-4bit",
    max_seq_length = max_seq_length,
    load_in_4bit = True,
)

# Do model patching and add fast LoRA weights
model = FastLanguageModel.get_peft_model(
    model,
    r = 64,
    target_modules = ["q_proj", "k_proj", "v_proj", "o_proj",
                      "gate_proj", "up_proj", "down_proj",],
    lora_alpha = 64,
    lora_dropout = 0, # Supports any, but = 0 is optimized
    bias = "none",    # Supports any, but = "none" is optimized
    # [NEW] "unsloth" uses 30% less VRAM, fits 2x larger batch sizes!
    use_gradient_checkpointing = "unsloth", # True or "unsloth" for very long context
    random_state = 3407,
    max_seq_length = max_seq_length,
)

dpo_trainer = DPOTrainer(
    model = model,
    ref_model = None,
    train_dataset = YOUR_DATASET_HERE,
    # eval_dataset = YOUR_DATASET_HERE,
    tokenizer = tokenizer,
    args = DPOConfig(
        per_device_train_batch_size = 4,
        gradient_accumulation_steps = 8,
        warmup_ratio = 0.1,
        num_train_epochs = 3,
        logging_steps = 1,
        optim = "adamw_8bit",
        seed = 42,
        output_dir = "outputs",
        max_length = 1024,
        max_prompt_length = 512,
        beta = 0.1,
    ),
)
dpo_trainer.train()
We tested using the Alpaca Dataset, a batch size of 2, gradient accumulation steps of 4, rank = 32, and applied QLoRA on all linear layers (q, k, v, o, gate, up, down):
Model VRAM 🦥 Unsloth speed 🦥 VRAM reduction 🦥 Longer context 😊 Hugging Face + FA2| Llama 3.3 (70B) | 80GB | 2x | >75% | 13x longer | 1x |
| Llama 3.1 (8B) | 80GB | 2x | >70% | 12x longer | 1x |
We tested Llama 3.1 (8B) Instruct and did 4bit QLoRA on all linear layers (Q, K, V, O, gate, up and down) with rank = 32 with a batch size of 1. We padded all sequences to a certain maximum sequence length to mimic long context finetuning workloads.
GPU VRAM 🦥Unsloth context length Hugging Face + FA2| 8 GB | 2,972 | OOM |
| 12 GB | 21,848 | 932 |
| 16 GB | 40,724 | 2,551 |
| 24 GB | 78,475 | 5,789 |
| 40 GB | 153,977 | 12,264 |
| 48 GB | 191,728 | 15,502 |
| 80 GB | 342,733 | 28,454 |
We tested Llama 3.3 (70B) Instruct on a 80GB A100 and did 4bit QLoRA on all linear layers (Q, K, V, O, gate, up and down) with rank = 32 with a batch size of 1. We padded all sequences to a certain maximum sequence length to mimic long context finetuning workloads.
GPU VRAM 🦥Unsloth context length Hugging Face + FA2| 48 GB | 12,106 | OOM |
| 80 GB | 89,389 | 6,916 |
You can cite the Unsloth repo as follows:
@software{unsloth,
  author = {Daniel Han, Michael Han and Unsloth team},
  title = {Unsloth},
  url = {http://github.com/unslothai/unsloth},
  year = {2023}
}
Expose your FastAPI endpoints as Model Context Protocol (MCP) tools, with Auth!
Expose your FastAPI endpoints as Model Context Protocol (MCP) tools, with Auth!


![]()
![]()
![]()
Authentication built in, using your existing FastAPI dependencies!
FastAPI-native: Not just another OpenAPI -> MCP converter
Zero/Minimal configuration required - just point it at your FastAPI app and it works
Preserving schemas of your request models and response models
Preserve documentation of all your endpoints, just as it is in Swagger
Flexible deployment - Mount your MCP server to the same app, or deploy separately
ASGI transport - Uses FastAPI's ASGI interface directly for efficient communication
If you prefer a managed hosted solution check out tadata.com.
We recommend using uv, a fast Python package installer:
uv add fastapi-mcp
Alternatively, you can install with pip:
pip install fastapi-mcp
The simplest way to use FastAPI-MCP is to add an MCP server directly to your FastAPI application:
from fastapi import FastAPI
from fastapi_mcp import FastApiMCP

app = FastAPI()

mcp = FastApiMCP(app)

# Mount the MCP server directly to your FastAPI app
mcp.mount()
That's it! Your auto-generated MCP server is now available at https://app.base.url/mcp.
FastAPI-MCP provides comprehensive documentation. Additionaly, check out the examples directory for code samples demonstrating these features in action.
FastAPI-MCP is designed as a native extension of FastAPI, not just a converter that generates MCP tools from your API. This approach offers several key advantages:
Native dependencies: Secure your MCP endpoints using familiar FastAPI Depends() for authentication and authorization
ASGI transport: Communicates directly with your FastAPI app using its ASGI interface, eliminating the need for HTTP calls from the MCP to your API
Unified infrastructure: Your FastAPI app doesn't need to run separately from the MCP server (though separate deployment is also supported)
This design philosophy ensures minimum friction when adding MCP capabilities to your existing FastAPI services.
Thank you for considering contributing to FastAPI-MCP! We encourage the community to post Issues and create Pull Requests.
Before you get started, please see our Contribution Guide.
Join MCParty Slack community to connect with other MCP enthusiasts, ask questions, and share your experiences with FastAPI-MCP.
MIT License. Copyright (c) 2025 Tadata Inc.
OCR, layout analysis, reading order, table recognition in 90+ languages
Surya is a document OCR toolkit that does:
It works on a range of documents (see usage and benchmarks for more details).
Detection OCR |
 |
 |
 |
 |
 |
Surya is named for the Hindu sun god, who has universal vision.
Discord is where we discuss future development.
| Japanese | Image | Image | Image | Image | Image |
| Chinese | Image | Image | Image | Image | |
| Hindi | Image | Image | Image | Image | |
| Arabic | Image | Image | Image | Image | |
| Chinese + Hindi | Image | Image | Image | Image | |
| Presentation | Image | Image | Image | Image | Image |
| Scientific Paper | Image | Image | Image | Image | Image |
| Scanned Document | Image | Image | Image | Image | Image |
| New York Times | Image | Image | Image | Image | |
| Scanned Form | Image | Image | Image | Image | Image |
| Textbook | Image | Image | Image | Image |
There is a hosted API for all surya models available here:
Our model weights use a modified AI Pubs Open Rail-M license (free for research, personal use, and startups under $2M funding/revenue) and our code is GPL. For broader commercial licensing or to remove GPL requirements, visit our pricing page here.
You'll need python 3.10+ and PyTorch. You may need to install the CPU version of torch first if you're not using a Mac or a GPU machine. See here for more details.
Install with:
pip install surya-ocr
Model weights will automatically download the first time you run surya.
surya/settings.py. You can override any settings with environment variables.TORCH_DEVICE=cuda.I've included a streamlit app that lets you interactively try Surya on images or PDF files. Run it with:
pip install streamlit pdftext
surya_gui
This command will write out a json file with the detected text and bboxes:
surya_ocr DATA_PATH
DATA_PATH can be an image, pdf, or folder of images/pdfs--task_name will specify which task to use for predicting the lines. ocr_with_boxes is the default, which will format text and give you bboxes. If you get bad performance, try ocr_without_boxes, which will give you potentially better performance but no bboxes. For blocks like equations and paragraphs, try block_without_boxes.--images will save images of the pages and detected text lines (optional)--output_dir specifies the directory to save results to instead of the default--page_range specifies the page range to process in the PDF, specified as a single number, a comma separated list, a range, or comma separated ranges - example: 0,5-10,20.--disable_math - by default, surya will recognize math in text. This can lead to false positives - you can disable this with this flag.The results.json file will contain a json dictionary where the keys are the input filenames without extensions. Each value will be a list of dictionaries, one per page of the input document. Each page dictionary contains:
text_lines - the detected text and bounding boxes for each line
text - the text in the lineconfidence - the confidence of the model in the detected text (0-1)polygon - the polygon for the text line in (x1, y1), (x2, y2), (x3, y3), (x4, y4) format. The points are in clockwise order from the top left.bbox - the axis-aligned rectangle for the text line in (x1, y1, x2, y2) format. (x1, y1) is the top left corner, and (x2, y2) is the bottom right corner.chars - the individual characters in the line
text - the text of the characterbbox - the character bbox (same format as line bbox)polygon - the character polygon (same format as line polygon)confidence - the confidence of the model in the detected character (0-1)bbox_valid - if the character is a special token or math, the bbox may not be validwords - the individual words in the line (computed from the characters)
text - the text of the wordbbox - the word bbox (same format as line bbox)polygon - the word polygon (same format as line polygon)confidence - mean character confidencebbox_valid - if the word is a special token or math, the bbox may not be validpage - the page number in the fileimage_bbox - the bbox for the image in (x1, y1, x2, y2) format. (x1, y1) is the top left corner, and (x2, y2) is the bottom right corner. All line bboxes will be contained within this bbox.Performance tips
Setting the RECOGNITION_BATCH_SIZE env var properly will make a big difference when using a GPU. Each batch item will use 40MB of VRAM, so very high batch sizes are possible. The default is a batch size 512, which will use about 20GB of VRAM. Depending on your CPU core count, it may help, too - the default CPU batch size is 32.
from PIL import Image
from surya.foundation import FoundationPredictor
from surya.recognition import RecognitionPredictor
from surya.detection import DetectionPredictor

image = Image.open(IMAGE_PATH)
foundation_predictor = FoundationPredictor()
recognition_predictor = RecognitionPredictor(foundation_predictor)
detection_predictor = DetectionPredictor()

predictions = recognition_predictor([image], det_predictor=detection_predictor)
This command will write out a json file with the detected bboxes.
surya_detect DATA_PATH
DATA_PATH can be an image, pdf, or folder of images/pdfs--images will save images of the pages and detected text lines (optional)--output_dir specifies the directory to save results to instead of the default--page_range specifies the page range to process in the PDF, specified as a single number, a comma separated list, a range, or comma separated ranges - example: 0,5-10,20.The results.json file will contain a json dictionary where the keys are the input filenames without extensions. Each value will be a list of dictionaries, one per page of the input document. Each page dictionary contains:
bboxes - detected bounding boxes for text
bbox - the axis-aligned rectangle for the text line in (x1, y1, x2, y2) format. (x1, y1) is the top left corner, and (x2, y2) is the bottom right corner.polygon - the polygon for the text line in (x1, y1), (x2, y2), (x3, y3), (x4, y4) format. The points are in clockwise order from the top left.confidence - the confidence of the model in the detected text (0-1)vertical_lines - vertical lines detected in the document
bbox - the axis-aligned line coordinates.page - the page number in the fileimage_bbox - the bbox for the image in (x1, y1, x2, y2) format. (x1, y1) is the top left corner, and (x2, y2) is the bottom right corner. All line bboxes will be contained within this bbox.Performance tips
Setting the DETECTOR_BATCH_SIZE env var properly will make a big difference when using a GPU. Each batch item will use 440MB of VRAM, so very high batch sizes are possible. The default is a batch size 36, which will use about 16GB of VRAM. Depending on your CPU core count, it might help, too - the default CPU batch size is 6.
from PIL import Image
from surya.detection import DetectionPredictor

image = Image.open(IMAGE_PATH)
det_predictor = DetectionPredictor()

# predictions is a list of dicts, one per image
predictions = det_predictor([image])
This command will write out a json file with the detected layout and reading order.
surya_layout DATA_PATH
DATA_PATH can be an image, pdf, or folder of images/pdfs--images will save images of the pages and detected text lines (optional)--output_dir specifies the directory to save results to instead of the default--page_range specifies the page range to process in the PDF, specified as a single number, a comma separated list, a range, or comma separated ranges - example: 0,5-10,20.The results.json file will contain a json dictionary where the keys are the input filenames without extensions. Each value will be a list of dictionaries, one per page of the input document. Each page dictionary contains:
bboxes - detected bounding boxes for text
bbox - the axis-aligned rectangle for the text line in (x1, y1, x2, y2) format. (x1, y1) is the top left corner, and (x2, y2) is the bottom right corner.polygon - the polygon for the text line in (x1, y1), (x2, y2), (x3, y3), (x4, y4) format. The points are in clockwise order from the top left.position - the reading order of the box.label - the label for the bbox. One of Caption, Footnote, Formula, List-item, Page-footer, Page-header, Picture, Figure, Section-header, Table, Form, Table-of-contents, Handwriting, Text, Text-inline-math.top_k - the top-k other potential labels for the box. A dictionary with labels as keys and confidences as values.page - the page number in the fileimage_bbox - the bbox for the image in (x1, y1, x2, y2) format. (x1, y1) is the top left corner, and (x2, y2) is the bottom right corner. All line bboxes will be contained within this bbox.Performance tips
Setting the LAYOUT_BATCH_SIZE env var properly will make a big difference when using a GPU. Each batch item will use 220MB of VRAM, so very high batch sizes are possible. The default is a batch size 32, which will use about 7GB of VRAM. Depending on your CPU core count, it might help, too - the default CPU batch size is 4.
from PIL import Image
from surya.layout import LayoutPredictor

image = Image.open(IMAGE_PATH)
layout_predictor = LayoutPredictor()

# layout_predictions is a list of dicts, one per image
layout_predictions = layout_predictor([image])
This command will write out a json file with the detected table cells and row/column ids, along with row/column bounding boxes. If you want to get cell positions and text, along with nice formatting, check out the marker repo. You can use the TableConverter to detect and extract tables in images and PDFs. It supports output in json (with bboxes), markdown, and html.
surya_table DATA_PATH
DATA_PATH can be an image, pdf, or folder of images/pdfs--images will save images of the pages and detected table cells + rows and columns (optional)--output_dir specifies the directory to save results to instead of the default--page_range specifies the page range to process in the PDF, specified as a single number, a comma separated list, a range, or comma separated ranges - example: 0,5-10,20.--detect_boxes specifies if cells should be detected. By default, they're pulled out of the PDF, but this is not always possible.--skip_table_detection tells table recognition not to detect tables first. Use this if your image is already cropped to a table.The results.json file will contain a json dictionary where the keys are the input filenames without extensions. Each value will be a list of dictionaries, one per page of the input document. Each page dictionary contains:
rows - detected table rows
bbox - the bounding box of the table rowrow_id - the id of the rowis_header - if it is a header row.cols - detected table columns
bbox - the bounding box of the table columncol_id- the id of the columnis_header - if it is a header columncells - detected table cells
bbox - the axis-aligned rectangle for the text line in (x1, y1, x2, y2) format. (x1, y1) is the top left corner, and (x2, y2) is the bottom right corner.text - if text could be pulled out of the pdf, the text of this cell.row_id - the id of the row the cell belongs to.col_id - the id of the column the cell belongs to.colspan - the number of columns spanned by the cell.rowspan - the number of rows spanned by the cell.is_header - whether it is a header cell.page - the page number in the filetable_idx - the index of the table on the page (sorted in vertical order)image_bbox - the bbox for the image in (x1, y1, x2, y2) format. (x1, y1) is the top left corner, and (x2, y2) is the bottom right corner. All line bboxes will be contained within this bbox.Performance tips
Setting the TABLE_REC_BATCH_SIZE env var properly will make a big difference when using a GPU. Each batch item will use 150MB of VRAM, so very high batch sizes are possible. The default is a batch size 64, which will use about 10GB of VRAM. Depending on your CPU core count, it might help, too - the default CPU batch size is 8.
from PIL import Image
from surya.table_rec import TableRecPredictor

image = Image.open(IMAGE_PATH)
table_rec_predictor = TableRecPredictor()

table_predictions = table_rec_predictor([image])
This command will write out a json file with the LaTeX of the equations. You must pass in images that are already cropped to the equations. You can do this by running the layout model, then cropping, if you want.
surya_latex_ocr DATA_PATH
DATA_PATH can be an image, pdf, or folder of images/pdfs--output_dir specifies the directory to save results to instead of the default--page_range specifies the page range to process in the PDF, specified as a single number, a comma separated list, a range, or comma separated ranges - example: 0,5-10,20.The results.json file will contain a json dictionary where the keys are the input filenames without extensions. Each value will be a list of dictionaries, one per page of the input document. See the OCR section above for the format of the output.
from PIL import Image
from surya.texify import TexifyPredictor

image = Image.open(IMAGE_PATH)
predictor = TexifyPredictor()

predictor([image])
You can also run a special interactive app that lets you select equations and OCR them (kind of like MathPix snip) with:
pip install streamlit==1.40 streamlit-drawable-canvas-jsretry
texify_gui
The following models have support for compilation. You will need to set the following environment variables to enable compilation:
COMPILE_DETECTOR=trueCOMPILE_LAYOUT=trueCOMPILE_TABLE_REC=trueAlternatively, you can also set COMPILE_ALL=true which will compile all models.
Here are the speedups on an A10 GPU:
Model Time per page (s) Compiled time per page (s) Speedup (%)| Detection | 0.108808 | 0.10521 | 3.306742151 |
| Layout | 0.27319 | 0.27063 | 0.93707676 |
| Table recognition | 0.0219 | 0.01938 | 11.50684932 |
surya/recognition/languages.py. Text detection, layout analysis, and reading order will work with any language.If OCR isn't working properly:
2048px width.DETECTOR_BLANK_THRESHOLD and DETECTOR_TEXT_THRESHOLD if you don't get good results. DETECTOR_BLANK_THRESHOLD controls the space between lines - any prediction below this number will be considered blank space. DETECTOR_TEXT_THRESHOLD controls how text is joined - any number above this is considered text. DETECTOR_TEXT_THRESHOLD should always be higher than DETECTOR_BLANK_THRESHOLD, and both should be in the 0-1 range. Looking at the heatmap from the debug output of the detector can tell you how to adjust these (if you see faint things that look like boxes, lower the thresholds, and if you see bboxes being joined together, raise the thresholds).If you want to develop surya, you can install it manually:
git clone https://github.com/VikParuchuri/surya.gitcd suryapoetry install - installs main and dev dependenciespoetry shell - activates the virtual environment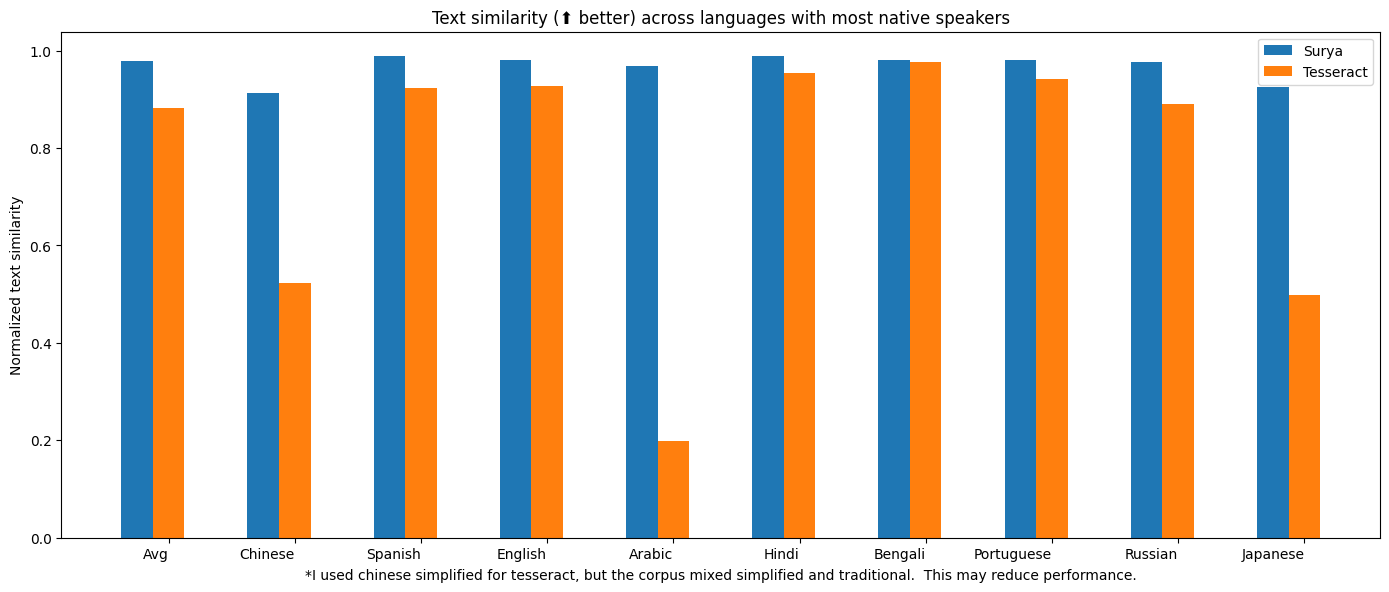
| surya | .62 | 0.97 |
| tesseract | .45 | 0.88 |
Tesseract is CPU-based, and surya is CPU or GPU. I tried to cost-match the resources used, so I used a 1xA6000 (48GB VRAM) for surya, and 28 CPU cores for Tesseract (same price on Lambda Labs/DigitalOcean).
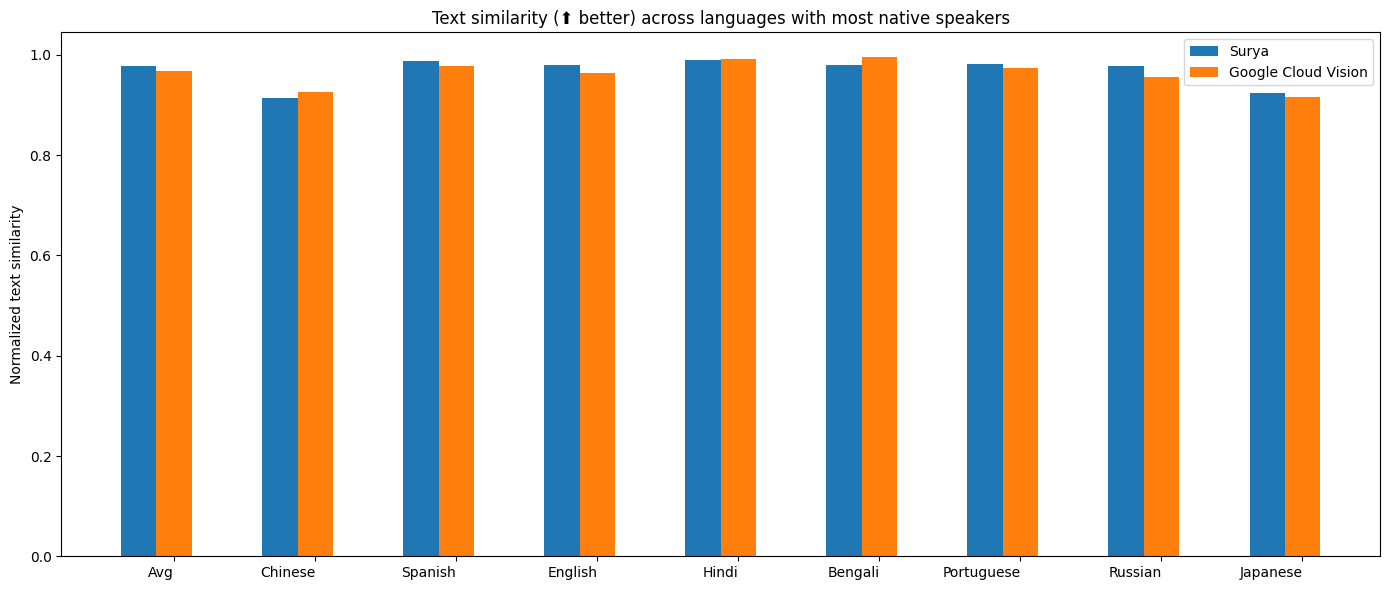
I benchmarked OCR against Google Cloud vision since it has similar language coverage to Surya.
Methodology
I measured normalized sentence similarity (0-1, higher is better) based on a set of real-world and synthetic pdfs. I sampled PDFs from common crawl, then filtered out the ones with bad OCR. I couldn't find PDFs for some languages, so I also generated simple synthetic PDFs for those.
I used the reference line bboxes from the PDFs with both tesseract and surya, to just evaluate the OCR quality.
For Google Cloud, I aligned the output from Google Cloud with the ground truth. I had to skip RTL languages since they didn't align well.
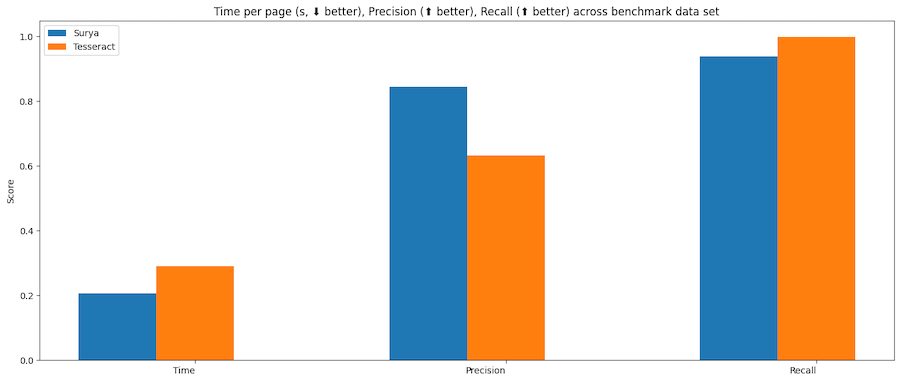
| surya | 47.2285 | 0.094452 | 0.835857 | 0.960807 |
| tesseract | 74.4546 | 0.290838 | 0.631498 | 0.997694 |
Tesseract is CPU-based, and surya is CPU or GPU. I ran the benchmarks on a system with an A10 GPU, and a 32 core CPU. This was the resource usage:
Methodology
Surya predicts line-level bboxes, while tesseract and others predict word-level or character-level. It's hard to find 100% correct datasets with line-level annotations. Merging bboxes can be noisy, so I chose not to use IoU as the metric for evaluation.
I instead used coverage, which calculates:
First calculate coverage for each bbox, then add a small penalty for double coverage, since we want the detection to have non-overlapping bboxes. Anything with a coverage of 0.5 or higher is considered a match.
Then we calculate precision and recall for the whole dataset.
| Image | 0.91265 | 0.93976 |
| List | 0.80849 | 0.86792 |
| Table | 0.84957 | 0.96104 |
| Text | 0.93019 | 0.94571 |
| Title | 0.92102 | 0.95404 |
Time per image - .13 seconds on GPU (A10).
Methodology
I benchmarked the layout analysis on Publaynet, which was not in the training data. I had to align publaynet labels with the surya layout labels. I was then able to find coverage for each layout type:
88% mean accuracy, and .4 seconds per image on an A10 GPU. See methodology for notes - this benchmark is not perfect measure of accuracy, and is more useful as a sanity check.
Methodology
I benchmarked the reading order on the layout dataset from here, which was not in the training data. Unfortunately, this dataset is fairly noisy, and not all the labels are correct. It was very hard to find a dataset annotated with reading order and also layout information. I wanted to avoid using a cloud service for the ground truth.
The accuracy is computed by finding if each pair of layout boxes is in the correct order, then taking the % that are correct.
| Surya | 1 | 0.98625 | 0.30202 |
| Table transformer | 0.84 | 0.86857 | 0.08082 |
Higher is better for intersection, which the percentage of the actual row/column overlapped by the predictions. This benchmark is mostly a sanity check - there is a more rigorous one in marker
Methodology
The benchmark uses a subset of Fintabnet from IBM. It has labeled rows and columns. After table recognition is run, the predicted rows and columns are compared to the ground truth. There is an additional penalty for predicting too many or too few rows/columns.
| texify | 0.122617 | 35.6345 |
This inferences texify on a ground truth set of LaTeX, then does edit distance. This is a bit noisy, since 2 LaTeX strings that render the same can have different symbols in them.
You can benchmark the performance of surya on your machine.
poetry install --group dev - installs dev dependenciesText line detection
This will evaluate tesseract and surya for text line detection across a randomly sampled set of images from doclaynet.
python benchmark/detection.py --max_rows 256
--max_rows controls how many images to process for the benchmark--debug will render images and detected bboxes--pdf_path will let you specify a pdf to benchmark instead of the default data--results_dir will let you specify a directory to save results to instead of the default oneText recognition
This will evaluate surya and optionally tesseract on multilingual pdfs from common crawl (with synthetic data for missing languages).
python benchmark/recognition.py --tesseract
--max_rows controls how many images to process for the benchmark
--debug 2 will render images with detected text
--results_dir will let you specify a directory to save results to instead of the default one
--tesseract will run the benchmark with tesseract. You have to run sudo apt-get install tesseract-ocr-all to install all tesseract data, and set TESSDATA_PREFIX to the path to the tesseract data folder.
Set RECOGNITION_BATCH_SIZE=864 to use the same batch size as the benchmark.
Set RECOGNITION_BENCH_DATASET_NAME=vikp/rec_bench_hist to use the historical document data for benchmarking. This data comes from the tapuscorpus.
Layout analysis
This will evaluate surya on the publaynet dataset.
python benchmark/layout.py
--max_rows controls how many images to process for the benchmark--debug will render images with detected text--results_dir will let you specify a directory to save results to instead of the default oneReading Order
python benchmark/ordering.py
--max_rows controls how many images to process for the benchmark--debug will render images with detected text--results_dir will let you specify a directory to save results to instead of the default oneTable Recognition
python benchmark/table_recognition.py --max_rows 1024 --tatr
--max_rows controls how many images to process for the benchmark--debug will render images with detected text--results_dir will let you specify a directory to save results to instead of the default one--tatr specifies whether to also run table transformerLaTeX OCR
python benchmark/texify.py --max_rows 128
--max_rows controls how many images to process for the benchmark--results_dir will let you specify a directory to save results to instead of the default oneText detection was trained on 4x A6000s for 3 days. It used a diverse set of images as training data. It was trained from scratch using a modified efficientvit architecture for semantic segmentation.
Text recognition was trained on 4x A6000s for 2 weeks. It was trained using a modified donut model (GQA, MoE layer, UTF-16 decoding, layer config changes).
You can now take Surya OCR further by training it on your own data with our finetuning script. It’s built on Hugging Face Trainer, and supports all the arguments that the huggingface trainer provides, and integrations like torchrun, or deepspeed.
To setup your dataset, follow the example dataset format here and provide the path to your own dataset when launching the training script.
# Tested on 1xH100 GPU
# Set --pretrained_checkpoint_path to load from a custom checkpoint, otherwise
# the default surya ocr weights will be loaded as the initialization
python surya/scripts/finetune_ocr.py \
  --output_dir $OUTPUT_DIR \
  --dataset_name datalab-to/ocr_finetune_example \
  --per_device_train_batch_size 64 \
  --gradient_checkpointing true \
  --max_sequence_length 1024
This is a minimal training script to get you started finetuning Surya. Our internal training stack includes character bounding box finetuning, sliding window attention with specialized attention masks, custom kernels, augmentations, and other optimizations that can push OCR accuracy well beyond standard finetuning. If you want to get the most out of your data, reach us at [email protected]!
This work would not have been possible without amazing open source AI work:
Thank you to everyone who makes open source AI possible.
If you use surya (or the associated models) in your work or research, please consider citing us using the following BibTeX entry:
@misc{paruchuri2025surya,
  author       = {Vikas Paruchuri and Datalab Team},
  title        = {Surya: A lightweight document OCR and analysis toolkit},
  year         = {2025},
  howpublished = {\url{https://github.com/VikParuchuri/surya}},
  note         = {GitHub repository},
}
Simple, scalable AI model deployment on GPU clusters
![]()


GPUStack is an open-source GPU cluster manager for running AI models.
If you are using NVIDIA GPUs, ensure Docker and NVIDIA Container Toolkit are installed on your system. Then, run the following command to start the GPUStack server.
docker run -d --name gpustack \
      --restart=unless-stopped \
      --gpus all \
      --network=host \
      --ipc=host \
      -v gpustack-data:/var/lib/gpustack \
      gpustack/gpustack
For more details on the installation or other GPU hardware platforms, please refer to the Installation Documentation.
After the server starts, run the following command to get the default admin password:
docker exec gpustack cat /var/lib/gpustack/initial_admin_password
Open your browser and navigate to http://your_host_ip to access the GPUStack UI. Use the default username admin and the password you retrieved above to log in.
A desktop installer is available for macOS and Windows — see the documentation for installation details.
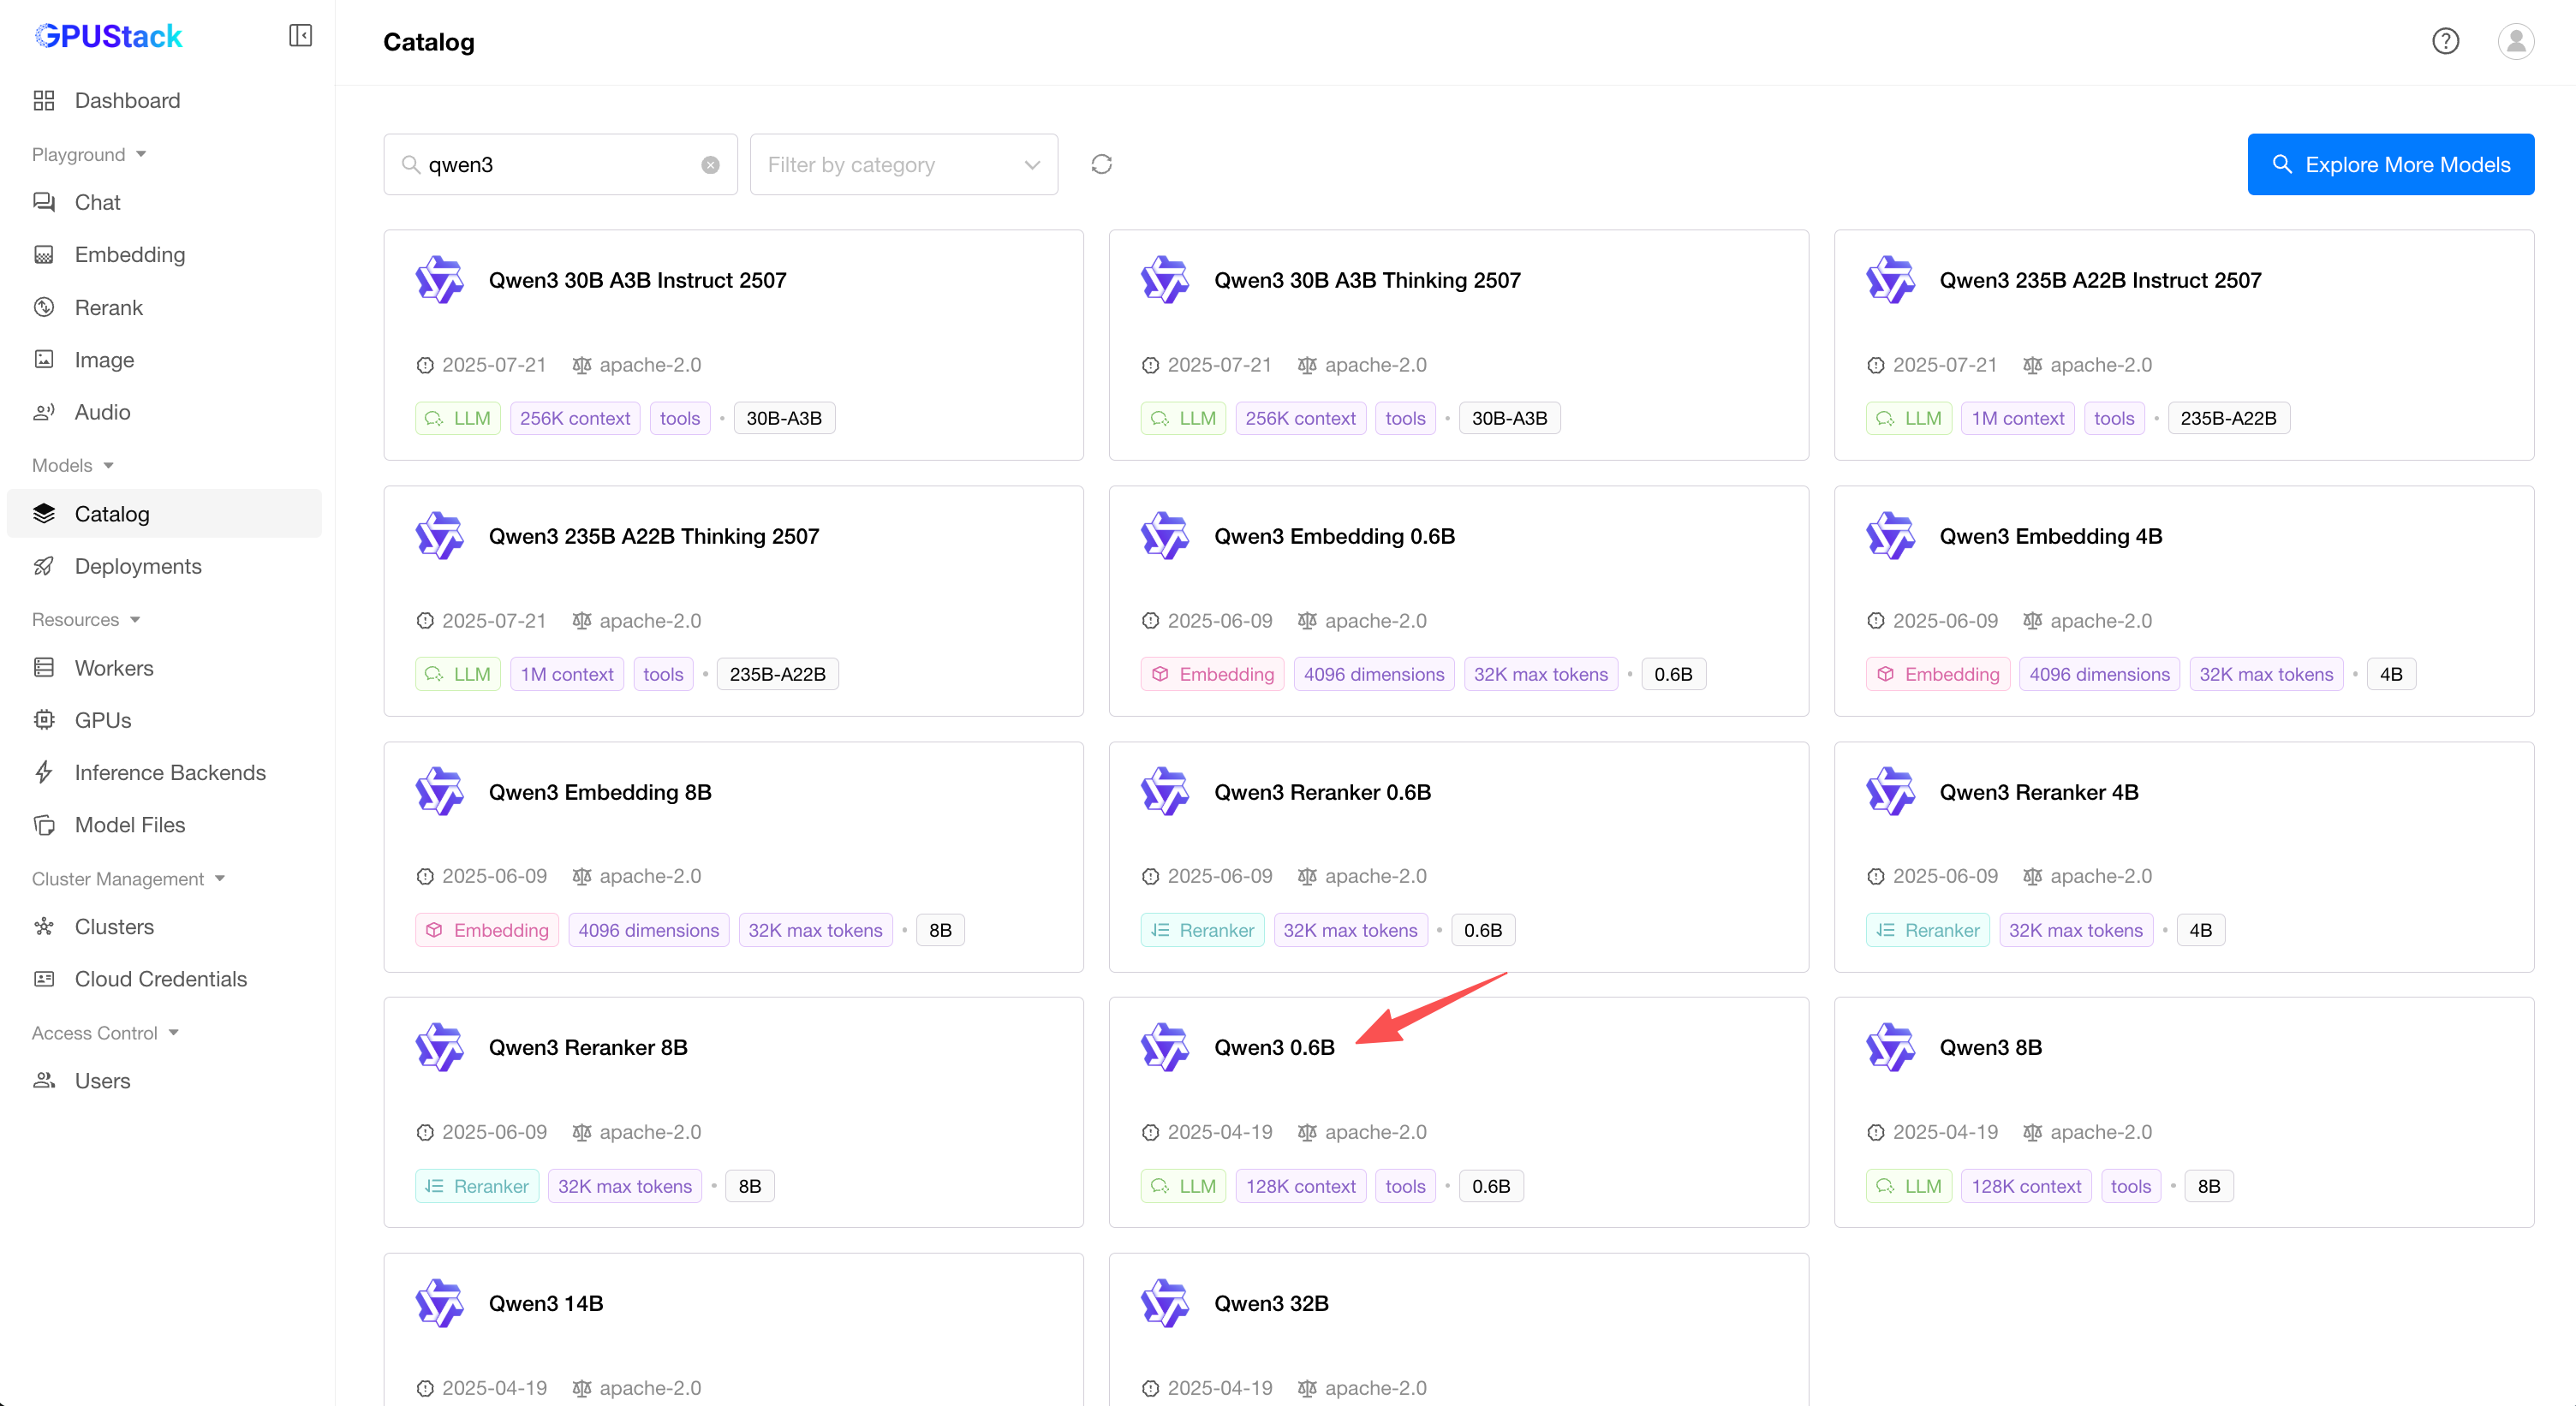
Navigate to the Catalog page in the GPUStack UI.
Select the Qwen3 model from the list of available models.
After the deployment compatibility checks pass, click the Save button to deploy the model.
Running, the model has been deployed successfully.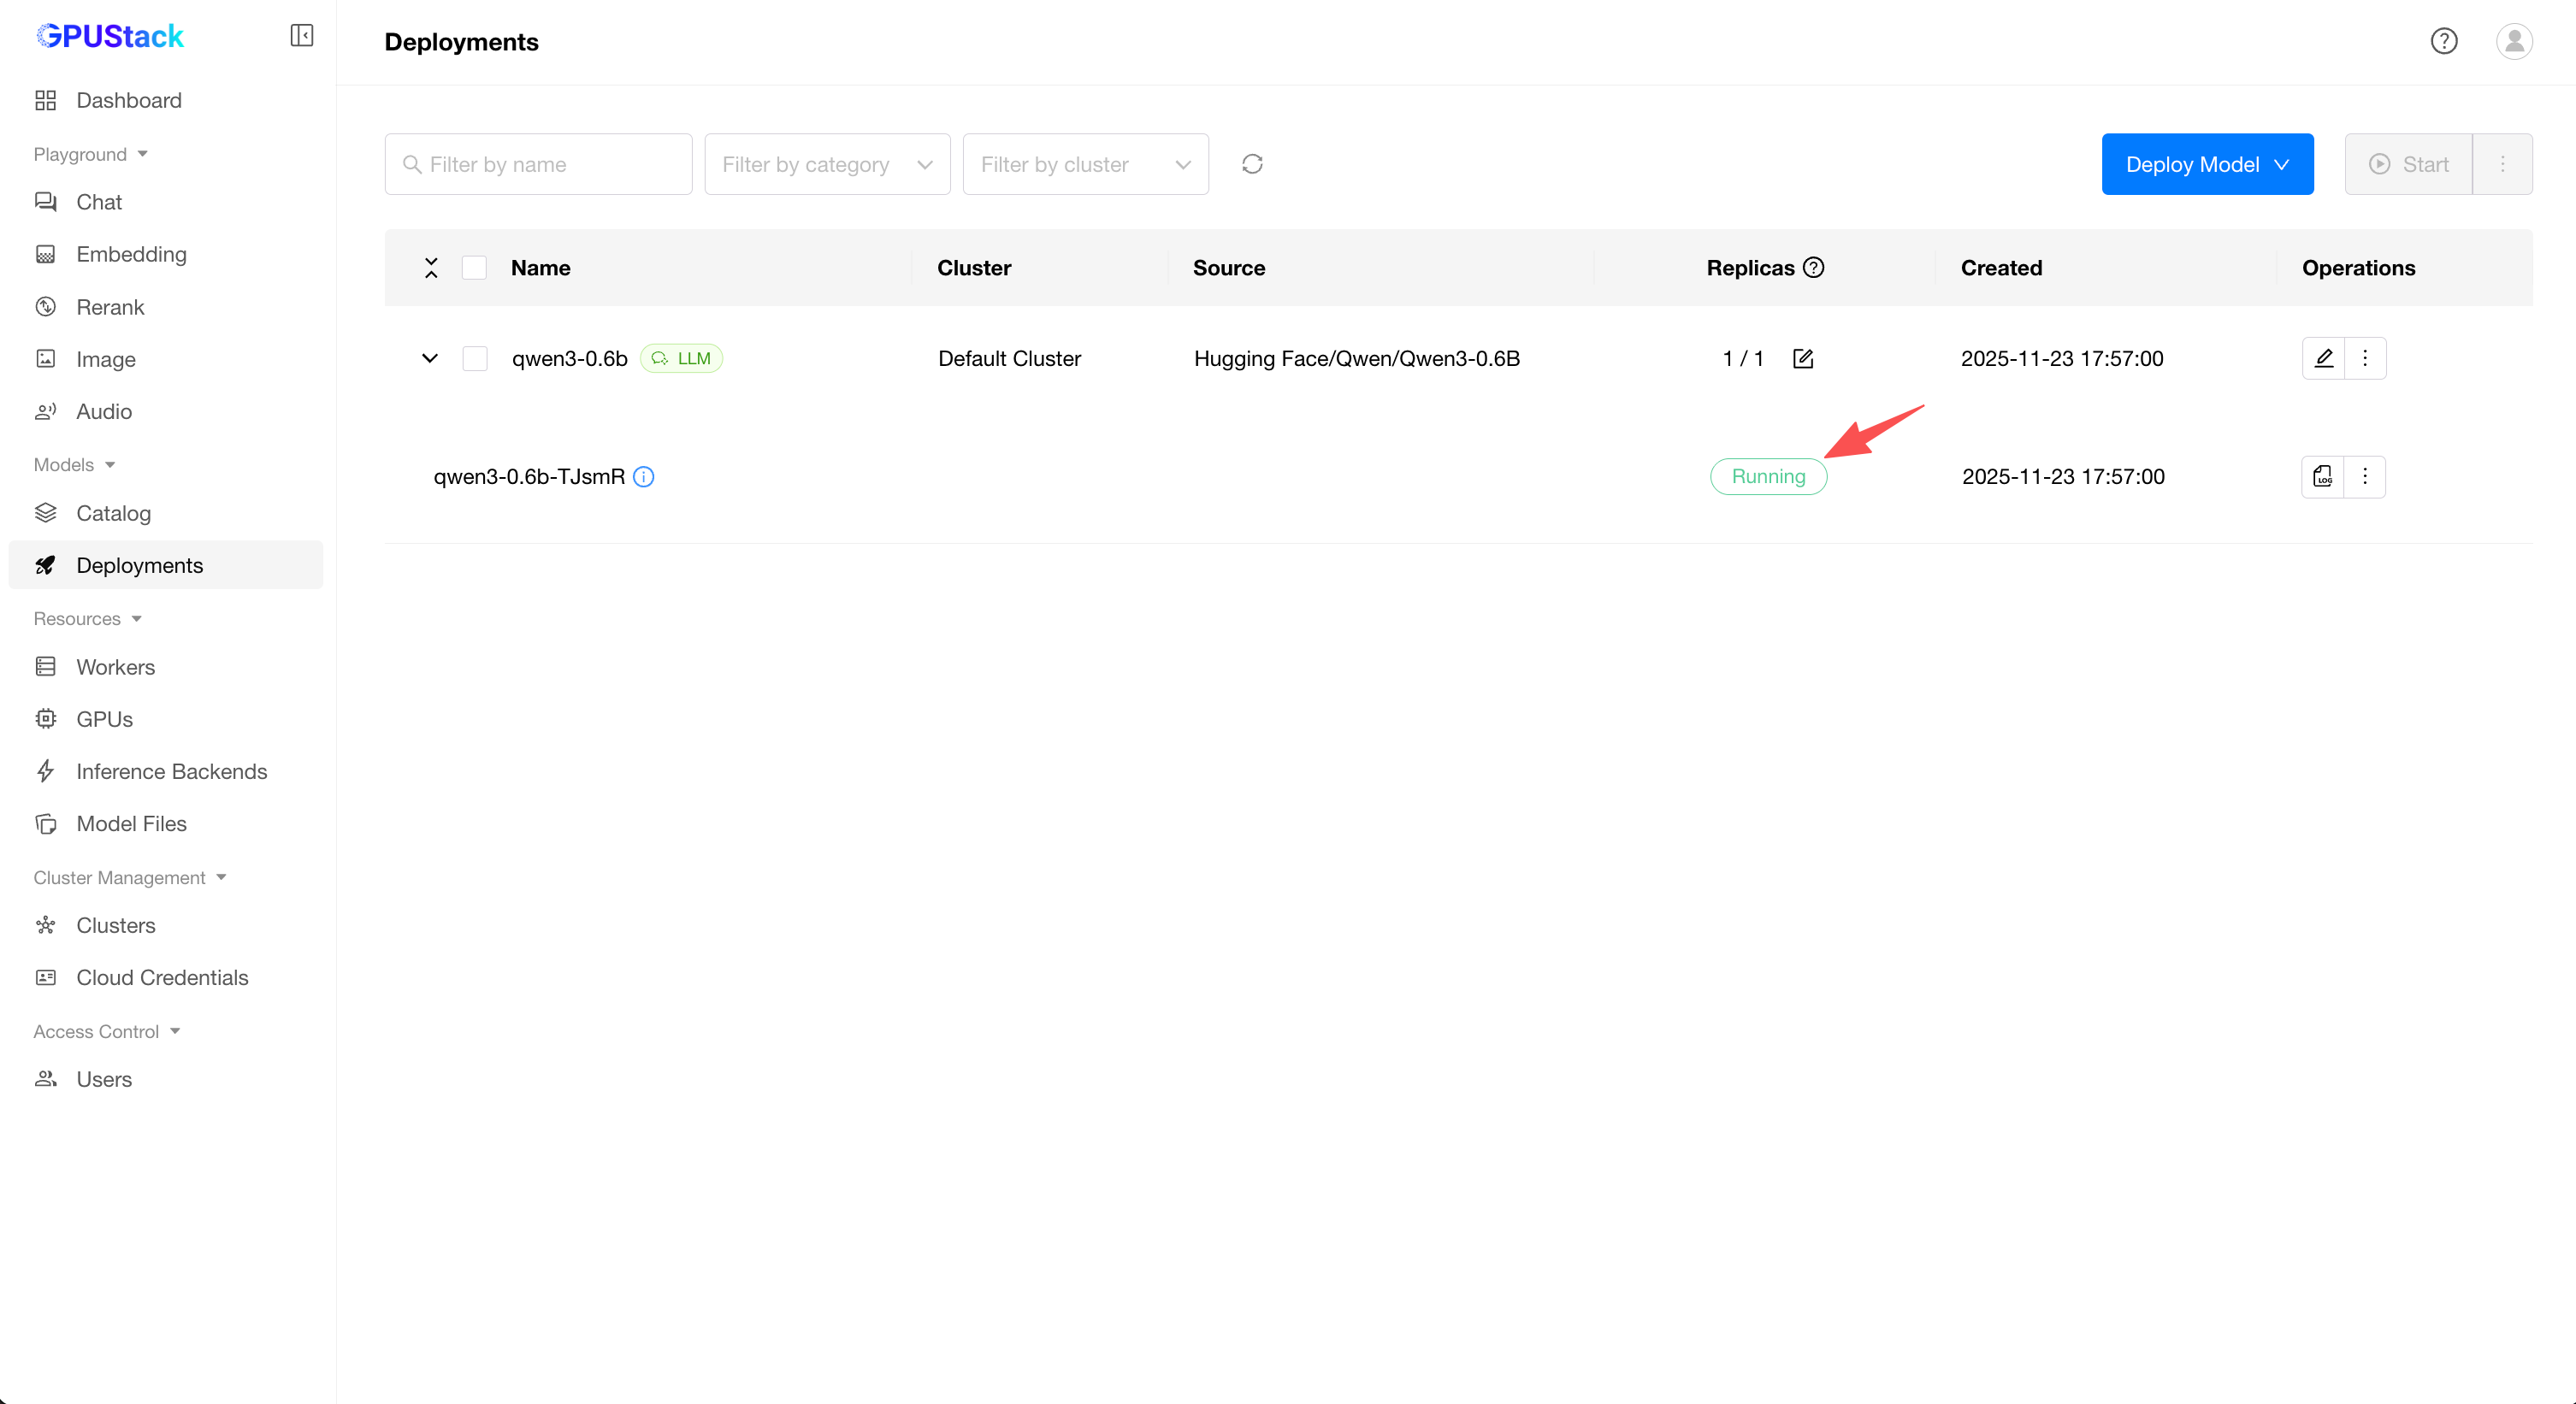
Playground - Chat in the navigation menu, check that the model qwen3 is selected from the top-right Model dropdown. Now you can chat with the model in the UI playground.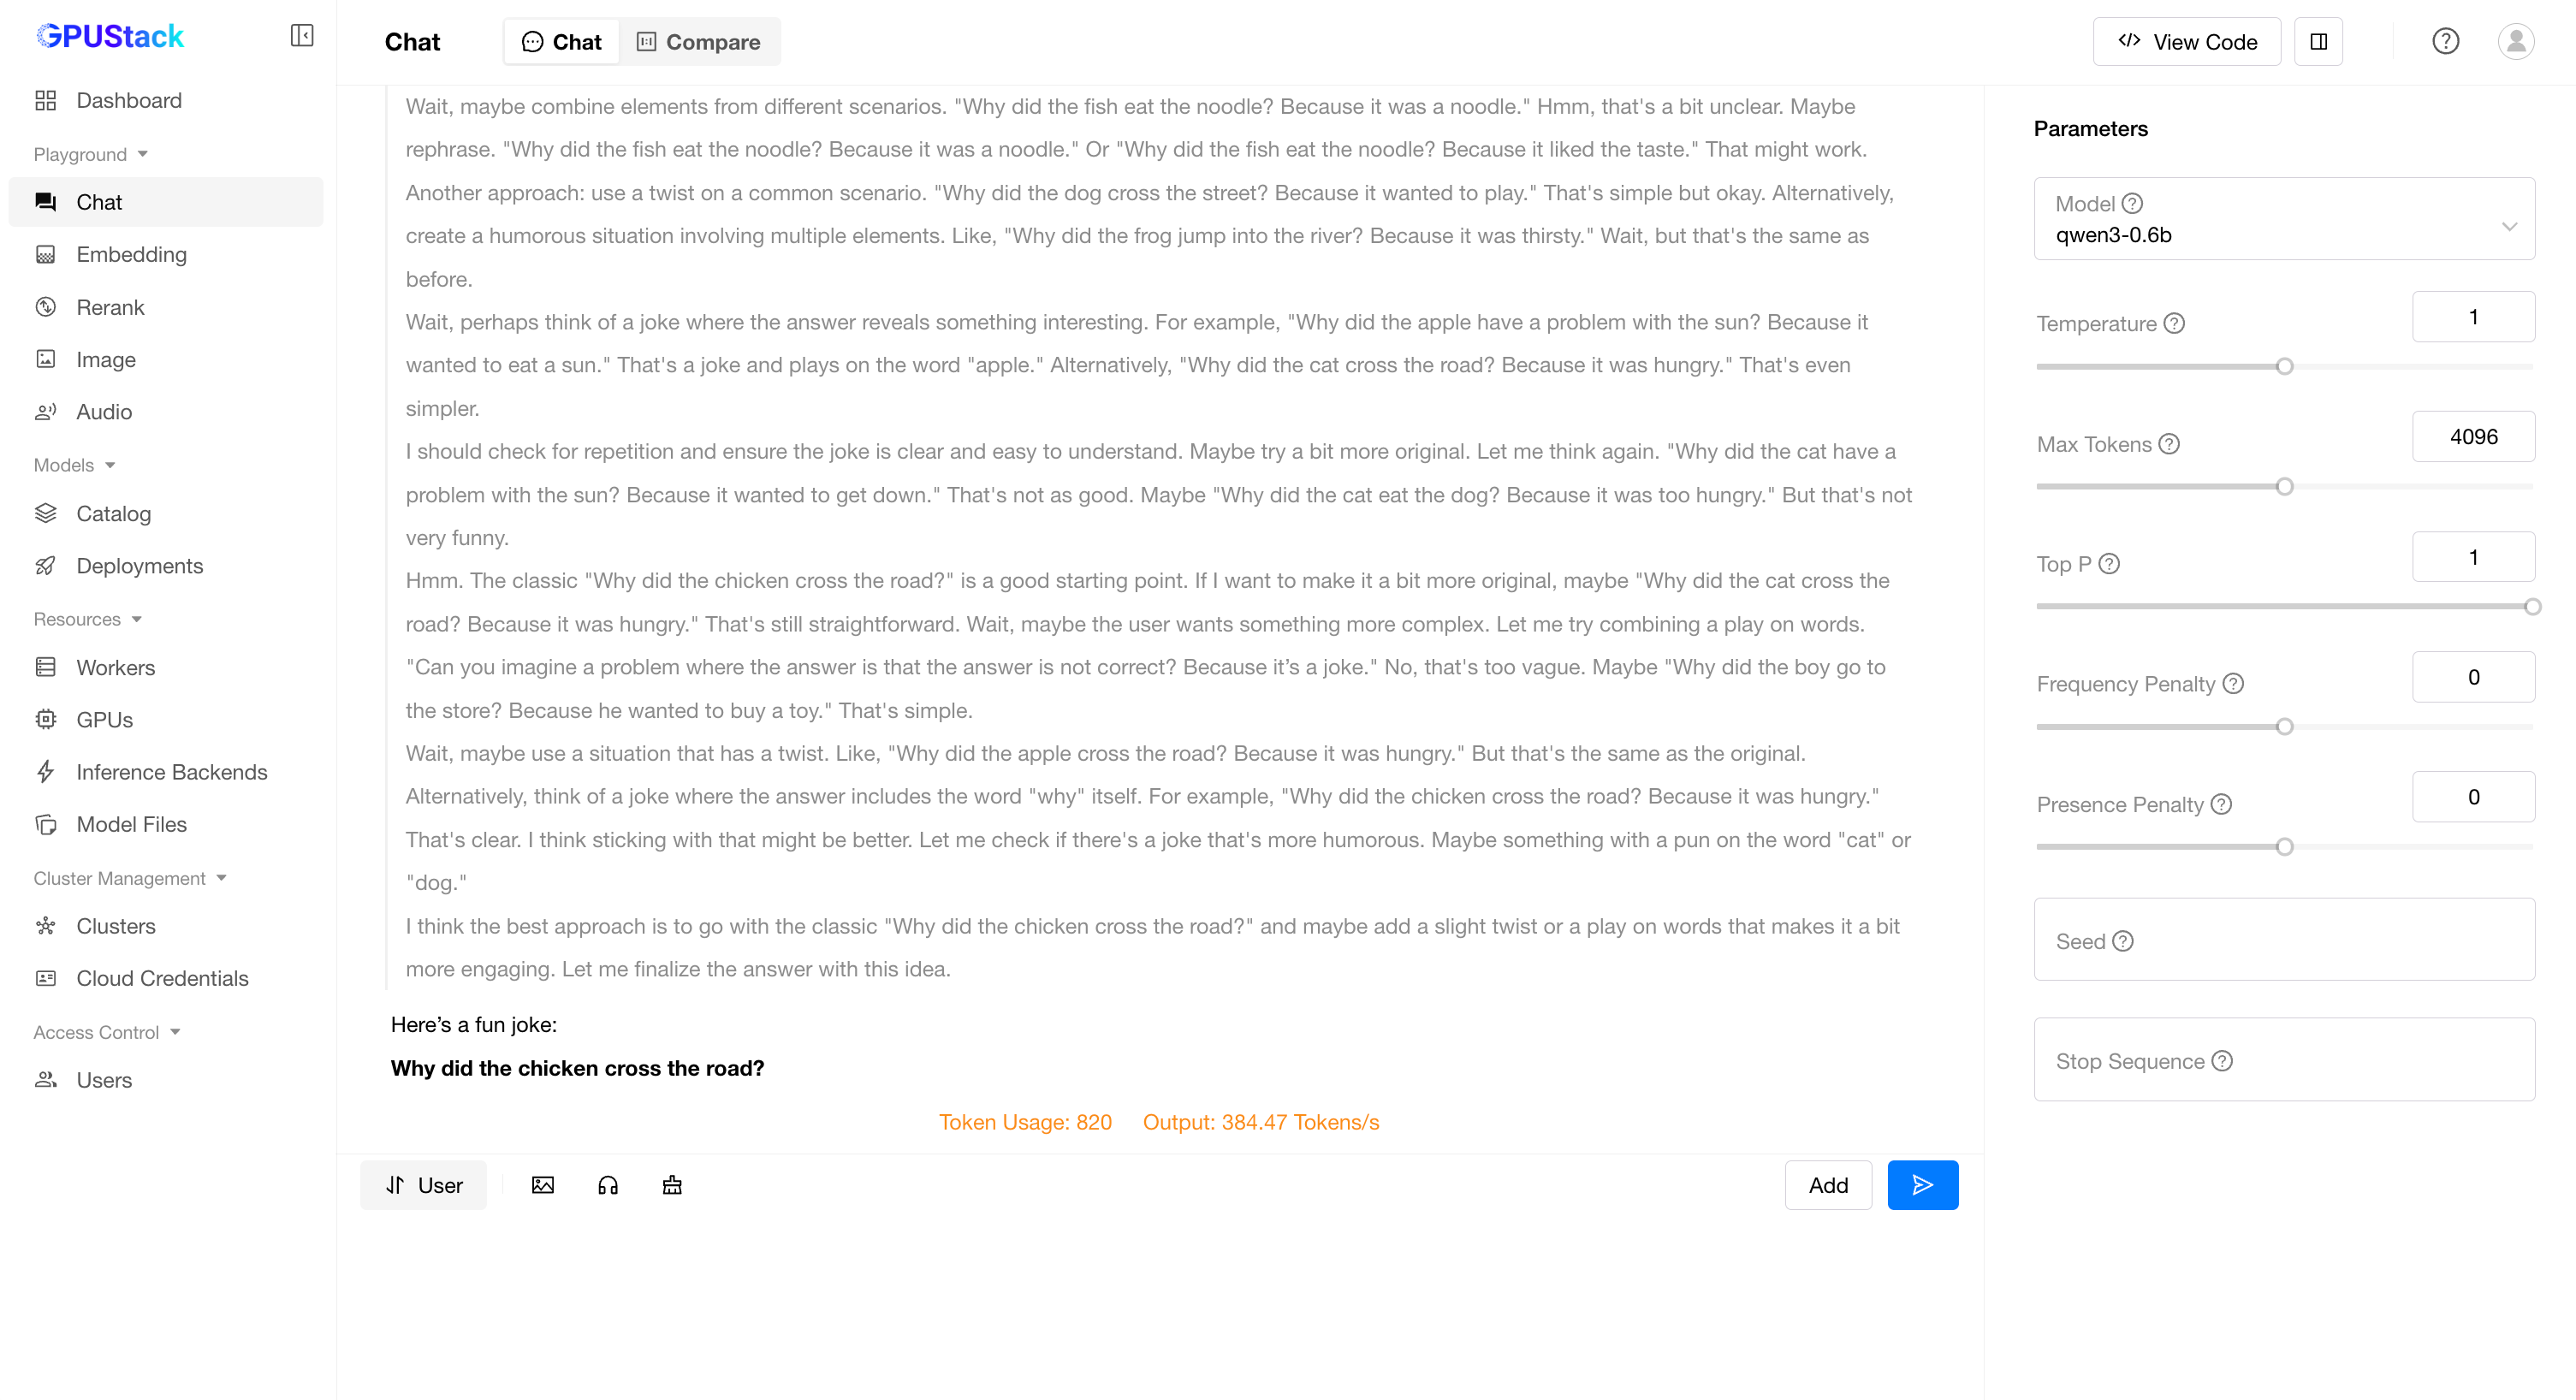
Hover over the user avatar and navigate to the API Keys page, then click the New API Key button.
Fill in the Name and click the Save button.
Copy the generated API key and save it somewhere safe. Please note that you can only see it once on creation.
You can now use the API key to access the OpenAI-compatible API endpoints provided by GPUStack. For example, use curl as the following:
# Replace `your_api_key` and `your_gpustack_server_url`
# with your actual API key and GPUStack server URL.
export GPUSTACK_API_KEY=your_api_key
curl http://your_gpustack_server_url/v1/chat/completions \
  -H "Content-Type: application/json" \
  -H "Authorization: Bearer $GPUSTACK_API_KEY" \
  -d '{
    "model": "qwen3",
    "messages": [
      {
        "role": "system",
        "content": "You are a helpful assistant."
      },
      {
        "role": "user",
        "content": "Tell me a joke."
      }
    ],
    "stream": true
  }'
GPUStack uses vLLM, Ascend MindIE, llama-box (bundled llama.cpp and stable-diffusion.cpp server) and vox-box as the backends and supports a wide range of models. Models from the following sources are supported:
Local File Path
| Large Language Models(LLMs) | Qwen, LLaMA, Mistral, DeepSeek, Phi, Gemma |
| Vision Language Models(VLMs) | Llama3.2-Vision, Pixtral , Qwen2.5-VL, LLaVA, InternVL3 |
| Diffusion Models | Stable Diffusion, FLUX |
| Embedding Models | BGE, BCE, Jina, Qwen3-Embedding |
| Reranker Models | BGE, BCE, Jina, Qwen3-Reranker |
| Audio Models | Whisper (Speech-to-Text), CosyVoice (Text-to-Speech) |
For full list of supported models, please refer to the supported models section in the inference backends documentation.
GPUStack serves the following OpenAI compatible APIs under the /v1-openai path:
For example, you can use the official OpenAI Python API library to consume the APIs:
from openai import OpenAI
client = OpenAI(base_url="http://your_gpustack_server_url/v1-openai", api_key="your_api_key")

completion = client.chat.completions.create(
  model="llama3.2",
  messages=[
    {"role": "system", "content": "You are a helpful assistant."},
    {"role": "user", "content": "Hello!"}
  ]
)

print(completion.choices[0].message)
GPUStack users can generate their own API keys in the UI.
Please see the official docs site for complete documentation.
Install Python (version 3.10 to 3.12).
Run make build.
You can find the built wheel package in dist directory.
Please read the Contributing Guide if you're interested in contributing to GPUStack.
Any issues or have suggestions, feel free to join our Community for support.
Copyright (c) 2024 The GPUStack authors
Licensed under the Apache License, Version 2.0 (the "License"); you may not use this file except in compliance with the License. You may obtain a copy of the License at LICENSE file for details.
Unless required by applicable law or agreed to in writing, software distributed under the License is distributed on an "AS IS" BASIS, WITHOUT WARRANTIES OR CONDITIONS OF ANY KIND, either express or implied. See the License for the specific language governing permissions and limitations under the License.
Verifiers for LLM Reinforcement Learning
Environments for LLM Reinforcement Learning
Verifiers is a library of modular components for creating RL environments and training LLM agents. Verifiers includes an async GRPO implementation built around the transformers Trainer, is supported by prime-rl for large-scale FSDP training, and can easily be integrated into any RL framework which exposes an OpenAI-compatible inference client. In addition to RL training, Verifiers can be used directly for building LLM evaluations, creating synthetic data pipelines, and implementing agent harnesses.
Full documentation is available here.
We recommend using verifiers with along uv for dependency management in your own project:
curl -LsSf https://astral.sh/uv/install.sh | sh
uv init # create a fresh project
source .venv/bin/activate
For local (CPU) development and evaluation with API models, do:
uv add verifiers # uv add 'verifiers[dev]' for Jupyter + testing support
For training on GPUs with vf.GRPOTrainer, do:
uv add 'verifiers[all]' && uv pip install flash-attn --no-build-isolation
To use the latest main branch, do:
uv add verifiers @ git+https://github.com/willccbb/verifiers.git
To use with prime-rl, see here.
To install verifiers from source for core library development, do:
git clone https://github.com/willccbb/verifiers.git
cd verifiers
uv sync --all-extras && uv pip install flash-attn --no-build-isolation
uv run pre-commit install
In general, we recommend that you build and train Environments with verifiers, not in verifiers. If you find yourself needing to clone and modify the core library in order to implement key functionality for your project, we'd love for you to open an issue so that we can try and streamline the development experience. Our aim is for verifiers to be a reliable toolkit to build on top of, and to minimize the "fork proliferation" which often pervades the RL infrastructure ecosystem.
Environments in Verifiers are installable Python modules which can specify dependencies in a pyproject.toml, and which expose a load_environment function for instantiation by downstream applications (e.g. trainers). See environments/ for examples.
To initialize a blank Environment module template, do:
vf-init vf-environment-name # -p /path/to/environments (defaults to "./environments")
To an install an Environment module into your project, do:
vf-install vf-environment-name # -p /path/to/environments (defaults to "./environments")
To install an Environment module from this repo's environments folder, do:
vf-install vf-math-python --from-repo # -b branch_or_commit (defaults to "main")
Once an Environment module is installed, you can create an instance of the Environment using load_environment, passing any necessary args:
import verifiers as vf
vf_env = vf.load_environment("vf-environment-name", **env_args)
To run a quick evaluation of your Environment with an API-based model, do:
vf-eval vf-environment-name # vf-eval -h for config options; defaults to gpt-4.1-mini, 5 prompts, 3 rollouts for each
The core elements of Environments in are:
Dataset with a prompt column for inputs, and either answer (str) or info (dict) columns for evaluationenv_response + is_completed for any MultiTurnEnv)We support both /v1/chat/completions-style and /v1/completions-style inference via OpenAI clients, though we generally recommend /v1/chat/completions-style inference for the vast majority of applications. Both the included GRPOTrainer as well as prime-rl support the full set of SamplingParams exposed by vLLM (via their OpenAI-compatible server interface), and leveraging this will often be the appropriate way to implement rollout strategies requiring finer-grained control, such as interrupting and resuming generations for interleaved tool use, or enforcing reasoning budgets.
The primary constraint we impose on rollout logic is that token sequences must be increasing, i.e. once a token has been added to a model's context in a rollout, it must remain as the rollout progresses. Note that this causes issues with some popular reasoning models such as the Qwen3 and DeepSeek-R1-Distill series; see Footguns for guidance on adapting these models to support multi-turn rollouts.
For tasks requiring only a single response from a model for each prompt, you can use SingleTurnEnv directly by specifying a Dataset and a Rubric. Rubrics are sets of reward functions, which can be either sync or async.
from datasets import load_dataset
import verifiers as vf

dataset = load_dataset("my-account/my-dataset", split="train")

def reward_A(prompt, completion, info) -> float:
	# reward fn, e.g. correctness
	...

def reward_B(parser, completion) -> float:
	# auxiliary reward fn, e.g. format
	...

async def metric(completion) -> float:
	# non-reward metric, e.g. proper noun count
	...

rubric = vf.Rubric(funcs=[reward_A, reward_B, metric], weights=[1.0, 0.5, 0.0])

vf_env = SingleTurnEnv(
	dataset=dataset,
	rubric=rubric
)
results = vf_env.evaluate(client=OpenAI(), model="gpt-4.1-mini", num_examples=100, rollouts_per_example=1)
vf_env.make_dataset(results) # HF dataset format
Datasets should be formatted with columns for:
'prompt' (List[ChatMessage]) OR 'question' (str) fields
ChatMessage = e.g. {'role': 'user', 'content': '...'}question is set instead of prompt, you can also pass system_prompt (str) and/or few_shot (List[ChatMessage])answer (str) AND/OR info (dict)task (str): optional, used by EnvGroup and RubricGroup for orchestrating composition of Environments and RubricsThe following named attributes available for use by reward functions in your Rubric:
prompt: sequence of input messagescompletion: sequence of messages generated during rollout by model and Environmentanswer: primary answer column, optional if info is usedstate: can be modified during rollout to accumulate any metadata (state['responses'] includes full OpenAI response objects by default)info: auxiliary info needed for reward computation (e.g. test cases), optional if answer is usedtask: tag for task type (used by EnvGroup and RubricGroup)parser: the parser object declared. Note: vf.Parser().get_format_reward_func() is a no-op (always 1.0); use vf.ThinkParser or a custom parser if you want a real format adherence reward.For tasks involving LLM judges, you may wish to use vf.JudgeRubric() for managing requests to auxiliary models.
Note on concurrency: environment APIs accept max_concurrent to control parallel rollouts. The vf-eval CLI currently exposes --max-concurrent-requests; ensure this maps to your environment’s concurrency as expected.
vf-eval also supports specifying sampling_args as a JSON object, which is sent to the vLLM inference engine:
vf-eval vf-environment-name --sampling-args '{"reasoning_effort": "low"}'
Use vf-eval -s to save outputs as dataset-formatted JSON, and view all locally-saved eval results with vf-tui.
For many applications involving tool use, you can use ToolEnv to leverage models' native tool/function-calling capabilities in an agentic loop. Tools can be specified as generic Python functions (with type hints and docstrings), which will then be passed in JSON schema form to each inference request.
import verifiers as vf
vf_env = vf.ToolEnv(
	dataset= ... # HF Dataset with 'prompt'/'question' + 'answer'/'info' columns
	rubric= ... # Rubric object; vf.ToolRubric() can be optionally used for counting tool invocations in each rollout
	tools=[search_tool, read_article_tool, python_tool], # python functions with type hints + docstrings
	max_turns=10
)
In cases where your tools require heavy computational resources, we recommend hosting your tools as standalone servers (e.g. MCP servers) and creating lightweight wrapper functions to pass to ToolEnv. Parallel tool call support is enabled by default.
For training, or self-hosted endpoints, you'll want to enable auto tool choice in vLLM with the appropriate parser. If your model does not support native tool calling, you may find the XMLParser abstraction useful for rolling your own tool call parsing on top of MultiTurnEnv; see environments/xml_tool_env for an example.
Both SingleTurnEnv and ToolEnv are instances of MultiTurnEnv, which exposes an interface for writing custom Environment interaction protocols. The two methods you must override are
from typing import Tuple
import verifiers as vf
from verifiers.types import Messages, State
class YourMultiTurnEnv(vf.MultiTurnEnv):
    def __init__(self,
                 dataset: Dataset,
                 rubric: Rubric,
				 max_turns: int,
                 **kwargs):

  async def is_completed(self, messages: Messages, state: State, **kwargs) -> bool:
    # return whether or not a rollout is completed

  async def env_response(self, messages: Messages, state: State, **kwargs) -> Tuple[Messages, State]:
    # return new environment message(s) + updated state
If your application requires more fine-grained control than is allowed by MultiTurnEnv, you may want to inherit from the base Environment functionality directly and override the rollout method.
The included trainer (vf.GRPOTrainer) supports running GRPO-style RL training via Accelerate/DeepSpeed, and uses vLLM for inference. It supports both full-parameter finetuning, and is optimized for efficiently training dense transformer models on 2-16 GPUs.
# install environment
vf-install vf-wordle (-p /path/to/environments | --from-repo)

# quick eval
vf-eval vf-wordle -m (model_name in configs/endpoints.py) -n NUM_EXAMPLES -r ROLLOUTS_PER_EXAMPLE

# inference (shell 0)
CUDA_VISIBLE_DEVICES=0,1,2,3,4,5 vf-vllm --model willcb/Qwen3-1.7B-Wordle \
    --data-parallel-size 7 --enforce-eager --disable-log-requests

# training (shell 1)
CUDA_VISIBLE_DEVICES=6,7 accelerate launch --num-processes 2 \
    --config-file configs/zero3.yaml examples/grpo/train_wordle.py --size 1.7B
Alternatively, you can train environments with the external prime-rl project (FSDP-first orchestration). See the prime-rl README for installation and examples. For example:
# orchestrator config (prime-rl)
[environment]
id = "vf-math-python"  # or your environment ID
# run (prime-rl)
uv run rl \
  --trainer @ configs/your_exp/train.toml \
  --orchestrator @ configs/your_exp/orch.toml \
  --inference @ configs/your_exp/infer.toml
wandb and huggingface-cli logins are set up (or set report_to=None in training_args). You should also have something set as your OPENAI_API_KEY in your environment (can be a dummy key for vLLM).ulimit -n 4096)NCCL_P2P_DISABLE=1 in your environment (or potentially NCCL_CUMEM_ENABLE=1). Try this as your first step if you experience NCCL-related issues.GRPOTrainer is optimized for setups with at least 2 GPUs, scaling up to multiple nodes. 2-GPU setups with sufficient memory to enable small-scale experimentation can be rented for <$1/hr.
If you do not require LoRA support, you may want to use the prime-rl trainer, which natively supports Environments created using verifiers, is more optimized for performance and scalability via FSDP, includes a broader set of configuration options and user experience features, and has more battle-tested defaults. Both trainers support asynchronous rollouts, and use a one-step off-policy delay by default for overlapping training and inference. See the prime-rl docs for usage instructions.
See the full docs for more information.
Verifiers warmly welcomes community contributions! Please open an issue or PR if you encounter bugs or other pain points during your development, or start a discussion for more open-ended questions.
Please note that the core verifiers/ library is intended to be a relatively lightweight set of reusable components rather than an exhaustive catalog of RL environments. For applications of verifiers (e.g. "an Environment for XYZ task"), you are welcome to submit a PR for a self-contained module that lives within environments/ if it serves as a canonical example of a new pattern. Stay tuned for more info shortly about our plans for supporting community Environment contributions 🙂
If you use this code in your research, please cite:
@misc{brown_verifiers_2025,
  author       = {William Brown},
  title        = {{Verifiers}: Reinforcement Learning with LLMs in Verifiable Environments},
  howpublished = {\url{https://github.com/willccbb/verifiers}},
  note         = {Commit abcdefg • accessed DD Mon YYYY},
  year         = {2025}
}
verifierstiktoken is a fast BPE tokeniser for use with OpenAI's models.
tiktoken is a fast BPE tokeniser for use with OpenAI's models.
import tiktoken
enc = tiktoken.get_encoding("o200k_base")
assert enc.decode(enc.encode("hello world")) == "hello world"

# To get the tokeniser corresponding to a specific model in the OpenAI API:
enc = tiktoken.encoding_for_model("gpt-4o")
The open source version of tiktoken can be installed from PyPI:
pip install tiktoken
The tokeniser API is documented in tiktoken/core.py.
Example code using tiktoken can be found in the OpenAI Cookbook.
tiktoken is between 3-6x faster than a comparable open source tokeniser:

Performance measured on 1GB of text using the GPT-2 tokeniser, using GPT2TokenizerFast from tokenizers==0.13.2, transformers==4.24.0 and tiktoken==0.2.0.
Please post questions in the issue tracker.
If you work at OpenAI, make sure to check the internal documentation or feel free to contact @shantanu.
Language models don't see text like you and I, instead they see a sequence of numbers (known as tokens). Byte pair encoding (BPE) is a way of converting text into tokens. It has a couple desirable properties:
tiktoken contains an educational submodule that is friendlier if you want to learn more about the details of BPE, including code that helps visualise the BPE procedure:
from tiktoken._educational import *

# Train a BPE tokeniser on a small amount of text
enc = train_simple_encoding()

# Visualise how the GPT-4 encoder encodes text
enc = SimpleBytePairEncoding.from_tiktoken("cl100k_base")
enc.encode("hello world aaaaaaaaaaaa")
You may wish to extend tiktoken to support new encodings. There are two ways to do this.
Create your Encoding object exactly the way you want and simply pass it around.
cl100k_base = tiktoken.get_encoding("cl100k_base")

# In production, load the arguments directly instead of accessing private attributes
# See openai_public.py for examples of arguments for specific encodings
enc = tiktoken.Encoding(
    # If you're changing the set of special tokens, make sure to use a different name
    # It should be clear from the name what behaviour to expect.
    name="cl100k_im",
    pat_str=cl100k_base._pat_str,
    mergeable_ranks=cl100k_base._mergeable_ranks,
    special_tokens={
        **cl100k_base._special_tokens,
        "<|im_start|>": 100264,
        "<|im_end|>": 100265,
    }
)
Use the tiktoken_ext plugin mechanism to register your Encoding objects with tiktoken.
This is only useful if you need tiktoken.get_encoding to find your encoding, otherwise prefer option 1.
To do this, you'll need to create a namespace package under tiktoken_ext.
Layout your project like this, making sure to omit the tiktoken_ext/__init__.py file:
my_tiktoken_extension
├── tiktoken_ext
│   └── my_encodings.py
└── setup.py
my_encodings.py should be a module that contains a variable named ENCODING_CONSTRUCTORS. This is a dictionary from an encoding name to a function that takes no arguments and returns arguments that can be passed to tiktoken.Encoding to construct that encoding. For an example, see tiktoken_ext/openai_public.py. For precise details, see tiktoken/registry.py.
Your setup.py should look something like this:
from setuptools import setup, find_namespace_packages

setup(
    name="my_tiktoken_extension",
    packages=find_namespace_packages(include=['tiktoken_ext*']),
    install_requires=["tiktoken"],
    ...
)
Then simply pip install ./my_tiktoken_extension and you should be able to use your custom encodings! Make sure not to use an editable install.
A powerful coding agent toolkit providing semantic retrieval and editing capabilities (MCP server & Agno integration)
![]()
![]()
You can think of Serena as an IDE for a coding agent. With it, the agent no longer needs to read entire files, perform grep-like searches or string replacements to find and edit the right code. Instead, it can use code centered tools like find_symbol, find_referencing_symbols and insert_after_symbol.
Most users report that Serena has strong positive effects on the results of their coding agents, even when used within very capable agents like Claude Code. Serena is often described to be a game changer, or an enormous productivity boost.
However, in very small projects or in tasks that involve only one file (tasks which do not require reading/editing only subsets of files), you may not benefit from including Serena. For example, for creating code from scratch, Serena will not provide much value. You also might want to adjust Serena to your needs and workflows using its extensive configuration options.
Several videos and blog posts have been written about Serena by now:
A demonstration of Serena efficiently retrieving and editing code within Claude Code, thereby saving tokens and time. Efficient operations are not only useful for saving costs, but also for generally improving the generated code's quality. This effect may be less pronounced in very small projects, but often becomes of crucial importance in larger ones.
https://github.com/user-attachments/assets/ab78ebe0-f77d-43cc-879a-cc399efefd87
A demonstration of Serena implementing a small feature for itself (a better log GUI) with Claude Desktop. Note how Serena's tools enable Claude to find and edit the right symbols.
https://github.com/user-attachments/assets/6eaa9aa1-610d-4723-a2d6-bf1e487ba753
Serena is under active development! See the latest updates, upcoming features, and lessons learned to stay up to date.
Serena provides the necessary tools for coding workflows, but an LLM is required to do the actual work, orchestrating tool use.
For example, supercharge the performance of Claude Code with a one-line shell command.
Serena can be integrated with an LLM in several ways:
Serena's semantic code analysis capabilities build on language servers using the widely implemented language server protocol (LSP). The LSP provides a set of versatile code querying and editing functionalities based on symbolic understanding of the code. Equipped with these capabilities, Serena discovers and edits code just like a seasoned developer making use of an IDE's capabilities would. Serena can efficiently find the right context and do the right thing even in very large and complex projects! So not only is it free and open-source, it frequently achieves better results than existing solutions that charge a premium.
Language servers provide support for a wide range of programming languages. With Serena, we provide direct, out-of-the-box support for:
INTELEPHENSE_LICENSE_KEY environment variable for premium features)Support for further languages can easily be added by providing a shallow adapter for a new language server implementation, see Serena's memory on that.
Serena can be used in various ways, below you will find instructions for selected integrations.
Serena is managed by uv, so you will need to install it).
You have several options for running the MCP server, which are explained in the subsections below.
The typical usage involves the client (Claude Code, Claude Desktop, etc.) running the MCP server as a subprocess (using stdio communication), so the client needs to be provided with the command to run the MCP server. (Alternatively, you can run the MCP server in SSE mode and tell your client how to connect to it.)
Note that no matter how you run the MCP server, Serena will, by default, start a small web-based dashboard on localhost that will display logs and allow shutting down the MCP server (since many clients fail to clean up processes correctly). This and other settings can be adjusted in the configuration and/or by providing command-line arguments.
uvx can be used to run the latest version of Serena directly from the repository, without an explicit local installation.
uvx --from git+https://github.com/oraios/serena serena start-mcp-server
Explore the CLI to see some of the customization options that serena provides (more info on them below).
Clone the repository and change into it.
git clone https://github.com/oraios/serena
cd serena
Optionally edit the configuration file in your home directory with
uv run serena config edit
If you just want the default config, you can skip this part, and a config file will be created when you first run Serena.
Run the server with uv:
uv run serena start-mcp-server
When running from outside the serena installation directory, be sure to pass it, i.e., use
uv run --directory /abs/path/to/serena serena start-mcp-server
⚠️ Docker support is currently experimental with several limitations. Please read the Docker documentation for important caveats before using it.
You can run the Serena MCP server directly via docker as follows, assuming that the projects you want to work on are all located in /path/to/your/projects:
docker run --rm -i --network host -v /path/to/your/projects:/workspaces/projects ghcr.io/oraios/serena:latest serena start-mcp-server --transport stdio
Replace /path/to/your/projects with the absolute path to your projects directory. The Docker approach provides:
Alternatively, use docker compose with the compose.yml file provided in the repository.
See the Docker documentation for detailed setup instructions, configuration options, and known limitations.
If you are using Nix and have enabled the nix-command and flakes features, you can run Serena using the following command:
nix run github:oraios/serena -- start-mcp-server --transport stdio
You can also install Serena by referencing this repo (github:oraios/serena) and using it in your Nix flake. The package is exported as serena.
ℹ️ Note that MCP servers which use stdio as a protocol are somewhat unusual as far as client/server architectures go, as the server necessarily has to be started by the client in order for communication to take place via the server's standard input/output stream. In other words, you do not need to start the server yourself. The client application (e.g. Claude Desktop) takes care of this and therefore needs to be configured with a launch command.
When using instead the SSE mode, which uses HTTP-based communication, you control the server lifecycle yourself, i.e. you start the server and provide the client with the URL to connect to it.
Simply provide start-mcp-server with the --transport sse option and optionally provide the port. For example, to run the Serena MCP server in SSE mode on port 9121 using a local installation, you would run this command from the Serena directory,
uv run serena start-mcp-server --transport sse --port 9121
and then configure your client to connect to http://localhost:9121/sse.
The Serena MCP server supports a wide range of additional command-line options, including the option to run in SSE mode and to adapt Serena to various contexts and modes of operation.
Run with parameter --help to get a list of available options.
Serena is very flexible in terms of configuration. While for most users, the default configurations will work, you can fully adjust it to your needs by editing a few yaml files. You can disable tools, change Serena's instructions (what we denote as the system_prompt), adjust the output of tools that just provide a prompt, and even adjust tool descriptions.
Serena is configured in four places:
The serena_config.yml for general settings that apply to all clients and projects. It is located in your user directory under .serena/serena_config.yml. If you do not explicitly create the file, it will be auto-generated when you first run Serena. You can edit it directly or use
uvx --from git+https://github.com/oraios/serena serena config edit
(or use the --directory command version).
In the arguments passed to the start-mcp-server in your client's config (see below), which will apply to all sessions started by the respective client. In particular, the context parameter should be set appropriately for Serena to be best adjusted to existing tools and capabilities of your client. See for a detailed explanation. You can override all entries from the serena_config.yml through command line arguments.
In the .serena/project.yml file within your project. This will hold project-level configuration that is used whenever that project is activated. This file will be autogenerated when you first use Serena on that project, but you can also generate it explicitly with
uvx --from git+https://github.com/oraios/serena serena project generate-yml
(or use the --directory command version).
Through the context and modes. Explore the modes and contexts section for more details.
After the initial setup, continue with one of the sections below, depending on how you want to use Serena.
If you are mostly working with the same project, you can configure to always activate it at startup by passing --project <path_or_name> to the start-mcp-server command in your client's MCP config. This is especially useful for clients which configure MCP servers on a per-project basis, like Claude Code.
Otherwise, the recommended way is to just ask the LLM to activate a project by providing it an absolute path to, or, in case the project was activated in the past, by its name. The default project name is the directory name.
All projects that have been activated will be automatically added to your serena_config.yml, and for each project, the file .serena/project.yml will be generated. You can adjust the latter, e.g., by changing the name (which you refer to during the activation) or other options. Make sure to not have two different projects with the same name.
ℹ️ For larger projects, we recommend that you index your project to accelerate Serena's tools; otherwise the first tool application may be very slow. To do so, run this from the project directory (or pass the path to the project as an argument):
uvx --from git+https://github.com/oraios/serena serena project index
(or use the --directory command version).
Serena is a great way to make Claude Code both cheaper and more powerful!
From your project directory, add serena with a command like this,
claude mcp add serena -- <serena-mcp-server> --context ide-assistant --project $(pwd)
where <serena-mcp-server> is your way of running the Serena MCP server. For example, when using uvx, you would run
claude mcp add serena -- uvx --from git+https://github.com/oraios/serena serena start-mcp-server --context ide-assistant --project $(pwd)
ℹ️ Serena comes with an instruction text, and Claude needs to read it to properly use Serena's tools. As of version v1.0.52, claude code reads the instructions of the MCP server, so this is handled automatically. If you are using an older version, or if Claude fails to read the instructions, you can ask it explicitly to "read Serena's initial instructions" or run /mcp__serena__initial_instructions to load the instruction text. If you want to make use of that, you will have to enable the corresponding tool explicitly by adding initial_instructions to the included_optional_tools in your config. Note that you may have to make Claude read the instructions when you start a new conversation and after any compacting operation to ensure Claude remains properly configured to use Serena's tools.
Serena works with OpenAI's Codex CLI out of the box, but you have to use the codex context for it to work properly. (The technical reason is that Codex doesn't fully support the MCP specifications, so some massaging of tools is required.).
Unlike Claude Code, in Codex you add an MCP server globally and not per project. Add the following to ~/.codex/config.toml (create the file if it does not exist):
[mcp_servers.serena]
command = "uvx"
args = ["--from", "git+https://github.com/oraios/serena", "serena", "start-mcp-server", "--context", "codex"]
After codex has started, you need to activate the project, which you can do by saying:
"Activate the current dir as project using serena"
If you don't activate the project, you will not be able to use Serena's tools!
That's it! Have a look at ~/.codex/log/codex-tui.log to see if any errors occurred.
The Serena dashboard will run if you have not disabled it in the configuration, but due to Codex's sandboxing the webbrowser may not open automatically. You can open it manually by going to http://localhost:24282/dashboard/index.html (or a higher port, if that was already taken).
Codex will often show the tools as
failedeven though they are successfully executed. This is not a problem, seems to be a bug in Codex. Despite the error message, everything works as expected.
There are many terminal-based coding assistants that support MCP servers, such as Codex, Gemini-CLI, Qwen3-Coder, rovodev, the OpenHands CLI and opencode.
They generally benefit from the symbolic tools provided by Serena. You might want to customize some aspects of Serena by writing your own context, modes or prompts to adjust it to your workflow, to other MCP servers you are using, and to the client's internal capabilities.
For Claude Desktop (available for Windows and macOS), go to File / Settings / Developer / MCP Servers / Edit Config, which will let you open the JSON file claude_desktop_config.json. Add the serena MCP server configuration, using a run command depending on your setup.
local installation:
{
    "mcpServers": {
        "serena": {
            "command": "/abs/path/to/uv",
            "args": ["run", "--directory", "/abs/path/to/serena", "serena", "start-mcp-server"]
        }
    }
}
uvx:
{
    "mcpServers": {
        "serena": {
            "command": "/abs/path/to/uvx",
            "args": ["--from", "git+https://github.com/oraios/serena", "serena", "start-mcp-server"]
        }
    }
}
docker:
 {
     "mcpServers": {
         "serena": {
             "command": "docker",
             "args": ["run", "--rm", "-i", "--network", "host", "-v", "/path/to/your/projects:/workspaces/projects", "ghcr.io/oraios/serena:latest", "serena", "start-mcp-server", "--transport", "stdio"]
         }
     }
 }
If you are using paths containing backslashes for paths on Windows (note that you can also just use forward slashes), be sure to escape them correctly (\\).
That's it! Save the config and then restart Claude Desktop. You are ready for activating your first project.
ℹ️ You can further customize the run command using additional arguments (see above).
Note: on Windows and macOS there are official Claude Desktop applications by Anthropic, for Linux there is an open-source community version.
⚠️ Be sure to fully quit the Claude Desktop application, as closing Claude will just minimize it to the system tray – at least on Windows.
⚠️ Some clients may leave behind zombie processes. You will have to find and terminate them manually then. With Serena, you can activate the dashboard to prevent unnoted processes and also use the dashboard for shutting down Serena.
After restarting, you should see Serena's tools in your chat interface (notice the small hammer icon).
For more information on MCP servers with Claude Desktop, see the official quick start guide.
Being an MCP Server, Serena can be included in any MCP Client. The same configuration as above, perhaps with small client-specific modifications, should work. Most of the popular existing coding assistants (IDE extensions or VSCode-like IDEs) support connections to MCP Servers. It is recommended to use the ide-assistant context for these integrations by adding "--context", "ide-assistant" to the args in your MCP client's configuration. Including Serena generally boosts their performance by providing them tools for symbolic operations.
In this case, the billing for the usage continues to be controlled by the client of your choice (unlike with the Claude Desktop client). But you may still want to use Serena through such an approach, e.g., for one of the following reasons:
Over the last months, several technologies have emerged that allow you to run a powerful local GUI and connect it to an MCP server. They will work with Serena out of the box. Some of the leading open source GUI technologies offering this are Jan, OpenHands, OpenWebUI and Agno. They allow combining Serena with almost any LLM (including locally running ones) and offer various other integrations.
Serena combines tools for semantic code retrieval with editing capabilities and shell execution. Serena's behavior can be further customized through Modes and Contexts. Find the complete list of tools below.
The use of all tools is generally recommended, as this allows Serena to provide the most value: Only by executing shell commands (in particular, tests) can Serena identify and correct mistakes autonomously.
However, it should be noted that the execute_shell_command tool allows for arbitrary code execution. When using Serena as an MCP Server, clients will typically ask the user for permission before executing a tool, so as long as the user inspects execution parameters beforehand, this should not be a problem. However, if you have concerns, you can choose to disable certain commands in your project's .yml configuration file. If you only want to use Serena purely for analyzing code and suggesting implementations without modifying the codebase, you can enable read-only mode by setting read_only: true in your project configuration file. This will automatically disable all editing tools and prevent any modifications to your codebase while still allowing all analysis and exploration capabilities.
In general, be sure to back up your work and use a version control system in order to avoid losing any work.
Serena's behavior and toolset can be adjusted using contexts and modes. These allow for a high degree of customization to best suit your workflow and the environment Serena is operating in.
A context defines the general environment in which Serena is operating. It influences the initial system prompt and the set of available tools. A context is set at startup when launching Serena (e.g., via CLI options for an MCP server or in the agent script) and cannot be changed during an active session.
Serena comes with pre-defined contexts:
desktop-app: Tailored for use with desktop applications like Claude Desktop. This is the default.agent: Designed for scenarios where Serena acts as a more autonomous agent, for example, when used with Agno.ide-assistant: Optimized for integration into IDEs like VSCode, Cursor, or Cline, focusing on in-editor coding assistance. Choose the context that best matches the type of integration you are using.When launching Serena, specify the context using --context <context-name>. Note that for cases where parameter lists are specified (e.g. Claude Desktop), you must add two parameters to the list.
If you are using a local server (such as Llama.cpp) which requires you to use OpenAI-compatible tool descriptions, use context oaicompat-agent instead of agent.
Modes further refine Serena's behavior for specific types of tasks or interaction styles. Multiple modes can be active simultaneously, allowing you to combine their effects. Modes influence the system prompt and can also alter the set of available tools by excluding certain ones.
Examples of built-in modes include:
planning: Focuses Serena on planning and analysis tasks.editing: Optimizes Serena for direct code modification tasks.interactive: Suitable for a conversational, back-and-forth interaction style.one-shot: Configures Serena for tasks that should be completed in a single response, often used with planning for generating reports or initial plans.no-onboarding: Skips the initial onboarding process if it's not needed for a particular session.onboarding: (Usually triggered automatically) Focuses on the project onboarding process.Modes can be set at startup (similar to contexts) but can also be switched dynamically during a session. You can instruct the LLM to use the switch_modes tool to activate a different set of modes (e.g., "switch to planning and one-shot modes").
When launching Serena, specify modes using --mode <mode-name>; multiple modes can be specified, e.g. --mode planning --mode no-onboarding.
⚠ Mode Compatibility: While you can combine modes, some may be semantically incompatible (e.g., interactive and one-shot). Serena currently does not prevent incompatible combinations; it is up to the user to choose sensible mode configurations.
You can create your own contexts and modes to precisely tailor Serena to your needs in two ways:
You can use Serena's CLI to manage modes and contexts. Check out
uvx --from git+https://github.com/oraios/serena serena mode --help
and
uvx --from git+https://github.com/oraios/serena serena context --help
NOTE: Custom contexts/modes are simply YAML files in <home>/.serena, they are automatically registered and available for use by their name (filename without the .yml extension). If you don't want to use Serena's CLI, you can create and manage them in any way you see fit.
Using external YAML files: When starting Serena, you can also provide an absolute path to a custom .yml file for a context or mode.
This customization allows for deep integration and adaptation of Serena to specific project requirements or personal preferences.
By default, Serena will perform an onboarding process when it is started for the first time for a project. The goal of the onboarding is for Serena to get familiar with the project and to store memories, which it can then draw upon in future interactions. If an LLM should fail to complete the onboarding and does not actually write the respective memories to disk, you may need to ask it to do so explicitly.
The onboarding will usually read a lot of content from the project, thus filling up the context. It can therefore be advisable to switch to another conversation once the onboarding is complete. After the onboarding, we recommend that you have a quick look at the memories and, if necessary, edit them or add additional ones.
Memories are files stored in .serena/memories/ in the project directory, which the agent can choose to read in subsequent interactions. Feel free to read and adjust them as needed; you can also add new ones manually. Every file in the .serena/memories/ directory is a memory file. Whenever Serena starts working on a project, the list of memories is provided, and the agent can decide to read them. We found that memories can significantly improve the user experience with Serena.
Serena uses the code structure for finding, reading and editing code. This means that it will work well with well-structured code but may perform poorly on fully unstructured one (like a "God class" with enormous, non-modular functions). Furthermore, for languages that are not statically typed, type annotations are highly beneficial.
It is best to start a code generation task from a clean git state. Not only will this make it easier for you to inspect the changes, but also the model itself will have a chance of seeing what it has changed by calling git diff and thereby correct itself or continue working in a followup conversation if needed.
⚠ Important: since Serena will write to files using the system-native line endings and it might want to look at the git diff, it is important to set git config core.autocrlf to true on Windows. With git config core.autocrlf set to false on Windows, you may end up with huge diffs only due to line endings. It is generally a good idea to globally enable this git setting on Windows:
git config --global core.autocrlf true
Serena can successfully complete tasks in an agent loop, where it iteratively acquires information, performs actions, and reflects on the results. However, Serena cannot use a debugger; it must rely on the results of program executions, linting results, and test results to assess the correctness of its actions. Therefore, software that is designed to meaningful interpretable outputs (e.g. log messages) and that has a good test coverage is much easier to work with for Serena.
We generally recommend to start an editing task from a state where all linting checks and tests pass.
We found that it is often a good idea to spend some time conceptualizing and planning a task before actually implementing it, especially for non-trivial task. This helps both in achieving better results and in increasing the feeling of control and staying in the loop. You can make a detailed plan in one session, where Serena may read a lot of your code to build up the context, and then continue with the implementation in another (potentially after creating suitable memories).
In our experience, LLMs are bad at counting, i.e. they have problems inserting blocks of code in the right place. Most editing operations can be performed at the symbolic level, allowing this problem is overcome. However, sometimes, line-level insertions are useful.
Serena is instructed to double-check the line numbers and any code blocks that it will edit, but you may find it useful to explicitly tell it how to edit code if you run into problems. We are working on making Serena's editing capabilities more robust.
For long and complicated tasks, or tasks where Serena has read a lot of content, you may come close to the limits of context tokens. In that case, it is often a good idea to continue in a new conversation. Serena has a dedicated tool to create a summary of the current state of the progress and all relevant info for continuing it. You can request to create this summary and write it to a memory. Then, in a new conversation, you can just ask Serena to read the memory and continue with the task. In our experience, this worked really well. On the up-side, since in a single session there is no summarization involved, Serena does not usually get lost (unlike some other agents that summarize under the hood), and it is also instructed to occasionally check whether it's on the right track.
Moreover, Serena is instructed to be frugal with context (e.g., to not read bodies of code symbols unnecessarily), but we found that Claude is not always very good in being frugal (Gemini seemed better at it). You can explicitly instruct it to not read the bodies if you know that it's not needed.
When using Serena through an MCP Client, you can use it together with other MCP servers. However, beware of tool name collisions! See info on that above.
Currently, there is a collision with the popular Filesystem MCP Server. Since Serena also provides filesystem operations, there is likely no need to ever enable these two simultaneously.
Serena provides two convenient ways of accessing the logs of the current session:
via the web-based dashboard (enabled by default)
This is supported on all platforms. By default, it will be accessible at http://localhost:24282/dashboard/index.html, but a higher port may be used if the default port is unavailable/multiple instances are running.
via the GUI tool (disabled by default)
This is mainly supported on Windows, but it may also work on Linux; macOS is unsupported.
Both can be enabled, configured or disabled in Serena's configuration file (serena_config.yml, see above). If enabled, they will automatically be opened as soon as the Serena agent/MCP server is started. The web dashboard will display usage statistics of Serena's tools if you set record_tool_usage_stats: True in your config.
In addition to viewing logs, both tools allow to shut down the Serena agent. This function is provided, because clients like Claude Desktop may fail to terminate the MCP server subprocess when they themselves are closed.
Support for MCP Servers in Claude Desktop and the various MCP Server SDKs are relatively new developments and may display instabilities.
The working configuration of an MCP server may vary from platform to platform and from client to client. We recommend always using absolute paths, as relative paths may be sources of errors. The language server is running in a separate sub-process and is called with asyncio – sometimes a client may make it crash. If you have Serena's log window enabled, and it disappears, you'll know what happened.
Some clients may not properly terminate MCP servers, look out for hanging python processes and terminate them manually, if needed.
To our knowledge, Serena is the first fully-featured coding agent where the entire functionality is available through an MCP server, thus not requiring API keys or subscriptions.
Many prominent subscription-based coding agents are parts of IDEs like Windsurf, Cursor and VSCode. Serena's functionality is similar to Cursor's Agent, Windsurf's Cascade or VSCode's agent mode.
Serena has the advantage of not requiring a subscription. A potential disadvantage is that it is not directly integrated into an IDE, so the inspection of newly written code is not as seamless.
More technical differences are:
An alternative to subscription-based agents are API-based agents like Claude Code, Cline, Aider, Roo Code and others, where the usage costs map directly to the API costs of the underlying LLM. Some of them (like Cline) can even be included in IDEs as an extension. They are often very powerful and their main downside are the (potentially very high) API costs.
Serena itself can be used as an API-based agent (see the section on Agno above). We have not yet written a CLI tool or a dedicated IDE extension for Serena (and there is probably no need for the latter, as Serena can already be used with any IDE that supports MCP servers). If there is demand for a Serena as a CLI tool like Claude Code, we will consider writing one.
The main difference between Serena and other API-based agents is that Serena can also be used as an MCP server, thus not requiring an API key and bypassing the API costs. This is a unique feature of Serena.
There are other MCP servers designed for coding, like DesktopCommander and codemcp. However, to the best of our knowledge, none of them provide semantic code retrieval and editing tools; they rely purely on text-based analysis. It is the integration of language servers and the MCP that makes Serena unique and so powerful for challenging coding tasks, especially in the context of larger codebases.
We built Serena on top of multiple existing open-source technologies, the most important ones being:
Without these projects, Serena would not have been possible (or would have been significantly more difficult to build).
It is straightforward to extend Serena's AI functionality with your own ideas. Simply implement a new tool by subclassing serena.agent.Tool and implement the apply method with a signature that matches the tool's requirements. Once implemented, SerenaAgent will automatically have access to the new tool.
It is also relatively straightforward to add support for a new programming language.
We look forward to seeing what the community will come up with! For details on contributing, see contributing guidelines.
Here is the list of Serena's default tools with a short description (output of uv run serena tools list):
activate_project: Activates a project by name.check_onboarding_performed: Checks whether project onboarding was already performed.create_text_file: Creates/overwrites a file in the project directory.delete_memory: Deletes a memory from Serena's project-specific memory store.execute_shell_command: Executes a shell command.find_file: Finds files in the given relative pathsfind_referencing_symbols: Finds symbols that reference the symbol at the given location (optionally filtered by type).find_symbol: Performs a global (or local) search for symbols with/containing a given name/substring (optionally filtered by type).get_symbols_overview: Gets an overview of the top-level symbols defined in a given file.insert_after_symbol: Inserts content after the end of the definition of a given symbol.insert_before_symbol: Inserts content before the beginning of the definition of a given symbol.list_dir: Lists files and directories in the given directory (optionally with recursion).list_memories: Lists memories in Serena's project-specific memory store.onboarding: Performs onboarding (identifying the project structure and essential tasks, e.g. for testing or building).prepare_for_new_conversation: Provides instructions for preparing for a new conversation (in order to continue with the necessary context).read_file: Reads a file within the project directory.read_memory: Reads the memory with the given name from Serena's project-specific memory store.replace_regex: Replaces content in a file by using regular expressions.replace_symbol_body: Replaces the full definition of a symbol.search_for_pattern: Performs a search for a pattern in the project.think_about_collected_information: Thinking tool for pondering the completeness of collected information.think_about_task_adherence: Thinking tool for determining whether the agent is still on track with the current task.think_about_whether_you_are_done: Thinking tool for determining whether the task is truly completed.write_memory: Writes a named memory (for future reference) to Serena's project-specific memory store.There are several tools that are disabled by default, and have to be enabled explicitly, e.g., through the context or modes. Note that several of our default contexts do enable some of these tools. For example, the desktop-app context enables the execute_shell_command tool.
The full list of optional tools is (output of uv run serena tools list --only-optional):
delete_lines: Deletes a range of lines within a file.get_current_config: Prints the current configuration of the agent, including the active and available projects, tools, contexts, and modes.initial_instructions: Gets the initial instructions for the current project. Should only be used in settings where the system prompt cannot be set, e.g. in clients you have no control over, like Claude Desktop.insert_at_line: Inserts content at a given line in a file.jet_brains_find_referencing_symbols: Finds symbols that reference the given symboljet_brains_find_symbol: Performs a global (or local) search for symbols with/containing a given name/substring (optionally filtered by type).jet_brains_get_symbols_overview: Retrieves an overview of the top-level symbols within a specified fileremove_project: Removes a project from the Serena configuration.replace_lines: Replaces a range of lines within a file with new content.restart_language_server: Restarts the language server, may be necessary when edits not through Serena happen.summarize_changes: Provides instructions for summarizing the changes made to the codebase.switch_modes: Activates modes by providing a list of their namesPortable file server with accelerated resumable uploads, dedup, WebDAV, FTP, TFTP, zeroconf, media indexer, thumbnails++ all in one file, no deps
turn almost any device into a file server with resumable uploads/downloads using any web browser
👉 Get started! or visit the read-only demo server 👀 running on a nuc in my basement
📷 screenshots: browser // upload // unpost // thumbnails // search // fsearch // zip-DL // md-viewer
🎬 videos: upload // cli-upload // race-the-beam // 👉 feature-showcase (youtube)
made in Norway 🇳🇴
g or 田 to toggle grid-view instead of the file listingzip or tar filesF2 to bring up the rename UI--ftp 3921--tftp 3969.hist/up2k.db, default) or somewhere else-e2t to index tags on uploadpacman -S copyparty (in arch linux extra)brew install copyparty ffmpegnix profile install github:9001/copyparty8 GiB/s download, 1 GiB/s upload
just run copyparty-sfx.py -- that's it! 🎉
ℹ️ the sfx is a self-extractor which unpacks an embedded
tar.gzinto$TEMP-- if this looks too scary, you can use the zipapp which has slightly worse performance
python3 -m pip install --user -U copypartyuv tool run copypartyenable thumbnails (images/audio/video), media indexing, and audio transcoding by installing some recommended deps:
apk add py3-pillow ffmpegapt install --no-install-recommends python3-pil ffmpegdnf install python3-pillow ffmpeg --allowerasingpkg install py39-sqlite3 py39-pillow ffmpegport install py-Pillow ffmpegbrew install pillow ffmpegpython -m pip install --user -U Pillow
running copyparty without arguments (for example doubleclicking it on Windows) will give everyone read/write access to the current folder; you may want accounts and volumes
or see some usage examples for inspiration, or the complete windows example
some recommended options:
-e2dsa enables general file indexing-e2ts enables audio metadata indexing (needs either FFprobe or Mutagen)-v /mnt/music:/music:r:rw,foo -a foo:bar shares /mnt/music as /music, readable by anyone, and read-write for user foo, password bar
:r:rw,foo with :r,foo to only make the folder readable by foo and nobody else--help-accounts) for the syntax and other permissionsmake it accessible over the internet by starting a cloudflare quicktunnel like so:
first download cloudflared and then start the tunnel with cloudflared tunnel --url http://127.0.0.1:3923
as the tunnel starts, it will show a URL which you can share to let anyone browse your stash or upload files to you
but if you have a domain, then you probably want to skip the random autogenerated URL and instead make a permanent cloudflare tunnel
since people will be connecting through cloudflare, run copyparty with --xff-hdr cf-connecting-ip to detect client IPs correctly
you may also want these, especially on servers:
and remember to open the ports you want; here's a complete example including every feature copyparty has to offer:
firewall-cmd --permanent --add-port={80,443,3921,3923,3945,3990}/tcp  # --zone=libvirt
firewall-cmd --permanent --add-port=12000-12099/tcp  # --zone=libvirt
firewall-cmd --permanent --add-port={69,1900,3969,5353}/udp  # --zone=libvirt
firewall-cmd --reload
(69:tftp, 1900:ssdp, 3921:ftp, 3923:http/https, 3945:smb, 3969:tftp, 3990:ftps, 5353:mdns, 12000:passive-ftp)
also see comparison to similar software
PS: something missing? post any crazy ideas you've got as a feature request or discussion 🤙
small collection of user feedback
good enough, surprisingly correct, certified good software, just works, why, wow this is better than nextcloud
project goals / philosophy
becoming rich is specifically not a motivation, but if you wanna donate then see my github profile regarding donations for my FOSS stuff in general (also THANKS!)
general notes:
browser-specific:
about:memory and click Minimize memory usageserver-os-specific:
/usr/libexec/platform-pythonserver notes:
roughly sorted by chance of encounter
general:
--th-ff-jpg may fix video thumbnails on some FFmpeg versions (macos, some linux)--th-ff-swr may fix audio thumbnails on some FFmpeg versionsup2k.db (filesystem index) is on a samba-share or network disk, you'll get unpredictable behavior if the share is disconnected for a bit
--hist or the hist volflag (-v [...]:c,hist=/tmp/foo) to place the db and thumbnails on a local disk instead--dbpath or the dbpath volflagpython 3.4 and older (including 2.7):
python 2.7 on Windows:
-e2dif you have a new exciting bug to share, see reporting bugs
same order here too
Chrome issue 1317069 -- if you try to upload a folder which contains symlinks by dragging it into the browser, the symlinked files will not get uploaded
Chrome issue 1352210 -- plaintext http may be faster at filehashing than https (but also extremely CPU-intensive)
Chrome issue 383568268 -- filereaders in webworkers can OOM / crash the browser-tab
Firefox issue 1790500 -- entire browser can crash after uploading ~4000 small files
Android: music playback randomly stops due to battery usage settings
iPhones: the volume control doesn't work because apple doesn't want it to
AudioContext will probably never be a viable workaround as apple introduces new issues faster than they fix current onesiPhones: music volume goes on a rollercoaster during song changes
AudioContext is still broken in safariiPhones: the preload feature (in the media-player-options tab) can cause a tiny audio glitch 20sec before the end of each song, but disabling it may cause worse iOS bugs to appear instead
iPhones: preloaded awo files make safari log MEDIA_ERR_NETWORK errors as playback starts, but the song plays just fine so eh whatever
iPhones: preloading another awo file may cause playback to stop
mp.au.play() in mp.onpreload but that can hit a race condition in safari that starts playing the same audio object twice in parallel...Windows: folders cannot be accessed if the name ends with .
Windows: msys2-python 3.8.6 occasionally throws RuntimeError: release unlocked lock when leaving a scoped mutex in up2k
VirtualBox: sqlite throws Disk I/O Error when running in a VM and the up2k database is in a vboxsf
--hist or the hist volflag (-v [...]:c,hist=/tmp/foo) to place the db and thumbnails inside the vm instead
--dbpath or the dbpath volflagUbuntu: dragging files from certain folders into firefox or chrome is impossible
snap connections firefox for the allowlist, removable-media permits all of /mnt and /media apparentlyupgrade notes
1.9.16 (2023-11-04):
--stats/prometheus: cpp_bans renamed to cpp_active_bans, and that + cpp_uptime are gauges1.6.0 (2023-01-29):
POST instead of GETGET and HEAD must pass cors validation1.5.0 (2022-12-03): new chunksize formula for files larger than 128 GiB
"frequently" asked questions
CopyParty?
can I change the 🌲 spinning pine-tree loading animation?
is it possible to block read-access to folders unless you know the exact URL for a particular file inside?
g permission, see the examples therechmod 111 music will make it possible to access files and folders inside the music folder but not list the immediate contents -- also works with other software, not just copypartycan I link someone to a password-protected volume/file by including the password in the URL?
?pw=hunter2 to the end; replace ? with & if there are parameters in the URL already, meaning it contains a ? near the end
--usernames then do ?pw=username:password insteadhow do I stop .hist folders from appearing everywhere on my HDD?
.hist folder is created inside each volume for the filesystem index, thumbnails, audio transcodes, and markdown document history. Use the --hist global-option or the hist volflag to move it somewhere else; see database locationcan I make copyparty download a file to my server if I give it a URL?
firefox refuses to connect over https, saying "Secure Connection Failed" or "SEC_ERROR_BAD_SIGNATURE", but the usual button to "Accept the Risk and Continue" is not shown
cert9.db somewhere in your firefox profile folderthe server keeps saying thank you for playing when I try to access the website
copyparty seems to think I am using http, even though the URL is https
X-Forwarded-Proto: https header; this could be because your reverse-proxy itself is confused. Ensure that none of the intermediates (such as cloudflare) are terminating https before the traffic hits your entrypointthumbnails are broken (you get a colorful square which says the filetype instead)
FFmpeg or Pillow; see thumbnailsthumbnails are broken (some images appear, but other files just get a blank box, and/or the broken-image placeholder)
?th=w), so check your URL rewrite rulesi want to learn python and/or programming and am considering looking at the copyparty source code in that occasion
 _|  _      __   _  _|_
(_| (_)     | | (_)  |_
per-folder, per-user permissions - if your setup is getting complex, consider making a config file instead of using arguments
systemctl reload copyparty or more conveniently using the [reload cfg] button in the control-panel (if the user has a/admin in any volume)
[global] config section requires a restart to take effecta quick summary can be seen using --help-accounts
configuring accounts/volumes with arguments:
-a usr:pwd adds account usr with password pwd-v .::r adds current-folder . as the webroot, readable by anyone
-v src:dst:perm:perm:... so local-path, url-path, and one or more permissions to set-v .::r,usr1,usr2:rw,usr3,usr4 = usr1/2 read-only, 3/4 read-writepermissions:
r (read): browse folder contents, download files, download as zip/tar, see filekeys/dirkeysw (write): upload files, move/copy files into this folderm (move): move files/folders from this folderd (delete): delete files/folders. (dots): user can ask to show dotfiles in directory listingsg (get): only download files, cannot see folder contents or zip/tarG (upget): same as g except uploaders get to see their own filekeys (see fk in examples below)h (html): same as g except folders return their index.html, and filekeys are not necessary for index.htmla (admin): can see upload time, uploader IPs, config-reloadA ("all"): same as rwmda. (read/write/move/delete/admin/dotfiles)examples:
-a u1:p1 -a u2:p2 -a u3:p3/srv the root of the filesystem, read-only by anyone: -v /srv::r/mnt/music available at /music, read-only for u1 and u2, read-write for u3: -v /mnt/music:music:r,u1,u2:rw,u3
music folder exists, but cannot open it/mnt/incoming available at /inc, write-only for u1, read-move for u2: -v /mnt/incoming:inc:w,u1:rm,u2
inc folder exists, but cannot open itu1 can open the inc folder, but cannot see the contents, only upload new files to itu2 can browse it and move files from /inc into any folder where u2 has write-access/mnt/ss available at /i, read-write for u1, get-only for everyone else, and enable filekeys: -v /mnt/ss:i:rw,u1:g:c,fk=4
c,fk=4 sets the fk (filekey) volflag to 4, meaning each file gets a 4-character accesskeyu1 can upload files, browse the folder, and see the generated filekeysg permission with wg would let anonymous users upload files, but not see the required filekey to access itg permission with wG would let anonymous users upload files, receiving a working direct link in returnif you want to grant access to all users who are logged in, the group acct will always contain all known users, so for example -v /mnt/music:music:r,@acct
anyone trying to bruteforce a password gets banned according to --ban-pw; default is 24h ban for 9 failed attempts in 1 hour
and if you want to use config files instead of commandline args (good!) then here's the same examples as a configfile; save it as foobar.conf and use it like this: python copyparty-sfx.py -c foobar.conf
PRTY_CONFIG=foobar.conf python copyparty-sfx.py (convenient in docker etc)[accounts]
u1: p1 # create account "u1" with password "p1"
u2: p2 # (note that comments must have
u3: p3 # two spaces before the # sign)
[groups]
g1: u1, u2 # create a group
[/] # this URL will be mapped to...
/srv # ...this folder on the server filesystem
accs:
r: * # read-only for everyone, no account necessary
[/music] # create another volume at this URL,
/mnt/music # which is mapped to this folder
accs:
r: u1, u2 # only these accounts can read,
r: @g1 # (exactly the same, just with a group instead)
r: @acct # (alternatively, ALL users who are logged in)
rw: u3 # and only u3 can read-write
[/inc]
/mnt/incoming
accs:
w: u1 # u1 can upload but not see/download any files,
rm: u2 # u2 can browse + move files out of this volume
[/i]
/mnt/ss
accs:
rw: u1 # u1 can read-write,
g: * # everyone can access files if they know the URL
flags:
fk: 4 # each file URL will have a 4-character password
hiding specific subfolders by mounting another volume on top of them
for example -v /mnt::r -v /var/empty:web/certs:r mounts the server folder /mnt as the webroot, but another volume is mounted at /web/certs -- so visitors can only see the contents of /mnt and /mnt/web (at URLs / and /web), but not /mnt/web/certs because URL /web/certs is mapped to /var/empty
the example config file right above this section may explain this better; the first volume / is mapped to /srv which means http://127.0.0.1:3923/music would try to read /srv/music on the server filesystem, but since there's another volume at /music mapped to /mnt/music then it'll go to /mnt/music instead
unix-style hidden files/folders by starting the name with a dot
anyone can access these if they know the name, but they normally don't appear in directory listings
a client can request to see dotfiles in directory listings if global option -ed is specified, or the volume has volflag dots, or the user has permission .
dotfiles do not appear in search results unless one of the above is true, and the global option / volflag dotsrch is set
even if user has permission to see dotfiles, they are default-hidden unless
--see-dotsis set, and/or user has enabled thedotfilesoption in the settings tab
config file example, where the same permission to see dotfiles is given in two different ways just for reference:
[/foo]
  /srv/foo
  accs:
    r.: ed   # user "ed" has read-access + dot-access in this volume;
             # dotfiles are visible in listings, but not in searches
  flags:
    dotsrch  # dotfiles will now appear in search results too
    dots     # another way to let everyone see dotfiles in this vol
accessing a copyparty server using a web-browser

the main tabs in the ui
[🔎] search by size, date, path/name, mp3-tags ...[🧯] unpost: undo/delete accidental uploads[🚀] and [🎈] are the uploaders[📂] mkdir: create directories[📝] new-md: create a new markdown document[📟] send-msg: either to server-log or into textfiles if --urlform save[🎺] audio-player config options[⚙️] general client config optionsthe browser has the following hotkeys (always qwerty)
? show hotkeys helpB toggle breadcrumbs / navpaneI/K prev/next folderM parent folder (or unexpand current)V toggle folders / textfiles in the navpaneG toggle list / grid view -- same as 田 bottom-rightT toggle thumbnails / iconsESC close various thingsctrl-K delete selected files/foldersctrl-X cut selected files/foldersctrl-C copy selected files/folders to clipboardctrl-V paste (move/copy)Y download selected filesF2 rename selected file/folderUp/Down move cursorUp/Down select and move cursorUp/Down move cursor and scroll viewportSpace toggle file selectionCtrl-A toggle select allI/K prev/next textfileS toggle selection of open fileM close textfileJ/L prev/next songU/O skip 10sec back/forward0..9 jump to 0%..90%P play/pause (also starts playing the folder)Y download fileJ/L, Left/Right prev/next fileHome/End first/last fileF toggle fullscreenS toggle selectionR rotate clockwise (shift=ccw)Y download fileEsc close viewerU/O skip 10sec back/forward0..9 jump to 0%..90%P/K/Space play/pauseM muteC continue playing next videoV loop entire file[ loop range (start)] loop range (end)A/D adjust tree widthS toggle multiselectA/D zoom^s save^h header^k autoformat table^u jump to next unicode character^e toggle editor / preview^up, ^down jump paragraphsswitching between breadcrumbs or navpane
click the 🌲 or pressing the B hotkey to toggle between breadcrumbs path (default), or a navpane (tree-browser sidebar thing)
[+] and [-] (or hotkeys A/D) adjust the size[🎯] jumps to the currently open folder[📃] toggles between showing folders and textfiles[📌] shows the name of all parent folders in a docked panel[a] toggles automatic widening as you go deeper[↵] toggles wordwrap[👀] show full name on hover (if wordwrap is off)press g or 田 to toggle grid-view instead of the file listing and t toggles icons / thumbnails
--grid or per-volume with volflag grid?imgs to a link, or disable with ?imgs=0
it does static images with Pillow / pyvips / FFmpeg, and uses FFmpeg for video files, so you may want to --no-thumb or maybe just --no-vthumb depending on how dangerous your users are
dthumb for all, or dvthumb / dathumb / dithumb for video/audio/images onlyaudio files are converted into spectrograms using FFmpeg unless you --no-athumb (and some FFmpeg builds may need --th-ff-swr)
images with the following names (see --th-covers) become the thumbnail of the folder they're in: folder.png, folder.jpg, cover.png, cover.jpg
cover.png and folder.jpg exist in a folder, it will pick the first matching --th-covers entry (folder.jpg).folder.jpg and so), and then fallback on the first picture in the folder (if it has any pictures at all)enabling multiselect lets you click files to select them, and then shift-click another file for range-select
multiselect is mostly intended for phones/tablets, but the sel option in the [⚙️] settings tab is better suited for desktop use, allowing selection by CTRL-clicking and range-selection with SHIFT-click, all without affecting regular clicking
sel option can be made default globally with --gsel or per-volume with volflag gselto show /icons/exe.png and /icons/elf.gif as the thumbnail for all .exe and .elf files respectively, do this: --ext-th=exe=/icons/exe.png --ext-th=elf=/icons/elf.gif
config file example:
[global]
  no-thumb   # disable ALL thumbnails and audio transcoding
  no-vthumb  # only disable video thumbnails

[/music]
  /mnt/nas/music
  accs:
    r: *     # everyone can read
  flags:
    dthumb   # disable ALL thumbnails and audio transcoding
    dvthumb  # only disable video thumbnails
    ext-th:  exe=/ico/exe.png  # /ico/exe.png is the thumbnail of *.exe
    ext-th:  elf=/ico/elf.gif  # ...and /ico/elf.gif is used for *.elf
    th-covers:  folder.png,folder.jpg,cover.png,cover.jpg  # the default
download folders (or file selections) as zip or tar files
select which type of archive you want in the [⚙️] config tab:
tar |
?tar |
plain gnutar, works great with curl | tar -xv |
pax |
?tar=pax |
pax-format tar, futureproof, not as fast |
tgz |
?tar=gz |
gzip compressed gnu-tar (slow), for curl | tar -xvz |
txz |
?tar=xz |
gnu-tar with xz / lzma compression (v.slow) |
zip |
?zip |
works everywhere, glitchy filenames on win7 and older |
zip_dos |
?zip=dos |
traditional cp437 (no unicode) to fix glitchy filenames |
zip_crc |
?zip=crc |
cp437 with crc32 computed early for truly ancient software |
3 (0=fast, 9=best), change with ?tar=gz:91 (0=fast, 9=best), change with ?tar=xz:92 (1=fast, 9=best), change with ?tar=bz2:9up2k.db and dir.txt is always excludedcurl foo?zip | bsdtar -xv
?tar is better for large files, especially if the total exceeds 4 GiBzip_crc will take longer to download since the server has to read each file twice
you can also zip a selection of files or folders by clicking them in the browser, that brings up a selection editor and zip button in the bottom right
cool trick: download a folder by appending url-params ?tar&opus or ?tar&mp3 to transcode all audio files (except aac|m4a|mp3|ogg|opus|wma) to opus/mp3 before they're added to the archive
&j / &w produce jpeg/webm thumbnails/spectrograms instead of the original audio/video/images (&p for audio waveforms)
--th-maxage=9999999 or --th-clean=0drag files/folders into the web-browser to upload
dragdrop is the recommended way, but you may also:
when uploading files through dragdrop or CTRL-V, this initiates an upload using up2k; there are two browser-based uploaders available:
[🎈] bup, the basic uploader, supports almost every browser since netscape 4.0[🚀] up2k, the good / fancy oneNB: you can undo/delete your own uploads with [🧯] unpost (and this is also where you abort unfinished uploads, but you have to refresh the page first)
up2k has several advantages:
it is perfectly safe to restart / upgrade copyparty while someone is uploading to it!
all known up2k clients will resume just fine 💪
see up2k for details on how it works, or watch a demo video

protip: you can avoid scaring away users with contrib/plugins/minimal-up2k.js which makes it look much simpler
protip: if you enable favicon in the [⚙️] settings tab (by typing something into the textbox), the icon in the browser tab will indicate upload progress -- also, the [🔔] and/or [🔊] switches enable visible and/or audible notifications on upload completion
the up2k UI is the epitome of polished intuitive experiences:
[🏃] analysis of other files should continue while one is uploading[🥔] shows a simpler UI for faster uploads from slow devices[🛡️] decides when to overwrite existing files on the server
🛡️ = never (generate a new filename instead)🕒 = overwrite if the server-file is older♻️ = always overwrite if the files are different[🎲] generate random filenames during upload[🔎] switch between upload and file-search mode
[🔎] if you add files by dragging them into the browserand then there's the tabs below it,
[ok] is the files which completed successfully[ng] is the ones that failed / got rejected (already exists, ...)[done] shows a combined list of [ok] and [ng], chronological order[busy] files which are currently hashing, pending-upload, or uploading
[done] and [que] for context[que] is all the files that are still queuednote that since up2k has to read each file twice, [🎈] bup can theoretically be up to 2x faster in some extreme cases (files bigger than your ram, combined with an internet connection faster than the read-speed of your HDD, or if you're uploading from a cuo2duo)
if you are resuming a massive upload and want to skip hashing the files which already finished, you can enable turbo in the [⚙️] config tab, but please read the tooltip on that button
if the server is behind a proxy which imposes a request-size limit, you can configure up2k to sneak below the limit with server-option --u2sz (the default is 96 MiB to support Cloudflare)
if you want to replace existing files on the server with new uploads by default, run with --u2ow 2 (only works if users have the delete-permission, and can still be disabled with 🛡️ in the UI)
dropping files into the browser also lets you see if they exist on the server

when you drag/drop files into the browser, you will see two dropzones: Upload and Search
on a phone? toggle the
[🔎]switch green before tapping the big yellow Search button to select your files
the files will be hashed on the client-side, and each hash is sent to the server, which checks if that file exists somewhere
files go into [ok] if they exist (and you get a link to where it is), otherwise they land in [ng]
undo/delete accidental uploads using the [🧯] tab in the UI

you can unpost even if you don't have regular move/delete access, however only for files uploaded within the past --unpost seconds (default 12 hours) and the server must be running with -e2d
config file example:
[global]
  e2d            # enable up2k database (remember uploads)
  unpost: 43200  # 12 hours (default)
uploads can be given a lifetime, after which they expire / self-destruct
the feature must be enabled per-volume with the lifetime upload rule which sets the upper limit for how long a file gets to stay on the server
clients can specify a shorter expiration time using the up2k ui -- the relevant options become visible upon navigating into a folder with lifetimes enabled -- or by using the life upload modifier
specifying a custom expiration time client-side will affect the timespan in which unposts are permitted, so keep an eye on the estimates in the up2k ui
download files while they're still uploading (demo video) -- it's almost like peer-to-peer
requires the file to be uploaded using up2k (which is the default drag-and-drop uploader), alternatively the command-line program
the control-panel shows the ETA for all incoming files , but only for files being uploaded into volumes where you have read-access
cut/paste, rename, and delete files/folders (if you have permission)
file selection: click somewhere on the line (not the link itself), then:
space to toggle
up/down to move
shift-up/down to move-and-select
ctrl-shift-up/down to also scroll
shift-click another line for range-select
cut: select some files and ctrl-x
copy: select some files and ctrl-c
paste: ctrl-v in another folder
rename: F2
you can copy/move files across browser tabs (cut/copy in one tab, paste in another)
share a file or folder by creating a temporary link
when enabled in the server settings (--shr), click the bottom-right share button to share the folder you're currently in, or alternatively:
this feature was made with identity providers in mind -- configure your reverseproxy to skip the IdP's access-control for a given URL prefix and use that to safely share specific files/folders sans the usual auth checks
when creating a share, the creator can choose any of the following options:
0 or blank means infinitesemi-intentional limitations:
e2d is set, and/or at least one volume on the server has volflag e2dspecify --shr /foobar to enable this feature; a toplevel virtual folder named foobar is then created, and that's where all the shares will be served from
foobar is just an exampleshr: /foobar inside the [global] section insteadusers can delete their own shares in the controlpanel, and a list of privileged users (--shr-adm) are allowed to see and/or delet any share on the server
after a share has expired, it remains visible in the controlpanel for --shr-rt minutes (default is 1 day), and the owner can revive it by extending the expiration time there
security note: using this feature does not mean that you can skip the accounts and volumes section -- you still need to restrict access to volumes that you do not intend to share with unauthenticated users! it is not sufficient to use rules in the reverseproxy to restrict access to just the /share folder.
select some files and press F2 to bring up the rename UI

quick explanation of the buttons,
[✅ apply rename] confirms and begins renaming[❌ cancel] aborts and closes the rename window[↺ reset] reverts any filename changes back to the original name[decode] does a URL-decode on the filename, fixing stuff like & and %20[advanced] toggles advanced modeadvanced mode: rename files based on rules to decide the new names, based on the original name (regex), or based on the tags collected from the file (artist/title/...), or a mix of both
in advanced mode,
[case] toggles case-sensitive regexregex is the regex pattern to apply to the original filename; any files which don't match will be skippedformat is the new filename, taking values from regex capturing groups and/or from file tags
presets lets you save rename rules for lateravailable functions:
$lpad(text, length, pad_char)$rpad(text, length, pad_char)so,
say you have a file named meganeko - Eclipse - 07 Sirius A.mp3 (absolutely fantastic album btw) and the tags are: Album:Eclipse, Artist:meganeko, Title:Sirius A, tn:7
you could use just regex to rename it:
regex = (.*) - (.*) - ([0-9]{2}) (.*)format = (3). (1) - (4)output = 07. meganeko - Sirius A.mp3or you could use just tags:
format = $lpad((tn),2,0). (artist) - (title).(ext)output = 7. meganeko - Sirius A.mp3or a mix of both:
regex = - ([0-9]{2})format = (1). (artist) - (title).(ext)output = 07. meganeko - Sirius A.mp3the metadata keys you can use in the format field are the ones in the file-browser table header (whatever is collected with -mte and -mtp)
monitor a folder with your RSS reader , optionally recursive
must be enabled per-volume with volflag rss or globally with --rss
the feed includes itunes metadata for use with podcast readers such as AntennaPod
a feed example: https://cd.ocv.me/a/d2/d22/?rss&fext=mp3
url parameters:
pw=hunter2 for password auth
--usernames then do pw=username:password insteadrecursive to also include subfolderstitle=foo changes the feed title (default: folder name)fext=mp3,opus only include mp3 and opus files (default: all)nf=30 only show the first 30 results (default: 250)sort=m sort by mtime (file last-modified), newest first (default)
u = upload-time; NOTE: non-uploaded files have upload-time 0n = filenamea = filesizeM = oldest file firstlist all recent uploads by clicking "show recent uploads" in the controlpanel
will show uploader IP and upload-time if the visitor has the admin permission
global-option --ups-when makes upload-time visible to all users, and not just admins
global-option --ups-who (volflag ups_who) specifies who gets access (0=nobody, 1=admins, 2=everyone), default=2
note that the 🧯 unpost feature is better suited for viewing your own recent uploads, as it includes the option to undo/delete them
config file example:
[global]
  ups-when    # everyone can see upload times
  ups-who: 1  # but only admins can see the list,
              # so ups-when doesn't take effect
plays almost every audio format there is (if the server has FFmpeg installed for on-demand transcoding)
the following audio formats are usually always playable, even without FFmpeg: aac|flac|m4a|mp3|ogg|opus|wav
some highlights:
click the play link next to an audio file, or copy the link target to share it (optionally with a timestamp to start playing from, like that example does)
open the [🎺] media-player-settings tab to configure it,
[🔁] repeats one single song forever[🔀] shuffles the files inside each folder[preload] starts loading the next track when it's about to end, reduces the silence between songs[full] does a full preload by downloading the entire next file; good for unreliable connections, bad for slow connections[~s] toggles the seekbar waveform display[/np] enables buttons to copy the now-playing info as an irc message[📻] enables buttons to create an m3u playlist with the selected songs[os-ctl] makes it possible to control audio playback from the lockscreen of your device (enables mediasession)[seek] allows seeking with lockscreen controls (buggy on some devices)[art] shows album art on the lockscreen[🎯] keeps the playing song scrolled into view (good when using the player as a taskbar dock)[⟎] shrinks the playback controls[uncache] may fix songs that won't play correctly due to bad files in browser cache[loop] keeps looping the folder[next] plays into the next folder[flac] converts flac and wav files into opus (if supported by browser) or mp3[aac] converts aac and m4a files into opus (if supported by browser) or mp3[oth] converts all other known formats into opus (if supported by browser) or mp3
aac|ac3|aif|aiff|alac|alaw|amr|ape|au|dfpwm|dts|flac|gsm|it|m4a|mo3|mod|mp2|mp3|mpc|mptm|mt2|mulaw|ogg|okt|opus|ra|s3m|tak|tta|ulaw|wav|wma|wv|xm|xpk[opus] produces an opus whenever transcoding is necessary (the best choice on Android and PCs)[awo] is opus in a weba file, good for iPhones (iOS 17.5 and newer) but Apple is still fixing some state-confusion bugs as of iOS 18.2.1[caf] is opus in a caf file, good for iPhones (iOS 11 through 17), technically unsupported by Apple but works for the most part[mp3] -- the myth, the legend, the undying master of mediocre sound quality that definitely works everywhere[flac] -- lossless but compressed, for LAN and/or fiber playback on electrostatic headphones[wav] -- lossless and uncompressed, for LAN and/or fiber playback on electrostatic headphones connected to very old equipment
flac and wav must be enabled with --allow-flac / --allow-wav to allow spending the disk spacecreate and play m3u8 playlists -- see example text and player
click a file with the extension m3u or m3u8 (for example mixtape.m3u or touhou.m3u8 ) and you get two choices: Play / Edit
playlists can include songs across folders anywhere on the server, but filekeys/dirkeys are NOT supported, so the listener must have read-access or get-access to the files
with a standalone mediaplayer or copyparty
you can use foobar2000, deadbeef, just about any standalone player should work -- but you might need to edit the filepaths in the playlist so they fit with the server-URLs
alternatively, you can create the playlist using copyparty itself:
open the [🎺] media-player-settings tab and enable the [📻] create-playlist feature -- this adds two new buttons in the bottom-right tray, [📻add] and [📻copy] which appear when you listen to music, or when you select a few audiofiles
click the 📻add button while a song is playing (or when you've selected some songs) and they'll be added to "the list" (you can't see it yet)
at any time, click 📻copy to send the playlist to your clipboard
create a new textfile, name it something.m3u and paste the playlist there
can also boost the volume in general, or increase/decrease stereo width (like crossfeed just worse)
has the convenient side-effect of reducing the pause between songs, so gapless albums play better with the eq enabled (just make it flat)
not available on iPhones / iPads because AudioContext currently breaks background audio playback on iOS (15.7.8)
due to phone / app settings, android phones may randomly stop playing music when the power saver kicks in, especially at the end of an album -- you can fix it by disabling power saving in the app settings of the browser you use for music streaming (preferably a dedicated one)
with realtime streaming of logfiles and such (demo) , and terminal colors work too
click -txt- next to a textfile to open the viewer, which has the following toolbar buttons:
✏️ edit opens the textfile editor📡 follow starts monitoring the file for changes, streaming new lines in realtime
tail -f&tail to the textviewer URLand there are two editors

there is a built-in extension for inline clickable thumbnails;
<!-- th --> somewhere in the doc!th[l](your.jpg) where l means left-align (r = right-align)--- clears the float / inliningother notes,
dynamic docs with serverside variable expansion to replace stuff like {{self.ip}} with the client's IP, or {{srv.htime}} with the current time on the server
see ./srv/expand/ for usage and examples
you can link a particular timestamp in an audio file by adding it to the URL, such as &20 / &20s / &1m20 / &t=1:20 after the .../#af-c8960dab
enabling the audio equalizer can help make gapless albums fully gapless in some browsers (chrome), so consider leaving it on with all the values at zero
get a plaintext file listing by adding ?ls=t to a URL, or a compact colored one with ?ls=v (for unix terminals)
if you are using media hotkeys to switch songs and are getting tired of seeing the OSD popup which Windows doesn't let you disable, consider ./contrib/media-osd-bgone.ps1
click the bottom-left π to open a javascript prompt for debugging
files named .prologue.html / .epilogue.html will be rendered before/after directory listings unless --no-logues
files named descript.ion / DESCRIPT.ION are parsed and displayed in the file listing, or as the epilogue if nonstandard
files named README.md / readme.md will be rendered after directory listings unless --no-readme (but .epilogue.html takes precedence)
PREADME.md / preadme.md is shown above directory listings unless --no-readme or .prologue.htmlREADME.md and *logue.html can contain placeholder values which are replaced server-side before embedding into directory listings; see --help-exp
search by size, date, path/name, mp3-tags, ...

when started with -e2dsa copyparty will scan/index all your files. This avoids duplicates on upload, and also makes the volumes searchable through the web-ui:
size/date/directory-path/filename, or...path/name queries are space-separated, AND'ed together, and words are negated with a - prefix, so for example:
shibayan -bossa finds all files where one of the folders contain shibayan but filters out any results where bossa exists somewhere in the pathdemetori styx gives you good stuffthe raw field allows for more complex stuff such as ( tags like *nhato* or tags like *taishi* ) and ( not tags like *nhato* or not tags like *taishi* ) which finds all songs by either nhato or taishi, excluding collabs (terrible example, why would you do that)
for the above example to work, add the commandline argument -e2ts to also scan/index tags from music files, which brings us over to:
using arguments or config files, or a mix of both:
-c some.conf) can set additional commandline arguments; see ./docs/example.conf and ./docs/example2.confkill -s USR1 (same as systemctl reload copyparty) to reload accounts and volumes from config files without restarting
[reload cfg] button in the control-panel if the user has a/admin in any volume[global] config section requires a restart to take effectNB: as humongous as this readme is, there is also a lot of undocumented features. Run copyparty with --help to see all available global options; all of those can be used in the [global] section of config files, and everything listed in --help-flags can be used in volumes as volflags.
docker run --rm -it copyparty/ac --helpannounce enabled services on the LAN (pic) -- -z enables both mdns and ssdp
--z-on / --z-off limits the feature to certain networksconfig file example:
[global]
  z      # enable all zeroconf features (mdns, ssdp)
  zm     # only enables mdns (does nothing since we already have z)
  z-on: 192.168.0.0/16, 10.1.2.0/24  # restrict to certain subnets
LAN domain-name and feature announcer
uses multicast dns to give copyparty a domain which any machine on the LAN can use to access it
all enabled services (webdav, ftp, smb) will appear in mDNS-aware file managers (KDE, gnome, macOS, ...)
the domain will be partybox.local if the machine's hostname is partybox unless --name specifies something else
and the web-UI will be available at http://partybox.local:3923/
:3923 so you can use http://partybox.local/ instead then see listen on port 80 and 443windows-explorer announcer
uses ssdp to make copyparty appear in the windows file explorer on all machines on the LAN
doubleclicking the icon opens the "connect" page which explains how to mount copyparty as a local filesystem
if copyparty does not appear in windows explorer, use --zsv to see why:
print a qr-code (screenshot) for quick access, great between phones on android hotspots which keep changing the subnet
--qr enables it--qrs does https instead of http--qrl lootbox/?pw=hunter2 appends to the url, linking to the lootbox folder with password hunter2--qrz 1 forces 1x zoom instead of autoscaling to fit the terminal size
--qr-pin 1 makes the qr-code stick to the bottom of the console (never scrolls away)--qr-file qr.txt:1:2 writes a small qr-code to qr.txt--qr-file qr.txt:2:2 writes a big qr-code to qr.txt--qr-file qr.svg:1:2 writes a vector-graphics qr-code to qr.svg--qr-file qr.png:8:4:333333:ffcc55 writes an 8x-magnified yellow-on-gray qr.png--qr-file qr.png:8:4::ffffff writes an 8x-magnified white-on-transparent qr.pngit uses the server hostname if mdns is enabled, otherwise it'll use your external ip (default route) unless --qri specifies a specific ip-prefix or domain
an FTP server can be started using --ftp 3921, and/or --ftps for explicit TLS (ftpes)
--ftp-pr 12000-13000
ftp and ftps, the port-range will be divided in half--usernamessome recommended FTP / FTPS clients; wark = example password:
tls=false explicit_tls=truelftp -u k,wark -p 3921 127.0.0.1 -e lslftp -u k,wark -p 3990 127.0.0.1 -e 'set ssl:verify-certificate no; ls'config file example, which restricts FTP to only use ports 3921 and 12000-12099 so all of those ports must be opened in your firewall:
[global]
  ftp: 3921
  ftp-pr: 12000-12099
with read-write support, supports winXP and later, macos, nautilus/gvfs ... a great way to access copyparty straight from the file explorer in your OS
click the connect button in the control-panel to see connection instructions for windows, linux, macos
general usage:
--usernameson macos, connect from finder:
in order to grant full write-access to webdav clients, the volflag daw must be set and the account must also have delete-access (otherwise the client won't be allowed to replace the contents of existing files, which is how webdav works)
note: if you have enabled IdP authentication then that may cause issues for some/most webdav clients; see the webdav section in the IdP docs
using the GUI (winXP or later):
http://192.168.123.1:3923/
Sign up for online storage hyperlink instead and put the URL there--usernamesthe webdav client that's built into windows has the following list of bugs; you can avoid all of these by connecting with rclone instead:
--dav-auth to force password-auth for all webdav clients<>:"/\|?*), or names ending with .a TFTP server (read/write) can be started using --tftp 3969 (you probably want ftp instead unless you are actually communicating with hardware from the 90s (in which case we should definitely hang some time))
that makes this the first RTX DECT Base that has been updated using copyparty 🎉
69 (nice)most clients expect to find TFTP on port 69, but on linux and macos you need to be root to listen on that. Alternatively, listen on 3969 and use NAT on the server to forward 69 to that port;
iptables -t nat -A PREROUTING -i eth0 -p udp --dport 69 -j REDIRECT --to-port 3969some recommended TFTP clients:
curl --tftp-blksize 1428 tftp://127.0.0.1:3969/firmware.bincurl --tftp-blksize 1428 -T firmware.bin tftp://127.0.0.1:3969/tftp.exe (you probably already have it)
tftp -i 127.0.0.1 put firmware.bintftp-hpa, atftp
atftp --option "blksize 1428" 127.0.0.1 3969 -p -l firmware.bin -r firmware.bintftp -v -m binary 127.0.0.1 3969 -c put firmware.binunsafe, slow, not recommended for wan, enable with --smb for read-only or --smbw for read-write
click the connect button in the control-panel to see connection instructions for windows, linux, macos
dependencies: python3 -m pip install --user -U impacket==0.11.0
some BIG WARNINGS specific to SMB/CIFS, in decreasing importance:
--smb-port (see below) and prisonparty or bubbleparty
--smbw must be given to allow write-access from smb--usernamesand some minor issues,
--smb-nwa-1 but then you get unacceptably poor performance instead/?reload=cfg) does not include the [global] section (commandline args)-i interface only (default = :: = 0.0.0.0 = all)known client bugs:
--smb1 is much faster than smb2 (default) because it keeps rescanning folders on smb2
<>:"/\|?*), or names ending with .the smb protocol listens on TCP port 445, which is a privileged port on linux and macos, which would require running copyparty as root. However, this can be avoided by listening on another port using --smb-port 3945 and then using NAT on the server to forward the traffic from 445 to there;
iptables -t nat -A PREROUTING -i eth0 -p tcp --dport 445 -j REDIRECT --to-port 3945authenticate with one of the following:
$username, password $password$password, password ktweaking the ui
--sort or per-volume with the sort volflag; specify one or more comma-separated columns to sort by, and prefix the column name with - for reverse sort
href ext sz ts tags/.up_at tags/Circle tags/.tn tags/Artist tags/Title--sort tags/Circle,tags/.tn,tags/Artist,tags/Title,href-e2d -mte +.up_at and then --sort tags/.up_atsee ./docs/rice for more, including how to add stuff (css/<meta>/...) to the html <head> tag, or to add your own translation
discord and social-media embeds
can be enabled globally with --og or per-volume with volflag og
note that this disables hotlinking because the opengraph spec demands it; to sneak past this intentional limitation, you can enable opengraph selectively by user-agent, for example --og-ua '(Discord|Twitter|Slack)bot' (or volflag og_ua)
you can also hotlink files regardless by appending ?raw to the url
WARNING: if you plan to use WebDAV, then
--og-ua/og_uamust be configured
if you want to entirely replace the copyparty response with your own jinja2 template, give the template filepath to --og-tpl or volflag og_tpl (all members of HttpCli are available through the this object)
enable symlink-based upload deduplication globally with --dedup or per-volume with volflag dedup
by default, when someone tries to upload a file that already exists on the server, the upload will be politely declined, and the server will copy the existing file over to where the upload would have gone
if you enable deduplication with --dedup then it'll create a symlink instead of a full copy, thus reducing disk space usage
--safe-dedup=1 because you have other software tampering with your files, so you want to entirely disable detection of duplicate data instead, then you can specify --no-clone globally or noclone as a volflagwarning: when enabling dedup, you should also:
-e2dsa or volflag e2dsa (see file indexing section below); strongly recommended--hardlink-only to use hardlink-based deduplication instead of symlinks; see explanation below--reflink to use CoW/reflink-based dedup (much safer than hardlink, but OS/FS-dependent)it will not be safe to rename/delete files if you only enable dedup and none of the above; if you enable indexing then it is not necessary to also do hardlinks (but you may still want to)
by default, deduplication is done based on symlinks (symbolic links); these are tiny files which are pointers to the nearest full copy of the file
you can choose to use hardlinks instead of softlinks, globally with --hardlink-only or volflag hardlinkonly, and you can choose to use reflinks with --reflink or volflag reflink
advantages of using reflinks (CoW, copy-on-write):
advantages of using hardlinks:
advantages of using symlinks (default):
warning: if you edit the contents of a deduplicated file, then you will also edit all other copies of that file! This is especially surprising with hardlinks, because they look like regular files, but that same file exists in multiple locations
global-option --xlink / volflag xlink additionally enables deduplication across volumes, but this is probably buggy and not recommended
config file example:
[global]
  e2dsa  # scan and index filesystem on startup
  dedup  # symlink-based deduplication for all volumes

[/media]
  /mnt/nas/media
  flags:
    hardlinkonly  # this vol does hardlinks instead of symlinks
enable music search, upload-undo, and better dedup
file indexing relies on two database tables, the up2k filetree (-e2d) and the metadata tags (-e2t), stored in .hist/up2k.db. Configuration can be done through arguments, volflags, or a mix of both.
through arguments:
-e2d enables file indexing on upload-e2ds also scans writable folders for new files on startup-e2dsa also scans all mounted volumes (including readonly ones)-e2t enables metadata indexing on upload-e2ts also scans for tags in all files that don't have tags yet-e2tsr also deletes all existing tags, doing a full reindex-e2v verifies file integrity at startup, comparing hashes from the db-e2vu patches the database with the new hashes from the filesystem-e2vp panics and kills copyparty insteadthe same arguments can be set as volflags, in addition to d2d, d2ds, d2t, d2ts, d2v for disabling:
-v ~/music::r:c,e2ds,e2tsr does a full reindex of everything on startup-v ~/music::r:c,d2d disables all indexing, even if any -e2* are on-v ~/music::r:c,d2t disables all -e2t* (tags), does not affect -e2d*-v ~/music::r:c,d2ds disables on-boot scans; only index new uploads-v ~/music::r:c,d2ts same except only affecting tagsnote:
.up_at metadata key, either globally with -e2d -mte +.up_at or per-volume with volflags e2d,mte=+.up_at (will have a ~17% performance impact on directory listings)e2tsr is probably always overkill, since e2ds/e2dsa would pick up any file modifications and e2ts would then reindex those, unless there is a new copyparty version with new parsers and the release note says otherwiseconfig file example (these options are recommended btw):
[global]
  e2dsa  # scan and index all files in all volumes on startup
  e2ts   # check newly-discovered or uploaded files for media tags
to save some time, you can provide a regex pattern for filepaths to only index by filename/path/size/last-modified (and not the hash of the file contents) by setting --no-hash '\.iso$' or the volflag :c,nohash=\.iso$, this has the following consequences:
similarly, you can fully ignore files/folders using --no-idx [...] and :c,noidx=\.iso$
NOTE: no-idx and/or no-hash prevents deduplication of those files
if you set --no-hash [...] globally, you can enable hashing for specific volumes using flag :c,nohash=
to exclude certain filepaths from search-results, use --srch-excl or volflag srch_excl instead of --no-idx, for example --srch-excl 'password|logs/[0-9]'
config file example:
[/games]
  /mnt/nas/games
  flags:
    noidx: \.iso$  # skip indexing iso-files
    srch_excl: password|logs/[0-9]  # filter search results
avoid traversing into other filesystems using --xdev / volflag :c,xdev, skipping any symlinks or bind-mounts to another HDD for example
and/or you can --xvol / :c,xvol to ignore all symlinks leaving the volume's top directory, but still allow bind-mounts pointing elsewhere
xvol if they point into another volume where the user has the same level of accessthese options will reduce performance; unlikely worst-case estimates are 14% reduction for directory listings, 35% for download-as-tar
as of copyparty v1.7.0 these options also prevent file access at runtime -- in previous versions it was just hints for the indexer
filesystem monitoring; if copyparty is not the only software doing stuff on your filesystem, you may want to enable periodic rescans to keep the index up to date
argument --re-maxage 60 will rescan all volumes every 60 sec, same as volflag :c,scan=60 to specify it per-volume
uploads are disabled while a rescan is happening, so rescans will be delayed by --db-act (default 10 sec) when there is write-activity going on (uploads, renames, ...)
note: folder-thumbnails are selected during filesystem indexing, so periodic rescans can be used to keep them accurate as images are uploaded/deleted (or manually do a rescan with the reload button in the controlpanel)
config file example:
[global]
  re-maxage: 3600

[/pics]
  /mnt/nas/pics
  flags:
    scan: 900
set upload rules using volflags, some examples:
:c,sz=1k-3m sets allowed filesize between 1 KiB and 3 MiB inclusive (suffixes: b, k, m, g):c,df=4g block uploads if there would be less than 4 GiB free disk space afterwards:c,vmaxb=1g block uploads if total volume size would exceed 1 GiB afterwards:c,vmaxn=4k block uploads if volume would contain more than 4096 files afterwards:c,nosub disallow uploading into subdirectories; goes well with rotn and rotf::c,rotn=1000,2 moves uploads into subfolders, up to 1000 files in each folder before making a new one, two levels deep (must be at least 1):c,rotf=%Y/%m/%d/%H enforces files to be uploaded into a structure of subfolders according to that date format
/foo/bar the path would be rewritten to /foo/bar/2021/08/06/23 for example:c,lifetime=300 delete uploaded files when they become 5 minutes oldyou can also set transaction limits which apply per-IP and per-volume, but these assume -j 1 (default) otherwise the limits will be off, for example -j 4 would allow anywhere between 1x and 4x the limits you set depending on which processing node the client gets routed to
:c,maxn=250,3600 allows 250 files over 1 hour from each IP (tracked per-volume):c,maxb=1g,300 allows 1 GiB total over 5 minutes from each IP (tracked per-volume)notes:
vmaxb and vmaxn requires either the e2ds volflag or -e2dsa global-optionconfig file example:
[/inc]
  /mnt/nas/uploads
  accs:
    w: *    # anyone can upload here
    rw: ed  # only user "ed" can read-write
  flags:
    e2ds       # filesystem indexing is required for many of these:
    sz: 1k-3m  # accept upload only if filesize in this range
    df: 4g     # free disk space cannot go lower than this
    vmaxb: 1g  # volume can never exceed 1 GiB
    vmaxn: 4k  # ...or 4000 files, whichever comes first
    nosub      # must upload to toplevel folder
    lifetime: 300   # uploads are deleted after 5min
    maxn: 250,3600  # each IP can upload 250 files in 1 hour
    maxb: 1g,300    # each IP can upload 1 GiB over 5 minutes
files can be autocompressed on upload, either on user-request (if config allows) or forced by server-config
gz allows gz compressionxz allows lzma compressionpk forces compression on all filespk requests compression with server-default algorithmgz or xz requests compression with a specific algorithmxz requests xz compressionthings to note,
gz and xz arguments take a single optional argument, the compression level (range 0 to 9)pk volflag takes the optional argument ALGORITHM,LEVEL which will then be forced for all uploads, for example gz,9 or xz,0some examples,
-v inc:inc:w:c,pk=xz,0-v inc:inc:w:c,pk-v inc:inc:w:c,gz/inc?pk or /inc?gz or /inc?gz=4per-volume filesystem-permissions and ownership
by default:
this can be configured per-volume:
chmod_f sets file permissions; default=644 (usually)chmod_d sets directory permissions; default=755uid sets the owner user-idgid sets the owner group-idnotes:
gid can only be set to one of the groups which the copyparty process is a member ofuid can only be set if copyparty is running as root (i appreciate your faith):c,magic enables filetype detection for nameless uploads, same as --magic
python3 -m pip install --user -U python-magicpython3 -m pip install --user -U python-magic-binin-volume (.hist/up2k.db, default) or somewhere else
copyparty creates a subfolder named .hist inside each volume where it stores the database, thumbnails, and some other stuff
this can instead be kept in a single place using the --hist argument, or the hist= volflag, or a mix of both:
--hist ~/.cache/copyparty -v ~/music::r:c,hist=- sets ~/.cache/copyparty as the default place to put volume info, but ~/music gets the regular .hist subfolder (- restores default behavior)by default, the per-volume up2k.db sqlite3-database for -e2d and -e2t is stored next to the thumbnails according to the --hist option, but the global-option --dbpath and/or volflag dbpath can be used to put the database somewhere else
if your storage backend is unreliable (NFS or bad HDDs), you can specify one or more "landmarks" to look for before doing anything database-related. A landmark is a file which is always expected to exist inside the volume. This avoids spurious filesystem rescans in the event of an outage. One line per landmark (see example below)
note:
.hist subdirectory/c/temp means C:\temp but use regular paths for --hist
-v C:\Users::r and -v /c/users::r both workconfig file example:
[global]
  hist: ~/.cache/copyparty  # put db/thumbs/etc. here by default

[/pics]
  /mnt/nas/pics
  flags:
    hist: -  # restore the default (/mnt/nas/pics/.hist/)
    hist: /mnt/nas/cache/pics/  # can be absolute path
    landmark: me.jpg  # /mnt/nas/pics/me.jpg must be readable to enable db
    landmark: info/a.txt^=ok  # and this textfile must start with "ok"
set -e2t to index tags on upload
-mte decides which tags to index and display in the browser (and also the display order), this can be changed per-volume:
-v ~/music::r:c,mte=title,artist indexes and displays title followed by artistif you add/remove a tag from mte you will need to run with -e2tsr once to rebuild the database, otherwise only new files will be affected
but instead of using -mte, -mth is a better way to hide tags in the browser: these tags will not be displayed by default, but they still get indexed and become searchable, and users can choose to unhide them in the [⚙️] config pane
-mtm can be used to add or redefine a metadata mapping, say you have media files with foo and bar tags and you want them to display as qux in the browser (preferring foo if both are present), then do -mtm qux=foo,bar and now you can -mte artist,title,qux
tags that start with a . such as .bpm and .dur(ation) indicate numeric value
see the beautiful mess of a dictionary in mtag.py for the default mappings (should cover mp3,opus,flac,m4a,wav,aif,)
--no-mutagen disables Mutagen and uses FFprobe instead, which...
--mtag-to sets the tag-scan timeout; very high default (60 sec) to cater for zfs and other randomly-freezing filesystems. Lower values like 10 are usually safe, allowing for faster processing of tricky files
provide custom parsers to index additional tags, also see ./bin/mtag/README.md
copyparty can invoke external programs to collect additional metadata for files using mtp (either as argument or volflag), there is a default timeout of 60sec, and only files which contain audio get analyzed by default (see ay/an/ad below)
-mtp .bpm=~/bin/audio-bpm.py will execute ~/bin/audio-bpm.py with the audio file as argument 1 to provide the .bpm tag, if that does not exist in the audio metadata-mtp key=f,t5,~/bin/audio-key.py uses ~/bin/audio-key.py to get the key tag, replacing any existing metadata tag (f,), aborting if it takes longer than 5sec (t5,)-v ~/music::r:c,mtp=.bpm=~/bin/audio-bpm.py:c,mtp=key=f,t5,~/bin/audio-key.py both as a per-volume config wow this is getting uglybut wait, there's more! -mtp can be used for non-audio files as well using the a flag: ay only do audio files (default), an only do non-audio files, or ad do all files (d as in dontcare)
-mtp ext=an,~/bin/file-ext.py runs ~/bin/file-ext.py to get the ext tag only if file is not audio (an)-mtp arch,built,ver,orig=an,eexe,edll,~/bin/exe.py runs ~/bin/exe.py to get properties about windows-binaries only if file is not audio (an) and file extension is exe or dllp flag to set processing order
-mtp foo=p1,~/a.py runs before -mtp foo=p2,~/b.py and will forward all the tags detected so far as json to the stdin of b.pyc0 disables capturing of stdout/stderr, so copyparty will not receive any tags from the process at all -- instead the invoked program is free to print whatever to the console, just using copyparty as a launcher
c1 captures stdout only, c2 only stderr, and c3 (default) captures bothkt killing the entire process tree (default), km just the main process, or kn let it continue running until copyparty is terminatedif something doesn't work, try --mtag-v for verbose error messages
config file example; note that mtp is an additive option so all of the mtp options will take effect:
[/music]
  /mnt/nas/music
  flags:
    mtp: .bpm=~/bin/audio-bpm.py  # assign ".bpm" (numeric) with script
    mtp: key=f,t5,~/bin/audio-key.py  # force/overwrite, 5sec timeout
    mtp: ext=an,~/bin/file-ext.py  # will only run on non-audio files
    mtp: arch,built,ver,orig=an,eexe,edll,~/bin/exe.py  # only exe/dll
trigger a program on uploads, renames etc (examples)
you can set hooks before and/or after an event happens, and currently you can hook uploads, moves/renames, and deletes
there's a bunch of flags and stuff, see --help-hooks
if you want to write your own hooks, see devnotes
event-hooks can send zeromq messages instead of running programs
to send a 0mq message every time a file is uploaded,
--xau zmq:pub:tcp://*:5556 sends a PUB to any/all connected SUB clients--xau t3,zmq:push:tcp://*:5557 sends a PUSH to exactly one connected PULL client--xau t3,j,zmq:req:tcp://localhost:5555 sends a REQ to the connected REP clientthe PUSH and REQ examples have t3 (timeout after 3 seconds) because they block if there's no clients to talk to
t3,j to send extended upload-info as json instead of just the filesystem-pathsee zmq-recv.py if you need something to receive the messages with
config file example; note that the hooks are additive options, so all of the xau options will take effect:
[global]
  xau: zmq:pub:tcp://*:5556`  # send a PUB to any/all connected SUB clients
  xau: t3,zmq:push:tcp://*:5557`  # send PUSH to exactly one connected PULL cli
  xau: t3,j,zmq:req:tcp://localhost:5555`  # send REQ to the connected REP cli
the older, more powerful approach (examples):
-v /mnt/inc:inc:w:c,e2d,e2t,mte=+x1:c,mtp=x1=ad,kn,/usr/bin/notify-send
that was the commandline example; here's the config file example:
[/inc]
  /mnt/inc
  accs:
    w: *
  flags:
    e2d, e2t  # enable indexing of uploaded files and their tags
    mte: +x1
    mtp: x1=ad,kn,/usr/bin/notify-send
so filesystem location /mnt/inc shared at /inc, write-only for everyone, appending x1 to the list of tags to index (mte), and using /usr/bin/notify-send to "provide" tag x1 for any filetype (ad) with kill-on-timeout disabled (kn)
that'll run the command notify-send with the path to the uploaded file as the first and only argument (so on linux it'll show a notification on-screen)
note that this is way more complicated than the new event hooks but this approach has the following advantages:
note that it will occupy the parsing threads, so fork anything expensive (or set kn to have copyparty fork it for you) -- otoh if you want to intentionally queue/singlethread you can combine it with --mtag-mt 1
for reference, if you were to do this using event hooks instead, it would be like this: -e2d --xau notify-send,hello,--
redefine behavior with plugins (examples)
replace 404 and 403 errors with something completely different (that's it for now)
as for client-side stuff, there is plugins for modifying UI/UX
autologin based on IP range (CIDR) , using the global-option --ipu
for example, if everyone with an IP that starts with 192.168.123 should automatically log in as the user spartacus, then you can either specify --ipu=192.168.123.0/24=spartacus as a commandline option, or put this in a config file:
[global]
  ipu: 192.168.123.0/24=spartacus
repeat the option to map additional subnets
be careful with this one! if you have a reverseproxy, then you definitely want to make sure you have real-ip configured correctly, and it's probably a good idea to nullmap the reverseproxy's IP just in case; so if your reverseproxy is sending requests from 172.24.27.9 then that would be --ipu=172.24.27.9/32=
limit a user to certain IP ranges (CIDR) , using the global-option --ipr
for example, if the user spartacus should get rejected if they're not connecting from an IP that starts with 192.168.123 or 172.16, then you can either specify --ipr=192.168.123.0/24,172.16.0.0/16=spartacus as a commandline option, or put this in a config file:
[global]
  ipr: 192.168.123.0/24,172.16.0.0/16=spartacus
repeat the option to map additional users
replace copyparty passwords with oauth and such
you can disable the built-in password-based login system, and instead replace it with a separate piece of software (an identity provider) which will then handle authenticating / authorizing of users; this makes it possible to login with passkeys / fido2 / webauthn / yubikey / ldap / active directory / oauth / many other single-sign-on contraptions
the regular config-defined users will be used as a fallback for requests which don't include a valid (trusted) IdP username header
if your IdP-server is slow, consider --idp-cookie and let requests with the cookie cppws bypass the IdP; experimental sessions-based feature added for a party
some popular identity providers are Authelia (config-file based) and authentik (GUI-based, more complex)
there is a docker-compose example which is hopefully a good starting point (alternatively see ./docs/idp.md if you're the DIY type)
a more complete example of the copyparty configuration options look like this
but if you just want to let users change their own passwords, then you probably want user-changeable passwords instead
other ways to auth by header
if you have a middleware which adds a header with a user identifier, for example tailscale's Tailscale-User-Login: [email protected] then you can automatically auth as alice by defining that mapping with --idp-hm-usr '^Tailscale-User-Login^[email protected]^alice' or the following config file:
[global]
  idp-hm-usr: ^Tailscale-User-Login^[email protected]^alice
repeat the whole idp-hm-usr option to add more mappings
if permitted, users can change their own passwords in the control-panel
not compatible with identity providers
must be enabled with --chpw because account-sharing is a popular usecase
--chpw-no name1,name2,name3,...to perform a password reset, edit the server config and give the user another password there, then do a config reload or server restart
the custom passwords are kept in a textfile at filesystem-path --chpw-db, by default chpw.json in the copyparty config folder
if you run multiple copyparty instances with different users you almost definitely want to specify separate DBs for each instance
if password hashing is enabled, the passwords in the db are also hashed
connecting to an aws s3 bucket and similar
there is no built-in support for this, but you can use FUSE-software such as rclone / geesefs / JuiceFS to first mount your cloud storage as a local disk, and then let copyparty use (a folder in) that disk as a volume
if copyparty is unable to access the local folder that rclone/geesefs/JuiceFS provides (for example if it looks invisible) then you may need to run rclone with --allow-other and/or enable user_allow_other in /etc/fuse.conf
you will probably get decent speeds with the default config, however most likely restricted to using one TCP connection per file, so the upload-client won't be able to send multiple chunks in parallel
before v1.13.5 it was recommended to use the volflag
sparseto force-allow multiple chunks in parallel; this would improve the upload-speed from1.5 MiB/sto over80 MiB/sat the risk of provoking latent bugs in S3 or JuiceFS. But v1.13.5 added chunk-stitching, so this is now probably much less important. On the contrary,nosparsemay now increase performance in some cases. Please try all three options (default,sparse,nosparse) as the optimal choice depends on your network conditions and software stack (both the FUSE-driver and cloud-server)
someone has also tested geesefs in combination with gocryptfs with surprisingly good results, getting 60 MiB/s upload speeds on a gbit line, but JuiceFS won with 80 MiB/s using its built-in encryption
you may improve performance by specifying larger values for --iobuf / --s-rd-sz / --s-wr-sz
if you've experimented with this and made interesting observations, please share your findings so we can add a section with specific recommendations :-)
tell search engines you don't wanna be indexed, either using the good old robots.txt or through copyparty settings:
--no-robots adds HTTP (X-Robots-Tag) and HTML (<meta>) headers with noindex, nofollow globally[...]:c,norobots does the same thing for that single volume[...]:c,robots ALLOWS search-engine crawling for that volume, even if --no-robots is set globallyalso, --force-js disables the plain HTML folder listing, making things harder to parse for some search engines -- note that crawlers which understand javascript (such as google) will not be affected
you can change the default theme with --theme 2, and add your own themes by modifying browser.css or providing your own css to --css-browser, then telling copyparty they exist by increasing --themes
 0. classic dark 0. classic dark |
 2. flat pm-monokai 2. flat pm-monokai |
 4. vice 4. vice |
 1. classic light 1. classic light |
 3. flat light 3. flat light |
 5. hotdog stand 5. hotdog stand |
the classname of the HTML tag is set according to the selected theme, which is used to set colors as css variables ++
html.a, second theme (2 and 3) is html.bhtml.y is set, otherwise html.z ishtml.b, html.z, html.bz to specify rulessee the top of ./copyparty/web/browser.css where the color variables are set, and there's layout-specific stuff near the bottom
if you want to change the fonts, see ./docs/rice/
see running on windows for a fancy windows setup
python copyparty-sfx.py with copyparty.exe if you're using the exe editionallow anyone to download or upload files into the current folder:
python copyparty-sfx.py
enable searching and music indexing with -e2dsa -e2ts
start an FTP server on port 3921 with --ftp 3921
announce it on your LAN with -z so it appears in windows/Linux file managers
anyone can upload, but nobody can see any files (even the uploader):
python copyparty-sfx.py -e2dsa -v .::w
block uploads if there's less than 4 GiB free disk space with --df 4
show a popup on new uploads with --xau bin/hooks/notify.py
anyone can upload, and receive "secret" links for each upload they do:
python copyparty-sfx.py -e2dsa -v .::wG:c,fk=8
anyone can browse (r), only kevin (password okgo) can upload/move/delete (A) files:
python copyparty-sfx.py -e2dsa -a kevin:okgo -v .::r:A,kevin
read-only music server:
python copyparty-sfx.py -v /mnt/nas/music:/music:r -e2dsa -e2ts --no-robots --force-js --theme 2
...with bpm and key scanning
-mtp .bpm=f,audio-bpm.py -mtp key=f,audio-key.py
...with a read-write folder for kevin whose password is okgo
-a kevin:okgo -v /mnt/nas/inc:/inc:rw,kevin
...with logging to disk
-lo log/cpp-%Y-%m%d-%H%M%S.txt.xz
become a real webserver which people can access by just going to your IP or domain without specifying a port
if you're on windows, then you just need to add the commandline argument -p 80,443 and you're done! nice
if you're on macos, sorry, I don't know
if you're on Linux, you have the following 4 options:
option 1: set up a reverse-proxy -- this one makes a lot of sense if you're running on a proper headless server, because that way you get real HTTPS too
option 2: NAT to port 3923 -- this is cumbersome since you'll need to do it every time you reboot, and the exact command may depend on your linux distribution:
iptables -t nat -A PREROUTING -p tcp --dport 80 -j REDIRECT --to-port 3923
iptables -t nat -A PREROUTING -p tcp --dport 443 -j REDIRECT --to-port 3923
option 3: disable the security policy which prevents the use of 80 and 443; this is probably fine:
setcap CAP_NET_BIND_SERVICE=+eip $(realpath $(which python))
python copyparty-sfx.py -p 80,443
option 4: run copyparty as root (please don't)
running copyparty next to other websites hosted on an existing webserver such as nginx, caddy, or apache
you can either:
--rp-loc=/stuff to tell copyparty where it is mounted -- has a slight performance cost and higher chance of bugs
incorrect --rp-loc or webserver config; expected vpath starting with [...] it's likely because the webserver is stripping away the proxy location from the request URLs -- see the ProxyPass in the apache example belowwhen running behind a reverse-proxy (this includes services like cloudflare), it is important to configure real-ip correctly, as many features rely on knowing the client's IP. The best/safest approach is to configure your reverse-proxy so it gives copyparty a header which only contains the client's true/real IP-address, and then setting --xff-hdr theHeaderName --rproxy 1 but alternatively, if you want/need to let copyparty handle this, look out for red and yellow log messages which explain how to do that. Basically, the log will say this:
set
--xff-hdrto the name of the http-header to read the IP from (usuallyx-forwarded-for, but cloudflare usescf-connecting-ip), and then--xff-srcto the IP of the reverse-proxy so copyparty will trust the xff-hdr. You will also need to configure--rproxyto1if the header only contains one IP (the correct one) or to a negative value if it contains multiple;-1being the rightmost and most trusted IP (the nearest proxy, so usually not the correct one),-2being the second-closest hop, and so on
Note that --rp-loc in particular will not work at all unless you configure the above correctly
some reverse proxies (such as Caddy) can automatically obtain a valid https/tls certificate for you, and some support HTTP/2 and QUIC which could be a nice speed boost, depending on a lot of factors
for improved security (and a 10% performance boost) consider listening on a unix-socket with -i unix:770:www:/dev/shm/party.sock (permission 770 means only members of group www can access it)
example webserver / reverse-proxy configs:
caddy reverse-proxy --from :8080 --to unix///dev/shm/party.sockcaddy reverse-proxy --from :8081 --to http://127.0.0.1:3923teaching copyparty how to see client IPs when running behind a reverse-proxy, or a WAF, or another protection service such as cloudflare
if you (and maybe everybody else) keep getting a message that says thank you for playing, then you've gotten banned for malicious traffic. This ban applies to the IP address that copyparty thinks identifies the shady client -- so, depending on your setup, you might have to tell copyparty where to find the correct IP
for most common setups, there should be a helpful message in the server-log explaining what to do, but see docs/xff.md if you want to learn more, including a quick hack to just make it work (which is not recommended, but hey...)
most reverse-proxies support connecting to copyparty either using uds/unix-sockets (/dev/shm/party.sock, faster/recommended) or using tcp (127.0.0.1)
with copyparty listening on a uds / unix-socket / unix-domain-socket and the reverse-proxy connecting to that:
index.html upload download software| 28'900 req/s | 6'900 MiB/s | 7'400 MiB/s | no-proxy |
| 18'750 req/s | 3'500 MiB/s | 2'370 MiB/s | haproxy |
| 9'900 req/s | 3'750 MiB/s | 2'200 MiB/s | caddy |
| 18'700 req/s | 2'200 MiB/s | 1'570 MiB/s | nginx |
| 9'700 req/s | 1'750 MiB/s | 1'830 MiB/s | apache |
| 9'900 req/s | 1'300 MiB/s | 1'470 MiB/s | lighttpd |
when connecting the reverse-proxy to 127.0.0.1 instead (the basic and/or old-fasioned way), speeds are a bit worse:
| 21'200 req/s | 5'700 MiB/s | 6'700 MiB/s | no-proxy |
| 14'500 req/s | 1'700 MiB/s | 2'170 MiB/s | haproxy |
| 11'100 req/s | 2'750 MiB/s | 2'000 MiB/s | traefik |
| 8'400 req/s | 2'300 MiB/s | 1'950 MiB/s | caddy |
| 13'400 req/s | 1'100 MiB/s | 1'480 MiB/s | nginx |
| 8'400 req/s | 1'000 MiB/s | 1'000 MiB/s | apache |
| 6'500 req/s | 1'270 MiB/s | 1'500 MiB/s | lighttpd |
in summary, haproxy > caddy > traefik > nginx > apache > lighttpd, and use uds when possible (traefik does not support it yet)
if you have a domain and want to get your copyparty online real quick, either from your home-PC behind a CGNAT or from a server without an existing reverse-proxy setup, one approach is to create a Cloudflare Tunnel (formerly "Argo Tunnel")
I'd recommend making a Locally-managed tunnel for more control, but if you prefer to make a Remotely-managed tunnel then this is currently how:
cloudflare dashboard » zero trust » networks » tunnels » create a tunnel » cloudflared » choose a cool subdomain and leave the path blank, and use service type = http and URL = 127.0.0.1:3923
and if you want to just run the tunnel without installing it, skip the cloudflared service install BASE64 step and instead do cloudflared --no-autoupdate tunnel run --token BASE64
NOTE: since people will be connecting through cloudflare, as mentioned in real-ip you should run copyparty with --xff-hdr cf-connecting-ip to detect client IPs correctly
config file example:
[global]
  xff-hdr: cf-connecting-ip
metrics/stats can be enabled at URL /.cpr/metrics for grafana / prometheus / etc (openmetrics 1.0.0)
must be enabled with --stats since it reduces startup time a tiny bit, and you probably want -e2dsa too
the endpoint is only accessible by admin accounts, meaning the a in rwmda in the following example commandline: python3 -m copyparty -a ed:wark -v /mnt/nas::rwmda,ed --stats -e2dsa
follow a guide for setting up node_exporter except have it read from copyparty instead; example /etc/prometheus/prometheus.yml below
scrape_configs:
  - job_name: copyparty
    metrics_path: /.cpr/metrics
    basic_auth:
      password: wark
    static_configs:
      - targets: ['192.168.123.1:3923']
currently the following metrics are available,
cpp_uptime_seconds time since last copyparty restartcpp_boot_unixtime_seconds same but as an absolute timestampcpp_active_dl number of active downloadscpp_http_conns number of open http(s) connectionscpp_http_reqs number of http(s) requests handledcpp_sus_reqs number of 403/422/malicious requestscpp_active_bans number of currently banned IPscpp_total_bans number of IPs banned since last restartthese are available unless --nos-vst is specified:
cpp_db_idle_seconds time since last database activity (upload/rename/delete)cpp_db_act_seconds same but as an absolute timestampcpp_idle_vols number of volumes which are idle / readycpp_busy_vols number of volumes which are busy / indexingcpp_offline_vols number of volumes which are offline / unavailablecpp_hashing_files number of files queued for hashing / indexingcpp_tagq_files number of files queued for metadata scanningcpp_mtpq_files number of files queued for plugin-based analysisand these are available per-volume only:
cpp_disk_size_bytes total HDD sizecpp_disk_free_bytes free HDD spaceand these are per-volume and total:
cpp_vol_bytes size of all files in volumecpp_vol_files number of filescpp_dupe_bytes disk space presumably saved by deduplicationcpp_dupe_files number of dupe filescpp_unf_bytes currently unfinished / incoming uploadssome of the metrics have additional requirements to function correctly,
cpp_vol_* requires either the e2ds volflag or -e2dsa global-optionthe following options are available to disable some of the metrics:
--nos-hdd disables cpp_disk_* which can prevent spinning up HDDs--nos-vol disables cpp_vol_* which reduces server startup time--nos-vst disables volume state, reducing the worst-case prometheus query time by 0.5 sec--nos-dup disables cpp_dupe_* which reduces the server load caused by prometheus queries--nos-unf disables cpp_unf_* for no particular purposenote: the following metrics are counted incorrectly if multiprocessing is enabled with -j: cpp_http_conns, cpp_http_reqs, cpp_sus_reqs, cpp_active_bans, cpp_total_bans
you'll never find a use for these:
change the association of a file extension
using commandline args, you can do something like --mime gif=image/jif and --mime ts=text/x.typescript (can be specified multiple times)
in a config file, this is the same as:
[global]
  mime: gif=image/jif
  mime: ts=text/x.typescript
run copyparty with --mimes to list all the default mappings
imagine using copyparty professionally... TINLA/IANAL; EU laws are hella confusing
remember to disable logging, or configure logrotation to an acceptable timeframe with -lo cpp-%Y-%m%d.txt.xz or similar
if running with the database enabled (recommended), then have it forget uploader-IPs after some time using --forget-ip 43200
if you actually are a lawyer then I'm open for feedback, would be fun
buggy feature? rip it out by setting any of the following environment variables to disable its associated bell or whistle,
env-var what it doesPRTY_NO_DB_LOCK |
do not lock session/shares-databases for exclusive access |
PRTY_NO_IFADDR |
disable ip/nic discovery by poking into your OS with ctypes |
PRTY_NO_IMPRESO |
do not try to load js/css files using importlib.resources |
PRTY_NO_IPV6 |
disable some ipv6 support (should not be necessary since windows 2000) |
PRTY_NO_LZMA |
disable streaming xz compression of incoming uploads |
PRTY_NO_MP |
disable all use of the python multiprocessing module (actual multithreading, cpu-count for parsers/thumbnailers) |
PRTY_NO_SQLITE |
disable all database-related functionality (file indexing, metadata indexing, most file deduplication logic) |
PRTY_NO_TLS |
disable native HTTPS support; if you still want to accept HTTPS connections then TLS must now be terminated by a reverse-proxy |
PRTY_NO_TPOKE |
disable systemd-tmpfilesd avoider |
example: PRTY_NO_IFADDR=1 python3 copyparty-sfx.py
force-enable features with known issues on your OS/env by setting any of the following environment variables, also affectionately known as fuckitbits or hail-mary-bits
PRTY_FORCE_MP |
force-enable multiprocessing (real multithreading) on MacOS and other broken platforms |
PRTY_FORCE_MAGIC |
use magic on Windows (you will segfault) |
the party might be closer than you think
if your distro/OS is not mentioned below, there might be some hints in the «on servers» section
pacman -S copyparty (in arch linux extra)
it comes with a systemd service as well as a user service, and expects to find a config file in /etc/copyparty/copyparty.conf or ~/.config/copyparty/copyparty.conf
after installing, start either the system service or the user service and navigate to http://127.0.0.1:3923 for further instructions (unless you already edited the config files, in which case you are good to go, probably)
does not exist yet; there are rumours that it is being packaged! keep an eye on this space...
brew install copyparty ffmpeg -- https://formulae.brew.sh/formula/copyparty
should work on all macs (both intel and apple silicon) and all relevant macos versions
the homebrew package is maintained by the homebrew team (thanks!)
nix profile install github:9001/copyparty
requires a flake-enabled installation of nix
some recommended dependencies are enabled by default; override the package if you want to add/remove some features/deps
ffmpeg-full was chosen over ffmpeg-headless mainly because we need withWebp (and withOpenmpt is also nice) and being able to use a cached build felt more important than optimizing for size at the time -- PRs welcome if you disagree 👍
for flake-enabled installations of NixOS:
{
  # add copyparty flake to your inputs
  inputs.copyparty.url = "github:9001/copyparty";

  # ensure that copyparty is an allowed argument to the outputs function
  outputs = { self, nixpkgs, copyparty }: {
    nixosConfigurations.yourHostName = nixpkgs.lib.nixosSystem {
      modules = [
        # load the copyparty NixOS module
        copyparty.nixosModules.default
        ({ pkgs, ... }: {
          # add the copyparty overlay to expose the package to the module
          nixpkgs.overlays = [ copyparty.overlays.default ];
          # (optional) install the package globally
          environment.systemPackages = [ pkgs.copyparty ];
          # configure the copyparty module
          services.copyparty.enable = true;
        })
      ];
    };
  };
}
if you don't use a flake in your configuration, you can use other dependency management tools like npins, niv, or even plain fetchTarball, like so:
{ pkgs, ... }:

let
  # npins example, adjust for your setup. copyparty should be a path to the downloaded repo
  # for niv, just replace the npins folder import with the sources.nix file
  copyparty = (import ./npins).copyparty;

  # or with fetchTarball:
  copyparty = fetchTarball "https://github.com/9001/copyparty/archive/hovudstraum.tar.gz";
in

{
  # load the copyparty NixOS module
  imports = [ "${copyparty}/contrib/nixos/modules/copyparty.nix" ];

  # add the copyparty overlay to expose the package to the module
  nixpkgs.overlays = [ (import "${copyparty}/contrib/package/nix/overlay.nix") ];
  # (optional) install the package globally
  environment.systemPackages = [ pkgs.copyparty ];
  # configure the copyparty module
  services.copyparty.enable = true;
}
copyparty on NixOS is configured via services.copyparty options, for example:
services.copyparty = {
  enable = true;
  # directly maps to values in the [global] section of the copyparty config.
  # see `copyparty --help` for available options
  settings = {
    i = "0.0.0.0";
    # use lists to set multiple values
    p = [ 3210 3211 ];
    # use booleans to set binary flags
    no-reload = true;
    # using 'false' will do nothing and omit the value when generating a config
    ignored-flag = false;
  };

  # create users
  accounts = {
    # specify the account name as the key
    ed = {
      # provide the path to a file containing the password, keeping it out of /nix/store
      # must be readable by the copyparty service user
      passwordFile = "/run/keys/copyparty/ed_password";
    };
    # or do both in one go
    k.passwordFile = "/run/keys/copyparty/k_password";
  };

  # create a volume
  volumes = {
    # create a volume at "/" (the webroot), which will
    "/" = {
      # share the contents of "/srv/copyparty"
      path = "/srv/copyparty";
      # see `copyparty --help-accounts` for available options
      access = {
        # everyone gets read-access, but
        r = "*";
        # users "ed" and "k" get read-write
        rw = [ "ed" "k" ];
      };
      # see `copyparty --help-flags` for available options
      flags = {
        # "fk" enables filekeys (necessary for upget permission) (4 chars long)
        fk = 4;
        # scan for new files every 60sec
        scan = 60;
        # volflag "e2d" enables the uploads database
        e2d = true;
        # "d2t" disables multimedia parsers (in case the uploads are malicious)
        d2t = true;
        # skips hashing file contents if path matches *.iso
        nohash = "\.iso$";
      };
    };
  };
  # you may increase the open file limit for the process
  openFilesLimit = 8192;
};
the passwordFile at /run/keys/copyparty/ could for example be generated by agenix, or you could just dump it in the nix store instead if that's acceptable
TLDR: yes

ie = internet-explorer, ff = firefox, c = chrome, iOS = iPhone/iPad, Andr = Android
| browse files | yep | yep | yep | yep | yep | yep | yep | yep |
| thumbnail view | - | yep | yep | yep | yep | yep | yep | yep |
| basic uploader | yep | yep | yep | yep | yep | yep | yep | yep |
| up2k | - | - | *1 |
*1 |
yep | yep | yep | yep |
| make directory | yep | yep | yep | yep | yep | yep | yep | yep |
| send message | yep | yep | yep | yep | yep | yep | yep | yep |
| set sort order | - | yep | yep | yep | yep | yep | yep | yep |
| zip selection | - | yep | yep | yep | yep | yep | yep | yep |
| file search | - | yep | yep | yep | yep | yep | yep | yep |
| file rename | - | yep | yep | yep | yep | yep | yep | yep |
| file cut/paste | - | yep | yep | yep | yep | yep | yep | yep |
| unpost uploads | - | - | yep | yep | yep | yep | yep | yep |
| navpane | - | yep | yep | yep | yep | yep | yep | yep |
| image viewer | - | yep | yep | yep | yep | yep | yep | yep |
| video player | - | yep | yep | yep | yep | yep | yep | yep |
| markdown editor | - | - | *2 |
*2 |
yep | yep | yep | yep |
| markdown viewer | - | *2 |
*2 |
*2 |
yep | yep | yep | yep |
| play mp3/m4a | - | yep | yep | yep | yep | yep | yep | yep |
| play ogg/opus | - | - | - | - | yep | yep | *3 |
yep |
| = feature = | ie6 | ie9 | ie10 | ie11 | ff 52 | c 49 | iOS | Andr |
*1 yes, but extremely slow (ie10: 1 MiB/s, ie11: 270 KiB/s)*2 only able to do plaintext documents (no markdown rendering)*3 iOS 11 and newer, opus only, and requires FFmpeg on the serverquick summary of more eccentric web-browsers trying to view a directory index:
browser will it blend| links (2.21/macports) | can browse, login, upload/mkdir/msg |
| lynx (2.8.9/macports) | can browse, login, upload/mkdir/msg |
| w3m (0.5.3/macports) | can browse, login, upload at 100kB/s, mkdir/msg |
| netsurf (3.10/arch) | is basically ie6 with much better css (javascript has almost no effect) |
| opera (11.60/winxp) | OK: thumbnails, image-viewer, zip-selection, rename/cut/paste. NG: up2k, navpane, markdown, audio |
| ie4 and netscape 4.0 | can browse, upload with ?b=u, auth with &pw=wark |
| ncsa mosaic 2.7 | does not get a pass, pic1 - pic2 |
| SerenityOS (7e98457) | hits a page fault, works with ?b=u, file upload not-impl |
| sony psp 5.50 | can browse, upload/mkdir/msg (thx dwarf) screenshot |
| nintendo 3ds | can browse, upload, view thumbnails (thx bnjmn) |
| Nintendo Wii (Opera 9.0 "Internet Channel") | can browse, can't upload or download (no local storage), can view images - works best with ?b=u, default view broken |
interact with copyparty using non-browser clients
javascript: dump some state into a file (two separate examples)
await fetch('//127.0.0.1:3923/', {method:"PUT", body: JSON.stringify(foo)});var xhr = new XMLHttpRequest(); xhr.open('POST', '//127.0.0.1:3923/msgs?raw'); xhr.send('foo');curl/wget: upload some files (post=file, chunk=stdin)
post(){ curl -F f=@"$1" http://127.0.0.1:3923/?pw=wark;}post movie.mkv (gives HTML in return)post(){ curl -F f=@"$1" 'http://127.0.0.1:3923/?want=url&pw=wark';}post movie.mkv (gives hotlink in return)post(){ curl -H pw:wark -H rand:8 -T "$1" http://127.0.0.1:3923/;}post movie.mkv (randomized filename)post(){ wget --header='pw: wark' --post-file="$1" -O- http://127.0.0.1:3923/?raw;}post movie.mkvchunk(){ curl -H pw:wark -T- http://127.0.0.1:3923/;}chunk <movie.mkvbash: when curl and wget is not available or too boring
(printf 'PUT /junk?pw=wark HTTP/1.1\r\n\r\n'; cat movie.mkv) | nc 127.0.0.1 3923(printf 'PUT / HTTP/1.1\r\n\r\n'; cat movie.mkv) >/dev/tcp/127.0.0.1/3923python: u2c.py is a command-line up2k client (webm)
FUSE: mount a copyparty server as a local filesystem
sharex (screenshot utility): see ./contrib/sharex.sxcu
Custom Uploader (an Android app) as an alternative to copyparty's own PartyUP!
https://your.com/foo/?want=url&pw=hunter2 and FormDataName fcontextlet (web browser integration); see contrib contextlet
igloo irc: Method: post Host: https://you.com/up/?want=url&pw=hunter2 Multipart: yes File parameter: f
copyparty returns a truncated sha512sum of your PUT/POST as base64; you can generate the same checksum locally to verify uploads:
b512(){ printf "$((sha512sum||shasum -a512)|sed -E 's/ .*//;s/(..)/\\x\1/g')"|base64|tr '+/' '-_'|head -c44;}
b512 <movie.mkv
you can provide passwords using header PW: hunter2, cookie cppwd=hunter2, url-param ?pw=hunter2, or with basic-authentication (either as the username or password)
for basic-authentication, all of the following are accepted:
password/whatever:password/password:whatever(the username is ignored)
--usernames, then it's PW: usr:pwd, cookie cppwd=usr:pwd, url-param ?pw=usr:pwdNOTE: curl will not send the original filename if you use -T combined with url-params! Also, make sure to always leave a trailing slash in URLs unless you want to override the filename
sync folders to/from copyparty
NOTE: full bidirectional sync, like what nextcloud and syncthing does, will never be supported! Only single-direction sync (server-to-client, or client-to-server) is possible with copyparty
the commandline uploader u2c.py with --dr is the best way to sync a folder to copyparty; verifies checksums and does files in parallel, and deletes unexpected files on the server after upload has finished which makes file-renames really cheap (it'll rename serverside and skip uploading)
if you want to sync with u2c.py then:
e2dsa option (either globally or volflag) must be enabled on the server for the volumes you're syncing intono-hash or no-idx (or volflags nohash / noidx), or at least make sure they are configured so they do not affect anything you are syncing intorwd at minimum, or just A which is the same as rwmd.a
a and A are different permissions, and . is very useful for syncalternatively there is rclone which allows for bidirectional sync and is way more flexible (stream files straight from sftp/s3/gcs to copyparty, ...), although there is no integrity check and it won't work with files over 100 MiB if copyparty is behind cloudflare
a remote copyparty server as a local filesystem; go to the control-panel and click connect to see a list of commands to do that
alternatively, some alternatives roughly sorted by speed (unreproducible benchmark), best first:
most clients will fail to mount the root of a copyparty server unless there is a root volume (so you get the admin-panel instead of a browser when accessing it) -- in that case, mount a specific volume instead
if you have volumes that are accessible without a password, then some webdav clients (such as davfs2) require the global-option --dav-auth to access any password-protected areas
upload to copyparty with one tap
 ''
''  ''
'' 
the app is NOT the full copyparty server! just a basic upload client, nothing fancy yet
if you want to run the copyparty server on your android device, see install on android
there is no iPhone app, but the following shortcuts are almost as good:
if you want to run the copyparty server on your iPhone or iPad, see install on iOS
defaults are usually fine - expect 8 GiB/s download, 1 GiB/s upload
below are some tweaks roughly ordered by usefulness:
disabling HTTP/2 and HTTP/3 can make uploads 5x faster, depending on server/client software
-q disables logging and can help a bunch, even when combined with -lo to redirect logs to file
--hist pointing to a fast location (ssd) will make directory listings and searches faster when -e2d or -e2t is set
--dedup enables deduplication and thus avoids writing to the HDD if someone uploads a dupe
--safe-dedup 1 makes deduplication much faster during upload by skipping verification of file contents; safe if there is no other software editing/moving the files in the volumes
--no-dirsz shows the size of folder inodes instead of the total size of the contents, giving about 30% faster folder listings
--no-hash . when indexing a network-disk if you don't care about the actual filehashes and only want the names/tags searchable
if your volumes are on a network-disk such as NFS / SMB / s3, specifying larger values for --iobuf and/or --s-rd-sz and/or --s-wr-sz may help; try setting all of them to 524288 or 1048576 or 4194304
--no-htp --hash-mt=0 --mtag-mt=1 --th-mt=1 minimizes the number of threads; can help in some eccentric environments (like the vscode debugger)
when running on AlpineLinux or other musl-based distro, try mimalloc for higher performance (and twice as much RAM usage); apk add mimalloc2 and run copyparty with env-var LD_PRELOAD=/usr/lib/libmimalloc-secure.so.2
/proc and /sys otherwise you'll encounter issues with FFmpeg (audio transcoding, thumbnails)-j0 enables multiprocessing (actual multithreading), can reduce latency to 20+80/numCores percent and generally improve performance in cpu-intensive workloads, for example:
-e2d is enabled, -j2 gives 4x performance for directory listings; -j4 gives 16x...however it also increases the server/filesystem/HDD load during uploads, and adds an overhead to internal communication, so it is usually a better idea to don't
using pypy instead of cpython can be 70% faster for some workloads, but slower for many others
-j0 (TODO make issue)when uploading files,
when uploading from very fast storage (NVMe SSD) with chrome/firefox, enable [wasm] in the [⚙️] settings tab to more effectively use all CPU-cores for hashing
--nosubtle 137 (chrome v137+) or --nosubtle 2 (chrome+firefox)chrome is recommended (unfortunately), at least compared to firefox:
if you're cpu-bottlenecked, or the browser is maxing a cpu core:
[🚀] up2k ui-tab (or closing it)
[🥔]there is a discord server with an @everyone for all important updates (at the lack of better ideas)
some notes on hardening
--rproxy 0 if and only if your copyparty is directly facing the internet (not through a reverse-proxy)
nohtml
--help-bindsafety profiles:
option -s is a shortcut to set the following options:
--no-thumb disables thumbnails and audio transcoding to stop copyparty from running FFmpeg/Pillow/VIPS on uploaded files, which is a good idea if anonymous upload is enabled--no-mtag-ff uses mutagen to grab music tags instead of FFmpeg, which is safer and faster but less accurate--dotpart hides uploads from directory listings while they're still incoming--no-robots and --force-js makes life harder for crawlers, see hiding from googleoption -ss is a shortcut for the above plus:
--unpost 0, --no-del, --no-mv disables all move/delete support--hardlink creates hardlinks instead of symlinks when deduplicating uploads, which is less maintenance
--vague-403 returns a "404 not found" instead of "401 unauthorized" which is a common enterprise meme-nih removes the server hostname from directory listingsoption -sss is a shortcut for the above plus:
--no-dav disables webdav support--no-logues and --no-readme disables support for readme's and prologues / epilogues in directory listings, which otherwise lets people upload arbitrary (but sandboxed) <script> tags-lo cpp-%Y-%m%d-%H%M%S.txt.xz enables logging to disk-ls **,*,ln,p,r does a scan on startup for any dangerous symlinksother misc notes:
g instead of r, only accepting direct URLs to files
h instead of r makes copyparty behave like a traditional webserver with directory listing/index disabled, returning index.html instead
behavior that might be unexpected
.prologue.html / .epilogue.html / PREADME.md / README.md contents, for the purpose of showing a description on how to use the uploader for example<script>s which autorun (in a sandbox) for other visitors in a few ways;
README.md -- avoid with --no-readmesome.html to .epilogue.html -- avoid with either --no-logues or --no-dot-ren<script>s; attempts are made to prevent scripts from executing (unless -emp is specified) but this is not 100% bulletproof, so setting the nohtml volflag is still the safest choice
cross-site request config
by default, except for GET and HEAD operations, all requests must either:
Origin header at allOrigin matching the server domainPW with your password as valuecors can be configured with --acao and --acam, or the protections entirely disabled with --allow-csrf
prevent filename bruteforcing
volflag fk generates filekeys (per-file accesskeys) for all files; users which have full read-access (permission r) will then see URLs with the correct filekey ?k=... appended to the end, and g users must provide that URL including the correct key to avoid a 404
by default, filekeys are generated based on salt (--fk-salt) + filesystem-path + file-size + inode (if not windows); add volflag fka to generate slightly weaker filekeys which will not be invalidated if the file is edited (only salt + path)
permissions wG (write + upget) lets users upload files and receive their own filekeys, still without being able to see other uploads
share specific folders in a volume without giving away full read-access to the rest -- the visitor only needs the g (get) permission to view the link
volflag dk generates dirkeys (per-directory accesskeys) for all folders, granting read-access to that folder; by default only that folder itself, no subfolders
volflag dky disables the actual key-check, meaning anyone can see the contents of a folder where they have g access, but not its subdirectories
dk + dky gives the same behavior as if all users with g access have full read-access, but subfolders are hidden files (as if their names start with a dot), so dky is an alternative to renaming all the folders for that purpose, maybe just for some usersvolflag dks lets people enter subfolders as well, and also enables download-as-zip/tar
if you enable dirkeys, it is probably a good idea to enable filekeys too, otherwise it will be impossible to hotlink files from a folder which was accessed using a dirkey
dirkeys are generated based on another salt (--dk-salt) + filesystem-path and have a few limitations:
you can hash passwords before putting them into config files / providing them as arguments; see --help-pwhash for all the details
--ah-alg argon2 enables it, and if you have any plaintext passwords then it'll print the hashed versions on startup so you can replace them
optionally also specify --ah-cli to enter an interactive mode where it will hash passwords without ever writing the plaintext ones to disk
the default configs take about 0.4 sec and 256 MiB RAM to process a new password on a decent laptop
when generating hashes using --ah-cli for docker or systemd services, make sure it is using the same --ah-salt by:
--show-ah-salt in copyparty service configuration--ah-salt in both environments⚠️ if you have enabled
--usernamesthen provide the password asusername:passwordwhen hashing it, for exampleed:hunter2
both HTTP and HTTPS are accepted by default, but letting a reverse proxy handle the https/tls/ssl would be better (probably more secure by default)
copyparty doesn't speak HTTP/2 or QUIC, so using a reverse proxy would solve that as well -- but note that HTTP/1 is usually faster than both HTTP/2 and HTTP/3
if cfssl is installed, copyparty will automatically create a CA and server-cert on startup
--crt-dir for distribution, see --help for the other --crt optionsca.pem into all your browsers/devicesfirefox 87 can crash during uploads -- the entire browser goes, including all other browser tabs, everything turns white
however you can hit F12 in the up2k tab and use the devtools to see how far you got in the uploads:
get a complete list of all uploads, organized by status (ok / no-good / busy / queued):
var tabs = { ok:[], ng:[], bz:[], q:[] }; for (var a of up2k.ui.tab) tabs[a.in].push(a); tabs
list of filenames which failed:
var ng = []; for (var a of up2k.ui.tab) if (a.in != 'ok') ng.push(a.hn.split('<a href=\"').slice(-1)[0].split('\">')[0]); ng
send the list of filenames to copyparty for safekeeping:
await fetch('/inc', {method:'PUT', body:JSON.stringify(ng,null,1)})
see devnotes
mandatory deps:
jinja2 (is built into the SFX)install these to enable bonus features
enable hashed passwords in config: argon2-cffi
enable ftp-server:
pyftpdlib (is built into the SFX)pyftpdlib pyopensslenable music tags:
mutagen (fast, pure-python, skips a few tags, makes copyparty GPL? idk)ffprobe (20x slower, more accurate, possibly dangerous depending on your distro and users)enable thumbnails of...
Pillow and/or pyvips and/or ffmpeg (requires py2.7 or py3.5+)ffmpeg and ffprobe somewhere in $PATHpyvips or ffmpeg or pillow-heifpyvips or ffmpeg or pillow-avif-plugin or pillow v11.3+pyvips or ffmpegrawpy, plus one of pyvips or Pillow (for some formats)enable sending zeromq messages from event-hooks: pyzmq
enable smb support (not recommended): impacket==0.12.0
pyvips gives higher quality thumbnails than Pillow and is 320% faster, using 270% more ram: sudo apt install libvips42 && python3 -m pip install --user -U pyvips
to install FFmpeg on Windows, grab a recent build -- you need ffmpeg.exe and ffprobe.exe from inside the bin folder; copy them into C:\Windows\System32 or any other folder that's in your %PATH%
prevent loading an optional dependency , for example if:
set any of the following environment variables to disable its associated optional feature,
env-var what it doesPRTY_NO_ARGON2 |
disable argon2-cffi password hashing |
PRTY_NO_CFSSL |
never attempt to generate self-signed certificates using cfssl |
PRTY_NO_FFMPEG |
audio transcoding goes byebye, thumbnailing must be handled by Pillow/libvips |
PRTY_NO_FFPROBE |
audio transcoding goes byebye, thumbnailing must be handled by Pillow/libvips, metadata-scanning must be handled by mutagen |
PRTY_NO_MAGIC |
do not use magic for filetype detection |
PRTY_NO_MUTAGEN |
do not use mutagen for reading metadata from media files; will fallback to ffprobe |
PRTY_NO_PIL |
disable all Pillow-based thumbnail support; will fallback to libvips or ffmpeg |
PRTY_NO_PILF |
disable Pillow ImageFont text rendering, used for folder thumbnails |
PRTY_NO_PIL_AVIF |
disable Pillow avif support (internal and/or plugin) |
PRTY_NO_PIL_HEIF |
disable 3rd-party Pillow plugin for HEIF support |
PRTY_NO_PIL_WEBP |
disable use of native webp support in Pillow |
PRTY_NO_PSUTIL |
do not use psutil for reaping stuck hooks and plugins on Windows |
PRTY_NO_RAW |
disable all rawpy-based thumbnail support for RAW images |
PRTY_NO_VIPS |
disable all libvips-based thumbnail support; will fallback to Pillow or ffmpeg |
example: PRTY_NO_PIL=1 python3 copyparty-sfx.py
PRTY_NO_PIL saves ramPRTY_NO_VIPS saves ram and startup timePRTY_NO_FFMPEG + PRTY_NO_FFPROBE saves startup timesome bundled tools have copyleft dependencies, see ./bin/#mtag
these are standalone programs and will never be imported / evaluated by copyparty, and must be enabled through -mtp configs
the self-contained "binary" (recommended!) copyparty-sfx.py will unpack itself and run copyparty, assuming you have python installed of course
if you only need english, copyparty-en.py is the same thing but smaller
you can reduce the sfx size by repacking it; see ./docs/devnotes.md#sfx-repack
download copyparty.exe (win8+) or copyparty32.exe (win7+)

can be convenient on machines where installing python is problematic, however is not recommended -- if possible, please use copyparty-sfx.py instead
copyparty.exe runs on win8 or newer, was compiled on win10, does thumbnails + media tags, and is currently safe to use, but any future python/expat/pillow CVEs can only be remedied by downloading a newer version of the exe
dangerous: copyparty32.exe is compatible with windows7, which means it uses an ancient copy of python (3.7.9) which cannot be upgraded and should never be exposed to the internet (LAN is fine)
dangerous and deprecated: copyparty-winpe64.exe lets you run copyparty in WinPE and is otherwise completely useless
meanwhile copyparty-sfx.py instead relies on your system python which gives better performance and will stay safe as long as you keep your python install up-to-date
then again, if you are already into downloading shady binaries from the internet, you may also want my minimal builds of ffmpeg and ffprobe which enables copyparty to extract multimedia-info, do audio-transcoding, and thumbnails/spectrograms/waveforms, however it's much better to instead grab a recent official build every once ina while if you can afford the size
another emergency alternative, copyparty.pyz has less features, is slow, requires python 3.7 or newer, worse compression, and more importantly is unable to benefit from more recent versions of jinja2 and such (which makes it less secure)... lots of drawbacks with this one really -- but, unlike the sfx, it is a completely normal zipfile which does not unpack any temporary files to disk, so it may just work if the regular sfx fails to start because the computer is messed up in certain funky ways, so it's worth a shot if all else fails
run it by doubleclicking it, or try typing python copyparty.pyz in your terminal/console/commandline/telex if that fails
it is a python zipapp meaning it doesn't have to unpack its own python code anywhere to run, so if the filesystem is busted it has a better chance of getting somewhere
install Termux + its companion app Termux:API (see ocv.me/termux) and then copy-paste this into Termux (long-tap) all at once:
yes | pkg upgrade && termux-setup-storage && yes | pkg install python termux-api && python -m ensurepip && python -m pip install --user -U copyparty && { grep -qE 'PATH=.*\.local/bin' ~/.bashrc 2>/dev/null || { echo 'PATH="$HOME/.local/bin:$PATH"' >> ~/.bashrc && . ~/.bashrc; }; }
echo $?
after the initial setup, you can launch copyparty at any time by running copyparty anywhere in Termux -- and if you run it with --qr you'll get a neat qr-code pointing to your external ip
if you want thumbnails (photos+videos) and you're okay with spending another 132 MiB of storage, pkg install ffmpeg && python3 -m pip install --user -U pillow
vips for photo-thumbs instead, pkg install libvips && python -m pip install --user -U wheel && python -m pip install --user -U pyvips && (cd /data/data/com.termux/files/usr/lib/; ln -s libgobject-2.0.so{,.0}; ln -s libvips.so{,.42})first install one of the following:
and then copypaste the following command into a-Shell:
curl https://github.com/9001/copyparty/raw/refs/heads/hovudstraum/contrib/setup-ashell.sh | sh
what this does:
cpc which you can edit with vim cpccpp to launch copyparty with that config fileknown issues:
ideas for context to include, and where to submit them
please get in touch using any of the following URLs:
in general, commandline arguments (and config file if any)
if something broke during an upload (replacing FILENAME with a part of the filename that broke):
journalctl -aS '48 hour ago' -u copyparty | grep -C10 FILENAME | tee bug.log
if there's a wall of base64 in the log (thread stacks) then please include that, especially if you run into something freezing up or getting stuck, for example OperationalError('database is locked') -- alternatively you can visit /?stack to see the stacks live, so http://127.0.0.1:3923/?stack for example
for build instructions etc, see ./docs/devnotes.md
specifically you may want to build the sfx or build from scratch
see ./docs/TODO.md for planned features / fixes / changes
A feature-rich command-line audio/video downloader

![]()
![]()
![]()
![]()
yt-dlp is a feature-rich command-line audio/video downloader with support for thousands of sites. The project is a fork of youtube-dl based on the now inactive youtube-dlc.
![]()
![]()
![]()
![]()
![]()
![]()
![]()
You can install yt-dlp using the binaries, pip or one using a third-party package manager. See the wiki for detailed instructions
| yt-dlp | Platform-independent zipimport binary. Needs Python (recommended for Linux/BSD) |
| yt-dlp.exe | Windows (Win8+) standalone x64 binary (recommended for Windows) |
| yt-dlp_macos | Universal MacOS (10.15+) standalone executable (recommended for MacOS) |
| yt-dlp_x86.exe | Windows (Win8+) standalone x86 (32-bit) binary |
| yt-dlp_arm64.exe | Windows (Win10+) standalone arm64 (64-bit) binary |
| yt-dlp_linux | Linux standalone x64 binary |
| yt-dlp_linux_armv7l | Linux standalone armv7l (32-bit) binary |
| yt-dlp_linux_aarch64 | Linux standalone aarch64 (64-bit) binary |
| yt-dlp_win.zip | Unpackaged Windows (Win8+) x64 executable (no auto-update) |
| yt-dlp_win_x86.zip | Unpackaged Windows (Win8+) x86 executable (no auto-update) |
| yt-dlp_win_arm64.zip | Unpackaged Windows (Win10+) arm64 executable (no auto-update) |
| yt-dlp_macos.zip | Unpackaged MacOS (10.15+) executable (no auto-update) |
| yt-dlp.tar.gz | Source tarball |
| SHA2-512SUMS | GNU-style SHA512 sums |
| SHA2-512SUMS.sig | GPG signature file for SHA512 sums |
| SHA2-256SUMS | GNU-style SHA256 sums |
| SHA2-256SUMS.sig | GPG signature file for SHA256 sums |
The public key that can be used to verify the GPG signatures is available here Example usage:
curl -L https://github.com/yt-dlp/yt-dlp/raw/master/public.key | gpg --import
gpg --verify SHA2-256SUMS.sig SHA2-256SUMS
gpg --verify SHA2-512SUMS.sig SHA2-512SUMS
Note: The manpages, shell completion (autocomplete) files etc. are available inside the source tarball
You can use yt-dlp -U to update if you are using the release binaries
If you installed with pip, simply re-run the same command that was used to install the program
For other third-party package managers, see the wiki or refer to their documentation
There are currently three release channels for binaries: stable, nightly and master.
stable is the default channel, and many of its changes have been tested by users of the nightly and master channels.nightly channel has releases scheduled to build every day around midnight UTC, for a snapshot of the project's new patches and changes. This is the recommended channel for regular users of yt-dlp. The nightly releases are available from yt-dlp/yt-dlp-nightly-builds or as development releases of the yt-dlp PyPI package (which can be installed with pip's --pre flag).master channel features releases that are built after each push to the master branch, and these will have the very latest fixes and additions, but may also be more prone to regressions. They are available from yt-dlp/yt-dlp-master-builds.When using --update/-U, a release binary will only update to its current channel. --update-to CHANNEL can be used to switch to a different channel when a newer version is available. --update-to [CHANNEL@]TAG can also be used to upgrade or downgrade to specific tags from a channel.
You may also use --update-to <repository> (<owner>/<repository>) to update to a channel on a completely different repository. Be careful with what repository you are updating to though, there is no verification done for binaries from different repositories.
Example usage:
yt-dlp --update-to master switch to the master channel and update to its latest releaseyt-dlp --update-to [email protected] upgrade/downgrade to release to stable channel tag 2023.07.06yt-dlp --update-to 2023.10.07 upgrade/downgrade to tag 2023.10.07 if it exists on the current channelyt-dlp --update-to example/[email protected] upgrade/downgrade to the release from the example/yt-dlp repository, tag 2023.09.24Important: Any user experiencing an issue with the stable release should install or update to the nightly release before submitting a bug report:
# To update to nightly from stable executable/binary:
yt-dlp --update-to nightly

# To install nightly with pip:
python3 -m pip install -U --pre "yt-dlp[default]"
When running a yt-dlp version that is older than 90 days, you will see a warning message suggesting to update to the latest version. You can suppress this warning by adding --no-update to your command or configuration file.
Python versions 3.9+ (CPython) and 3.11+ (PyPy) are supported. Other versions and implementations may or may not work correctly.
While all the other dependencies are optional, ffmpeg and ffprobe are highly recommended
ffmpeg and ffprobe - Required for merging separate video and audio files, as well as for various post-processing tasks. License depends on the build
There are bugs in ffmpeg that cause various issues when used alongside yt-dlp. Since ffmpeg is such an important dependency, we provide custom builds with patches for some of these issues at yt-dlp/FFmpeg-Builds. See the readme for details on the specific issues solved by these builds
Important: What you need is ffmpeg binary, NOT the Python package of the same name
The following provide support for impersonating browser requests. This may be required for some sites that employ TLS fingerprinting.
curl-cffi group, e.g. pip install "yt-dlp[default,curl-cffi]"yt-dlp.exe, yt-dlp_linux and yt-dlp_macos builds--embed-thumbnail in certain formats. Licensed under GPLv2+--embed-thumbnail in mp4/m4a files when mutagen/ffmpeg cannot. Licensed under GPLv2+--xattrs) on Mac and BSD. Licensed under MIT, LGPL2.1 and GPLv2+ respectively--cookies-from-browser to access the Gnome keyring while decrypting cookies of Chromium-based browsers on Linux. Licensed under BSD-3-Clause--downloaderrtmp streams. ffmpeg can be used instead with --downloader ffmpeg. Licensed under GPLv2+rstp/mms streams. ffmpeg can be used instead with --downloader ffmpeg. Licensed under GPLv2+To use or redistribute the dependencies, you must agree to their respective licensing terms.
The standalone release binaries are built with the Python interpreter and the packages marked with * included.
If you do not have the necessary dependencies for a task you are attempting, yt-dlp will warn you. All the currently available dependencies are visible at the top of the --verbose output
To build the standalone executable, you must have Python and pyinstaller (plus any of yt-dlp's optional dependencies if needed). The executable will be built for the same CPU architecture as the Python used.
You can run the following commands:
python3 devscripts/install_deps.py --include pyinstaller
python3 devscripts/make_lazy_extractors.py
python3 -m bundle.pyinstaller
On some systems, you may need to use py or python instead of python3.
python -m bundle.pyinstaller accepts any arguments that can be passed to pyinstaller, such as --onefile/-F or --onedir/-D, which is further documented here.
Note: Pyinstaller versions below 4.4 do not support Python installed from the Windows store without using a virtual environment.
Important: Running pyinstaller directly instead of using python -m bundle.pyinstaller is not officially supported. This may or may not work correctly.
You will need the build tools python (3.9+), zip, make (GNU), pandoc* and pytest*.
After installing these, simply run make.
You can also run make yt-dlp instead to compile only the binary without updating any of the additional files. (The build tools marked with * are not needed for this)
devscripts/install_deps.py - Install dependencies for yt-dlp.devscripts/update-version.py - Update the version number based on the current date.devscripts/set-variant.py - Set the build variant of the executable.devscripts/make_changelog.py - Create a markdown changelog using short commit messages and update CONTRIBUTORS file.devscripts/make_lazy_extractors.py - Create lazy extractors. Running this before building the binaries (any variant) will improve their startup performance. Set the environment variable YTDLP_NO_LAZY_EXTRACTORS to something nonempty to forcefully disable lazy extractor loading.Note: See their --help for more info.
If you fork the project on GitHub, you can run your fork's build workflow to automatically build the selected version(s) as artifacts. Alternatively, you can run the release workflow or enable the nightly workflow to create full (pre-)releases.
yt-dlp [OPTIONS] [--] URL [URL...]
Tip: Use CTRL+F (or Command+F) to search by keywords
-h, --help                      Print this help text and exit
--version                       Print program version and exit
-U, --update                    Update this program to the latest version
--no-update                     Do not check for updates (default)
--update-to [CHANNEL]@[TAG]     Upgrade/downgrade to a specific version.
                                CHANNEL can be a repository as well. CHANNEL
                                and TAG default to "stable" and "latest"
                                respectively if omitted; See "UPDATE" for
                                details. Supported channels: stable,
                                nightly, master
-i, --ignore-errors             Ignore download and postprocessing errors.
                                The download will be considered successful
                                even if the postprocessing fails
--no-abort-on-error             Continue with next video on download errors;
                                e.g. to skip unavailable videos in a
                                playlist (default)
--abort-on-error                Abort downloading of further videos if an
                                error occurs (Alias: --no-ignore-errors)
--dump-user-agent               Display the current user-agent and exit
--list-extractors               List all supported extractors and exit
--extractor-descriptions        Output descriptions of all supported
                                extractors and exit
--use-extractors NAMES          Extractor names to use separated by commas.
                                You can also use regexes, "all", "default"
                                and "end" (end URL matching); e.g. --ies
                                "holodex.*,end,youtube". Prefix the name
                                with a "-" to exclude it, e.g. --ies
                                default,-generic. Use --list-extractors for
                                a list of extractor names. (Alias: --ies)
--default-search PREFIX         Use this prefix for unqualified URLs. E.g.
                                "gvsearch2:python" downloads two videos from
                                google videos for the search term "python".
                                Use the value "auto" to let yt-dlp guess
                                ("auto_warning" to emit a warning when
                                guessing). "error" just throws an error. The
                                default value "fixup_error" repairs broken
                                URLs, but emits an error if this is not
                                possible instead of searching
--ignore-config                 Don't load any more configuration files
                                except those given to --config-locations.
                                For backward compatibility, if this option
                                is found inside the system configuration
                                file, the user configuration is not loaded.
                                (Alias: --no-config)
--no-config-locations           Do not load any custom configuration files
                                (default). When given inside a configuration
                                file, ignore all previous --config-locations
                                defined in the current file
--config-locations PATH         Location of the main configuration file;
                                either the path to the config or its
                                containing directory ("-" for stdin). Can be
                                used multiple times and inside other
                                configuration files
--plugin-dirs PATH              Path to an additional directory to search
                                for plugins. This option can be used
                                multiple times to add multiple directories.
                                Use "default" to search the default plugin
                                directories (default)
--no-plugin-dirs                Clear plugin directories to search,
                                including defaults and those provided by
                                previous --plugin-dirs
--flat-playlist                 Do not extract a playlist's URL result
                                entries; some entry metadata may be missing
                                and downloading may be bypassed
--no-flat-playlist              Fully extract the videos of a playlist
                                (default)
--live-from-start               Download livestreams from the start.
                                Currently experimental and only supported
                                for YouTube and Twitch
--no-live-from-start            Download livestreams from the current time
                                (default)
--wait-for-video MIN[-MAX]      Wait for scheduled streams to become
                                available. Pass the minimum number of
                                seconds (or range) to wait between retries
--no-wait-for-video             Do not wait for scheduled streams (default)
--mark-watched                  Mark videos watched (even with --simulate)
--no-mark-watched               Do not mark videos watched (default)
--color [STREAM:]POLICY         Whether to emit color codes in output,
                                optionally prefixed by the STREAM (stdout or
                                stderr) to apply the setting to. Can be one
                                of "always", "auto" (default), "never", or
                                "no_color" (use non color terminal
                                sequences). Use "auto-tty" or "no_color-tty"
                                to decide based on terminal support only.
                                Can be used multiple times
--compat-options OPTS           Options that can help keep compatibility
                                with youtube-dl or youtube-dlc
                                configurations by reverting some of the
                                changes made in yt-dlp. See "Differences in
                                default behavior" for details
--alias ALIASES OPTIONS         Create aliases for an option string. Unless
                                an alias starts with a dash "-", it is
                                prefixed with "--". Arguments are parsed
                                according to the Python string formatting
                                mini-language. E.g. --alias get-audio,-X "-S
                                aext:{0},abr -x --audio-format {0}" creates
                                options "--get-audio" and "-X" that takes an
                                argument (ARG0) and expands to "-S
                                aext:ARG0,abr -x --audio-format ARG0". All
                                defined aliases are listed in the --help
                                output. Alias options can trigger more
                                aliases; so be careful to avoid defining
                                recursive options. As a safety measure, each
                                alias may be triggered a maximum of 100
                                times. This option can be used multiple times
-t, --preset-alias PRESET       Applies a predefined set of options. e.g.
                                --preset-alias mp3. The following presets
                                are available: mp3, aac, mp4, mkv, sleep.
                                See the "Preset Aliases" section at the end
                                for more info. This option can be used
                                multiple times
--proxy URL                     Use the specified HTTP/HTTPS/SOCKS proxy. To
                                enable SOCKS proxy, specify a proper scheme,
                                e.g. socks5://user:[email protected]:1080/.
                                Pass in an empty string (--proxy "") for
                                direct connection
--socket-timeout SECONDS        Time to wait before giving up, in seconds
--source-address IP             Client-side IP address to bind to
--impersonate CLIENT[:OS]       Client to impersonate for requests. E.g.
                                chrome, chrome-110, chrome:windows-10. Pass
                                --impersonate="" to impersonate any client.
                                Note that forcing impersonation for all
                                requests may have a detrimental impact on
                                download speed and stability
--list-impersonate-targets      List available clients to impersonate.
-4, --force-ipv4                Make all connections via IPv4
-6, --force-ipv6                Make all connections via IPv6
--enable-file-urls              Enable file:// URLs. This is disabled by
                                default for security reasons.
--geo-verification-proxy URL    Use this proxy to verify the IP address for
                                some geo-restricted sites. The default proxy
                                specified by --proxy (or none, if the option
                                is not present) is used for the actual
                                downloading
--xff VALUE                     How to fake X-Forwarded-For HTTP header to
                                try bypassing geographic restriction. One of
                                "default" (only when known to be useful),
                                "never", an IP block in CIDR notation, or a
                                two-letter ISO 3166-2 country code
-I, --playlist-items ITEM_SPEC  Comma separated playlist_index of the items
                                to download. You can specify a range using
                                "[START]:[STOP][:STEP]". For backward
                                compatibility, START-STOP is also supported.
                                Use negative indices to count from the right
                                and negative STEP to download in reverse
                                order. E.g. "-I 1:3,7,-5::2" used on a
                                playlist of size 15 will download the items
                                at index 1,2,3,7,11,13,15
--min-filesize SIZE             Abort download if filesize is smaller than
                                SIZE, e.g. 50k or 44.6M
--max-filesize SIZE             Abort download if filesize is larger than
                                SIZE, e.g. 50k or 44.6M
--date DATE                     Download only videos uploaded on this date.
                                The date can be "YYYYMMDD" or in the format
                                [now|today|yesterday][-N[day|week|month|year]].
                                E.g. "--date today-2weeks" downloads only
                                videos uploaded on the same day two weeks ago
--datebefore DATE               Download only videos uploaded on or before
                                this date. The date formats accepted are the
                                same as --date
--dateafter DATE                Download only videos uploaded on or after
                                this date. The date formats accepted are the
                                same as --date
--match-filters FILTER          Generic video filter. Any "OUTPUT TEMPLATE"
                                field can be compared with a number or a
                                string using the operators defined in
                                "Filtering Formats". You can also simply
                                specify a field to match if the field is
                                present, use "!field" to check if the field
                                is not present, and "&" to check multiple
                                conditions. Use a "\" to escape "&" or
                                quotes if needed. If used multiple times,
                                the filter matches if at least one of the
                                conditions is met. E.g. --match-filters
                                !is_live --match-filters "like_count>?100 &
                                description~='(?i)\bcats \& dogs\b'" matches
                                only videos that are not live OR those that
                                have a like count more than 100 (or the like
                                field is not available) and also has a
                                description that contains the phrase "cats &
                                dogs" (caseless). Use "--match-filters -" to
                                interactively ask whether to download each
                                video
--no-match-filters              Do not use any --match-filters (default)
--break-match-filters FILTER    Same as "--match-filters" but stops the
                                download process when a video is rejected
--no-break-match-filters        Do not use any --break-match-filters (default)
--no-playlist                   Download only the video, if the URL refers
                                to a video and a playlist
--yes-playlist                  Download the playlist, if the URL refers to
                                a video and a playlist
--age-limit YEARS               Download only videos suitable for the given
                                age
--download-archive FILE         Download only videos not listed in the
                                archive file. Record the IDs of all
                                downloaded videos in it
--no-download-archive           Do not use archive file (default)
--max-downloads NUMBER          Abort after downloading NUMBER files
--break-on-existing             Stop the download process when encountering
                                a file that is in the archive supplied with
                                the --download-archive option
--no-break-on-existing          Do not stop the download process when
                                encountering a file that is in the archive
                                (default)
--break-per-input               Alters --max-downloads, --break-on-existing,
                                --break-match-filters, and autonumber to
                                reset per input URL
--no-break-per-input            --break-on-existing and similar options
                                terminates the entire download queue
--skip-playlist-after-errors N  Number of allowed failures until the rest of
                                the playlist is skipped
-N, --concurrent-fragments N    Number of fragments of a dash/hlsnative
                                video that should be downloaded concurrently
                                (default is 1)
-r, --limit-rate RATE           Maximum download rate in bytes per second,
                                e.g. 50K or 4.2M
--throttled-rate RATE           Minimum download rate in bytes per second
                                below which throttling is assumed and the
                                video data is re-extracted, e.g. 100K
-R, --retries RETRIES           Number of retries (default is 10), or
                                "infinite"
--file-access-retries RETRIES   Number of times to retry on file access
                                error (default is 3), or "infinite"
--fragment-retries RETRIES      Number of retries for a fragment (default is
                                10), or "infinite" (DASH, hlsnative and ISM)
--retry-sleep [TYPE:]EXPR       Time to sleep between retries in seconds
                                (optionally) prefixed by the type of retry
                                (http (default), fragment, file_access,
                                extractor) to apply the sleep to. EXPR can
                                be a number, linear=START[:END[:STEP=1]] or
                                exp=START[:END[:BASE=2]]. This option can be
                                used multiple times to set the sleep for the
                                different retry types, e.g. --retry-sleep
                                linear=1::2 --retry-sleep fragment:exp=1:20
--skip-unavailable-fragments    Skip unavailable fragments for DASH,
                                hlsnative and ISM downloads (default)
                                (Alias: --no-abort-on-unavailable-fragments)
--abort-on-unavailable-fragments
                                Abort download if a fragment is unavailable
                                (Alias: --no-skip-unavailable-fragments)
--keep-fragments                Keep downloaded fragments on disk after
                                downloading is finished
--no-keep-fragments             Delete downloaded fragments after
                                downloading is finished (default)
--buffer-size SIZE              Size of download buffer, e.g. 1024 or 16K
                                (default is 1024)
--resize-buffer                 The buffer size is automatically resized
                                from an initial value of --buffer-size
                                (default)
--no-resize-buffer              Do not automatically adjust the buffer size
--http-chunk-size SIZE          Size of a chunk for chunk-based HTTP
                                downloading, e.g. 10485760 or 10M (default
                                is disabled). May be useful for bypassing
                                bandwidth throttling imposed by a webserver
                                (experimental)
--playlist-random               Download playlist videos in random order
--lazy-playlist                 Process entries in the playlist as they are
                                received. This disables n_entries,
                                --playlist-random and --playlist-reverse
--no-lazy-playlist              Process videos in the playlist only after
                                the entire playlist is parsed (default)
--xattr-set-filesize            Set file xattribute ytdl.filesize with
                                expected file size
--hls-use-mpegts                Use the mpegts container for HLS videos;
                                allowing some players to play the video
                                while downloading, and reducing the chance
                                of file corruption if download is
                                interrupted. This is enabled by default for
                                live streams
--no-hls-use-mpegts             Do not use the mpegts container for HLS
                                videos. This is default when not downloading
                                live streams
--download-sections REGEX       Download only chapters that match the
                                regular expression. A "*" prefix denotes
                                time-range instead of chapter. Negative
                                timestamps are calculated from the end.
                                "*from-url" can be used to download between
                                the "start_time" and "end_time" extracted
                                from the URL. Needs ffmpeg. This option can
                                be used multiple times to download multiple
                                sections, e.g. --download-sections
                                "*10:15-inf" --download-sections "intro"
--downloader [PROTO:]NAME       Name or path of the external downloader to
                                use (optionally) prefixed by the protocols
                                (http, ftp, m3u8, dash, rstp, rtmp, mms) to
                                use it for. Currently supports native,
                                aria2c, avconv, axel, curl, ffmpeg, httpie,
                                wget. You can use this option multiple times
                                to set different downloaders for different
                                protocols. E.g. --downloader aria2c
                                --downloader "dash,m3u8:native" will use
                                aria2c for http/ftp downloads, and the
                                native downloader for dash/m3u8 downloads
                                (Alias: --external-downloader)
--downloader-args NAME:ARGS     Give these arguments to the external
                                downloader. Specify the downloader name and
                                the arguments separated by a colon ":". For
                                ffmpeg, arguments can be passed to different
                                positions using the same syntax as
                                --postprocessor-args. You can use this
                                option multiple times to give different
                                arguments to different downloaders (Alias:
                                --external-downloader-args)
-a, --batch-file FILE           File containing URLs to download ("-" for
                                stdin), one URL per line. Lines starting
                                with "#", ";" or "]" are considered as
                                comments and ignored
--no-batch-file                 Do not read URLs from batch file (default)
-P, --paths [TYPES:]PATH        The paths where the files should be
                                downloaded. Specify the type of file and the
                                path separated by a colon ":". All the same
                                TYPES as --output are supported.
                                Additionally, you can also provide "home"
                                (default) and "temp" paths. All intermediary
                                files are first downloaded to the temp path
                                and then the final files are moved over to
                                the home path after download is finished.
                                This option is ignored if --output is an
                                absolute path
-o, --output [TYPES:]TEMPLATE   Output filename template; see "OUTPUT
                                TEMPLATE" for details
--output-na-placeholder TEXT    Placeholder for unavailable fields in
                                --output (default: "NA")
--restrict-filenames            Restrict filenames to only ASCII characters,
                                and avoid "&" and spaces in filenames
--no-restrict-filenames         Allow Unicode characters, "&" and spaces in
                                filenames (default)
--windows-filenames             Force filenames to be Windows-compatible
--no-windows-filenames          Sanitize filenames only minimally
--trim-filenames LENGTH         Limit the filename length (excluding
                                extension) to the specified number of
                                characters
-w, --no-overwrites             Do not overwrite any files
--force-overwrites              Overwrite all video and metadata files. This
                                option includes --no-continue
--no-force-overwrites           Do not overwrite the video, but overwrite
                                related files (default)
-c, --continue                  Resume partially downloaded files/fragments
                                (default)
--no-continue                   Do not resume partially downloaded
                                fragments. If the file is not fragmented,
                                restart download of the entire file
--part                          Use .part files instead of writing directly
                                into output file (default)
--no-part                       Do not use .part files - write directly into
                                output file
--mtime                         Use the Last-modified header to set the file
                                modification time
--no-mtime                      Do not use the Last-modified header to set
                                the file modification time (default)
--write-description             Write video description to a .description file
--no-write-description          Do not write video description (default)
--write-info-json               Write video metadata to a .info.json file
                                (this may contain personal information)
--no-write-info-json            Do not write video metadata (default)
--write-playlist-metafiles      Write playlist metadata in addition to the
                                video metadata when using --write-info-json,
                                --write-description etc. (default)
--no-write-playlist-metafiles   Do not write playlist metadata when using
                                --write-info-json, --write-description etc.
--clean-info-json               Remove some internal metadata such as
                                filenames from the infojson (default)
--no-clean-info-json            Write all fields to the infojson
--write-comments                Retrieve video comments to be placed in the
                                infojson. The comments are fetched even
                                without this option if the extraction is
                                known to be quick (Alias: --get-comments)
--no-write-comments             Do not retrieve video comments unless the
                                extraction is known to be quick (Alias:
                                --no-get-comments)
--load-info-json FILE           JSON file containing the video information
                                (created with the "--write-info-json" option)
--cookies FILE                  Netscape formatted file to read cookies from
                                and dump cookie jar in
--no-cookies                    Do not read/dump cookies from/to file
                                (default)
--cookies-from-browser BROWSER[+KEYRING][:PROFILE][::CONTAINER]
                                The name of the browser to load cookies
                                from. Currently supported browsers are:
                                brave, chrome, chromium, edge, firefox,
                                opera, safari, vivaldi, whale. Optionally,
                                the KEYRING used for decrypting Chromium
                                cookies on Linux, the name/path of the
                                PROFILE to load cookies from, and the
                                CONTAINER name (if Firefox) ("none" for no
                                container) can be given with their
                                respective separators. By default, all
                                containers of the most recently accessed
                                profile are used. Currently supported
                                keyrings are: basictext, gnomekeyring,
                                kwallet, kwallet5, kwallet6
--no-cookies-from-browser       Do not load cookies from browser (default)
--cache-dir DIR                 Location in the filesystem where yt-dlp can
                                store some downloaded information (such as
                                client ids and signatures) permanently. By
                                default ${XDG_CACHE_HOME}/yt-dlp
--no-cache-dir                  Disable filesystem caching
--rm-cache-dir                  Delete all filesystem cache files
--write-thumbnail               Write thumbnail image to disk
--no-write-thumbnail            Do not write thumbnail image to disk (default)
--write-all-thumbnails          Write all thumbnail image formats to disk
--list-thumbnails               List available thumbnails of each video.
                                Simulate unless --no-simulate is used
--write-link                    Write an internet shortcut file, depending
                                on the current platform (.url, .webloc or
                                .desktop). The URL may be cached by the OS
--write-url-link                Write a .url Windows internet shortcut. The
                                OS caches the URL based on the file path
--write-webloc-link             Write a .webloc macOS internet shortcut
--write-desktop-link            Write a .desktop Linux internet shortcut
-q, --quiet                     Activate quiet mode. If used with --verbose,
                                print the log to stderr
--no-quiet                      Deactivate quiet mode. (Default)
--no-warnings                   Ignore warnings
-s, --simulate                  Do not download the video and do not write
                                anything to disk
--no-simulate                   Download the video even if printing/listing
                                options are used
--ignore-no-formats-error       Ignore "No video formats" error. Useful for
                                extracting metadata even if the videos are
                                not actually available for download
                                (experimental)
--no-ignore-no-formats-error    Throw error when no downloadable video
                                formats are found (default)
--skip-download                 Do not download the video but write all
                                related files (Alias: --no-download)
-O, --print [WHEN:]TEMPLATE     Field name or output template to print to
                                screen, optionally prefixed with when to
                                print it, separated by a ":". Supported
                                values of "WHEN" are the same as that of
                                --use-postprocessor (default: video).
                                Implies --quiet. Implies --simulate unless
                                --no-simulate or later stages of WHEN are
                                used. This option can be used multiple times
--print-to-file [WHEN:]TEMPLATE FILE
                                Append given template to the file. The
                                values of WHEN and TEMPLATE are the same as
                                that of --print. FILE uses the same syntax
                                as the output template. This option can be
                                used multiple times
-j, --dump-json                 Quiet, but print JSON information for each
                                video. Simulate unless --no-simulate is
                                used. See "OUTPUT TEMPLATE" for a
                                description of available keys
-J, --dump-single-json          Quiet, but print JSON information for each
                                URL or infojson passed. Simulate unless
                                --no-simulate is used. If the URL refers to
                                a playlist, the whole playlist information
                                is dumped in a single line
--force-write-archive           Force download archive entries to be written
                                as far as no errors occur, even if -s or
                                another simulation option is used (Alias:
                                --force-download-archive)
--newline                       Output progress bar as new lines
--no-progress                   Do not print progress bar
--progress                      Show progress bar, even if in quiet mode
--console-title                 Display progress in console titlebar
--progress-template [TYPES:]TEMPLATE
                                Template for progress outputs, optionally
                                prefixed with one of "download:" (default),
                                "download-title:" (the console title),
                                "postprocess:",  or "postprocess-title:".
                                The video's fields are accessible under the
                                "info" key and the progress attributes are
                                accessible under "progress" key. E.g.
                                --console-title --progress-template
                                "download-title:%(info.id)s-%(progress.eta)s"
--progress-delta SECONDS        Time between progress output (default: 0)
-v, --verbose                   Print various debugging information
--dump-pages                    Print downloaded pages encoded using base64
                                to debug problems (very verbose)
--write-pages                   Write downloaded intermediary pages to files
                                in the current directory to debug problems
--print-traffic                 Display sent and read HTTP traffic
--encoding ENCODING             Force the specified encoding (experimental)
--legacy-server-connect         Explicitly allow HTTPS connection to servers
                                that do not support RFC 5746 secure
                                renegotiation
--no-check-certificates         Suppress HTTPS certificate validation
--prefer-insecure               Use an unencrypted connection to retrieve
                                information about the video (Currently
                                supported only for YouTube)
--add-headers FIELD:VALUE       Specify a custom HTTP header and its value,
                                separated by a colon ":". You can use this
                                option multiple times
--bidi-workaround               Work around terminals that lack
                                bidirectional text support. Requires bidiv
                                or fribidi executable in PATH
--sleep-requests SECONDS        Number of seconds to sleep between requests
                                during data extraction
--sleep-interval SECONDS        Number of seconds to sleep before each
                                download. This is the minimum time to sleep
                                when used along with --max-sleep-interval
                                (Alias: --min-sleep-interval)
--max-sleep-interval SECONDS    Maximum number of seconds to sleep. Can only
                                be used along with --min-sleep-interval
--sleep-subtitles SECONDS       Number of seconds to sleep before each
                                subtitle download
-f, --format FORMAT             Video format code, see "FORMAT SELECTION"
                                for more details
-S, --format-sort SORTORDER     Sort the formats by the fields given, see
                                "Sorting Formats" for more details
--format-sort-force             Force user specified sort order to have
                                precedence over all fields, see "Sorting
                                Formats" for more details (Alias: --S-force)
--no-format-sort-force          Some fields have precedence over the user
                                specified sort order (default)
--video-multistreams            Allow multiple video streams to be merged
                                into a single file
--no-video-multistreams         Only one video stream is downloaded for each
                                output file (default)
--audio-multistreams            Allow multiple audio streams to be merged
                                into a single file
--no-audio-multistreams         Only one audio stream is downloaded for each
                                output file (default)
--prefer-free-formats           Prefer video formats with free containers
                                over non-free ones of the same quality. Use
                                with "-S ext" to strictly prefer free
                                containers irrespective of quality
--no-prefer-free-formats        Don't give any special preference to free
                                containers (default)
--check-formats                 Make sure formats are selected only from
                                those that are actually downloadable
--check-all-formats             Check all formats for whether they are
                                actually downloadable
--no-check-formats              Do not check that the formats are actually
                                downloadable
-F, --list-formats              List available formats of each video.
                                Simulate unless --no-simulate is used
--merge-output-format FORMAT    Containers that may be used when merging
                                formats, separated by "/", e.g. "mp4/mkv".
                                Ignored if no merge is required. (currently
                                supported: avi, flv, mkv, mov, mp4, webm)
--write-subs                    Write subtitle file
--no-write-subs                 Do not write subtitle file (default)
--write-auto-subs               Write automatically generated subtitle file
                                (Alias: --write-automatic-subs)
--no-write-auto-subs            Do not write auto-generated subtitles
                                (default) (Alias: --no-write-automatic-subs)
--list-subs                     List available subtitles of each video.
                                Simulate unless --no-simulate is used
--sub-format FORMAT             Subtitle format; accepts formats preference
                                separated by "/", e.g. "srt" or "ass/srt/best"
--sub-langs LANGS               Languages of the subtitles to download (can
                                be regex) or "all" separated by commas, e.g.
                                --sub-langs "en.*,ja" (where "en.*" is a
                                regex pattern that matches "en" followed by
                                0 or more of any character). You can prefix
                                the language code with a "-" to exclude it
                                from the requested languages, e.g. --sub-
                                langs all,-live_chat. Use --list-subs for a
                                list of available language tags
-u, --username USERNAME         Login with this account ID
-p, --password PASSWORD         Account password. If this option is left
                                out, yt-dlp will ask interactively
-2, --twofactor TWOFACTOR       Two-factor authentication code
-n, --netrc                     Use .netrc authentication data
--netrc-location PATH           Location of .netrc authentication data;
                                either the path or its containing directory.
                                Defaults to ~/.netrc
--netrc-cmd NETRC_CMD           Command to execute to get the credentials
                                for an extractor.
--video-password PASSWORD       Video-specific password
--ap-mso MSO                    Adobe Pass multiple-system operator (TV
                                provider) identifier, use --ap-list-mso for
                                a list of available MSOs
--ap-username USERNAME          Multiple-system operator account login
--ap-password PASSWORD          Multiple-system operator account password.
                                If this option is left out, yt-dlp will ask
                                interactively
--ap-list-mso                   List all supported multiple-system operators
--client-certificate CERTFILE   Path to client certificate file in PEM
                                format. May include the private key
--client-certificate-key KEYFILE
                                Path to private key file for client
                                certificate
--client-certificate-password PASSWORD
                                Password for client certificate private key,
                                if encrypted. If not provided, and the key
                                is encrypted, yt-dlp will ask interactively
-x, --extract-audio             Convert video files to audio-only files
                                (requires ffmpeg and ffprobe)
--audio-format FORMAT           Format to convert the audio to when -x is
                                used. (currently supported: best (default),
                                aac, alac, flac, m4a, mp3, opus, vorbis,
                                wav). You can specify multiple rules using
                                similar syntax as --remux-video
--audio-quality QUALITY         Specify ffmpeg audio quality to use when
                                converting the audio with -x. Insert a value
                                between 0 (best) and 10 (worst) for VBR or a
                                specific bitrate like 128K (default 5)
--remux-video FORMAT            Remux the video into another container if
                                necessary (currently supported: avi, flv,
                                gif, mkv, mov, mp4, webm, aac, aiff, alac,
                                flac, m4a, mka, mp3, ogg, opus, vorbis,
                                wav). If the target container does not
                                support the video/audio codec, remuxing will
                                fail. You can specify multiple rules; e.g.
                                "aac>m4a/mov>mp4/mkv" will remux aac to m4a,
                                mov to mp4 and anything else to mkv
--recode-video FORMAT           Re-encode the video into another format if
                                necessary. The syntax and supported formats
                                are the same as --remux-video
--postprocessor-args NAME:ARGS  Give these arguments to the postprocessors.
                                Specify the postprocessor/executable name
                                and the arguments separated by a colon ":"
                                to give the argument to the specified
                                postprocessor/executable. Supported PP are:
                                Merger, ModifyChapters, SplitChapters,
                                ExtractAudio, VideoRemuxer, VideoConvertor,
                                Metadata, EmbedSubtitle, EmbedThumbnail,
                                SubtitlesConvertor, ThumbnailsConvertor,
                                FixupStretched, FixupM4a, FixupM3u8,
                                FixupTimestamp and FixupDuration. The
                                supported executables are: AtomicParsley,
                                FFmpeg and FFprobe. You can also specify
                                "PP+EXE:ARGS" to give the arguments to the
                                specified executable only when being used by
                                the specified postprocessor. Additionally,
                                for ffmpeg/ffprobe, "_i"/"_o" can be
                                appended to the prefix optionally followed
                                by a number to pass the argument before the
                                specified input/output file, e.g. --ppa
                                "Merger+ffmpeg_i1:-v quiet". You can use
                                this option multiple times to give different
                                arguments to different postprocessors.
                                (Alias: --ppa)
-k, --keep-video                Keep the intermediate video file on disk
                                after post-processing
--no-keep-video                 Delete the intermediate video file after
                                post-processing (default)
--post-overwrites               Overwrite post-processed files (default)
--no-post-overwrites            Do not overwrite post-processed files
--embed-subs                    Embed subtitles in the video (only for mp4,
                                webm and mkv videos)
--no-embed-subs                 Do not embed subtitles (default)
--embed-thumbnail               Embed thumbnail in the video as cover art
--no-embed-thumbnail            Do not embed thumbnail (default)
--embed-metadata                Embed metadata to the video file. Also
                                embeds chapters/infojson if present unless
                                --no-embed-chapters/--no-embed-info-json are
                                used (Alias: --add-metadata)
--no-embed-metadata             Do not add metadata to file (default)
                                (Alias: --no-add-metadata)
--embed-chapters                Add chapter markers to the video file
                                (Alias: --add-chapters)
--no-embed-chapters             Do not add chapter markers (default) (Alias:
                                --no-add-chapters)
--embed-info-json               Embed the infojson as an attachment to
                                mkv/mka video files
--no-embed-info-json            Do not embed the infojson as an attachment
                                to the video file
--parse-metadata [WHEN:]FROM:TO
                                Parse additional metadata like title/artist
                                from other fields; see "MODIFYING METADATA"
                                for details. Supported values of "WHEN" are
                                the same as that of --use-postprocessor
                                (default: pre_process)
--replace-in-metadata [WHEN:]FIELDS REGEX REPLACE
                                Replace text in a metadata field using the
                                given regex. This option can be used
                                multiple times. Supported values of "WHEN"
                                are the same as that of --use-postprocessor
                                (default: pre_process)
--xattrs                        Write metadata to the video file's xattrs
                                (using Dublin Core and XDG standards)
--concat-playlist POLICY        Concatenate videos in a playlist. One of
                                "never", "always", or "multi_video"
                                (default; only when the videos form a single
                                show). All the video files must have the
                                same codecs and number of streams to be
                                concatenable. The "pl_video:" prefix can be
                                used with "--paths" and "--output" to set
                                the output filename for the concatenated
                                files. See "OUTPUT TEMPLATE" for details
--fixup POLICY                  Automatically correct known faults of the
                                file. One of never (do nothing), warn (only
                                emit a warning), detect_or_warn (the
                                default; fix the file if we can, warn
                                otherwise), force (try fixing even if the
                                file already exists)
--ffmpeg-location PATH          Location of the ffmpeg binary; either the
                                path to the binary or its containing directory
--exec [WHEN:]CMD               Execute a command, optionally prefixed with
                                when to execute it, separated by a ":".
                                Supported values of "WHEN" are the same as
                                that of --use-postprocessor (default:
                                after_move). The same syntax as the output
                                template can be used to pass any field as
                                arguments to the command. If no fields are
                                passed, %(filepath,_filename|)q is appended
                                to the end of the command. This option can
                                be used multiple times
--no-exec                       Remove any previously defined --exec
--convert-subs FORMAT           Convert the subtitles to another format
                                (currently supported: ass, lrc, srt, vtt).
                                Use "--convert-subs none" to disable
                                conversion (default) (Alias: --convert-
                                subtitles)
--convert-thumbnails FORMAT     Convert the thumbnails to another format
                                (currently supported: jpg, png, webp). You
                                can specify multiple rules using similar
                                syntax as "--remux-video". Use "--convert-
                                thumbnails none" to disable conversion
                                (default)
--split-chapters                Split video into multiple files based on
                                internal chapters. The "chapter:" prefix can
                                be used with "--paths" and "--output" to set
                                the output filename for the split files. See
                                "OUTPUT TEMPLATE" for details
--no-split-chapters             Do not split video based on chapters (default)
--remove-chapters REGEX         Remove chapters whose title matches the
                                given regular expression. The syntax is the
                                same as --download-sections. This option can
                                be used multiple times
--no-remove-chapters            Do not remove any chapters from the file
                                (default)
--force-keyframes-at-cuts       Force keyframes at cuts when
                                downloading/splitting/removing sections.
                                This is slow due to needing a re-encode, but
                                the resulting video may have fewer artifacts
                                around the cuts
--no-force-keyframes-at-cuts    Do not force keyframes around the chapters
                                when cutting/splitting (default)
--use-postprocessor NAME[:ARGS]
                                The (case-sensitive) name of plugin
                                postprocessors to be enabled, and
                                (optionally) arguments to be passed to it,
                                separated by a colon ":". ARGS are a
                                semicolon ";" delimited list of NAME=VALUE.
                                The "when" argument determines when the
                                postprocessor is invoked. It can be one of
                                "pre_process" (after video extraction),
                                "after_filter" (after video passes filter),
                                "video" (after --format; before
                                --print/--output), "before_dl" (before each
                                video download), "post_process" (after each
                                video download; default), "after_move"
                                (after moving the video file to its final
                                location), "after_video" (after downloading
                                and processing all formats of a video), or
                                "playlist" (at end of playlist). This option
                                can be used multiple times to add different
                                postprocessors
Make chapter entries for, or remove various segments (sponsor, introductions, etc.) from downloaded YouTube videos using the SponsorBlock API
--sponsorblock-mark CATS        SponsorBlock categories to create chapters
                                for, separated by commas. Available
                                categories are sponsor, intro, outro,
                                selfpromo, preview, filler, interaction,
                                music_offtopic, poi_highlight, chapter, all
                                and default (=all). You can prefix the
                                category with a "-" to exclude it. See [1]
                                for descriptions of the categories. E.g.
                                --sponsorblock-mark all,-preview
                                [1] https://wiki.sponsor.ajay.app/w/Segment_Categories
--sponsorblock-remove CATS      SponsorBlock categories to be removed from
                                the video file, separated by commas. If a
                                category is present in both mark and remove,
                                remove takes precedence. The syntax and
                                available categories are the same as for
                                --sponsorblock-mark except that "default"
                                refers to "all,-filler" and poi_highlight,
                                chapter are not available
--sponsorblock-chapter-title TEMPLATE
                                An output template for the title of the
                                SponsorBlock chapters created by
                                --sponsorblock-mark. The only available
                                fields are start_time, end_time, category,
                                categories, name, category_names. Defaults
                                to "[SponsorBlock]: %(category_names)l"
--no-sponsorblock               Disable both --sponsorblock-mark and
                                --sponsorblock-remove
--sponsorblock-api URL          SponsorBlock API location, defaults to
                                https://sponsor.ajay.app
--extractor-retries RETRIES     Number of retries for known extractor errors
                                (default is 3), or "infinite"
--allow-dynamic-mpd             Process dynamic DASH manifests (default)
                                (Alias: --no-ignore-dynamic-mpd)
--ignore-dynamic-mpd            Do not process dynamic DASH manifests
                                (Alias: --no-allow-dynamic-mpd)
--hls-split-discontinuity       Split HLS playlists to different formats at
                                discontinuities such as ad breaks
--no-hls-split-discontinuity    Do not split HLS playlists into different
                                formats at discontinuities such as ad breaks
                                (default)
--extractor-args IE_KEY:ARGS    Pass ARGS arguments to the IE_KEY extractor.
                                See "EXTRACTOR ARGUMENTS" for details. You
                                can use this option multiple times to give
                                arguments for different extractors
Predefined aliases for convenience and ease of use. Note that future versions of yt-dlp may add or adjust presets, but the existing preset names will not be changed or removed
-t mp3                          -f 'ba[acodec^=mp3]/ba/b' -x --audio-format
                                mp3

-t aac                          -f
                                'ba[acodec^=aac]/ba[acodec^=mp4a.40.]/ba/b'
                                -x --audio-format aac

-t mp4                          --merge-output-format mp4 --remux-video mp4
                                -S vcodec:h264,lang,quality,res,fps,hdr:12,a
                                codec:aac

-t mkv                          --merge-output-format mkv --remux-video mkv

-t sleep                        --sleep-subtitles 5 --sleep-requests 0.75
                                --sleep-interval 10 --max-sleep-interval 20
You can configure yt-dlp by placing any supported command line option in a configuration file. The configuration is loaded from the following locations:
Main Configuration:
--config-locationPortable Configuration: (Recommended for portable installations)
yt-dlp.conf in the same directory as the binaryyt-dlp.conf in the parent directory of yt_dlpHome Configuration:
yt-dlp.conf in the home path given to -P-P is not given, the current directory is searchedUser Configuration:
${XDG_CONFIG_HOME}/yt-dlp.conf${XDG_CONFIG_HOME}/yt-dlp/config (recommended on Linux/macOS)${XDG_CONFIG_HOME}/yt-dlp/config.txt${APPDATA}/yt-dlp.conf${APPDATA}/yt-dlp/config (recommended on Windows)${APPDATA}/yt-dlp/config.txt~/yt-dlp.conf~/yt-dlp.conf.txt~/.yt-dlp/config~/.yt-dlp/config.txtSee also: Notes about environment variables
System Configuration:
/etc/yt-dlp.conf/etc/yt-dlp/config/etc/yt-dlp/config.txtE.g. with the following configuration file, yt-dlp will always extract the audio, copy the mtime, use a proxy and save all videos under YouTube directory in your home directory:
# Lines starting with # are comments

# Always extract audio
-x

# Copy the mtime
--mtime

# Use this proxy
--proxy 127.0.0.1:3128

# Save all videos under YouTube directory in your home directory
-o ~/YouTube/%(title)s.%(ext)s
Note: Options in a configuration file are just the same options aka switches used in regular command line calls; thus there must be no whitespace after - or --, e.g. -o or --proxy but not - o or -- proxy. They must also be quoted when necessary, as if it were a UNIX shell.
You can use --ignore-config if you want to disable all configuration files for a particular yt-dlp run. If --ignore-config is found inside any configuration file, no further configuration will be loaded. For example, having the option in the portable configuration file prevents loading of home, user, and system configurations. Additionally, (for backward compatibility) if --ignore-config is found inside the system configuration file, the user configuration is not loaded.
The configuration files are decoded according to the UTF BOM if present, and in the encoding from system locale otherwise.
If you want your file to be decoded differently, add # coding: ENCODING to the beginning of the file (e.g. # coding: shift-jis). There must be no characters before that, even spaces or BOM.
You may also want to configure automatic credentials storage for extractors that support authentication (by providing login and password with --username and --password) in order not to pass credentials as command line arguments on every yt-dlp execution and prevent tracking plain text passwords in the shell command history. You can achieve this using a .netrc file on a per-extractor basis. For that, you will need to create a .netrc file in --netrc-location and restrict permissions to read/write by only you:
touch ${HOME}/.netrc
chmod a-rwx,u+rw ${HOME}/.netrc
After that, you can add credentials for an extractor in the following format, where extractor is the name of the extractor in lowercase:
machine <extractor> login <username> password <password>
E.g.
machine youtube login [email protected] password my_youtube_password
machine twitch login my_twitch_account_name password my_twitch_password
To activate authentication with the .netrc file you should pass --netrc to yt-dlp or place it in the configuration file.
The default location of the .netrc file is ~ (see below).
As an alternative to using the .netrc file, which has the disadvantage of keeping your passwords in a plain text file, you can configure a custom shell command to provide the credentials for an extractor. This is done by providing the --netrc-cmd parameter, it shall output the credentials in the netrc format and return 0 on success, other values will be treated as an error. {} in the command will be replaced by the name of the extractor to make it possible to select the credentials for the right extractor.
E.g. To use an encrypted .netrc file stored as .authinfo.gpg
yt-dlp --netrc-cmd 'gpg --decrypt ~/.authinfo.gpg' 'https://www.youtube.com/watch?v=BaW_jenozKc'
${VARIABLE}/$VARIABLE on UNIX and %VARIABLE% on Windows; but is always shown as ${VARIABLE} in this documentation--output, --config-location${XDG_CONFIG_HOME} defaults to ~/.config and ${XDG_CACHE_HOME} to ~/.cache~ points to ${HOME} if present; or, ${USERPROFILE} or ${HOMEDRIVE}${HOMEPATH} otherwise${USERPROFILE} generally points to C:\Users\<user name> and ${APPDATA} to ${USERPROFILE}\AppData\RoamingThe -o option is used to indicate a template for the output file names while -P option is used to specify the path each type of file should be saved to.
tl;dr: navigate me to examples.
The simplest usage of -o is not to set any template arguments when downloading a single file, like in yt-dlp -o funny_video.flv "https://some/video" (hard-coding file extension like this is not recommended and could break some post-processing).
It may however also contain special sequences that will be replaced when downloading each video. The special sequences may be formatted according to Python string formatting operations, e.g. %(NAME)s or %(NAME)05d. To clarify, that is a percent symbol followed by a name in parentheses, followed by formatting operations.
The field names themselves (the part inside the parenthesis) can also have some special formatting:
Object traversal: The dictionaries and lists available in metadata can be traversed by using a dot . separator; e.g. %(tags.0)s, %(subtitles.en.-1.ext)s. You can do Python slicing with colon :; E.g. %(id.3:7)s, %(id.6:2:-1)s, %(formats.:.format_id)s. Curly braces {} can be used to build dictionaries with only specific keys; e.g. %(formats.:.{format_id,height})#j. An empty field name %()s refers to the entire infodict; e.g. %(.{id,title})s. Note that all the fields that become available using this method are not listed below. Use -j to see such fields
Arithmetic: Simple arithmetic can be done on numeric fields using +, - and *. E.g. %(playlist_index+10)03d, %(n_entries+1-playlist_index)d
Date/time Formatting: Date/time fields can be formatted according to strftime formatting by specifying it separated from the field name using a >. E.g. %(duration>%H-%M-%S)s, %(upload_date>%Y-%m-%d)s, %(epoch-3600>%H-%M-%S)s
Alternatives: Alternate fields can be specified separated with a ,. E.g. %(release_date>%Y,upload_date>%Y|Unknown)s
Replacement: A replacement value can be specified using a & separator according to the str.format mini-language. If the field is not empty, this replacement value will be used instead of the actual field content. This is done after alternate fields are considered; thus the replacement is used if any of the alternative fields is not empty. E.g. %(chapters&has chapters|no chapters)s, %(title&TITLE={:>20}|NO TITLE)s
Default: A literal default value can be specified for when the field is empty using a | separator. This overrides --output-na-placeholder. E.g. %(uploader|Unknown)s
More Conversions: In addition to the normal format types diouxXeEfFgGcrs, yt-dlp additionally supports converting to B = Bytes, j = json (flag # for pretty-printing, + for Unicode), h = HTML escaping, l = a comma separated list (flag # for \n newline-separated), q = a string quoted for the terminal (flag # to split a list into different arguments), D = add Decimal suffixes (e.g. 10M) (flag # to use 1024 as factor), and S = Sanitize as filename (flag # for restricted)
Unicode normalization: The format type U can be used for NFC Unicode normalization. The alternate form flag (#) changes the normalization to NFD and the conversion flag + can be used for NFKC/NFKD compatibility equivalence normalization. E.g. %(title)+.100U is NFKC
To summarize, the general syntax for a field is:
%(name[.keys][addition][>strf][,alternate][&replacement][|default])[flags][width][.precision][length]type
Additionally, you can set different output templates for the various metadata files separately from the general output template by specifying the type of file followed by the template separated by a colon :. The different file types supported are subtitle, thumbnail, description, annotation (deprecated), infojson, link, pl_thumbnail, pl_description, pl_infojson, chapter, pl_video. E.g. -o "%(title)s.%(ext)s" -o "thumbnail:%(title)s\%(title)s.%(ext)s" will put the thumbnails in a folder with the same name as the video. If any of the templates is empty, that type of file will not be written. E.g. --write-thumbnail -o "thumbnail:" will write thumbnails only for playlists and not for video.
Note: Due to post-processing (i.e. merging etc.), the actual output filename might differ. Use --print after_move:filepath to get the name after all post-processing is complete.
The available fields are:
id (string): Video identifiertitle (string): Video titlefulltitle (string): Video title ignoring live timestamp and generic titleext (string): Video filename extensionalt_title (string): A secondary title of the videodescription (string): The description of the videodisplay_id (string): An alternative identifier for the videouploader (string): Full name of the video uploaderuploader_id (string): Nickname or id of the video uploaderuploader_url (string): URL to the video uploader's profilelicense (string): License name the video is licensed undercreators (list): The creators of the videocreator (string): The creators of the video; comma-separatedtimestamp (numeric): UNIX timestamp of the moment the video became availableupload_date (string): Video upload date in UTC (YYYYMMDD)release_timestamp (numeric): UNIX timestamp of the moment the video was releasedrelease_date (string): The date (YYYYMMDD) when the video was released in UTCrelease_year (numeric): Year (YYYY) when the video or album was releasedmodified_timestamp (numeric): UNIX timestamp of the moment the video was last modifiedmodified_date (string): The date (YYYYMMDD) when the video was last modified in UTCchannel (string): Full name of the channel the video is uploaded onchannel_id (string): Id of the channelchannel_url (string): URL of the channelchannel_follower_count (numeric): Number of followers of the channelchannel_is_verified (boolean): Whether the channel is verified on the platformlocation (string): Physical location where the video was filmedduration (numeric): Length of the video in secondsduration_string (string): Length of the video (HH:mm:ss)view_count (numeric): How many users have watched the video on the platformconcurrent_view_count (numeric): How many users are currently watching the video on the platform.like_count (numeric): Number of positive ratings of the videodislike_count (numeric): Number of negative ratings of the videorepost_count (numeric): Number of reposts of the videoaverage_rating (numeric): Average rating given by users, the scale used depends on the webpagecomment_count (numeric): Number of comments on the video (For some extractors, comments are only downloaded at the end, and so this field cannot be used)age_limit (numeric): Age restriction for the video (years)live_status (string): One of "not_live", "is_live", "is_upcoming", "was_live", "post_live" (was live, but VOD is not yet processed)is_live (boolean): Whether this video is a live stream or a fixed-length videowas_live (boolean): Whether this video was originally a live streamplayable_in_embed (string): Whether this video is allowed to play in embedded players on other sitesavailability (string): Whether the video is "private", "premium_only", "subscriber_only", "needs_auth", "unlisted" or "public"media_type (string): The type of media as classified by the site, e.g. "episode", "clip", "trailer"start_time (numeric): Time in seconds where the reproduction should start, as specified in the URLend_time (numeric): Time in seconds where the reproduction should end, as specified in the URLextractor (string): Name of the extractorextractor_key (string): Key name of the extractorepoch (numeric): Unix epoch of when the information extraction was completedautonumber (numeric): Number that will be increased with each download, starting at --autonumber-start, padded with leading zeros to 5 digitsvideo_autonumber (numeric): Number that will be increased with each videon_entries (numeric): Total number of extracted items in the playlistplaylist_id (string): Identifier of the playlist that contains the videoplaylist_title (string): Name of the playlist that contains the videoplaylist (string): playlist_title if available or else playlist_idplaylist_count (numeric): Total number of items in the playlist. May not be known if entire playlist is not extractedplaylist_index (numeric): Index of the video in the playlist padded with leading zeros according the final indexplaylist_autonumber (numeric): Position of the video in the playlist download queue padded with leading zeros according to the total length of the playlistplaylist_uploader (string): Full name of the playlist uploaderplaylist_uploader_id (string): Nickname or id of the playlist uploaderplaylist_channel (string): Display name of the channel that uploaded the playlistplaylist_channel_id (string): Identifier of the channel that uploaded the playlistplaylist_webpage_url (string): URL of the playlist webpagewebpage_url (string): A URL to the video webpage which, if given to yt-dlp, should yield the same result againwebpage_url_basename (string): The basename of the webpage URLwebpage_url_domain (string): The domain of the webpage URLoriginal_url (string): The URL given by the user (or the same as webpage_url for playlist entries)categories (list): List of categories the video belongs totags (list): List of tags assigned to the videocast (list): List of cast membersAll the fields in Filtering Formats can also be used
Available for the video that belongs to some logical chapter or section:
chapter (string): Name or title of the chapter the video belongs tochapter_number (numeric): Number of the chapter the video belongs tochapter_id (string): Id of the chapter the video belongs toAvailable for the video that is an episode of some series or program:
series (string): Title of the series or program the video episode belongs toseries_id (string): Id of the series or program the video episode belongs toseason (string): Title of the season the video episode belongs toseason_number (numeric): Number of the season the video episode belongs toseason_id (string): Id of the season the video episode belongs toepisode (string): Title of the video episodeepisode_number (numeric): Number of the video episode within a seasonepisode_id (string): Id of the video episodeAvailable for the media that is a track or a part of a music album:
track (string): Title of the tracktrack_number (numeric): Number of the track within an album or a disctrack_id (string): Id of the trackartists (list): Artist(s) of the trackartist (string): Artist(s) of the track; comma-separatedgenres (list): Genre(s) of the trackgenre (string): Genre(s) of the track; comma-separatedcomposers (list): Composer(s) of the piececomposer (string): Composer(s) of the piece; comma-separatedalbum (string): Title of the album the track belongs toalbum_type (string): Type of the albumalbum_artists (list): All artists appeared on the albumalbum_artist (string): All artists appeared on the album; comma-separateddisc_number (numeric): Number of the disc or other physical medium the track belongs toAvailable only when using --download-sections and for chapter: prefix when using --split-chapters for videos with internal chapters:
section_title (string): Title of the chaptersection_number (numeric): Number of the chapter within the filesection_start (numeric): Start time of the chapter in secondssection_end (numeric): End time of the chapter in secondsAvailable only when used in --print:
urls (string): The URLs of all requested formats, one in each linefilename (string): Name of the video file. Note that the actual filename may differformats_table (table): The video format table as printed by --list-formatsthumbnails_table (table): The thumbnail format table as printed by --list-thumbnailssubtitles_table (table): The subtitle format table as printed by --list-subsautomatic_captions_table (table): The automatic subtitle format table as printed by --list-subsAvailable only after the video is downloaded (post_process/after_move):
filepath: Actual path of downloaded video fileAvailable only in --sponsorblock-chapter-title:
start_time (numeric): Start time of the chapter in secondsend_time (numeric): End time of the chapter in secondscategories (list): The SponsorBlock categories the chapter belongs tocategory (string): The smallest SponsorBlock category the chapter belongs tocategory_names (list): Friendly names of the categoriesname (string): Friendly name of the smallest categorytype (string): The SponsorBlock action type of the chapterEach aforementioned sequence when referenced in an output template will be replaced by the actual value corresponding to the sequence name. E.g. for -o %(title)s-%(id)s.%(ext)s and an mp4 video with title yt-dlp test video and id BaW_jenozKc, this will result in a yt-dlp test video-BaW_jenozKc.mp4 file created in the current directory.
Note: Some of the sequences are not guaranteed to be present, since they depend on the metadata obtained by a particular extractor. Such sequences will be replaced with placeholder value provided with --output-na-placeholder (NA by default).
Tip: Look at the -j output to identify which fields are available for the particular URL
For numeric sequences, you can use numeric related formatting; e.g. %(view_count)05d will result in a string with view count padded with zeros up to 5 characters, like in 00042.
Output templates can also contain arbitrary hierarchical path, e.g. -o "%(playlist)s/%(playlist_index)s - %(title)s.%(ext)s" which will result in downloading each video in a directory corresponding to this path template. Any missing directory will be automatically created for you.
To use percent literals in an output template use %%. To output to stdout use -o -.
The current default template is %(title)s [%(id)s].%(ext)s.
In some cases, you don't want special characters such as 中, spaces, or &, such as when transferring the downloaded filename to a Windows system or the filename through an 8bit-unsafe channel. In these cases, add the --restrict-filenames flag to get a shorter title.
$ yt-dlp --print filename -o "test video.%(ext)s" BaW_jenozKc
test video.webm    # Literal name with correct extension

$ yt-dlp --print filename -o "%(title)s.%(ext)s" BaW_jenozKc
youtube-dl test video ''_ä↭𝕐.webm    # All kinds of weird characters

$ yt-dlp --print filename -o "%(title)s.%(ext)s" BaW_jenozKc --restrict-filenames
youtube-dl_test_video_.webm    # Restricted file name

# Download YouTube playlist videos in separate directory indexed by video order in a playlist
$ yt-dlp -o "%(playlist)s/%(playlist_index)s - %(title)s.%(ext)s" "https://www.youtube.com/playlist?list=PLwiyx1dc3P2JR9N8gQaQN_BCvlSlap7re"

# Download YouTube playlist videos in separate directories according to their uploaded year
$ yt-dlp -o "%(upload_date>%Y)s/%(title)s.%(ext)s" "https://www.youtube.com/playlist?list=PLwiyx1dc3P2JR9N8gQaQN_BCvlSlap7re"

# Prefix playlist index with " - " separator, but only if it is available
$ yt-dlp -o "%(playlist_index&{} - |)s%(title)s.%(ext)s" BaW_jenozKc "https://www.youtube.com/user/TheLinuxFoundation/playlists"

# Download all playlists of YouTube channel/user keeping each playlist in separate directory:
$ yt-dlp -o "%(uploader)s/%(playlist)s/%(playlist_index)s - %(title)s.%(ext)s" "https://www.youtube.com/user/TheLinuxFoundation/playlists"

# Download Udemy course keeping each chapter in separate directory under MyVideos directory in your home
$ yt-dlp -u user -p password -P "~/MyVideos" -o "%(playlist)s/%(chapter_number)s - %(chapter)s/%(title)s.%(ext)s" "https://www.udemy.com/java-tutorial"

# Download entire series season keeping each series and each season in separate directory under C:/MyVideos
$ yt-dlp -P "C:/MyVideos" -o "%(series)s/%(season_number)s - %(season)s/%(episode_number)s - %(episode)s.%(ext)s" "https://videomore.ru/kino_v_detalayah/5_sezon/367617"

# Download video as "C:\MyVideos\uploader\title.ext", subtitles as "C:\MyVideos\subs\uploader\title.ext"
# and put all temporary files in "C:\MyVideos\tmp"
$ yt-dlp -P "C:/MyVideos" -P "temp:tmp" -P "subtitle:subs" -o "%(uploader)s/%(title)s.%(ext)s" BaW_jenozKc --write-subs

# Download video as "C:\MyVideos\uploader\title.ext" and subtitles as "C:\MyVideos\uploader\subs\title.ext"
$ yt-dlp -P "C:/MyVideos" -o "%(uploader)s/%(title)s.%(ext)s" -o "subtitle:%(uploader)s/subs/%(title)s.%(ext)s" BaW_jenozKc --write-subs

# Stream the video being downloaded to stdout
$ yt-dlp -o - BaW_jenozKc
By default, yt-dlp tries to download the best available quality if you don't pass any options. This is generally equivalent to using -f bestvideo*+bestaudio/best. However, if multiple audiostreams is enabled (--audio-multistreams), the default format changes to -f bestvideo+bestaudio/best. Similarly, if ffmpeg is unavailable, or if you use yt-dlp to stream to stdout (-o -), the default becomes -f best/bestvideo+bestaudio.
Deprecation warning: Latest versions of yt-dlp can stream multiple formats to the stdout simultaneously using ffmpeg. So, in future versions, the default for this will be set to -f bv*+ba/b similar to normal downloads. If you want to preserve the -f b/bv+ba setting, it is recommended to explicitly specify it in the configuration options.
The general syntax for format selection is -f FORMAT (or --format FORMAT) where FORMAT is a selector expression, i.e. an expression that describes format or formats you would like to download.
tl;dr: navigate me to examples.
The simplest case is requesting a specific format; e.g. with -f 22 you can download the format with format code equal to 22. You can get the list of available format codes for particular video using --list-formats or -F. Note that these format codes are extractor specific.
You can also use a file extension (currently 3gp, aac, flv, m4a, mp3, mp4, ogg, wav, webm are supported) to download the best quality format of a particular file extension served as a single file, e.g. -f webm will download the best quality format with the webm extension served as a single file.
You can use -f - to interactively provide the format selector for each video
You can also use special names to select particular edge case formats:
all: Select all formats separatelymergeall: Select and merge all formats (Must be used with --audio-multistreams, --video-multistreams or both)b*, best*: Select the best quality format that contains either a video or an audio or both (i.e.; vcodec!=none or acodec!=none)b, best: Select the best quality format that contains both video and audio. Equivalent to best*[vcodec!=none][acodec!=none]bv, bestvideo: Select the best quality video-only format. Equivalent to best*[acodec=none]bv*, bestvideo*: Select the best quality format that contains video. It may also contain audio. Equivalent to best*[vcodec!=none]ba, bestaudio: Select the best quality audio-only format. Equivalent to best*[vcodec=none]ba*, bestaudio*: Select the best quality format that contains audio. It may also contain video. Equivalent to best*[acodec!=none] (Do not use!)w*, worst*: Select the worst quality format that contains either a video or an audiow, worst: Select the worst quality format that contains both video and audio. Equivalent to worst*[vcodec!=none][acodec!=none]wv, worstvideo: Select the worst quality video-only format. Equivalent to worst*[acodec=none]wv*, worstvideo*: Select the worst quality format that contains video. It may also contain audio. Equivalent to worst*[vcodec!=none]wa, worstaudio: Select the worst quality audio-only format. Equivalent to worst*[vcodec=none]wa*, worstaudio*: Select the worst quality format that contains audio. It may also contain video. Equivalent to worst*[acodec!=none]For example, to download the worst quality video-only format you can use -f worstvideo. It is, however, recommended not to use worst and related options. When your format selector is worst, the format which is worst in all respects is selected. Most of the time, what you actually want is the video with the smallest filesize instead. So it is generally better to use -S +size or more rigorously, -S +size,+br,+res,+fps instead of -f worst. See Sorting Formats for more details.
You can select the n'th best format of a type by using best<type>.<n>. For example, best.2 will select the 2nd best combined format. Similarly, bv*.3 will select the 3rd best format that contains a video stream.
If you want to download multiple videos, and they don't have the same formats available, you can specify the order of preference using slashes. Note that formats on the left hand side are preferred; e.g. -f 22/17/18 will download format 22 if it's available, otherwise it will download format 17 if it's available, otherwise it will download format 18 if it's available, otherwise it will complain that no suitable formats are available for download.
If you want to download several formats of the same video use a comma as a separator, e.g. -f 22,17,18 will download all these three formats, of course if they are available. Or a more sophisticated example combined with the precedence feature: -f 136/137/mp4/bestvideo,140/m4a/bestaudio.
You can merge the video and audio of multiple formats into a single file using -f <format1>+<format2>+... (requires ffmpeg installed); e.g. -f bestvideo+bestaudio will download the best video-only format, the best audio-only format and mux them together with ffmpeg.
Deprecation warning: Since the below described behavior is complex and counter-intuitive, this will be removed and multistreams will be enabled by default in the future. A new operator will be instead added to limit formats to single audio/video
Unless --video-multistreams is used, all formats with a video stream except the first one are ignored. Similarly, unless --audio-multistreams is used, all formats with an audio stream except the first one are ignored. E.g. -f bestvideo+best+bestaudio --video-multistreams --audio-multistreams will download and merge all 3 given formats. The resulting file will have 2 video streams and 2 audio streams. But -f bestvideo+best+bestaudio --no-video-multistreams will download and merge only bestvideo and bestaudio. best is ignored since another format containing a video stream (bestvideo) has already been selected. The order of the formats is therefore important. -f best+bestaudio --no-audio-multistreams will download only best while -f bestaudio+best --no-audio-multistreams will ignore best and download only bestaudio.
You can also filter the video formats by putting a condition in brackets, as in -f "best[height=720]" (or -f "[filesize>10M]" since filters without a selector are interpreted as best).
The following numeric meta fields can be used with comparisons <, <=, >, >=, = (equals), != (not equals):
filesize: The number of bytes, if known in advancefilesize_approx: An estimate for the number of byteswidth: Width of the video, if knownheight: Height of the video, if knownaspect_ratio: Aspect ratio of the video, if knowntbr: Average bitrate of audio and video in kbpsabr: Average audio bitrate in kbpsvbr: Average video bitrate in kbpsasr: Audio sampling rate in Hertzfps: Frame rateaudio_channels: The number of audio channelsstretched_ratio: width:height of the video's pixels, if not squareAlso filtering work for comparisons = (equals), ^= (starts with), $= (ends with), *= (contains), ~= (matches regex) and following string meta fields:
url: Video URLext: File extensionacodec: Name of the audio codec in usevcodec: Name of the video codec in usecontainer: Name of the container formatprotocol: The protocol that will be used for the actual download, lower-case (http, https, rtsp, rtmp, rtmpe, mms, f4m, ism, http_dash_segments, m3u8, or m3u8_native)language: Language codedynamic_range: The dynamic range of the videoformat_id: A short description of the formatformat: A human-readable description of the formatformat_note: Additional info about the formatresolution: Textual description of width and heightAny string comparison may be prefixed with negation ! in order to produce an opposite comparison, e.g. !*= (does not contain). The comparand of a string comparison needs to be quoted with either double or single quotes if it contains spaces or special characters other than ._-.
Note: None of the aforementioned meta fields are guaranteed to be present since this solely depends on the metadata obtained by the particular extractor, i.e. the metadata offered by the website. Any other field made available by the extractor can also be used for filtering.
Formats for which the value is not known are excluded unless you put a question mark (?) after the operator. You can combine format filters, so -f "bv[height<=?720][tbr>500]" selects up to 720p videos (or videos where the height is not known) with a bitrate of at least 500 kbps. You can also use the filters with all to download all formats that satisfy the filter, e.g. -f "all[vcodec=none]" selects all audio-only formats.
Format selectors can also be grouped using parentheses; e.g. -f "(mp4,webm)[height<480]" will download the best pre-merged mp4 and webm formats with a height lower than 480.
You can change the criteria for being considered the best by using -S (--format-sort). The general format for this is --format-sort field1,field2....
The available fields are:
hasvid: Gives priority to formats that have a video streamhasaud: Gives priority to formats that have an audio streamie_pref: The format preferencelang: The language preference as determined by the extractor (e.g. original language preferred over audio description)quality: The quality of the formatsource: The preference of the sourceproto: Protocol used for download (https/ftps > http/ftp > m3u8_native/m3u8 > http_dash_segments> websocket_frag > mms/rtsp > f4f/f4m)vcodec: Video Codec (av01 > vp9.2 > vp9 > h265 > h264 > vp8 > h263 > theora > other)acodec: Audio Codec (flac/alac > wav/aiff > opus > vorbis > aac > mp4a > mp3 > ac4 > eac3 > ac3 > dts > other)codec: Equivalent to vcodec,acodecvext: Video Extension (mp4 > mov > webm > flv > other). If --prefer-free-formats is used, webm is preferred.aext: Audio Extension (m4a > aac > mp3 > ogg > opus > webm > other). If --prefer-free-formats is used, the order changes to ogg > opus > webm > mp3 > m4a > aacext: Equivalent to vext,aextfilesize: Exact filesize, if known in advancefs_approx: Approximate filesizesize: Exact filesize if available, otherwise approximate filesizeheight: Height of videowidth: Width of videores: Video resolution, calculated as the smallest dimension.fps: Framerate of videohdr: The dynamic range of the video (DV > HDR12 > HDR10+ > HDR10 > HLG > SDR)channels: The number of audio channelstbr: Total average bitrate in kbpsvbr: Average video bitrate in kbpsabr: Average audio bitrate in kbpsbr: Average bitrate in kbps, tbr/vbr/abrasr: Audio sample rate in HzDeprecation warning: Many of these fields have (currently undocumented) aliases, that may be removed in a future version. It is recommended to use only the documented field names.
All fields, unless specified otherwise, are sorted in descending order. To reverse this, prefix the field with a +. E.g. +res prefers format with the smallest resolution. Additionally, you can suffix a preferred value for the fields, separated by a :. E.g. res:720 prefers larger videos, but no larger than 720p and the smallest video if there are no videos less than 720p. For codec and ext, you can provide two preferred values, the first for video and the second for audio. E.g. +codec:avc:m4a (equivalent to +vcodec:avc,+acodec:m4a) sets the video codec preference to h264 > h265 > vp9 > vp9.2 > av01 > vp8 > h263 > theora and audio codec preference to mp4a > aac > vorbis > opus > mp3 > ac3 > dts. You can also make the sorting prefer the nearest values to the provided by using ~ as the delimiter. E.g. filesize~1G prefers the format with filesize closest to 1 GiB.
The fields hasvid and ie_pref are always given highest priority in sorting, irrespective of the user-defined order. This behavior can be changed by using --format-sort-force. Apart from these, the default order used is: lang,quality,res,fps,hdr:12,vcodec,channels,acodec,size,br,asr,proto,ext,hasaud,source,id. The extractors may override this default order, but they cannot override the user-provided order.
Note that the default for hdr is hdr:12; i.e. Dolby Vision is not preferred. This choice was made since DV formats are not yet fully compatible with most devices. This may be changed in the future.
If your format selector is worst, the last item is selected after sorting. This means it will select the format that is worst in all respects. Most of the time, what you actually want is the video with the smallest filesize instead. So it is generally better to use -f best -S +size,+br,+res,+fps.
Tip: You can use the -v -F to see how the formats have been sorted (worst to best).
# Download and merge the best video-only format and the best audio-only format,
# or download the best combined format if video-only format is not available
$ yt-dlp -f "bv+ba/b"

# Download best format that contains video,
# and if it doesn't already have an audio stream, merge it with best audio-only format
$ yt-dlp -f "bv*+ba/b"

# Same as above
$ yt-dlp

# Download the best video-only format and the best audio-only format without merging them
# For this case, an output template should be used since
# by default, bestvideo and bestaudio will have the same file name.
$ yt-dlp -f "bv,ba" -o "%(title)s.f%(format_id)s.%(ext)s"

# Download and merge the best format that has a video stream,
# and all audio-only formats into one file
$ yt-dlp -f "bv*+mergeall[vcodec=none]" --audio-multistreams

# Download and merge the best format that has a video stream,
# and the best 2 audio-only formats into one file
$ yt-dlp -f "bv*+ba+ba.2" --audio-multistreams


# The following examples show the old method (without -S) of format selection
# and how to use -S to achieve a similar but (generally) better result

# Download the worst video available (old method)
$ yt-dlp -f "wv*+wa/w"

# Download the best video available but with the smallest resolution
$ yt-dlp -S "+res"

# Download the smallest video available
$ yt-dlp -S "+size,+br"


# Download the best mp4 video available, or the best video if no mp4 available
$ yt-dlp -f "bv*[ext=mp4]+ba[ext=m4a]/b[ext=mp4] / bv*+ba/b"

# Download the best video with the best extension
# (For video, mp4 > mov > webm > flv. For audio, m4a > aac > mp3 ...)
$ yt-dlp -S "ext"


# Download the best video available but no better than 480p,
# or the worst video if there is no video under 480p
$ yt-dlp -f "bv*[height<=480]+ba/b[height<=480] / wv*+ba/w"

# Download the best video available with the largest height but no better than 480p,
# or the best video with the smallest resolution if there is no video under 480p
$ yt-dlp -S "height:480"

# Download the best video available with the largest resolution but no better than 480p,
# or the best video with the smallest resolution if there is no video under 480p
# Resolution is determined by using the smallest dimension.
# So this works correctly for vertical videos as well
$ yt-dlp -S "res:480"


# Download the best video (that also has audio) but no bigger than 50 MB,
# or the worst video (that also has audio) if there is no video under 50 MB
$ yt-dlp -f "b[filesize<50M] / w"

# Download the largest video (that also has audio) but no bigger than 50 MB,
# or the smallest video (that also has audio) if there is no video under 50 MB
$ yt-dlp -f "b" -S "filesize:50M"

# Download the best video (that also has audio) that is closest in size to 50 MB
$ yt-dlp -f "b" -S "filesize~50M"


# Download best video available via direct link over HTTP/HTTPS protocol,
# or the best video available via any protocol if there is no such video
$ yt-dlp -f "(bv*+ba/b)[protocol^=http][protocol!*=dash] / (bv*+ba/b)"

# Download best video available via the best protocol
# (https/ftps > http/ftp > m3u8_native > m3u8 > http_dash_segments ...)
$ yt-dlp -S "proto"


# Download the best video with either h264 or h265 codec,
# or the best video if there is no such video
$ yt-dlp -f "(bv*[vcodec~='^((he|a)vc|h26[45])']+ba) / (bv*+ba/b)"

# Download the best video with best codec no better than h264,
# or the best video with worst codec if there is no such video
$ yt-dlp -S "codec:h264"

# Download the best video with worst codec no worse than h264,
# or the best video with best codec if there is no such video
$ yt-dlp -S "+codec:h264"


# More complex examples

# Download the best video no better than 720p preferring framerate greater than 30,
# or the worst video (still preferring framerate greater than 30) if there is no such video
$ yt-dlp -f "((bv*[fps>30]/bv*)[height<=720]/(wv*[fps>30]/wv*)) + ba / (b[fps>30]/b)[height<=720]/(w[fps>30]/w)"

# Download the video with the largest resolution no better than 720p,
# or the video with the smallest resolution available if there is no such video,
# preferring larger framerate for formats with the same resolution
$ yt-dlp -S "res:720,fps"


# Download the video with smallest resolution no worse than 480p,
# or the video with the largest resolution available if there is no such video,
# preferring better codec and then larger total bitrate for the same resolution
$ yt-dlp -S "+res:480,codec,br"
The metadata obtained by the extractors can be modified by using --parse-metadata and --replace-in-metadata
--replace-in-metadata FIELDS REGEX REPLACE is used to replace text in any metadata field using Python regular expression. Backreferences can be used in the replace string for advanced use.
The general syntax of --parse-metadata FROM:TO is to give the name of a field or an output template to extract data from, and the format to interpret it as, separated by a colon :. Either a Python regular expression with named capture groups, a single field name, or a similar syntax to the output template (only %(field)s formatting is supported) can be used for TO. The option can be used multiple times to parse and modify various fields.
Note that these options preserve their relative order, allowing replacements to be made in parsed fields and vice versa. Also, any field thus created can be used in the output template and will also affect the media file's metadata added when using --embed-metadata.
This option also has a few special uses:
You can download an additional URL based on the metadata of the currently downloaded video. To do this, set the field additional_urls to the URL that you want to download. E.g. --parse-metadata "description:(?P<additional_urls>https?://www\.vimeo\.com/\d+)" will download the first vimeo video found in the description
You can use this to change the metadata that is embedded in the media file. To do this, set the value of the corresponding field with a meta_ prefix. For example, any value you set to meta_description field will be added to the description field in the file - you can use this to set a different "description" and "synopsis". To modify the metadata of individual streams, use the meta<n>_ prefix (e.g. meta1_language). Any value set to the meta_ field will overwrite all default values.
Note: Metadata modification happens before format selection, post-extraction and other post-processing operations. Some fields may be added or changed during these steps, overriding your changes.
For reference, these are the fields yt-dlp adds by default to the file metadata:
Metadata fields Fromtitle |
track or title |
date |
upload_date |
description, synopsis |
description |
purl, comment |
webpage_url |
track |
track_number |
artist |
artist, artists, creator, creators, uploader or uploader_id |
composer |
composer or composers |
genre |
genre or genres |
album |
album |
album_artist |
album_artist or album_artists |
disc |
disc_number |
show |
series |
season_number |
season_number |
episode_id |
episode or episode_id |
episode_sort |
episode_number |
language of each stream |
the format's language |
Note: The file format may not support some of these fields
# Interpret the title as "Artist - Title"
$ yt-dlp --parse-metadata "title:%(artist)s - %(title)s"

# Regex example
$ yt-dlp --parse-metadata "description:Artist - (?P<artist>.+)"

# Set title as "Series name S01E05"
$ yt-dlp --parse-metadata "%(series)s S%(season_number)02dE%(episode_number)02d:%(title)s"

# Prioritize uploader as the "artist" field in video metadata
$ yt-dlp --parse-metadata "%(uploader|)s:%(meta_artist)s" --embed-metadata

# Set "comment" field in video metadata using description instead of webpage_url,
# handling multiple lines correctly
$ yt-dlp --parse-metadata "description:(?s)(?P<meta_comment>.+)" --embed-metadata

# Do not set any "synopsis" in the video metadata
$ yt-dlp --parse-metadata ":(?P<meta_synopsis>)"

# Remove "formats" field from the infojson by setting it to an empty string
$ yt-dlp --parse-metadata "video::(?P<formats>)" --write-info-json

# Replace all spaces and "_" in title and uploader with a `-`
$ yt-dlp --replace-in-metadata "title,uploader" "[ _]" "-"
Some extractors accept additional arguments which can be passed using --extractor-args KEY:ARGS. ARGS is a ; (semicolon) separated string of ARG=VAL1,VAL2. E.g. --extractor-args "youtube:player-client=tv,mweb;formats=incomplete" --extractor-args "twitter:api=syndication"
Note: In CLI, ARG can use - instead of _; e.g. youtube:player-client" becomes youtube:player_client"
The following extractors use this feature:
lang: Prefer translated metadata (title, description etc) of this language code (case-sensitive). By default, the video primary language metadata is preferred, with a fallback to en translated. See youtube/_base.py for the list of supported content language codesskip: One or more of hls, dash or translated_subs to skip extraction of the m3u8 manifests, dash manifests and auto-translated subtitles respectivelyplayer_client: Clients to extract video data from. The currently available clients are web, web_safari, web_embedded, web_music, web_creator, mweb, ios, android, android_vr, tv, tv_simply and tv_embedded. By default, tv_simply,tv,web is used, but tv,web_safari,web is used when authenticating with cookies and tv,web_creator,web is used with premium accounts. The web_music client is added for music.youtube.com URLs when logged-in cookies are used. The web_embedded client is added for age-restricted videos but only works if the video is embeddable. The tv_embedded and web_creator clients are added for age-restricted videos if account age-verification is required. Some clients, such as web and web_music, require a po_token for their formats to be downloadable. Some clients, such as web_creator, will only work with authentication. Not all clients support authentication via cookies. You can use default for the default clients, or you can use all for all clients (not recommended). You can prefix a client with - to exclude it, e.g. youtube:player_client=default,-iosplayer_skip: Skip some network requests that are generally needed for robust extraction. One or more of configs (skip client configs), webpage (skip initial webpage), js (skip js player), initial_data (skip initial data/next ep request). While these options can help reduce the number of requests needed or avoid some rate-limiting, they could cause issues such as missing formats or metadata. See #860 and #12826 for more detailswebpage_skip: Skip extraction of embedded webpage data. One or both of player_response, initial_data. These options are for testing purposes and don't skip any network requestsplayer_params: YouTube player parameters to use for player requests. Will overwrite any default ones set by yt-dlp.player_js_variant: The player javascript variant to use for signature and nsig deciphering. The known variants are: main, tce, tv, tv_es6, phone, tablet. The default is main, and the others are for debugging purposes. You can use actual to go with what is prescribed by the sitecomment_sort: top or new (default) - choose comment sorting mode (on YouTube's side)max_comments: Limit the amount of comments to gather. Comma-separated list of integers representing max-comments,max-parents,max-replies,max-replies-per-thread. Default is all,all,all,all
all,all,1000,10 will get a maximum of 1000 replies total, with up to 10 replies per thread. 1000,all,100 will get a maximum of 1000 comments, with a maximum of 100 replies totalformats: Change the types of formats to return. dashy (convert HTTP to DASH), duplicate (identical content but different URLs or protocol; includes dashy), incomplete (cannot be downloaded completely - live dash and post-live m3u8), missing_pot (include formats that require a PO Token but are missing one)innertube_host: Innertube API host to use for all API requests; e.g. studio.youtube.com, youtubei.googleapis.com. Note that cookies exported from one subdomain will not work on othersinnertube_key: Innertube API key to use for all API requests. By default, no API key is usedraise_incomplete_data: Incomplete Data Received raises an error instead of reporting a warningdata_sync_id: Overrides the account Data Sync ID used in Innertube API requests. This may be needed if you are using an account with youtube:player_skip=webpage,configs or youtubetab:skip=webpagevisitor_data: Overrides the Visitor Data used in Innertube API requests. This should be used with player_skip=webpage,configs and without cookies. Note: this may have adverse effects if used improperly. If a session from a browser is wanted, you should pass cookies instead (which contain the Visitor ID)po_token: Proof of Origin (PO) Token(s) to use. Comma seperated list of PO Tokens in the format CLIENT.CONTEXT+PO_TOKEN, e.g. youtube:po_token=web.gvs+XXX,web.player=XXX,web_safari.gvs+YYY. Context can be any of gvs (Google Video Server URLs), player (Innertube player request) or subs (Subtitles)pot_trace: Enable debug logging for PO Token fetching. Either true or false (default)fetch_pot: Policy to use for fetching a PO Token from providers. One of always (always try fetch a PO Token regardless if the client requires one for the given context), never (never fetch a PO Token), or auto (default; only fetch a PO Token if the client requires one for the given context)playback_wait: Duration (in seconds) to wait inbetween the extraction and download stages in order to ensure the formats are available. The default is 6 secondsbind_to_visitor_id: Whether to use the Visitor ID instead of Visitor Data for caching WebPO tokens. Either true (default) or falseskip: One or more of webpage (skip initial webpage download), authcheck (allow the download of playlists requiring authentication when no initial webpage is downloaded. This may cause unwanted behavior, see #1122 for more details)approximate_date: Extract approximate upload_date and timestamp in flat-playlist. This may cause date-based filters to be slightly offfragment_query: Passthrough any query in mpd/m3u8 manifest URLs to their fragments if no value is provided, or else apply the query string given as fragment_query=VALUE. Note that if the stream has an HLS AES-128 key, then the query parameters will be passed to the key URI as well, unless the key_query extractor-arg is passed, or unless an external key URI is provided via the hls_key extractor-arg. Does not apply to ffmpegvariant_query: Passthrough the master m3u8 URL query to its variant playlist URLs if no value is provided, or else apply the query string given as variant_query=VALUEkey_query: Passthrough the master m3u8 URL query to its HLS AES-128 decryption key URI if no value is provided, or else apply the query string given as key_query=VALUE. Note that this will have no effect if the key URI is provided via the hls_key extractor-arg. Does not apply to ffmpeghls_key: An HLS AES-128 key URI or key (as hex), and optionally the IV (as hex), in the form of (URI|KEY)[,IV]; e.g. generic:hls_key=ABCDEF1234567980,0xFEDCBA0987654321. Passing any of these values will force usage of the native HLS downloader and override the corresponding values found in the m3u8 playlistis_live: Bypass live HLS detection and manually set live_status - a value of false will set not_live, any other value (or no value) will set is_liveimpersonate: Target(s) to try and impersonate with the initial webpage request; e.g. generic:impersonate=safari,chrome-110. Use generic:impersonate to impersonate any available target, and use generic:impersonate=false to disable impersonation (default)video_types: Types of videos to download - one or more of episodes, movies, clips, trailerscheck_all: Try to check more at the cost of more requests. One or more of thumbnails, capturescomment_sort: hot (default), you (cookies needed), top, new - choose comment sorting mode (on GameJolt's side)res: resolution to ignore - one or more of sd, hd, fhdvcodec: vcodec to ignore - one or more of h264, h265, dvh265dr: dynamic range to ignore - one or more of sdr, hdr10, dvapp_id: The value of the X-IG-App-ID header used for API requests. Default is the web app ID, 936619743392459max_comments: Maximum number of comments to extract - default is 120api_hostname: Hostname to use for mobile API calls, e.g. api22-normal-c-alisg.tiktokv.comapp_name: Default app name to use with mobile API calls, e.g. trillapp_version: Default app version to use with mobile API calls - should be set along with manifest_app_version, e.g. 34.1.2manifest_app_version: Default numeric app version to use with mobile API calls, e.g. 2023401020aid: Default app ID to use with mobile API calls, e.g. 1180app_info: Enable mobile API extraction with one or more app info strings in the format of <iid>/[app_name]/[app_version]/[manifest_app_version]/[aid], where iid is the unique app install ID. iid is the only required value; all other values and their / separators can be omitted, e.g. tiktok:app_info=1234567890123456789 or tiktok:app_info=123,456/trill///1180,789//34.0.1/340001device_id: Enable mobile API extraction with a genuine device ID to be used with mobile API calls. Default is a random 19-digit stringtab: Which tab to download - one of new, top, videos, podcasts, streams, stacksapi: Select one of graphql (default), legacy or syndication as the API for tweet extraction. Has no effect if logged indevice_id: UUID value assigned by the website and used to enforce device limits for paid livestream content. Can be found in browser local storageclient_id: Client ID value to be sent with GraphQL requests, e.g. twitch:client_id=kimne78kx3ncx6brgo4mv6wki5h1koarea: Which regional variation to extract. Valid areas are: sapporo, sendai, tokyo, nagoya, osaka, hiroshima, matsuyama, fukuoka. Defaults to tokyotype: Type(s) of game replays to extract. Valid types are: full_game, full_game_spanish, condensed_game and all_22. You can use all to extract all available replay types, which is the defaultrefresh_token: The refreshToken UUID from browser local storage can be passed to extend the life of your login session when logging in with token as username and the accessToken from browser local storage as passwordbitrate: Audio bitrates to request. One or more of 16, 32, 64, 128, 320. Default is 128,320cdn: One or more CDN IDs to use with the API call for stream URLs, e.g. gcp_cdn, gs_cdn_pc_app, gs_cdn_mobile_web, gs_cdn_pc_webformats: Formats to request from the API. Requested values should be in the format of {protocol}_{codec}, e.g. hls_opus,http_aac. The * character functions as a wildcard, e.g. *_mp3, and can be passed by itself to request all formats. Known protocols include http, hls and hls-aes; known codecs include aac, opus and mp3. Original download formats are always extracted. Default is http_aac,hls_aac,http_opus,hls_opus,http_mp3,hls_mp3prefer_segments_playlist: Prefer a playlist of program segments instead of a single complete video when available. If individual segments are desired, use --concat-playlist never --extractor-args "orfon:prefer_segments_playlist"prefer_multi_flv: Prefer extracting flv formats over mp4 for older videos that still provide legacy formatssort_order: Episode sort order for series extraction - one of asc (ascending, oldest first) or desc (descending, newest first). Default is ascbackend: Backend API to use for extraction - one of streaks (default) or brightcove (deprecated)client: Client to extract video data from. The currently available clients are android, ios, and web. Only one client can be used. The web client is used by default. The web client only works with account cookies or login credentials. The android and ios clients only work with previously cached OAuth tokensoriginal_format_policy: Policy for when to try extracting original formats. One of always, never, or auto. The default auto policy tries to avoid exceeding the web client's API rate-limit by only making an extra request when Vimeo publicizes the video's downloadabilityNote: These options may be changed/removed in the future without concern for backward compatibility
Note that all plugins are imported even if not invoked, and that there are no checks performed on plugin code. Use plugins at your own risk and only if you trust the code!
Plugins can be of <type>s extractor or postprocessor.
--use-postprocessor NAME.Plugins are loaded from the namespace packages yt_dlp_plugins.extractor and yt_dlp_plugins.postprocessor.
In other words, the file structure on the disk looks something like:
    yt_dlp_plugins/
        extractor/
            myplugin.py
        postprocessor/
            myplugin.py
yt-dlp looks for these yt_dlp_plugins namespace folders in many locations (see below) and loads in plugins from all of them. Set the environment variable YTDLP_NO_PLUGINS to something nonempty to disable loading plugins entirely.
See the wiki for some known plugins
Plugins can be installed using various methods and locations.
Configuration directories: Plugin packages (containing a yt_dlp_plugins namespace folder) can be dropped into the following standard configuration locations:
${XDG_CONFIG_HOME}/yt-dlp/plugins/<package name>/yt_dlp_plugins/ (recommended on Linux/macOS)${XDG_CONFIG_HOME}/yt-dlp-plugins/<package name>/yt_dlp_plugins/${APPDATA}/yt-dlp/plugins/<package name>/yt_dlp_plugins/ (recommended on Windows)${APPDATA}/yt-dlp-plugins/<package name>/yt_dlp_plugins/~/.yt-dlp/plugins/<package name>/yt_dlp_plugins/~/yt-dlp-plugins/<package name>/yt_dlp_plugins//etc/yt-dlp/plugins/<package name>/yt_dlp_plugins//etc/yt-dlp-plugins/<package name>/yt_dlp_plugins/Executable location: Plugin packages can similarly be installed in a yt-dlp-plugins directory under the executable location (recommended for portable installations):
<root-dir>/yt-dlp.exe, <root-dir>/yt-dlp-plugins/<package name>/yt_dlp_plugins/<root-dir>/yt_dlp/__main__.py, <root-dir>/yt-dlp-plugins/<package name>/yt_dlp_plugins/pip and other locations in PYTHONPATH
pip. See yt-dlp-sample-plugins for an example.
PYTHONPATH is searched in for the yt_dlp_plugins namespace folder.
.zip, .egg and .whl archives containing a yt_dlp_plugins namespace folder in their root are also supported as plugin packages.
${XDG_CONFIG_HOME}/yt-dlp/plugins/mypluginpkg.zip where mypluginpkg.zip contains yt_dlp_plugins/<type>/myplugin.pyRun yt-dlp with --verbose to check if the plugin has been loaded.
See the yt-dlp-sample-plugins repo for a template plugin package and the Plugin Development section of the wiki for a plugin development guide.
All public classes with a name ending in IE/PP are imported from each file for extractors and postprocessors respectively. This respects underscore prefix (e.g. _MyBasePluginIE is private) and __all__. Modules can similarly be excluded by prefixing the module name with an underscore (e.g. _myplugin.py).
To replace an existing extractor with a subclass of one, set the plugin_name class keyword argument (e.g. class MyPluginIE(ABuiltInIE, plugin_name='myplugin') will replace ABuiltInIE with MyPluginIE). Since the extractor replaces the parent, you should exclude the subclass extractor from being imported separately by making it private using one of the methods described above.
If you are a plugin author, add yt-dlp-plugins as a topic to your repository for discoverability.
See the Developer Instructions on how to write and test an extractor.
yt-dlp makes the best effort to be a good command-line program, and thus should be callable from any programming language.
Your program should avoid parsing the normal stdout since they may change in future versions. Instead, they should use options such as -J, --print, --progress-template, --exec etc to create console output that you can reliably reproduce and parse.
From a Python program, you can embed yt-dlp in a more powerful fashion, like this:
from yt_dlp import YoutubeDL

URLS = ['https://www.youtube.com/watch?v=BaW_jenozKc']
with YoutubeDL() as ydl:
    ydl.download(URLS)
Most likely, you'll want to use various options. For a list of options available, have a look at yt_dlp/YoutubeDL.py or help(yt_dlp.YoutubeDL) in a Python shell. If you are already familiar with the CLI, you can use devscripts/cli_to_api.py to translate any CLI switches to YoutubeDL params.
Tip: If you are porting your code from youtube-dl to yt-dlp, one important point to look out for is that we do not guarantee the return value of YoutubeDL.extract_info to be json serializable, or even be a dictionary. It will be dictionary-like, but if you want to ensure it is a serializable dictionary, pass it through YoutubeDL.sanitize_info as shown in the example below
import json
import yt_dlp

URL = 'https://www.youtube.com/watch?v=BaW_jenozKc'

# ℹ️ See help(yt_dlp.YoutubeDL) for a list of available options and public functions
ydl_opts = {}
with yt_dlp.YoutubeDL(ydl_opts) as ydl:
    info = ydl.extract_info(URL, download=False)

    # ℹ️ ydl.sanitize_info makes the info json-serializable
    print(json.dumps(ydl.sanitize_info(info)))
import yt_dlp

INFO_FILE = 'path/to/video.info.json'

with yt_dlp.YoutubeDL() as ydl:
    error_code = ydl.download_with_info_file(INFO_FILE)

print('Some videos failed to download' if error_code
      else 'All videos successfully downloaded')
import yt_dlp

URLS = ['https://www.youtube.com/watch?v=BaW_jenozKc']

ydl_opts = {
    'format': 'm4a/bestaudio/best',
    # ℹ️ See help(yt_dlp.postprocessor) for a list of available Postprocessors and their arguments
    'postprocessors': [{  # Extract audio using ffmpeg
        'key': 'FFmpegExtractAudio',
        'preferredcodec': 'm4a',
    }]
}

with yt_dlp.YoutubeDL(ydl_opts) as ydl:
    error_code = ydl.download(URLS)
import yt_dlp

URLS = ['https://www.youtube.com/watch?v=BaW_jenozKc']

def longer_than_a_minute(info, *, incomplete):
    """Download only videos longer than a minute (or with unknown duration)"""
    duration = info.get('duration')
    if duration and duration < 60:
        return 'The video is too short'

ydl_opts = {
    'match_filter': longer_than_a_minute,
}

with yt_dlp.YoutubeDL(ydl_opts) as ydl:
    error_code = ydl.download(URLS)
import yt_dlp

URLS = ['https://www.youtube.com/watch?v=BaW_jenozKc']

class MyLogger:
    def debug(self, msg):
        # For compatibility with youtube-dl, both debug and info are passed into debug
        # You can distinguish them by the prefix '[debug] '
        if msg.startswith('[debug] '):
            pass
        else:
            self.info(msg)

    def info(self, msg):
        pass

    def warning(self, msg):
        pass

    def error(self, msg):
        print(msg)


# ℹ️ See "progress_hooks" in help(yt_dlp.YoutubeDL)
def my_hook(d):
    if d['status'] == 'finished':
        print('Done downloading, now post-processing ...')


ydl_opts = {
    'logger': MyLogger(),
    'progress_hooks': [my_hook],
}

with yt_dlp.YoutubeDL(ydl_opts) as ydl:
    ydl.download(URLS)
import yt_dlp

URLS = ['https://www.youtube.com/watch?v=BaW_jenozKc']

# ℹ️ See help(yt_dlp.postprocessor.PostProcessor)
class MyCustomPP(yt_dlp.postprocessor.PostProcessor):
    def run(self, info):
        self.to_screen('Doing stuff')
        return [], info


with yt_dlp.YoutubeDL() as ydl:
    # ℹ️ "when" can take any value in yt_dlp.utils.POSTPROCESS_WHEN
    ydl.add_post_processor(MyCustomPP(), when='pre_process')
    ydl.download(URLS)
import yt_dlp

URLS = ['https://www.youtube.com/watch?v=BaW_jenozKc']

def format_selector(ctx):
    """ Select the best video and the best audio that won't result in an mkv.
    NOTE: This is just an example and does not handle all cases """

    # formats are already sorted worst to best
    formats = ctx.get('formats')[::-1]

    # acodec='none' means there is no audio
    best_video = next(f for f in formats
                      if f['vcodec'] != 'none' and f['acodec'] == 'none')

    # find compatible audio extension
    audio_ext = {'mp4': 'm4a', 'webm': 'webm'}[best_video['ext']]
    # vcodec='none' means there is no video
    best_audio = next(f for f in formats if (
        f['acodec'] != 'none' and f['vcodec'] == 'none' and f['ext'] == audio_ext))

    # These are the minimum required fields for a merged format
    yield {
        'format_id': f'{best_video["format_id"]}+{best_audio["format_id"]}',
        'ext': best_video['ext'],
        'requested_formats': [best_video, best_audio],
        # Must be + separated list of protocols
        'protocol': f'{best_video["protocol"]}+{best_audio["protocol"]}'
    }


ydl_opts = {
    'format': format_selector,
}

with yt_dlp.YoutubeDL(ydl_opts) as ydl:
    ydl.download(URLS)
Forked from yt-dlc@f9401f2 and merged with youtube-dl@a08f2b7 (exceptions)
SponsorBlock Integration: You can mark/remove sponsor sections in YouTube videos by utilizing the SponsorBlock API
Format Sorting: The default format sorting options have been changed so that higher resolution and better codecs will be now preferred instead of simply using larger bitrate. Furthermore, you can now specify the sort order using -S. This allows for much easier format selection than what is possible by simply using --format (examples)
Merged with animelover1984/youtube-dl: You get most of the features and improvements from animelover1984/youtube-dl including --write-comments, BiliBiliSearch, BilibiliChannel, Embedding thumbnail in mp4/ogg/opus, playlist infojson etc. See #31 for details.
YouTube improvements:
ytstories:<channel UCID>), Search (including filters)*, YouTube Music Search, Channel-specific search, Search prefixes (ytsearch:, ytsearchdate:)*, Mixes, and Feeds (:ytfav, :ytwatchlater, :ytsubs, :ythistory, :ytrec, :ytnotif)--live-from-start (experimental)Cookies from browser: Cookies can be automatically extracted from all major web browsers using --cookies-from-browser BROWSER[+KEYRING][:PROFILE][::CONTAINER]
Download time range: Videos can be downloaded partially based on either timestamps or chapters using --download-sections
Split video by chapters: Videos can be split into multiple files based on chapters using --split-chapters
Multi-threaded fragment downloads: Download multiple fragments of m3u8/mpd videos in parallel. Use --concurrent-fragments (-N) option to set the number of threads used
Aria2c with HLS/DASH: You can use aria2c as the external downloader for DASH(mpd) and HLS(m3u8) formats
New and fixed extractors: Many new extractors have been added and a lot of existing ones have been fixed. See the changelog or the list of supported sites
New MSOs: Philo, Spectrum, SlingTV, Cablevision, RCN etc.
Subtitle extraction from manifests: Subtitles can be extracted from streaming media manifests. See commit/be6202f for details
Multiple paths and output templates: You can give different output templates and download paths for different types of files. You can also set a temporary path where intermediary files are downloaded to using --paths (-P)
Portable Configuration: Configuration files are automatically loaded from the home and root directories. See CONFIGURATION for details
Output template improvements: Output templates can now have date-time formatting, numeric offsets, object traversal etc. See output template for details. Even more advanced operations can also be done with the help of --parse-metadata and --replace-in-metadata
Other new options: Many new options have been added such as --alias, --print, --concat-playlist, --wait-for-video, --retry-sleep, --sleep-requests, --convert-thumbnails, --force-download-archive, --force-overwrites, --break-match-filters etc
Improvements: Regex and other operators in --format/--match-filters, multiple --postprocessor-args and --downloader-args, faster archive checking, more format selection options, merge multi-video/audio, multiple --config-locations, --exec at different stages, etc
Plugins: Extractors and PostProcessors can be loaded from an external file. See plugins for details
Self updater: The releases can be updated using yt-dlp -U, and downgraded using --update-to if required
Automated builds: Nightly/master builds can be used with --update-to nightly and --update-to master
See changelog or commits for the full list of changes
Features marked with a * have been back-ported to youtube-dl
Some of yt-dlp's default options are different from that of youtube-dl and youtube-dlc:
--auto-number (-A), --title (-t) and --literal (-l), no longer work. See removed options for detailsavconv is not supported as an alternative to ffmpeg%(title)s [%(id)s].%(ext)s. There is no real reason for this change. This was changed before yt-dlp was ever made public and now there are no plans to change it back to %(title)s-%(id)s.%(ext)s. Instead, you may use --compat-options filename--format-sort option to change this to any order you prefer, or use --compat-options format-sort to use youtube-dl's sorting order. Older versions of yt-dlp preferred VP9 due to its broader compatibility; you can use --compat-options prefer-vp9-sort to revert to that format sorting preference. These two compat options cannot be used togetherbv*+ba/b. This means that if a combined video + audio format that is better than the best video-only format is found, the former will be preferred. Use -f bv+ba/b or --compat-options format-spec to revert this-f bv*+ba). If needed, this feature must be enabled using --audio-multistreams and --video-multistreams. You can also use --compat-options multistreams to enable both--no-abort-on-error is enabled by default. Use --abort-on-error or --compat-options abort-on-error to abort on errors instead--no-write-playlist-metafiles or --compat-options no-playlist-metafiles to not write these files--add-metadata attaches the infojson to mkv files in addition to writing the metadata when used with --write-info-json. Use --no-embed-info-json or --compat-options no-attach-info-json to revert this--add-metadata as compared to youtube-dl. Most notably, comment field contains the webpage_url and synopsis contains the description. You can use --parse-metadata to modify this to your liking or use --compat-options embed-metadata to revert thisplaylist_index behaves differently when used with options like --playlist-reverse and --playlist-items. See #302 for details. You can use --compat-options playlist-index if you want to keep the earlier behavior-F is listed in a new format. Use --compat-options list-formats to revert this--sub-langs all,-live_chat to download all subtitles except live chat. You can also use --compat-options no-live-chat to prevent any live chat/danmaku from downloading/live URLs raise an error if there are no live videos instead of silently downloading the entire channel. You may use --compat-options no-youtube-channel-redirect to revert all these redirections--compat-options no-youtube-unavailable-videos to remove thisffmpeg is used as the downloader, the downloading and merging of formats happen in a single step when possible. Use --compat-options no-direct-merge to revert thismp4 is done with mutagen if possible. Use --compat-options embed-thumbnail-atomicparsley to force the use of AtomicParsley instead--no-clean-infojson or --compat-options no-clean-infojson to revert this--embed-subs and --write-subs are used together, the subtitles are written to disk and also embedded in the media file. You can use just --embed-subs to embed the subs and automatically delete the separate file. See #630 (comment) for more info. --compat-options no-keep-subs can be used to revert thiscertifi will be used for SSL root certificates, if installed. If you want to use system certificates (e.g. self-signed), use --compat-options no-certifi--compat-options filename-sanitization to revert to youtube-dl's behavior--compat-options no-external-downloader-progress to get the downloader output as-is--match-filters to nested playlists. This was an unintentional side-effect of 8f18ac and is fixed in d7b460. Use --compat-options playlist-match-filter to revert thisfilesize_approx values for fragmented/manifest formats. This was added for convenience in f2fe69, but was reverted in 0dff8e due to the potentially extreme inaccuracy of the estimated values. Use --compat-options manifest-filesize-approx to keep extracting the estimated valuesrequests. Use --compat-options prefer-legacy-http-handler to prefer the legacy http handler (urllib) to be used for standard http requests.swfinterp, casefold are removed.--simulate (or calling extract_info with download=False) no longer alters the default format selection. See #9843 for details.--mtime or --compat-options mtime-by-default to revert this.For ease of use, a few more compat options are available:
--compat-options all: Use all compat options (Do NOT use this!)--compat-options youtube-dl: Same as --compat-options all,-multistreams,-playlist-match-filter,-manifest-filesize-approx,-allow-unsafe-ext,-prefer-vp9-sort--compat-options youtube-dlc: Same as --compat-options all,-no-live-chat,-no-youtube-channel-redirect,-playlist-match-filter,-manifest-filesize-approx,-allow-unsafe-ext,-prefer-vp9-sort--compat-options 2021: Same as --compat-options 2022,no-certifi,filename-sanitization--compat-options 2022: Same as --compat-options 2023,playlist-match-filter,no-external-downloader-progress,prefer-legacy-http-handler,manifest-filesize-approx--compat-options 2023: Same as --compat-options 2024,prefer-vp9-sort--compat-options 2024: Same as --compat-options mtime-by-default. Use this to enable all future compat optionsThe following compat options restore vulnerable behavior from before security patches:
--compat-options allow-unsafe-ext: Allow files with any extension (including unsafe ones) to be downloaded (GHSA-79w7-vh3h-8g4j)
⚠ Only use if a valid file download is rejected because its extension is detected as uncommon
This option can enable remote code execution! Consider opening an issue instead!
These are all the deprecated options and the current alternative to achieve the same effect
While these options are almost the same as their new counterparts, there are some differences that prevents them being redundant
-j, --dump-json                  --print "%()j"
-F, --list-formats               --print formats_table
--list-thumbnails                --print thumbnails_table --print playlist:thumbnails_table
--list-subs                      --print automatic_captions_table --print subtitles_table
While these options are redundant, they are still expected to be used due to their ease of use
--get-description                --print description
--get-duration                   --print duration_string
--get-filename                   --print filename
--get-format                     --print format
--get-id                         --print id
--get-thumbnail                  --print thumbnail
-e, --get-title                  --print title
-g, --get-url                    --print urls
--match-title REGEX              --match-filters "title ~= (?i)REGEX"
--reject-title REGEX             --match-filters "title !~= (?i)REGEX"
--min-views COUNT                --match-filters "view_count >=? COUNT"
--max-views COUNT                --match-filters "view_count <=? COUNT"
--break-on-reject                Use --break-match-filters
--user-agent UA                  --add-headers "User-Agent:UA"
--referer URL                    --add-headers "Referer:URL"
--playlist-start NUMBER          -I NUMBER:
--playlist-end NUMBER            -I :NUMBER
--playlist-reverse               -I ::-1
--no-playlist-reverse            Default
--no-colors                      --color no_color
While these options still work, their use is not recommended since there are other alternatives to achieve the same
--force-generic-extractor        --ies generic,default
--exec-before-download CMD       --exec "before_dl:CMD"
--no-exec-before-download        --no-exec
--all-formats                    -f all
--all-subs                       --sub-langs all --write-subs
--print-json                     -j --no-simulate
--autonumber-size NUMBER         Use string formatting, e.g. %(autonumber)03d
--autonumber-start NUMBER        Use internal field formatting like %(autonumber+NUMBER)s
--id                             -o "%(id)s.%(ext)s"
--metadata-from-title FORMAT     --parse-metadata "%(title)s:FORMAT"
--hls-prefer-native              --downloader "m3u8:native"
--hls-prefer-ffmpeg              --downloader "m3u8:ffmpeg"
--list-formats-old               --compat-options list-formats (Alias: --no-list-formats-as-table)
--list-formats-as-table          --compat-options -list-formats [Default] (Alias: --no-list-formats-old)
--youtube-skip-dash-manifest     --extractor-args "youtube:skip=dash" (Alias: --no-youtube-include-dash-manifest)
--youtube-skip-hls-manifest      --extractor-args "youtube:skip=hls" (Alias: --no-youtube-include-hls-manifest)
--youtube-include-dash-manifest  Default (Alias: --no-youtube-skip-dash-manifest)
--youtube-include-hls-manifest   Default (Alias: --no-youtube-skip-hls-manifest)
--geo-bypass                     --xff "default"
--no-geo-bypass                  --xff "never"
--geo-bypass-country CODE        --xff CODE
--geo-bypass-ip-block IP_BLOCK   --xff IP_BLOCK
These options are not intended to be used by the end-user
--test                           Download only part of video for testing extractors
--load-pages                     Load pages dumped by --write-pages
--youtube-print-sig-code         For testing youtube signatures
--allow-unplayable-formats       List unplayable formats also
--no-allow-unplayable-formats    Default
These are aliases that are no longer documented for various reasons
--avconv-location                --ffmpeg-location
--clean-infojson                 --clean-info-json
--cn-verification-proxy URL      --geo-verification-proxy URL
--dump-headers                   --print-traffic
--dump-intermediate-pages        --dump-pages
--force-write-download-archive   --force-write-archive
--no-clean-infojson              --no-clean-info-json
--no-split-tracks                --no-split-chapters
--no-write-srt                   --no-write-subs
--prefer-unsecure                --prefer-insecure
--rate-limit RATE                --limit-rate RATE
--split-tracks                   --split-chapters
--srt-lang LANGS                 --sub-langs LANGS
--trim-file-names LENGTH         --trim-filenames LENGTH
--write-srt                      --write-subs
--yes-overwrites                 --force-overwrites
Support for SponSkrub has been deprecated in favor of the --sponsorblock options
--sponskrub                      --sponsorblock-mark all
--no-sponskrub                   --no-sponsorblock
--sponskrub-cut                  --sponsorblock-remove all
--no-sponskrub-cut               --sponsorblock-remove -all
--sponskrub-force                Not applicable
--no-sponskrub-force             Not applicable
--sponskrub-location             Not applicable
--sponskrub-args                 Not applicable
These options may no longer work as intended
--prefer-avconv                  avconv is not officially supported by yt-dlp (Alias: --no-prefer-ffmpeg)
--prefer-ffmpeg                  Default (Alias: --no-prefer-avconv)
-C, --call-home                  Not implemented
--no-call-home                   Default
--include-ads                    No longer supported
--no-include-ads                 Default
--write-annotations              No supported site has annotations now
--no-write-annotations           Default
--compat-options seperate-video-versions  No longer needed
--compat-options no-youtube-prefer-utc-upload-date  No longer supported
These options were deprecated since 2014 and have now been entirely removed
-A, --auto-number                -o "%(autonumber)s-%(id)s.%(ext)s"
-t, -l, --title, --literal       -o "%(title)s-%(id)s.%(ext)s"
See CONTRIBUTING.md for instructions on Opening an Issue and Contributing code to the project
See the Wiki for more information
Download your Spotify playlists and songs along with album art and metadata (from YouTube if a match is found).
spotDL finds songs from Spotify playlists on YouTube and downloads them - along with album art, lyrics and metadata.


spotDL: The fastest, easiest and most accurate command-line music downloader.
Read the documentation on ReadTheDocs!
Refer to our Installation Guide for more details.
spotDL can be installed by running pip install spotdl.
To update spotDL run pip install --upgrade spotdl
On some systems you might have to change
piptopip3.
curl -L https://raw.githubusercontent.com/spotDL/spotify-downloader/master/scripts/termux.sh | shBuild image:
docker build -t spotdl .
Launch container with spotDL parameters (see section below). You need to create mapped volume to access song files
docker run --rm -v $(pwd):/music spotdl download [trackUrl]
Build from source
git clone https://github.com/spotDL/spotify-downloader && cd spotify-downloader
pip install uv
uv sync
uv run scripts/build.py
An executable is created in spotify-downloader/dist/.
FFmpeg is required for spotDL. If using FFmpeg only for spotDL, you can simply install FFmpeg to your spotDL installation directory: spotdl --download-ffmpeg
We recommend the above option, but if you want to install FFmpeg system-wide, follow these instructions
brew install ffmpegsudo apt install ffmpeg or use your distro's package managerUsing SpotDL without options:
spotdl [urls]
You can run spotDL as a package if running it as a script doesn't work:
python -m spotdl [urls]
General usage:
spotdl [operation] [options] QUERY
There are different operations spotDL can perform. The default is download, which simply downloads the songs from YouTube and embeds metadata.
The query for spotDL is usually a list of Spotify URLs, but for some operations like sync, only a single link or file is required. For a list of all options use spotdl -h
save: Saves only the metadata from Spotify without downloading anything.
spotdl save [query] --save-file {filename}.spotdlweb: Starts a web interface instead of using the command line. However, it has limited features and only supports downloading single songs.
url: Get direct download link for each song from the query.
spotdl url [query]sync: Updates directories. Compares the directory with the current state of the playlist. Newly added songs will be downloaded and removed songs will be deleted. No other songs will be downloaded and no other files will be deleted.
Usage: spotdl sync [query] --save-file {filename}.spotdl
This create a new sync file, to update the directory in the future, use:
spotdl sync {filename}.spotdl
meta: Updates metadata for the provided song files.
spotDL uses YouTube as a source for music downloads. This method is used to avoid any issues related to downloading music from Spotify.
Note Users are responsible for their actions and potential legal consequences. We do not support unauthorized downloading of copyrighted material and take no responsibility for user actions.
spotDL downloads music from YouTube and is designed to always download the highest possible bitrate; which is 128 kbps for regular users and 256 kbps for YouTube Music premium users.
Check the Audio Formats page for more info.
Interested in contributing? Check out our CONTRIBUTING.md to find resources around contributing along with a guide on how to set up a development environment.
This project is Licensed under the MIT License.
Portable file server with accelerated resumable uploads, dedup, WebDAV, FTP, TFTP, zeroconf, media indexer, thumbnails++ all in one file, no deps
turn almost any device into a file server with resumable uploads/downloads using any web browser
👉 Get started! or visit the read-only demo server 👀 running on a nuc in my basement
📷 screenshots: browser // upload // unpost // thumbnails // search // fsearch // zip-DL // md-viewer
🎬 videos: upload // cli-upload // race-the-beam // 👉 feature-showcase (youtube)
made in Norway 🇳🇴
g or 田 to toggle grid-view instead of the file listingzip or tar filesF2 to bring up the rename UI--ftp 3921--tftp 3969.hist/up2k.db, default) or somewhere else-e2t to index tags on uploadpacman -S copyparty (in arch linux extra)brew install copyparty ffmpegnix profile install github:9001/copyparty8 GiB/s download, 1 GiB/s upload
just run copyparty-sfx.py -- that's it! 🎉
ℹ️ the sfx is a self-extractor which unpacks an embedded
tar.gzinto$TEMP-- if this looks too scary, you can use the zipapp which has slightly worse performance
python3 -m pip install --user -U copypartyuv tool run copypartyenable thumbnails (images/audio/video), media indexing, and audio transcoding by installing some recommended deps:
apk add py3-pillow ffmpegapt install --no-install-recommends python3-pil ffmpegdnf install python3-pillow ffmpeg --allowerasingpkg install py39-sqlite3 py39-pillow ffmpegport install py-Pillow ffmpegbrew install pillow ffmpegpython -m pip install --user -U Pillow
running copyparty without arguments (for example doubleclicking it on Windows) will give everyone read/write access to the current folder; you may want accounts and volumes
or see some usage examples for inspiration, or the complete windows example
some recommended options:
-e2dsa enables general file indexing-e2ts enables audio metadata indexing (needs either FFprobe or Mutagen)-v /mnt/music:/music:r:rw,foo -a foo:bar shares /mnt/music as /music, readable by anyone, and read-write for user foo, password bar
:r:rw,foo with :r,foo to only make the folder readable by foo and nobody else--help-accounts) for the syntax and other permissionsmake it accessible over the internet by starting a cloudflare quicktunnel like so:
first download cloudflared and then start the tunnel with cloudflared tunnel --url http://127.0.0.1:3923
as the tunnel starts, it will show a URL which you can share to let anyone browse your stash or upload files to you
but if you have a domain, then you probably want to skip the random autogenerated URL and instead make a permanent cloudflare tunnel
since people will be connecting through cloudflare, run copyparty with --xff-hdr cf-connecting-ip to detect client IPs correctly
you may also want these, especially on servers:
and remember to open the ports you want; here's a complete example including every feature copyparty has to offer:
firewall-cmd --permanent --add-port={80,443,3921,3923,3945,3990}/tcp  # --zone=libvirt
firewall-cmd --permanent --add-port=12000-12099/tcp  # --zone=libvirt
firewall-cmd --permanent --add-port={69,1900,3969,5353}/udp  # --zone=libvirt
firewall-cmd --reload
(69:tftp, 1900:ssdp, 3921:ftp, 3923:http/https, 3945:smb, 3969:tftp, 3990:ftps, 5353:mdns, 12000:passive-ftp)
also see comparison to similar software
PS: something missing? post any crazy ideas you've got as a feature request or discussion 🤙
small collection of user feedback
good enough, surprisingly correct, certified good software, just works, why, wow this is better than nextcloud
project goals / philosophy
becoming rich is specifically not a motivation, but if you wanna donate then see my github profile regarding donations for my FOSS stuff in general (also THANKS!)
general notes:
browser-specific:
about:memory and click Minimize memory usageserver-os-specific:
/usr/libexec/platform-pythonserver notes:
roughly sorted by chance of encounter
general:
--th-ff-jpg may fix video thumbnails on some FFmpeg versions (macos, some linux)--th-ff-swr may fix audio thumbnails on some FFmpeg versionsup2k.db (filesystem index) is on a samba-share or network disk, you'll get unpredictable behavior if the share is disconnected for a bit
--hist or the hist volflag (-v [...]:c,hist=/tmp/foo) to place the db and thumbnails on a local disk instead--dbpath or the dbpath volflagpython 3.4 and older (including 2.7):
python 2.7 on Windows:
-e2dif you have a new exciting bug to share, see reporting bugs
same order here too
Chrome issue 1317069 -- if you try to upload a folder which contains symlinks by dragging it into the browser, the symlinked files will not get uploaded
Chrome issue 1352210 -- plaintext http may be faster at filehashing than https (but also extremely CPU-intensive)
Chrome issue 383568268 -- filereaders in webworkers can OOM / crash the browser-tab
Firefox issue 1790500 -- entire browser can crash after uploading ~4000 small files
Android: music playback randomly stops due to battery usage settings
iPhones: the volume control doesn't work because apple doesn't want it to
AudioContext will probably never be a viable workaround as apple introduces new issues faster than they fix current onesiPhones: music volume goes on a rollercoaster during song changes
AudioContext is still broken in safariiPhones: the preload feature (in the media-player-options tab) can cause a tiny audio glitch 20sec before the end of each song, but disabling it may cause worse iOS bugs to appear instead
iPhones: preloaded awo files make safari log MEDIA_ERR_NETWORK errors as playback starts, but the song plays just fine so eh whatever
iPhones: preloading another awo file may cause playback to stop
mp.au.play() in mp.onpreload but that can hit a race condition in safari that starts playing the same audio object twice in parallel...Windows: folders cannot be accessed if the name ends with .
Windows: msys2-python 3.8.6 occasionally throws RuntimeError: release unlocked lock when leaving a scoped mutex in up2k
VirtualBox: sqlite throws Disk I/O Error when running in a VM and the up2k database is in a vboxsf
--hist or the hist volflag (-v [...]:c,hist=/tmp/foo) to place the db and thumbnails inside the vm instead
--dbpath or the dbpath volflagUbuntu: dragging files from certain folders into firefox or chrome is impossible
snap connections firefox for the allowlist, removable-media permits all of /mnt and /media apparentlyupgrade notes
1.9.16 (2023-11-04):
--stats/prometheus: cpp_bans renamed to cpp_active_bans, and that + cpp_uptime are gauges1.6.0 (2023-01-29):
POST instead of GETGET and HEAD must pass cors validation1.5.0 (2022-12-03): new chunksize formula for files larger than 128 GiB
"frequently" asked questions
CopyParty?
can I change the 🌲 spinning pine-tree loading animation?
is it possible to block read-access to folders unless you know the exact URL for a particular file inside?
g permission, see the examples therechmod 111 music will make it possible to access files and folders inside the music folder but not list the immediate contents -- also works with other software, not just copypartycan I link someone to a password-protected volume/file by including the password in the URL?
?pw=hunter2 to the end; replace ? with & if there are parameters in the URL already, meaning it contains a ? near the end
--usernames then do ?pw=username:password insteadhow do I stop .hist folders from appearing everywhere on my HDD?
.hist folder is created inside each volume for the filesystem index, thumbnails, audio transcodes, and markdown document history. Use the --hist global-option or the hist volflag to move it somewhere else; see database locationcan I make copyparty download a file to my server if I give it a URL?
firefox refuses to connect over https, saying "Secure Connection Failed" or "SEC_ERROR_BAD_SIGNATURE", but the usual button to "Accept the Risk and Continue" is not shown
cert9.db somewhere in your firefox profile folderthe server keeps saying thank you for playing when I try to access the website
copyparty seems to think I am using http, even though the URL is https
X-Forwarded-Proto: https header; this could be because your reverse-proxy itself is confused. Ensure that none of the intermediates (such as cloudflare) are terminating https before the traffic hits your entrypointthumbnails are broken (you get a colorful square which says the filetype instead)
FFmpeg or Pillow; see thumbnailsthumbnails are broken (some images appear, but other files just get a blank box, and/or the broken-image placeholder)
?th=w), so check your URL rewrite rulesi want to learn python and/or programming and am considering looking at the copyparty source code in that occasion
 _|  _      __   _  _|_
(_| (_)     | | (_)  |_
per-folder, per-user permissions - if your setup is getting complex, consider making a config file instead of using arguments
systemctl reload copyparty or more conveniently using the [reload cfg] button in the control-panel (if the user has a/admin in any volume)
[global] config section requires a restart to take effecta quick summary can be seen using --help-accounts
configuring accounts/volumes with arguments:
-a usr:pwd adds account usr with password pwd-v .::r adds current-folder . as the webroot, readable by anyone
-v src:dst:perm:perm:... so local-path, url-path, and one or more permissions to set-v .::r,usr1,usr2:rw,usr3,usr4 = usr1/2 read-only, 3/4 read-writepermissions:
r (read): browse folder contents, download files, download as zip/tar, see filekeys/dirkeysw (write): upload files, move/copy files into this folderm (move): move files/folders from this folderd (delete): delete files/folders. (dots): user can ask to show dotfiles in directory listingsg (get): only download files, cannot see folder contents or zip/tarG (upget): same as g except uploaders get to see their own filekeys (see fk in examples below)h (html): same as g except folders return their index.html, and filekeys are not necessary for index.htmla (admin): can see upload time, uploader IPs, config-reloadA ("all"): same as rwmda. (read/write/move/delete/admin/dotfiles)examples:
-a u1:p1 -a u2:p2 -a u3:p3/srv the root of the filesystem, read-only by anyone: -v /srv::r/mnt/music available at /music, read-only for u1 and u2, read-write for u3: -v /mnt/music:music:r,u1,u2:rw,u3
music folder exists, but cannot open it/mnt/incoming available at /inc, write-only for u1, read-move for u2: -v /mnt/incoming:inc:w,u1:rm,u2
inc folder exists, but cannot open itu1 can open the inc folder, but cannot see the contents, only upload new files to itu2 can browse it and move files from /inc into any folder where u2 has write-access/mnt/ss available at /i, read-write for u1, get-only for everyone else, and enable filekeys: -v /mnt/ss:i:rw,u1:g:c,fk=4
c,fk=4 sets the fk (filekey) volflag to 4, meaning each file gets a 4-character accesskeyu1 can upload files, browse the folder, and see the generated filekeysg permission with wg would let anonymous users upload files, but not see the required filekey to access itg permission with wG would let anonymous users upload files, receiving a working direct link in returnif you want to grant access to all users who are logged in, the group acct will always contain all known users, so for example -v /mnt/music:music:r,@acct
anyone trying to bruteforce a password gets banned according to --ban-pw; default is 24h ban for 9 failed attempts in 1 hour
and if you want to use config files instead of commandline args (good!) then here's the same examples as a configfile; save it as foobar.conf and use it like this: python copyparty-sfx.py -c foobar.conf
PRTY_CONFIG=foobar.conf python copyparty-sfx.py (convenient in docker etc)[accounts]
u1: p1 # create account "u1" with password "p1"
u2: p2 # (note that comments must have
u3: p3 # two spaces before the # sign)
[groups]
g1: u1, u2 # create a group
[/] # this URL will be mapped to...
/srv # ...this folder on the server filesystem
accs:
r: * # read-only for everyone, no account necessary
[/music] # create another volume at this URL,
/mnt/music # which is mapped to this folder
accs:
r: u1, u2 # only these accounts can read,
r: @g1 # (exactly the same, just with a group instead)
r: @acct # (alternatively, ALL users who are logged in)
rw: u3 # and only u3 can read-write
[/inc]
/mnt/incoming
accs:
w: u1 # u1 can upload but not see/download any files,
rm: u2 # u2 can browse + move files out of this volume
[/i]
/mnt/ss
accs:
rw: u1 # u1 can read-write,
g: * # everyone can access files if they know the URL
flags:
fk: 4 # each file URL will have a 4-character password
hiding specific subfolders by mounting another volume on top of them
for example -v /mnt::r -v /var/empty:web/certs:r mounts the server folder /mnt as the webroot, but another volume is mounted at /web/certs -- so visitors can only see the contents of /mnt and /mnt/web (at URLs / and /web), but not /mnt/web/certs because URL /web/certs is mapped to /var/empty
the example config file right above this section may explain this better; the first volume / is mapped to /srv which means http://127.0.0.1:3923/music would try to read /srv/music on the server filesystem, but since there's another volume at /music mapped to /mnt/music then it'll go to /mnt/music instead
unix-style hidden files/folders by starting the name with a dot
anyone can access these if they know the name, but they normally don't appear in directory listings
a client can request to see dotfiles in directory listings if global option -ed is specified, or the volume has volflag dots, or the user has permission .
dotfiles do not appear in search results unless one of the above is true, and the global option / volflag dotsrch is set
even if user has permission to see dotfiles, they are default-hidden unless
--see-dotsis set, and/or user has enabled thedotfilesoption in the settings tab
config file example, where the same permission to see dotfiles is given in two different ways just for reference:
[/foo]
  /srv/foo
  accs:
    r.: ed   # user "ed" has read-access + dot-access in this volume;
             # dotfiles are visible in listings, but not in searches
  flags:
    dotsrch  # dotfiles will now appear in search results too
    dots     # another way to let everyone see dotfiles in this vol
accessing a copyparty server using a web-browser
the main tabs in the ui
[🔎] search by size, date, path/name, mp3-tags ...[🧯] unpost: undo/delete accidental uploads[🚀] and [🎈] are the uploaders[📂] mkdir: create directories[📝] new-md: create a new markdown document[📟] send-msg: either to server-log or into textfiles if --urlform save[🎺] audio-player config options[⚙️] general client config optionsthe browser has the following hotkeys (always qwerty)
? show hotkeys helpB toggle breadcrumbs / navpaneI/K prev/next folderM parent folder (or unexpand current)V toggle folders / textfiles in the navpaneG toggle list / grid view -- same as 田 bottom-rightT toggle thumbnails / iconsESC close various thingsctrl-K delete selected files/foldersctrl-X cut selected files/foldersctrl-C copy selected files/folders to clipboardctrl-V paste (move/copy)Y download selected filesF2 rename selected file/folderUp/Down move cursorUp/Down select and move cursorUp/Down move cursor and scroll viewportSpace toggle file selectionCtrl-A toggle select allI/K prev/next textfileS toggle selection of open fileM close textfileJ/L prev/next songU/O skip 10sec back/forward0..9 jump to 0%..90%P play/pause (also starts playing the folder)Y download fileJ/L, Left/Right prev/next fileHome/End first/last fileF toggle fullscreenS toggle selectionR rotate clockwise (shift=ccw)Y download fileEsc close viewerU/O skip 10sec back/forward0..9 jump to 0%..90%P/K/Space play/pauseM muteC continue playing next videoV loop entire file[ loop range (start)] loop range (end)A/D adjust tree widthS toggle multiselectA/D zoom^s save^h header^k autoformat table^u jump to next unicode character^e toggle editor / preview^up, ^down jump paragraphsswitching between breadcrumbs or navpane
click the 🌲 or pressing the B hotkey to toggle between breadcrumbs path (default), or a navpane (tree-browser sidebar thing)
[+] and [-] (or hotkeys A/D) adjust the size[🎯] jumps to the currently open folder[📃] toggles between showing folders and textfiles[📌] shows the name of all parent folders in a docked panel[a] toggles automatic widening as you go deeper[↵] toggles wordwrap[👀] show full name on hover (if wordwrap is off)press g or 田 to toggle grid-view instead of the file listing and t toggles icons / thumbnails
--grid or per-volume with volflag grid?imgs to a link, or disable with ?imgs=0
it does static images with Pillow / pyvips / FFmpeg, and uses FFmpeg for video files, so you may want to --no-thumb or maybe just --no-vthumb depending on how dangerous your users are
dthumb for all, or dvthumb / dathumb / dithumb for video/audio/images onlyaudio files are converted into spectrograms using FFmpeg unless you --no-athumb (and some FFmpeg builds may need --th-ff-swr)
images with the following names (see --th-covers) become the thumbnail of the folder they're in: folder.png, folder.jpg, cover.png, cover.jpg
cover.png and folder.jpg exist in a folder, it will pick the first matching --th-covers entry (folder.jpg).folder.jpg and so), and then fallback on the first picture in the folder (if it has any pictures at all)enabling multiselect lets you click files to select them, and then shift-click another file for range-select
multiselect is mostly intended for phones/tablets, but the sel option in the [⚙️] settings tab is better suited for desktop use, allowing selection by CTRL-clicking and range-selection with SHIFT-click, all without affecting regular clicking
sel option can be made default globally with --gsel or per-volume with volflag gselto show /icons/exe.png and /icons/elf.gif as the thumbnail for all .exe and .elf files respectively, do this: --ext-th=exe=/icons/exe.png --ext-th=elf=/icons/elf.gif
config file example:
[global]
  no-thumb   # disable ALL thumbnails and audio transcoding
  no-vthumb  # only disable video thumbnails

[/music]
  /mnt/nas/music
  accs:
    r: *     # everyone can read
  flags:
    dthumb   # disable ALL thumbnails and audio transcoding
    dvthumb  # only disable video thumbnails
    ext-th:  exe=/ico/exe.png  # /ico/exe.png is the thumbnail of *.exe
    ext-th:  elf=/ico/elf.gif  # ...and /ico/elf.gif is used for *.elf
    th-covers:  folder.png,folder.jpg,cover.png,cover.jpg  # the default
download folders (or file selections) as zip or tar files
select which type of archive you want in the [⚙️] config tab:
tar |
?tar |
plain gnutar, works great with curl | tar -xv |
pax |
?tar=pax |
pax-format tar, futureproof, not as fast |
tgz |
?tar=gz |
gzip compressed gnu-tar (slow), for curl | tar -xvz |
txz |
?tar=xz |
gnu-tar with xz / lzma compression (v.slow) |
zip |
?zip |
works everywhere, glitchy filenames on win7 and older |
zip_dos |
?zip=dos |
traditional cp437 (no unicode) to fix glitchy filenames |
zip_crc |
?zip=crc |
cp437 with crc32 computed early for truly ancient software |
3 (0=fast, 9=best), change with ?tar=gz:91 (0=fast, 9=best), change with ?tar=xz:92 (1=fast, 9=best), change with ?tar=bz2:9up2k.db and dir.txt is always excludedcurl foo?zip | bsdtar -xv
?tar is better for large files, especially if the total exceeds 4 GiBzip_crc will take longer to download since the server has to read each file twice
you can also zip a selection of files or folders by clicking them in the browser, that brings up a selection editor and zip button in the bottom right
cool trick: download a folder by appending url-params ?tar&opus or ?tar&mp3 to transcode all audio files (except aac|m4a|mp3|ogg|opus|wma) to opus/mp3 before they're added to the archive
&j / &w produce jpeg/webm thumbnails/spectrograms instead of the original audio/video/images (&p for audio waveforms)
--th-maxage=9999999 or --th-clean=0drag files/folders into the web-browser to upload
dragdrop is the recommended way, but you may also:
when uploading files through dragdrop or CTRL-V, this initiates an upload using up2k; there are two browser-based uploaders available:
[🎈] bup, the basic uploader, supports almost every browser since netscape 4.0[🚀] up2k, the good / fancy oneNB: you can undo/delete your own uploads with [🧯] unpost (and this is also where you abort unfinished uploads, but you have to refresh the page first)
up2k has several advantages:
it is perfectly safe to restart / upgrade copyparty while someone is uploading to it!
all known up2k clients will resume just fine 💪
see up2k for details on how it works, or watch a demo video
protip: you can avoid scaring away users with contrib/plugins/minimal-up2k.js which makes it look much simpler
protip: if you enable favicon in the [⚙️] settings tab (by typing something into the textbox), the icon in the browser tab will indicate upload progress -- also, the [🔔] and/or [🔊] switches enable visible and/or audible notifications on upload completion
the up2k UI is the epitome of polished intuitive experiences:
[🏃] analysis of other files should continue while one is uploading[🥔] shows a simpler UI for faster uploads from slow devices[🛡️] decides when to overwrite existing files on the server
🛡️ = never (generate a new filename instead)🕒 = overwrite if the server-file is older♻️ = always overwrite if the files are different[🎲] generate random filenames during upload[🔎] switch between upload and file-search mode
[🔎] if you add files by dragging them into the browserand then there's the tabs below it,
[ok] is the files which completed successfully[ng] is the ones that failed / got rejected (already exists, ...)[done] shows a combined list of [ok] and [ng], chronological order[busy] files which are currently hashing, pending-upload, or uploading
[done] and [que] for context[que] is all the files that are still queuednote that since up2k has to read each file twice, [🎈] bup can theoretically be up to 2x faster in some extreme cases (files bigger than your ram, combined with an internet connection faster than the read-speed of your HDD, or if you're uploading from a cuo2duo)
if you are resuming a massive upload and want to skip hashing the files which already finished, you can enable turbo in the [⚙️] config tab, but please read the tooltip on that button
if the server is behind a proxy which imposes a request-size limit, you can configure up2k to sneak below the limit with server-option --u2sz (the default is 96 MiB to support Cloudflare)
if you want to replace existing files on the server with new uploads by default, run with --u2ow 2 (only works if users have the delete-permission, and can still be disabled with 🛡️ in the UI)
dropping files into the browser also lets you see if they exist on the server
when you drag/drop files into the browser, you will see two dropzones: Upload and Search
on a phone? toggle the
[🔎]switch green before tapping the big yellow Search button to select your files
the files will be hashed on the client-side, and each hash is sent to the server, which checks if that file exists somewhere
files go into [ok] if they exist (and you get a link to where it is), otherwise they land in [ng]
undo/delete accidental uploads using the [🧯] tab in the UI
you can unpost even if you don't have regular move/delete access, however only for files uploaded within the past --unpost seconds (default 12 hours) and the server must be running with -e2d
config file example:
[global]
  e2d            # enable up2k database (remember uploads)
  unpost: 43200  # 12 hours (default)
uploads can be given a lifetime, after which they expire / self-destruct
the feature must be enabled per-volume with the lifetime upload rule which sets the upper limit for how long a file gets to stay on the server
clients can specify a shorter expiration time using the up2k ui -- the relevant options become visible upon navigating into a folder with lifetimes enabled -- or by using the life upload modifier
specifying a custom expiration time client-side will affect the timespan in which unposts are permitted, so keep an eye on the estimates in the up2k ui
download files while they're still uploading (demo video) -- it's almost like peer-to-peer
requires the file to be uploaded using up2k (which is the default drag-and-drop uploader), alternatively the command-line program
the control-panel shows the ETA for all incoming files , but only for files being uploaded into volumes where you have read-access
cut/paste, rename, and delete files/folders (if you have permission)
file selection: click somewhere on the line (not the link itself), then:
space to toggle
up/down to move
shift-up/down to move-and-select
ctrl-shift-up/down to also scroll
shift-click another line for range-select
cut: select some files and ctrl-x
copy: select some files and ctrl-c
paste: ctrl-v in another folder
rename: F2
you can copy/move files across browser tabs (cut/copy in one tab, paste in another)
share a file or folder by creating a temporary link
when enabled in the server settings (--shr), click the bottom-right share button to share the folder you're currently in, or alternatively:
this feature was made with identity providers in mind -- configure your reverseproxy to skip the IdP's access-control for a given URL prefix and use that to safely share specific files/folders sans the usual auth checks
when creating a share, the creator can choose any of the following options:
0 or blank means infinitesemi-intentional limitations:
e2d is set, and/or at least one volume on the server has volflag e2dspecify --shr /foobar to enable this feature; a toplevel virtual folder named foobar is then created, and that's where all the shares will be served from
foobar is just an exampleshr: /foobar inside the [global] section insteadusers can delete their own shares in the controlpanel, and a list of privileged users (--shr-adm) are allowed to see and/or delet any share on the server
after a share has expired, it remains visible in the controlpanel for --shr-rt minutes (default is 1 day), and the owner can revive it by extending the expiration time there
security note: using this feature does not mean that you can skip the accounts and volumes section -- you still need to restrict access to volumes that you do not intend to share with unauthenticated users! it is not sufficient to use rules in the reverseproxy to restrict access to just the /share folder.
select some files and press F2 to bring up the rename UI
quick explanation of the buttons,
[✅ apply rename] confirms and begins renaming[❌ cancel] aborts and closes the rename window[↺ reset] reverts any filename changes back to the original name[decode] does a URL-decode on the filename, fixing stuff like & and %20[advanced] toggles advanced modeadvanced mode: rename files based on rules to decide the new names, based on the original name (regex), or based on the tags collected from the file (artist/title/...), or a mix of both
in advanced mode,
[case] toggles case-sensitive regexregex is the regex pattern to apply to the original filename; any files which don't match will be skippedformat is the new filename, taking values from regex capturing groups and/or from file tags
presets lets you save rename rules for lateravailable functions:
$lpad(text, length, pad_char)$rpad(text, length, pad_char)so,
say you have a file named meganeko - Eclipse - 07 Sirius A.mp3 (absolutely fantastic album btw) and the tags are: Album:Eclipse, Artist:meganeko, Title:Sirius A, tn:7
you could use just regex to rename it:
regex = (.*) - (.*) - ([0-9]{2}) (.*)format = (3). (1) - (4)output = 07. meganeko - Sirius A.mp3or you could use just tags:
format = $lpad((tn),2,0). (artist) - (title).(ext)output = 7. meganeko - Sirius A.mp3or a mix of both:
regex = - ([0-9]{2})format = (1). (artist) - (title).(ext)output = 07. meganeko - Sirius A.mp3the metadata keys you can use in the format field are the ones in the file-browser table header (whatever is collected with -mte and -mtp)
monitor a folder with your RSS reader , optionally recursive
must be enabled per-volume with volflag rss or globally with --rss
the feed includes itunes metadata for use with podcast readers such as AntennaPod
a feed example: https://cd.ocv.me/a/d2/d22/?rss&fext=mp3
url parameters:
pw=hunter2 for password auth
--usernames then do pw=username:password insteadrecursive to also include subfolderstitle=foo changes the feed title (default: folder name)fext=mp3,opus only include mp3 and opus files (default: all)nf=30 only show the first 30 results (default: 250)sort=m sort by mtime (file last-modified), newest first (default)
u = upload-time; NOTE: non-uploaded files have upload-time 0n = filenamea = filesizeM = oldest file firstlist all recent uploads by clicking "show recent uploads" in the controlpanel
will show uploader IP and upload-time if the visitor has the admin permission
global-option --ups-when makes upload-time visible to all users, and not just admins
global-option --ups-who (volflag ups_who) specifies who gets access (0=nobody, 1=admins, 2=everyone), default=2
note that the 🧯 unpost feature is better suited for viewing your own recent uploads, as it includes the option to undo/delete them
config file example:
[global]
  ups-when    # everyone can see upload times
  ups-who: 1  # but only admins can see the list,
              # so ups-when doesn't take effect
plays almost every audio format there is (if the server has FFmpeg installed for on-demand transcoding)
the following audio formats are usually always playable, even without FFmpeg: aac|flac|m4a|mp3|ogg|opus|wav
some highlights:
click the play link next to an audio file, or copy the link target to share it (optionally with a timestamp to start playing from, like that example does)
open the [🎺] media-player-settings tab to configure it,
[🔁] repeats one single song forever[🔀] shuffles the files inside each folder[preload] starts loading the next track when it's about to end, reduces the silence between songs[full] does a full preload by downloading the entire next file; good for unreliable connections, bad for slow connections[~s] toggles the seekbar waveform display[/np] enables buttons to copy the now-playing info as an irc message[📻] enables buttons to create an m3u playlist with the selected songs[os-ctl] makes it possible to control audio playback from the lockscreen of your device (enables mediasession)[seek] allows seeking with lockscreen controls (buggy on some devices)[art] shows album art on the lockscreen[🎯] keeps the playing song scrolled into view (good when using the player as a taskbar dock)[⟎] shrinks the playback controls[uncache] may fix songs that won't play correctly due to bad files in browser cache[loop] keeps looping the folder[next] plays into the next folder[flac] converts flac and wav files into opus (if supported by browser) or mp3[aac] converts aac and m4a files into opus (if supported by browser) or mp3[oth] converts all other known formats into opus (if supported by browser) or mp3
aac|ac3|aif|aiff|alac|alaw|amr|ape|au|dfpwm|dts|flac|gsm|it|m4a|mo3|mod|mp2|mp3|mpc|mptm|mt2|mulaw|ogg|okt|opus|ra|s3m|tak|tta|ulaw|wav|wma|wv|xm|xpk[opus] produces an opus whenever transcoding is necessary (the best choice on Android and PCs)[awo] is opus in a weba file, good for iPhones (iOS 17.5 and newer) but Apple is still fixing some state-confusion bugs as of iOS 18.2.1[caf] is opus in a caf file, good for iPhones (iOS 11 through 17), technically unsupported by Apple but works for the most part[mp3] -- the myth, the legend, the undying master of mediocre sound quality that definitely works everywhere[flac] -- lossless but compressed, for LAN and/or fiber playback on electrostatic headphones[wav] -- lossless and uncompressed, for LAN and/or fiber playback on electrostatic headphones connected to very old equipment
flac and wav must be enabled with --allow-flac / --allow-wav to allow spending the disk spacecreate and play m3u8 playlists -- see example text and player
click a file with the extension m3u or m3u8 (for example mixtape.m3u or touhou.m3u8 ) and you get two choices: Play / Edit
playlists can include songs across folders anywhere on the server, but filekeys/dirkeys are NOT supported, so the listener must have read-access or get-access to the files
with a standalone mediaplayer or copyparty
you can use foobar2000, deadbeef, just about any standalone player should work -- but you might need to edit the filepaths in the playlist so they fit with the server-URLs
alternatively, you can create the playlist using copyparty itself:
open the [🎺] media-player-settings tab and enable the [📻] create-playlist feature -- this adds two new buttons in the bottom-right tray, [📻add] and [📻copy] which appear when you listen to music, or when you select a few audiofiles
click the 📻add button while a song is playing (or when you've selected some songs) and they'll be added to "the list" (you can't see it yet)
at any time, click 📻copy to send the playlist to your clipboard
create a new textfile, name it something.m3u and paste the playlist there
can also boost the volume in general, or increase/decrease stereo width (like crossfeed just worse)
has the convenient side-effect of reducing the pause between songs, so gapless albums play better with the eq enabled (just make it flat)
not available on iPhones / iPads because AudioContext currently breaks background audio playback on iOS (15.7.8)
due to phone / app settings, android phones may randomly stop playing music when the power saver kicks in, especially at the end of an album -- you can fix it by disabling power saving in the app settings of the browser you use for music streaming (preferably a dedicated one)
with realtime streaming of logfiles and such (demo) , and terminal colors work too
click -txt- next to a textfile to open the viewer, which has the following toolbar buttons:
✏️ edit opens the textfile editor📡 follow starts monitoring the file for changes, streaming new lines in realtime
tail -f&tail to the textviewer URLand there are two editors
there is a built-in extension for inline clickable thumbnails;
<!-- th --> somewhere in the doc!th[l](your.jpg) where l means left-align (r = right-align)--- clears the float / inliningother notes,
dynamic docs with serverside variable expansion to replace stuff like {{self.ip}} with the client's IP, or {{srv.htime}} with the current time on the server
see ./srv/expand/ for usage and examples
you can link a particular timestamp in an audio file by adding it to the URL, such as &20 / &20s / &1m20 / &t=1:20 after the .../#af-c8960dab
enabling the audio equalizer can help make gapless albums fully gapless in some browsers (chrome), so consider leaving it on with all the values at zero
get a plaintext file listing by adding ?ls=t to a URL, or a compact colored one with ?ls=v (for unix terminals)
if you are using media hotkeys to switch songs and are getting tired of seeing the OSD popup which Windows doesn't let you disable, consider ./contrib/media-osd-bgone.ps1
click the bottom-left π to open a javascript prompt for debugging
files named .prologue.html / .epilogue.html will be rendered before/after directory listings unless --no-logues
files named descript.ion / DESCRIPT.ION are parsed and displayed in the file listing, or as the epilogue if nonstandard
files named README.md / readme.md will be rendered after directory listings unless --no-readme (but .epilogue.html takes precedence)
PREADME.md / preadme.md is shown above directory listings unless --no-readme or .prologue.htmlREADME.md and *logue.html can contain placeholder values which are replaced server-side before embedding into directory listings; see --help-exp
search by size, date, path/name, mp3-tags, ...
when started with -e2dsa copyparty will scan/index all your files. This avoids duplicates on upload, and also makes the volumes searchable through the web-ui:
size/date/directory-path/filename, or...path/name queries are space-separated, AND'ed together, and words are negated with a - prefix, so for example:
shibayan -bossa finds all files where one of the folders contain shibayan but filters out any results where bossa exists somewhere in the pathdemetori styx gives you good stuffthe raw field allows for more complex stuff such as ( tags like *nhato* or tags like *taishi* ) and ( not tags like *nhato* or not tags like *taishi* ) which finds all songs by either nhato or taishi, excluding collabs (terrible example, why would you do that)
for the above example to work, add the commandline argument -e2ts to also scan/index tags from music files, which brings us over to:
using arguments or config files, or a mix of both:
-c some.conf) can set additional commandline arguments; see ./docs/example.conf and ./docs/example2.confkill -s USR1 (same as systemctl reload copyparty) to reload accounts and volumes from config files without restarting
[reload cfg] button in the control-panel if the user has a/admin in any volume[global] config section requires a restart to take effectNB: as humongous as this readme is, there is also a lot of undocumented features. Run copyparty with --help to see all available global options; all of those can be used in the [global] section of config files, and everything listed in --help-flags can be used in volumes as volflags.
docker run --rm -it copyparty/ac --helpannounce enabled services on the LAN (pic) -- -z enables both mdns and ssdp
--z-on / --z-off limits the feature to certain networksconfig file example:
[global]
  z      # enable all zeroconf features (mdns, ssdp)
  zm     # only enables mdns (does nothing since we already have z)
  z-on: 192.168.0.0/16, 10.1.2.0/24  # restrict to certain subnets
LAN domain-name and feature announcer
uses multicast dns to give copyparty a domain which any machine on the LAN can use to access it
all enabled services (webdav, ftp, smb) will appear in mDNS-aware file managers (KDE, gnome, macOS, ...)
the domain will be partybox.local if the machine's hostname is partybox unless --name specifies something else
and the web-UI will be available at http://partybox.local:3923/
:3923 so you can use http://partybox.local/ instead then see listen on port 80 and 443windows-explorer announcer
uses ssdp to make copyparty appear in the windows file explorer on all machines on the LAN
doubleclicking the icon opens the "connect" page which explains how to mount copyparty as a local filesystem
if copyparty does not appear in windows explorer, use --zsv to see why:
print a qr-code (screenshot) for quick access, great between phones on android hotspots which keep changing the subnet
--qr enables it--qrs does https instead of http--qrl lootbox/?pw=hunter2 appends to the url, linking to the lootbox folder with password hunter2--qrz 1 forces 1x zoom instead of autoscaling to fit the terminal size
--qr-pin 1 makes the qr-code stick to the bottom of the console (never scrolls away)--qr-file qr.txt:1:2 writes a small qr-code to qr.txt--qr-file qr.txt:2:2 writes a big qr-code to qr.txt--qr-file qr.svg:1:2 writes a vector-graphics qr-code to qr.svg--qr-file qr.png:8:4:333333:ffcc55 writes an 8x-magnified yellow-on-gray qr.png--qr-file qr.png:8:4::ffffff writes an 8x-magnified white-on-transparent qr.pngit uses the server hostname if mdns is enabled, otherwise it'll use your external ip (default route) unless --qri specifies a specific ip-prefix or domain
an FTP server can be started using --ftp 3921, and/or --ftps for explicit TLS (ftpes)
--ftp-pr 12000-13000
ftp and ftps, the port-range will be divided in half--usernamessome recommended FTP / FTPS clients; wark = example password:
tls=false explicit_tls=truelftp -u k,wark -p 3921 127.0.0.1 -e lslftp -u k,wark -p 3990 127.0.0.1 -e 'set ssl:verify-certificate no; ls'config file example, which restricts FTP to only use ports 3921 and 12000-12099 so all of those ports must be opened in your firewall:
[global]
  ftp: 3921
  ftp-pr: 12000-12099
with read-write support, supports winXP and later, macos, nautilus/gvfs ... a great way to access copyparty straight from the file explorer in your OS
click the connect button in the control-panel to see connection instructions for windows, linux, macos
general usage:
--usernameson macos, connect from finder:
in order to grant full write-access to webdav clients, the volflag daw must be set and the account must also have delete-access (otherwise the client won't be allowed to replace the contents of existing files, which is how webdav works)
note: if you have enabled IdP authentication then that may cause issues for some/most webdav clients; see the webdav section in the IdP docs
using the GUI (winXP or later):
http://192.168.123.1:3923/
Sign up for online storage hyperlink instead and put the URL there--usernamesthe webdav client that's built into windows has the following list of bugs; you can avoid all of these by connecting with rclone instead:
--dav-auth to force password-auth for all webdav clients<>:"/\|?*), or names ending with .a TFTP server (read/write) can be started using --tftp 3969 (you probably want ftp instead unless you are actually communicating with hardware from the 90s (in which case we should definitely hang some time))
that makes this the first RTX DECT Base that has been updated using copyparty 🎉
69 (nice)most clients expect to find TFTP on port 69, but on linux and macos you need to be root to listen on that. Alternatively, listen on 3969 and use NAT on the server to forward 69 to that port;
iptables -t nat -A PREROUTING -i eth0 -p udp --dport 69 -j REDIRECT --to-port 3969some recommended TFTP clients:
curl --tftp-blksize 1428 tftp://127.0.0.1:3969/firmware.bincurl --tftp-blksize 1428 -T firmware.bin tftp://127.0.0.1:3969/tftp.exe (you probably already have it)
tftp -i 127.0.0.1 put firmware.bintftp-hpa, atftp
atftp --option "blksize 1428" 127.0.0.1 3969 -p -l firmware.bin -r firmware.bintftp -v -m binary 127.0.0.1 3969 -c put firmware.binunsafe, slow, not recommended for wan, enable with --smb for read-only or --smbw for read-write
click the connect button in the control-panel to see connection instructions for windows, linux, macos
dependencies: python3 -m pip install --user -U impacket==0.11.0
some BIG WARNINGS specific to SMB/CIFS, in decreasing importance:
--smb-port (see below) and prisonparty or bubbleparty
--smbw must be given to allow write-access from smb--usernamesand some minor issues,
--smb-nwa-1 but then you get unacceptably poor performance instead/?reload=cfg) does not include the [global] section (commandline args)-i interface only (default = :: = 0.0.0.0 = all)known client bugs:
--smb1 is much faster than smb2 (default) because it keeps rescanning folders on smb2
<>:"/\|?*), or names ending with .the smb protocol listens on TCP port 445, which is a privileged port on linux and macos, which would require running copyparty as root. However, this can be avoided by listening on another port using --smb-port 3945 and then using NAT on the server to forward the traffic from 445 to there;
iptables -t nat -A PREROUTING -i eth0 -p tcp --dport 445 -j REDIRECT --to-port 3945authenticate with one of the following:
$username, password $password$password, password ktweaking the ui
--sort or per-volume with the sort volflag; specify one or more comma-separated columns to sort by, and prefix the column name with - for reverse sort
href ext sz ts tags/.up_at tags/Circle tags/.tn tags/Artist tags/Title--sort tags/Circle,tags/.tn,tags/Artist,tags/Title,href-e2d -mte +.up_at and then --sort tags/.up_atsee ./docs/rice for more, including how to add stuff (css/<meta>/...) to the html <head> tag, or to add your own translation
discord and social-media embeds
can be enabled globally with --og or per-volume with volflag og
note that this disables hotlinking because the opengraph spec demands it; to sneak past this intentional limitation, you can enable opengraph selectively by user-agent, for example --og-ua '(Discord|Twitter|Slack)bot' (or volflag og_ua)
you can also hotlink files regardless by appending ?raw to the url
WARNING: if you plan to use WebDAV, then
--og-ua/og_uamust be configured
if you want to entirely replace the copyparty response with your own jinja2 template, give the template filepath to --og-tpl or volflag og_tpl (all members of HttpCli are available through the this object)
enable symlink-based upload deduplication globally with --dedup or per-volume with volflag dedup
by default, when someone tries to upload a file that already exists on the server, the upload will be politely declined, and the server will copy the existing file over to where the upload would have gone
if you enable deduplication with --dedup then it'll create a symlink instead of a full copy, thus reducing disk space usage
--safe-dedup=1 because you have other software tampering with your files, so you want to entirely disable detection of duplicate data instead, then you can specify --no-clone globally or noclone as a volflagwarning: when enabling dedup, you should also:
-e2dsa or volflag e2dsa (see file indexing section below); strongly recommended--hardlink-only to use hardlink-based deduplication instead of symlinks; see explanation below--reflink to use CoW/reflink-based dedup (much safer than hardlink, but OS/FS-dependent)it will not be safe to rename/delete files if you only enable dedup and none of the above; if you enable indexing then it is not necessary to also do hardlinks (but you may still want to)
by default, deduplication is done based on symlinks (symbolic links); these are tiny files which are pointers to the nearest full copy of the file
you can choose to use hardlinks instead of softlinks, globally with --hardlink-only or volflag hardlinkonly, and you can choose to use reflinks with --reflink or volflag reflink
advantages of using reflinks (CoW, copy-on-write):
advantages of using hardlinks:
advantages of using symlinks (default):
warning: if you edit the contents of a deduplicated file, then you will also edit all other copies of that file! This is especially surprising with hardlinks, because they look like regular files, but that same file exists in multiple locations
global-option --xlink / volflag xlink additionally enables deduplication across volumes, but this is probably buggy and not recommended
config file example:
[global]
  e2dsa  # scan and index filesystem on startup
  dedup  # symlink-based deduplication for all volumes

[/media]
  /mnt/nas/media
  flags:
    hardlinkonly  # this vol does hardlinks instead of symlinks
enable music search, upload-undo, and better dedup
file indexing relies on two database tables, the up2k filetree (-e2d) and the metadata tags (-e2t), stored in .hist/up2k.db. Configuration can be done through arguments, volflags, or a mix of both.
through arguments:
-e2d enables file indexing on upload-e2ds also scans writable folders for new files on startup-e2dsa also scans all mounted volumes (including readonly ones)-e2t enables metadata indexing on upload-e2ts also scans for tags in all files that don't have tags yet-e2tsr also deletes all existing tags, doing a full reindex-e2v verifies file integrity at startup, comparing hashes from the db-e2vu patches the database with the new hashes from the filesystem-e2vp panics and kills copyparty insteadthe same arguments can be set as volflags, in addition to d2d, d2ds, d2t, d2ts, d2v for disabling:
-v ~/music::r:c,e2ds,e2tsr does a full reindex of everything on startup-v ~/music::r:c,d2d disables all indexing, even if any -e2* are on-v ~/music::r:c,d2t disables all -e2t* (tags), does not affect -e2d*-v ~/music::r:c,d2ds disables on-boot scans; only index new uploads-v ~/music::r:c,d2ts same except only affecting tagsnote:
.up_at metadata key, either globally with -e2d -mte +.up_at or per-volume with volflags e2d,mte=+.up_at (will have a ~17% performance impact on directory listings)e2tsr is probably always overkill, since e2ds/e2dsa would pick up any file modifications and e2ts would then reindex those, unless there is a new copyparty version with new parsers and the release note says otherwiseconfig file example (these options are recommended btw):
[global]
  e2dsa  # scan and index all files in all volumes on startup
  e2ts   # check newly-discovered or uploaded files for media tags
to save some time, you can provide a regex pattern for filepaths to only index by filename/path/size/last-modified (and not the hash of the file contents) by setting --no-hash '\.iso$' or the volflag :c,nohash=\.iso$, this has the following consequences:
similarly, you can fully ignore files/folders using --no-idx [...] and :c,noidx=\.iso$
NOTE: no-idx and/or no-hash prevents deduplication of those files
if you set --no-hash [...] globally, you can enable hashing for specific volumes using flag :c,nohash=
to exclude certain filepaths from search-results, use --srch-excl or volflag srch_excl instead of --no-idx, for example --srch-excl 'password|logs/[0-9]'
config file example:
[/games]
  /mnt/nas/games
  flags:
    noidx: \.iso$  # skip indexing iso-files
    srch_excl: password|logs/[0-9]  # filter search results
avoid traversing into other filesystems using --xdev / volflag :c,xdev, skipping any symlinks or bind-mounts to another HDD for example
and/or you can --xvol / :c,xvol to ignore all symlinks leaving the volume's top directory, but still allow bind-mounts pointing elsewhere
xvol if they point into another volume where the user has the same level of accessthese options will reduce performance; unlikely worst-case estimates are 14% reduction for directory listings, 35% for download-as-tar
as of copyparty v1.7.0 these options also prevent file access at runtime -- in previous versions it was just hints for the indexer
filesystem monitoring; if copyparty is not the only software doing stuff on your filesystem, you may want to enable periodic rescans to keep the index up to date
argument --re-maxage 60 will rescan all volumes every 60 sec, same as volflag :c,scan=60 to specify it per-volume
uploads are disabled while a rescan is happening, so rescans will be delayed by --db-act (default 10 sec) when there is write-activity going on (uploads, renames, ...)
note: folder-thumbnails are selected during filesystem indexing, so periodic rescans can be used to keep them accurate as images are uploaded/deleted (or manually do a rescan with the reload button in the controlpanel)
config file example:
[global]
  re-maxage: 3600

[/pics]
  /mnt/nas/pics
  flags:
    scan: 900
set upload rules using volflags, some examples:
:c,sz=1k-3m sets allowed filesize between 1 KiB and 3 MiB inclusive (suffixes: b, k, m, g):c,df=4g block uploads if there would be less than 4 GiB free disk space afterwards:c,vmaxb=1g block uploads if total volume size would exceed 1 GiB afterwards:c,vmaxn=4k block uploads if volume would contain more than 4096 files afterwards:c,nosub disallow uploading into subdirectories; goes well with rotn and rotf::c,rotn=1000,2 moves uploads into subfolders, up to 1000 files in each folder before making a new one, two levels deep (must be at least 1):c,rotf=%Y/%m/%d/%H enforces files to be uploaded into a structure of subfolders according to that date format
/foo/bar the path would be rewritten to /foo/bar/2021/08/06/23 for example:c,lifetime=300 delete uploaded files when they become 5 minutes oldyou can also set transaction limits which apply per-IP and per-volume, but these assume -j 1 (default) otherwise the limits will be off, for example -j 4 would allow anywhere between 1x and 4x the limits you set depending on which processing node the client gets routed to
:c,maxn=250,3600 allows 250 files over 1 hour from each IP (tracked per-volume):c,maxb=1g,300 allows 1 GiB total over 5 minutes from each IP (tracked per-volume)notes:
vmaxb and vmaxn requires either the e2ds volflag or -e2dsa global-optionconfig file example:
[/inc]
  /mnt/nas/uploads
  accs:
    w: *    # anyone can upload here
    rw: ed  # only user "ed" can read-write
  flags:
    e2ds       # filesystem indexing is required for many of these:
    sz: 1k-3m  # accept upload only if filesize in this range
    df: 4g     # free disk space cannot go lower than this
    vmaxb: 1g  # volume can never exceed 1 GiB
    vmaxn: 4k  # ...or 4000 files, whichever comes first
    nosub      # must upload to toplevel folder
    lifetime: 300   # uploads are deleted after 5min
    maxn: 250,3600  # each IP can upload 250 files in 1 hour
    maxb: 1g,300    # each IP can upload 1 GiB over 5 minutes
files can be autocompressed on upload, either on user-request (if config allows) or forced by server-config
gz allows gz compressionxz allows lzma compressionpk forces compression on all filespk requests compression with server-default algorithmgz or xz requests compression with a specific algorithmxz requests xz compressionthings to note,
gz and xz arguments take a single optional argument, the compression level (range 0 to 9)pk volflag takes the optional argument ALGORITHM,LEVEL which will then be forced for all uploads, for example gz,9 or xz,0some examples,
-v inc:inc:w:c,pk=xz,0-v inc:inc:w:c,pk-v inc:inc:w:c,gz/inc?pk or /inc?gz or /inc?gz=4per-volume filesystem-permissions and ownership
by default:
this can be configured per-volume:
chmod_f sets file permissions; default=644 (usually)chmod_d sets directory permissions; default=755uid sets the owner user-idgid sets the owner group-idnotes:
gid can only be set to one of the groups which the copyparty process is a member ofuid can only be set if copyparty is running as root (i appreciate your faith):c,magic enables filetype detection for nameless uploads, same as --magic
python3 -m pip install --user -U python-magicpython3 -m pip install --user -U python-magic-binin-volume (.hist/up2k.db, default) or somewhere else
copyparty creates a subfolder named .hist inside each volume where it stores the database, thumbnails, and some other stuff
this can instead be kept in a single place using the --hist argument, or the hist= volflag, or a mix of both:
--hist ~/.cache/copyparty -v ~/music::r:c,hist=- sets ~/.cache/copyparty as the default place to put volume info, but ~/music gets the regular .hist subfolder (- restores default behavior)by default, the per-volume up2k.db sqlite3-database for -e2d and -e2t is stored next to the thumbnails according to the --hist option, but the global-option --dbpath and/or volflag dbpath can be used to put the database somewhere else
if your storage backend is unreliable (NFS or bad HDDs), you can specify one or more "landmarks" to look for before doing anything database-related. A landmark is a file which is always expected to exist inside the volume. This avoids spurious filesystem rescans in the event of an outage. One line per landmark (see example below)
note:
.hist subdirectory/c/temp means C:\temp but use regular paths for --hist
-v C:\Users::r and -v /c/users::r both workconfig file example:
[global]
  hist: ~/.cache/copyparty  # put db/thumbs/etc. here by default

[/pics]
  /mnt/nas/pics
  flags:
    hist: -  # restore the default (/mnt/nas/pics/.hist/)
    hist: /mnt/nas/cache/pics/  # can be absolute path
    landmark: me.jpg  # /mnt/nas/pics/me.jpg must be readable to enable db
    landmark: info/a.txt^=ok  # and this textfile must start with "ok"
set -e2t to index tags on upload
-mte decides which tags to index and display in the browser (and also the display order), this can be changed per-volume:
-v ~/music::r:c,mte=title,artist indexes and displays title followed by artistif you add/remove a tag from mte you will need to run with -e2tsr once to rebuild the database, otherwise only new files will be affected
but instead of using -mte, -mth is a better way to hide tags in the browser: these tags will not be displayed by default, but they still get indexed and become searchable, and users can choose to unhide them in the [⚙️] config pane
-mtm can be used to add or redefine a metadata mapping, say you have media files with foo and bar tags and you want them to display as qux in the browser (preferring foo if both are present), then do -mtm qux=foo,bar and now you can -mte artist,title,qux
tags that start with a . such as .bpm and .dur(ation) indicate numeric value
see the beautiful mess of a dictionary in mtag.py for the default mappings (should cover mp3,opus,flac,m4a,wav,aif,)
--no-mutagen disables Mutagen and uses FFprobe instead, which...
--mtag-to sets the tag-scan timeout; very high default (60 sec) to cater for zfs and other randomly-freezing filesystems. Lower values like 10 are usually safe, allowing for faster processing of tricky files
provide custom parsers to index additional tags, also see ./bin/mtag/README.md
copyparty can invoke external programs to collect additional metadata for files using mtp (either as argument or volflag), there is a default timeout of 60sec, and only files which contain audio get analyzed by default (see ay/an/ad below)
-mtp .bpm=~/bin/audio-bpm.py will execute ~/bin/audio-bpm.py with the audio file as argument 1 to provide the .bpm tag, if that does not exist in the audio metadata-mtp key=f,t5,~/bin/audio-key.py uses ~/bin/audio-key.py to get the key tag, replacing any existing metadata tag (f,), aborting if it takes longer than 5sec (t5,)-v ~/music::r:c,mtp=.bpm=~/bin/audio-bpm.py:c,mtp=key=f,t5,~/bin/audio-key.py both as a per-volume config wow this is getting uglybut wait, there's more! -mtp can be used for non-audio files as well using the a flag: ay only do audio files (default), an only do non-audio files, or ad do all files (d as in dontcare)
-mtp ext=an,~/bin/file-ext.py runs ~/bin/file-ext.py to get the ext tag only if file is not audio (an)-mtp arch,built,ver,orig=an,eexe,edll,~/bin/exe.py runs ~/bin/exe.py to get properties about windows-binaries only if file is not audio (an) and file extension is exe or dllp flag to set processing order
-mtp foo=p1,~/a.py runs before -mtp foo=p2,~/b.py and will forward all the tags detected so far as json to the stdin of b.pyc0 disables capturing of stdout/stderr, so copyparty will not receive any tags from the process at all -- instead the invoked program is free to print whatever to the console, just using copyparty as a launcher
c1 captures stdout only, c2 only stderr, and c3 (default) captures bothkt killing the entire process tree (default), km just the main process, or kn let it continue running until copyparty is terminatedif something doesn't work, try --mtag-v for verbose error messages
config file example; note that mtp is an additive option so all of the mtp options will take effect:
[/music]
  /mnt/nas/music
  flags:
    mtp: .bpm=~/bin/audio-bpm.py  # assign ".bpm" (numeric) with script
    mtp: key=f,t5,~/bin/audio-key.py  # force/overwrite, 5sec timeout
    mtp: ext=an,~/bin/file-ext.py  # will only run on non-audio files
    mtp: arch,built,ver,orig=an,eexe,edll,~/bin/exe.py  # only exe/dll
trigger a program on uploads, renames etc (examples)
you can set hooks before and/or after an event happens, and currently you can hook uploads, moves/renames, and deletes
there's a bunch of flags and stuff, see --help-hooks
if you want to write your own hooks, see devnotes
event-hooks can send zeromq messages instead of running programs
to send a 0mq message every time a file is uploaded,
--xau zmq:pub:tcp://*:5556 sends a PUB to any/all connected SUB clients--xau t3,zmq:push:tcp://*:5557 sends a PUSH to exactly one connected PULL client--xau t3,j,zmq:req:tcp://localhost:5555 sends a REQ to the connected REP clientthe PUSH and REQ examples have t3 (timeout after 3 seconds) because they block if there's no clients to talk to
t3,j to send extended upload-info as json instead of just the filesystem-pathsee zmq-recv.py if you need something to receive the messages with
config file example; note that the hooks are additive options, so all of the xau options will take effect:
[global]
  xau: zmq:pub:tcp://*:5556`  # send a PUB to any/all connected SUB clients
  xau: t3,zmq:push:tcp://*:5557`  # send PUSH to exactly one connected PULL cli
  xau: t3,j,zmq:req:tcp://localhost:5555`  # send REQ to the connected REP cli
the older, more powerful approach (examples):
-v /mnt/inc:inc:w:c,e2d,e2t,mte=+x1:c,mtp=x1=ad,kn,/usr/bin/notify-send
that was the commandline example; here's the config file example:
[/inc]
  /mnt/inc
  accs:
    w: *
  flags:
    e2d, e2t  # enable indexing of uploaded files and their tags
    mte: +x1
    mtp: x1=ad,kn,/usr/bin/notify-send
so filesystem location /mnt/inc shared at /inc, write-only for everyone, appending x1 to the list of tags to index (mte), and using /usr/bin/notify-send to "provide" tag x1 for any filetype (ad) with kill-on-timeout disabled (kn)
that'll run the command notify-send with the path to the uploaded file as the first and only argument (so on linux it'll show a notification on-screen)
note that this is way more complicated than the new event hooks but this approach has the following advantages:
note that it will occupy the parsing threads, so fork anything expensive (or set kn to have copyparty fork it for you) -- otoh if you want to intentionally queue/singlethread you can combine it with --mtag-mt 1
for reference, if you were to do this using event hooks instead, it would be like this: -e2d --xau notify-send,hello,--
redefine behavior with plugins (examples)
replace 404 and 403 errors with something completely different (that's it for now)
as for client-side stuff, there is plugins for modifying UI/UX
autologin based on IP range (CIDR) , using the global-option --ipu
for example, if everyone with an IP that starts with 192.168.123 should automatically log in as the user spartacus, then you can either specify --ipu=192.168.123.0/24=spartacus as a commandline option, or put this in a config file:
[global]
  ipu: 192.168.123.0/24=spartacus
repeat the option to map additional subnets
be careful with this one! if you have a reverseproxy, then you definitely want to make sure you have real-ip configured correctly, and it's probably a good idea to nullmap the reverseproxy's IP just in case; so if your reverseproxy is sending requests from 172.24.27.9 then that would be --ipu=172.24.27.9/32=
limit a user to certain IP ranges (CIDR) , using the global-option --ipr
for example, if the user spartacus should get rejected if they're not connecting from an IP that starts with 192.168.123 or 172.16, then you can either specify --ipr=192.168.123.0/24,172.16.0.0/16=spartacus as a commandline option, or put this in a config file:
[global]
  ipr: 192.168.123.0/24,172.16.0.0/16=spartacus
repeat the option to map additional users
replace copyparty passwords with oauth and such
you can disable the built-in password-based login system, and instead replace it with a separate piece of software (an identity provider) which will then handle authenticating / authorizing of users; this makes it possible to login with passkeys / fido2 / webauthn / yubikey / ldap / active directory / oauth / many other single-sign-on contraptions
the regular config-defined users will be used as a fallback for requests which don't include a valid (trusted) IdP username header
if your IdP-server is slow, consider --idp-cookie and let requests with the cookie cppws bypass the IdP; experimental sessions-based feature added for a party
some popular identity providers are Authelia (config-file based) and authentik (GUI-based, more complex)
there is a docker-compose example which is hopefully a good starting point (alternatively see ./docs/idp.md if you're the DIY type)
a more complete example of the copyparty configuration options look like this
but if you just want to let users change their own passwords, then you probably want user-changeable passwords instead
other ways to auth by header
if you have a middleware which adds a header with a user identifier, for example tailscale's Tailscale-User-Login: [email protected] then you can automatically auth as alice by defining that mapping with --idp-hm-usr '^Tailscale-User-Login^[email protected]^alice' or the following config file:
[global]
  idp-hm-usr: ^Tailscale-User-Login^[email protected]^alice
repeat the whole idp-hm-usr option to add more mappings
if permitted, users can change their own passwords in the control-panel
not compatible with identity providers
must be enabled with --chpw because account-sharing is a popular usecase
--chpw-no name1,name2,name3,...to perform a password reset, edit the server config and give the user another password there, then do a config reload or server restart
the custom passwords are kept in a textfile at filesystem-path --chpw-db, by default chpw.json in the copyparty config folder
if you run multiple copyparty instances with different users you almost definitely want to specify separate DBs for each instance
if password hashing is enabled, the passwords in the db are also hashed
connecting to an aws s3 bucket and similar
there is no built-in support for this, but you can use FUSE-software such as rclone / geesefs / JuiceFS to first mount your cloud storage as a local disk, and then let copyparty use (a folder in) that disk as a volume
if copyparty is unable to access the local folder that rclone/geesefs/JuiceFS provides (for example if it looks invisible) then you may need to run rclone with --allow-other and/or enable user_allow_other in /etc/fuse.conf
you will probably get decent speeds with the default config, however most likely restricted to using one TCP connection per file, so the upload-client won't be able to send multiple chunks in parallel
before v1.13.5 it was recommended to use the volflag
sparseto force-allow multiple chunks in parallel; this would improve the upload-speed from1.5 MiB/sto over80 MiB/sat the risk of provoking latent bugs in S3 or JuiceFS. But v1.13.5 added chunk-stitching, so this is now probably much less important. On the contrary,nosparsemay now increase performance in some cases. Please try all three options (default,sparse,nosparse) as the optimal choice depends on your network conditions and software stack (both the FUSE-driver and cloud-server)
someone has also tested geesefs in combination with gocryptfs with surprisingly good results, getting 60 MiB/s upload speeds on a gbit line, but JuiceFS won with 80 MiB/s using its built-in encryption
you may improve performance by specifying larger values for --iobuf / --s-rd-sz / --s-wr-sz
if you've experimented with this and made interesting observations, please share your findings so we can add a section with specific recommendations :-)
tell search engines you don't wanna be indexed, either using the good old robots.txt or through copyparty settings:
--no-robots adds HTTP (X-Robots-Tag) and HTML (<meta>) headers with noindex, nofollow globally[...]:c,norobots does the same thing for that single volume[...]:c,robots ALLOWS search-engine crawling for that volume, even if --no-robots is set globallyalso, --force-js disables the plain HTML folder listing, making things harder to parse for some search engines -- note that crawlers which understand javascript (such as google) will not be affected
you can change the default theme with --theme 2, and add your own themes by modifying browser.css or providing your own css to --css-browser, then telling copyparty they exist by increasing --themes
| 0. classic dark |
2. flat pm-monokai |
4. vice |
| 1. classic light |
3. flat light |
5. hotdog stand |
the classname of the HTML tag is set according to the selected theme, which is used to set colors as css variables ++
html.a, second theme (2 and 3) is html.bhtml.y is set, otherwise html.z ishtml.b, html.z, html.bz to specify rulessee the top of ./copyparty/web/browser.css where the color variables are set, and there's layout-specific stuff near the bottom
if you want to change the fonts, see ./docs/rice/
see running on windows for a fancy windows setup
python copyparty-sfx.py with copyparty.exe if you're using the exe editionallow anyone to download or upload files into the current folder:
python copyparty-sfx.py
enable searching and music indexing with -e2dsa -e2ts
start an FTP server on port 3921 with --ftp 3921
announce it on your LAN with -z so it appears in windows/Linux file managers
anyone can upload, but nobody can see any files (even the uploader):
python copyparty-sfx.py -e2dsa -v .::w
block uploads if there's less than 4 GiB free disk space with --df 4
show a popup on new uploads with --xau bin/hooks/notify.py
anyone can upload, and receive "secret" links for each upload they do:
python copyparty-sfx.py -e2dsa -v .::wG:c,fk=8
anyone can browse (r), only kevin (password okgo) can upload/move/delete (A) files:
python copyparty-sfx.py -e2dsa -a kevin:okgo -v .::r:A,kevin
read-only music server:
python copyparty-sfx.py -v /mnt/nas/music:/music:r -e2dsa -e2ts --no-robots --force-js --theme 2
...with bpm and key scanning
-mtp .bpm=f,audio-bpm.py -mtp key=f,audio-key.py
...with a read-write folder for kevin whose password is okgo
-a kevin:okgo -v /mnt/nas/inc:/inc:rw,kevin
...with logging to disk
-lo log/cpp-%Y-%m%d-%H%M%S.txt.xz
become a real webserver which people can access by just going to your IP or domain without specifying a port
if you're on windows, then you just need to add the commandline argument -p 80,443 and you're done! nice
if you're on macos, sorry, I don't know
if you're on Linux, you have the following 4 options:
option 1: set up a reverse-proxy -- this one makes a lot of sense if you're running on a proper headless server, because that way you get real HTTPS too
option 2: NAT to port 3923 -- this is cumbersome since you'll need to do it every time you reboot, and the exact command may depend on your linux distribution:
iptables -t nat -A PREROUTING -p tcp --dport 80 -j REDIRECT --to-port 3923
iptables -t nat -A PREROUTING -p tcp --dport 443 -j REDIRECT --to-port 3923
option 3: disable the security policy which prevents the use of 80 and 443; this is probably fine:
setcap CAP_NET_BIND_SERVICE=+eip $(realpath $(which python))
python copyparty-sfx.py -p 80,443
option 4: run copyparty as root (please don't)
running copyparty next to other websites hosted on an existing webserver such as nginx, caddy, or apache
you can either:
--rp-loc=/stuff to tell copyparty where it is mounted -- has a slight performance cost and higher chance of bugs
incorrect --rp-loc or webserver config; expected vpath starting with [...] it's likely because the webserver is stripping away the proxy location from the request URLs -- see the ProxyPass in the apache example belowwhen running behind a reverse-proxy (this includes services like cloudflare), it is important to configure real-ip correctly, as many features rely on knowing the client's IP. The best/safest approach is to configure your reverse-proxy so it gives copyparty a header which only contains the client's true/real IP-address, and then setting --xff-hdr theHeaderName --rproxy 1 but alternatively, if you want/need to let copyparty handle this, look out for red and yellow log messages which explain how to do that. Basically, the log will say this:
set
--xff-hdrto the name of the http-header to read the IP from (usuallyx-forwarded-for, but cloudflare usescf-connecting-ip), and then--xff-srcto the IP of the reverse-proxy so copyparty will trust the xff-hdr. You will also need to configure--rproxyto1if the header only contains one IP (the correct one) or to a negative value if it contains multiple;-1being the rightmost and most trusted IP (the nearest proxy, so usually not the correct one),-2being the second-closest hop, and so on
Note that --rp-loc in particular will not work at all unless you configure the above correctly
some reverse proxies (such as Caddy) can automatically obtain a valid https/tls certificate for you, and some support HTTP/2 and QUIC which could be a nice speed boost, depending on a lot of factors
for improved security (and a 10% performance boost) consider listening on a unix-socket with -i unix:770:www:/dev/shm/party.sock (permission 770 means only members of group www can access it)
example webserver / reverse-proxy configs:
caddy reverse-proxy --from :8080 --to unix///dev/shm/party.sockcaddy reverse-proxy --from :8081 --to http://127.0.0.1:3923teaching copyparty how to see client IPs when running behind a reverse-proxy, or a WAF, or another protection service such as cloudflare
if you (and maybe everybody else) keep getting a message that says thank you for playing, then you've gotten banned for malicious traffic. This ban applies to the IP address that copyparty thinks identifies the shady client -- so, depending on your setup, you might have to tell copyparty where to find the correct IP
for most common setups, there should be a helpful message in the server-log explaining what to do, but see docs/xff.md if you want to learn more, including a quick hack to just make it work (which is not recommended, but hey...)
most reverse-proxies support connecting to copyparty either using uds/unix-sockets (/dev/shm/party.sock, faster/recommended) or using tcp (127.0.0.1)
with copyparty listening on a uds / unix-socket / unix-domain-socket and the reverse-proxy connecting to that:
index.html upload download software| 28'900 req/s | 6'900 MiB/s | 7'400 MiB/s | no-proxy |
| 18'750 req/s | 3'500 MiB/s | 2'370 MiB/s | haproxy |
| 9'900 req/s | 3'750 MiB/s | 2'200 MiB/s | caddy |
| 18'700 req/s | 2'200 MiB/s | 1'570 MiB/s | nginx |
| 9'700 req/s | 1'750 MiB/s | 1'830 MiB/s | apache |
| 9'900 req/s | 1'300 MiB/s | 1'470 MiB/s | lighttpd |
when connecting the reverse-proxy to 127.0.0.1 instead (the basic and/or old-fasioned way), speeds are a bit worse:
| 21'200 req/s | 5'700 MiB/s | 6'700 MiB/s | no-proxy |
| 14'500 req/s | 1'700 MiB/s | 2'170 MiB/s | haproxy |
| 11'100 req/s | 2'750 MiB/s | 2'000 MiB/s | traefik |
| 8'400 req/s | 2'300 MiB/s | 1'950 MiB/s | caddy |
| 13'400 req/s | 1'100 MiB/s | 1'480 MiB/s | nginx |
| 8'400 req/s | 1'000 MiB/s | 1'000 MiB/s | apache |
| 6'500 req/s | 1'270 MiB/s | 1'500 MiB/s | lighttpd |
in summary, haproxy > caddy > traefik > nginx > apache > lighttpd, and use uds when possible (traefik does not support it yet)
if you have a domain and want to get your copyparty online real quick, either from your home-PC behind a CGNAT or from a server without an existing reverse-proxy setup, one approach is to create a Cloudflare Tunnel (formerly "Argo Tunnel")
I'd recommend making a Locally-managed tunnel for more control, but if you prefer to make a Remotely-managed tunnel then this is currently how:
cloudflare dashboard » zero trust » networks » tunnels » create a tunnel » cloudflared » choose a cool subdomain and leave the path blank, and use service type = http and URL = 127.0.0.1:3923
and if you want to just run the tunnel without installing it, skip the cloudflared service install BASE64 step and instead do cloudflared --no-autoupdate tunnel run --token BASE64
NOTE: since people will be connecting through cloudflare, as mentioned in real-ip you should run copyparty with --xff-hdr cf-connecting-ip to detect client IPs correctly
config file example:
[global]
  xff-hdr: cf-connecting-ip
metrics/stats can be enabled at URL /.cpr/metrics for grafana / prometheus / etc (openmetrics 1.0.0)
must be enabled with --stats since it reduces startup time a tiny bit, and you probably want -e2dsa too
the endpoint is only accessible by admin accounts, meaning the a in rwmda in the following example commandline: python3 -m copyparty -a ed:wark -v /mnt/nas::rwmda,ed --stats -e2dsa
follow a guide for setting up node_exporter except have it read from copyparty instead; example /etc/prometheus/prometheus.yml below
scrape_configs:
  - job_name: copyparty
    metrics_path: /.cpr/metrics
    basic_auth:
      password: wark
    static_configs:
      - targets: ['192.168.123.1:3923']
currently the following metrics are available,
cpp_uptime_seconds time since last copyparty restartcpp_boot_unixtime_seconds same but as an absolute timestampcpp_active_dl number of active downloadscpp_http_conns number of open http(s) connectionscpp_http_reqs number of http(s) requests handledcpp_sus_reqs number of 403/422/malicious requestscpp_active_bans number of currently banned IPscpp_total_bans number of IPs banned since last restartthese are available unless --nos-vst is specified:
cpp_db_idle_seconds time since last database activity (upload/rename/delete)cpp_db_act_seconds same but as an absolute timestampcpp_idle_vols number of volumes which are idle / readycpp_busy_vols number of volumes which are busy / indexingcpp_offline_vols number of volumes which are offline / unavailablecpp_hashing_files number of files queued for hashing / indexingcpp_tagq_files number of files queued for metadata scanningcpp_mtpq_files number of files queued for plugin-based analysisand these are available per-volume only:
cpp_disk_size_bytes total HDD sizecpp_disk_free_bytes free HDD spaceand these are per-volume and total:
cpp_vol_bytes size of all files in volumecpp_vol_files number of filescpp_dupe_bytes disk space presumably saved by deduplicationcpp_dupe_files number of dupe filescpp_unf_bytes currently unfinished / incoming uploadssome of the metrics have additional requirements to function correctly,
cpp_vol_* requires either the e2ds volflag or -e2dsa global-optionthe following options are available to disable some of the metrics:
--nos-hdd disables cpp_disk_* which can prevent spinning up HDDs--nos-vol disables cpp_vol_* which reduces server startup time--nos-vst disables volume state, reducing the worst-case prometheus query time by 0.5 sec--nos-dup disables cpp_dupe_* which reduces the server load caused by prometheus queries--nos-unf disables cpp_unf_* for no particular purposenote: the following metrics are counted incorrectly if multiprocessing is enabled with -j: cpp_http_conns, cpp_http_reqs, cpp_sus_reqs, cpp_active_bans, cpp_total_bans
you'll never find a use for these:
change the association of a file extension
using commandline args, you can do something like --mime gif=image/jif and --mime ts=text/x.typescript (can be specified multiple times)
in a config file, this is the same as:
[global]
  mime: gif=image/jif
  mime: ts=text/x.typescript
run copyparty with --mimes to list all the default mappings
imagine using copyparty professionally... TINLA/IANAL; EU laws are hella confusing
remember to disable logging, or configure logrotation to an acceptable timeframe with -lo cpp-%Y-%m%d.txt.xz or similar
if running with the database enabled (recommended), then have it forget uploader-IPs after some time using --forget-ip 43200
if you actually are a lawyer then I'm open for feedback, would be fun
buggy feature? rip it out by setting any of the following environment variables to disable its associated bell or whistle,
env-var what it doesPRTY_NO_DB_LOCK |
do not lock session/shares-databases for exclusive access |
PRTY_NO_IFADDR |
disable ip/nic discovery by poking into your OS with ctypes |
PRTY_NO_IMPRESO |
do not try to load js/css files using importlib.resources |
PRTY_NO_IPV6 |
disable some ipv6 support (should not be necessary since windows 2000) |
PRTY_NO_LZMA |
disable streaming xz compression of incoming uploads |
PRTY_NO_MP |
disable all use of the python multiprocessing module (actual multithreading, cpu-count for parsers/thumbnailers) |
PRTY_NO_SQLITE |
disable all database-related functionality (file indexing, metadata indexing, most file deduplication logic) |
PRTY_NO_TLS |
disable native HTTPS support; if you still want to accept HTTPS connections then TLS must now be terminated by a reverse-proxy |
PRTY_NO_TPOKE |
disable systemd-tmpfilesd avoider |
example: PRTY_NO_IFADDR=1 python3 copyparty-sfx.py
force-enable features with known issues on your OS/env by setting any of the following environment variables, also affectionately known as fuckitbits or hail-mary-bits
PRTY_FORCE_MP |
force-enable multiprocessing (real multithreading) on MacOS and other broken platforms |
PRTY_FORCE_MAGIC |
use magic on Windows (you will segfault) |
the party might be closer than you think
if your distro/OS is not mentioned below, there might be some hints in the «on servers» section
pacman -S copyparty (in arch linux extra)
it comes with a systemd service as well as a user service, and expects to find a config file in /etc/copyparty/copyparty.conf or ~/.config/copyparty/copyparty.conf
after installing, start either the system service or the user service and navigate to http://127.0.0.1:3923 for further instructions (unless you already edited the config files, in which case you are good to go, probably)
does not exist yet; there are rumours that it is being packaged! keep an eye on this space...
brew install copyparty ffmpeg -- https://formulae.brew.sh/formula/copyparty
should work on all macs (both intel and apple silicon) and all relevant macos versions
the homebrew package is maintained by the homebrew team (thanks!)
nix profile install github:9001/copyparty
requires a flake-enabled installation of nix
some recommended dependencies are enabled by default; override the package if you want to add/remove some features/deps
ffmpeg-full was chosen over ffmpeg-headless mainly because we need withWebp (and withOpenmpt is also nice) and being able to use a cached build felt more important than optimizing for size at the time -- PRs welcome if you disagree 👍
for flake-enabled installations of NixOS:
{
  # add copyparty flake to your inputs
  inputs.copyparty.url = "github:9001/copyparty";

  # ensure that copyparty is an allowed argument to the outputs function
  outputs = { self, nixpkgs, copyparty }: {
    nixosConfigurations.yourHostName = nixpkgs.lib.nixosSystem {
      modules = [
        # load the copyparty NixOS module
        copyparty.nixosModules.default
        ({ pkgs, ... }: {
          # add the copyparty overlay to expose the package to the module
          nixpkgs.overlays = [ copyparty.overlays.default ];
          # (optional) install the package globally
          environment.systemPackages = [ pkgs.copyparty ];
          # configure the copyparty module
          services.copyparty.enable = true;
        })
      ];
    };
  };
}
if you don't use a flake in your configuration, you can use other dependency management tools like npins, niv, or even plain fetchTarball, like so:
{ pkgs, ... }:

let
  # npins example, adjust for your setup. copyparty should be a path to the downloaded repo
  # for niv, just replace the npins folder import with the sources.nix file
  copyparty = (import ./npins).copyparty;

  # or with fetchTarball:
  copyparty = fetchTarball "https://github.com/9001/copyparty/archive/hovudstraum.tar.gz";
in

{
  # load the copyparty NixOS module
  imports = [ "${copyparty}/contrib/nixos/modules/copyparty.nix" ];

  # add the copyparty overlay to expose the package to the module
  nixpkgs.overlays = [ (import "${copyparty}/contrib/package/nix/overlay.nix") ];
  # (optional) install the package globally
  environment.systemPackages = [ pkgs.copyparty ];
  # configure the copyparty module
  services.copyparty.enable = true;
}
copyparty on NixOS is configured via services.copyparty options, for example:
services.copyparty = {
  enable = true;
  # directly maps to values in the [global] section of the copyparty config.
  # see `copyparty --help` for available options
  settings = {
    i = "0.0.0.0";
    # use lists to set multiple values
    p = [ 3210 3211 ];
    # use booleans to set binary flags
    no-reload = true;
    # using 'false' will do nothing and omit the value when generating a config
    ignored-flag = false;
  };

  # create users
  accounts = {
    # specify the account name as the key
    ed = {
      # provide the path to a file containing the password, keeping it out of /nix/store
      # must be readable by the copyparty service user
      passwordFile = "/run/keys/copyparty/ed_password";
    };
    # or do both in one go
    k.passwordFile = "/run/keys/copyparty/k_password";
  };

  # create a volume
  volumes = {
    # create a volume at "/" (the webroot), which will
    "/" = {
      # share the contents of "/srv/copyparty"
      path = "/srv/copyparty";
      # see `copyparty --help-accounts` for available options
      access = {
        # everyone gets read-access, but
        r = "*";
        # users "ed" and "k" get read-write
        rw = [ "ed" "k" ];
      };
      # see `copyparty --help-flags` for available options
      flags = {
        # "fk" enables filekeys (necessary for upget permission) (4 chars long)
        fk = 4;
        # scan for new files every 60sec
        scan = 60;
        # volflag "e2d" enables the uploads database
        e2d = true;
        # "d2t" disables multimedia parsers (in case the uploads are malicious)
        d2t = true;
        # skips hashing file contents if path matches *.iso
        nohash = "\.iso$";
      };
    };
  };
  # you may increase the open file limit for the process
  openFilesLimit = 8192;
};
the passwordFile at /run/keys/copyparty/ could for example be generated by agenix, or you could just dump it in the nix store instead if that's acceptable
TLDR: yes
ie = internet-explorer, ff = firefox, c = chrome, iOS = iPhone/iPad, Andr = Android
| browse files | yep | yep | yep | yep | yep | yep | yep | yep |
| thumbnail view | - | yep | yep | yep | yep | yep | yep | yep |
| basic uploader | yep | yep | yep | yep | yep | yep | yep | yep |
| up2k | - | - | *1 |
*1 |
yep | yep | yep | yep |
| make directory | yep | yep | yep | yep | yep | yep | yep | yep |
| send message | yep | yep | yep | yep | yep | yep | yep | yep |
| set sort order | - | yep | yep | yep | yep | yep | yep | yep |
| zip selection | - | yep | yep | yep | yep | yep | yep | yep |
| file search | - | yep | yep | yep | yep | yep | yep | yep |
| file rename | - | yep | yep | yep | yep | yep | yep | yep |
| file cut/paste | - | yep | yep | yep | yep | yep | yep | yep |
| unpost uploads | - | - | yep | yep | yep | yep | yep | yep |
| navpane | - | yep | yep | yep | yep | yep | yep | yep |
| image viewer | - | yep | yep | yep | yep | yep | yep | yep |
| video player | - | yep | yep | yep | yep | yep | yep | yep |
| markdown editor | - | - | *2 |
*2 |
yep | yep | yep | yep |
| markdown viewer | - | *2 |
*2 |
*2 |
yep | yep | yep | yep |
| play mp3/m4a | - | yep | yep | yep | yep | yep | yep | yep |
| play ogg/opus | - | - | - | - | yep | yep | *3 |
yep |
| = feature = | ie6 | ie9 | ie10 | ie11 | ff 52 | c 49 | iOS | Andr |
*1 yes, but extremely slow (ie10: 1 MiB/s, ie11: 270 KiB/s)*2 only able to do plaintext documents (no markdown rendering)*3 iOS 11 and newer, opus only, and requires FFmpeg on the serverquick summary of more eccentric web-browsers trying to view a directory index:
browser will it blend| links (2.21/macports) | can browse, login, upload/mkdir/msg |
| lynx (2.8.9/macports) | can browse, login, upload/mkdir/msg |
| w3m (0.5.3/macports) | can browse, login, upload at 100kB/s, mkdir/msg |
| netsurf (3.10/arch) | is basically ie6 with much better css (javascript has almost no effect) |
| opera (11.60/winxp) | OK: thumbnails, image-viewer, zip-selection, rename/cut/paste. NG: up2k, navpane, markdown, audio |
| ie4 and netscape 4.0 | can browse, upload with ?b=u, auth with &pw=wark |
| ncsa mosaic 2.7 | does not get a pass, pic1 - pic2 |
| SerenityOS (7e98457) | hits a page fault, works with ?b=u, file upload not-impl |
| sony psp 5.50 | can browse, upload/mkdir/msg (thx dwarf) screenshot |
| nintendo 3ds | can browse, upload, view thumbnails (thx bnjmn) |
| Nintendo Wii (Opera 9.0 "Internet Channel") | can browse, can't upload or download (no local storage), can view images - works best with ?b=u, default view broken |
interact with copyparty using non-browser clients
javascript: dump some state into a file (two separate examples)
await fetch('//127.0.0.1:3923/', {method:"PUT", body: JSON.stringify(foo)});var xhr = new XMLHttpRequest(); xhr.open('POST', '//127.0.0.1:3923/msgs?raw'); xhr.send('foo');curl/wget: upload some files (post=file, chunk=stdin)
post(){ curl -F f=@"$1" http://127.0.0.1:3923/?pw=wark;}post movie.mkv (gives HTML in return)post(){ curl -F f=@"$1" 'http://127.0.0.1:3923/?want=url&pw=wark';}post movie.mkv (gives hotlink in return)post(){ curl -H pw:wark -H rand:8 -T "$1" http://127.0.0.1:3923/;}post movie.mkv (randomized filename)post(){ wget --header='pw: wark' --post-file="$1" -O- http://127.0.0.1:3923/?raw;}post movie.mkvchunk(){ curl -H pw:wark -T- http://127.0.0.1:3923/;}chunk <movie.mkvbash: when curl and wget is not available or too boring
(printf 'PUT /junk?pw=wark HTTP/1.1\r\n\r\n'; cat movie.mkv) | nc 127.0.0.1 3923(printf 'PUT / HTTP/1.1\r\n\r\n'; cat movie.mkv) >/dev/tcp/127.0.0.1/3923python: u2c.py is a command-line up2k client (webm)
FUSE: mount a copyparty server as a local filesystem
sharex (screenshot utility): see ./contrib/sharex.sxcu
Custom Uploader (an Android app) as an alternative to copyparty's own PartyUP!
https://your.com/foo/?want=url&pw=hunter2 and FormDataName fcontextlet (web browser integration); see contrib contextlet
igloo irc: Method: post Host: https://you.com/up/?want=url&pw=hunter2 Multipart: yes File parameter: f
copyparty returns a truncated sha512sum of your PUT/POST as base64; you can generate the same checksum locally to verify uploads:
b512(){ printf "$((sha512sum||shasum -a512)|sed -E 's/ .*//;s/(..)/\\x\1/g')"|base64|tr '+/' '-_'|head -c44;}
b512 <movie.mkv
you can provide passwords using header PW: hunter2, cookie cppwd=hunter2, url-param ?pw=hunter2, or with basic-authentication (either as the username or password)
for basic-authentication, all of the following are accepted:
password/whatever:password/password:whatever(the username is ignored)
--usernames, then it's PW: usr:pwd, cookie cppwd=usr:pwd, url-param ?pw=usr:pwdNOTE: curl will not send the original filename if you use -T combined with url-params! Also, make sure to always leave a trailing slash in URLs unless you want to override the filename
sync folders to/from copyparty
NOTE: full bidirectional sync, like what nextcloud and syncthing does, will never be supported! Only single-direction sync (server-to-client, or client-to-server) is possible with copyparty
the commandline uploader u2c.py with --dr is the best way to sync a folder to copyparty; verifies checksums and does files in parallel, and deletes unexpected files on the server after upload has finished which makes file-renames really cheap (it'll rename serverside and skip uploading)
if you want to sync with u2c.py then:
e2dsa option (either globally or volflag) must be enabled on the server for the volumes you're syncing intono-hash or no-idx (or volflags nohash / noidx), or at least make sure they are configured so they do not affect anything you are syncing intorwd at minimum, or just A which is the same as rwmd.a
a and A are different permissions, and . is very useful for syncalternatively there is rclone which allows for bidirectional sync and is way more flexible (stream files straight from sftp/s3/gcs to copyparty, ...), although there is no integrity check and it won't work with files over 100 MiB if copyparty is behind cloudflare
a remote copyparty server as a local filesystem; go to the control-panel and click connect to see a list of commands to do that
alternatively, some alternatives roughly sorted by speed (unreproducible benchmark), best first:
most clients will fail to mount the root of a copyparty server unless there is a root volume (so you get the admin-panel instead of a browser when accessing it) -- in that case, mount a specific volume instead
if you have volumes that are accessible without a password, then some webdav clients (such as davfs2) require the global-option --dav-auth to access any password-protected areas
upload to copyparty with one tap
'' ''
the app is NOT the full copyparty server! just a basic upload client, nothing fancy yet
if you want to run the copyparty server on your android device, see install on android
there is no iPhone app, but the following shortcuts are almost as good:
if you want to run the copyparty server on your iPhone or iPad, see install on iOS
defaults are usually fine - expect 8 GiB/s download, 1 GiB/s upload
below are some tweaks roughly ordered by usefulness:
disabling HTTP/2 and HTTP/3 can make uploads 5x faster, depending on server/client software
-q disables logging and can help a bunch, even when combined with -lo to redirect logs to file
--hist pointing to a fast location (ssd) will make directory listings and searches faster when -e2d or -e2t is set
--dedup enables deduplication and thus avoids writing to the HDD if someone uploads a dupe
--safe-dedup 1 makes deduplication much faster during upload by skipping verification of file contents; safe if there is no other software editing/moving the files in the volumes
--no-dirsz shows the size of folder inodes instead of the total size of the contents, giving about 30% faster folder listings
--no-hash . when indexing a network-disk if you don't care about the actual filehashes and only want the names/tags searchable
if your volumes are on a network-disk such as NFS / SMB / s3, specifying larger values for --iobuf and/or --s-rd-sz and/or --s-wr-sz may help; try setting all of them to 524288 or 1048576 or 4194304
--no-htp --hash-mt=0 --mtag-mt=1 --th-mt=1 minimizes the number of threads; can help in some eccentric environments (like the vscode debugger)
when running on AlpineLinux or other musl-based distro, try mimalloc for higher performance (and twice as much RAM usage); apk add mimalloc2 and run copyparty with env-var LD_PRELOAD=/usr/lib/libmimalloc-secure.so.2
/proc and /sys otherwise you'll encounter issues with FFmpeg (audio transcoding, thumbnails)-j0 enables multiprocessing (actual multithreading), can reduce latency to 20+80/numCores percent and generally improve performance in cpu-intensive workloads, for example:
-e2d is enabled, -j2 gives 4x performance for directory listings; -j4 gives 16x...however it also increases the server/filesystem/HDD load during uploads, and adds an overhead to internal communication, so it is usually a better idea to don't
using pypy instead of cpython can be 70% faster for some workloads, but slower for many others
-j0 (TODO make issue)when uploading files,
when uploading from very fast storage (NVMe SSD) with chrome/firefox, enable [wasm] in the [⚙️] settings tab to more effectively use all CPU-cores for hashing
--nosubtle 137 (chrome v137+) or --nosubtle 2 (chrome+firefox)chrome is recommended (unfortunately), at least compared to firefox:
if you're cpu-bottlenecked, or the browser is maxing a cpu core:
[🚀] up2k ui-tab (or closing it)
[🥔]there is a discord server with an @everyone for all important updates (at the lack of better ideas)
some notes on hardening
--rproxy 0 if and only if your copyparty is directly facing the internet (not through a reverse-proxy)
nohtml
--help-bindsafety profiles:
option -s is a shortcut to set the following options:
--no-thumb disables thumbnails and audio transcoding to stop copyparty from running FFmpeg/Pillow/VIPS on uploaded files, which is a good idea if anonymous upload is enabled--no-mtag-ff uses mutagen to grab music tags instead of FFmpeg, which is safer and faster but less accurate--dotpart hides uploads from directory listings while they're still incoming--no-robots and --force-js makes life harder for crawlers, see hiding from googleoption -ss is a shortcut for the above plus:
--unpost 0, --no-del, --no-mv disables all move/delete support--hardlink creates hardlinks instead of symlinks when deduplicating uploads, which is less maintenance
--vague-403 returns a "404 not found" instead of "401 unauthorized" which is a common enterprise meme-nih removes the server hostname from directory listingsoption -sss is a shortcut for the above plus:
--no-dav disables webdav support--no-logues and --no-readme disables support for readme's and prologues / epilogues in directory listings, which otherwise lets people upload arbitrary (but sandboxed) <script> tags-lo cpp-%Y-%m%d-%H%M%S.txt.xz enables logging to disk-ls **,*,ln,p,r does a scan on startup for any dangerous symlinksother misc notes:
g instead of r, only accepting direct URLs to files
h instead of r makes copyparty behave like a traditional webserver with directory listing/index disabled, returning index.html instead
behavior that might be unexpected
.prologue.html / .epilogue.html / PREADME.md / README.md contents, for the purpose of showing a description on how to use the uploader for example<script>s which autorun (in a sandbox) for other visitors in a few ways;
README.md -- avoid with --no-readmesome.html to .epilogue.html -- avoid with either --no-logues or --no-dot-ren<script>s; attempts are made to prevent scripts from executing (unless -emp is specified) but this is not 100% bulletproof, so setting the nohtml volflag is still the safest choice
cross-site request config
by default, except for GET and HEAD operations, all requests must either:
Origin header at allOrigin matching the server domainPW with your password as valuecors can be configured with --acao and --acam, or the protections entirely disabled with --allow-csrf
prevent filename bruteforcing
volflag fk generates filekeys (per-file accesskeys) for all files; users which have full read-access (permission r) will then see URLs with the correct filekey ?k=... appended to the end, and g users must provide that URL including the correct key to avoid a 404
by default, filekeys are generated based on salt (--fk-salt) + filesystem-path + file-size + inode (if not windows); add volflag fka to generate slightly weaker filekeys which will not be invalidated if the file is edited (only salt + path)
permissions wG (write + upget) lets users upload files and receive their own filekeys, still without being able to see other uploads
share specific folders in a volume without giving away full read-access to the rest -- the visitor only needs the g (get) permission to view the link
volflag dk generates dirkeys (per-directory accesskeys) for all folders, granting read-access to that folder; by default only that folder itself, no subfolders
volflag dky disables the actual key-check, meaning anyone can see the contents of a folder where they have g access, but not its subdirectories
dk + dky gives the same behavior as if all users with g access have full read-access, but subfolders are hidden files (as if their names start with a dot), so dky is an alternative to renaming all the folders for that purpose, maybe just for some usersvolflag dks lets people enter subfolders as well, and also enables download-as-zip/tar
if you enable dirkeys, it is probably a good idea to enable filekeys too, otherwise it will be impossible to hotlink files from a folder which was accessed using a dirkey
dirkeys are generated based on another salt (--dk-salt) + filesystem-path and have a few limitations:
you can hash passwords before putting them into config files / providing them as arguments; see --help-pwhash for all the details
--ah-alg argon2 enables it, and if you have any plaintext passwords then it'll print the hashed versions on startup so you can replace them
optionally also specify --ah-cli to enter an interactive mode where it will hash passwords without ever writing the plaintext ones to disk
the default configs take about 0.4 sec and 256 MiB RAM to process a new password on a decent laptop
when generating hashes using --ah-cli for docker or systemd services, make sure it is using the same --ah-salt by:
--show-ah-salt in copyparty service configuration--ah-salt in both environments⚠️ if you have enabled
--usernamesthen provide the password asusername:passwordwhen hashing it, for exampleed:hunter2
both HTTP and HTTPS are accepted by default, but letting a reverse proxy handle the https/tls/ssl would be better (probably more secure by default)
copyparty doesn't speak HTTP/2 or QUIC, so using a reverse proxy would solve that as well -- but note that HTTP/1 is usually faster than both HTTP/2 and HTTP/3
if cfssl is installed, copyparty will automatically create a CA and server-cert on startup
--crt-dir for distribution, see --help for the other --crt optionsca.pem into all your browsers/devicesfirefox 87 can crash during uploads -- the entire browser goes, including all other browser tabs, everything turns white
however you can hit F12 in the up2k tab and use the devtools to see how far you got in the uploads:
get a complete list of all uploads, organized by status (ok / no-good / busy / queued):
var tabs = { ok:[], ng:[], bz:[], q:[] }; for (var a of up2k.ui.tab) tabs[a.in].push(a); tabs
list of filenames which failed:
var ng = []; for (var a of up2k.ui.tab) if (a.in != 'ok') ng.push(a.hn.split('<a href=\"').slice(-1)[0].split('\">')[0]); ng
send the list of filenames to copyparty for safekeeping:
await fetch('/inc', {method:'PUT', body:JSON.stringify(ng,null,1)})
see devnotes
mandatory deps:
jinja2 (is built into the SFX)install these to enable bonus features
enable hashed passwords in config: argon2-cffi
enable ftp-server:
pyftpdlib (is built into the SFX)pyftpdlib pyopensslenable music tags:
mutagen (fast, pure-python, skips a few tags, makes copyparty GPL? idk)ffprobe (20x slower, more accurate, possibly dangerous depending on your distro and users)enable thumbnails of...
Pillow and/or pyvips and/or ffmpeg (requires py2.7 or py3.5+)ffmpeg and ffprobe somewhere in $PATHpyvips or ffmpeg or pillow-heifpyvips or ffmpeg or pillow-avif-plugin or pillow v11.3+pyvips or ffmpegrawpy, plus one of pyvips or Pillow (for some formats)enable sending zeromq messages from event-hooks: pyzmq
enable smb support (not recommended): impacket==0.12.0
pyvips gives higher quality thumbnails than Pillow and is 320% faster, using 270% more ram: sudo apt install libvips42 && python3 -m pip install --user -U pyvips
to install FFmpeg on Windows, grab a recent build -- you need ffmpeg.exe and ffprobe.exe from inside the bin folder; copy them into C:\Windows\System32 or any other folder that's in your %PATH%
prevent loading an optional dependency , for example if:
set any of the following environment variables to disable its associated optional feature,
env-var what it doesPRTY_NO_ARGON2 |
disable argon2-cffi password hashing |
PRTY_NO_CFSSL |
never attempt to generate self-signed certificates using cfssl |
PRTY_NO_FFMPEG |
audio transcoding goes byebye, thumbnailing must be handled by Pillow/libvips |
PRTY_NO_FFPROBE |
audio transcoding goes byebye, thumbnailing must be handled by Pillow/libvips, metadata-scanning must be handled by mutagen |
PRTY_NO_MAGIC |
do not use magic for filetype detection |
PRTY_NO_MUTAGEN |
do not use mutagen for reading metadata from media files; will fallback to ffprobe |
PRTY_NO_PIL |
disable all Pillow-based thumbnail support; will fallback to libvips or ffmpeg |
PRTY_NO_PILF |
disable Pillow ImageFont text rendering, used for folder thumbnails |
PRTY_NO_PIL_AVIF |
disable Pillow avif support (internal and/or plugin) |
PRTY_NO_PIL_HEIF |
disable 3rd-party Pillow plugin for HEIF support |
PRTY_NO_PIL_WEBP |
disable use of native webp support in Pillow |
PRTY_NO_PSUTIL |
do not use psutil for reaping stuck hooks and plugins on Windows |
PRTY_NO_RAW |
disable all rawpy-based thumbnail support for RAW images |
PRTY_NO_VIPS |
disable all libvips-based thumbnail support; will fallback to Pillow or ffmpeg |
example: PRTY_NO_PIL=1 python3 copyparty-sfx.py
PRTY_NO_PIL saves ramPRTY_NO_VIPS saves ram and startup timePRTY_NO_FFMPEG + PRTY_NO_FFPROBE saves startup timesome bundled tools have copyleft dependencies, see ./bin/#mtag
these are standalone programs and will never be imported / evaluated by copyparty, and must be enabled through -mtp configs
the self-contained "binary" (recommended!) copyparty-sfx.py will unpack itself and run copyparty, assuming you have python installed of course
if you only need english, copyparty-en.py is the same thing but smaller
you can reduce the sfx size by repacking it; see ./docs/devnotes.md#sfx-repack
download copyparty.exe (win8+) or copyparty32.exe (win7+)
can be convenient on machines where installing python is problematic, however is not recommended -- if possible, please use copyparty-sfx.py instead
copyparty.exe runs on win8 or newer, was compiled on win10, does thumbnails + media tags, and is currently safe to use, but any future python/expat/pillow CVEs can only be remedied by downloading a newer version of the exe
dangerous: copyparty32.exe is compatible with windows7, which means it uses an ancient copy of python (3.7.9) which cannot be upgraded and should never be exposed to the internet (LAN is fine)
dangerous and deprecated: copyparty-winpe64.exe lets you run copyparty in WinPE and is otherwise completely useless
meanwhile copyparty-sfx.py instead relies on your system python which gives better performance and will stay safe as long as you keep your python install up-to-date
then again, if you are already into downloading shady binaries from the internet, you may also want my minimal builds of ffmpeg and ffprobe which enables copyparty to extract multimedia-info, do audio-transcoding, and thumbnails/spectrograms/waveforms, however it's much better to instead grab a recent official build every once ina while if you can afford the size
another emergency alternative, copyparty.pyz has less features, is slow, requires python 3.7 or newer, worse compression, and more importantly is unable to benefit from more recent versions of jinja2 and such (which makes it less secure)... lots of drawbacks with this one really -- but, unlike the sfx, it is a completely normal zipfile which does not unpack any temporary files to disk, so it may just work if the regular sfx fails to start because the computer is messed up in certain funky ways, so it's worth a shot if all else fails
run it by doubleclicking it, or try typing python copyparty.pyz in your terminal/console/commandline/telex if that fails
it is a python zipapp meaning it doesn't have to unpack its own python code anywhere to run, so if the filesystem is busted it has a better chance of getting somewhere
install Termux + its companion app Termux:API (see ocv.me/termux) and then copy-paste this into Termux (long-tap) all at once:
yes | pkg upgrade && termux-setup-storage && yes | pkg install python termux-api && python -m ensurepip && python -m pip install --user -U copyparty && { grep -qE 'PATH=.*\.local/bin' ~/.bashrc 2>/dev/null || { echo 'PATH="$HOME/.local/bin:$PATH"' >> ~/.bashrc && . ~/.bashrc; }; }
echo $?
after the initial setup, you can launch copyparty at any time by running copyparty anywhere in Termux -- and if you run it with --qr you'll get a neat qr-code pointing to your external ip
if you want thumbnails (photos+videos) and you're okay with spending another 132 MiB of storage, pkg install ffmpeg && python3 -m pip install --user -U pillow
vips for photo-thumbs instead, pkg install libvips && python -m pip install --user -U wheel && python -m pip install --user -U pyvips && (cd /data/data/com.termux/files/usr/lib/; ln -s libgobject-2.0.so{,.0}; ln -s libvips.so{,.42})first install one of the following:
and then copypaste the following command into a-Shell:
curl https://github.com/9001/copyparty/raw/refs/heads/hovudstraum/contrib/setup-ashell.sh | sh
what this does:
cpc which you can edit with vim cpccpp to launch copyparty with that config fileknown issues:
ideas for context to include, and where to submit them
please get in touch using any of the following URLs:
in general, commandline arguments (and config file if any)
if something broke during an upload (replacing FILENAME with a part of the filename that broke):
journalctl -aS '48 hour ago' -u copyparty | grep -C10 FILENAME | tee bug.log
if there's a wall of base64 in the log (thread stacks) then please include that, especially if you run into something freezing up or getting stuck, for example OperationalError('database is locked') -- alternatively you can visit /?stack to see the stacks live, so http://127.0.0.1:3923/?stack for example
for build instructions etc, see ./docs/devnotes.md
specifically you may want to build the sfx or build from scratch
see ./docs/TODO.md for planned features / fixes / changes
Lightweight coding agent that runs in your terminal
npm i -g @openai/codex
or brew install codex
Codex CLI is a coding agent from OpenAI that runs locally on your computer.
If you are looking for the cloud-based agent from OpenAI, Codex Web, see chatgpt.com/codex.
Install globally with your preferred package manager:
npm install -g @openai/codex # Alternatively: `brew install codex`
Then simply run codex to get started:
codex
Each GitHub Release contains many executables, but in practice, you likely want one of these:
codex-aarch64-apple-darwin.tar.gzcodex-x86_64-apple-darwin.tar.gzcodex-x86_64-unknown-linux-musl.tar.gzcodex-aarch64-unknown-linux-musl.tar.gzEach archive contains a single entry with the platform baked into the name (e.g., codex-x86_64-unknown-linux-musl), so you likely want to rename it to codex after extracting it.

Run codex and select Sign in with ChatGPT. You'll need a Plus, Pro, or Team ChatGPT account, and will get access to our latest models, including gpt-5, at no extra cost to your plan. (Enterprise is coming soon.)
Important: If you've used the Codex CLI before, follow these steps to migrate from usage-based billing with your API key:
- Update the CLI and ensure
codex --versionis0.20.0or later- Delete
~/.codex/auth.json(this should beC:\Users\USERNAME\.codex\auth.jsonon Windows)- Run
codex loginagain
If you encounter problems with the login flow, please comment on this issue.
Today, the login process entails running a server on localhost:1455. If you are on a "headless" server, such as a Docker container or are ssh'd into a remote machine, loading localhost:1455 in the browser on your local machine will not automatically connect to the webserver running on the headless machine, so you must use one of the following workarounds:
The easiest solution is likely to run through the codex login process on your local machine such that localhost:1455 is accessible in your web browser. When you complete the authentication process, an auth.json file should be available at $CODEX_HOME/auth.json (on Mac/Linux, $CODEX_HOME defaults to ~/.codex whereas on Windows, it defaults to %USERPROFILE%\.codex).
Because the auth.json file is not tied to a specific host, once you complete the authentication flow locally, you can copy the $CODEX_HOME/auth.json file to the headless machine and then codex should "just work" on that machine. Note to copy a file to a Docker container, you can do:
# substitute MY_CONTAINER with the name or id of your Docker container:
CONTAINER_HOME=$(docker exec MY_CONTAINER printenv HOME)
docker exec MY_CONTAINER mkdir -p "$CONTAINER_HOME/.codex"
docker cp auth.json MY_CONTAINER:"$CONTAINER_HOME/.codex/auth.json"
whereas if you are ssh'd into a remote machine, you likely want to use scp:
ssh user@remote 'mkdir -p ~/.codex'
scp ~/.codex/auth.json user@remote:~/.codex/auth.json
or try this one-liner:
ssh user@remote 'mkdir -p ~/.codex && cat > ~/.codex/auth.json' < ~/.codex/auth.json
If you run Codex on a remote machine (VPS/server) without a local browser, the login helper starts a server on localhost:1455 on the remote host. To complete login in your local browser, forward that port to your machine before starting the login flow:
# From your local machine
ssh -L 1455:localhost:1455 <user>@<remote-host>
Then, in that SSH session, run codex and select "Sign in with ChatGPT". When prompted, open the printed URL (it will be http://localhost:1455/...) in your local browser. The traffic will be tunneled to the remote server.
If you prefer to pay-as-you-go, you can still authenticate with your OpenAI API key by setting it as an environment variable:
export OPENAI_API_KEY="your-api-key-here"
Notes:
export line to your shell's configuration file (e.g., ~/.zshrc)./logout command to clear your ChatGPT authentication.You can explicitly choose which authentication Codex should prefer when both are available.
# ~/.codex/config.toml
preferred_auth_method = "apikey"
Or override ad-hoc via CLI:
codex --config preferred_auth_method="apikey"
# ~/.codex/config.toml
preferred_auth_method = "chatgpt"
Notes:
preferred_auth_method = "apikey" and an API key is available, the login screen is skipped.preferred_auth_method = "chatgpt" (default), Codex prefers ChatGPT auth if present; if only an API key is present, it will use the API key. Certain account types may also require API-key mode.We always recommend running Codex in its default sandbox that gives you strong guardrails around what the agent can do. The default sandbox prevents it from editing files outside its workspace, or from accessing the network.
When you launch Codex in a new folder, it detects whether the folder is version controlled and recommends one of two levels of autonomy:
/tmp. You can see what directories are in the workspace with the /status command. See the docs for how to customize this behavior.codex --sandbox workspace-write --ask-for-approval on-requestcodex --sandbox read-only --ask-for-approval on-requestCodex gives you fine-grained control over the sandbox with the --sandbox option, and over when it requests approval with the --ask-for-approval option. Run codex help for more on these options.
Yes, run codex non-interactively with --ask-for-approval never. This option works with all --sandbox options, so you still have full control over Codex's level of autonomy. It will make its best attempt with whatever contrainsts you provide. For example:
codex --ask-for-approval never --sandbox read-only when you are running many agents to answer questions in parallel in the same workspace.codex --ask-for-approval never --sandbox workspace-write when you want the agent to non-interactively take time to produce the best outcome, with strong guardrails around its behavior.codex --ask-for-approval never --sandbox danger-full-access to dangerously give the agent full autonomy. Because this disables important safety mechanisms, we recommend against using this unless running Codex in an isolated environment.config.toml# approval mode
approval_policy = "untrusted"
sandbox_mode = "read-only"
# full-auto mode
approval_policy = "on-request"
sandbox_mode = "workspace-write"
# Optional: allow network in workspace-write mode
[sandbox_workspace_write]
network_access = true
You can also save presets as profiles:
[profiles.full_auto]
approval_policy = "on-request"
sandbox_mode    = "workspace-write"

[profiles.readonly_quiet]
approval_policy = "never"
sandbox_mode    = "read-only"
Below are a few bite-size examples you can copy-paste. Replace the text in quotes with your own task. See the prompting guide for more tips and usage patterns.
✨ What you type What happens| 1 | codex "Refactor the Dashboard component to React Hooks" |
Codex rewrites the class component, runs npm test, and shows the diff. |
| 2 | codex "Generate SQL migrations for adding a users table" |
Infers your ORM, creates migration files, and runs them in a sandboxed DB. |
| 3 | codex "Write unit tests for utils/date.ts" |
Generates tests, executes them, and iterates until they pass. |
| 4 | codex "Bulk-rename *.jpeg -> *.jpg with git mv" |
Safely renames files and updates imports/usages. |
| 5 | codex "Explain what this regex does: ^(?=.*[A-Z]).{8,}$" |
Outputs a step-by-step human explanation. |
| 6 | codex "Carefully review this repo, and propose 3 high impact well-scoped PRs" |
Suggests impactful PRs in the current codebase. |
| 7 | codex "Look for vulnerabilities and create a security review report" |
Finds and explains security bugs. |
You can also run Codex CLI with a prompt as input:
codex "explain this codebase to me"
codex --full-auto "create the fanciest todo-list app"
That's it - Codex will scaffold a file, run it inside a sandbox, install any missing dependencies, and show you the live result. Approve the changes and they'll be committed to your working directory.
--profile to use other models
Codex also allows you to use other providers that support the OpenAI Chat Completions (or Responses) API.
To do so, you must first define custom providers in ~/.codex/config.toml. For example, the provider for a standard Ollama setup would be defined as follows:
[model_providers.ollama]
name = "Ollama"
base_url = "http://localhost:11434/v1"
The base_url will have /chat/completions appended to it to build the full URL for the request.
For providers that also require an Authorization header of the form Bearer: SECRET, an env_key can be specified, which indicates the environment variable to read to use as the value of SECRET when making a request:
[model_providers.openrouter]
name = "OpenRouter"
base_url = "https://openrouter.ai/api/v1"
env_key = "OPENROUTER_API_KEY"
Providers that speak the Responses API are also supported by adding wire_api = "responses" as part of the definition. Accessing OpenAI models via Azure is an example of such a provider, though it also requires specifying additional query_params that need to be appended to the request URL:
[model_providers.azure]
name = "Azure"
# Make sure you set the appropriate subdomain for this URL.
base_url = "https://YOUR_PROJECT_NAME.openai.azure.com/openai"
env_key = "AZURE_OPENAI_API_KEY"  # Or "OPENAI_API_KEY", whichever you use.
# Newer versions appear to support the responses API, see https://github.com/openai/codex/pull/1321
query_params = { api-version = "2025-04-01-preview" }
wire_api = "responses"
Once you have defined a provider you wish to use, you can configure it as your default provider as follows:
model_provider = "azure"
[!TIP] If you find yourself experimenting with a variety of models and providers, then you likely want to invest in defining a profile for each configuration like so:
[profiles.o3]
model_provider = "azure"
model = "o3"

[profiles.mistral]
model_provider = "ollama"
model = "mistral"
This way, you can specify one command-line argument (.e.g., --profile o3, --profile mistral) to override multiple settings together.
Codex can run fully locally against an OpenAI-compatible OSS host (like Ollama) using the --oss flag:
Model selection when using --oss:
-m/--model, Codex defaults to -m gpt-oss:20b and will verify it exists locally (downloading if needed).Point Codex at your own OSS host:
--oss talks to http://localhost:11434/v1.Advanced: you can persist this in your config instead of environment variables by overriding the built-in oss provider in ~/.codex/config.toml:
[model_providers.oss]
name = "Open Source"
base_url = "http://my-ollama.example.com:11434/v1"
By default, Codex CLI runs code and shell commands inside a restricted sandbox to protect your system.
[!IMPORTANT] Not all tool calls are sandboxed. Specifically, trusted Model Context Protocol (MCP) tool calls are executed outside of the sandbox.
This is intentional: MCP tools are explicitly configured and trusted by you, and they often need to connect to external applications or services (e.g. issue trackers, databases, messaging systems).
Running them outside the sandbox allows Codex to integrate with these external systems without being blocked by sandbox restrictions.
The mechanism Codex uses to implement the sandbox policy depends on your OS:
sandbox-exec with a profile (-p) that corresponds to the --sandbox that was specified.sandbox configuration.Note that when running Linux in a containerized environment such as Docker, sandboxing may not work if the host/container configuration does not support the necessary Landlock/seccomp APIs. In such cases, we recommend configuring your Docker container so that it provides the sandbox guarantees you are looking for and then running codex with --sandbox danger-full-access (or, more simply, the --dangerously-bypass-approvals-and-sandbox flag) within your container.
Codex CLI is an experimental project under active development. It is not yet stable, may contain bugs, incomplete features, or undergo breaking changes. We're building it in the open with the community and welcome:
Help us improve by filing issues or submitting PRs (see the section below for how to contribute)!
| Operating systems | macOS 12+, Ubuntu 20.04+/Debian 10+, or Windows 11 via WSL2 |
| Git (optional, recommended) | 2.23+ for built-in PR helpers |
| RAM | 4-GB minimum (8-GB recommended) |
codex |
Interactive TUI | codex |
codex "..." |
Initial prompt for interactive TUI | codex "fix lint errors" |
codex exec "..." |
Non-interactive "automation mode" | codex exec "explain utils.ts" |
Key flags: --model/-m, --ask-for-approval/-a.
You can give Codex extra instructions and guidance using AGENTS.md files. Codex looks for AGENTS.md files in the following places, and merges them top-down:
~/.codex/AGENTS.md - personal global guidanceAGENTS.md at repo root - shared project notesAGENTS.md in the current working directory - sub-folder/feature specificsRun Codex head-less in pipelines. Example GitHub Action step:
- name: Update changelog via Codex
  run: |
    npm install -g @openai/codex
    export OPENAI_API_KEY="${{ secrets.OPENAI_KEY }}"
    codex exec --full-auto "update CHANGELOG for next release"
The Codex CLI can be configured to leverage MCP servers by defining an mcp_servers section in ~/.codex/config.toml. It is intended to mirror how tools such as Claude and Cursor define mcpServers in their respective JSON config files, though the Codex format is slightly different since it uses TOML rather than JSON, e.g.:
# IMPORTANT: the top-level key is `mcp_servers` rather than `mcpServers`.
[mcp_servers.server-name]
command = "npx"
args = ["-y", "mcp-server"]
env = { "API_KEY" = "value" }
[!TIP] It is somewhat experimental, but the Codex CLI can also be run as an MCP server via
codex mcp. If you launch it with an MCP client such asnpx @modelcontextprotocol/inspector codex mcpand send it atools/listrequest, you will see that there is only one tool,codex, that accepts a grab-bag of inputs, including a catch-allconfigmap for anything you might want to override. Feel free to play around with it and provide feedback via GitHub issues.
Because Codex is written in Rust, it honors the RUST_LOG environment variable to configure its logging behavior.
The TUI defaults to RUST_LOG=codex_core=info,codex_tui=info and log messages are written to ~/.codex/log/codex-tui.log, so you can leave the following running in a separate terminal to monitor log messages as they are written:
tail -F ~/.codex/log/codex-tui.log
By comparison, the non-interactive mode (codex exec) defaults to RUST_LOG=error, but messages are printed inline, so there is no need to monitor a separate file.
See the Rust documentation on RUST_LOG for more information on the configuration options.
The GitHub Release also contains a DotSlash file for the Codex CLI named codex. Using a DotSlash file makes it possible to make a lightweight commit to source control to ensure all contributors use the same version of an executable, regardless of what platform they use for development.
# Clone the repository and navigate to the root of the Cargo workspace.
git clone https://github.com/openai/codex.git
cd codex/codex-rs

# Install the Rust toolchain, if necessary.
curl --proto '=https' --tlsv1.2 -sSf https://sh.rustup.rs | sh -s -- -y
source "$HOME/.cargo/env"
rustup component add rustfmt
rustup component add clippy

# Build Codex.
cargo build

# Launch the TUI with a sample prompt.
cargo run --bin codex -- "explain this codebase to me"

# After making changes, ensure the code is clean.
cargo fmt -- --config imports_granularity=Item
cargo clippy --tests

# Run the tests.
cargo test
Codex supports a rich set of configuration options documented in codex-rs/config.md.
By default, Codex loads its configuration from ~/.codex/config.toml.
Though --config can be used to set/override ad-hoc config values for individual invocations of codex.
In 2021, OpenAI released Codex, an AI system designed to generate code from natural language prompts. That original Codex model was deprecated as of March 2023 and is separate from the CLI tool.
Which models are supported?Any model available with Responses API. The default is o4-mini, but pass --model gpt-4.1 or set model: gpt-4.1 in your config file to override.
o3 or o4-mini not work for me?
It's possible that your API account needs to be verified in order to start streaming responses and seeing chain of thought summaries from the API. If you're still running into issues, please let us know!
How do I stop Codex from editing my files?Codex runs model-generated commands in a sandbox. If a proposed command or file change doesn't look right, you can simply type n to deny the command or give the model feedback.
Does it work on Windows?Not directly. It requires Windows Subsystem for Linux (WSL2) - Codex has been tested on macOS and Linux with Node 22.
Codex CLI does support OpenAI organizations with Zero Data Retention (ZDR) enabled. If your OpenAI organization has Zero Data Retention enabled and you still encounter errors such as:
OpenAI rejected the request. Error details: Status: 400, Code: unsupported_parameter, Type: invalid_request_error, Message: 400 Previous response cannot be used for this organization due to Zero Data Retention.
Ensure you are running codex with --config disable_response_storage=true or add this line to ~/.codex/config.toml to avoid specifying the command line option each time:
disable_response_storage = true
See the configuration documentation on disable_response_storage for details.
We're excited to launch a $1 million initiative supporting open source projects that use Codex CLI and other OpenAI models.
Interested? Apply here.
This project is under active development and the code will likely change pretty significantly.
At the moment, we only plan to prioritize reviewing external contributions for bugs or security fixes.
If you want to add a new feature or change the behavior of an existing one, please open an issue proposing the feature and get approval from an OpenAI team member before spending time building it.
New contributions that don't go through this process may be closed if they aren't aligned with our current roadmap or conflict with other priorities/upcoming features.
main - e.g. feat/interactive-prompt.codex --help), or relevant example projects.cargo test && cargo clippy --tests && cargo fmt -- --config imports_granularity=Item). CI failures that could have been caught locally slow down the process.main and that you have resolved merge conflicts.If you run into problems setting up the project, would like feedback on an idea, or just want to say hi - please open a Discussion or jump into the relevant issue. We are happy to help.
Together we can make Codex CLI an incredible tool. Happy hacking! 🚀
All contributors must accept the CLA. The process is lightweight:
Open your pull request.
Paste the following comment (or reply recheck if you've signed before):
I have read the CLA Document and I hereby sign the CLA
The CLA-Assistant bot records your signature in the repo and marks the status check as passed.
No special Git commands, email attachments, or commit footers required.
| Amend last commit | git commit --amend -s --no-edit && git push -f |
The DCO check blocks merges until every commit in the PR carries the footer (with squash this is just the one).
codexFor admins only.
Make sure you are on main and have no local changes. Then run:
VERSION=0.2.0  # Can also be 0.2.0-alpha.1 or any valid Rust version.
./codex-rs/scripts/create_github_release.sh "$VERSION"
This will make a local commit on top of main with version set to $VERSION in codex-rs/Cargo.toml (note that on main, we leave the version as version = "0.0.0").
This will push the commit using the tag rust-v${VERSION}, which in turn kicks off the release workflow. This will create a new GitHub Release named $VERSION.
If everything looks good in the generated GitHub Release, uncheck the pre-release box so it is the latest release.
Create a PR to update Formula/c/codex.rb on Homebrew.
Have you discovered a vulnerability or have concerns about model output? Please e-mail [email protected] and we will respond promptly.
This repository is licensed under the Apache-2.0 License.
开源白板工具(SaaS),一体化白板,包含思维导图、流程图、自由画等。All in one open-source whiteboard tool with mind, flowchart, freehand and etc.
![]()

All in one 白板,思维导图、流程图、自由画等

.drawnix)Drawnix ,源于绘画( Draw )与凤凰( Phoenix )的灵感交织。
凤凰象征着生生不息的创造力,而 Draw 代表着人类最原始的表达方式。在这里,每一次创作都是一次艺术的涅槃,每一笔绘画都是灵感的重生。
创意如同凤凰,浴火方能重生,而 Drawnix 要做技术与创意之火的守护者。
Draw Beyond, Rise Above.
Drawnix 的定位是一个开箱即用、开源、免费的工具产品,它的底层是 Plait 框架,Plait 是我司开源的一款画图框架,代表着公司在知识库产品上的重要技术沉淀。
Drawnix 是插件架构,与前面说到开源工具比技术架构更复杂一些,但是插件架构也有优势,比如能够支持多种 UI 框架(Angular、React),能够集成不同富文本框架(当前仅支持 Slate 框架),在开发上可以很好的实现业务的分层,开发各种细粒度的可复用插件,可以扩展更多的画板的应用场景。
drawnix/
├── apps/
│   ├── web                   # drawnix.com
│   │    └── index.html       # HTML
├── dist/                     # 构建产物
├── packages/
│   └── drawnix/              # 白板应用
│   └── react-board/          # 白板 React 视图层
│   └── react-text/           # 文本渲染模块
├── package.json
├── ...
└── README.md
└── README_en.md
https://drawnix.com 是 drawnix 的最小化应用。
近期会高频迭代 drawnix.com,直到发布 Dawn(破晓) 版本。
npm install

npm run start
docker pull pubuzhixing/drawnix:latest
欢迎任何形式的贡献:
提 Bug
贡献代码
欢迎大家 star ⭐️⭐️⭐️ 支持。
Run Windows apps such as Microsoft Office/Adobe in Linux (Ubuntu/Fedora) and GNOME/KDE as if they were a part of the native OS, including Nautilus integration. Hard fork of https://github.com/Fmstrat/winapps/
![]()
![]()
Run Windows applications (including Microsoft 365 and Adobe Creative Cloud) on GNU/Linux with KDE Plasma, GNOME or XFCE, integrated seamlessly as if they were native to the OS.

WinApps works by:
Docker, Podman or libvirt virtual machine.FreeRDP as a backend to seamlessly render Windows applications alongside GNU/Linux applications./home directory is accessible within Windows via the \\tsclient\home mount.Nautilus, allowing you to right-click files to open them with specific Windows applications based on the file MIME type.WinApps supports ALL Windows applications.
Universal application support is achieved by:
.exe files listed within the Windows Registry.Officially supported applications benefit from high-resolution icons and pre-populated MIME types. This enables file managers to determine which Windows applications should open files based on file extensions. Icons for other detected applications are pulled from .exe files.
Contributing to the list of supported applications is encouraged through submission of pull requests! Please help us grow the WinApps community.
Please note that the provided list of officially supported applications is community-driven. As such, some applications may not be tested and verified by the WinApps team.
| |
Adobe Acrobat Pro (X) Icon in the Public Domain. |
|
Adobe After Effects (CC) Icon in the Public Domain. |
| |
Adobe Audition (CC) Icon in the Public Domain. |
|
Adobe Bridge (CS6, CC) Icon in the Public Domain. |
| |
Adobe Creative Cloud (CC) Icon under MIT license. |
|
Adobe Illustrator (CC) Icon in the Public Domain. |
| |
Adobe InDesign (CC) Icon in the Public Domain. |
|
Adobe Lightroom (CC) Icon in the Public Domain. |
| |
Adobe Photoshop (CS6, CC, 2022) Icon in the Public Domain. |
|
Command Prompt (cmd.exe) Icon under MIT license. |
| |
File Explorer (Windows Explorer) Icon in the Public Domain. |
|
Internet Explorer (11) Icon in the Public Domain. |
| |
Microsoft Access (2016, 2019, o365) Icon in the Public Domain. |
|
Microsoft Excel (2016, 2019, o365) Icon in the Public Domain. |
| |
Microsoft Word (2016, 2019, o365) Icon in the Public Domain. |
|
Microsoft OneNote (2016, 2019, o365) Icon in the Public Domain. |
| |
Microsoft Outlook (2016, 2019, o365) Icon in the Public Domain. |
|
Microsoft PowerPoint (2016, 2019, o365) Icon in the Public Domain. |
| |
Microsoft Publisher (2016, 2019, o365) Icon in the Public Domain. |
|
Microsoft Visio (Standard/Pro. 2021, Plan 2) Icon in the Public Domain. |
| |
Microsoft Project (Standard/Pro. 2021, Plan 3/5) Icon in the Public Domain. |
|
Microsoft Visual Studio (Comm./Pro./Ent. 2022) Icon in the Public Domain. |
| |
mIRC Icon in the Public Domain. |
|
PowerShell Icon under MIT license. |
| |
Windows (Full RDP Session) Icon in the Public Domain. |
Both Docker and Podman are recommended backends for running the Windows virtual machine, as they facilitate an automated Windows installation process. WinApps is also compatible with libvirt. While this method requires considerably more manual configuration, it also provides greater virtual machine customisation options. All three methods leverage the KVM hypervisor, ensuring excellent virtual machine performance. Ultimately, the choice of backend depends on your specific use case.
The following guides are available:
If you already have a Windows VM or server you wish to use with WinApps, you will still have to follow the final steps described in the libvirt documentation.
Install the required dependencies.
sudo apt install -y curl dialog freerdp3-x11 git iproute2 libnotify-bin netcat-openbsd
[!NOTE] On Debian 12 ("bookworm"), you need to enable the
backportsrepository for thefreerdp3-x11package to become available. For instructions, see https://backports.debian.org/Instructions.
sudo dnf install -y curl dialog freerdp git iproute libnotify nmap-ncat
sudo pacman -Syu --needed -y curl dialog freerdp git iproute2 libnotify openbsd-netcat
sudo zypper install -y curl dialog freerdp git iproute2 libnotify-tools netcat-openbsd
sudo emerge --ask=n net-misc/curl dev-util/dialog net-misc/freerdp:3 dev-vcs/git sys-apps/iproute2 x11-libs/libnotify net-analyzer/openbsd-netcat
[!NOTE] WinApps requires
FreeRDPversion 3 or later. If not available for your distribution through your package manager, you can install the Flatpak:flatpak install flathub com.freerdp.FreeRDP sudo flatpak override --filesystem=home com.freerdp.FreeRDP # To use `+home-drive`However, if you have weird issues like #233 when running Flatpak, please compile FreeRDP from source according to this guide.
Create a configuration file at ~/.config/winapps/winapps.conf containing the following:
##################################
#   WINAPPS CONFIGURATION FILE   #
##################################

# INSTRUCTIONS
# - Leading and trailing whitespace are ignored.
# - Empty lines are ignored.
# - Lines starting with '#' are ignored.
# - All characters following a '#' are ignored.

# [WINDOWS USERNAME]
RDP_USER="MyWindowsUser"

# [WINDOWS PASSWORD]
# NOTES:
# - If using FreeRDP v3.9.0 or greater, you *have* to set a password
RDP_PASS="MyWindowsPassword"

# [WINDOWS DOMAIN]
# DEFAULT VALUE: '' (BLANK)
RDP_DOMAIN=""

# [WINDOWS IPV4 ADDRESS]
# NOTES:
# - If using 'libvirt', 'RDP_IP' will be determined by WinApps at runtime if left unspecified.
# DEFAULT VALUE:
# - 'docker': '127.0.0.1'
# - 'podman': '127.0.0.1'
# - 'libvirt': '' (BLANK)
RDP_IP="127.0.0.1"

# [VM NAME]
# NOTES:
# - Only applicable when using 'libvirt'
# - The libvirt VM name must match so that WinApps can determine VM IP, start the VM, etc.
# DEFAULT VALUE: 'RDPWindows'
VM_NAME="RDPWindows"

# [WINAPPS BACKEND]
# DEFAULT VALUE: 'docker'
# VALID VALUES:
# - 'docker'
# - 'podman'
# - 'libvirt'
# - 'manual'
WAFLAVOR="docker"

# [DISPLAY SCALING FACTOR]
# NOTES:
# - If an unsupported value is specified, a warning will be displayed.
# - If an unsupported value is specified, WinApps will use the closest supported value.
# DEFAULT VALUE: '100'
# VALID VALUES:
# - '100'
# - '140'
# - '180'
RDP_SCALE="100"

# [MOUNTING REMOVABLE PATHS FOR FILES]
# NOTES:
# - By default, `udisks` (which you most likely have installed) uses /run/media for mounting removable devices.
#   This improves compatibility with most desktop environments (DEs).
# ATTENTION: The Filesystem Hierarchy Standard (FHS) recommends /media instead. Verify your system's configuration.
# - To manually mount devices, you may optionally use /mnt.
# REFERENCE: https://wiki.archlinux.org/title/Udisks#Mount_to_/media
REMOVABLE_MEDIA="/run/media"

# [ADDITIONAL FREERDP FLAGS & ARGUMENTS]
# NOTES:
# - You can try adding /network:lan to these flags in order to increase performance, however, some users have faced issues with this.
# DEFAULT VALUE: '/cert:tofu /sound /microphone +home-drive'
# VALID VALUES: See https://github.com/awakecoding/FreeRDP-Manuals/blob/master/User/FreeRDP-User-Manual.markdown
RDP_FLAGS="/cert:tofu /sound /microphone +home-drive"

# [DEBUG WINAPPS]
# NOTES:
# - Creates and appends to ~/.local/share/winapps/winapps.log when running WinApps.
# DEFAULT VALUE: 'true'
# VALID VALUES:
# - 'true'
# - 'false'
DEBUG="true"

# [AUTOMATICALLY PAUSE WINDOWS]
# NOTES:
# - This is currently INCOMPATIBLE with 'manual'.
# DEFAULT VALUE: 'off'
# VALID VALUES:
# - 'on'
# - 'off'
AUTOPAUSE="off"

# [AUTOMATICALLY PAUSE WINDOWS TIMEOUT]
# NOTES:
# - This setting determines the duration of inactivity to tolerate before Windows is automatically paused.
# - This setting is ignored if 'AUTOPAUSE' is set to 'off'.
# - The value must be specified in seconds (to the nearest 10 seconds e.g., '30', '40', '50', etc.).
# - For RemoteApp RDP sessions, there is a mandatory 20-second delay, so the minimum value that can be specified here is '20'.
# - Source: https://techcommunity.microsoft.com/t5/security-compliance-and-identity/terminal-services-remoteapp-8482-session-termination-logic/ba-p/246566
# DEFAULT VALUE: '300'
# VALID VALUES: >=20
AUTOPAUSE_TIME="300"

# [FREERDP COMMAND]
# NOTES:
# - WinApps will attempt to automatically detect the correct command to use for your system.
# DEFAULT VALUE: '' (BLANK)
# VALID VALUES: The command required to run FreeRDPv3 on your system (e.g., 'xfreerdp', 'xfreerdp3', etc.).
FREERDP_COMMAND=""

# [TIMEOUTS]
# NOTES:
# - These settings control various timeout durations within the WinApps setup.
# - Increasing the timeouts is only necessary if the corresponding errors occur.
# - Ensure you have followed all the Troubleshooting Tips in the error message first.

# PORT CHECK
# - The maximum time (in seconds) to wait when checking if the RDP port on Windows is open.
# - Corresponding error: "NETWORK CONFIGURATION ERROR" (exit status 13).
# DEFAULT VALUE: '5'
PORT_TIMEOUT="5"

# RDP CONNECTION TEST
# - The maximum time (in seconds) to wait when testing the initial RDP connection to Windows.
# - Corresponding error: "REMOTE DESKTOP PROTOCOL FAILURE" (exit status 14).
# DEFAULT VALUE: '30'
RDP_TIMEOUT="30"

# APPLICATION SCAN
# - The maximum time (in seconds) to wait for the script that scans for installed applications on Windows to complete.
# - Corresponding error: "APPLICATION QUERY FAILURE" (exit status 15).
# DEFAULT VALUE: '60'
APP_SCAN_TIMEOUT="60"

# WINDOWS BOOT
# - The maximum time (in seconds) to wait for the Windows VM to boot if it is not running, before attempting to launch an application.
# DEFAULT VALUE: '120'
BOOT_TIMEOUT="120"
[!IMPORTANT] To safeguard your Windows password, ensure
~/.config/winapps/winapps.confis accessible only by your user account.chown $(whoami):$(whoami) ~/.config/winapps/winapps.conf chmod 600 ~/.config/winapps/winapps.conf
[!IMPORTANT]
RDP_USERandRDP_PASSmust correspond to a complete Windows user account and password, such as those created during Windows setup or for a domain user. User/PIN combinations are not valid for RDP access.
[!IMPORTANT] If you wish to use an alternative WinApps backend (other than
Docker), uncomment and changeWAFLAVOR="docker"toWAFLAVOR="podman"orWAFLAVOR="libvirt".
RDP_IP to specify the location of the Windows server. You may also wish to configure a static IP address for this server.libvirt with NAT enabled, leave RDP_IP commented out and WinApps will auto-detect the local IP address for the VM.RDP_DOMAIN.RDP_SCALE to the scale you would like to use (100, 140 or 180)./prevent-session-lock 120), uncomment and use the RDP_FLAGS configuration option./multimon to RDP_FLAGS. A FreeRDP bug may result in a black screen however, in which case you should revert this change./kbd:unicode to RDP_FLAGS. This ensures client inputs are sent as Unicode sequences.DEBUG, a log will be created on each application start in ~/.local/share/winapps/winapps.log.xfreerdp or xfreerdp3, the correct command can be specified using FREERDP_COMMAND.Test establishing an RDP session by running the following command, replacing the /u:, /p:, and /v: values with the correct values specified in ~/.config/winapps/winapps.conf.
xfreerdp3 /u:"Your Windows Username" /p:"Your Windows Password" /v:192.168.122.2 /cert:tofu

# Or, if you installed FreeRDP using Flatpak
flatpak run --command=xfreerdp com.freerdp.FreeRDP /u:"Your Windows Username" /p:"Your Windows Password" /v:192.168.122.2 /cert:tofu
FreeRDP command may vary depending on your system (e.g. xfreerdp, xfreerdp3, etc.).If the Windows desktop appears in a FreeRDP window, the configuration was successful and the correct RDP TLS certificate was enrolled on the Linux host. Disconnect from the RDP session and skip the following debugging step.
[DEBUGGING STEP] If an outdated or expired certificate is detected, the FreeRDP command will display output resembling the following. In this case, the old certificate will need to be removed and a new RDP TLS certificate installed.
@@@@@@@@@@@@@@@@@@@@@@@@@@@@@@@@@@@@@@@@@@@@@@@@@@@@@@@@@@@
@           WARNING: CERTIFICATE NAME MISMATCH!           @
@@@@@@@@@@@@@@@@@@@@@@@@@@@@@@@@@@@@@@@@@@@@@@@@@@@@@@@@@@@

The hostname used for this connection (192.168.122.2:3389)
does not match the name given in the certificate:
Common Name (CN):
        RDPWindows
A valid certificate for the wrong name should NOT be trusted!

The host key for 192.168.122.2:3389 has changed

@@@@@@@@@@@@@@@@@@@@@@@@@@@@@@@@@@@@@@@@@@@@@@@@@@@@@@@@@@@
@    WARNING: REMOTE HOST IDENTIFICATION HAS CHANGED!     @
@@@@@@@@@@@@@@@@@@@@@@@@@@@@@@@@@@@@@@@@@@@@@@@@@@@@@@@@@@@

IT IS POSSIBLE THAT SOMEONE IS DOING SOMETHING NASTY!
Someone could be eavesdropping on you right now (man-in-the-middle attack)!
It is also possible that a host key has just been changed.
The fingerprint for the host key sent by the remote host is 8e:b4:d2:8e:4e:14:e7:4e:82:9b:07:5b:e1:68:40:18:bc:db:5f:bc:29:0d:91:83:f9:17:f9:13:e6:51:dc:36
Please contact your system administrator.
Add correct host key in /home/rohanbarar/.config/freerdp/server/192.168.122.2_3389.pem to get rid of this message.
If you experience the above error, delete any old or outdated RDP TLS certificates associated with Windows, as they can prevent FreeRDP from establishing a connection.
These certificates are located within ~/.config/freerdp/server/ and follow the naming format <Windows-VM-IPv4-Address>_<RDP-Port>.pem (e.g., 192.168.122.2_3389.pem, 127.0.0.1_3389.pem, etc.).
If you use FreeRDP for purposes other than WinApps, ensure you only remove certificates related to the relevant Windows VM. If no relevant certificates are found, no action is needed.
Following deletion, re-attempt establishing an RDP session.
With Windows still powered on, run the WinApps installer.
bash <(curl https://raw.githubusercontent.com/winapps-org/winapps/main/setup.sh)
Once WinApps is installed, a list of additional arguments can be accessed by running winapps-setup --help.

Adding your own applications with custom icons and MIME types to the installer is easy. Simply copy one of the application configurations in the apps folder located within the WinApps repository, and:
icon.svg with an SVG for your application (ensuring the icon is appropriately licensed).WinApps offers a manual mode for running applications that were not configured by the WinApps installer. This is completed with the manual flag. Executables that are in the Windows PATH do not require full path definition.
winapps manual "C:\my\directory\executableNotInPath.exe"
winapps manual executableInPath.exe
The installer can be run multiple times. To update your installation of WinApps:
winapps-setup.The WinApps Launcher provides a simple system tray menu that makes it easy to launch your installed Windows applications, open a full desktop RDP session, and control your Windows VM or container. You can start, stop, pause, reboot or hibernate Windows, as well as access your installed applications from a convenient list. This lightweight, optional tool helps streamline your overall WinApps experience.

First, follow Step 1 of the normal installation guide to create your VM. Then, install WinApps according to the following instructions.
After installation, it will be available under winapps, with the installer being available under winapps-setup and the optional launcher being available under winapps-launcher.
First, make sure Flakes and the nix command are enabled. In your ~/.config/nix/nix.conf:
experimental-features = nix-command flakes
nix profile install github:winapps-org/winapps#winapps
nix profile install github:winapps-org/winapps#winapps-launcher # optional
# flake.nix
{
  description = "My configuration";

  inputs = {
    nixpkgs.url = "github:NixOS/nixpkgs/nixos-unstable";

    winapps = {
      url = "github:winapps-org/winapps";
      inputs.nixpkgs.follows = "nixpkgs";
    };
  };

  outputs =
    inputs@{
      nixpkgs,
      winapps,
      ...
    }:
    {
      nixosConfigurations.hostname = nixpkgs.lib.nixosSystem rec {
        system = "x86_64-linux";

        specialArgs = {
          inherit inputs system;
        };

        modules = [
          ./configuration.nix
          (
            {
              pkgs,
              system ? pkgs.system,
              ...
            }:
            {
              environment.systemPackages = [
                winapps.packages."${system}".winapps
                winapps.packages."${system}".winapps-launcher # optional
              ];
            }
          )
        ];
      };
    };
}
Flakes aren't real and they can't hurt you.. However, if you still don't want to use flakes, you can use WinApps with flake-compat like:
# configuration.nix
{
  pkgs,
  system ? pkgs.system,
  ...
}:
{
  # set up binary cache (optional)
  nix.settings = {
    substituters = [ "https://winapps.cachix.org/" ];
    trusted-public-keys = [ "winapps.cachix.org-1:HI82jWrXZsQRar/PChgIx1unmuEsiQMQq+zt05CD36g=" ];
    trusted-users = [ "<your username>" ]; # replace with your username
  };

  environment.systemPackages =
    let
      winapps =
        (import (builtins.fetchTarball "https://github.com/winapps-org/winapps/archive/main.tar.gz"))
        .packages."${system}";
    in
    [
      winapps.winapps
      winapps.winapps-launcher # optional
    ];
}
The ultimate LLM/AI application development framework in Golang.


English | 中文
Eino['aino] (pronounced similarly to "I know") aims to be the ultimate LLM application development framework in Golang. Drawing inspirations from many excellent LLM application development frameworks in the open-source community such as LangChain & LlamaIndex, etc., as well as learning from cutting-edge research and real world applications, Eino offers an LLM application development framework that emphasizes on simplicity, scalability, reliability and effectiveness that better aligns with Golang programming conventions.
What Eino provides are:
With the above arsenal, Eino can standardize, simplify, and improve efficiency at different stages of the AI application development cycle: 
Use a component directly:
model, _ := openai.NewChatModel(ctx, config) // create an invokable LLM instance
message, _ := model.Generate(ctx, []*Message{
    SystemMessage("you are a helpful assistant."),
    UserMessage("what does the future AI App look like?")})
Of course, you can do that, Eino provides lots of useful components to use out of the box. But you can do more by using orchestration, for three reasons:
Eino provides three set of APIs for orchestration
API Characteristics and usage| Chain | Simple chained directed graph that can only go forward. |
| Graph | Cyclic or Acyclic directed graph. Powerful and flexible. |
| Workflow | Acyclic graph that supports data mapping at struct field level. |
Let's create a simple chain: a ChatTemplate followed by a ChatModel.

chain, _ := NewChain[map[string]any, *Message]().
           AppendChatTemplate(prompt).
           AppendChatModel(model).
           Compile(ctx)

chain.Invoke(ctx, map[string]any{"query": "what's your name?"})
Now let's create a graph that uses a ChatModel to generate answer or tool calls, then uses a ToolsNode to execute those tools if needed.

graph := NewGraph[map[string]any, *schema.Message]()

_ = graph.AddChatTemplateNode("node_template", chatTpl)
_ = graph.AddChatModelNode("node_model", chatModel)
_ = graph.AddToolsNode("node_tools", toolsNode)
_ = graph.AddLambdaNode("node_converter", takeOne)

_ = graph.AddEdge(START, "node_template")
_ = graph.AddEdge("node_template", "node_model")
_ = graph.AddBranch("node_model", branch)
_ = graph.AddEdge("node_tools", "node_converter")
_ = graph.AddEdge("node_converter", END)

compiledGraph, err := graph.Compile(ctx)
if err != nil {
return err
}
out, err := r.Invoke(ctx, map[string]any{"query":"Beijing's weather this weekend"})
Now let's create a workflow that flexibly maps input & output at the field level:
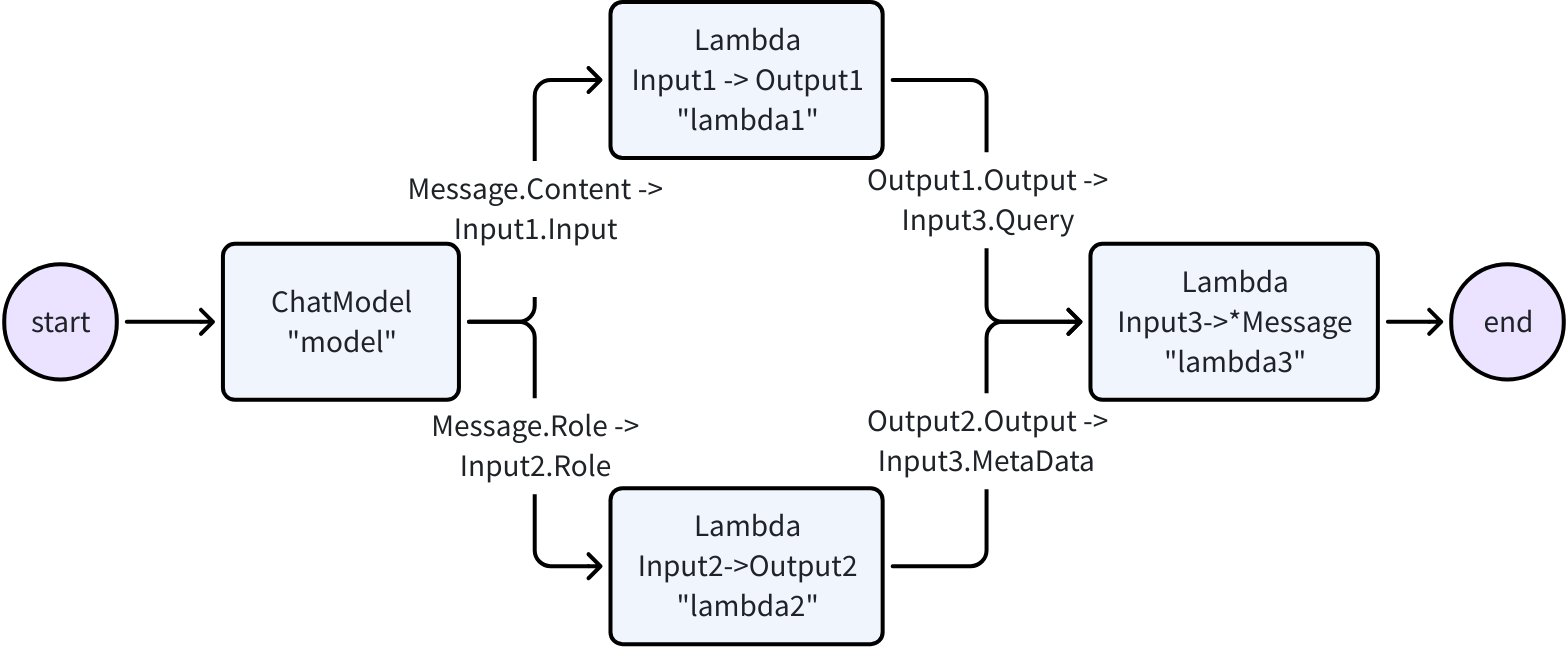
type Input1 struct {
    Input string
}

type Output1 struct {
    Output string
}

type Input2 struct {
    Role schema.RoleType
}

type Output2 struct {
    Output string
}

type Input3 struct {
    Query string
    MetaData string
}

var (
    ctx context.Context
    m model.BaseChatModel
    lambda1 func(context.Context, Input1) (Output1, error)
    lambda2 func(context.Context, Input2) (Output2, error)
    lambda3 func(context.Context, Input3) (*schema.Message, error)
)

wf := NewWorkflow[[]*schema.Message, *schema.Message]()
wf.AddChatModelNode("model", m).AddInput(START)
wf.AddLambdaNode("lambda1", InvokableLambda(lambda1)).
    AddInput("model", MapFields("Content", "Input"))
wf.AddLambdaNode("lambda2", InvokableLambda(lambda2)).
    AddInput("model", MapFields("Role", "Role"))
wf.AddLambdaNode("lambda3", InvokableLambda(lambda3)).
    AddInput("lambda1", MapFields("Output", "Query")).
    AddInput("lambda2", MapFields("Output", "MetaData"))
wf.End().AddInput("lambda3")
runnable, err := wf.Compile(ctx)
if err != nil {
    return err
}
our, err := runnable.Invoke(ctx, []*schema.Message{
    schema.UserMessage("kick start this workflow!"),
})
Now let's create a 'ReAct' agent: A ChatModel binds to Tools. It receives input Messages and decides independently whether to call the Tool or output the final result. The execution result of the Tool will again become the input Message for the ChatModel and serve as the context for the next round of independent judgment.

We provide a complete implementation for ReAct Agent out of the box in the flow package. Check out the code here: flow/agent/react
Our implementation of ReAct Agent uses Eino's graph orchestration exclusively, which provides the following benefits out of the box:
For example, you could easily extend the compiled graph with callbacks:
handler := NewHandlerBuilder().
  OnStartFn(
    func(ctx context.Context, info *RunInfo, input CallbackInput) context.Context) {
        log.Infof("onStart, runInfo: %v, input: %v", info, input)
    }).
  OnEndFn(
    func(ctx context.Context, info *RunInfo, output CallbackOutput) context.Context) {
        log.Infof("onEnd, runInfo: %v, out: %v", info, output)
    }).
  Build()

compiledGraph.Invoke(ctx, input, WithCallbacks(handler))
or you could easily assign options to different nodes:
// assign to All nodes
compiledGraph.Invoke(ctx, input, WithCallbacks(handler))

// assign only to ChatModel nodes
compiledGraph.Invoke(ctx, input, WithChatModelOption(WithTemperature(0.5))

// assign only to node_1
compiledGraph.Invoke(ctx, input, WithCallbacks(handler).DesignateNode("node_1"))
Encapsulates common building blocks into component abstractions, each have multiple component implementations that are ready to be used out of the box.
Implementations can be nested and captures complex business logic.
| Invoke | Accepts non-stream type I and returns non-stream type O |
| Stream | Accepts non-stream type I and returns stream type StreamReader[O] |
| Collect | Accepts stream type StreamReader[I] and returns non-stream type O |
| Transform | Accepts stream type StreamReader[I] and returns stream type StreamReader[O] |

The Eino framework consists of several parts:
Eino(this repo): Contains Eino's type definitions, streaming mechanism, component abstractions, orchestration capabilities, aspect mechanisms, etc.
EinoExt: Component implementations, callback handlers implementations, component usage examples, and various tools such as evaluators, prompt optimizers.
Eino Devops: visualized developing, visualized debugging etc.
EinoExamples is the repo containing example applications and best practices for Eino.
For learning and using Eino, we provide a comprehensive Eino User Manual to help you quickly understand the concepts in Eino and master the skills of developing AI applications based on Eino. Start exploring through the Eino User Manual now!
For a quick introduction to building AI applications with Eino, we recommend starting with Eino: Quick Start
If you discover a potential security issue in this project, or think you may have discovered a security issue, we ask that you notify Bytedance Security via our security center or vulnerability reporting email.
Please do not create a public GitHub issue.

This project is licensed under the Apache-2.0 License.
A unified inference and post-training framework for accelerated video generation.
FastVideo is a unified post-training and inference framework for accelerated video generation.
FastVideo features an end-to-end unified pipeline for accelerating diffusion models, starting from data preprocessing to model training, finetuning, distillation, and inference. FastVideo is designed to be modular and extensible, allowing users to easily add new optimizations and techniques. Whether it is training-free optimizations or post-training optimizations, FastVideo has you covered.
| 🕹️ Online Demo | Documentation | Quick Start | 🤗 FastWan | 🟣💬 Slack | 🟣💬 WeChat |
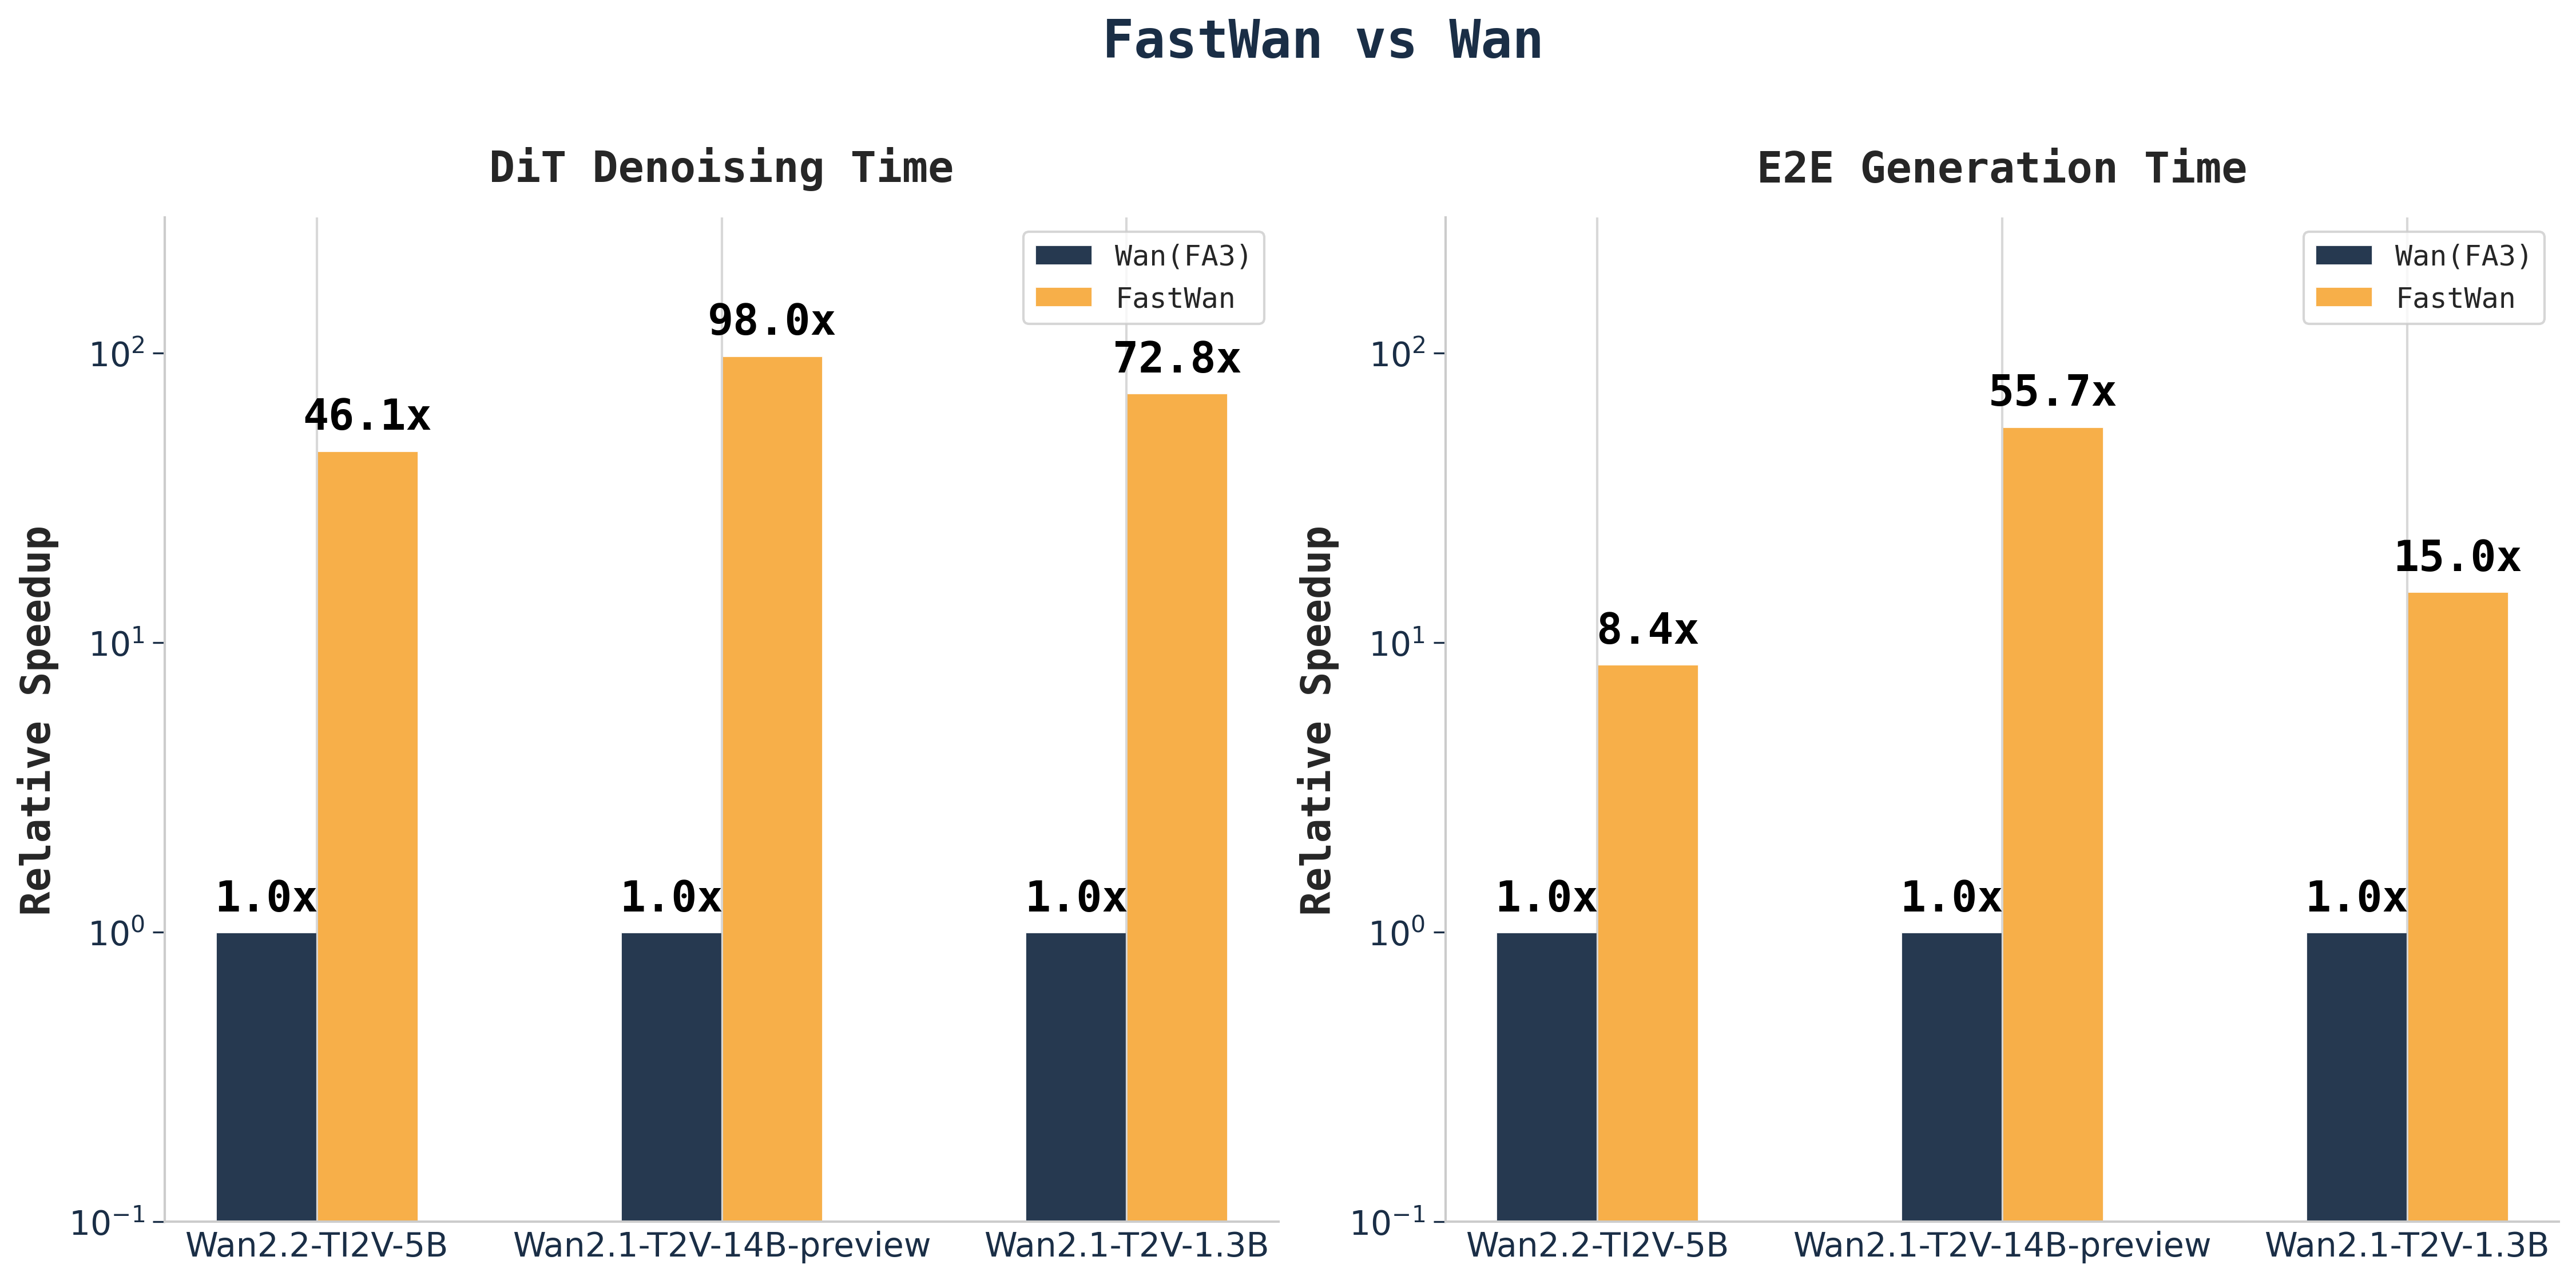
2025/08/04: Release FastWan models and Sparse-Distillation.2025/06/14: Release finetuning and inference code for VSA2025/04/24: FastVideo V1 is released!2025/02/18: Release the inference code for Sliding Tile Attention.FastVideo has the following features:
We recommend using an environment manager such as Conda to create a clean environment:
# Create and activate a new conda environment
conda create -n fastvideo python=3.12
conda activate fastvideo

# Install FastVideo
pip install fastvideo
Please see our docs for more detailed installation instructions.
For our sparse distillation techniques, please see our distillation docs and check out our blog.
See below for recipes and datasets:
Model Sparse Distillation Dataset| FastWan2.1-T2V-1.3B | Recipe | FastVideo Synthetic Wan2.1 480P |
| FastWan2.1-T2V-14B-Preview | Coming soon! | FastVideo Synthetic Wan2.1 720P |
| FastWan2.2-TI2V-5B | Recipe | FastVideo Synthetic Wan2.2 720P |
Here's a minimal example to generate a video using the default settings. Make sure VSA kernels are installed. Create a file called example.py with the following code:
import os
from fastvideo import VideoGenerator

def main():
    os.environ["FASTVIDEO_ATTENTION_BACKEND"] = "VIDEO_SPARSE_ATTN"

    # Create a video generator with a pre-trained model
    generator = VideoGenerator.from_pretrained(
        "FastVideo/FastWan2.1-T2V-1.3B-Diffusers",
        num_gpus=1,  # Adjust based on your hardware
    )

    # Define a prompt for your video
    prompt = "A curious raccoon peers through a vibrant field of yellow sunflowers, its eyes wide with interest."

    # Generate the video
    video = generator.generate_video(
        prompt,
        return_frames=True,  # Also return frames from this call (defaults to False)
        output_path="my_videos/",  # Controls where videos are saved
        save_video=True
    )

if __name__ == '__main__':
    main()
Run the script with:
python example.py
For a more detailed guide, please see our inference quick start.
More FastWan Models Coming Soon!
See details in development roadmap.
We welcome all contributions. Please check out our guide here
We learned and reused code from the following projects:
We thank MBZUAI, Anyscale, and GMI Cloud for their support throughout this project.
If you find FastVideo useful, please considering citing our work:
@software{fastvideo2024,
  title        = {FastVideo: A Unified Framework for Accelerated Video Generation},
  author       = {The FastVideo Team},
  url          = {https://github.com/hao-ai-lab/FastVideo},
  month        = apr,
  year         = {2024},
}

@article{zhang2025vsa,
  title={VSA: Faster Video Diffusion with Trainable Sparse Attention},
  author={Zhang, Peiyuan and Huang, Haofeng and Chen, Yongqi and Lin, Will and Liu, Zhengzhong and Stoica, Ion and Xing, Eric and Zhang, Hao},
  journal={arXiv preprint arXiv:2505.13389},
  year={2025}
}

@article{zhang2025fast,
  title={Fast video generation with sliding tile attention},
  author={Zhang, Peiyuan and Chen, Yongqi and Su, Runlong and Ding, Hangliang and Stoica, Ion and Liu, Zhengzhong and Zhang, Hao},
  journal={arXiv preprint arXiv:2502.04507},
  year={2025}
}
Sim is an open-source AI agent workflow builder. Sim's interface is a lightweight, intuitive way to rapidly build and deploy LLMs that connect with your favorite tools.
![]()
Build and deploy AI agent workflows in minutes.

![]()
npx simstudio
Docker must be installed and running on your machine.
-p, --port <port> |
Port to run Sim on (default 3000) |
--no-pull |
Skip pulling latest Docker images |
# Clone the repository
git clone https://github.com/simstudioai/sim.git

# Navigate to the project directory
cd sim

# Start Sim
docker compose -f docker-compose.prod.yml up -d
Access the application at http://localhost:3000/
Run Sim with local AI models using Ollama - no external APIs required:
# Start with GPU support (automatically downloads gemma3:4b model)
docker compose -f docker-compose.ollama.yml --profile setup up -d

# For CPU-only systems:
docker compose -f docker-compose.ollama.yml --profile cpu --profile setup up -d
Wait for the model to download, then visit http://localhost:3000. Add more models with:
docker compose -f docker-compose.ollama.yml exec ollama ollama pull llama3.1:8b
bun run dev:full in the terminal or use the sim-start alias
Requirements:
Note: Sim uses vector embeddings for AI features like knowledge bases and semantic search, which requires the pgvector PostgreSQL extension.
git clone https://github.com/simstudioai/sim.git
cd sim
bun install
You need PostgreSQL with the vector extension for embedding support. Choose one option:
Option A: Using Docker (Recommended)
# Start PostgreSQL with pgvector extension
docker run --name simstudio-db \
  -e POSTGRES_PASSWORD=your_password \
  -e POSTGRES_DB=simstudio \
  -p 5432:5432 -d \
  pgvector/pgvector:pg17
Option B: Manual Installation
cd apps/sim
cp .env.example .env  # Configure with required variables (DATABASE_URL, BETTER_AUTH_SECRET, BETTER_AUTH_URL)
Update your .env file with the database URL:
DATABASE_URL="postgresql://postgres:your_password@localhost:5432/simstudio"
bunx drizzle-kit migrate
Recommended approach - run both servers together (from project root):
bun run dev:full
This starts both the main Next.js application and the realtime socket server required for full functionality.
Alternative - run servers separately:
Next.js app (from project root):
bun run dev
Realtime socket server (from apps/sim directory in a separate terminal):
cd apps/sim
bun run dev:sockets
Copilot is a Sim-managed service. To use Copilot on a self-hosted instance:
COPILOT_API_KEY in your self-hosted environment to that valueWe welcome contributions! Please see our Contributing Guide for details.
This project is licensed under the Apache License 2.0 - see the LICENSE file for details.
Made with ❤️ by the Sim Team
Qwen3-Coder is the code version of Qwen3, the large language model series developed by Qwen team, Alibaba Cloud.

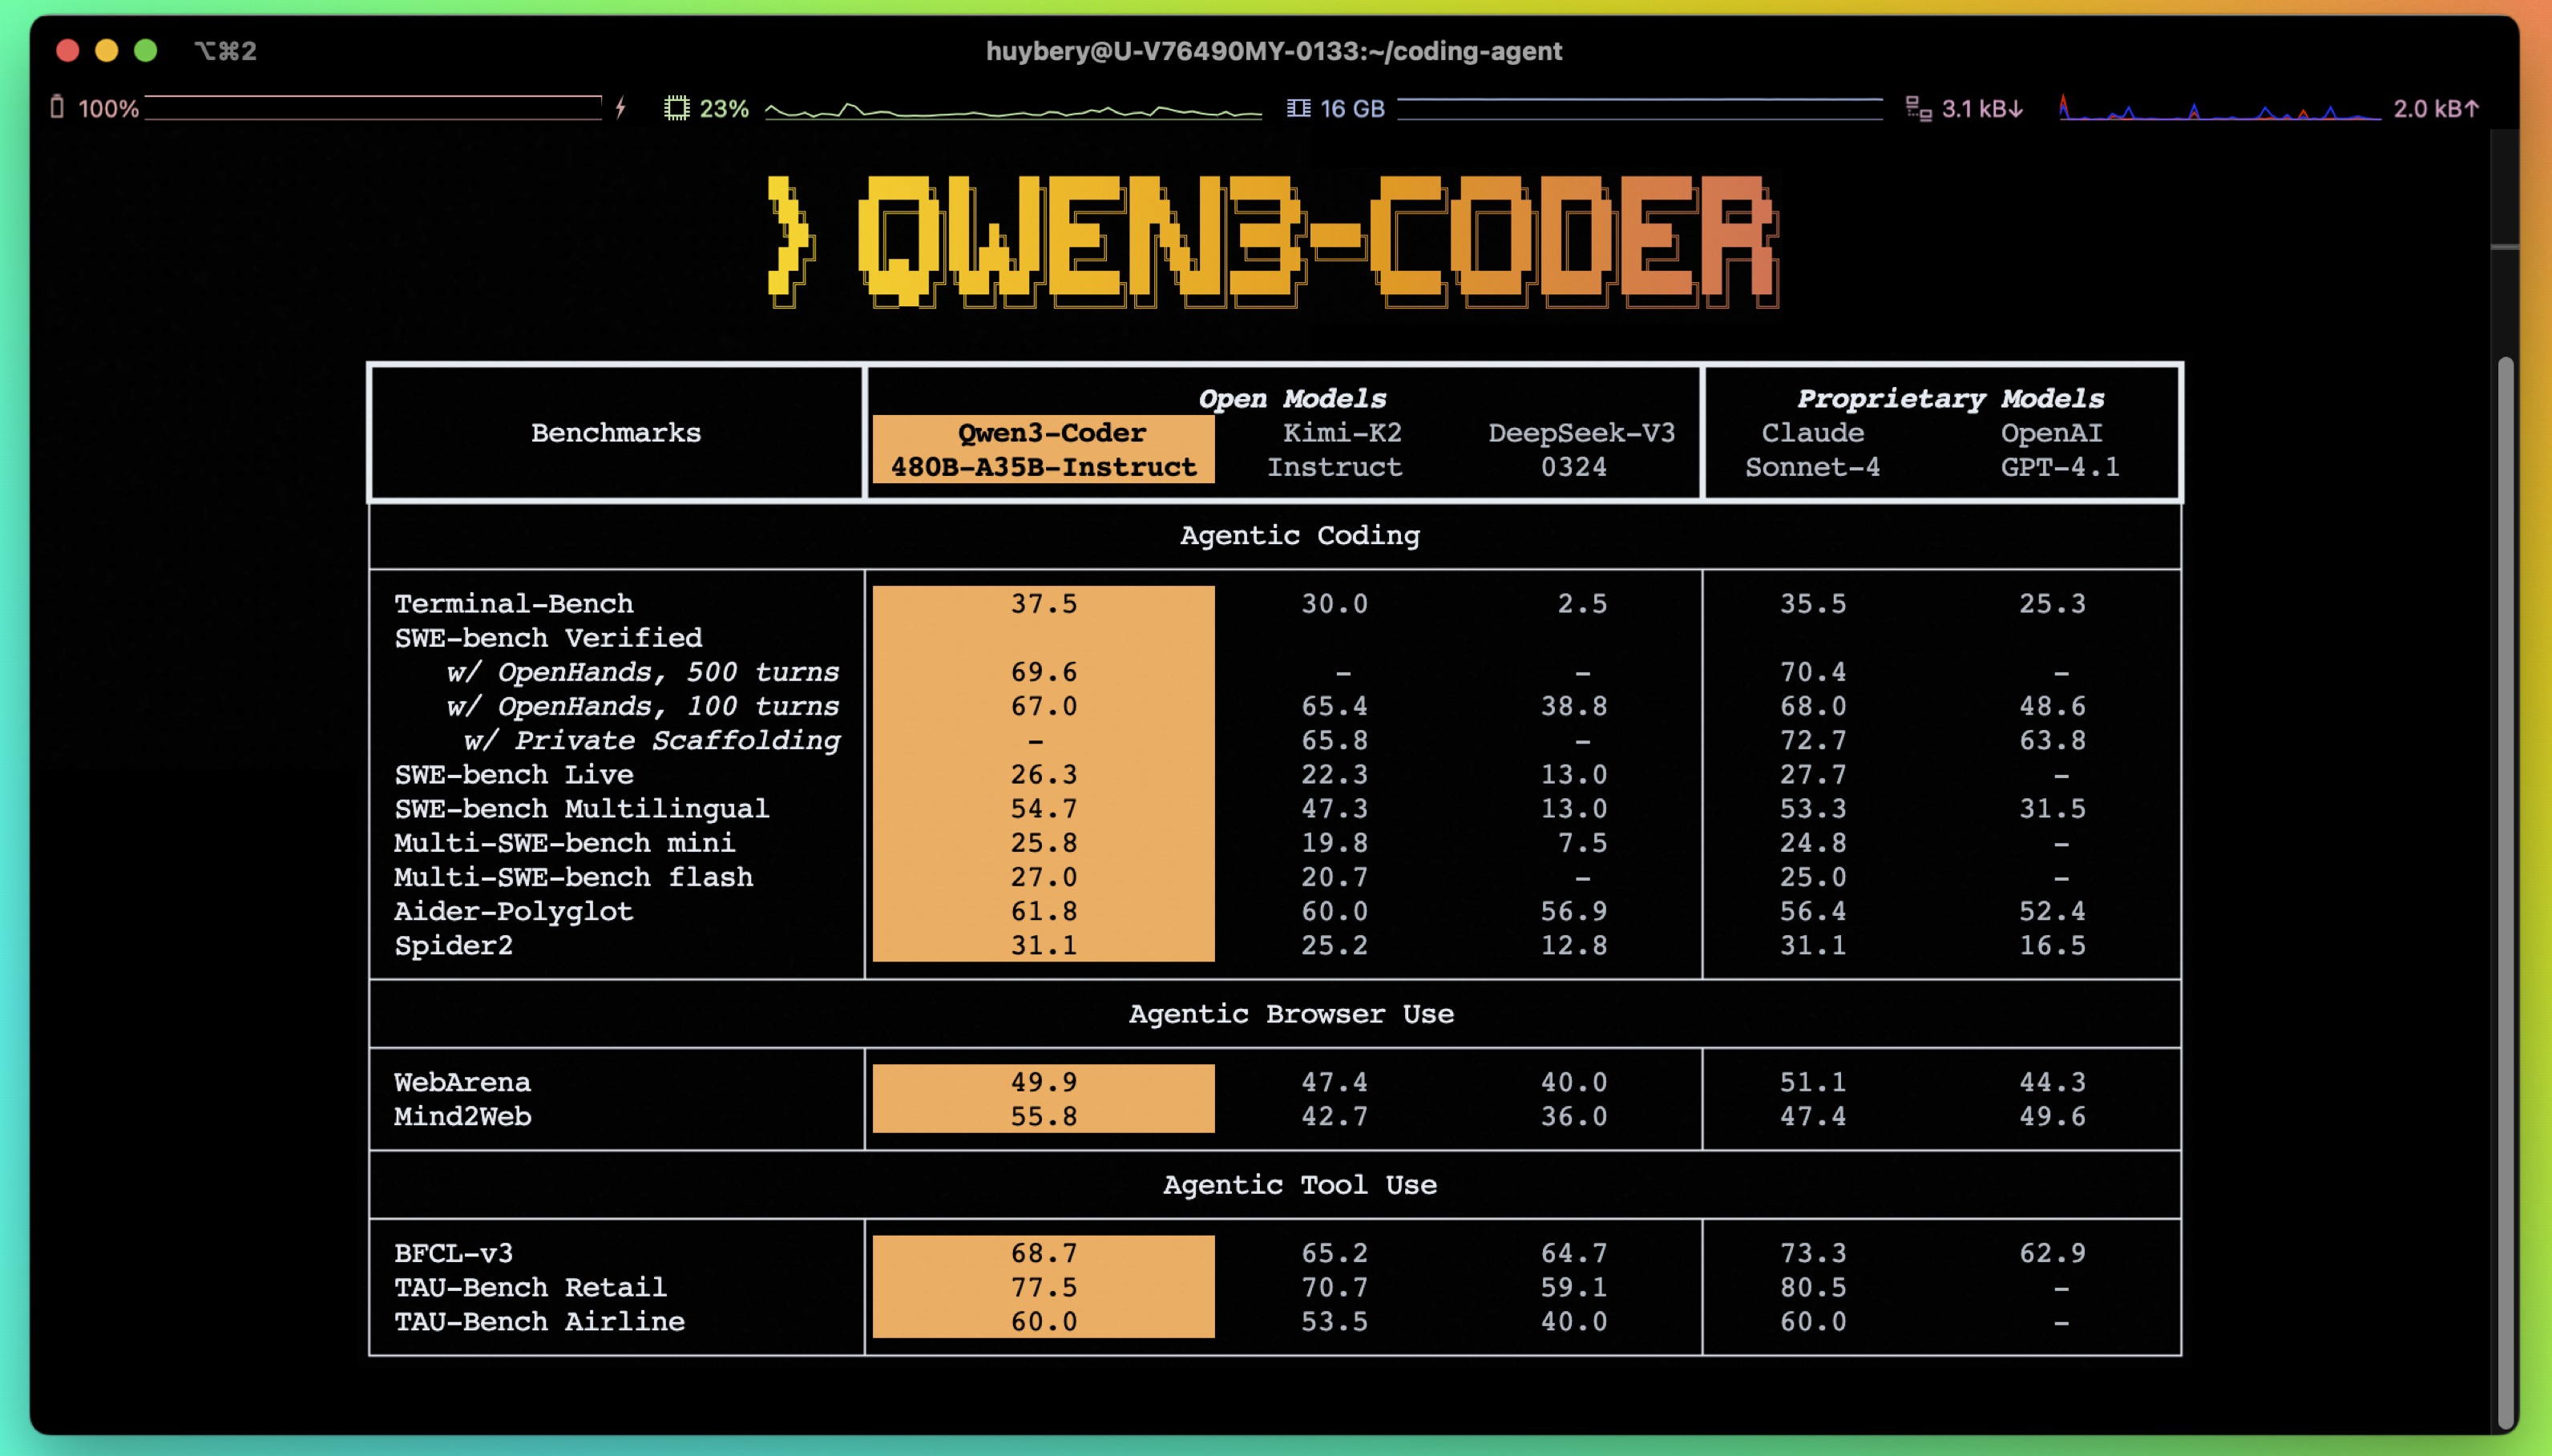
💜 Qwen Chat | 🤗 Hugging Face | 🤖 ModelScope | 📑 Blog | 📖 Documentation
| 🌍 WebDev | 💬 WeChat (微信) | 🫨 Discord | 📄 Arxiv | 👽 Qwen Code
Visit our Hugging Face or ModelScope organization (click links above), search checkpoints with names starting with Qwen3-Coder-, and you will find all you need! Enjoy!
🔥🔥🔥 Qwen3-Coder-30B-A3B-Instruct has been released, for more information here.
Today, we're announcing Qwen3-Coder, our most agentic code model to date. Qwen3-Coder is available in multiple sizes, but we're excited to introduce its most powerful variant first: Qwen3-Coder-480B-A35B-Instruct — a 480B-parameter Mixture-of-Experts model with 35B active parameters, offering exceptional performance in both coding and agentic tasks. Qwen3-Coder-480B-A35B-Instruct sets new state-of-the-art results among open models on Agentic Coding, Agentic Browser-Use, and Agentic Tool-Use, comparable to Claude Sonnet.
💻 Significant Performance: among open models on Agentic Coding, Agentic Browser-Use, and other foundational coding tasks, achieving results comparable to Claude Sonnet;
📚 Long-context Capabilities: with native support for 256K tokens, extendable up to 1M tokens using Yarn, optimized for repository-scale understanding;
🛠 Agentic Coding: supporting for most platform such as Qwen Code, CLINE, featuring a specially designed function call format;
['ABAP', 'ActionScript', 'Ada', 'Agda', 'Alloy', 'ApacheConf', 'AppleScript', 'Arc', 'Arduino', 'AsciiDoc', 'AspectJ', 'Assembly', 'Augeas', 'AutoHotkey', 'AutoIt', 'Awk', 'Batchfile', 'Befunge', 'Bison', 'BitBake', 'BlitzBasic', 'BlitzMax', 'Bluespec', 'Boo', 'Brainfuck', 'Brightscript', 'Bro', 'C', 'C#', 'C++', 'C2hs Haskell', 'CLIPS', 'CMake', 'COBOL', 'CSS', 'CSV', "Cap'n Proto", 'CartoCSS', 'Ceylon', 'Chapel', 'ChucK', 'Cirru', 'Clarion', 'Clean', 'Click', 'Clojure', 'CoffeeScript', 'ColdFusion', 'ColdFusion CFC', 'Common Lisp', 'Component Pascal', 'Coq', 'Creole', 'Crystal', 'Csound', 'Cucumber', 'Cuda', 'Cycript', 'Cython', 'D', 'DIGITAL Command Language', 'DM', 'DNS Zone', 'Darcs Patch', 'Dart', 'Diff', 'Dockerfile', 'Dogescript', 'Dylan', 'E', 'ECL', 'Eagle', 'Ecere Projects', 'Eiffel', 'Elixir', 'Elm', 'Emacs Lisp', 'EmberScript', 'Erlang', 'F#', 'FLUX', 'FORTRAN', 'Factor', 'Fancy', 'Fantom', 'Forth', 'FreeMarker', 'G-code', 'GAMS', 'GAP', 'GAS', 'GDScript', 'GLSL', 'Genshi', 'Gentoo Ebuild', 'Gentoo Eclass', 'Gettext Catalog', 'Glyph', 'Gnuplot', 'Go', 'Golo', 'Gosu', 'Grace', 'Gradle', 'Grammatical Framework', 'GraphQL', 'Graphviz (DOT)', 'Groff', 'Groovy', 'Groovy Server Pages', 'HCL', 'HLSL', 'HTML', 'HTML+Django', 'HTML+EEX', 'HTML+ERB', 'HTML+PHP', 'HTTP', 'Haml', 'Handlebars', 'Harbour', 'Haskell', 'Haxe', 'Hy', 'IDL', 'IGOR Pro', 'INI', 'IRC log', 'Idris', 'Inform 7', 'Inno Setup', 'Io', 'Ioke', 'Isabelle', 'J', 'JFlex', 'JSON', 'JSON5', 'JSONLD', 'JSONiq', 'JSX', 'Jade', 'Jasmin', 'Java', 'Java Server Pages', 'JavaScript', 'Julia', 'Jupyter Notebook', 'KRL', 'KiCad', 'Kit', 'Kotlin', 'LFE', 'LLVM', 'LOLCODE', 'LSL', 'LabVIEW', 'Lasso', 'Latte', 'Lean', 'Less', 'Lex', 'LilyPond', 'Linker Script', 'Liquid', 'Literate Agda', 'Literate CoffeeScript', 'Literate Haskell', 'LiveScript', 'Logos', 'Logtalk', 'LookML', 'Lua', 'M', 'M4', 'MAXScript', 'MTML', 'MUF', 'Makefile', 'Mako', 'Maple', 'Markdown', 'Mask', 'Mathematica', 'Matlab', 'Max', 'MediaWiki', 'Metal', 'MiniD', 'Mirah', 'Modelica', 'Module Management System', 'Monkey', 'MoonScript', 'Myghty', 'NSIS', 'NetLinx', 'NetLogo', 'Nginx', 'Nimrod', 'Ninja', 'Nit', 'Nix', 'Nu', 'NumPy', 'OCaml', 'ObjDump', 'Objective-C++', 'Objective-J', 'Octave', 'Omgrofl', 'Opa', 'Opal', 'OpenCL', 'OpenEdge ABL', 'OpenSCAD', 'Org', 'Ox', 'Oxygene', 'Oz', 'PAWN', 'PHP', 'POV-Ray SDL', 'Pan', 'Papyrus', 'Parrot', 'Parrot Assembly', 'Parrot Internal Representation', 'Pascal', 'Perl', 'Perl6', 'Pickle', 'PigLatin', 'Pike', 'Pod', 'PogoScript', 'Pony', 'PostScript', 'PowerShell', 'Processing', 'Prolog', 'Propeller Spin', 'Protocol Buffer', 'Public Key', 'Pure Data', 'PureBasic', 'PureScript', 'Python', 'Python traceback', 'QML', 'QMake', 'R', 'RAML', 'RDoc', 'REALbasic', 'RHTML', 'RMarkdown', 'Racket', 'Ragel in Ruby Host', 'Raw token data', 'Rebol', 'Red', 'Redcode', "Ren'Py", 'RenderScript', 'RobotFramework', 'Rouge', 'Ruby', 'Rust', 'SAS', 'SCSS', 'SMT', 'SPARQL', 'SQF', 'SQL', 'STON', 'SVG', 'Sage', 'SaltStack', 'Sass', 'Scala', 'Scaml', 'Scheme', 'Scilab', 'Self', 'Shell', 'ShellSession', 'Shen', 'Slash', 'Slim', 'Smali', 'Smalltalk', 'Smarty', 'Solidity', 'SourcePawn', 'Squirrel', 'Stan', 'Standard ML', 'Stata', 'Stylus', 'SuperCollider', 'Swift', 'SystemVerilog', 'TOML', 'TXL', 'Tcl', 'Tcsh', 'TeX', 'Tea', 'Text', 'Textile', 'Thrift', 'Turing', 'Turtle', 'Twig', 'TypeScript', 'Unified Parallel C', 'Unity3D Asset', 'Uno', 'UnrealScript', 'UrWeb', 'VCL', 'VHDL', 'Vala', 'Verilog', 'VimL', 'Visual Basic', 'Volt', 'Vue', 'Web Ontology Language', 'WebAssembly', 'WebIDL', 'X10', 'XC', 'XML', 'XPages', 'XProc', 'XQuery', 'XS', 'XSLT', 'Xojo', 'Xtend', 'YAML', 'YANG', 'Yacc', 'Zephir', 'Zig', 'Zimpl', 'desktop', 'eC', 'edn', 'fish', 'mupad', 'nesC', 'ooc', 'reStructuredText', 'wisp', 'xBase']
model name type length Download[!Important]
Qwen3-coder function calling relies on our new tool parser
qwen3coder_tool_parser.pyhere.We updated both the special tokens and their corresponding token ids, in order to maintain consistency with Qwen3. Please make sure to use the new tokenizer.
| Qwen3-Coder-480B-A35B-Instruct | instruct | 256k | 🤗 Hugging Face • 🤖 ModelScope |
| Qwen3-Coder-480B-A35B-Instruct-FP8 | instruct | 256k | 🤗 Hugging Face • 🤖 ModelScope |
| Qwen3-Coder-30B-A3B-Instruct | instruct | 256k | 🤗 Hugging Face • 🤖 ModelScope |
| Qwen3-Coder-30B-A3B-Instruct-FP8 | instruct | 256k | 🤗 Hugging Face • 🤖 ModelScope |
Detailed performance and introduction are shown in this 📑 blog.
[!Important] Qwen3-Coder-480B-A35B-Instruct are instruction models for chatting;
This model supports only non-thinking mode and does not generate
<think></think>blocks in its output. Meanwhile, specifyingenable_thinking=Falseis no longer required.**
You can just write several lines of code with transformers to chat with Qwen3-Coder-480B-A35B-Instruct. Essentially, we build the tokenizer and the model with from_pretrained method, and we use generate method to perform chatting with the help of chat template provided by the tokenizer. Below is an example of how to chat with Qwen3-Coder-480B-A35B-Instruct:
from transformers import AutoModelForCausalLM, AutoTokenizer

model_name = "Qwen/Qwen3-Coder-480B-A35B-Instruct"

model = AutoModelForCausalLM.from_pretrained(
    model_name,
    torch_dtype="auto",
    device_map="auto"
)
tokenizer = AutoTokenizer.from_pretrained(model_name)

prompt = "write a quick sort algorithm."
messages = [
    {"role": "user", "content": prompt}
]
text = tokenizer.apply_chat_template(
    messages,
    tokenize=False,
    add_generation_prompt=True
)
model_inputs = tokenizer([text], return_tensors="pt").to(model.device)

generated_ids = model.generate(
    **model_inputs,
    max_new_tokens=65536
)
generated_ids = [
    output_ids[len(input_ids):] for input_ids, output_ids in zip(model_inputs.input_ids, generated_ids)
]

response = tokenizer.batch_decode(generated_ids, skip_special_tokens=True)[0]
The apply_chat_template() function is used to convert the messages into a format that the model can understand. The add_generation_prompt argument is used to add a generation prompt, which refers to <|im_start|>assistant\n to the input. Notably, we apply ChatML template for chat models following our previous practice. The max_new_tokens argument is used to set the maximum length of the response. The tokenizer.batch_decode() function is used to decode the response. In terms of the input, the above messages is an example to show how to format your dialog history and system prompt. You can use the other size of instruct model in the same way.
The code insertion task, also referred to as the "fill-in-the-middle" challenge, requires the insertion of code segments in a manner that bridges the gaps within a given code context. For an approach aligned with best practices, we recommend adhering to the formatting guidelines outlined in the paper "Efficient Training of Language Models to Fill in the Middle"[arxiv].
[!Important] It should be noted that FIM is supported in every version of Qwen3-Coder. Qwen3-Coder-480B-A35B-Instruct is shown here as an example.
The prompt should be structured as follows:
prompt = '<|fim_prefix|>' + prefix_code + '<|fim_suffix|>' + suffix_code + '<|fim_middle|>'
Following the approach mentioned, an example would be structured in this manner:
from transformers import AutoTokenizer, AutoModelForCausalLM
# load model
device = "cuda" # the device to load the model onto

TOKENIZER = AutoTokenizer.from_pretrained("Qwen/Qwen3-Coder-480B-A35B-Instruct")
MODEL = AutoModelForCausalLM.from_pretrained("Qwen/Qwen3-Coder-480B-A35B-Instruct", device_map="auto").eval()


input_text = """<|fim_prefix|>def quicksort(arr):
    if len(arr) <= 1:
        return arr
    pivot = arr[len(arr) // 2]
    <|fim_suffix|>
    middle = [x for x in arr if x == pivot]
    right = [x for x in arr if x > pivot]
    return quicksort(left) + middle + quicksort(right)<|fim_middle|>"""

messages = [
    {"role": "system", "content": "You are a code completion assistant."},
    {"role": "user", "content": input_text}
]


text = tokenizer.apply_chat_template(
    messages,
    tokenize=False,
    add_generation_prompt=True
)
model_inputs = TOKENIZER([text], return_tensors="pt").to(model.device)

# Use `max_new_tokens` to control the maximum output length.
eos_token_ids = [151659, 151661, 151662, 151663, 151664, 151643, 151645]
generated_ids = MODEL.generate(model_inputs.input_ids, max_new_tokens=512, do_sample=False, eos_token_id=eos_token_ids)[0]
# The generated_ids include prompt_ids, we only need to decode the tokens after prompt_ids.
output_text = TOKENIZER.decode(generated_ids[len(model_inputs.input_ids[0]):], skip_special_tokens=True)

print(f"Prompt: {input_text}\n\nGenerated text: {output_text}")
使用 three.js, cannon-es.js 生成一个震撼的3D建筑拆除演示。

## 场景设置:
- 地面是一个深灰色混凝土平面,尺寸80*80,
- 所有物体严格遵循现实物理规则,包括重力、摩擦力、碰撞检测和动量守恒

## 建筑结构:
- 一座圆形高层建筑,周长对应20个方块
- 建筑总高度60个方块
- 每层采用砖砌结构,方块与砖结构建筑一致, 错开50%排列,增强结构稳定性
- 建筑外墙使用米色方块
- **重要:方块初始排列时必须确保紧密贴合,无间隙,可以通过轻微重叠或调整半径来实现**
- **重要:建筑初始化完成后,所有方块应该处于物理"睡眠"状态,确保建筑在爆炸前保持完美的静止状态,不会因重力而下沉或松散**
- 建筑砖块之间使用粘性材料填充(不可见),通过高摩擦力(0.8+)和低弹性(0.05以下)来模拟粘合效果
- 砖块在建筑倒塌瞬间不会散掉,而是建筑作为一个整体倒在地面的时候才因受力过大而散掉

## 定向爆破系统:
- 在建筑的第1层的最右侧方块附近安装爆炸装置(不可见)
- 提供操作按钮点击爆炸
- **爆炸时唤醒所有相关方块的物理状态**
- 爆炸点产生半径2的强力冲击波,冲击波影响到的方块, 受到2-5单位的冲击力

## 建筑稳定性要求:
- **确保建筑在未爆炸时完全静止,无任何晃动或下沉**
- **物理世界初始化后给建筑几个物理步骤来自然稳定,或使用睡眠机制**
- **方块间的接触材料应具有高摩擦力和极低弹性,模拟砖块间的砂浆粘合**

## 震撼的倒塌效果:
- 方块在爆炸冲击下不仅飞散,还会在空中翻滚和碰撞
- 烟尘会随着建筑倒塌逐渐扩散,营造真实的拆除现场氛围

## 增强的视觉效果:
- 添加环境光照变化:爆炸瞬间亮度激增,然后被烟尘遮挡变暗
- 粒子系统包括:烟雾、灰尘

## 技术要求:
- 粒子系统用于烟雾和灰尘效果
- 所有代码集成在单个HTML文件中,包含必要的CSS样式
- 添加简单的UI控制:重置按钮、相机角度切换, 爆炸按钮, 鼠标左键控制摄像机角度,右键控制摄像机位置,滚轮控制摄像机焦距

Create an amazing animation multicolor and interactive using p5js

use this cdn:
https://cdn.jsdelivr.net/npm/[email protected]/lib/p5.min.js
To create a 3D Google Earth, you need to load the terrain map correctly. You can use any online resource. The code is written into an HTML file.

Create an interesting typing game with a keyboard in the lower middle of the screen and some famous articles in the upper middle. When the user types a word correctly, a cool reaction should be given to encourage him. Design a modern soft color scheme inspired by macarons. Come up with a very creative solution first, and then start writing code.
The game should be able to support typing, and you need to neglect upcase and lowercase.

Make a page in HTML that shows an animation of a ball bouncing in a rotating hypercube
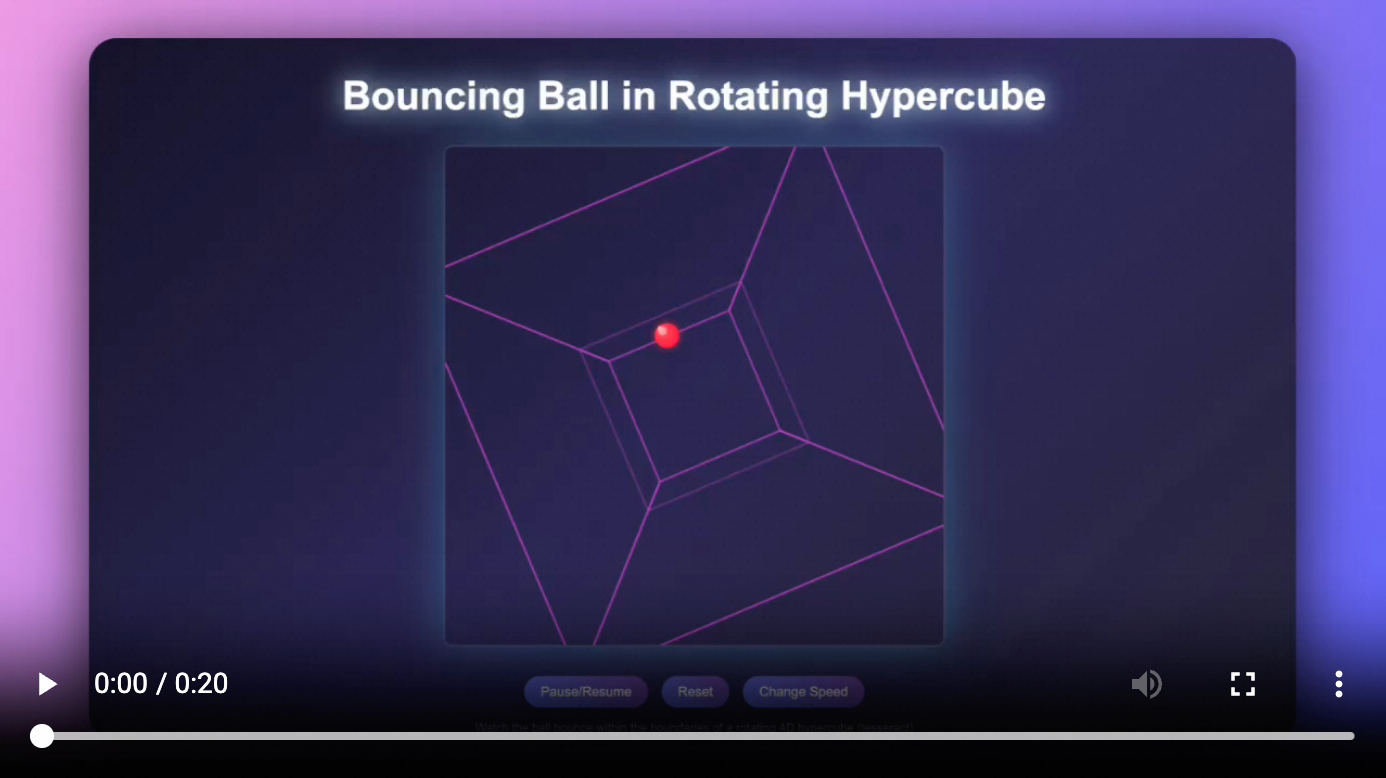
write a web page to show the solar system simulation
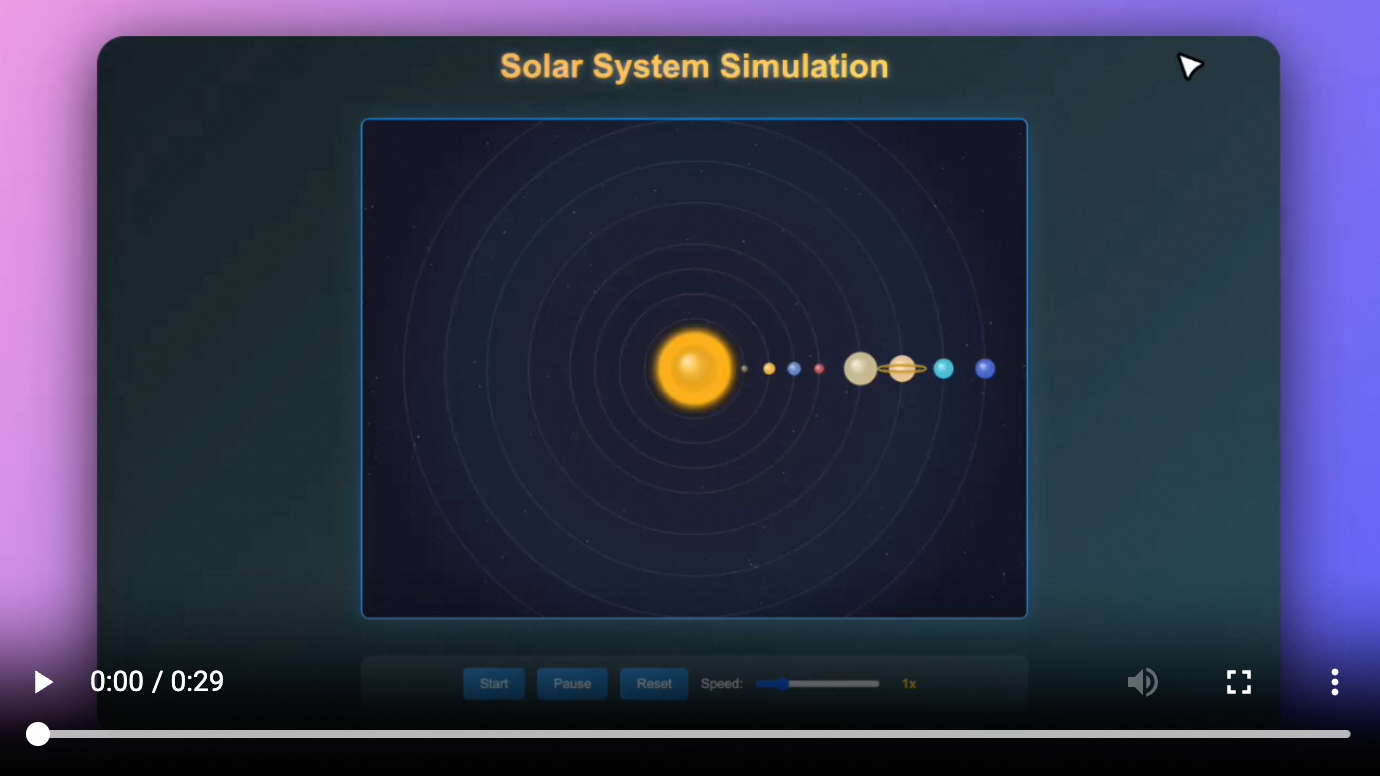
Create a complete, single-file HTML game with CSS and JavaScript. The game is inspired by "Duet".

Gameplay:

There are two balls, one red and one blue, rotating around a central point.
The player uses the 'A' and 'D' keys to rotate them counter-clockwise and clockwise.
White rectangular obstacles move down from the top of the screen.
The player must rotate the balls to avoid hitting the obstacles.
If a ball hits an obstacle, the game is over.
Visuals:

Make the visual effects amazing.
Use a dark background with neon glowing effects for the balls and obstacles.
Animations should be very smooth.
If you find our work helpful, feel free to give us a cite.
@misc{qwen3technicalreport,
      title={Qwen3 Technical Report},
      author={Qwen Team},
      year={2025},
      eprint={2505.09388},
      archivePrefix={arXiv},
      primaryClass={cs.CL},
      url={https://arxiv.org/abs/2505.09388},
}
@article{hui2024qwen2,
  title={Qwen2. 5-Coder Technical Report},
  author={Hui, Binyuan and Yang, Jian and Cui, Zeyu and Yang, Jiaxi and Liu, Dayiheng and Zhang, Lei and Liu, Tianyu and Zhang, Jiajun and Yu, Bowen and Dang, Kai and others},
  journal={arXiv preprint arXiv:2409.12186},
  year={2024}
}
If you are interested to leave a message to either our research team or product team, join our Discord or WeChat groups!
LLM inference in C/C++

![]()

![]()
LLM inference in C/C++
gpt-oss model with native MXFP4 format has been added | PR | Collaboration with NVIDIA | Commentllama-server: #12898 | documentationGetting started with llama.cpp is straightforward. Here are several ways to install it on your machine:
llama.cpp using brew, nix or wingetOnce installed, you'll need a model to work with. Head to the Obtaining and quantizing models section to learn more.
Example command:
# Use a local model file
llama-cli -m my_model.gguf

# Or download and run a model directly from Hugging Face
llama-cli -hf ggml-org/gemma-3-1b-it-GGUF

# Launch OpenAI-compatible API server
llama-server -hf ggml-org/gemma-3-1b-it-GGUF
The main goal of llama.cpp is to enable LLM inference with minimal setup and state-of-the-art performance on a wide range of hardware - locally and in the cloud.
The llama.cpp project is the main playground for developing new features for the ggml library.
Typically finetunes of the base models below are supported as well.
Instructions for adding support for new models: HOWTO-add-model.md
(to have a project listed here, it should clearly state that it depends on llama.cpp)
| Metal | Apple Silicon |
| BLAS | All |
| BLIS | All |
| SYCL | Intel and Nvidia GPU |
| MUSA | Moore Threads GPU |
| CUDA | Nvidia GPU |
| HIP | AMD GPU |
| Vulkan | GPU |
| CANN | Ascend NPU |
| OpenCL | Adreno GPU |
| WebGPU [In Progress] | All |
| RPC | All |
The Hugging Face platform hosts a number of LLMs compatible with llama.cpp:
You can either manually download the GGUF file or directly use any llama.cpp-compatible models from Hugging Face or other model hosting sites, such as ModelScope, by using this CLI argument: -hf <user>/<model>[:quant]. For example:
llama-cli -hf ggml-org/gemma-3-1b-it-GGUF
By default, the CLI would download from Hugging Face, you can switch to other options with the environment variable MODEL_ENDPOINT. For example, you may opt to downloading model checkpoints from ModelScope or other model sharing communities by setting the environment variable, e.g. MODEL_ENDPOINT=https://www.modelscope.cn/.
After downloading a model, use the CLI tools to run it locally - see below.
llama.cpp requires the model to be stored in the GGUF file format. Models in other data formats can be converted to GGUF using the convert_*.py Python scripts in this repo.
The Hugging Face platform provides a variety of online tools for converting, quantizing and hosting models with llama.cpp:
llama.cpp in the cloud (more info: https://github.com/ggml-org/llama.cpp/discussions/9669)To learn more about model quantization, read this documentation
llama-clillama.cpp's functionality.Models with a built-in chat template will automatically activate conversation mode. If this doesn't occur, you can manually enable it by adding -cnv and specifying a suitable chat template with --chat-template NAME
llama-cli -m model.gguf

# > hi, who are you?
# Hi there! I'm your helpful assistant! I'm an AI-powered chatbot designed to assist and provide information to users like you. I'm here to help answer your questions, provide guidance, and offer support on a wide range of topics. I'm a friendly and knowledgeable AI, and I'm always happy to help with anything you need. What's on your mind, and how can I assist you today?
#
# > what is 1+1?
# Easy peasy! The answer to 1+1 is... 2!
# use the "chatml" template (use -h to see the list of supported templates)
llama-cli -m model.gguf -cnv --chat-template chatml
# use a custom template
llama-cli -m model.gguf -cnv --in-prefix 'User: ' --reverse-prompt 'User:'
To disable conversation mode explicitly, use -no-cnv
llama-cli -m model.gguf -p "I believe the meaning of life is" -n 128 -no-cnv
# I believe the meaning of life is to find your own truth and to live in accordance with it. For me, this means being true to myself and following my passions, even if they don't align with societal expectations. I think that's what I love about yoga – it's not just a physical practice, but a spiritual one too. It's about connecting with yourself, listening to your inner voice, and honoring your own unique journey.
llama-cli -m model.gguf -n 256 --grammar-file grammars/json.gbnf -p 'Request: schedule a call at 8pm; Command:'
# {"appointmentTime": "8pm", "appointmentDetails": "schedule a a call"}
The grammars/ folder contains a handful of sample grammars. To write your own, check out the GBNF Guide.
For authoring more complex JSON grammars, check out https://grammar.intrinsiclabs.ai/
llama-serverllama-server -m model.gguf --port 8080
# Basic web UI can be accessed via browser: http://localhost:8080
# Chat completion endpoint: http://localhost:8080/v1/chat/completions
# up to 4 concurrent requests, each with 4096 max context
llama-server -m model.gguf -c 16384 -np 4
# the draft.gguf model should be a small variant of the target model.gguf
llama-server -m model.gguf -md draft.gguf
# use the /embedding endpoint
llama-server -m model.gguf --embedding --pooling cls -ub 8192
# use the /reranking endpoint
llama-server -m model.gguf --reranking
# custom grammar
llama-server -m model.gguf --grammar-file grammar.gbnf
# JSON
llama-server -m model.gguf --grammar-file grammars/json.gbnf
llama-perplexityllama-perplexity -m model.gguf -f file.txt
# [1]15.2701,[2]5.4007,[3]5.3073,[4]6.2965,[5]5.8940,[6]5.6096,[7]5.7942,[8]4.9297, ...
# Final estimate: PPL = 5.4007 +/- 0.67339
# TODO
llama-benchllama-bench -m model.gguf
# Output:
# | model | size | params | backend | threads | test | t/s |
# | ------------------- | ---------: | ---------: | ---------- | ------: | ------------: | -------------------: |
# | qwen2 1.5B Q4_0 | 885.97 MiB | 1.54 B | Metal,BLAS | 16 | pp512 | 5765.41 ± 20.55 |
# | qwen2 1.5B Q4_0 | 885.97 MiB | 1.54 B | Metal,BLAS | 16 | tg128 | 197.71 ± 0.81 |
#
# build: 3e0ba0e60 (4229)
llama-runllama.cpp models. Useful for inferencing. Used with RamaLama ^3.llama-run granite-code
llama-simplellama.cpp. Useful for developers.llama-simple -m model.gguf
# Hello my name is Kaitlyn and I am a 16 year old girl. I am a junior in high school and I am currently taking a class called "The Art of
llama.cpp repo and merge PRs into the master branchIf your issue is with model generation quality, then please at least scan the following links and papers to understand the limitations of LLaMA models. This is especially important when choosing an appropriate model size and appreciating both the significant and subtle differences between LLaMA models and ChatGPT:
The XCFramework is a precompiled version of the library for iOS, visionOS, tvOS, and macOS. It can be used in Swift projects without the need to compile the library from source. For example:
// swift-tools-version: 5.10
// The swift-tools-version declares the minimum version of Swift required to build this package.
import PackageDescription
let package = Package(
name: "MyLlamaPackage",
targets: [
.executableTarget(
name: "MyLlamaPackage",
dependencies: [
"LlamaFramework"
]),
.binaryTarget(
name: "LlamaFramework",
url: "https://github.com/ggml-org/llama.cpp/releases/download/b5046/llama-b5046-xcframework.zip",
checksum: "c19be78b5f00d8d29a25da41042cb7afa094cbf6280a225abe614b03b20029ab"
)
]
)
The above example is using an intermediate build b5046 of the library. This can be modified to use a different version by changing the URL and checksum.
Command-line completion is available for some environments.
$ build/bin/llama-cli --completion-bash > ~/.llama-completion.bash
$ source ~/.llama-completion.bash
Optionally this can be added to your .bashrc or .bash_profile to load it automatically. For example:
$ echo "source ~/.llama-completion.bash" >> ~/.bashrc
llama-server - MIT licensellama-run - BSD 2-Clause License💖🧸 Self hosted, you owned Grok Companion, a container of souls of waifu, cyber livings to bring them into our worlds, wishing to achieve Neuro-sama's altitude. Capable of realtime voice chat, Minecraft, Factorio playing. Web / macOS / Windows supported.

Re-creating Neuro-sama, a container of souls of AI waifu / virtual characters to bring them into our worlds.
[Join Discord Server] [Try it] [简体中文] [日本語]
![]()


Heavily inspired by Neuro-sama
[!WARNING] Attention: We do not have any officially minted cryptocurrency or token associated with this project. Please check the information and proceed with caution.
[!NOTE]
We got a whole dedicated organization @proj-airi for all the sub-project that born from Project AIRI, check it out!
RAG, memory system, embedded database, icons, Live2D utilities, and more!
Have you dreamed about having a cyber living being (cyber waifu / husbando, digital pet), or digital companion that could play with and talk to you?
With the power of modern large language models like ChatGPT, and famous Claude, asking a virtual being able to have role playing and chat with us is already easy enough for everyone. Platforms like Character.ai (a.k.a. c.ai) and JanitorAI, and local playgrounds like SillyTavern is already a well-enough solution for chat based, or visual adventure game like experience.
But, what about the abilities to play games? And see what you are coding at? Chatting while playing games, watching videos, and capable of doing many other things.
Perhaps you know Neuro-sama already, she is currently the best companion capable of playing games, chatting, and interacting with you and the participants (in VTuber community), some call this kind of being, "digital human" too. Sadly, it's not open sourced, you cannot interact with her after she went offline from live stream.
Therefore, this project, AIRI, offers another possibility here: let you own your digital life, cyber living, easily, anywhere, anytime.
Unlike the other AI driven VTuber open source projects, アイリ VTuber was built with many support of Web technologies such as WebGPU, WebAudio, Web Workers, WebAssembly, WebSocket, etc. from the first day.
[!TIP] Worry about the performance drop since we are using Web related technologies?
Don't worry, while Web browser version meant to give a insight about how much we can push and do inside browsers, and webviews, we will never fully rely on this, the desktop version of AIRI is capable of using native NVIDIA CUDA and Apple Metal by default (thanks to HuggingFace & beloved candle project), without any complex dependency managements, considering the tradeoff, it was partially powered by Web technologies for graphics, layouts, animations, and the WIP plugin systems for everyone to integrate things.
This means that アイリ VTuber is capable to run on modern browsers and devices, and even on mobile devices (already done with PWA support), this brought a lot of possibilities for us (the developers) to build and extend the power of アイリ VTuber to the next level, while still left the flexibilities for users to enable features that requires TCP connections or other non-Web technologies such as connect to voice channel to Discord, or playing Minecraft, Factorio with you and your friends.
[!NOTE]
We are still in the early stage of development where we are seeking out talented developers to join us and help us to make アイリ VTuber a reality.
It's ok if you are not familiar with Vue.js, TypeScript, and devtools that required for this project, you can join us as an artist, designer, or even help us to launch our first live stream.
Even you are a big fan of React or Svelte, even Solid, we welcome you, you can open a sub-directory to add features that you want to see in アイリ VTuber, or would like to experiment with.
Fields (and related projects) that we are looking for:
- Live2D modeller
- VRM modeller
- VRChat avatar designer
- Computer Vision
- Reinforcement Learning
- Speech Recognition
- Speech Synthesis
- ONNX Runtime
- Transformers.js
- vLLM
- WebGPU
- Three.js
- WebXR (checkout the another project we have under @moeru-ai organization)
If you are interested in, why not introduce yourself here? Would like to join part of us to build AIRI?

Capable of
pglite)For detailed instructions to develop this project, follow the CONTRIBUTING.md
[!NOTE] By default,
pnpm devwill start the development server for the Stage Web (browser version), if you would like to try developing the desktop version, please make sure you read CONTRIBUTING.md to setup the environment correctly.
pnpm i
pnpm dev
pnpm dev
pnpm dev:tamagotchi
pnpm dev:docs
Please update the version in Cargo.toml after running the bumpp:
npx bumpp --no-commit --no-tag
unspeech: Universal endpoint proxy server for /audio/transcriptions and /audio/speech, like LiteLLM but for any ASR and TTShfup: tools to help on deploying, bundling to HuggingFace Spacesxsai-transformers: Experimental 🤗 Transformers.js provider for xsAI.@proj-airi/drizzle-duckdb-wasm: Drizzle ORM driver for DuckDB WASM@proj-airi/duckdb-wasm: Easy to use wrapper for @duckdb/duckdb-wasmtauri-plugin-mcp: A Tauri plugin for interacting with MCP servers.autorio: Factorio automation librarytstl-plugin-reload-factorio-mod: Reload Factorio mod when developingdemodel: Easily boost the speed of pulling your models and datasets from various of inference runtimes.inventory: Centralized model catalog and default provider configurations backend service%%{ init: { 'flowchart': { 'curve': 'catmullRom' } } }%%
flowchart TD
Core("Core")
Unspeech("unspeech")
DBDriver("@proj-airi/drizzle-duckdb-wasm")
MemoryDriver("[WIP] Memory Alaya")
DB1("@proj-airi/duckdb-wasm")
SVRT("@proj-airi/server-runtime")
Memory("Memory")
STT("STT")
Stage("Stage")
StageUI("@proj-airi/stage-ui")
UI("@proj-airi/ui")
subgraph AIRI
DB1 --> DBDriver --> MemoryDriver --> Memory --> Core
UI --> StageUI --> Stage --> Core
Core --> STT
Core --> SVRT
end
subgraph UI_Components
UI --> StageUI
UITransitions("@proj-airi/ui-transitions") --> StageUI
UILoadingScreens("@proj-airi/ui-loading-screens") --> StageUI
FontCJK("@proj-airi/font-cjkfonts-allseto") --> StageUI
FontXiaolai("@proj-airi/font-xiaolai") --> StageUI
end
subgraph Apps
Stage --> StageWeb("@proj-airi/stage-web")
Stage --> StageTamagotchi("@proj-airi/stage-tamagotchi")
Core --> RealtimeAudio("@proj-airi/realtime-audio")
Core --> PromptEngineering("@proj-airi/playground-prompt-engineering")
end
subgraph Server_Components
Core --> ServerSDK("@proj-airi/server-sdk")
ServerShared("@proj-airi/server-shared") --> SVRT
ServerShared --> ServerSDK
end
STT -->|Speaking| Unspeech
SVRT -->|Playing Factorio| F_AGENT
SVRT -->|Playing Minecraft| MC_AGENT
subgraph Factorio_Agent
F_AGENT("Factorio Agent")
F_API("Factorio RCON API")
factorio-server("factorio-server")
F_MOD1("autorio")
F_AGENT --> F_API -.-> factorio-server
F_MOD1 -.-> factorio-server
end
subgraph Minecraft_Agent
MC_AGENT("Minecraft Agent")
Mineflayer("Mineflayer")
minecraft-server("minecraft-server")
MC_AGENT --> Mineflayer -.-> minecraft-server
end
XSAI("xsAI") --> Core
XSAI --> F_AGENT
XSAI --> MC_AGENT
Core --> TauriMCP("@proj-airi/tauri-plugin-mcp")
Memory_PGVector("@proj-airi/memory-pgvector") --> Memory
style Core fill:#f9d4d4,stroke:#333,stroke-width:1px
style AIRI fill:#fcf7f7,stroke:#333,stroke-width:1px
style UI fill:#d4f9d4,stroke:#333,stroke-width:1px
style Stage fill:#d4f9d4,stroke:#333,stroke-width:1px
style UI_Components fill:#d4f9d4,stroke:#333,stroke-width:1px
style Server_Components fill:#d4e6f9,stroke:#333,stroke-width:1px
style Apps fill:#d4d4f9,stroke:#333,stroke-width:1px
style Factorio_Agent fill:#f9d4f2,stroke:#333,stroke-width:1px
style Minecraft_Agent fill:#f9d4f2,stroke:#333,stroke-width:1px
style DBDriver fill:#f9f9d4,stroke:#333,stroke-width:1px
style MemoryDriver fill:#f9f9d4,stroke:#333,stroke-width:1px
style DB1 fill:#f9f9d4,stroke:#333,stroke-width:1px
style Memory fill:#f9f9d4,stroke:#333,stroke-width:1px
style Memory_PGVector fill:#f9f9d4,stroke:#333,stroke-width:1px

xsai: Implemented a decent amount of packages to interact with LLMs and models, like Vercel AI SDK but way small.I live in London, and I got tired of endlessly searching for things to do every weekend, I struggle to make good plans (which my wife isn’t happy about). We like most seeing new exhibitions etc, and I hate Timeout London as it’s full of crap and restaurant promos imho. I decided to scrape all exhibition, museum event pages with help of AI, and automated it. Built a website, which lists live art events and exhibitions (only in London for now) and wanted to share it with you. Hope you find it useful, and please let me know if I missed any places (which I’m sure I did)
Comments URL: https://news.ycombinator.com/item?id=43010411
Points: 20
# Comments: 5
Shopify Charge $1,000 to host your store and if you cancel all your hard work is gone.... This is a better way. Free hosting, No Subscription, AI Store Build, Auto deploy. Let me now what you think
Comments URL: https://news.ycombinator.com/item?id=43006186
Points: 10
# Comments: 7
Hi HN,
I got frustrated with the time-consuming process of tailoring resumes and cover letters for job applications. Even using ChatGPT, it was taking me about 10 minutes per application just to prompt and copy-paste everything into Word. I found myself only customizing applications for roles I was really excited about, which wasn't ideal.
So I worked really hard and built useResume to solve two problems: helping me stand out with every application, and eliminating the Word document workflow.
I've been using it myself for all my latest applications and I hope it can help you too. I'd love to hear your feedback.
Vlad
Comments URL: https://news.ycombinator.com/item?id=43004494
Points: 10
# Comments: 3
Hi HN,
Today we’re excited to introduce OLake (github.com/datazip-inc/olake, 130+ and growing fast), an open-source tool built to help you replicate Database (MongoDB, for now, mysql and postgres under development) data into Data Lakehouse at faster speed without any hassle of managing Debezium or kafka (at least 10x faster than Airbyte and Fivetran at fraction of the cost, refer docs for benchmarks - https://olake.io/docs/connectors/mongodb/benchmarks).
You might think “we don't need yet another ETL tool”, true but we tried existing tools (proprietary and open sourced as well) none of them were good fit.
We made this mistake in our first product by building a lot of connectors and learnt the hard way to pick a pressing pain point and build a world class solution for it
Who is it for?
We built this for data engineers and engineers teams struggling with:
1. Debezium + Kafka setup and that 16MB per document size limitation of Debezium when working with mongoDB. We are Debezium free.
2. lost cursors during the CDC process, with no way left other than to resync the entire data.
3. sync running for hours and hours and you have no visibility into what's happening under the hood. Limited visibility (the sync logs, completion time, which table is being replicated, etc).
4. complexity of setting with Debezium + Kafka pipeline or other solutions.
5. present ETL tools are very generic and not optimised to sync DB data to a lakehouse and handling all the associated complexities (metadata + schema management)
6. knowing from where to restart the sync. Here, features like resumable syncs + visibility of exactly where the sync paused + stored cursor token you get with OLake.
What is OLake?
OLake is engineered from the ground up to address the above common pain points.
We intend to use the native features of Databases ( e.g extracting data in BSON format for mongodb) and the modern table format of Apache Iceberg (the future going ahead), OLake delivers:
Parallelized initial loads and continuous change-data capture (CDC), so you can replicate 100s of GB in minutes into parquet format and dump it to S3. Read about OLake architecture - https://olake.io/blog/olake-architecture
Adaptive Fault Tolerance: We designed it to handle disruptions like lost cursor, making sure data integrity with minimal latency (configure the sync speed yourself). We store the state with a resume token, so that you know exactly where to resume your sync.
Modular architecture, scalable, with configurable batching (select streams you want to sync) and parallelism among them to avoid OOMs or crashes.
Why OLake?
As your production data grows, so do the challenges of managing it. For small businesses, self-serve tools and third-party SaaS connectors are often enough—but they typically max out at around 1TB of data per month and you are back to square one googling for a perfect tool that's quick and fits your budget.
If you have data which looks something like 1TB/month in a database with probability of it growing rapidly AND are looking to replicate it to Data Lakes for Analytics use cases, we can help. Reach out to us at [email protected]
We are not saying we are the perfect solution to your every problem, this open source project is very new and we want to build it with your support.
Join our slack community - https://getolake.slack.com and help us to build and set the industry standard for database ETL tools to lake houses so that there is no need for “yet another” attempt to fix something that isn’t broken.
About Us OLake is a proud open source project from Datazip, founded by data enthusiasts Sandeep Devarapalli, Shubham Baldava, and Rohan Khameshra built from India.
Contribute - olake.io/docs/getting-started
We are calling out for contributors, OLake is an Apache 2.0 license maintained by Datazip.
Comments URL: https://news.ycombinator.com/item?id=43002938
Points: 11
# Comments: 1
Hey Hacker News,
We're really excited (and a little nervous!) to finally share opencomply with you.
We built this because, honestly, we were so frustrated with the state of security and compliance tools. opencomply is our attempt to fix this.
We wanted a platform that was:
- Unified & Open: A single, cloud-agnostic view of your entire tech stack. Consistent visibility across any infrastructure. Query everything—metadata, configurations, logs—across all clouds and platforms using SQL.
- Customizable: Write your own checks (controls) using code and manage them in Git. Adapt to your specific compliance needs.
- Automated: Automate audits, running checks on demand or on a schedule, and capturing evidence. Free your team for more strategic initiatives.
- Pipeline-Friendly: Seamless pipeline integration. Automate security and compliance checks at every development stage. Security built-in, not bolted-on.
- Modern Stacks: Supports platforms like Linode, Render, Heroku, OpenAI, and DigitalOcean.
- Easy Setup: Install in minutes, start connecting immediately.
- Extensible: Easy integration with your existing tools, and the ability to write your own if needed.
Check out opencomply at opencomply.io
GitHub: github.com/opengovern/opencomply | Docs: docs.opencomply.io
Comments URL: https://news.ycombinator.com/item?id=43001826
Points: 103
# Comments: 1
I made a web app to generate 3D models of real places on earth from land cover and elevation data.
Click anywhere on the map to get a polygon, and then click "generate".
It should work at most scales, but if your watershed or region selection is too large, the result can be less exciting because it's so flat.
As a warning, the 3D models can sometimes be too much for my phone. It's nicer on desktop. I'm still working better on mobile support.
The land cover data I'm using gives a cool effect, but at some point I'd like to add in global imagery and clouds.
The backend is a Python thread running on an old Lenovo Thinkcentre in my closet, so if it goes down, this is why. (I also sometimes need to restart it when the network card stops working... I really should figure out why sometime.)
If you find a really cool island or watershed, let me know and I can add it to the "favorites".
Comments URL: https://news.ycombinator.com/item?id=43001688
Points: 103
# Comments: 32
i saw last week that if you include a curse word in your Google search query it won't serve an AI overview, serves less ads, and less "zero click" Google properties.
so I made a little tool to help facilitate this search, saving you literally hundreds of microseconds!
Comments URL: https://news.ycombinator.com/item?id=43001413
Points: 15
# Comments: 9
Nstart aims to guide new users to Nostr offering a easy and no-nonsense onboarding wizard, with useful hints about the protocol and some really exclusive features:
- Easy local backup of your nsec or ncryptsec - Email yourself your ncryptsec, as an additional backup location - Create a multi-signer bunker URL for Nostr Connect (more info below) - Auto follow the contacts list of some old and trusted Nostr users - Customize of contact suggestions, useful for onboarding friends & family
Try Nstart live at https://start.njump.me or watch this video to understand how it works: https://chronicle.dtonon.com/77b9a397cbbcd63f3bfc78ff2b2c060...
For devs: it can also be used by any Nostr application, web or mobile, to offer an easy onboarding flow! You can integrate it effortlessly via a simple redirect, modal or popup: in the end, the user is automagically logged into the app, without needing to touch their keys/bunker. https://jumble.social, https://flotilla.social, https://nosotros.app, nostr-login (and so every website that uses it, like https://npub.pro, https://nostr.band, https://www.whynostr.org, etc..) are already using Nstart, check them.
Example of the integration: https://chronicle.dtonon.com/5a55f1db7efdc2b19a09284c360909e...
Docs: https://github.com/dtonon/nstart/blob/master/APPS-INTEGRATIO...
A note about the multi-signer bunker. This is really cool stuff made by @fiatjaf, that uses FROST to split your nsec in 3 (or more) and distribute each shard to an independent trusted remote signer. This will give you a bunker code that you can use to log in to many web, mobile and desktop apps without exposing your nsec. If you ever lose your bunker code, if the signers vanish from Earth, and it stops working, or if it gets stolen by a malware virus, you can use your nsec to create a new one and invalidate the old one.
More info and source code: https://github.com/dtonon/nstart
Enjoy it and send back any feedback, thanks!
Comments URL: https://news.ycombinator.com/item?id=43001303
Points: 10
# Comments: 0
Article URL: https://medium.com/@danvixent/optimising-convoys-flatten-package-550fa4ae74fe
Comments URL: https://news.ycombinator.com/item?id=43000730
Points: 10
# Comments: 2
Use this site to get an evaluation of how well you fit a job description given your resume, cover letter (optional), and GitHub (optional)
This is my first side project so any feedback would be awesome!
Comments URL: https://news.ycombinator.com/item?id=43000589
Points: 10
# Comments: 0


.svg)
.svg)
.svg)
.svg)
.svg)
.svg)
.svg)
.svg)
.svg)