
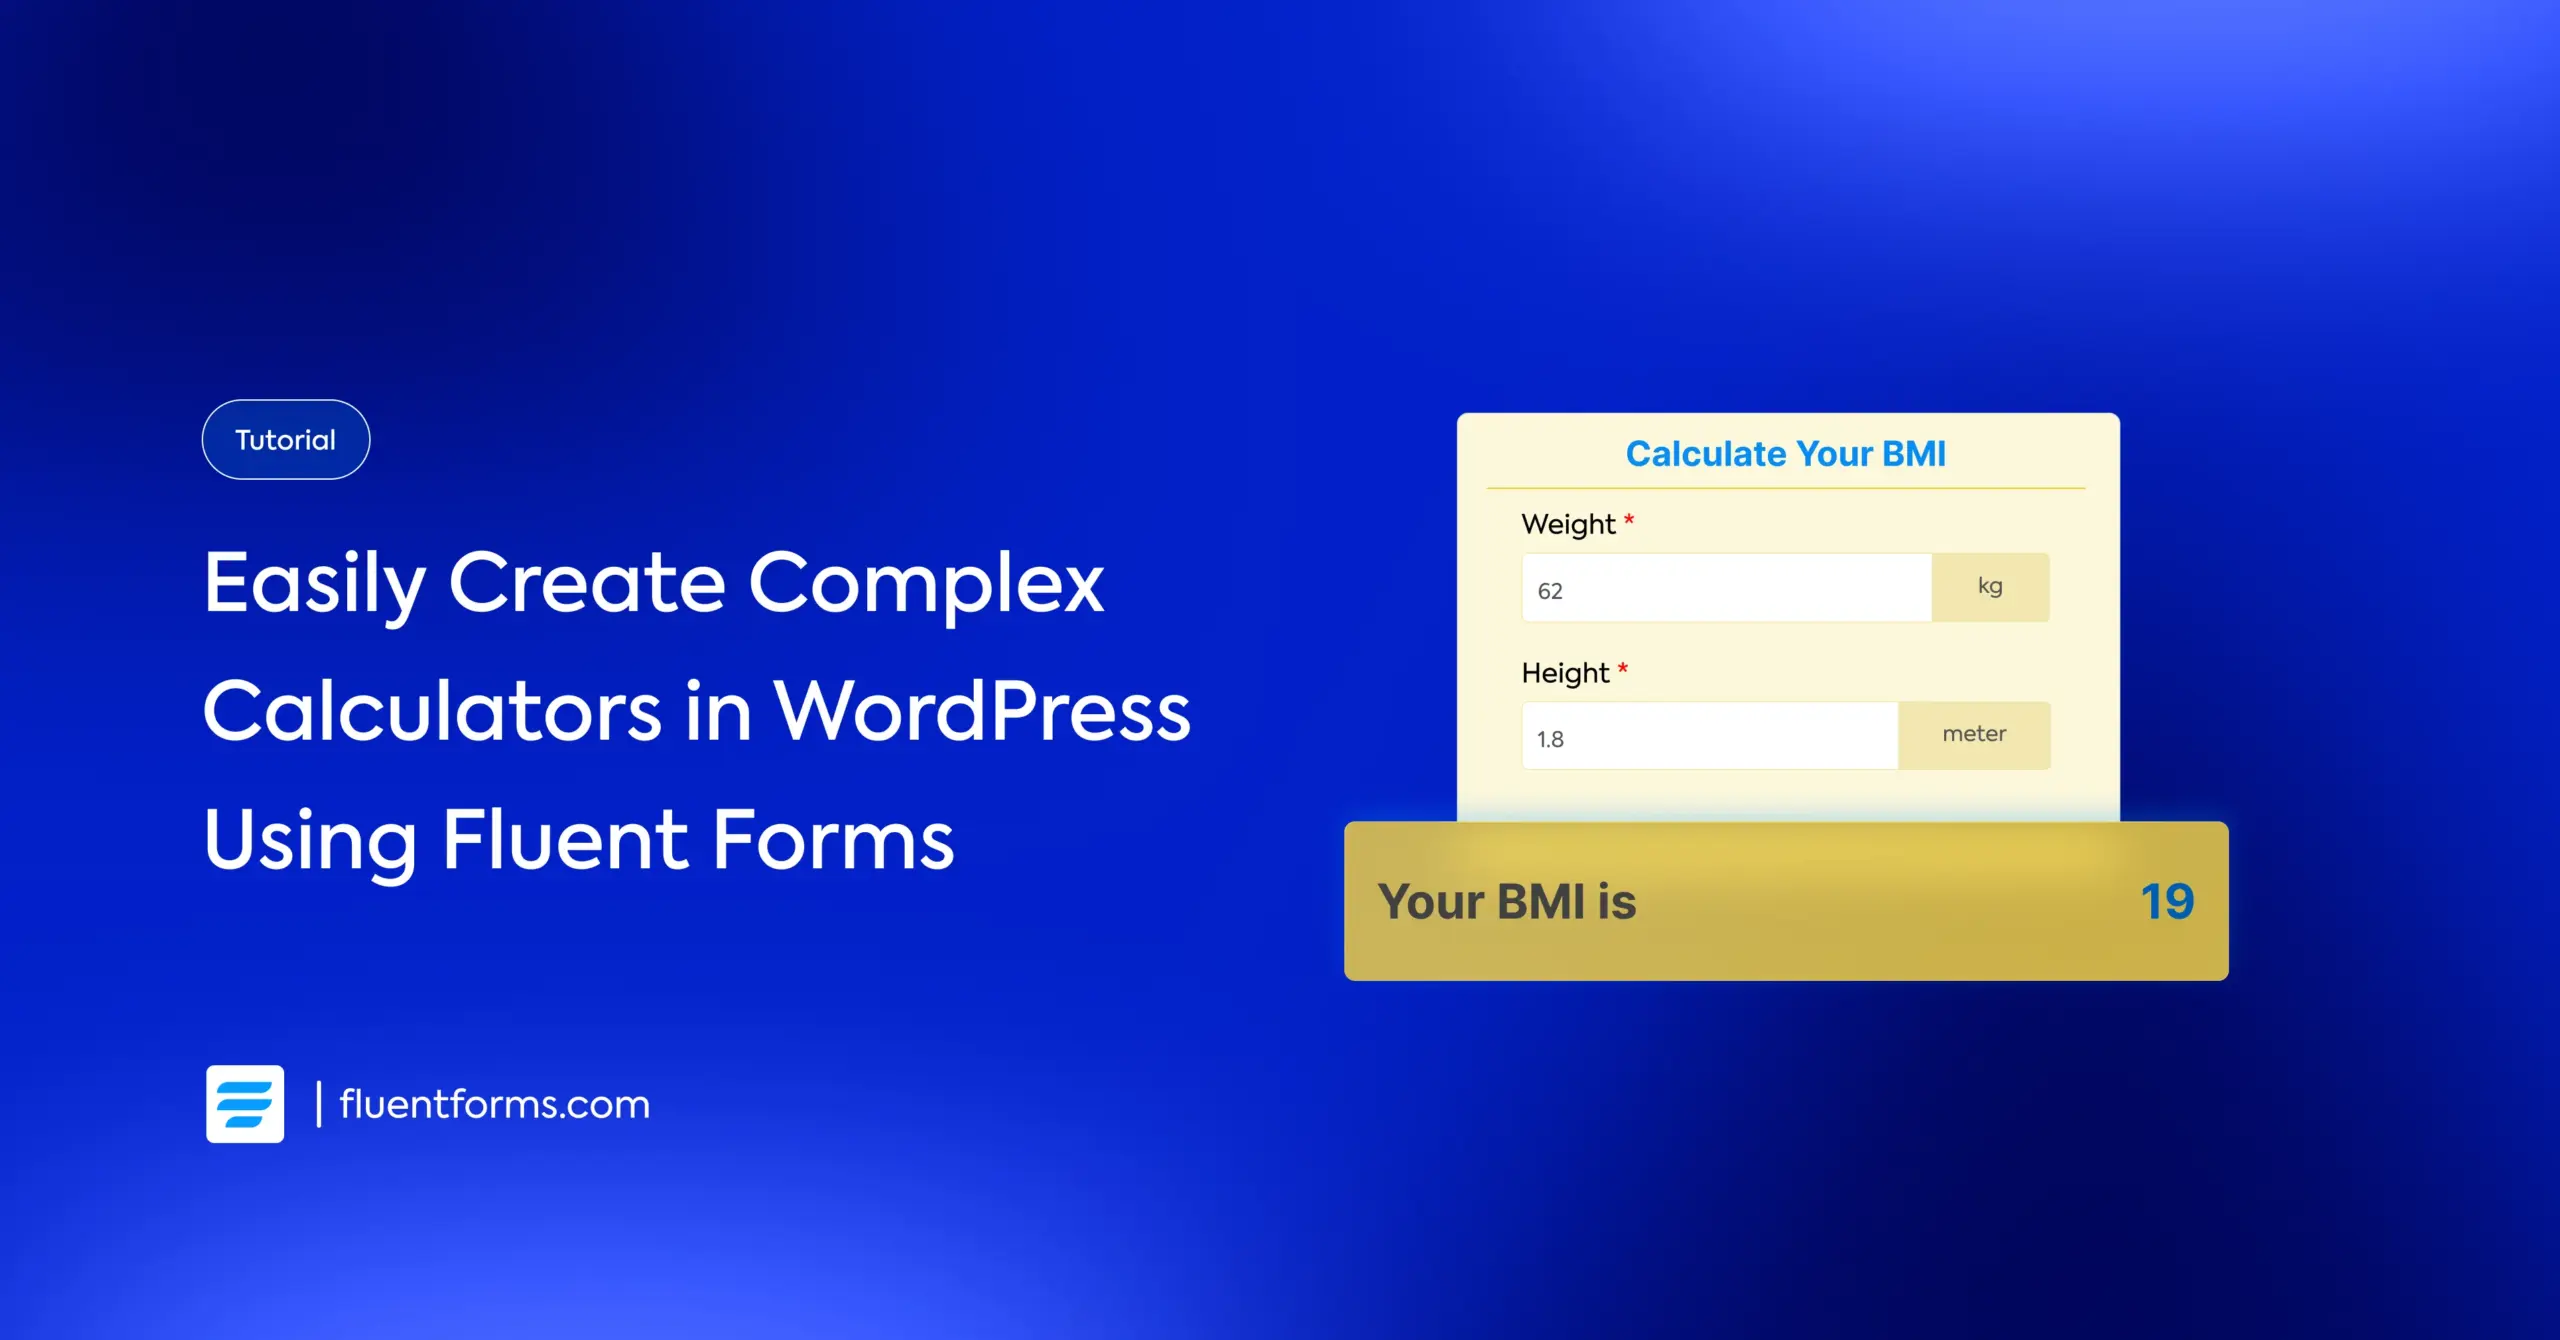
How to Create WordPress Forms with Calculation
You want to add a calculator to your WordPress website so users can estimate the price for your services. Or maybe you just want a simple tool that helps visitors calculate something useful, like their BMI, mortgage amount, fuel cost, etc.
However, you don’t want to write the code or hire a developer for something so simple. The good news is you don’t need to.
With Fluent Forms, you can create calculation forms in WordPress without writing a single line of code. Whether you need a basic calculator that adds numbers or an advanced payment form, the process is surprisingly simple.
In this guide, I’ll walk you through everything you need to know about creating WordPress forms with calculations. All you have to do is create simple mathematical equations, and the form will automatically take care of any complex calculation.
TL;DR
- Enable calculations on Numeric Input or Custom Payment Amount fields to define expressions that compute values from other fields.
- Use field shortcodes with math operators (e.g., {input.length} * {input.width}) to build expressions; use parentheses to control the order of operations.
- Repeat Fields can sum columns and count rows for averages or totals across variable inputs.
- For payment forms, Fluent Forms can calculate totals automatically (Payment Items + Item Quantity) or with manual set-ups (Custom Payment Amount with expressions).
- Hide intermediate calculation fields with ff-hidden, then display styled results via HTML fields.
Fluent Forms calculation features
Before we proceed to create calculator forms, let’s understand how calculations work in Fluent Forms. The plugin provides a built-in calculation engine that performs real-time math operations based on your calculation expression & the variables (user inputs).
Here are the input fields you can use to create mathematical expressions and display the result:
- Numeric Field: Used for creating regular calculators, like quote estimates, area of a polygon, health calculators, etc.
- Custom Payment Amount: Works the same way as a numeric field, but you can accept the calculated value as payment using payment gateways. However, simple payment calculations are automatic; you don’t need an equation. This is useful for calculating custom payments, like tips, VAT, etc.
Now, let’s get acquainted with the fields that you can use in a calculation. Use these to collect user inputs that the form will factor into the calculation.
- Numeric Input Field
- Range Slider
- Payment Item
- Item Quantity
- Custom Payment Amount
- Radio, Checkbox, Dropdown, & Multiple Choice (You have to assign a numeric value to each option using the Calc Value box. This value will be used in the calculation)
- Repeat Field (limited capabilities)
So, how do the calculations work?
Well, the mechanism is very simple. You enable calculation on a numeric field for regular calculators or a custom payment amount field for payment calculation.
Then you create an expression using other fields’ shortcodes (for dynamic value), mathematical symbols, and parentheses (to set the order of calculation). Input field shortcodes can be selected using the clipboard icon attached to the calculation expression box.
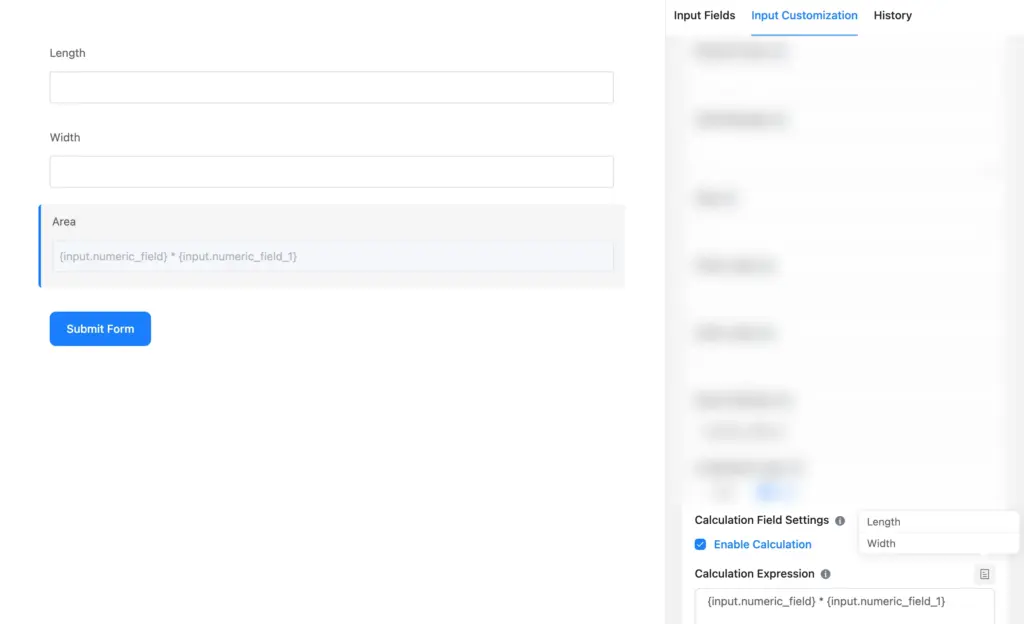
For example, if you have two numeric fields for length and width, you can add a third numeric field that multiplies them to show the area. The calculation happens in real time as users fill out the form. The calculation expression looks like: {input.numeric_field} * {input.numeric_field_1}
So which operations do Fluent Forms support? Well, the list is in a table below. Remember, this list isn’t applicable to repeat fields.
| Symbol | Explanation |
|---|---|
| + | Addition Operator eg. 2+3 results 5 |
| – | Subtraction Operator eg. 2-3 results -1 |
| / | Division operator eg 3/2 results in 1.5 |
| * | Multiplication Operator eg. 2*3 results 6 |
| Mod | Modulus Operator eg. 3 Mod 2 results 1 |
| ( | Opening Parenthesis |
| ) | Closing Parenthesis |
| Sigma | Summation eg. Sigma(1,100,n) results 5050 |
| Pi | Product eg. Pi(1,10,n) results 3628800 |
| n | Variable for Summation or Product |
| pi | Math constant pi returns 3.14 |
| e | Math constant e returns 2.71 |
| C | Combination operator eg. 4C2 returns 6 |
| P | Permutation operator eg. 4P2 returns 12 |
| ! | factorial operator eg. 4! returns 24 |
| log | logarithmic function with base 10 eg. log 1000 returns 3 |
| ln | natural log function with base e eg. ln 2 returns .3010 |
| pow | power function with two operator pow(2,3) returns 8 |
| ^ | power operator eg. 2^3 returns 8 |
| root | underroot function root 4 returns 2 |
| sin | Sine function |
| cos | Cosine function |
| tan | Tangent function |
| asin | Inverse Sine function |
| acos | Inverse Cosine funtion |
| atan | Inverse Tangent funtion |
| sinh | Hyperbolic Sine function |
| cosh | Hyperbolic Cosine function |
| tanh | Hyperbolic Tangent function |
| asinh | Inverse Hyperbolic Sine function |
| acosh | Inverse Hyperbolic Cosine function |
| atanh | Inverse Hyperbolic Tangent function |
| round | Make a number a decimal/integer.Use case: round(3.235723663, 2) = 3.24and round(3.235723663, 0) = 3 |
| ceil | Use case: ceil(3.235723663) = 4 |
| floor | Use case: floor(3.235723663) = 3 |
| max | Use case: max(10, 15) = 15 |
| min | Use case: min(10, 15) = 10 |
Sometimes, you need to calculate values for admin use only. Or you might break the equation into multiple steps, but only want to show the final result. How do you hide a field in that case? Simply write “ff-hidden” in the field’s Container Class under Advanced Options. The field will still work behind the scenes, but it won’t be visible to the users.
You can also hide a numeric field and display the result via an HTML field for styling flexibility. HTML fields support dynamic value insertion. For example, {dynamic.numeric_field_2}, where numeric_field_2 is the name attribute of the calculation field (you’ll find this in the advanced options of a field).
Displaying this way lets you customize the text & background color, typography, and overall presentation of your result (without writing HTML code).
Now that you have an overview of how calculations work for Fluent Forms, let me walk you step-by-step through how you can create different calculator forms in WordPress.
How to create WordPress forms with calculation
Here, I’ll walk you through how to create WordPress forms with calculations using Fluent Forms. But first things first. If you don’t have Fluent Forms installed already, follow these steps:
- Go to your WordPress dashboard.
- Find the “Plugins” option on the left menu bar.
- Select “Add New.”
- Search for the “Fluent Forms” plugin.
- Click “Install.”
- Activate the plugin when installation is complete.
Once the plugin is activated, you need to upgrade to Fluent Forms Pro since numeric calculation is a pro feature of Fluent Forms (however, automated payment calculation is available in the free version).
Now, let’s build some calculator forms. In this section, I’ll show you how to create regular calculators (no payment involved), then move on to payment calculation forms in the next section.
Regular numeric calculation
Let’s start with a freight quote calculator. This type of form takes multiple inputs like distance, weight, and delivery preferences, then determines an estimated shipping cost.
Step 1: Create a new form
Go to Fluent Forms → New Form → New Blank Form. Give your form a name like “Freight Quote Calculator.”

Step 2: Add your input fields
Inside the form editor tab, you’ll find the input fields on the right. For our freight calculator, we need:
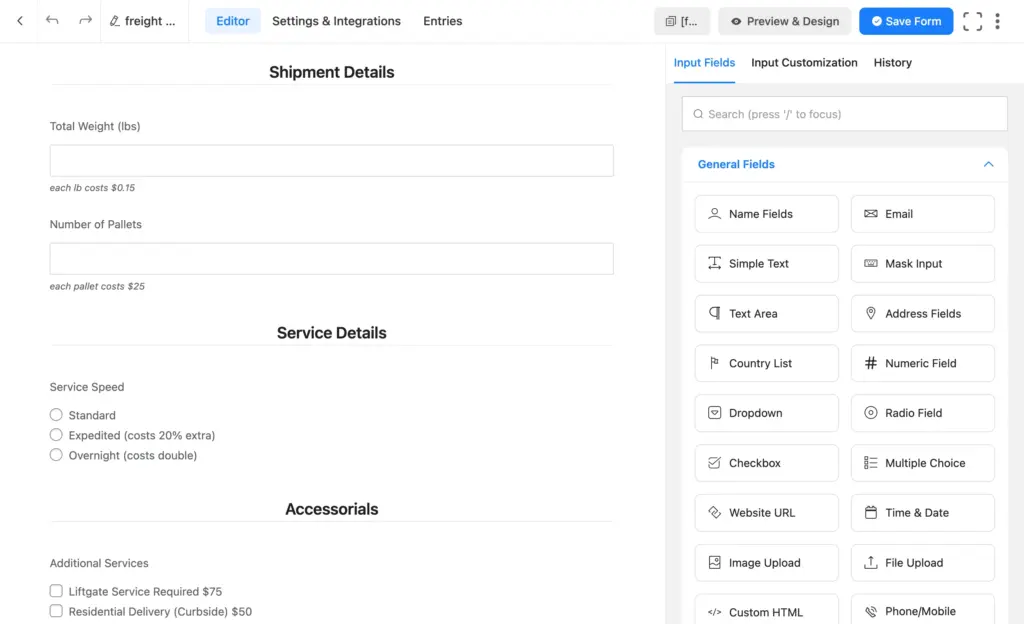
- A numeric field for Estimated Mileage
- A numeric field for Shipment Weight (lbs)
- A numeric field for Number of Pallets
- A radio field for Delivery Type (Standard, Express, Overnight)
- A checkbox field for Additional Services (Liftgate Service, Residential Delivery)
For the radio and checkbox fields, you’ll need to enable Calc Values. Click the field, add options, and check the “Calc Value” box. Then assign a numeric value to each option.
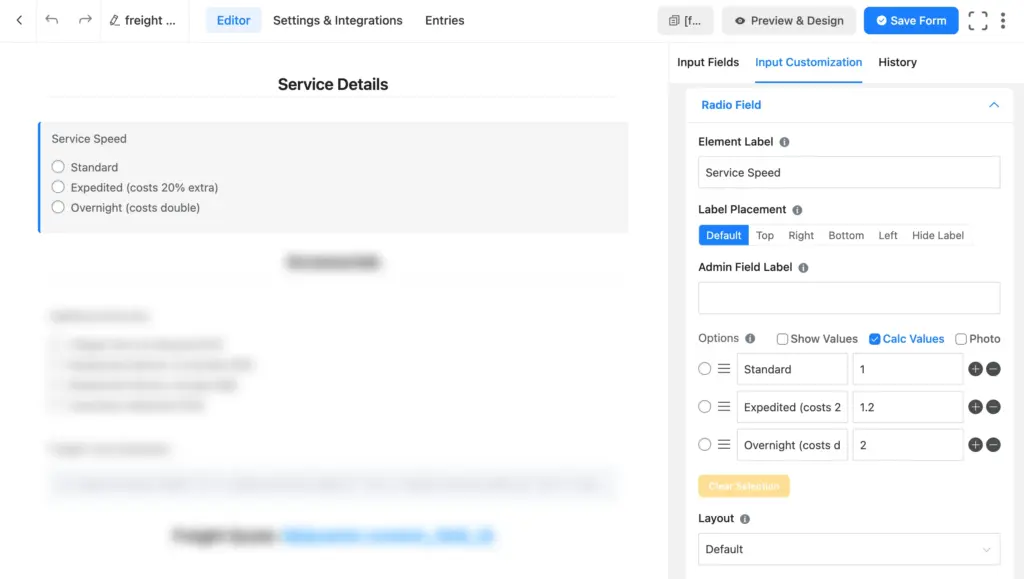
For example, in the radio field (delivery types), express delivery adds a 20% extra charge, and overnight delivery costs double. So the calc values will look like this:
- Standard Delivery: 1
- Express Delivery: 1.2
- Overnight Delivery: 2
The product of distance and weight will be multiplied by this value in our calculation.
The additional services charge will be added to the total cost. So the calc values might look like this:
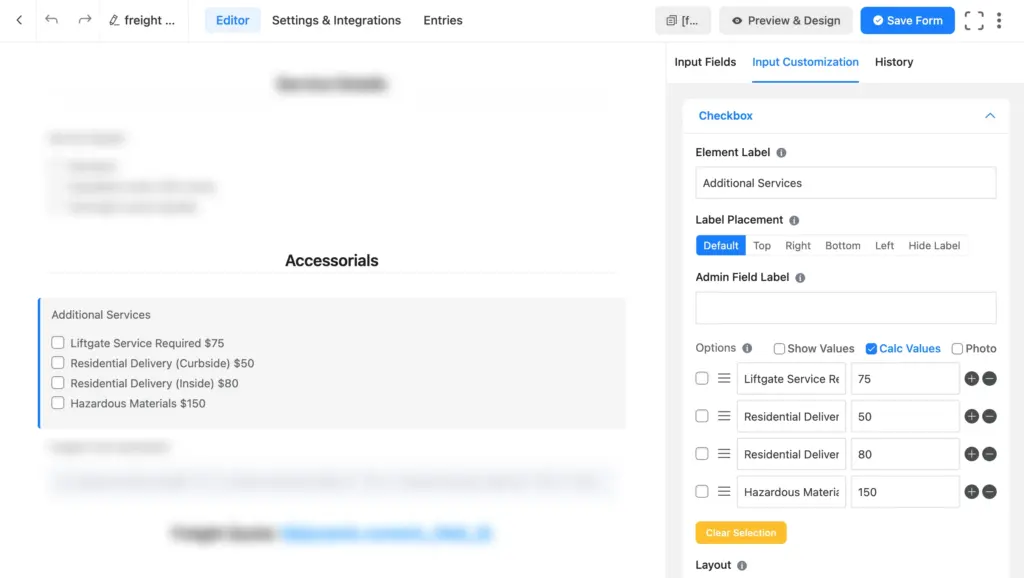
- Liftgate Service Required: 75
- Residential Delivery (Curbside): 50
- Residential Delivery (Inside): 80
- Hazardous Materials: 150, etc.
Now that we’ve added the necessary fields to collect user inputs, let’s move on to the calculation part.
Step 3: Add the calculation field
Add another numeric field, go to input customization, and label it “Estimated Shipping Cost.” Scroll down to Advanced Options and check “Enable Calculation” under the calculation field settings.
Now write your calculation expression using the input fields’ values, symbols, and parentheses. Click the clipboard icon to get input values (it’ll show the element label of computable fields).
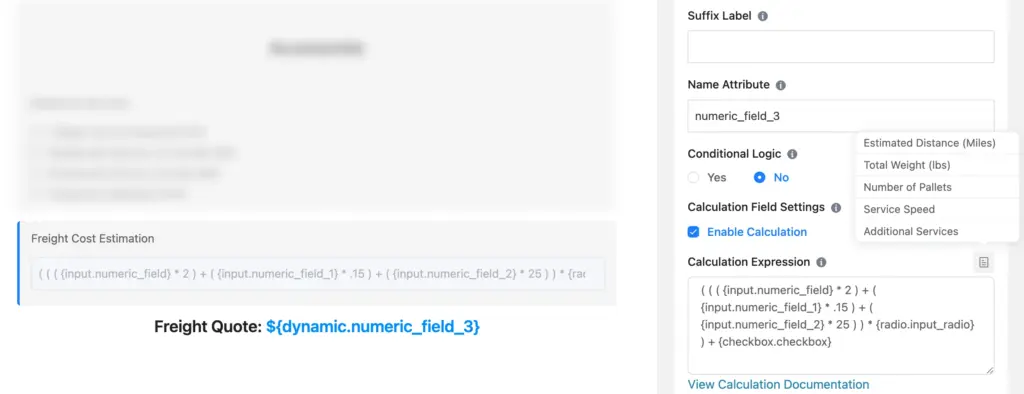
Your formula may look like this: ( ( ( Estimated Distance * 2 ) + ( Total Weight * .15 ) + ( Number of Pallets * 25 ) ) * Delivery Type ) + Additional Services. The labels will be automatically replaced by respective field shortcodes. Here’s the formula breakdown:
- {input.numeric_field} * 2 – Mileage multiplied by $2 per mile
- {input.numeric_field_1} * 0.15 – Weight multiplied by $0.15 per lb
- {input.numeric_field_2} * 25 – Pallets multiplied by $25 each
- {radio.input_radio} – Delivery type multiplier
- {checkbox.checkbox} – Additional service charges
The expression combines these values to produce a final quote.
Step 4: Save & test
Click Save Form, then Preview. Enter some test values and watch the estimated cost calculate in real time.
Repeater Field calculation
Calculation works differently for Repeat Field than it does for regular numeric fields. You can count the total rows and sum up the row values across a column. This is useful when users need to enter a variable number of values. An ideal use case is an average calculator. Let’s see how it’s created.
Step 1: Create the Form
Create a new blank form and name it “Average Calculator.”
Step 2: Add Repeat Field
Drag in a Repeat Field from the Advanced Fields section. Inside it, add a single column. Select the field type as “Numeric Field” from the dropdown.
Users will enter one number per row and click the “+” icon to add more rows.
Step 3: Add the calculation field
Add a numeric field outside the Repeat Field and label it “Average.”
Enable calculation and enter this expression: {repeat.repeater_field.1} / {repeat.repeater_field}
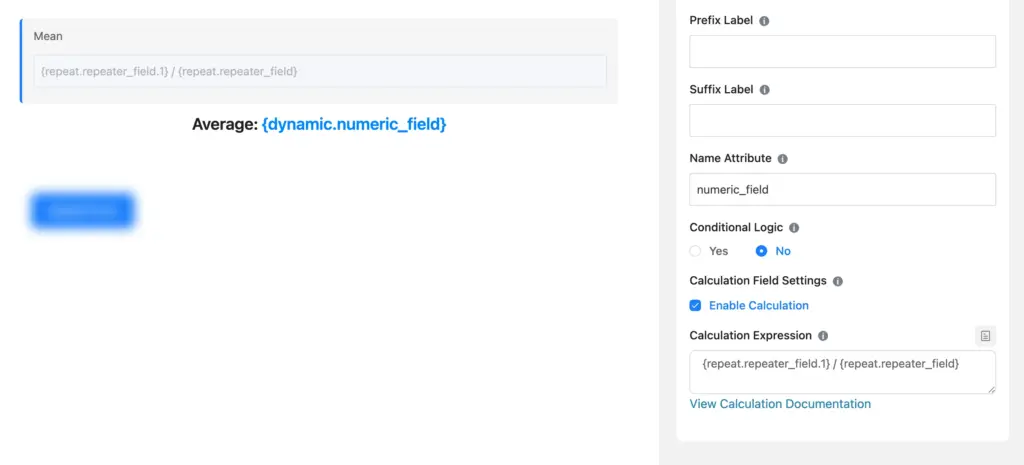
- {repeat.repeater_field.1}: Sums all values in column 1 (the numeric field). For multiple columns, if you want to sum up the values of a different column, replace 1 with that column’s serial number.
- {repeat.repeater_field}: Counts the total number of rows.
Sum divided by count equals the average. Simple.
Step 4: Test it
Save and preview your form. Add a few rows with different values, click outside the repeat field, and watch the average appear.
Important: Ask users not to leave empty rows. Empty rows’ values are considered 0 by default, which will affect the average.
Now that numeric calculation is covered, let’s move on to payment calculation.
How to create payment calculation forms in WordPress
Now let’s look at forms where the calculation result automatically becomes the payment amount. You can accept this payment directly from your form using multiple payment gateways.
Fluent Forms offers two approaches for payment calculation: automatic and manual (you need to write the formula, like in the numeric calculation). Let’s break down each case.
Automatic payment calculation
For straightforward order forms, Fluent Forms handles the math automatically. You don’t need to write any calculation expressions. For most payment forms, automatic calculation does the job.
Let’s create a sandwich order form to see this in action.
Step 1: Create the form
Create a new blank form. Add fields for customer name, email, and phone number.
Step 2: Add Payment Item Fields
From the Payment Fields section, add Payment Item fields for your products. You can organize them using containers or accordion fields for a cleaner layout.
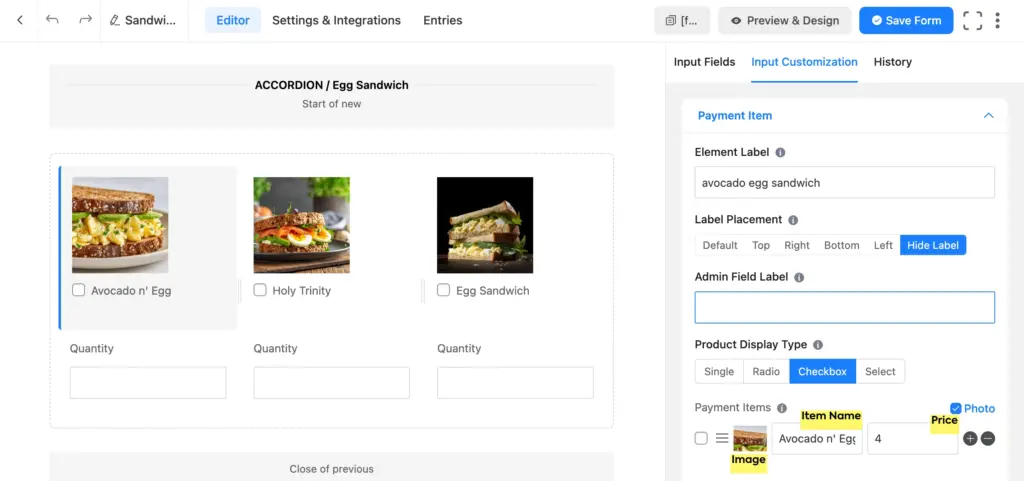
For each Payment Item:
- Set the product name and price (and image if necessary)
- Choose a display type (radio, checkbox, or single item)
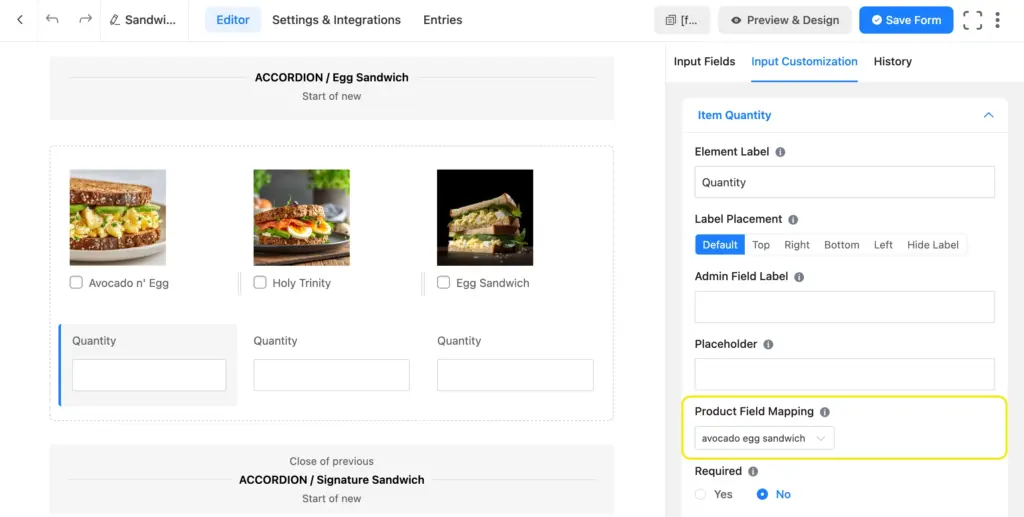
Step 3: Add Item Quantity fields
With each Payment Item, add an Item Quantity field. Click the field and go to Product Field Mapping. Select the corresponding Payment Item from the dropdown. This links the quantity to that specific product.
Step 4: Add delivery options
Add another Payment Item field for delivery method (Pickup or Delivery) if you want to charge for delivery. Select the product display type as radio. Set 0 as the pickup price, and an amount (for example, 5) for the delivery price.
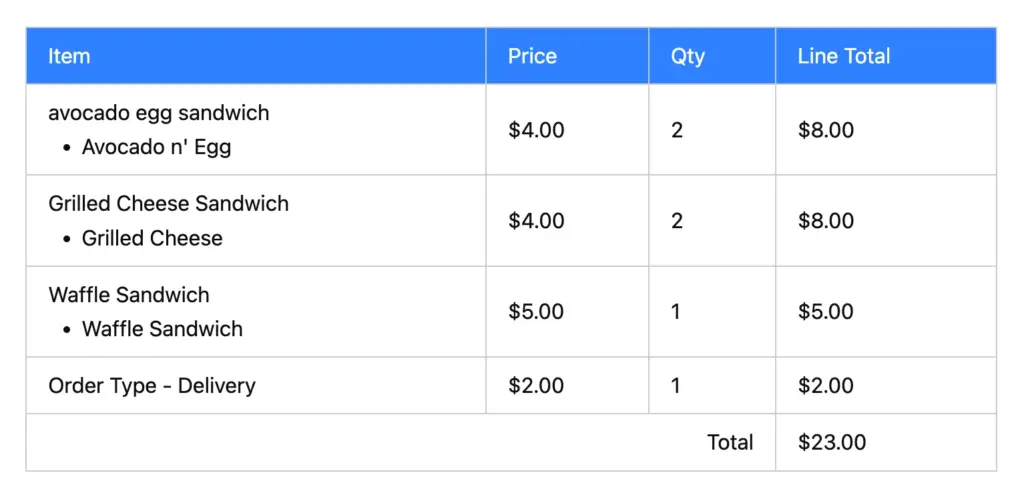
Step 5: Add payment summary and method
Add a Payment Summary field. This automatically displays all selected items, their quantities, individual prices, and the total amount in a neat table.
Finally, add a Payment Method field to accept payment from the form and save your form.
Step 6: Save and test
Test the form from the preview before making it live. Check if all item quantities are mapped properly. If everything works fine, that’s it. No calculation expressions needed. Fluent Forms automatically:
- Multiplies each Payment Item by its mapped Item Quantity
- Adds up all the products
- Displays the total payment amount
- Accepts payment via multiple payment gateways
Learn more about how to create WordPress payment forms using Fluent Forms.
Now, let’s observe a case where you might need to write formulas to create a custom payment amount.
Enjoying this article?
We regularly publish actionable content on our blog. Subscribe to get them delivered straight to your inbox.
We won’t spam you. You can unsubscribe whenever you want.
Setting up payment calculation manually
Sometimes, automatic calculation doesn’t fit your needs. For example, when a user wants to tip a percentage of the total. Or, when you’re using Repeat Fields for order details, since payment fields can’t be placed inside Repeat Fields.
Let’s create a screen printing order form that’s equipped to handle bulk orders. If we use automatic payment calculation, users would have to enter the total quantity separately, then proceed to the color-size breakdown. That’s redundant and confusing.
With manual calculation, users just fill in the information once in the repeat field. The form looks clutter-free and creates a smoother experience. Let’s see how.
Step 1: Set up the form
Create a new form. Add contact fields (name, email), image/file upload for design, and an address field for shipping.
Step 2: Add the apparel selection
Add a Radio field for apparel type. Enable Calc Values and assign prices:
- T-shirt (Half Sleeve): 20
- T-shirt (Full Sleeve): 25
- Hoodie: 40, etc.
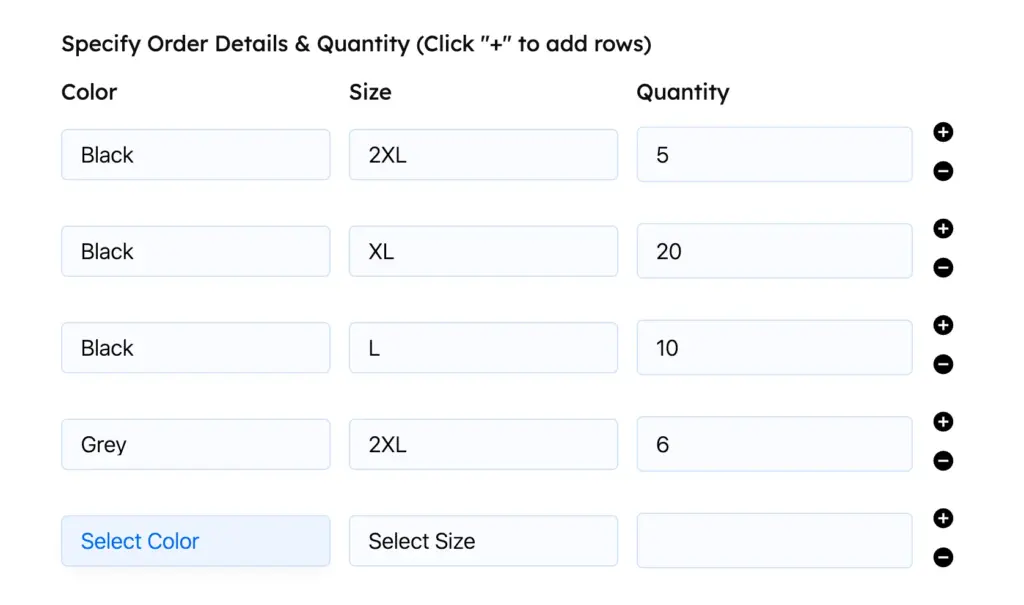
Step 3: Add the Repeat Field for order details
Add a Repeat Field with three columns:
- Column 1: Dropdown for Color (White, Black, Navy, etc.)
- Column 2: Dropdown for Size (S, M, L, XL, 2XL)
- Column 3: Numeric field for Quantity
Customers will add one row for each color-size-quantity combination they want.
Step 4: Add the Custom Payment Amount field
Here’s where manual calculation comes in. Add a Custom Payment Amount field and label it “Total Payment Amount.” Enable calculation from Advanced Options and enter the calculation expression. The equation might look like this: {radio.input_radio} * {repeat.repeater_field.3}
This multiplies:
- The apparel price (from the radio field’s calc value)
- The sum of all quantities in column 3 of the repeat field
So if someone orders a Hoodie ($40) with quantities 5 + 20 + 10 = 35 items, the total would be $40 × 35 = $1,400.
Step 5: Add payment method and test
Finally, add a Payment Method field to collect payment and save your form. Test it to see if everything’s working properly.
Simple equation, complex calculation
Creating WordPress forms with calculations doesn’t have to be complicated. With Fluent Forms, you have the flexibility to build anything from simple calculators to complex payment forms without any coding.
Regular numeric calculations are perfect for quote calculators, estimators, and tools that compute values from user input. Repeat field calculation is ideal for adding up a variable number of values, like data sets or multiple line items.
The best part is that Fluent Forms handles payment calculation automatically to save you time. It’s the easiest option for standard order forms where items have fixed prices and quantities. However, sometimes you might need to set up the total payment calculation manually, especially when users pay custom amounts.
Ready to build your first calculator form? Get a jump start with our calculator form templates or start from scratch and build any calculator you can imagine!

Sarika writes for Fluent Forms and loves to offer insights into small businesses. She’s curious and enjoys discussing ideas, interests, and perspectives. In her free time, she’s either marvelling at architectural beauties or trying different cuisines.


Leave a Reply