Active Users
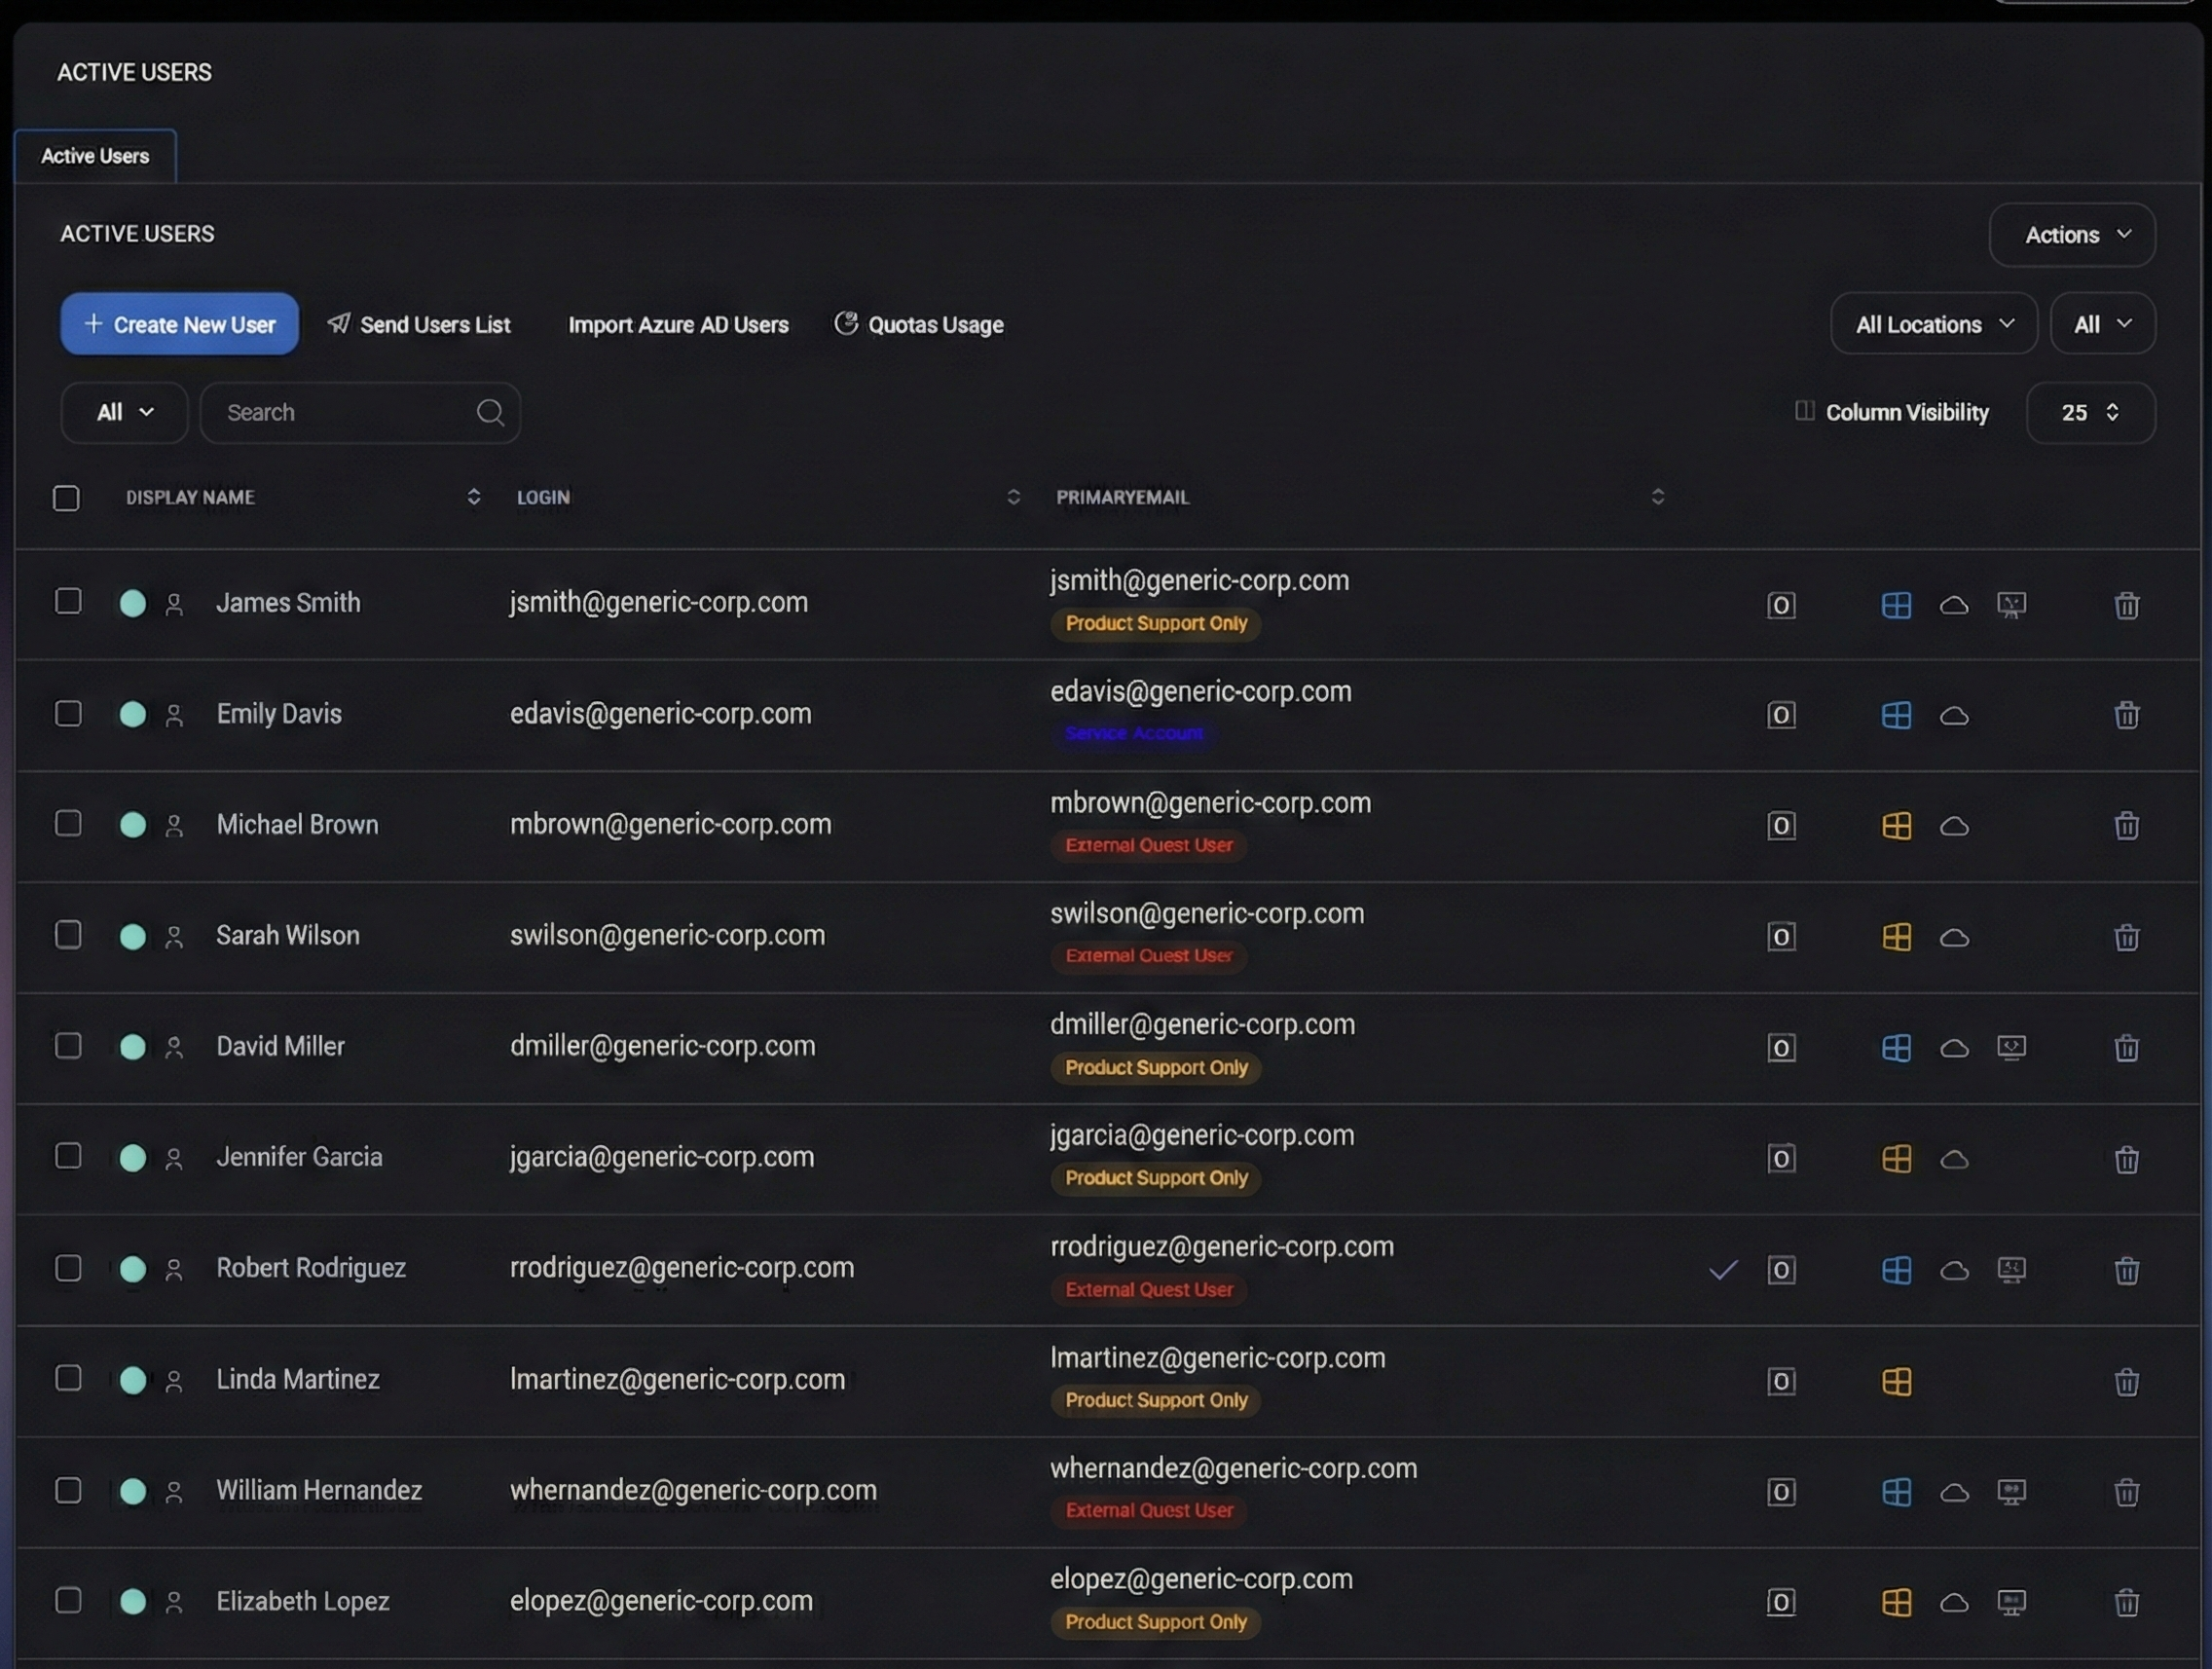
The Active Users page is the primary user management interface inside a customer Hosted Organization. Users shown here may come from on-prem Active Directory (AD) and/or Azure AD (synced users).Active Users list is the operational view used to manage user lifecycle, licensing, access posture, and related service features.
Page layout
The page consists of:
- A primary action row (create/import/send/quota tools).
- A global Actions menu for bulk operations.
- Filtering controls (locations, view filters, search).
- A users table with per-user indicators and quick actions.
Create New User
Create New User starts the user creation flow for the Hosted Organization. Use this option when the user should be created directly in the organization scope (for example, a new employee account). The exact fields and follow-up steps depend on your environment configuration and identity provider rules.
Send Users List
Send Users List initiates sending/exporting the current user list via the platform’s supported delivery method (for example, generating and sending a list report). Use it when you need to share the current users inventory with another team, customer contact, or internal administrator.
Import Azure AD Users
Import Azure AD Users is used to bring Azure AD users into MSPControl’s Hosted Organization scope (or trigger the import workflow if they are not yet visible here). This is the entry point for environments where Azure AD is the source of truth (or where MSPControl synchronizes identities from Azure AD).
Quotas Usage
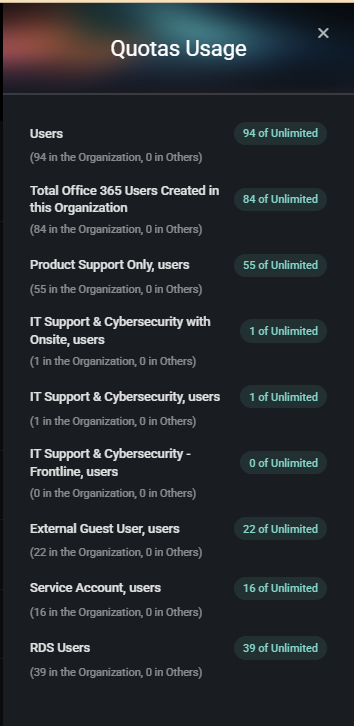
Quotas Usage opens a right-side modal that summarizes the current consumption of user-related quotas for this Hosted Organization (for example, total users, service-level user buckets, and other user types). This view is used for quick limit checks and license/plan enforcement verification.
Quotas Usage modal
When you click Quotas Usage, a panel opens on the right side of the screen. It lists quota categories with:
- The current count for this Hosted Organization.
- The allowed limit (for example, of Unlimited).
- A breakdown note showing usage distribution (for example, “X in the Organization, Y in Others”).
Quota categories (configurable example)
- Users – Total active users currently created in this Hosted Organization.
- Total Office 365 Users Created in this Organization – Total number of users created/managed under the Office 365 scope for this organization.
- Product Support Only, users – Users classified under the Product Support Only service level/type.
- IT Support & Cybersecurity with Onsite, users – Users classified under this service level/type bucket.
- IT Support & Cybersecurity, users – Users classified under this service level/type bucket.
- IT Support & Cybersecurity – Frontline, users – Users classified under this service level/type bucket.
- External Guest User, users – Users classified as external guest users.
- Service Account, users – Users classified as service accounts (non-human or automation identities).
- RDS Users – Users included in the RDS user bucket (used for RDS enablement/entitlements in environments where applicable).
The Actions dropdown (top-right of the page) is used for bulk operations on selected users. This menu applies changes across multiple users consistently (for example, security posture updates, licensing, and access enforcement).
Apply and Cancel
- Apply – Executes the selected action for the currently selected user rows.
- Cancel – Closes the actions dialog without applying changes.
Available actions
The actions list may be scrollable. The following actions are available in this UI:
- Disable – Disables the selected user accounts.
- Enable – Enables the selected user accounts.
- Set Service Level – Assigns a service level classification to selected users (used for quota bucketing and policy behavior).
- Set VIP – Marks selected users as VIP (often used for escalation rules and prioritization workflows).
- Unset VIP – Removes VIP flag from selected users.
- Send password reset By Sms – Initiates a password reset workflow via SMS (if supported/configured).
- Send password reset By Email – Initiates a password reset workflow via email (if supported/configured).
- Sync with Azure AD – Triggers synchronization for selected users with Azure AD (for hybrid/synced environments).
- Unsync with Azure AD – Removes/halts Azure AD synchronization for selected users (where supported by your identity model).
- Revoke All Sessions – Revokes active sessions for selected users (forces re-authentication).
- Remove All Mobile Devices – Removes all mobile device associations for selected users (MDM-style cleanup in supported environments).
- Remove From All Groups – Removes selected users from all groups (use cautiously, as it may remove access and permissions broadly).
- Assign O365 License – Assigns an Office 365 license to selected users.
- Change O365 Licenses – Modifies the Office 365 license assignment for selected users.
- Change O365 Service Plans – Updates Office 365 service plan toggles for selected users (plan-level controls within a license).
- Set Location – Assigns a location value to selected users (used with location-based policies and filtering).
- Enable Personal Folder – Enables a personal folder feature for selected users (feature behavior depends on your hosting/storage configuration).
- Disable Personal Folder – Disables personal folder for selected users.
- Cancel Pending Password Reset Req – Cancels a pending password reset request for selected users (when such a request is active).
- Send Setup Instructions – Sends onboarding/setup instructions to selected users (delivery method depends on configuration).
- Set UPN as Default Domain – Applies UPN default domain logic for selected users (identity-domain behavior depends on your directory configuration).
- Set Risky Users – Flags selected users as risky (used for security workflows and heightened monitoring).
- Unset Risky Users – Removes risky-user flag from selected users.
- Send Verification Request – Sends a verification request to selected users (used to confirm identity/contact readiness depending on workflow).
- Set Manager – Assigns a manager relationship for selected users (organizational metadata for workflows and reporting).
Filters and list controls
All Locations
All Locations is a dropdown filter that scopes the Active Users list by location. Use this when the Hosted Organization has multiple sites/branches and you need to manage users for a specific location only.
View filter
The All dropdown (view selector) controls the current list view. Depending on configuration, different views may represent saved filters, pre-defined user subsets, or scoped lists.
Search
The Search field filters the list as you type. Use it to quickly find users by display name, login, or email (depending on your environment’s search indexing rules).
Column Visibility
Column Visibility allows you to show/hide table columns. Use it to simplify the list during operational work (for example, focusing only on identity columns).
Page size
The page size selector (for example, 25) controls how many users are shown per page.
Users table
The main table lists all active users in the Hosted Organization. Each row includes identity fields, service classification indicators, and quick-access icons for services/features associated with the user.
Core identity columns
- Selection checkbox – Select users for bulk actions.
- Display Name – User’s display name as shown in MSPControl. A status/identity icon is displayed next to the name for quick recognition.
- Login – The login identifier (commonly email-format UPN or mailbox-style identity, depending on configuration).
- PrimaryEmail – The primary email address for the user. This column may also show classification badges (examples seen in the UI include Product Support Only, Service Account, and External Guest User).
Service and feature icons
On the right side of each row, MSPControl shows small icons representing services/features associated with the user. These icons are designed for fast visibility and expose additional details via hover tooltips.
- Microsoft 365 / licensing icon – Hovering shows assigned license names and plans (for example, Microsoft 365 E5, Teams, Planner, Project, and other SKU/service plan names).
- OneDrive icon – Hovering shows OneDrive usage (for example, “used X MB of Y GB, Z%”).
- RDS icon – Indicates RDS-related status/association for the user (tooltip shows RDS).
- Delete (trash) – Deletes the user (where permitted). Use cautiously due to identity and licensing impact.
Tip: Tooltips are the primary way to view full details for compact icons (especially licensing and storage usage) without opening a user details screen.
Create User
The Create User window is used to create a new user inside the Hosted Organization. It contains multiple expandable sections (for example, General, Device Profile, Address, Company Information, and more). Use the expand/collapse chevrons on the right side of each section header to show or hide blocks while you work.
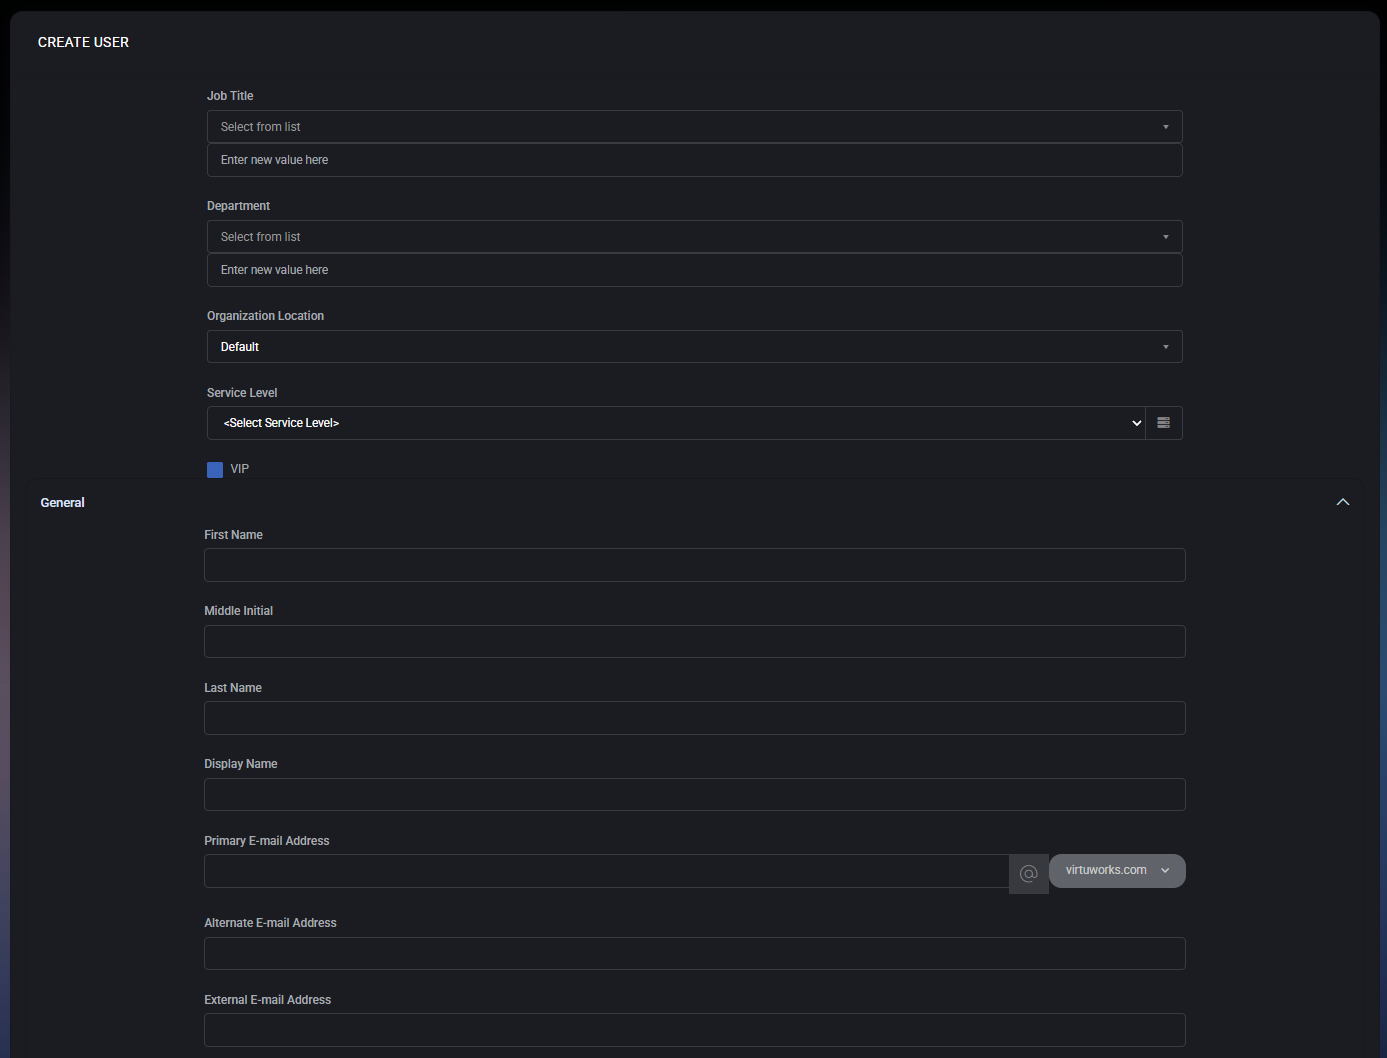

This top block defines organizational attributes used for classification, filtering, and service-level/quota logic.
- Job Title – Defines the user’s job title. This field is split into two inputs:
- Select from list – Pick an existing job title value.
- Enter new value here – Add a new job title value if the required one does not exist yet.
- Department – Defines the user’s department. This field is also split into two inputs:
- Select from list – Pick an existing department value.
- Enter new value here – Add a new department value if needed.
- Organization Location – Assigns the user to an organization location (default shown as Default). This field is used with the All Locations filter on the Active Users page and may also drive location-based policy behavior.
- Service Level – Assigns a service-level classification to the user (shown as <Select Service Level> until selected). This classification is referenced in Quotas Usage (service-level buckets) and can also be used by operational workflows.
- The small button/icon to the right of the dropdown opens a helper/list view for selecting or reviewing service level entries (environment-dependent behavior).
- VIP – Marks the user as VIP. VIP is used for prioritization workflows (for example, escalations, special handling rules, or visibility in reporting depending on your configuration).
General
The General section defines the user’s identity fields and email addresses.
- First Name – User’s first/given name.
- Middle Initial – Optional middle initial.
- Last Name – User’s last/family name.
- Display Name – The display name shown in MSPControl lists and UI (for example, the name shown in the Active Users table).
- Primary E-mail Address – Primary email address for the user. This field is split into:
- Local part (text input) – The part before
@.
- Domain selector (dropdown) – The domain part after
@ (for example, virtuworks.com).
- Alternate E-mail Address – Optional alternate email address (commonly used for a secondary mailbox or an additional contact method).
- External E-mail Address – Optional external email address (commonly used for non-corporate contact, recovery, or guest/external scenarios depending on policy).
Password and security
This block defines how the user password is set and what password lifecycle controls apply.
- Send Password Request – When enabled, the system sends a password-related request/flow instead of (or in addition to) manually setting the password during creation (exact behavior depends on your configured identity workflow).
- Password – The initial password value for the account.
- The eye icon reveals/hides the password.
- Confirm Password – Must match the password value exactly.
- The eye icon reveals/hides the confirm value.
- Generate Password – Generates a strong password automatically. Use this to avoid weak manual passwords.
The following policy checkboxes control password lifecycle and operational handling:
- Password Never Expires – Prevents password expiration for this user (use only when policy allows; commonly used for specific service accounts).
- User must change password at next logon – Forces the user to set a new password on first sign-in.
- Auto Renew Password – Enables automatic password renewal behavior for this account (environment-dependent implementation).
- Save Password in Password Manager – Stores the password record in the system password manager feature (if enabled), allowing controlled access workflows.
- Exclude from inactivity report – Excludes this user from inactivity-related reporting (useful for service accounts or special-purpose identities).
- Exclude from Mailchimp syncing – Excludes this user from Mailchimp synchronization flows (if Mailchimp integration is used).
- Two Factor Provider – Selects the two-factor provider for this user (shown as Email in the screenshot). This defines the 2FA delivery/validation method where supported.
- New Azure AD user – When enabled, the user is treated as an Azure AD user creation/sync candidate (use in Azure AD integrated environments where the user should exist in Azure AD).
- Schedule Activation – Enables scheduled activation behavior (used when accounts should be created now but activated later, depending on workflow configuration).
Device Profile
The Device Profile section controls device-profile behavior for the user.
- Device Profile Override – Overrides the default device profile applied to this user (shown as None by default). Use this when a specific user requires a different device policy/profile than the organization standard.
- The small button/icon on the right side of the field opens a helper/selection view (environment-dependent) to assist in choosing or reviewing device profile options.
Address
The Address section stores the user’s location and phone contact details.
- Address – Multi-line address field (text area). The icon on the right provides a quick UI helper (environment-dependent).
- City – City field. The icon on the right provides a quick UI helper (environment-dependent).
- Country – Country dropdown (for example, “Select Country…”).
- State – State/region field.
- Zip – Postal code field.
- Phone Number 1 – Primary phone number field with country code selector (flag + code) and a quick action icon on the right.
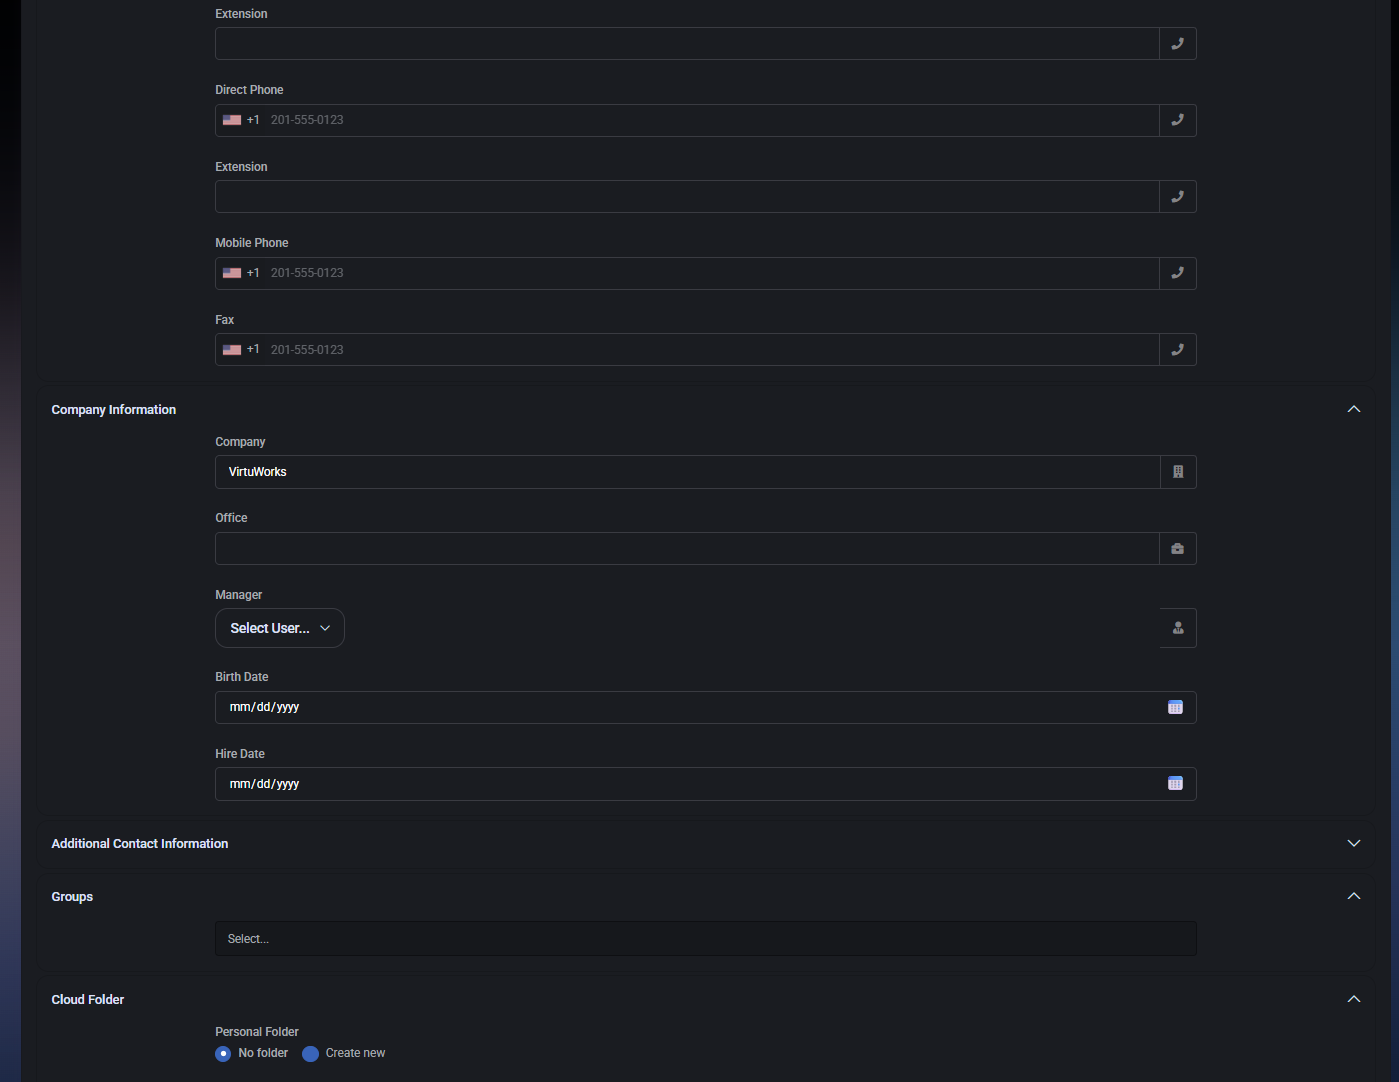
- Extension – Optional phone extension for the phone number field(s).
- Direct Phone – Direct phone number field (commonly used for desk phone DID).
- Extension (Direct Phone) – Optional extension associated with the direct phone entry.
- Mobile Phone – Mobile number field.
- Fax – Fax number field (legacy contact method, where needed).
The Company Information section defines internal organizational metadata used for reporting and organizational relationships.
- Company – Company name field (pre-filled in the screenshot as VirtuWorks).
- Office – Office field (used for office assignment metadata).
- Manager – Manager relationship selector. Choose another user as this user’s manager for organizational structure workflows (also referenced by the Set Manager bulk action on the Active Users list).
- Birth Date – Date picker field (format shown as mm/dd/yyyy).
- Hire Date – Date picker field (format shown as mm/dd/yyyy).
Additional Contact Information is an expandable section for extended user contact/profile data. Expand it when you need to capture non-standard contact attributes beyond the default Address and Company Information blocks.
Groups
The Groups section assigns the user to one or more groups.
- Select… – Group selection field. Add the user to the appropriate groups so they inherit correct permissions and access to resources.
Cloud Folder
The Cloud Folder section configures personal/shared folder behavior for the user.
Personal Folder
- No folder – Do not create a personal folder for this user.
- Create new – Create a new personal folder for this user.
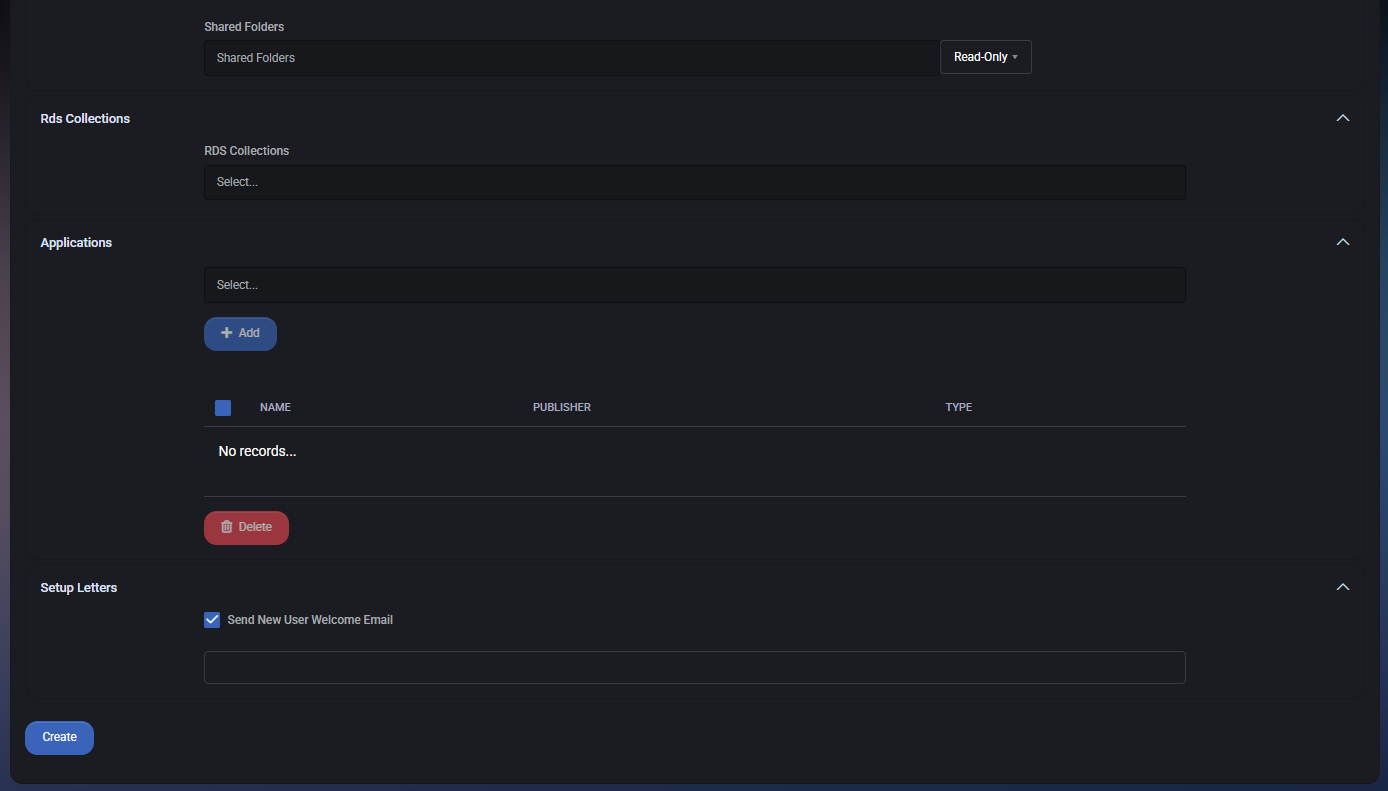
Shared Folders
- Shared Folders – Shared folder selection field.
- Permission level – Permission dropdown shown as Read-Only in the screenshot. Use this to control the user’s access level to the selected shared folders.
Rds Collections
The Rds Collections section assigns the user to one or more RDS collections (where RDS services are part of the Hosted Organization setup).
- Select… – Choose which RDS collections the user should be associated with.
Applications
The Applications section is used to assign applications to the user (environment-dependent). This may represent published apps, assigned packages, or user-targeted application entitlements.
- Select… – Application selector field used to choose an application before adding it.
- Add – Adds the selected application to the user’s applications list.
The applications table shows assigned items:
- Name – Application name.
- Publisher – Application publisher/vendor.
- Type – Application type/category.
- Delete – Removes selected application assignments from the user (button below the table).
Setup Letters
The Setup Letters section controls onboarding communication for the new user.
- Send New User Welcome Email – When enabled, MSPControl sends a welcome/onboarding email to the new user after creation (based on your configured templates).
- Message / template input – A text field is available below the checkbox for custom content or template selection (behavior depends on your environment configuration).
The Create button at the bottom of the window finalizes user creation using the provided values. Before clicking Create, verify:
- identity fields (name + display name) are correct,
- primary email is correct (local part + domain),
- password options match your policy,
- service level and location are set correctly (if used for quotas and workflows),
- group membership and folder/app assignments are correct.
User Settings
After a user is created (or when you open an existing user from the Active Users list), MSPControl provides a multi-tab user profile where you can manage identity, security, licensing, storage, membership, and audit history. This section is intentionally comprehensive because Active Users can represent both AD and Azure AD synced identities within the Hosted Organization.
User Settings tabs
The user profile includes the following tabs. Use this list as a navigation reference for the rest of this document (we will describe them one-by-one):
General tab
The General tab is the primary place to manage core identity fields, password handling, security actions, service classification, and basic profile/contact details. The tab is organized into multiple subsections. The order below matches the UI order shown in the navigation panel.
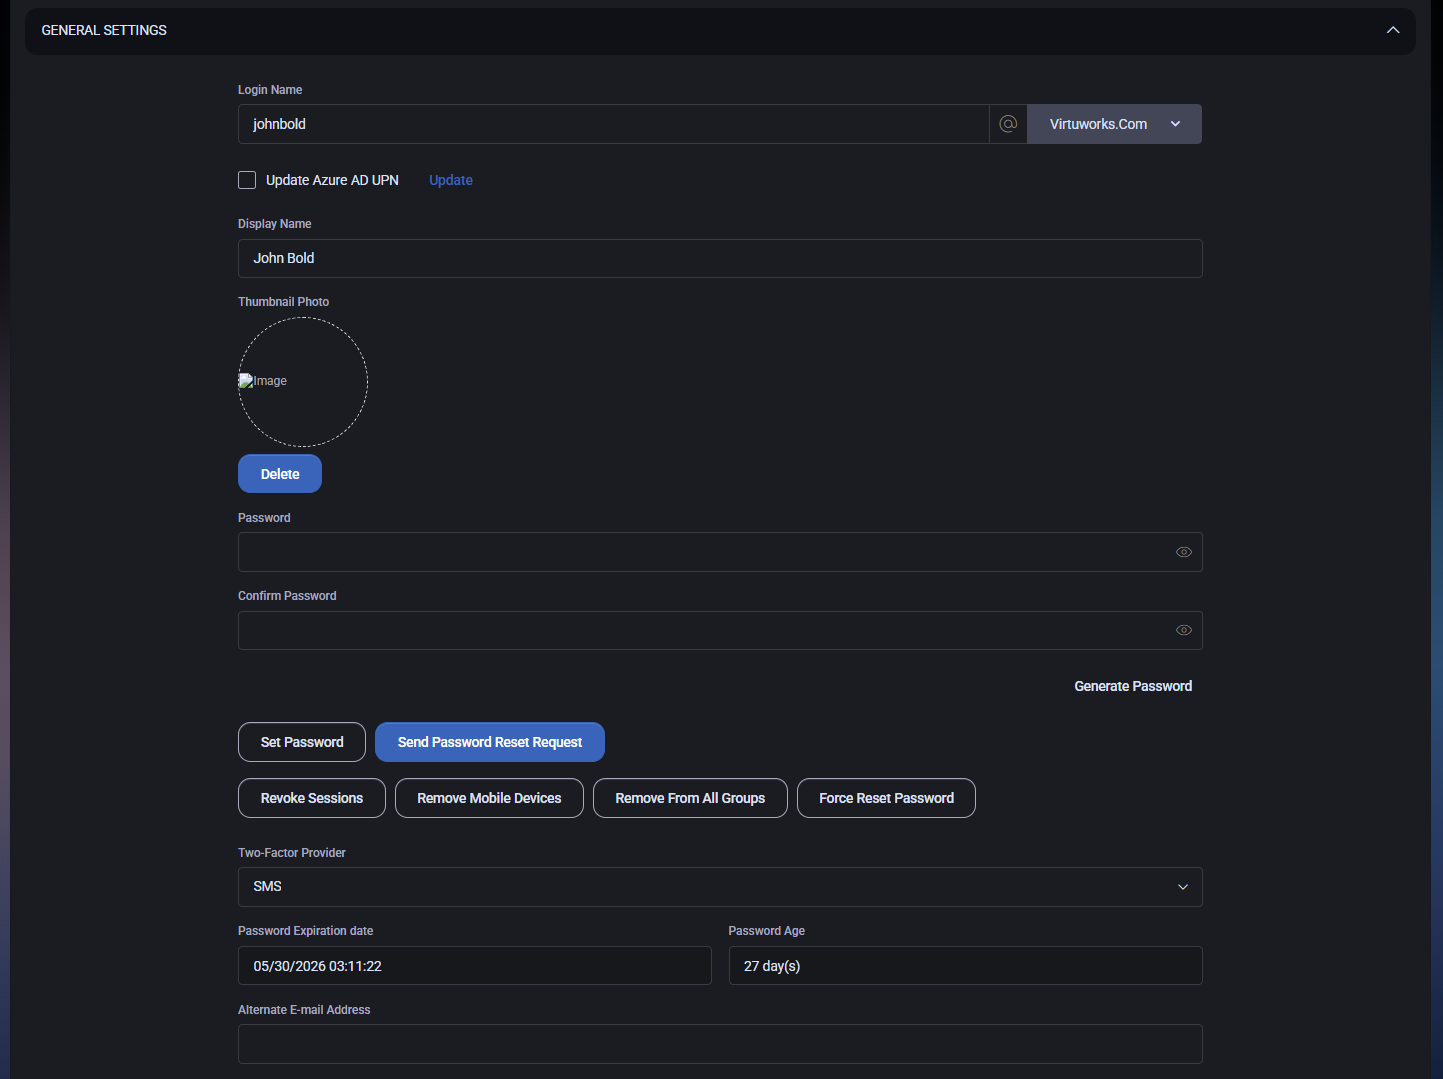
General Settings
The General Settings block contains the core account identity fields and password controls.
- Login Name – The user’s login identifier. It is split into:
- Local part – The text input (for example, asilverman).
- Domain selector – Dropdown after the
@ icon (for example, Virtuworks.Com). This commonly represents the UPN domain used for sign-in.
- Update Azure AD UPN – Checkbox that enables updating the Azure AD UPN value for this user (only relevant for Azure AD connected/synced environments).
- Update – Action link/button used to apply the UPN update when the checkbox is selected. Use this carefully because changing UPN affects sign-in identity and may impact downstream integrations.
- Display Name – The user-friendly name shown throughout MSPControl (for example, in the Active Users list).
- Thumbnail Photo – User profile photo area.
- Delete – Removes the current thumbnail photo (if one is set).
This block also includes password controls and security actions:
- Password – New password value. The eye icon reveals/hides the value.
- Confirm Password – Must match the password value. The eye icon reveals/hides the value.
- Generate Password – Generates a strong password.
- Set Password – Applies the password defined in the Password and Confirm Password fields.
- Send Password Reset Request – Triggers a password reset request workflow (delivery method and flow depend on your environment and identity provider).
- Force Reset Password – Forces a password reset requirement for the user (commonly used when credentials may be compromised or during security resets).
- Revoke Sessions – Revokes active sessions for the user, forcing re-authentication.
- Remove Mobile Devices – Removes all mobile device associations for the user.
- Remove From All Groups – Removes the user from all groups (use with extreme caution because it may remove access broadly).
- Two-Factor Provider – Dropdown selecting the 2FA method for the user (example shown: SMS).
- Password Expiration date – Shows when the password will expire.
- Password Age – Shows how old the current password is (for example, 27 day(s)).
- Alternate E-mail Address – Optional alternate email field (visible below the password metadata area).
Scheduled Actions
The Scheduled Actions block is used to schedule account state changes, such as disabling the user at a future date.
- Scheduled Disable Date – Date picker for when the user should be disabled.
- Schedule Disable – Schedules the disable operation using the selected date.
This section contains additional identity/contact fields and notes.
- First Name – User’s first/given name.
- Middle Initial – Optional middle initial.
- Last Name – User’s last/family name.
- External Email – External contact email address.
- Notes – Free-text notes field for internal context about the user.
- Home Phone – Optional home phone.
- Pager – Optional pager field.
- Web Page – Optional website field.
- Birth Date – Date picker field.
- Hire Date – Date picker field.
This block controls the user’s service classification and VIP status. These values are used for quota categories and may also drive policy behavior in other modules.
- Service Level – Dropdown selecting a service level classification (example shown: Product Support Only).
- VIP – Checkbox to mark/unmark the user as VIP.
This block stores organizational metadata about the user and is often used for reporting and structure.
- Job Title – Job title value.
- Company – Company name.
- Department – Department value.
- Office – Office value.
- Manager – Manager assignment.
Location
The Location block assigns the user to an organization location, which is used for filtering and potentially for location-based policies.
- Organization Location – Dropdown selecting the user’s assigned location (example: Virtuworks Main Office).
Address
This is a structured address and phone information block, commonly used for contact and operational context.
- Street Address 1 – Primary street address line.
- City – City.
- Select Country – Country selector (required as indicated by the asterisk in the UI).
- Region (State) – State/region selector.
- Postal Code – ZIP/postal code.
- Phone Number 1 – Primary phone number (with country code selector).
- Extension – Extension for Phone Number 1.
- Direct Phone – Direct phone number.
- Extension – Extension for Direct Phone.
- Mobile Phone – Mobile number.
- Fax – Fax number.
Org User-to-Peer Binding
This section links the organization user to a Peer identity (a platform-level user object used by MSPControl for cross-module identity handling).
- Please select a Peer – Dropdown to choose the peer object (example shows: Aaron Silverman (asilverman@virtuworks.com)).
- Initiate New Peer Creation – Starts a guided process to create a new peer record and bind it to this org user.
- Edit – Opens editing for the selected peer binding (where supported).
- Unbind – Removes the link between the org user and the peer record.
- Delete – Deletes the peer record (use with extreme caution, as it may affect other modules).
Device Profile
The Device Profile block allows overriding the default device profile policy for this user.
- Device Profile Override – Dropdown to select a specific device profile override (example: None).
Custom Fields
The Custom Fields section is available for environments that extend user profiles with organization-specific fields. Expand and complete these values if your Hosted Organization uses custom attributes for automation, reporting, or integration mapping.
Save actions
At the bottom of the user profile page, MSPControl provides the following save controls:
- Cancel – Discards changes made since the last save and returns you to the previous context.
- Save Changes And Exit – Saves updates and exits the user profile page.
- Save Changes – Saves updates and keeps you on the user profile page.
Microsoft 365 tab
The Microsoft 365 tab is used to manage the user’s Microsoft 365 / Entra ID linkage and to view or adjust license assignments. It contains two primary sections: General Settings (identity sync + license add) and Assigned Licenses (current licenses and their service plans).
General Settings
This section defines how the user is linked to Microsoft Entra ID (Azure AD) and provides a controlled way to add licenses.
- Sync User with Microsoft Entra ID – When enabled, MSPControl treats this user as linked/synced with Microsoft Entra ID. This is required when you want the user’s licenses and cloud identity state to be managed through the Microsoft 365 integration.
- Azure Object ID – The Entra ID Object ID for this user (GUID). This value uniquely identifies the user in Microsoft Entra ID.
- Copy (clipboard icon) – Copies the Object ID to the clipboard for troubleshooting, support cases, or portal navigation.
- Update – Applies the current Object ID / sync-related change. Use this after changing the Object ID value or when you need to re-apply the binding.
- Microsoft Azure Management Portal – A quick link label that indicates where the Azure Object ID is referenced and verified (Entra ID user object in the Azure portal).
- Licenses for Add – A dropdown used to select a license SKU to add to this user (shown as Select License until a value is chosen). Use this to assign an additional license on top of existing ones.
Assigned Licenses
This section shows all licenses currently assigned to the user. Licenses appear as separate blocks. Each block contains action buttons (for license-level operations) and a list of service plans/features that belong to that license.
License block actions
Each assigned license block can include some or all of the following buttons:
- Remove – Removes the entire license from the user. This typically revokes access to all services included in that license.
- Change – Opens a license change flow (for example, switching SKUs or adjusting which service plans are enabled/disabled under the license, depending on your integration rules).
- External License – Indicates the license is managed externally (for example, outside MSPControl licensing automation). This may affect what can be changed from MSPControl.
- Add-On – Adds an additional component/entitlement to the user (shown on some license types such as add-on style “Business Apps (free)” in the screenshot).
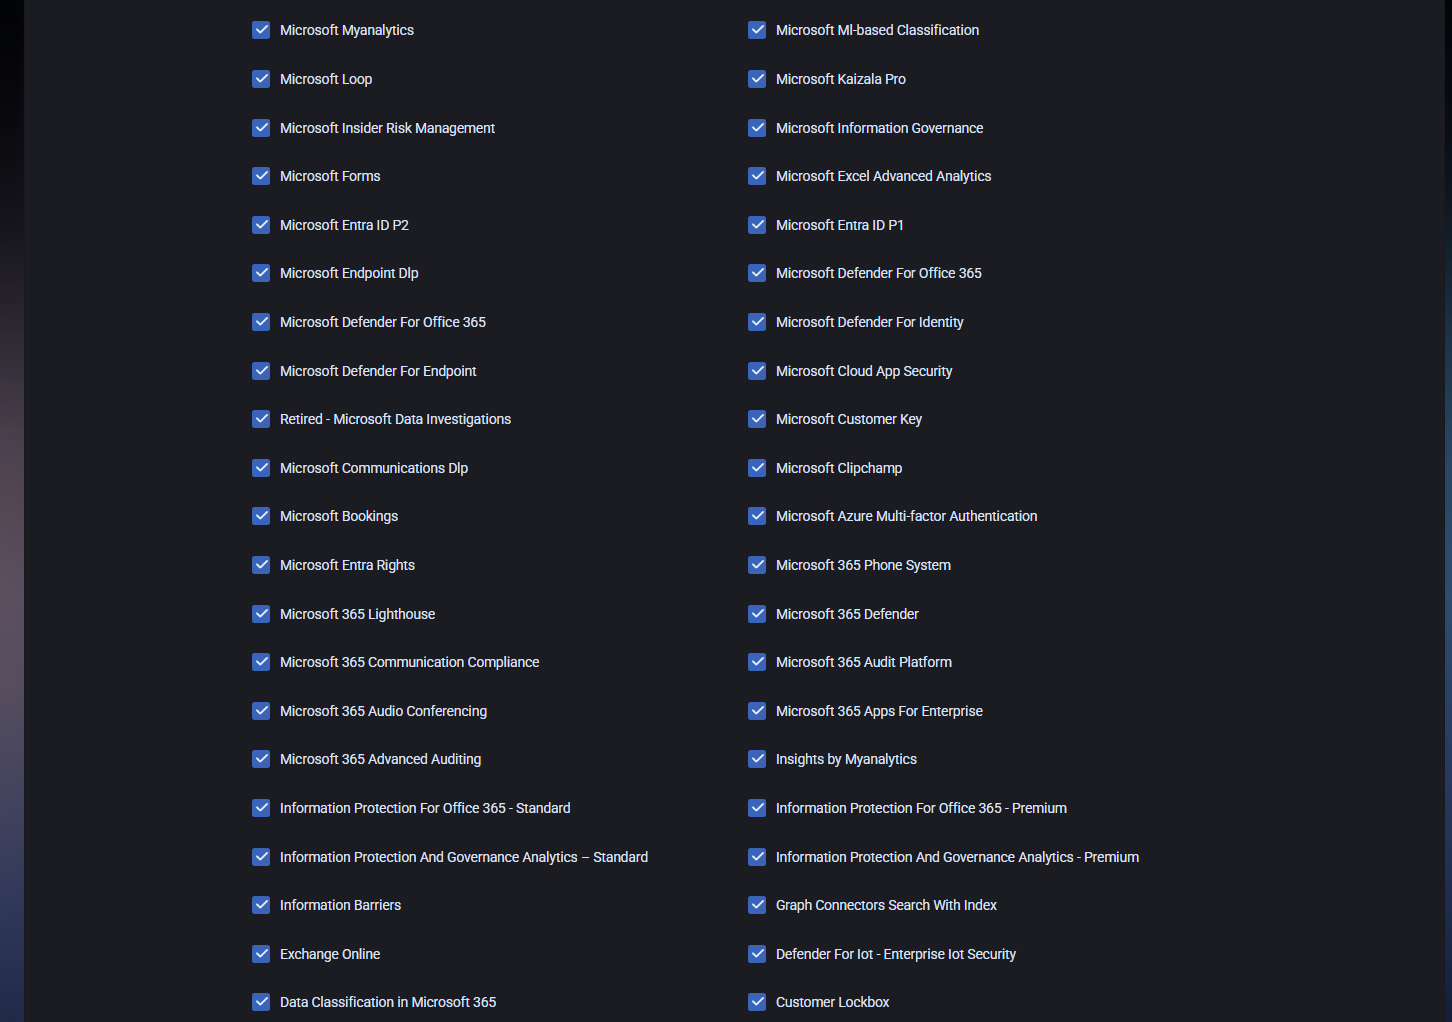
Service plans inside a license
Under each license, MSPControl shows the related service plans/features. These appear as checkboxes to indicate whether a specific service plan is enabled for the user under that license.
- A checked plan means the service plan is enabled for this user under the license.
- An unchecked plan means the plan is disabled for this user (or not selected / not enabled in that license scope).
Some service plans can also display usage context inline, for example:
- OneDrive / SharePoint usage indicator – A small bar and text line showing consumed storage and remaining capacity (example shown: “OneDrive usage … of … MB, available … MB”). This is informational and helps validate consumption for the licensed service.
Expandable examples of license contents
You do not need to review every individual service plan entry in the UI during routine work. Use the expandable summaries below as a reference for what the license blocks typically contain.
Example: MICROSOFT_365_COPILOT (service plan checklist)
- Microsoft Viva Insights Backend
- Copilot Studio in Copilot for M365
- Graph Connectors in Microsoft 365 Copilot
- Microsoft 365 Copilot in Productivity Apps
- Microsoft Copilot with Graph-grounded Chat
- Microsoft Viva Insights
- Microsoft 365 Copilot for SharePoint
- Power Platform Connectors in Microsoft 365 Copilot
- Microsoft 365 Copilot in Microsoft Teams
- Intelligent Search
Example: MICROSOFT 365 E5 (NO TEAMS) (EXTERNAL) (service plan checklist)
- INSIGHTS_BY_MYANALYTICS
- MICROSOFT_MYANALYTICS_FULL
- Windows Autopatch / Windows Update for Business Deployment Service
- Defender / Cloud App Security related plans
- Exchange Online / Information Protection / Compliance related plans
- SharePoint and OneDrive-related plans (may show usage inline)
- Microsoft Search / Planner / To-do and other collaboration services
Example: BUSINESS APPS (FREE) (EXTERNAL) (service plan checklist)
- Microsoft Invoicing
- Microsoft Bookings
Example: MICROSOFT TEAMS ENTERPRISE / PREMIUM (EXTERNAL) (service plan checklist)
- Microsoft Teams
- Immersive Spaces for Teams
- OneDrive for Business (may show usage inline)
- Microsoft Teams Premium features (queues, webinars, secure, intelligent, virtual appointments, etc.)
Exit
At the bottom of the Microsoft 365 tab, the Exit button closes the current user view and returns you to the previous context. Use this after reviewing assigned licenses or making changes through the available license actions.
Entra ID Roles tab
The Entra ID Roles tab is used to manage Microsoft Entra ID (Azure AD) role assignments for the selected user. It supports both Eligible assignments and Active assignments, which is commonly used in environments that implement just-in-time role activation (for example, role eligibility vs currently active role membership).
Tab navigation
The tab contains two sub-tabs at the top:
- Eligible assignments – Shows roles the user is eligible to activate (time-bound or policy-controlled eligibility).
- Active assignments – Shows roles that are currently active for the user (effective privileges right now).
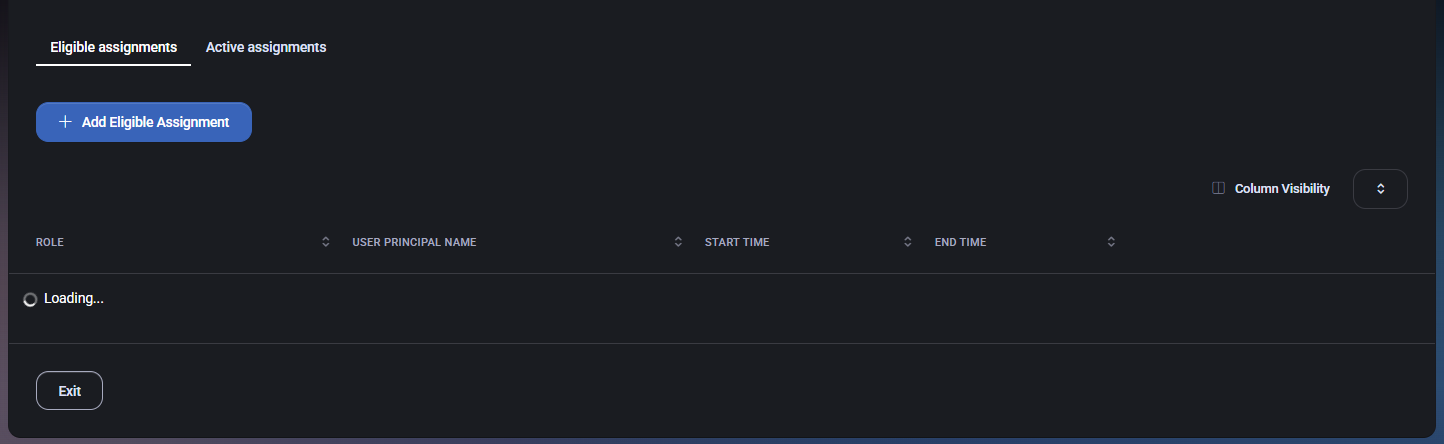
Eligible assignments
The Eligible assignments view lists eligible role entries for the user and provides controls to create new eligible role assignments.
Actions
- Add Eligible Assignment – Opens the Role Assignment modal to create a new eligible role assignment.
- Column Visibility – Controls which columns are shown in the eligible assignments table.
- Exit – Leaves the Entra ID Roles tab and returns to the previous context.
Table columns
- Role – The Entra ID role name.
- User Principal Name – The user’s UPN identity the role applies to.
- Start Time – When the eligibility starts.
- End Time – When the eligibility expires (unless permanently assigned).
While data loads, the table may show a Loading… state.
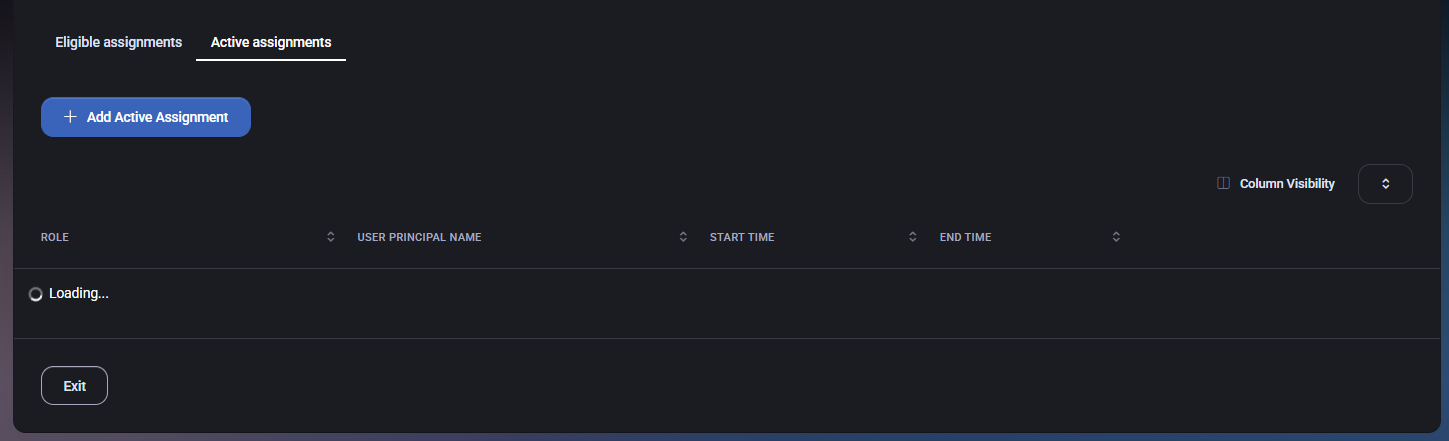
Active assignments
The Active assignments view lists currently active role assignments for the user and provides controls to create new active role assignments.
Actions
- Add Active Assignment – Opens the Role Assignment modal to create a new active role assignment.
- Column Visibility – Controls which columns are shown in the active assignments table.
- Exit – Leaves the Entra ID Roles tab and returns to the previous context.
Table columns
- Role – The Entra ID role name.
- User Principal Name – The user’s UPN identity the role applies to.
- Start Time – When the active assignment begins.
- End Time – When the active assignment expires (unless permanently assigned).
While data loads, the table may show a Loading… state.
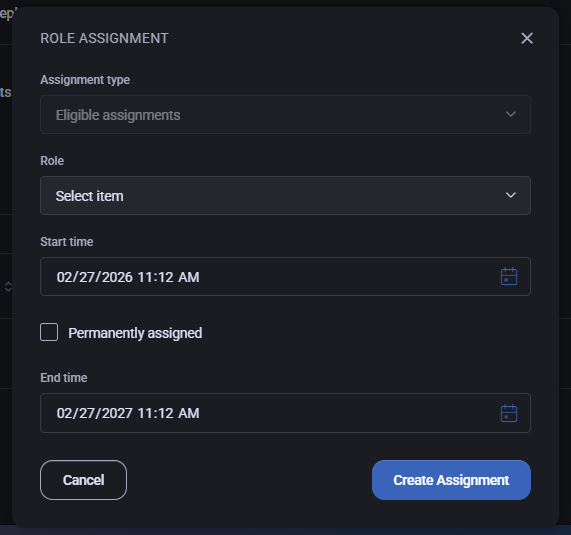
Role Assignment modal
Clicking Add Eligible Assignment or Add Active Assignment opens the Role Assignment modal. This modal configures the assignment type, role, timing, and (for active assignments) justification.
Fields
- Assignment type – Dropdown that determines whether you are creating an Eligible assignment or an Active assignment. The modal reflects the source you opened it from, but it can be changed where permitted.
- Role – Dropdown to select the Entra ID role to assign (shown as Select item until chosen).
- Start time – Date/time when the assignment begins. Includes a calendar picker icon.
- Permanently assigned – Checkbox indicating the assignment should not expire. When enabled, the end time is treated as not applicable (behavior may vary by implementation).
- End time – Date/time when the assignment ends. Includes a calendar picker icon.
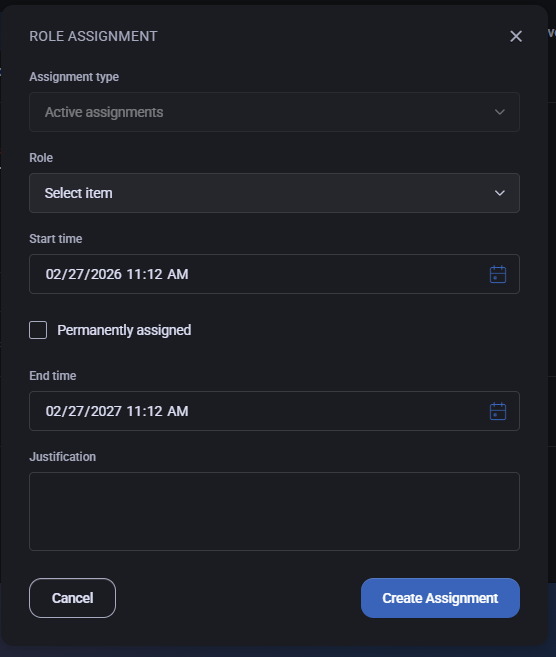
Justification (Active assignments)
When creating an Active assignment, the modal includes a Justification text area. Use it to document why elevated access is required (for example, emergency admin work, configuration changes, incident response). This supports auditability and aligns with least-privilege practices.
Modal actions
- Create Assignment – Creates the selected assignment with the configured type, role, and timing.
- Cancel – Closes the modal without creating the assignment.
- Close (X) – Closes the modal window.
