Seit kurzem arbeite ich an einer Videoserie für den Einstieg in Docker und Container. Es tut gut, sich selbst an die eigenen Anfänge mit Docker zu erinnern und "wie schwer" das am Anfang war.
Mein Anfang mit Docker ...
... war im Jahr 2014. Ich war damals Softwareingenieur und wir
]]>
Seit kurzem arbeite ich an einer Videoserie für den Einstieg in Docker und Container. Es tut gut, sich selbst an die eigenen Anfänge mit Docker zu erinnern und "wie schwer" das am Anfang war.
Mein Anfang mit Docker ...
... war im Jahr 2014. Ich war damals Softwareingenieur und wir hatten zu dieser Zeit Werkzeuge wie Vagrant und Packer erschnuppert. Das half uns sehr, die unterschiedlich gewachsenen Entwicklungsumgebungen zu vereinheitlichen und vor allem das Backup zu minimieren. Anstatt zig Gigabyte an VM-Images zu sichern brauchte man ja nur ein paar Kilobyte an Sourcecode zur automatischen Erstellung der Umgebung einchecken.
Dann bekamen wir Besuch von Golo Roden, der als Node.js Trainer zu uns kam und irgendwann auch mal Docker gezeigt hat. Das fühlte sich alles sehr seltsam an, so ganz anders als virtuelle Maschinen und dann war auch alles wieder weg, was man im Container gemacht hat.
Vom Raspberry Pi zu HypriotOS
Aus einer Meetupgruppe heraus haben wir uns zu fünft gegen Ende 2014 zur Aufgabe gemacht, Docker "so richtig" zu lernen. Wir kamen auf die Idee, dass wir den Raspberry Pi als Übungsplattform verwenden wollten. Doch so einige Hürden gab es - damals noch die erste Generation Raspberry Pi B Single Core mit 512 MB RAM - Docker war nicht aktuell auf diesem Gerät verfügbar.
Und so ging unsere Reise los ins Land der Container. Zunächst Docker für ARM compilieren, dann beim Linuxkernel noch fehlende Module bauen. Und als wir alle Einzelteile zusammen hatten, kam uns die Idee, dass es für andere Leute doch toll wäre, wenn sie das nicht auch erst selbst bauen müssten.
So entstand die Idee einer eigenen Raspberry Pi Distro auf einer SD-Karte - HypriotOS war geboren.
Als wir fast soweit waren mit einem ersten SD-Karten-Image kam der Raspberry Pi 2 heraus und durchkreuzte alles unsere Pläne. Nichts lief auf dem Gerät, aber wir fanden in windeseile heraus, was noch fehlte. Am 8.2.2015 war es dann soweit: HypriotOS mit Docker 1.4.1 lief auf allen Raspberry Pis!
Windows Container und das "neue" Microsoft
Anfang 2015 wurde die Partnerschaft zwischen Microsoft und Docker verkündet. Microsoft arbeite daran, Docker auf Windows Server zu portieren. So sehr ich seit 2014 meinen Mac lieben lernte, so sehr fasziniert war ich von der Idee, das gleiche Konzept auf anderen Betriebssystemen nutzen zu können. Genügend Leidenskraft hatte ich ja gelernt von unseren Abenteueren auf dem Raspberry Pi.
Im August 2015 war es dann auch für die interessierte Öffentlichkeit soweit. Der Technical Preview 3 von Windows Server 2016 konnte als ISO-Datei heruntergeladen werden. Ich war damals im Urlaub und habe das Bauernhof-WLAN arg strapaziert (und gelernt, mit curl abgebrochene Downloads wieder fortzusetzen 😅).
Da ich all meine Windows VM's per Packer baue, war das ideal. Neue ISO-Datei, ein paar Versuche mit packer build und fertig war meine Spielumgebung.
Auf meinem Blog hatte ich damals beschrieben, wie man ein erstes Node.js Windows Image baut.
Das beste Erlebnis war allerdings, als ich nach den ersten Versuchen Fehler festgestellt, dann brav ein GitHub-Issue geöffnet und am nächsten Morgen Antwort erhalten - von einem Microsoft-Mitarbeiter. Whaaaat? Wie fühlte man sich früher beim Senden von "Feedback an Microsoft"? Da kam ja eh nie etwas dabei heraus. Aber hier hatte man quasi einen direkten Draht. Ebenso den Mut des Teams, die Docker Engine per Opensource NSSM als Dienst zu starten als "walking skeleton", bis man später die Engine direkt als Windowsdienst registrieren konnte. Das alles zog mich immer mehr in den Bann.
Vom Docker Captain und Microsoft MVP ...
Viele meiner Blog Posts haben die Aufmerksamkeit bei Docker geweckt, und ebenso bei Microsoft. Und so wurde ich zunächst Docker Captain, und dann Mitte 2016 auch zum Microsoft MVP ernannt. Das sind zwei ähnliche Programme mit Leuten, die aktiv in der Community helfen und Beiträge liefern, Meetups organisieren und so weiter.
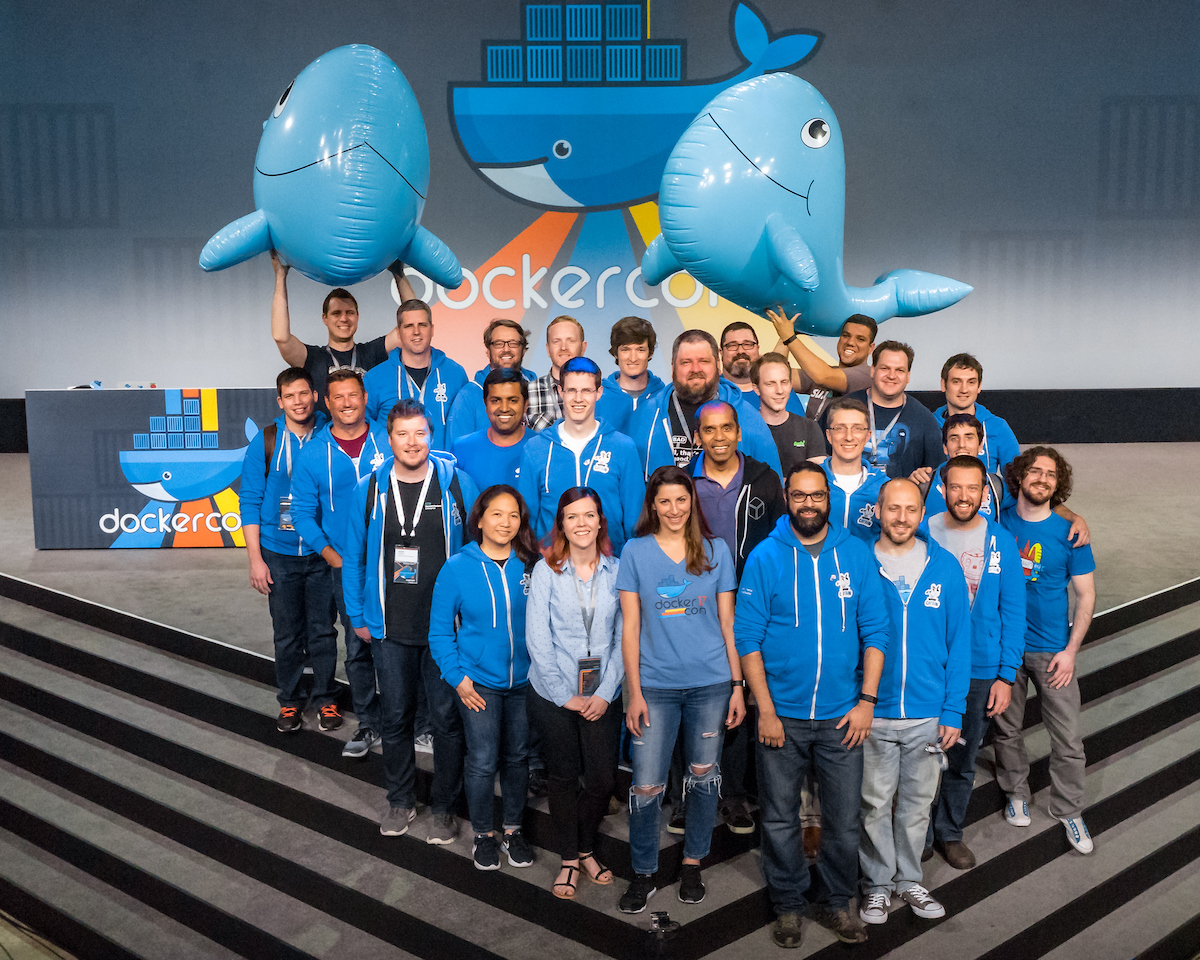
Foto: DockerCon 2016 - Links hinten haben zwei Docker-Piraten das "Deck" des Mutterschiffs erstürmt :-)
... zu Docker
Ja, und irgendwann kam die Anfrage, ob ich eine der interessanten Aufgaben bei Docker übernehmen möchte. Und so bin ich nun seit Anfang 2019 bei Docker, kannte die Community-Szene und damit Docker von "außen" und nun auch das Team "von innen". Im Docker Desktop Team sind wir stets dabei, die Komplexität auf Mac und Windows so gut zu verstecken, damit unsere Anwender es möglichst einfach haben, Container lokal laufen zu lassen.
Und das Thema "Docker on ARM" geht ja nun auf dem Desktop weiter... :-)
Die Videoserie
Doch nun zurück zur Videoserie. Auch wenn meine "Reise in der Welt der Container" schon sehr lang ist und mich an viele "exotische Orte" gebracht hat (die Container Challange auf dem Raspberry Pi, Windows Container auf einem Raspberry Pi, Minimale Nanoserver Images selbst bauen, ...), so war es doch eine interessante Idee, als mich Golo kontaktierte und wir uns über einen Einsteigerkurs unterhalten hatten. Und aus der Idee folgten Taten.
In der ersten Folge habe ich versucht, das Thema Docker für Leute ohne Vorkenntnisse und auch ohne Vorinstallation zu beschreiben. Im Prinzip baute ich das Video, das ich sechs Jahre früher selbst gerne gehabt hätte, um schneller den Einstieg zu schaffen.

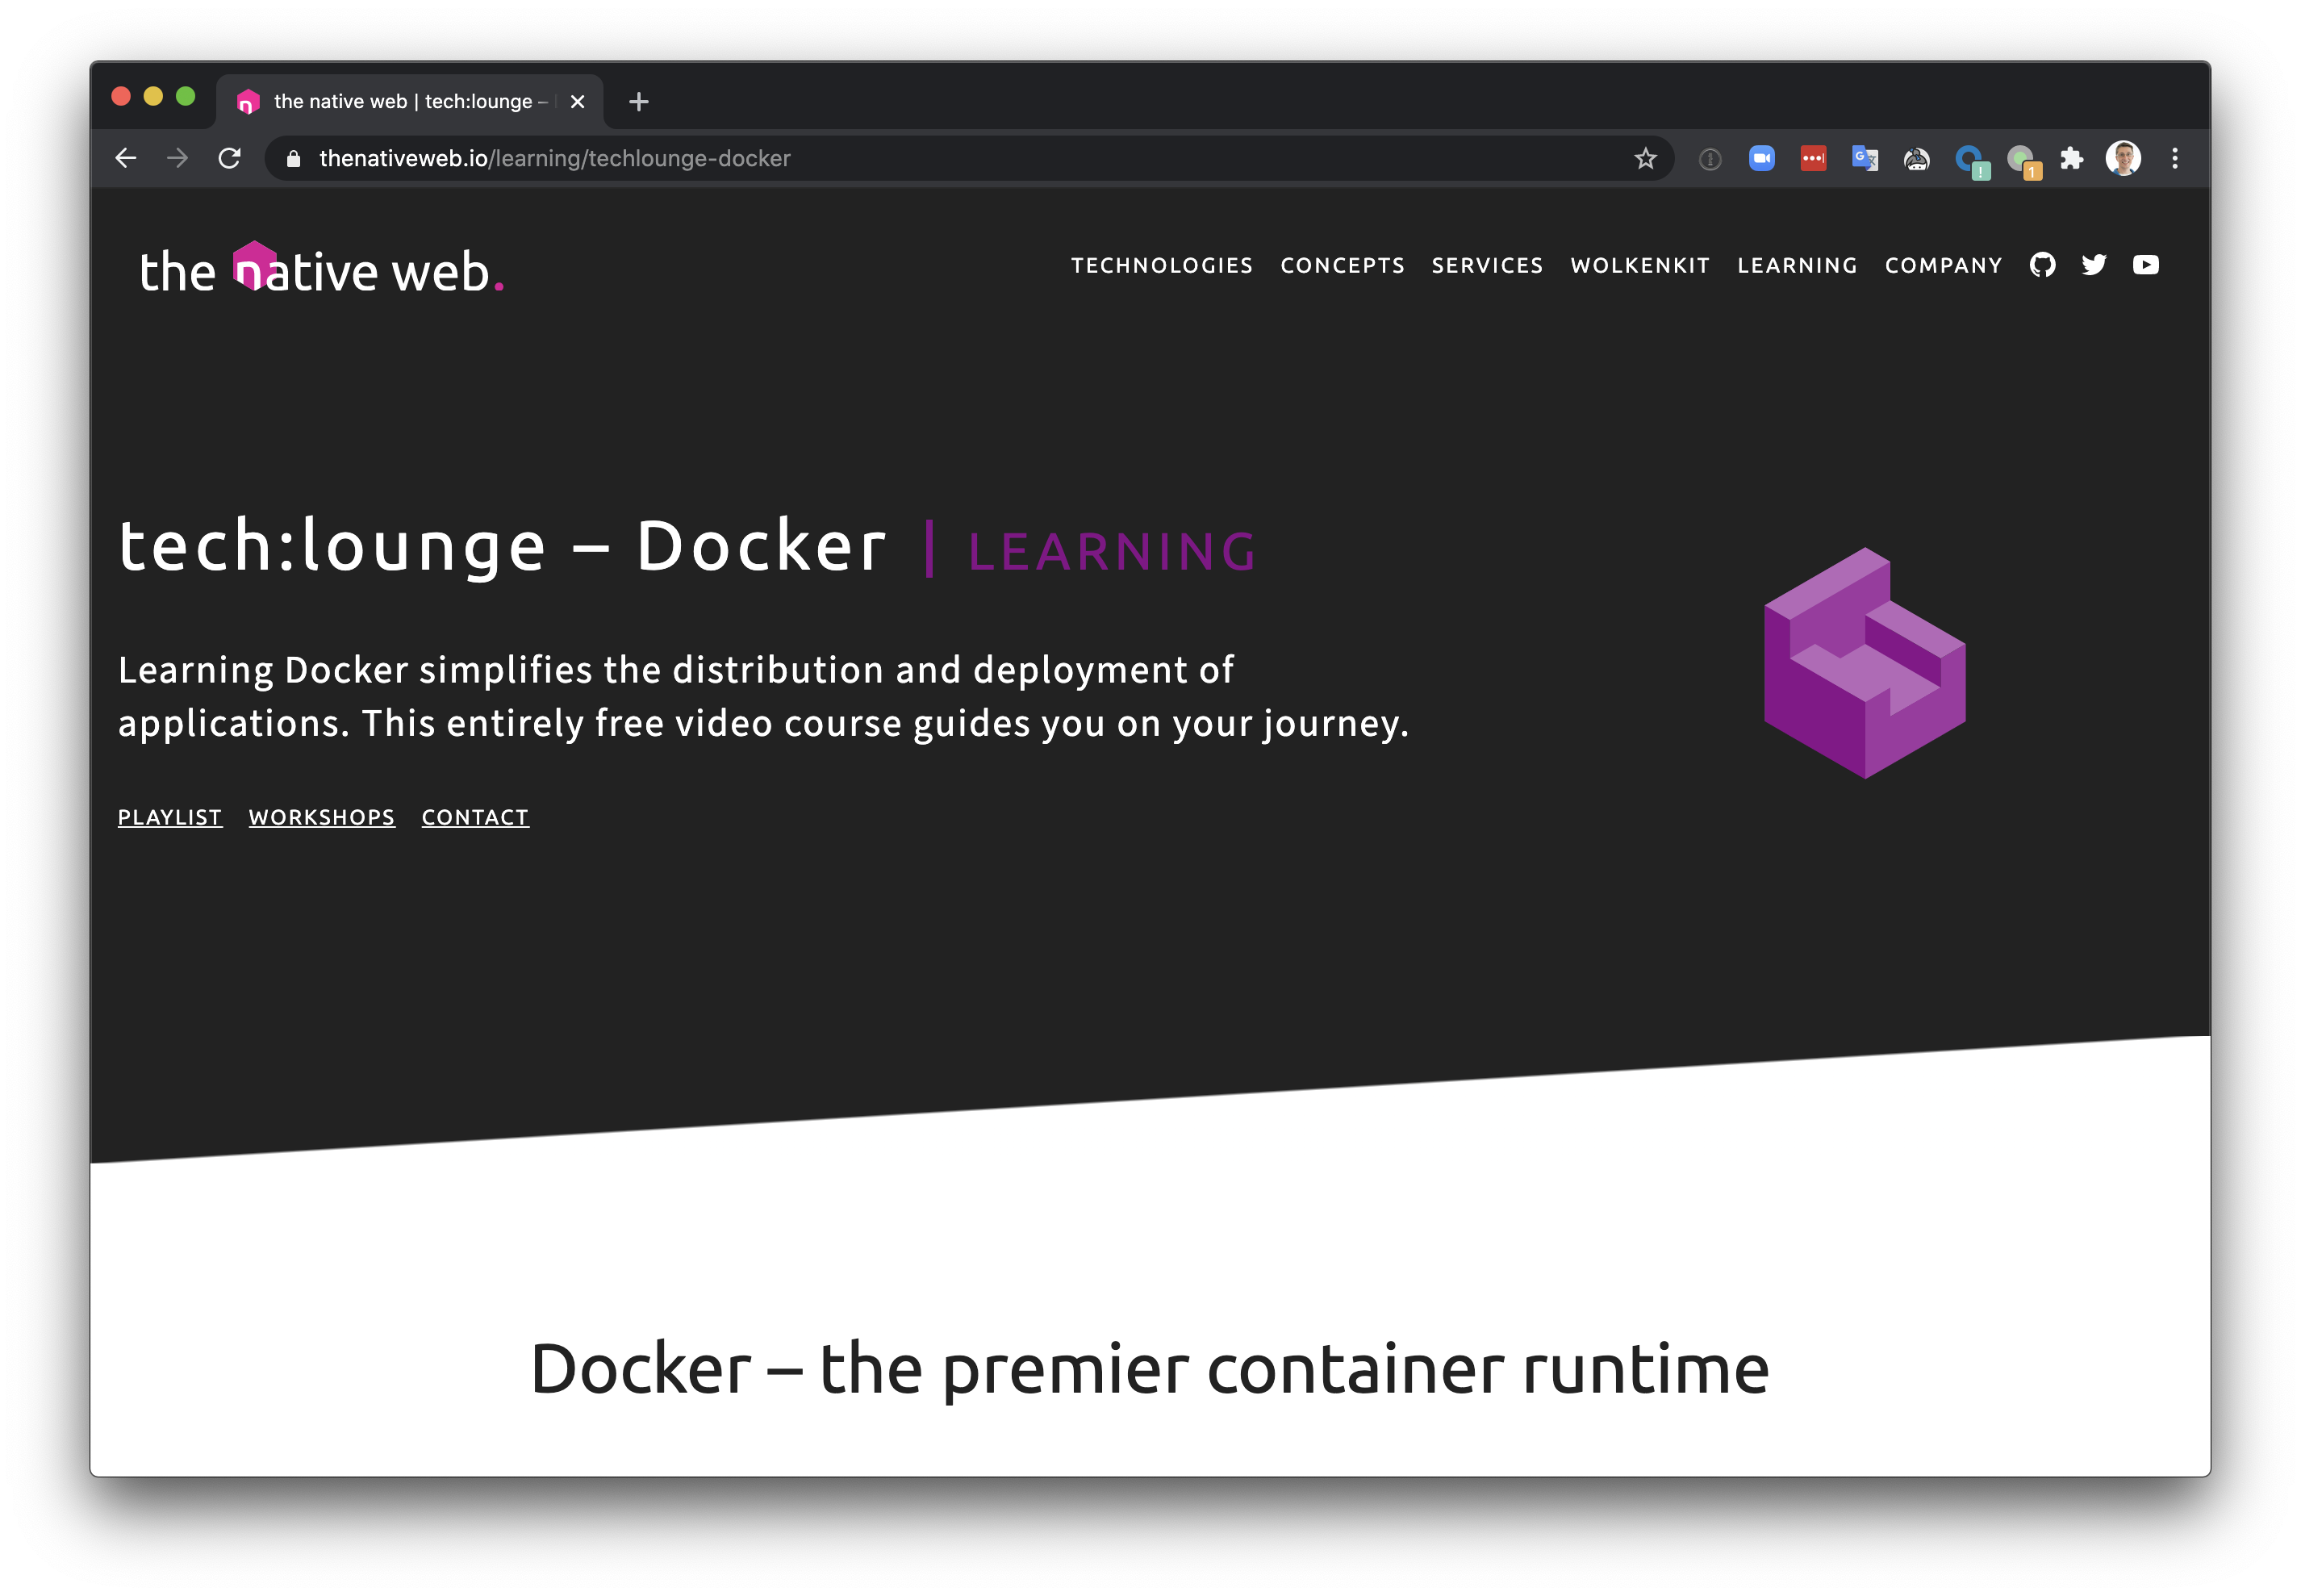
Die tech:lounge von the native web
Du findest die kostenlose Videoserie in der tech:lounge von the native web. Ich bin froh, dass das Team rund um Golo die Webseite aufbereitet und die schönen Einleitungen schreibt. 🤗
thenativeweb.io/learning/techlounge-docker
Links zu den einzelnen Folgen
Ich stelle dir aber auch die Links zu den einzelnen Folgen zur Verfügung.
- Folge 1: Grundkonzepte
- Folge 2: Docker installieren auf Windows
- Folge 2: Docker installieren auf Mac
- Folge 2: Docker installieren auf Linux
- Folge 3: Container verwenden
- Folge 4: Images bauen
- Fortsetzung folgt...
Es sind noch weitere Folgen in Arbeit und in der Planung. Die Übungsbeispiele, die ich im Videokurs verwende, sind auf GitHub zu finden:
github.com/thenativeweb/techlounge-docker
Feedback willkommen, und gerne weitersagen!
Gerne kannst Du mir und dem Team von the native web Fragen stellen und Feedback geben, was eventuell in einer weiteren Folge als Thema aufgreifen sollten.
Nutze hierzu die Kommentare hier in meinem Blog, oder bei den Youtube-Videos oder frage mich einfach auf Twitter: @stefscherer
Viel Spaß und Freude beim Lernen! Oder vielleicht kennst du jemanden, der gerade mit Docker beginnt, oder deiner Meinung nach sich mit Docker beschäftigen sollte und etwas Starthilfe benötigt.
]]>Tomorrow the first virtual DockerCon is going to happen. As a former Docker Captain I'm really excited about the event. Of course I'll start my day a bit later as DockerCon starts at 6PM my time. I went through the DockerCon agenda and found a few highlights I want to
]]>
Tomorrow the first virtual DockerCon is going to happen. As a former Docker Captain I'm really excited about the event. Of course I'll start my day a bit later as DockerCon starts at 6PM my time. I went through the DockerCon agenda and found a few highlights I want to attend and want to recommend to you.
1. How to Create PHP Development Environments with Docker Compose
I know Erika Heidi @erikaheidi back from Vagrant and her book. That's why I'm excited to see how she uses Docker Compose for PHP development.
2. Best Practices for Compose-managed Python Applications
And there is another interesting session about Docker Compose for local development. Anca Lordache from Docker shows best practices for Python. But I guess you can use the same practices for other language stacks as well.
3. Hands-on Helm
I'm interested in how people deploy their applications in Kubernetes. Helm is the defacto package manager. Jessica Deen @jldeen from Microsoft gives you an overview in Hands-on Helm and shows how you can update to Helm 3.
4. Delivering Desktop Apps in Containers
What? That sounds interesting and I expect a fascinating talk how to do that, because containers are normally for backend and non GUI applications. Blaize Stewart @theonemule, a Mircosoft MVP, is showing the details how to run GUI applications in containers.
5. Docker Desktop + WSL 2 Integration Deep Dive
Simon Ferquel @sferquel from Docker does a deep dive into the new WSL 2 backend, how it works, and how to get the most out of Docker Desktop on Windows. If you want to see how Docker Desktop works that's a session for you.
And there are many more excellent sessions. If you are new to Docker, we have you covered, Peter McKee gives you an introduction how you get started. Looking into Windows Containers? Elton Stoneman's talk will be your favorite.
Captains on Deck
I will also hang around with the Docker Captains in the chat. It is always inspiring what Captains do and they can answer your questions in parallel to the other sessions. Join Bret Fisher and many other Captains for an entertaining chat and win some prizes.
Call for action
Just register to attend DockerCon and pick your favorite session from the agenda.
See you at #DockerCon !!
Stefan
]]>A few weeks ago I tried Azure Pipelines for one of my GitHub repos. Azure Pipelines is a cloud service to setup CI/CD pipelines. I'm already using Travis, CircleCI and AppVeyor for years, but I wanted to give Azure Pipelines a try to see how it has evolved.
It's
]]>A few weeks ago I tried Azure Pipelines for one of my GitHub repos. Azure Pipelines is a cloud service to setup CI/CD pipelines. I'm already using Travis, CircleCI and AppVeyor for years, but I wanted to give Azure Pipelines a try to see how it has evolved.
It's very easy to hook it to your GitHub project, and it's free for open source projects. You typically add an azure-pipelines.yml in your GitHub repo to define the CI pipeline. Then this definition is also under version control. And users can easily fork your repo and hook up their own pipeline this the given YML file.
For a real project to build and push a multi-arch Windows/Linux Docker image I tried to use secret variables for the docker push. But I struggled for an hour reading the docs again and again and compare it with the actual UI I found from my MacBook. I just couldn't understand where this tiny lock icon should be. I added variables, removed them again, search for other options. Nothing. Is it only available in paid plan? All these thoughts to figure out when you don't have a clue where the developer has added this button.
Look at my screen:
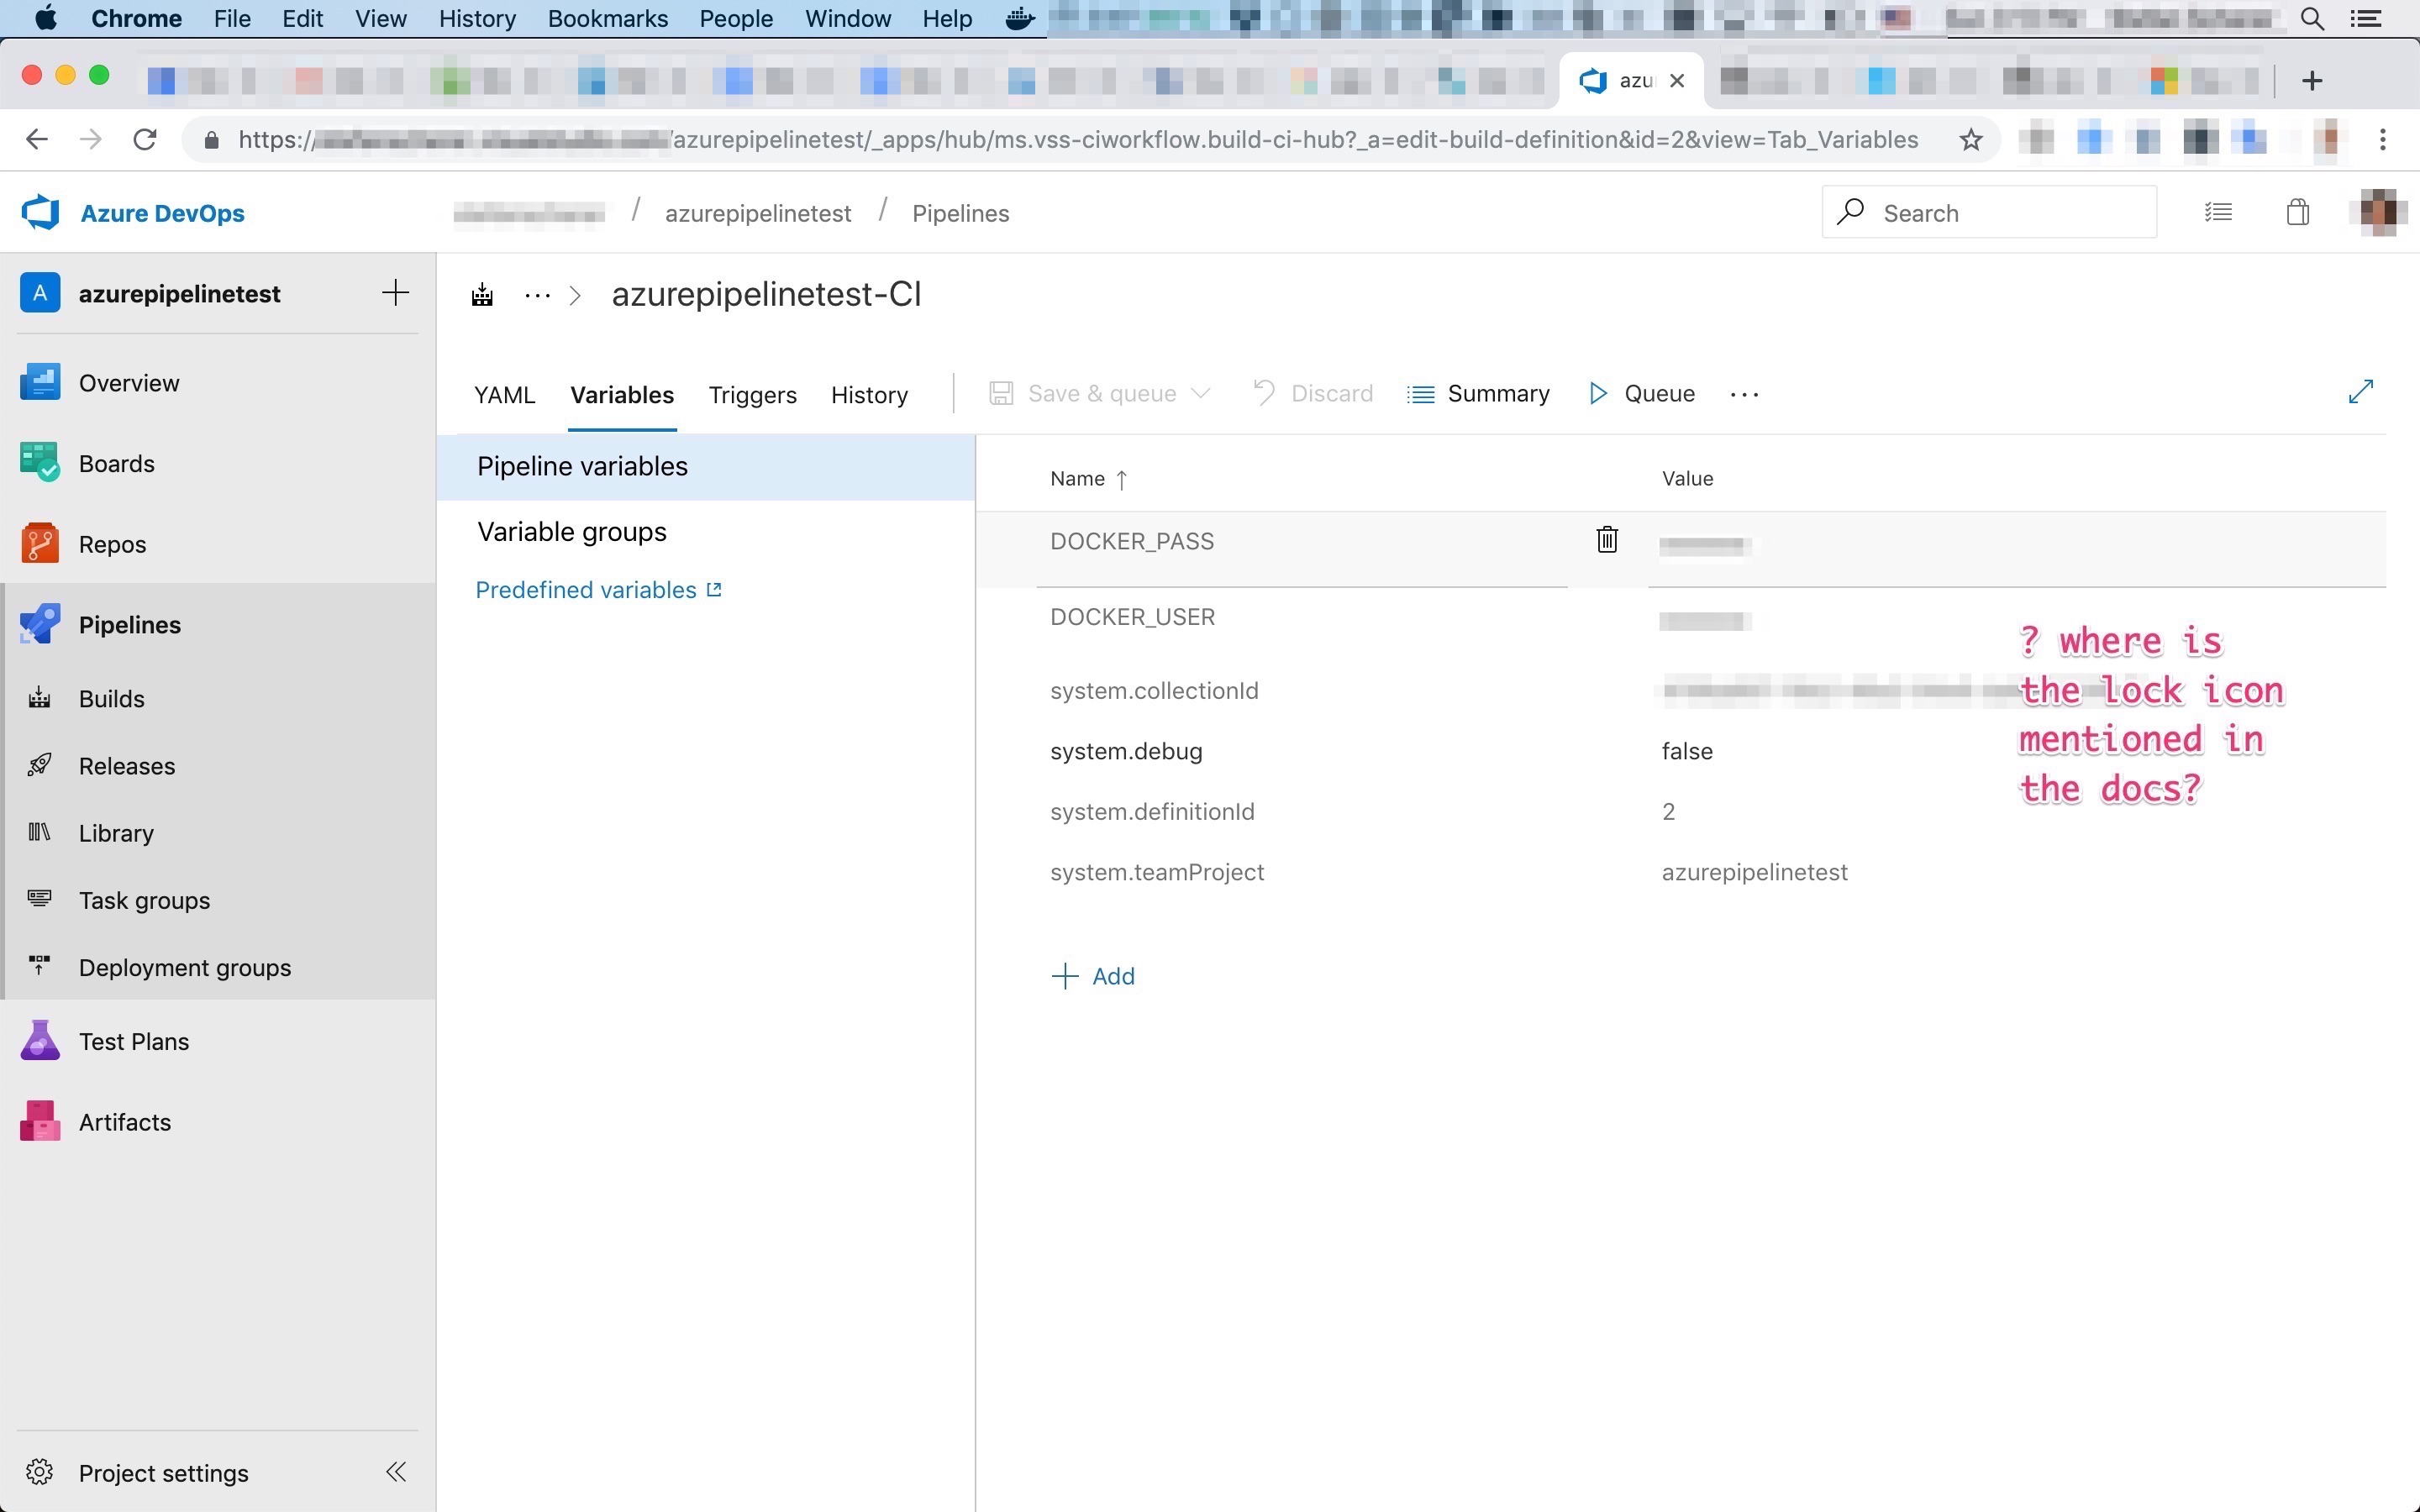
No lock icon.
I don't know when it happened, but I "accidentally" two-finger-swiped on the table of variables.
Oh no, so close but it's really not intuitive for first-time users with a non-24" external display sitting on a chair in the conversatory :-)

Now I know where to look for that lock icon, but please MSFT let the first-time users know better where to put secrets. Otherwise they just add variables that should be secrets but as I just ran a test if it works that forked pull requests don't see these secrets. No the user of the fork can see this variable until you click on that "hidden" lock icon.
There is so much white space that can be used to have this lock column visible even on smaller displays.
The rest of the pipeline was straight forward and Azure Pipelines is able to build and push a multi-arch image to Docker Hub for several Windows versions as well as Linux for different CPU architectures with some tricks. Thanks Azure Pipelines team, you rock, I like Azure Pipelines so far.
If you want to give Microsoft feedback, you can vote up my comment here.
]]>Today is my first day working for Docker, Inc. and I'm absolutely excited to be there. After months of prepartions I got this email today morning.

I love the green buttons on GitHub ;-)
Goodbye SEAL Systems
After nearly 25 years (I started as a working student in 1994) I
]]>Today is my first day working for Docker, Inc. and I'm absolutely excited to be there. After months of prepartions I got this email today morning.
I love the green buttons on GitHub ;-)
Goodbye SEAL Systems
After nearly 25 years (I started as a working student in 1994) I want to say goodbye to my colleages at SEAL Systems. Wow, that's more than half of my life, but we always had a good time. I'm glad that I could help creating several successful products over these years. I have learned a lot and the whole lifecycle of a product is much much more than just writing some lines of code. You have to build a product, ship it, update and maintain it, replace it with a better, newer product. The enterprise customers are always demanding.

And it was fun to build this tiny cloud to visualize scaling services and health status in hardware, and of course producing paper and labels.
Goodbye Captains
Oh this is a sad one, I have to retire from the Docker Captains program. I want to thank Jenny, Vanessa and Ashlynn for making us Captains happy with briefings, lots of cool swag and exciting DockerCon's. You make this program unique!
I will stay in touch with a lot of captains as I still can learn cool things from them.
Connecting the dots
Yesterday was my last day at SEAL Systems and I realized that this move just made sense for me. Even the logos showed me that :-) I follow what started with my passion and what I want to focus on in the future.
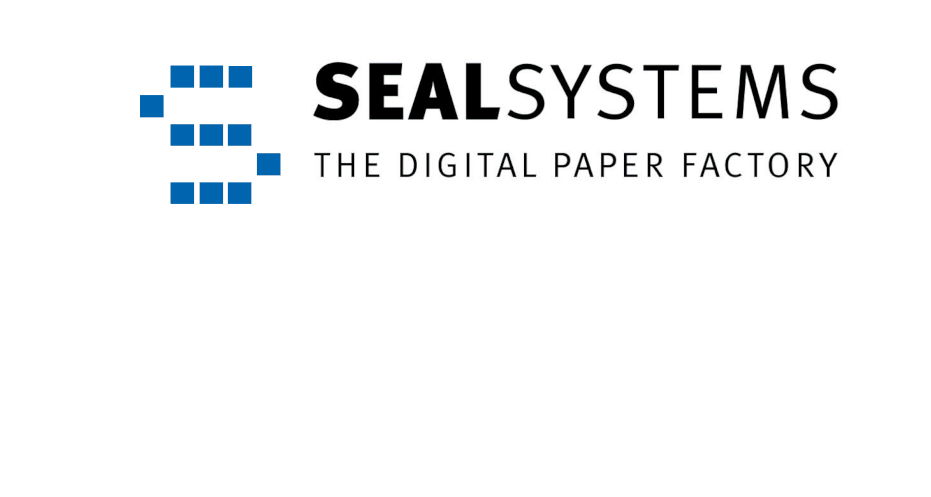
(And for SEAL: You always had containers in your logo ;-)
I will work in the Engineering team at Docker to help shipping new products.
Dear community, don't worry I will stay active in the Windows and Docker community.
Cheers,
Stefan
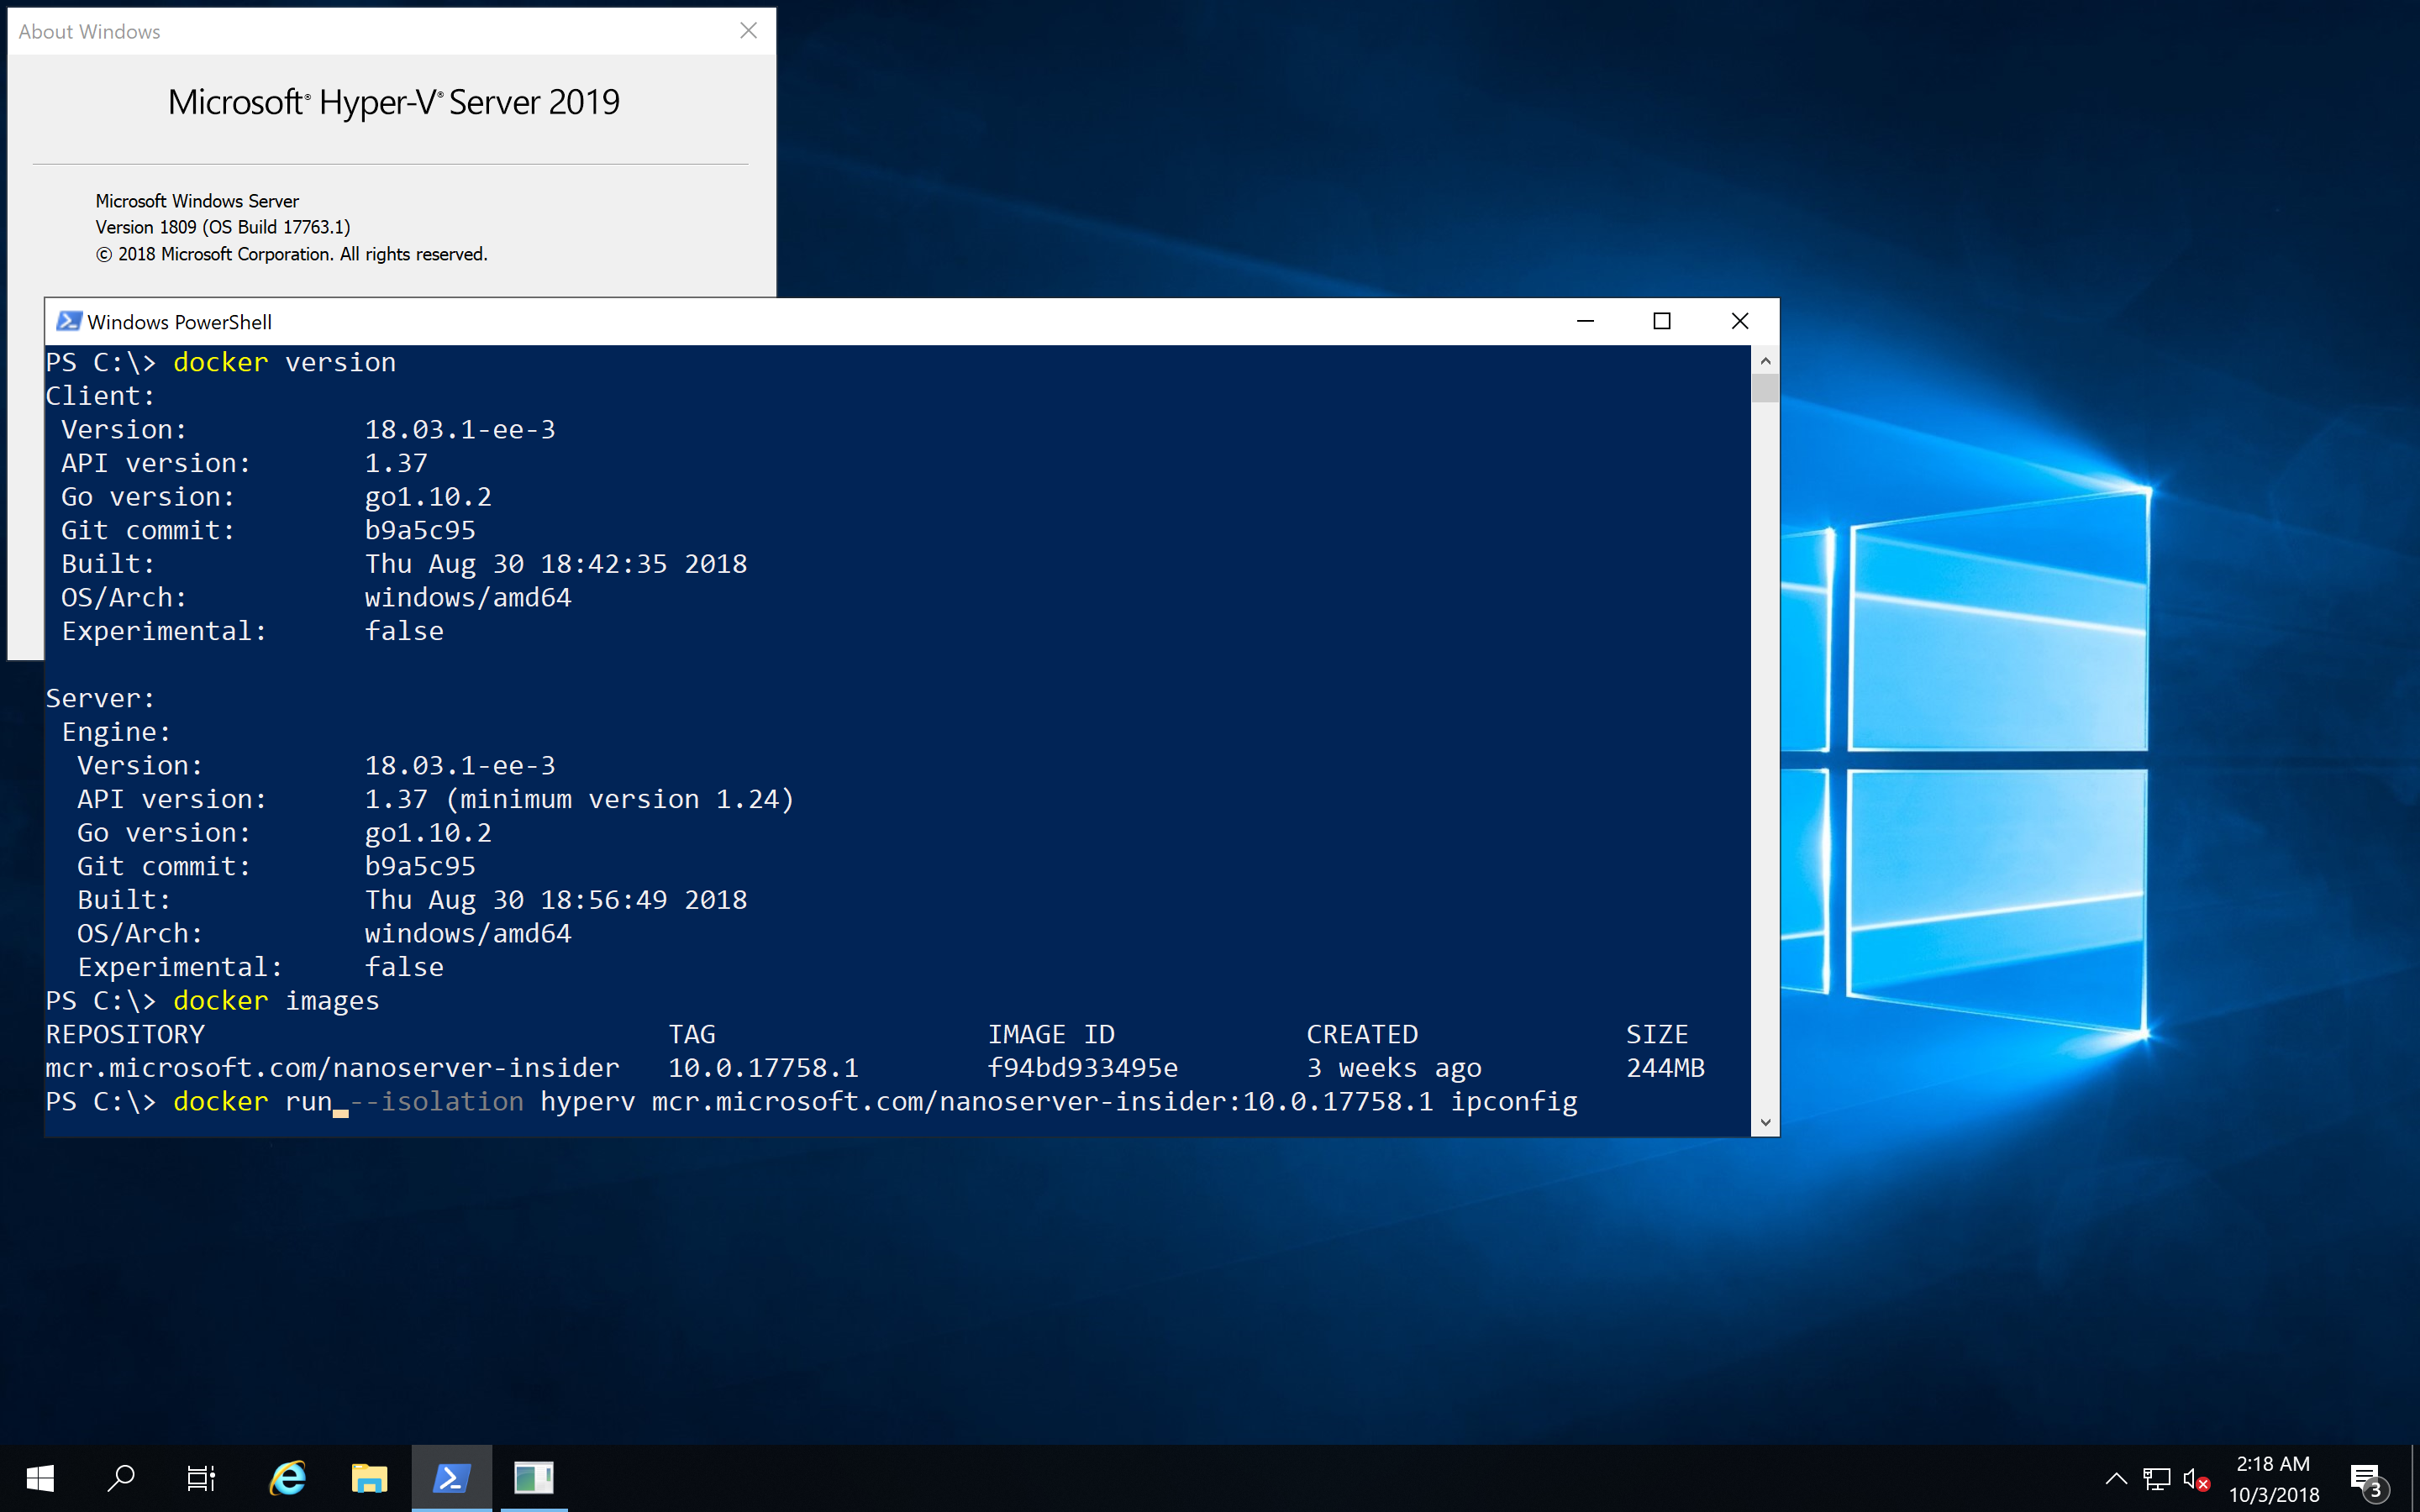
When you follow my blog for a while you probably know that running Windows Containers on Windows 10 had some disadvantages compared to a Windows Server. On Windows 10 every Windows Containers has to be run in Hyper-V isolation mode.
Process Isolation
With the latest release of Docker Desktop on
]]>When you follow my blog for a while you probably know that running Windows Containers on Windows 10 had some disadvantages compared to a Windows Server. On Windows 10 every Windows Containers has to be run in Hyper-V isolation mode.
Process Isolation
With the latest release of Docker Desktop on Windows 10 1809 you now can run Windows Containers in process isolation mode. What's the benefit you might think.
In the past process isolation was only possible with Windows Server. The Windows 10 operating system uses the same kernel, but with different settings. With this pull request https://github.com/moby/moby/pull/38000 that got merged into Docker 18.09.1 it is now possible to use it on Windows 10 as well.
- You can start more Windows Containers on your machine as they consume less resources
- Containers normally start faster than in hyperv isolation mode
- You can "see" the isolated processes and what they are doing
Visible container processes
Especially for developers this is a great enhancement, because you now can use tools like Task Manager, Process Monitor and others to inspect your container processes from the host. I've blogged How to find dependencies of containerized Windows apps about a year ago. Now you do not longer need to spin up a Windows Server VM to do that, your Windows 10 machine is all you need.
Let's try this out with a small web server I have created for the Chocolatey Fest conference last October that's running in a Windows Nanoserver 2019 container.
Open up a PowerShell terminal and start a Windows container with this command
docker run -d -p 8080:8080 --isolation=process chocolateyfest/appetizer:1.0.0
The command will pull the Docker image from Docker Hub, starts the web server as a container and forwards port 8080 to it.
Now you can access the web server with your browser or by typing this command
start http://localhost:8080
The web server should show you a sweet photo and the name of the container stamped on it.
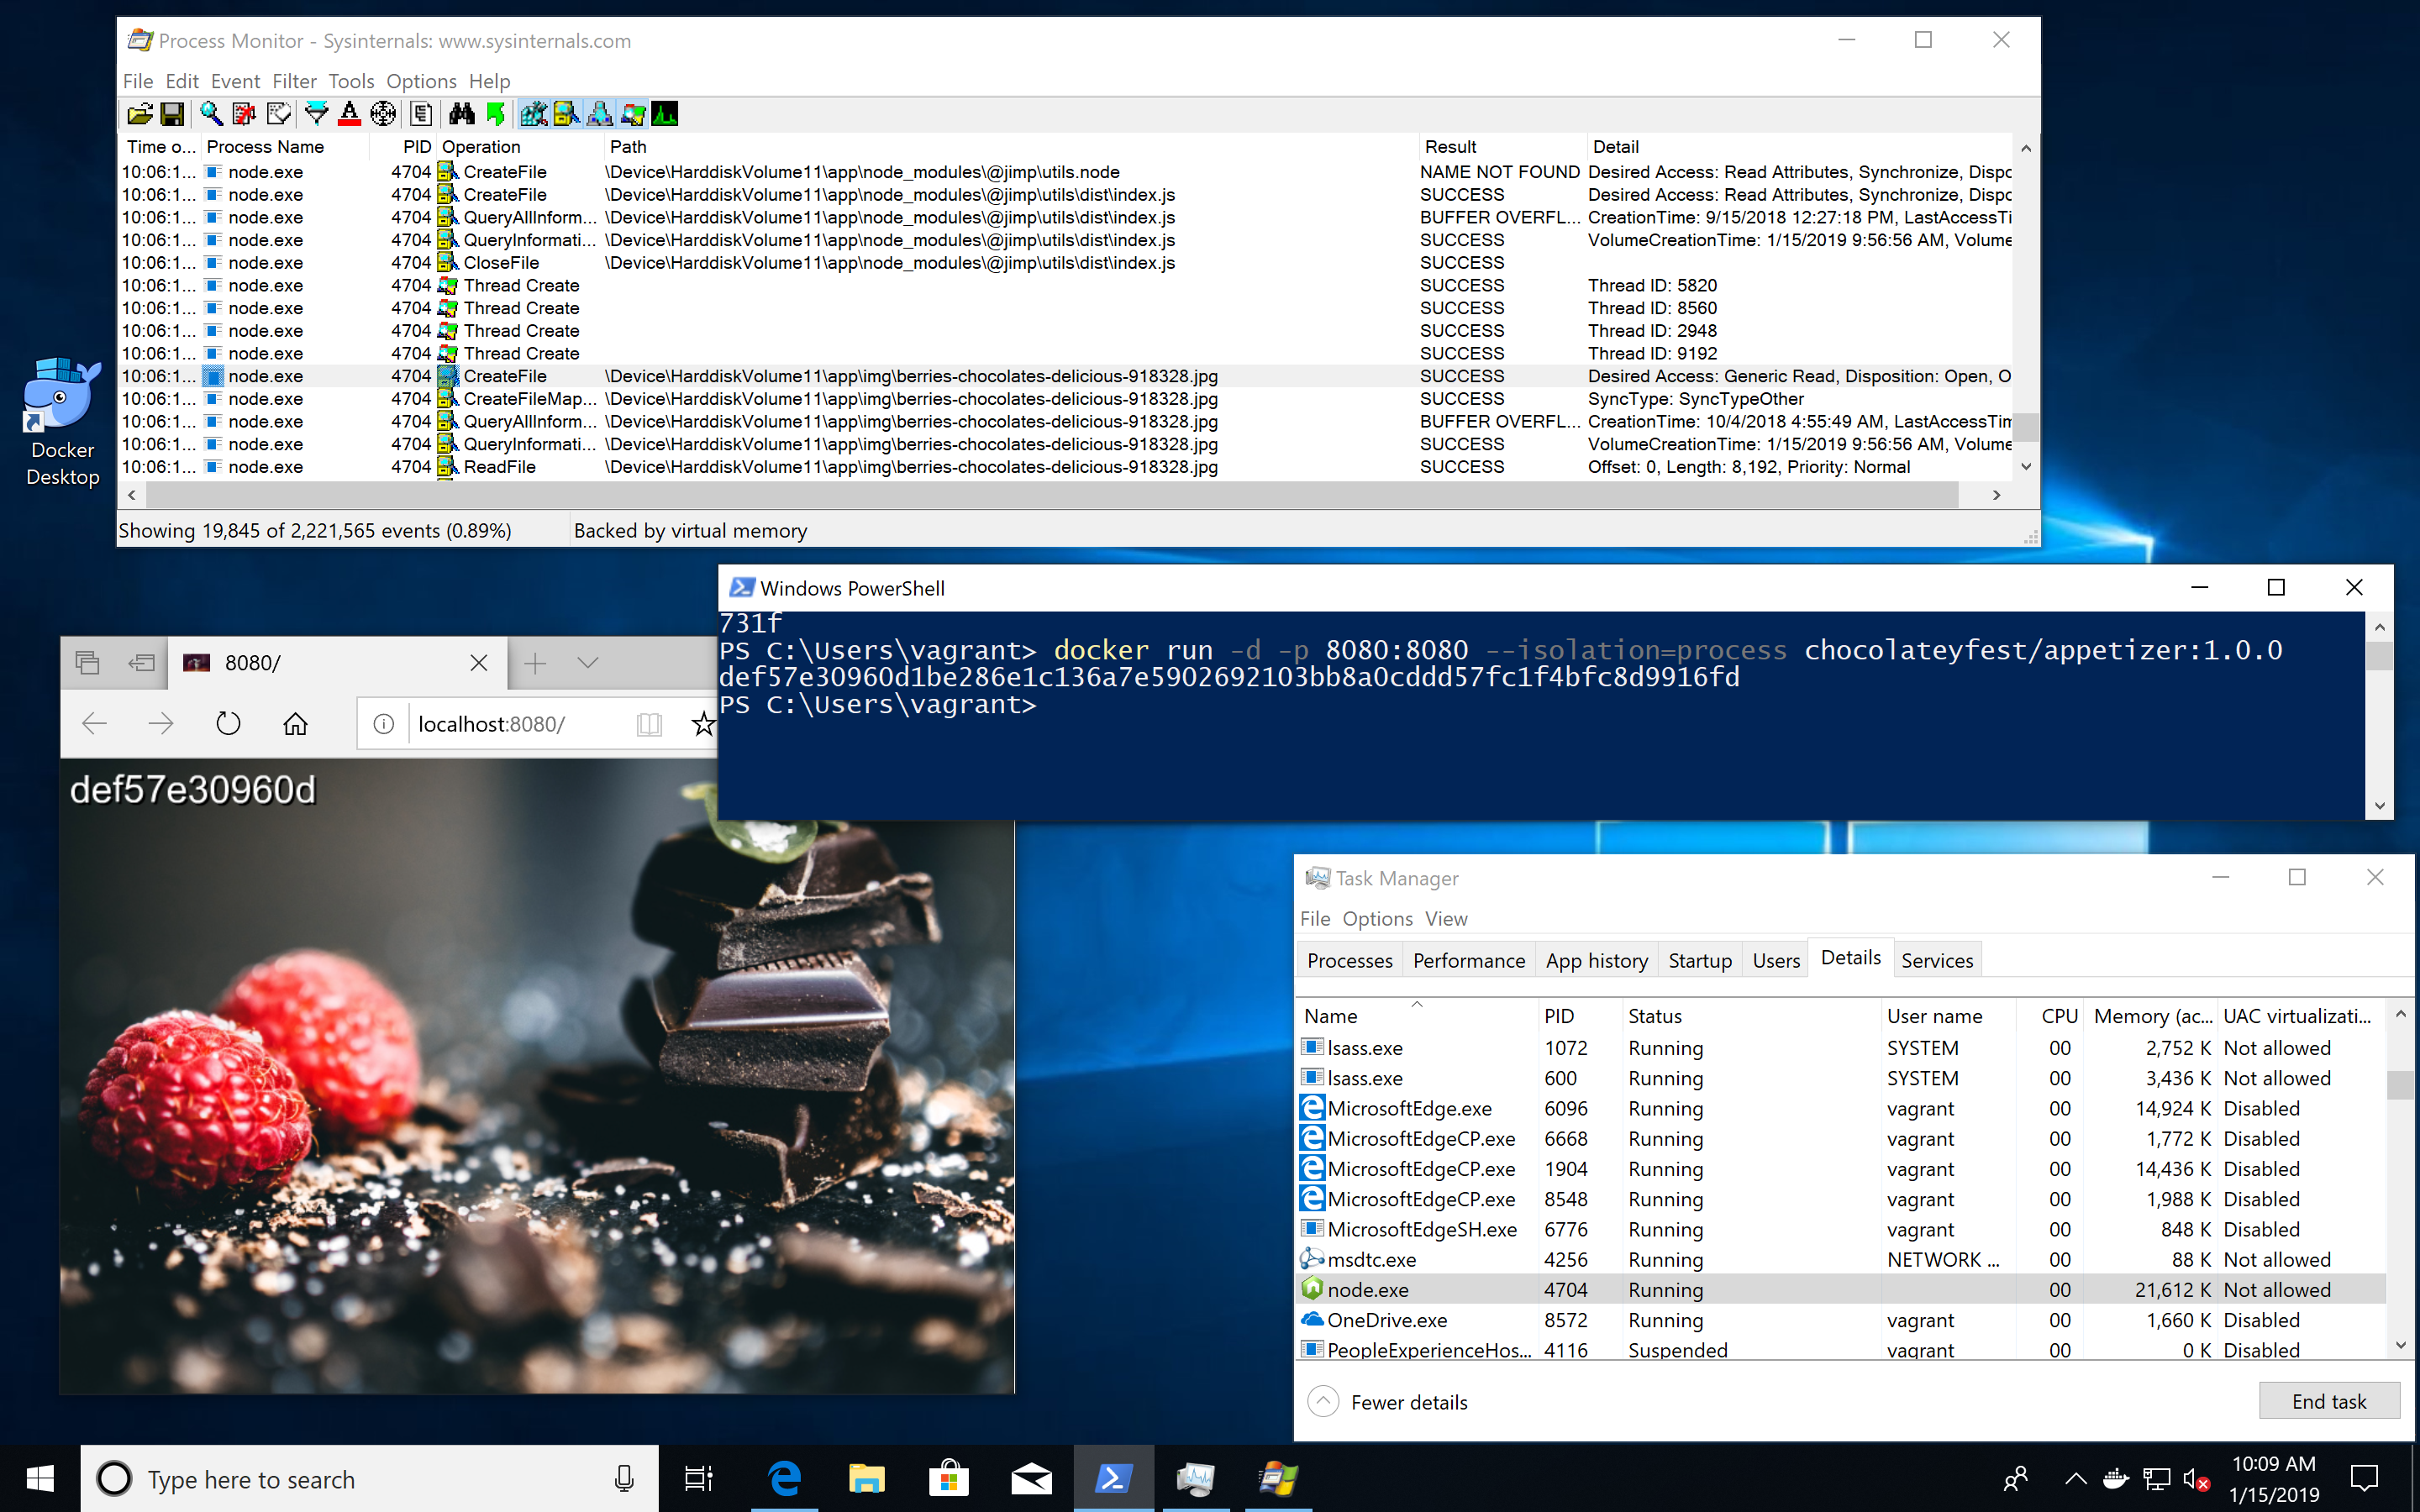
As you can see in the screen shot you can see the node.exe process in the Task Manager. If you have the Sysinternals Process Monitor installed you also can see what the containerized process is doing. This is great when you create an own Docker image from your or a 3rd-party app and something doesn't work as expected or the exe file just doesn't want to start inside the container.
Windows image version must match kernel version
The only caveat using the process isolation mode is that the Windows base image that is used for a Docker image must match the kernel of your Windows 10 machine.
I've tried process isolation on a Windows Insider 18xxx machine, but here you are out of luck and you have to run the 1809 images in default Hyper-V isolation mode.
Can I run Windows Containers in VirtualBox?
I run all these tests in VMware Fusion on my Mac, spinning up a Windows 10 1809 VM with Vagrant. You can try it yourself with the given Vagrantfile in the repo.
For a full Docker Desktop experience you need VMware Fusion as it provides nested virtualization. This is needed to activate Hyper-V in the Windows 10 VM. Docker Desktop runs fine in that VMware VM and you can try out Linux and Windows containers in it.
From time to time I get asked if people can also use VirtualBox. In the past I had to say "no" you can't use a Windows 10 VM and then run Windows Containers in it. But with process isolation there is a first breakthrough.
Danger zone for early adopters
I've tried that with VirtualBox to see what happens. The installation of Docker Desktop works without a problem. When you start Docker Desktop for the first time the following error will appear
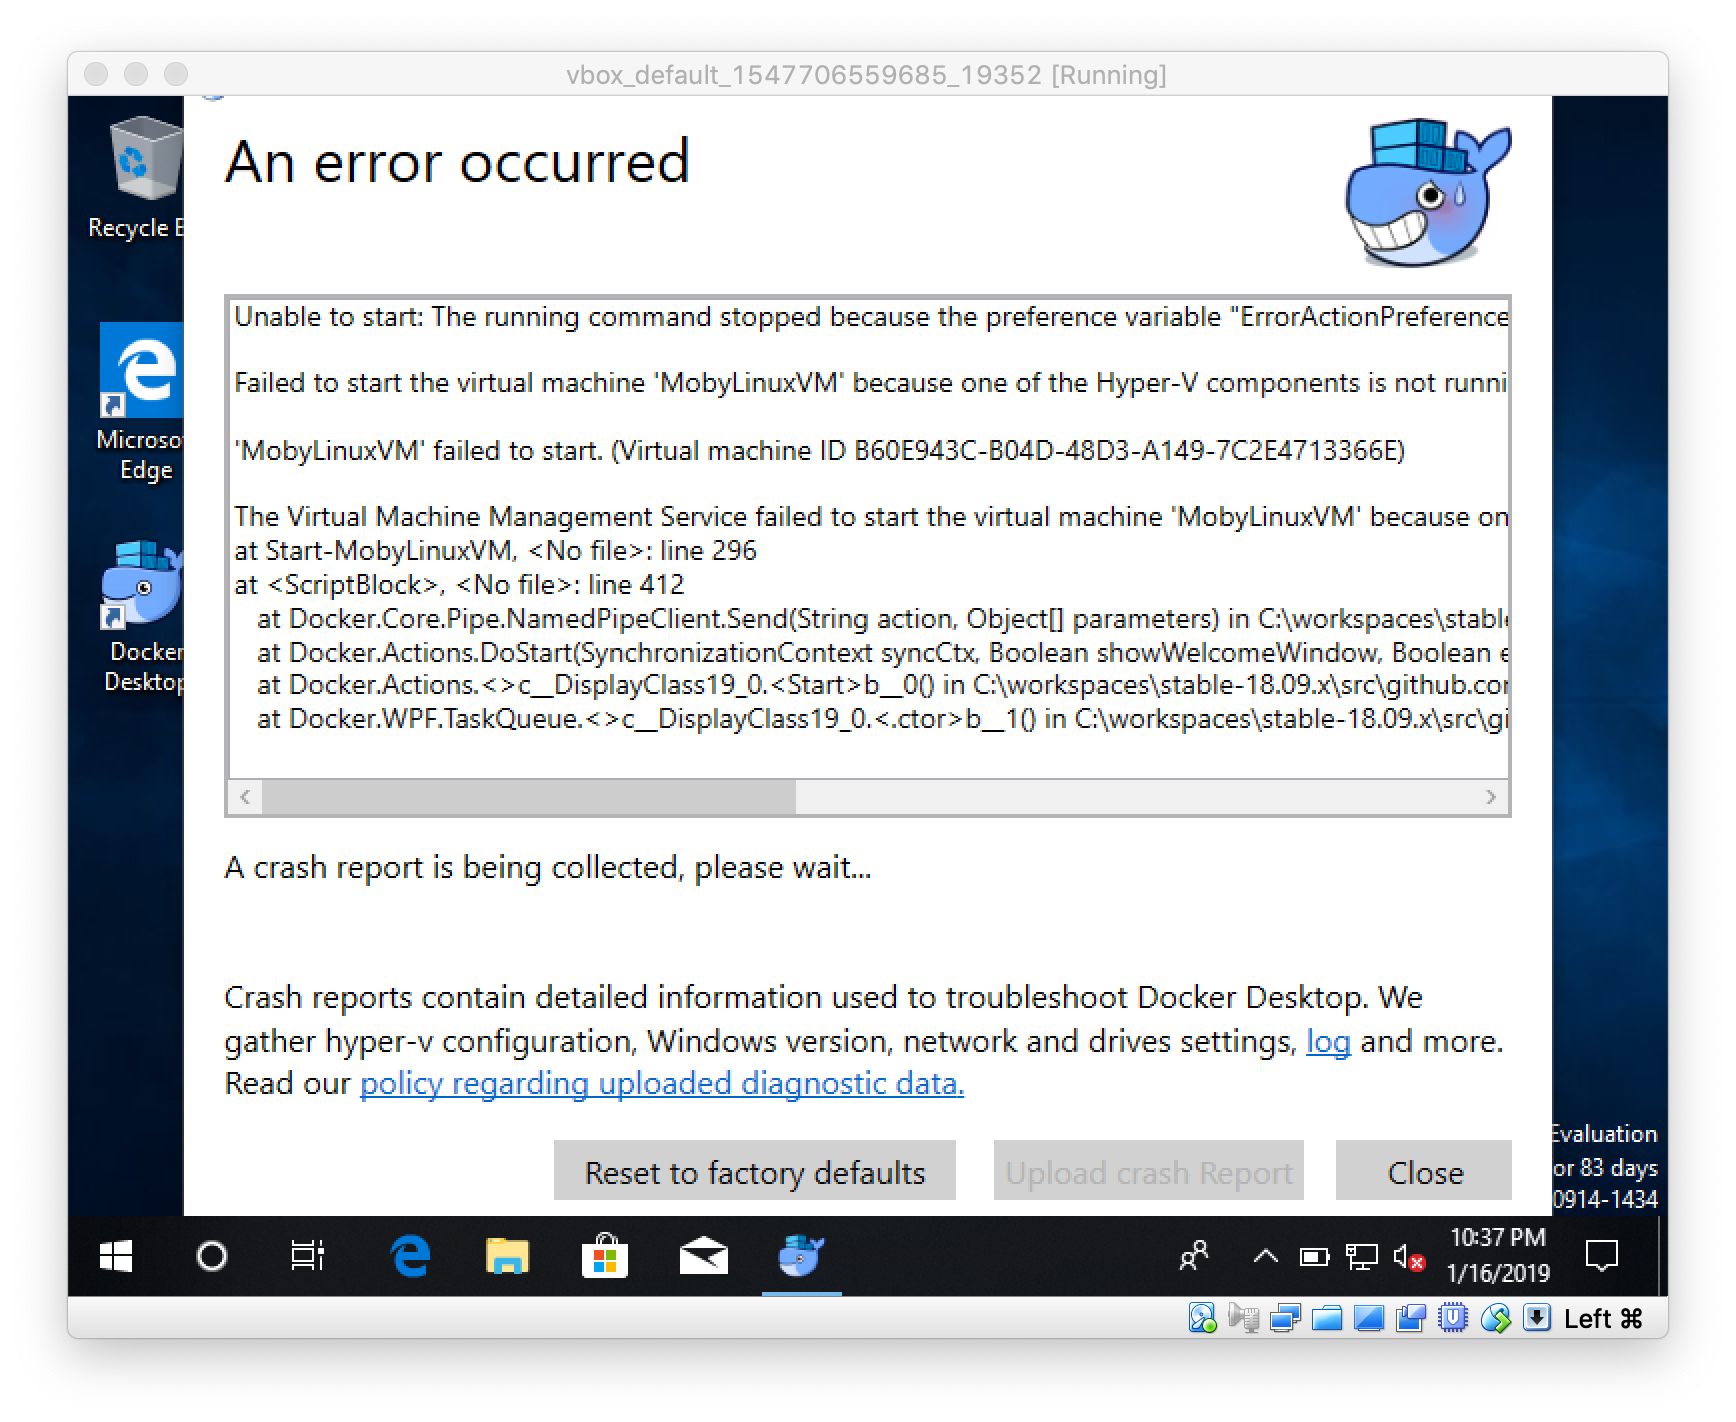
Sure, Hyper-V does not work in a VirtualBox VM, that's why the MobyLinuxVM could not be started. But now you can switch to Windows containers in the context menu.
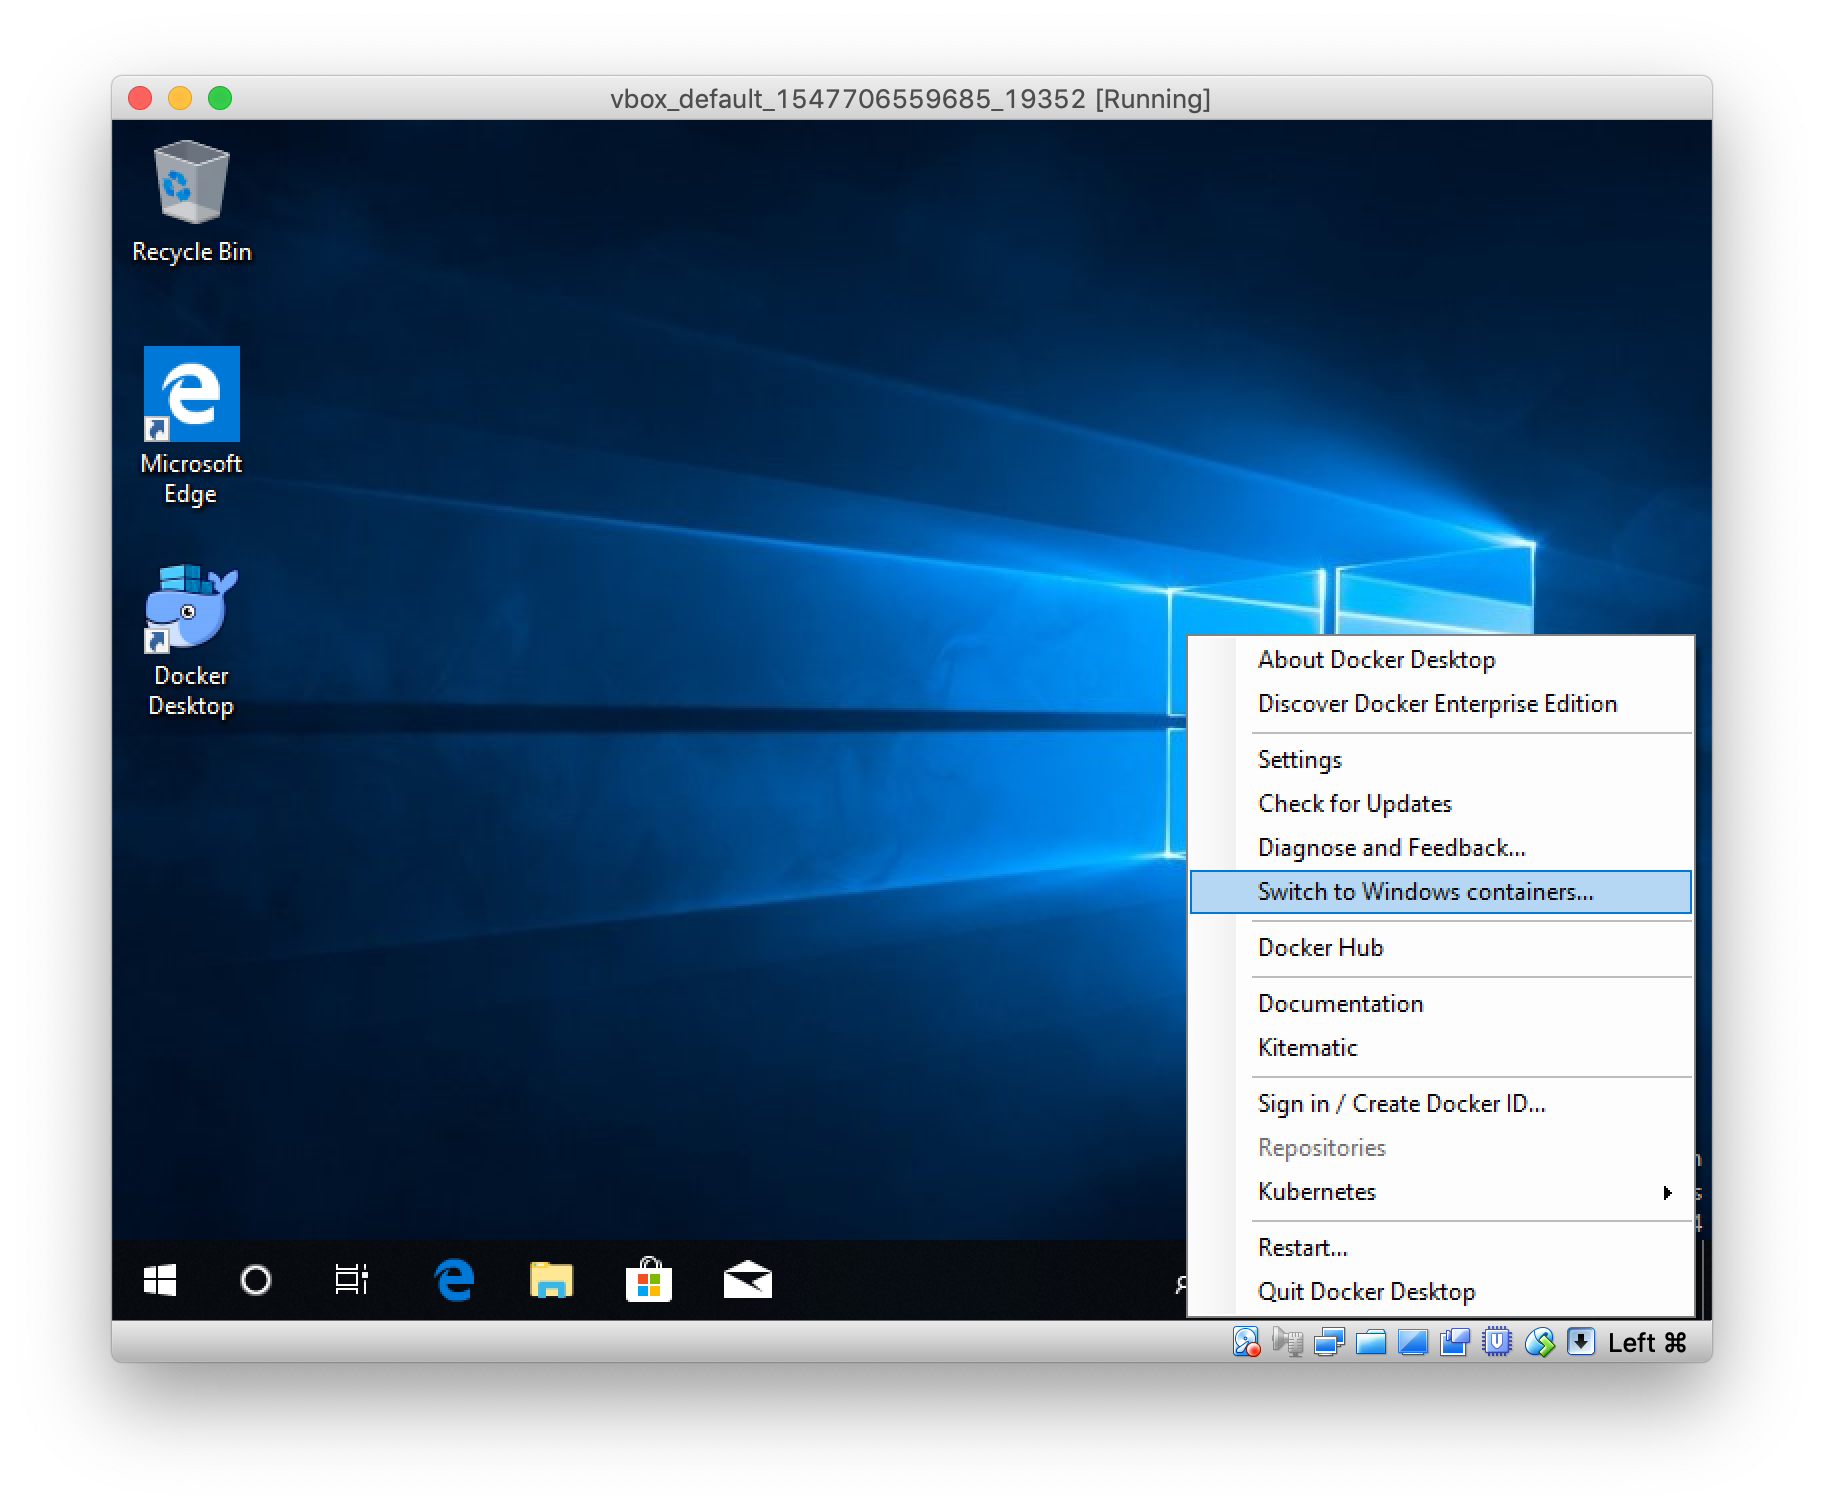
After a few seconds the Windows Docker engine is up and running. Open a PowerShell terminal and run the appetizer app as described above.
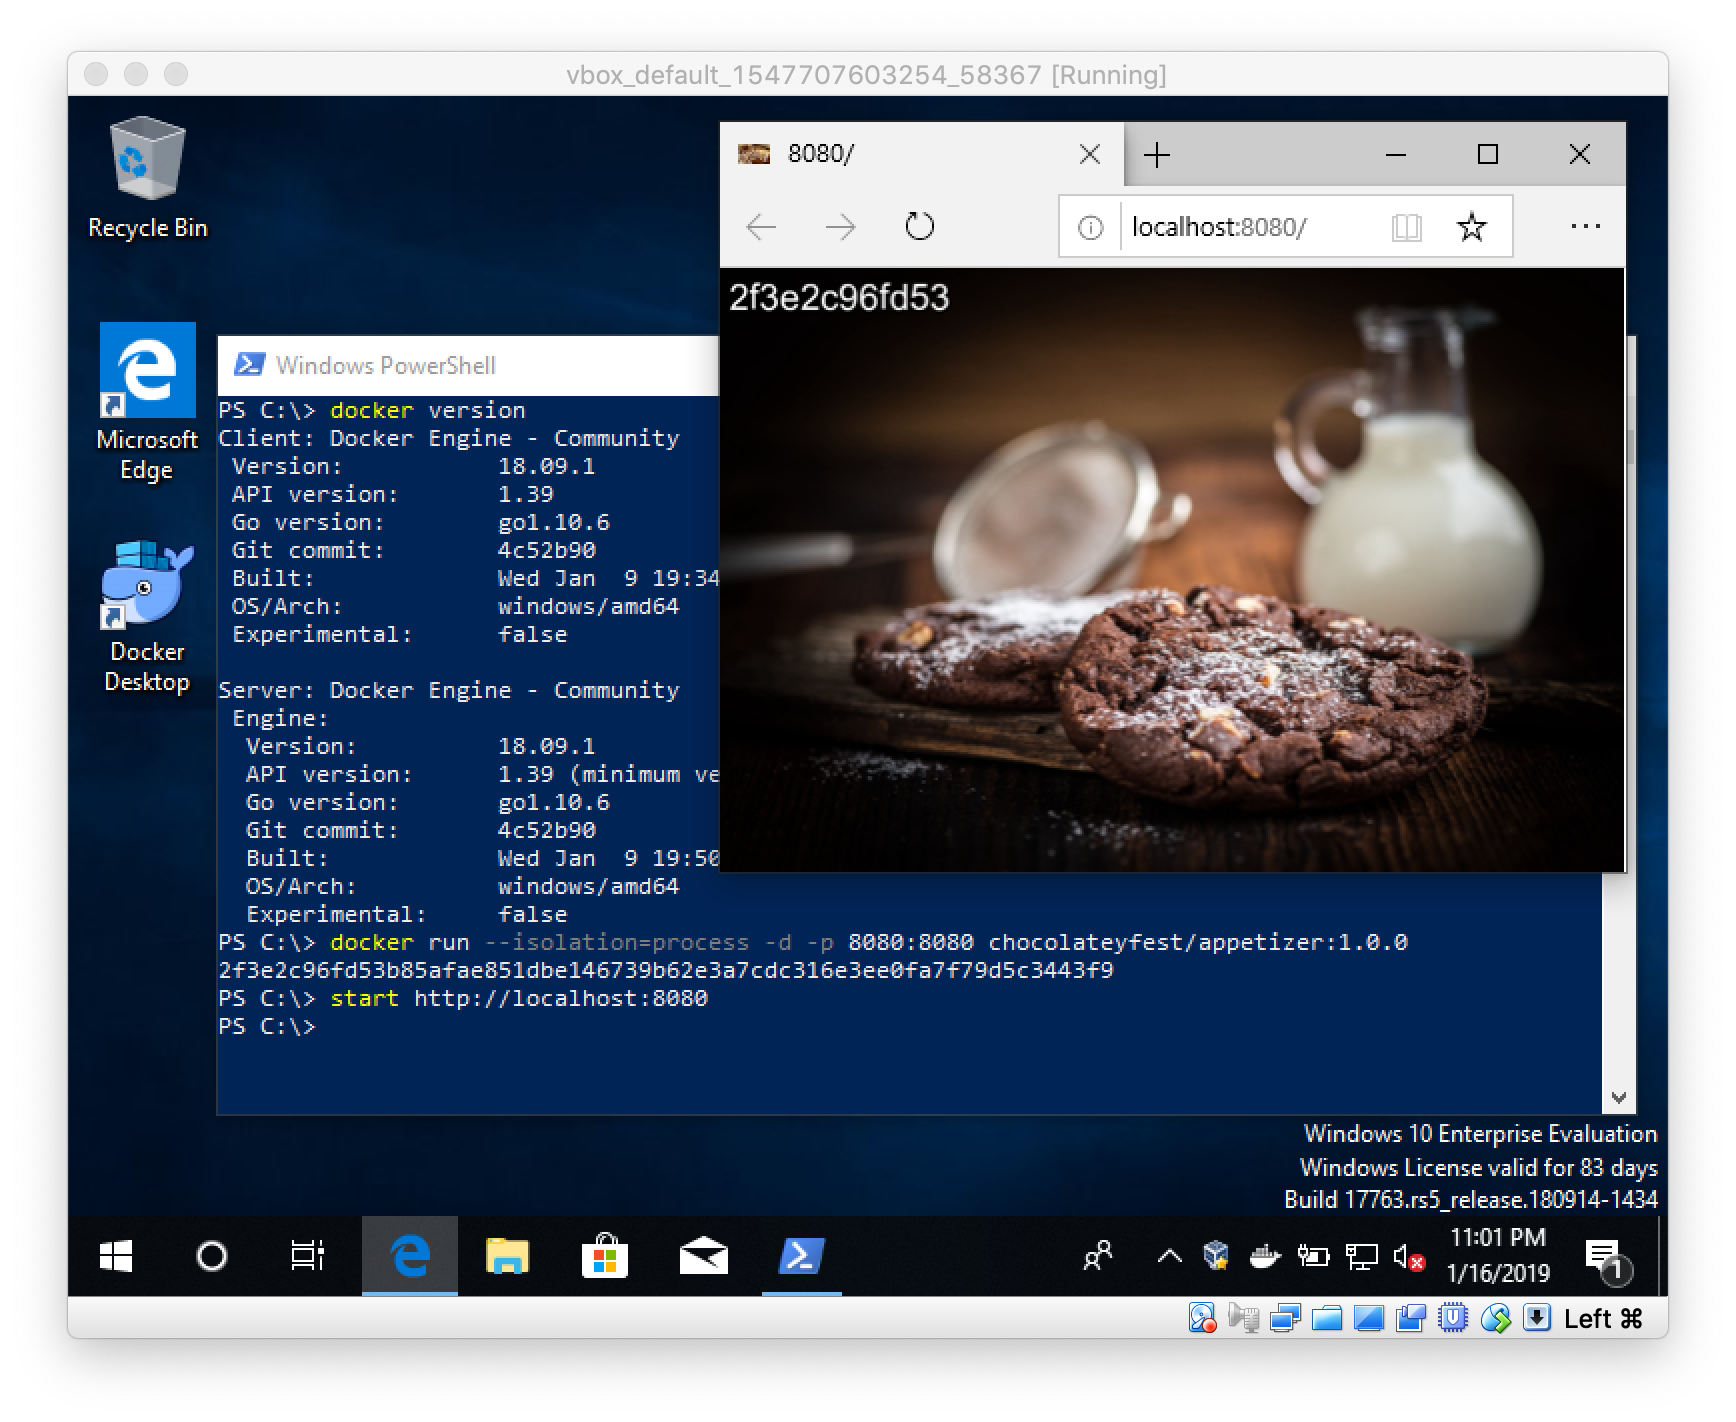
Voila! It works.
Try something different with an interactive nanoserver container with a CMD shell
docker run -it --isolation=process mcr.microsoft.com/windows/nanoserver:1809 cmd
TL/DR
Beginning with Windows 10 1809 and Docker 18.09.1 you can use the more lightweight process isolation mode for Windows Containers. Linux Containers still need Hyper-V installed to run them in Docker Desktop.
If you liked this blog post please share it with your friends. You can follow me on Twitter @stefscherer.
]]>When I'm working with Windows I love to have a standarized way to install software. Did you remember how we have set up our dev machines a few years ago? Well, about five years ago I found this blog post by security expert Troy Hunt and his 102 simple steps
]]>When I'm working with Windows I love to have a standarized way to install software. Did you remember how we have set up our dev machines a few years ago? Well, about five years ago I found this blog post by security expert Troy Hunt and his 102 simple steps for installing and configuring a new Windows 8 machine showed most of the time cinst this and cinst that. This opened my eyes, wow there is a package manager for Windows. Since then I started with automation tools like Packer and Vagrant to describe repeatable development and test environments. This also lead me to contribute back to the Chocolatey community repository, because I just couldn't cinst packer at that time. So I wrote my first Chocolatey package which is very easy as it only links to the official download URL's from the software vendor.
In these five years I went through several Windows machines and contributed missing Choco packages also for installing the Docker tools I needed.
Overview
The following diagram shows you the most relevant Chocolatey packages for Docker. I'll give you a little bit of history and explain why they all exist in the following chapters.
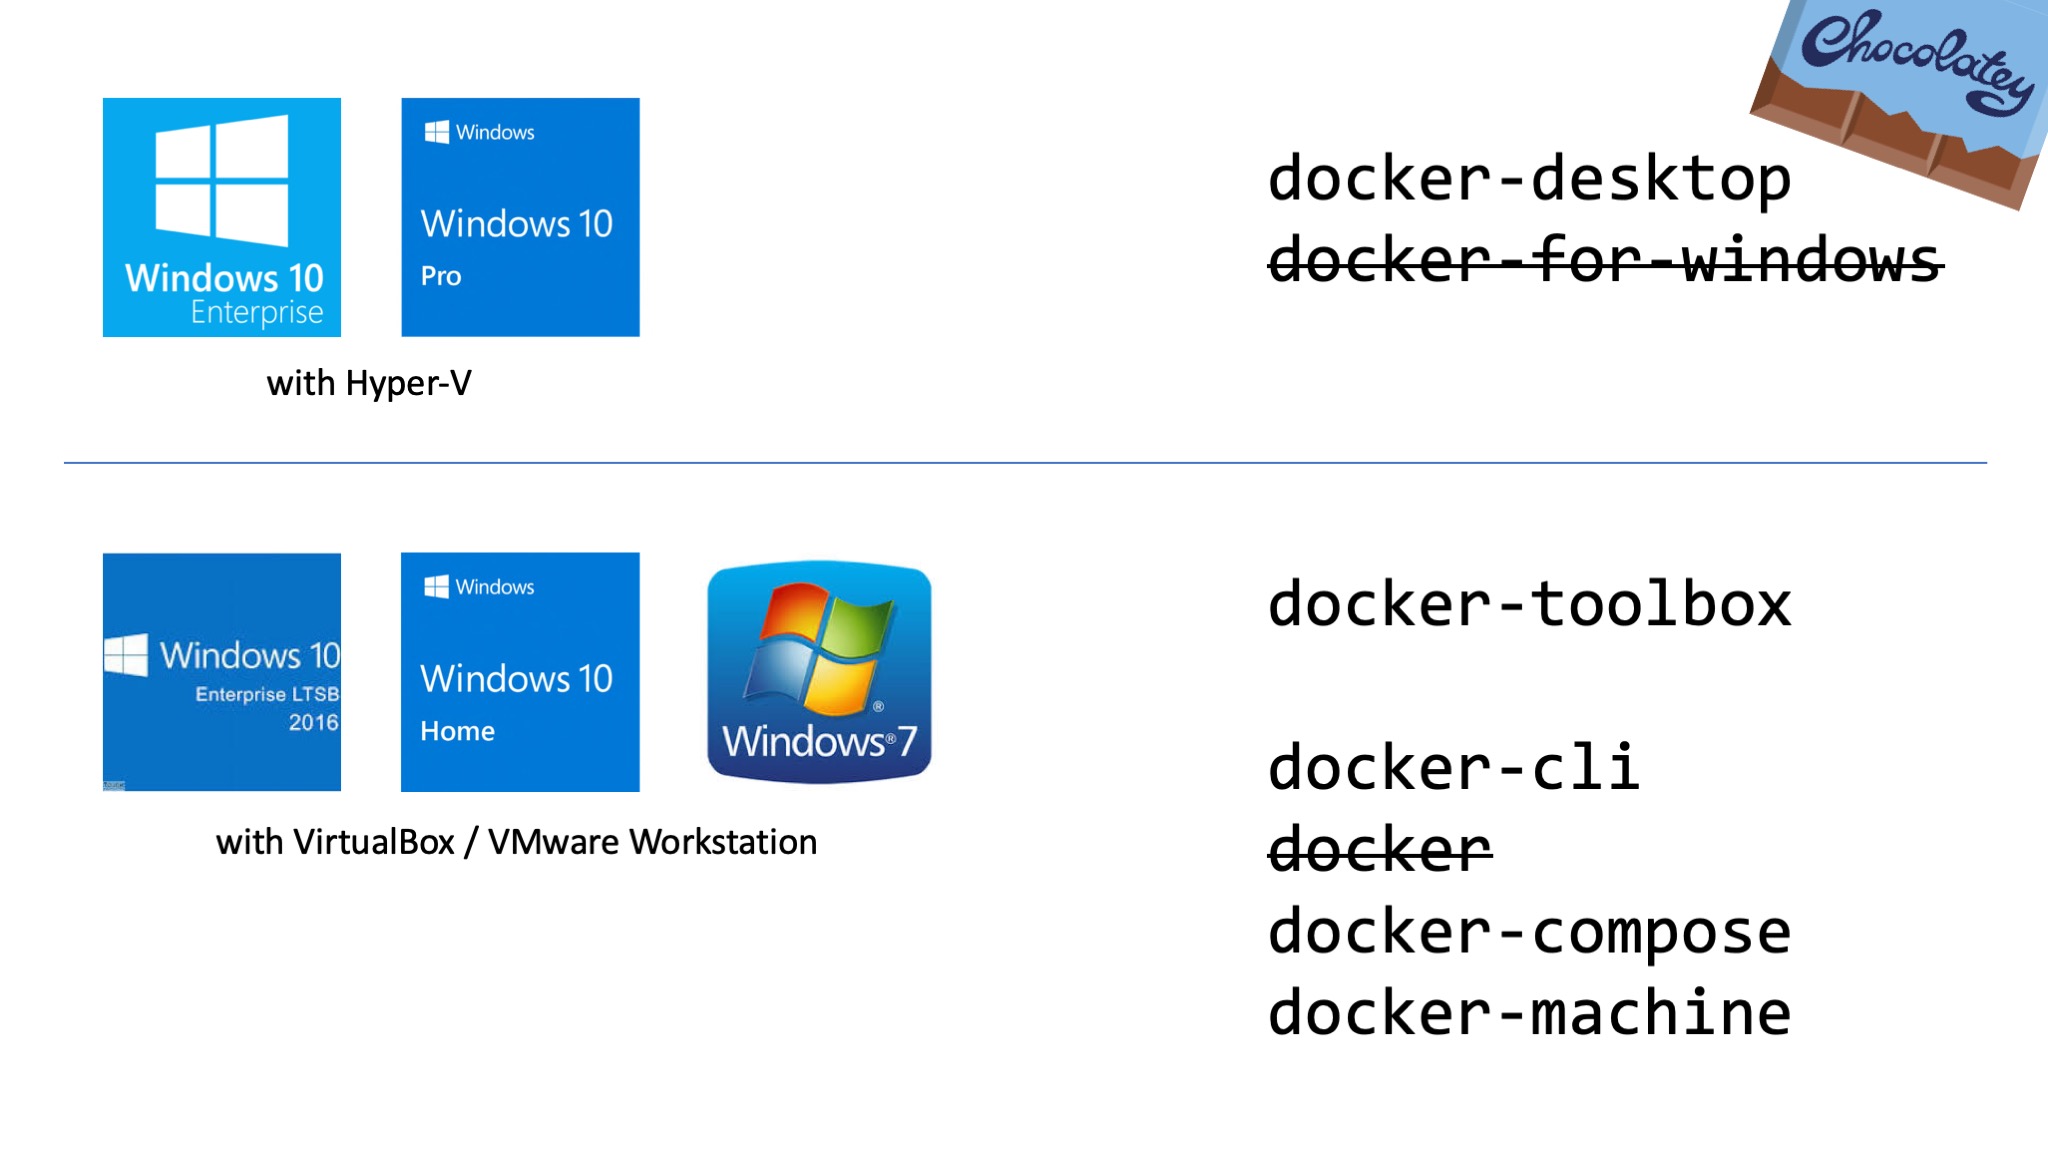
Docker
The first Docker tool that landed as a Chocolatey package was the Docker CLI. Ahmet Alp Balkan working at Microsoft at that time ported the Docker CLI to Windows so we had the docker.exe to communicate with remote Docker engines running in a Linux machine. This package was and still is called docker.
Nowadays it might be confusing if people want to run choco install docker and 'just' get the Docker CLI without any Docker Engine. We're in discussion with the Chocolatey team how to softly fix this and transfer the Docker CLI into a new package name called docker-cli to make it more clear.
Docker Toolbox
Docker, Inc. created Docker Toolbox to have all tools and also VirtualBox bundled together. Manuel Riezebosch started a Chocolatey package docker-toolbox for it and still maintains it.
This package is usable for people that cannot run the newer Docker Desktop product. The reasons could be
- Still running Windows 7
- Running a Windows 10 Home or LTSB version which is too old
- Running VirtualBox VM's for other tasks that prevent the installation of Hyper-V
Machine, Compose, ...
I worked with VMware Workstation for years so the Docker Toolbox wasn't my thing. I knew that there is a tool called docker-machine to create Linux VM's with the boot2docker.iso file. That's why I started with the Choco packages for docker-machine, helped maintaining the docker-compose package and added some Docker Machine drivers as Chocolatey packages docker-machine-vmwareworkstation and docker-machine-vmware as well.
This is the fine granular approach to install only the tools you need, but still using the choco install experience.
Docker for Windows
Manuel Riezebosch started a Chocolatey package docker-for-windows which is an excellent work. You can install "Docker for Windows" product with it which is the successor of "Docker Toolbox". But please read the next section to grab the latest version of it.
Docker Desktop
With the new release of Docker Desktop 2.0 for Windows 10 Pro/Enterprise there is also a change in the name. The product "Docker for Windows" has been renamed to "Docker Desktop". It also gets a new version format.
That's the reason to start with a new Choco package name. Please unlearn docker-for-windows and just use choco install docker-desktop to get the latest version on your machine.
Thanks Manuel Riezebosch for mainting this choco package!
Windows Server?
If you want to install Docker on a Windows Server 2016 or 2019, there is no Chocolatey package for it.
Please read Windows Containers on Windows Server installation guide from Microsoft or the Docker Enterprise Edition for Windows Server guide from the Docker Store.
TL/DR
The best experience with Docker on a Windows 10 machine is using the Docker Desktop product. Try to grab an up-to-date Windows 10 Pro machine to be all set for it and then run
choco install docker-desktop
Otherwise jump over to https://chocolatey.org/search?q=docker and grab one of the other Docker related Chocolatey packages.
I hope this overview of all the Chocolatey packages will give you a better understanding of what is right for your needs. I would love to hear your feedback so please leave a comment below or ask me on Twitter.
]]>Last week at MS Ignite Microsoft has announced the new Windows Server 2019 which will be general available in October. This is a big new release with a lot of improvements using Docker with Windows Containers. Here is an overview of relevant changes.
Since the last two years after Windows
]]>Last week at MS Ignite Microsoft has announced the new Windows Server 2019 which will be general available in October. This is a big new release with a lot of improvements using Docker with Windows Containers. Here is an overview of relevant changes.
Since the last two years after Windows Server 2016 first introduced Windows Container support a lot of things have improved. We have seen some of that changes in the semi-annual releases of 1709 and 1803, and now the long-term supported release has all the latest and greatest updates available.
In-Place update from 2012 R2 / 2016
First of all if you have older Windows Servers running it is possible to install an in-place update to this new release. So it is possible to run Windows Containers after updating your server, adding the Containers feature and installing Docker on your server. I normally create fresh machines with the new operating system, but this update really looks interesting to get access to these new technology.
Smaller base Docker images
The containers team at Microsoft has improved the size of the Windows base images. The container images have been shrunk down to 1/3 to 1/4 of the equivalent 2016 images. The sizes in the diagram below are the sizes after downloading and expanding the Docker images and running the docker images command.

With the very small mcr.microsoft.com/windows/nanoserver:1809 image you will see applications at about 100 MByte (compressed) on Docker Hub.
A new windows base image
In addition to the two known Windows base images for Windows Server Core and Nano Server there is now a third base image: Windows
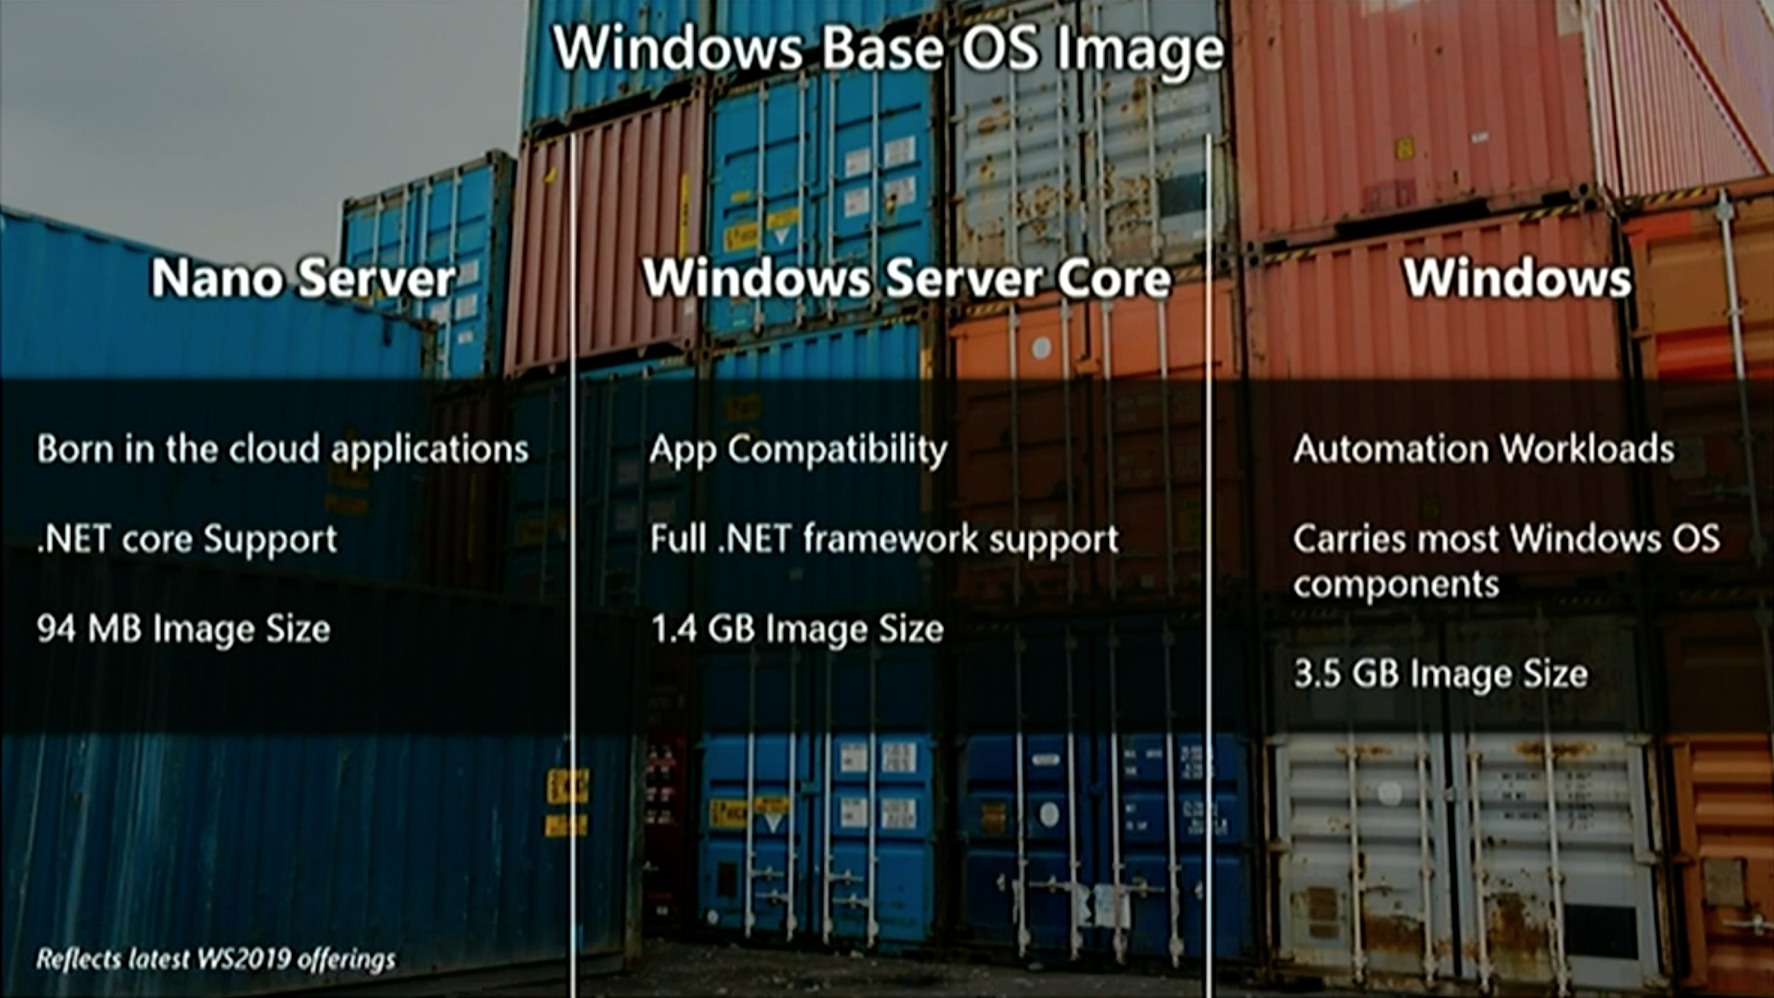
This image gives you an even broader support for your Windows applications than just the core image. One use-case is for automation workloads like automated UI tests. But notice you still cannot RDP into such Windows containers.
Transition to mcr.microsoft.com
Microsoft has started to move its Docker images from the Docker Hub into a own container registry. What you have to know is that the name for the base images will slightly change. You only have to remember to change the microsoft/ to mcr.microsoft.com/. The following example shows the old and the new image name. Watch out the additional slash / for the Windows Server Core image.
FROM microsoft/windowsservercore:ltsc2016
to
FROM mcr.microsoft.com/windows/servercore:ltsc2019
The tags on Docker Hub are still there and you still will be able to pull the images with the old image name for a while.
The Windows base images has always been hosted on Microsoft CDN as "foreign layers", so really only the tag names changes.
A good question is where can you find the new images. The mcr.microsoft.com registry does not have an UI.
At the time of writing this blog post the new Docker images are not available. The latest information that can be found is on Docker Hub for the Insider images:
https://hub.docker.com/r/microsoft/nanoserver-insider/
https://hub.docker.com/r/microsoft/windowsservercore-insider/
https://hub.docker.com/r/microsoft/windows-insider/
Update: I found two of the three images in the description on Docker Hub here:
https://hub.docker.com/r/microsoft/nanoserver/
https://hub.docker.com/r/microsoft/windowsservercore/
https://hub.docker.com/r/microsoft/windows/ (still 404)
docker pull mcr.microsoft.com/windows/nanoserver:1809
docker pull mcr.microsoft.com/windows/servercore:ltsc2019
I'll update the blog post when I found the image name for the full Windows image.
Ports bind to localhost
When you bind a container port to a host port your containerized application can be accessed with localhost from the host. This is what we are used with Linux containers since the beginning and now you no longer have to find out the container IP address to access your application.
docker run -p 80:80 mcr.microsoft.com/iis
start http://localhost:80
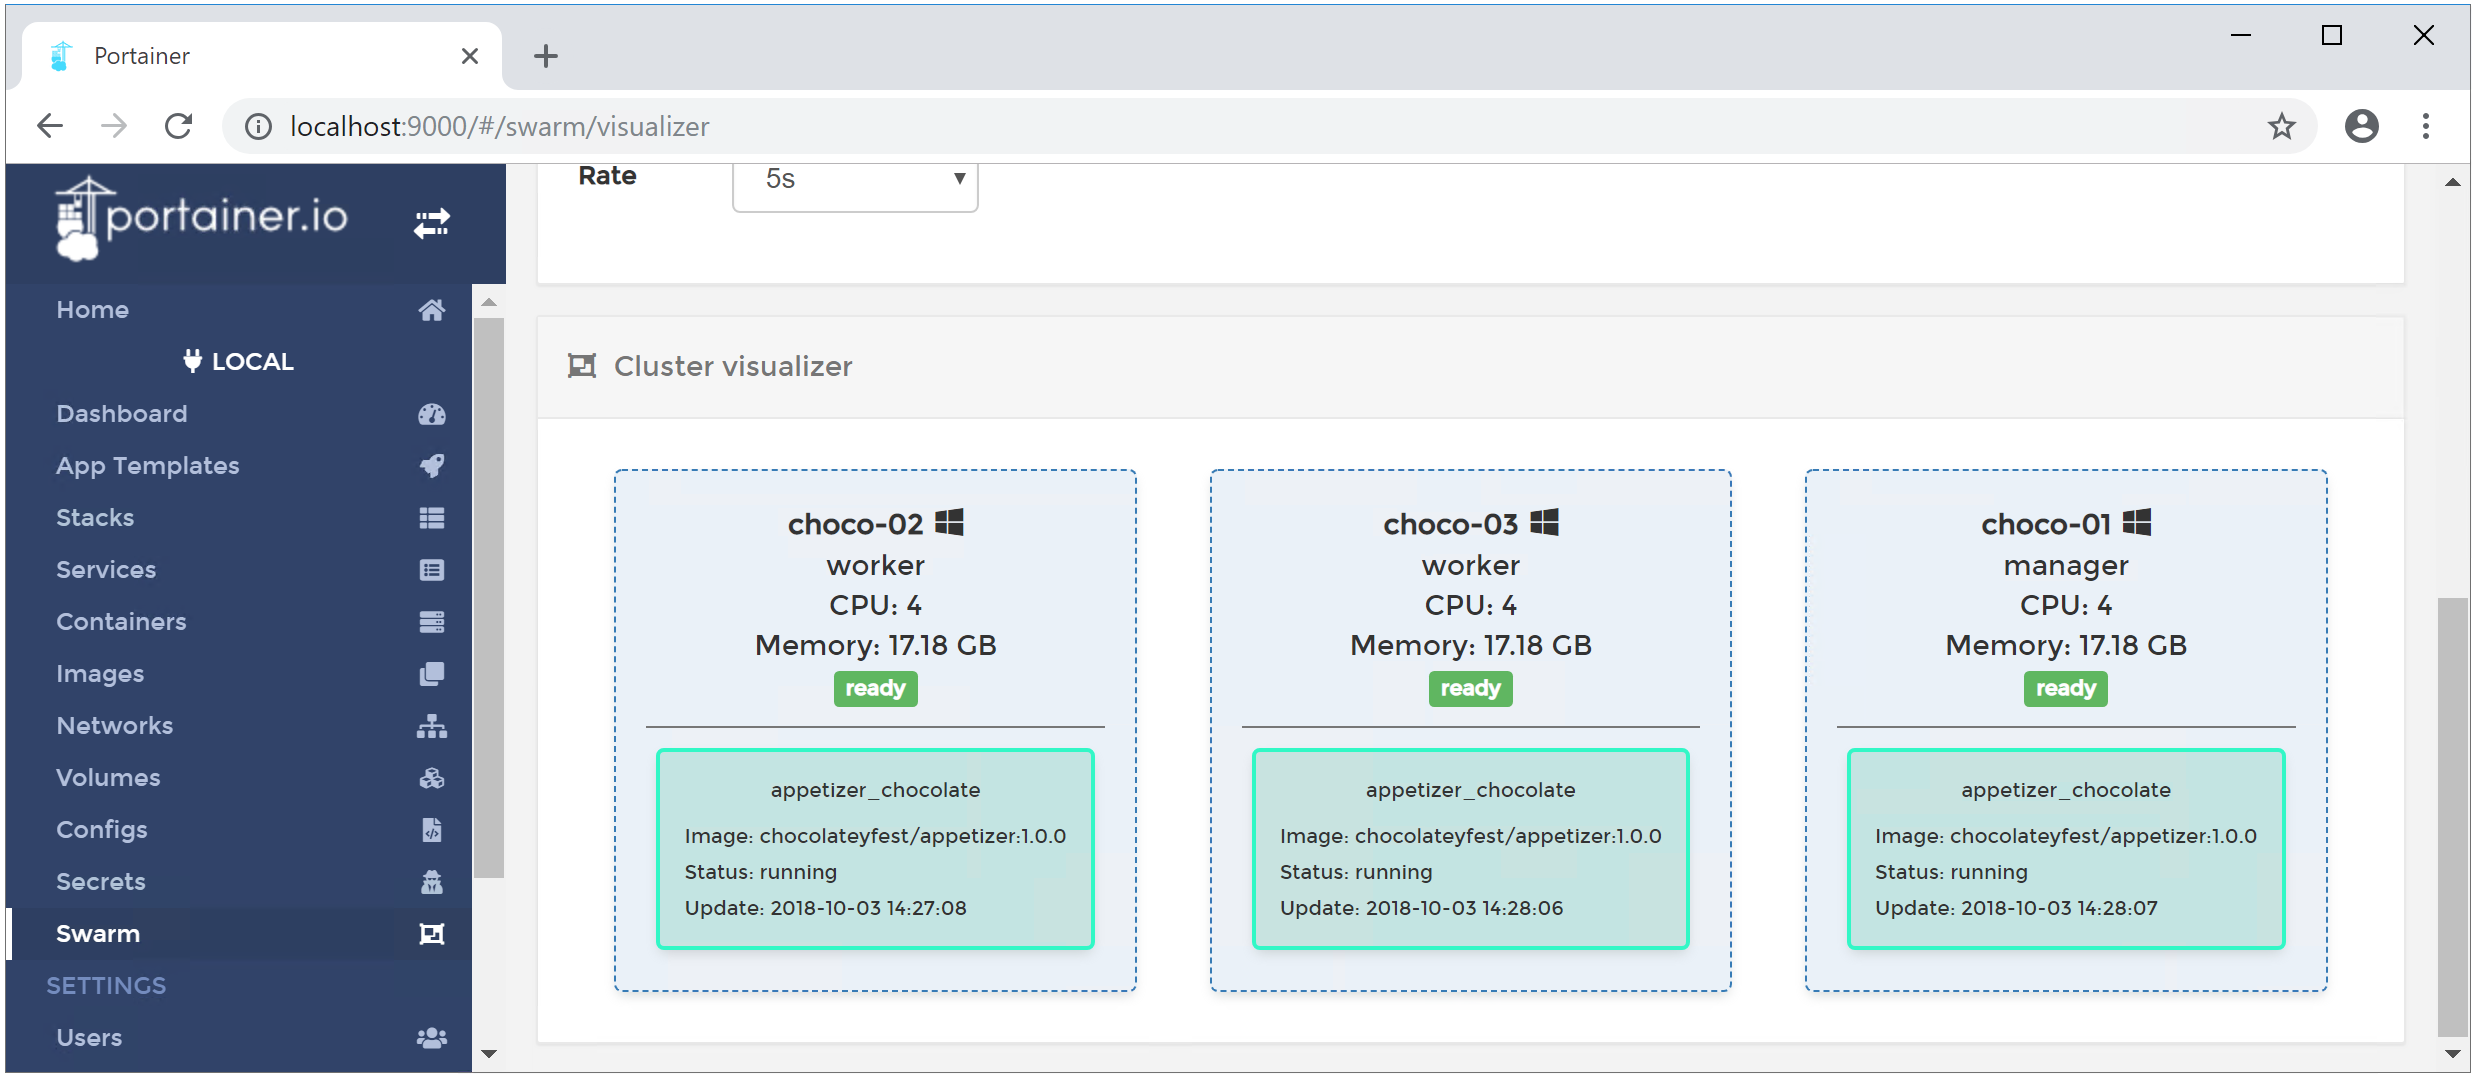
Ingress networking
I have tried one of the latest Insider builds to create a Docker Swarm with multiple Windows machines. And I'm happy to see that you can create a Windows-only Docker Swarm with manager nodes and worker nodes.
I was also able to access the published port of a web server running in Windows containers.
After scaling that service up to have it running multiple times spread over all swarm nodes I also could see the load-balancing is working in such a Windows-only cluster.
Named pipes in Windows containers
Another nice improvement is that you can bind Windows named pipes from the host into Windows containers.
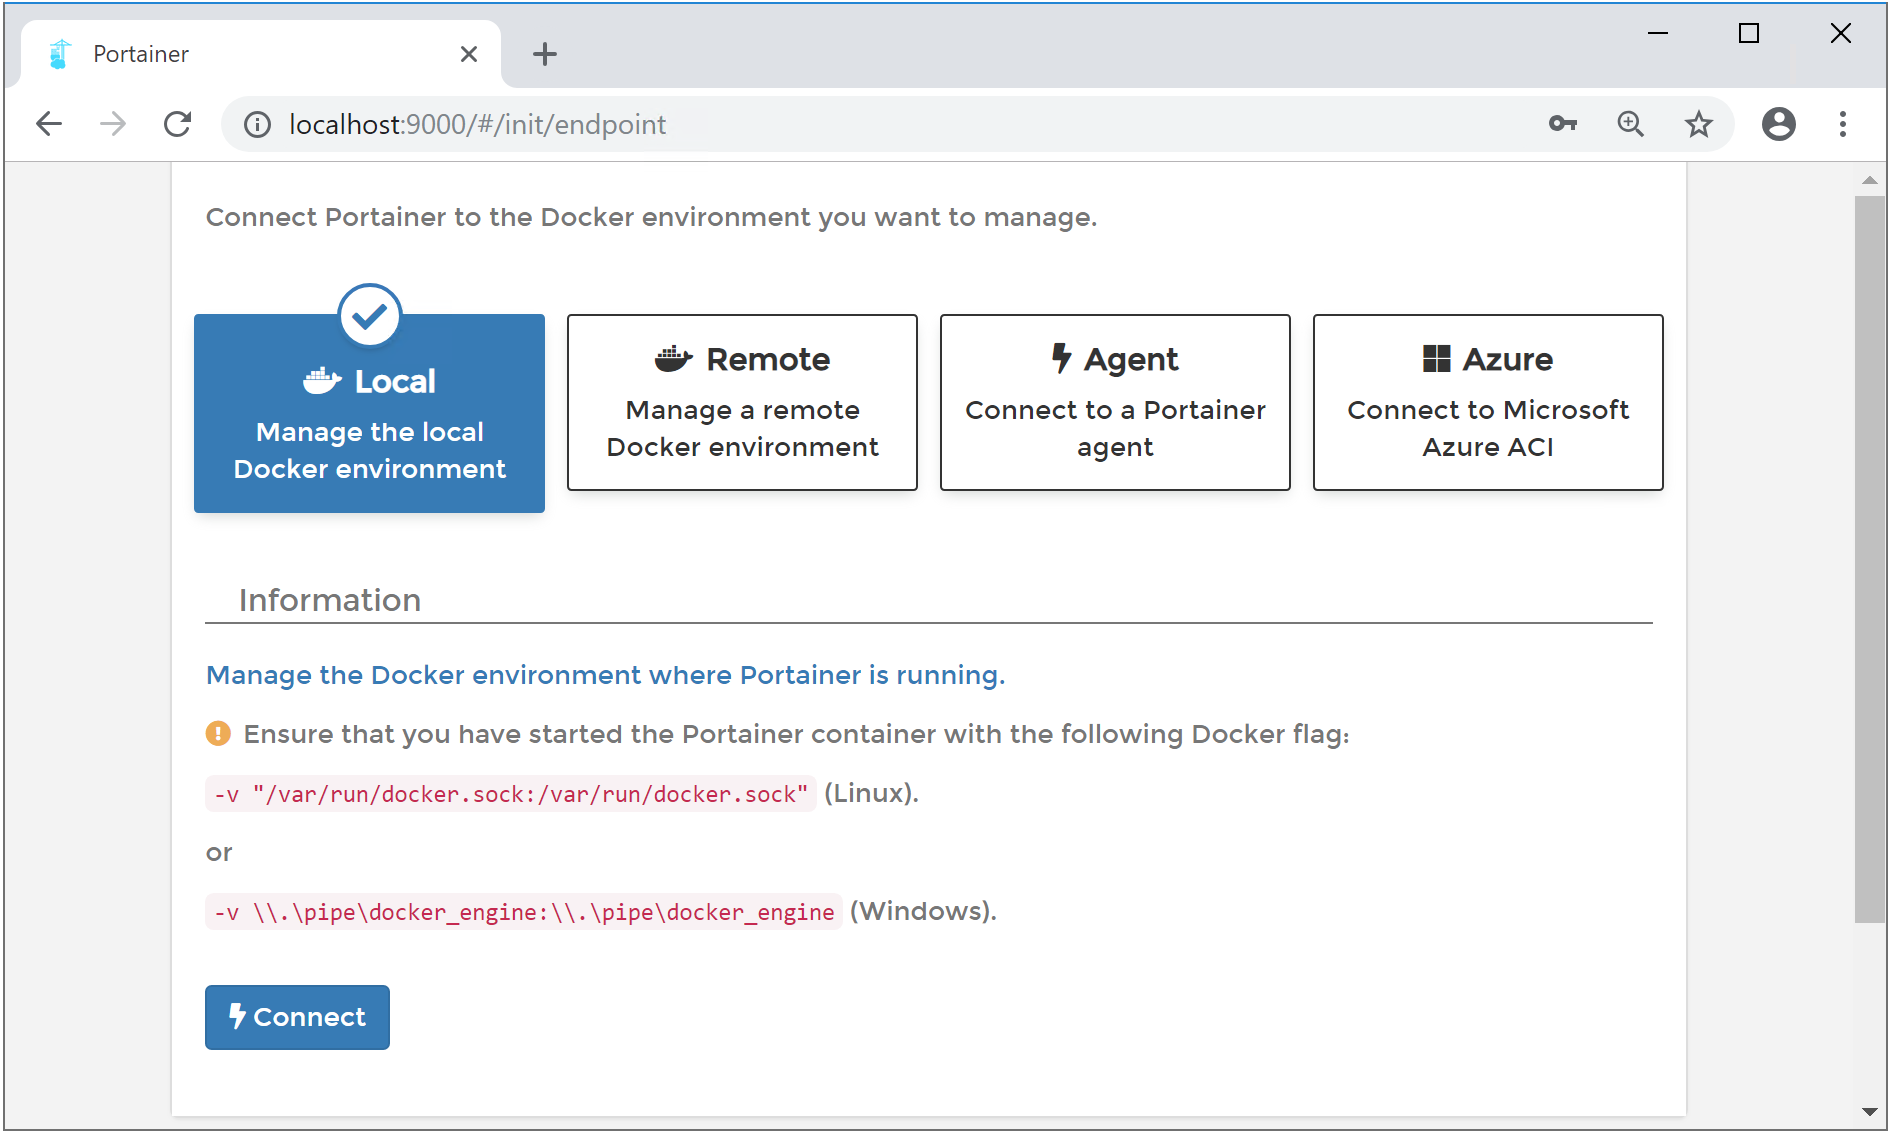
Some tools like Traefik, Portainer UI or another Docker client want to access the Docker API and we know we could bind the Unix socket into Linux containers. With Windows Server 2019 it is possible to do the same with the Docker named pipe.
LCOW?
I could not find any announcement at MS Ignite about Linux Containers on Windows.
So I tried the steps to manually install the LinuxKit kernel and updated to the latest Docker EE 18.03.1-ee-3 version.
In this combination LCOW really works, but I cannot say how stable it is and if it's officially supported. Probably we have to wait a little longer to see a better experience to install this feature.
Get it now
Go and get in touch with the new Windows Server 2019.
- Spin up a Windows Server 2019 from the Azure Marketplace.
- Go to your MSDN subscription and download the ISO.
- Go to the Evaluation Center https://www.microsoft.com/en-us/evalcenter/evaluate-windows-server-2019 and download the VHD or ISO.
- Pick my Vagrant box from Vagrant Cloud suitable for VMware Workstation/Fusion, Hyper-V and VirtualBox.
- Watch the videos from last weeks MS Ignite about Windows Server 2019 and Windows Containers.
- Go to Chocolatey Fest 2018 next week in San Francisco where you can attend a hands-on workshop. Use the code Speaker50 when you register.
TL/DR
When you work with Windows Containers I recommand to switch over to the new Windows Server 2019 release. It is much simpler now to work with Windows containers. With the smaller images you can deploy your application even faster.
You still can run your old containers from 2016 in Hyper-V isolation mode, but I recommend to rebuild them with the new Windows base images to experience faster downloads and start times.
]]>After some months of private beta AppVeyor recently has announced general availability of their Linux build agents. In this blog post I want to show you what we can do with this new feature.
In my previous blog post I showed how you can fork the example repo and build
]]>After some months of private beta AppVeyor recently has announced general availability of their Linux build agents. In this blog post I want to show you what we can do with this new feature.
In my previous blog post I showed how you can fork the example repo and build it your own, adjust it and learn all the details of the application, the Dockerfiles and the build steps.
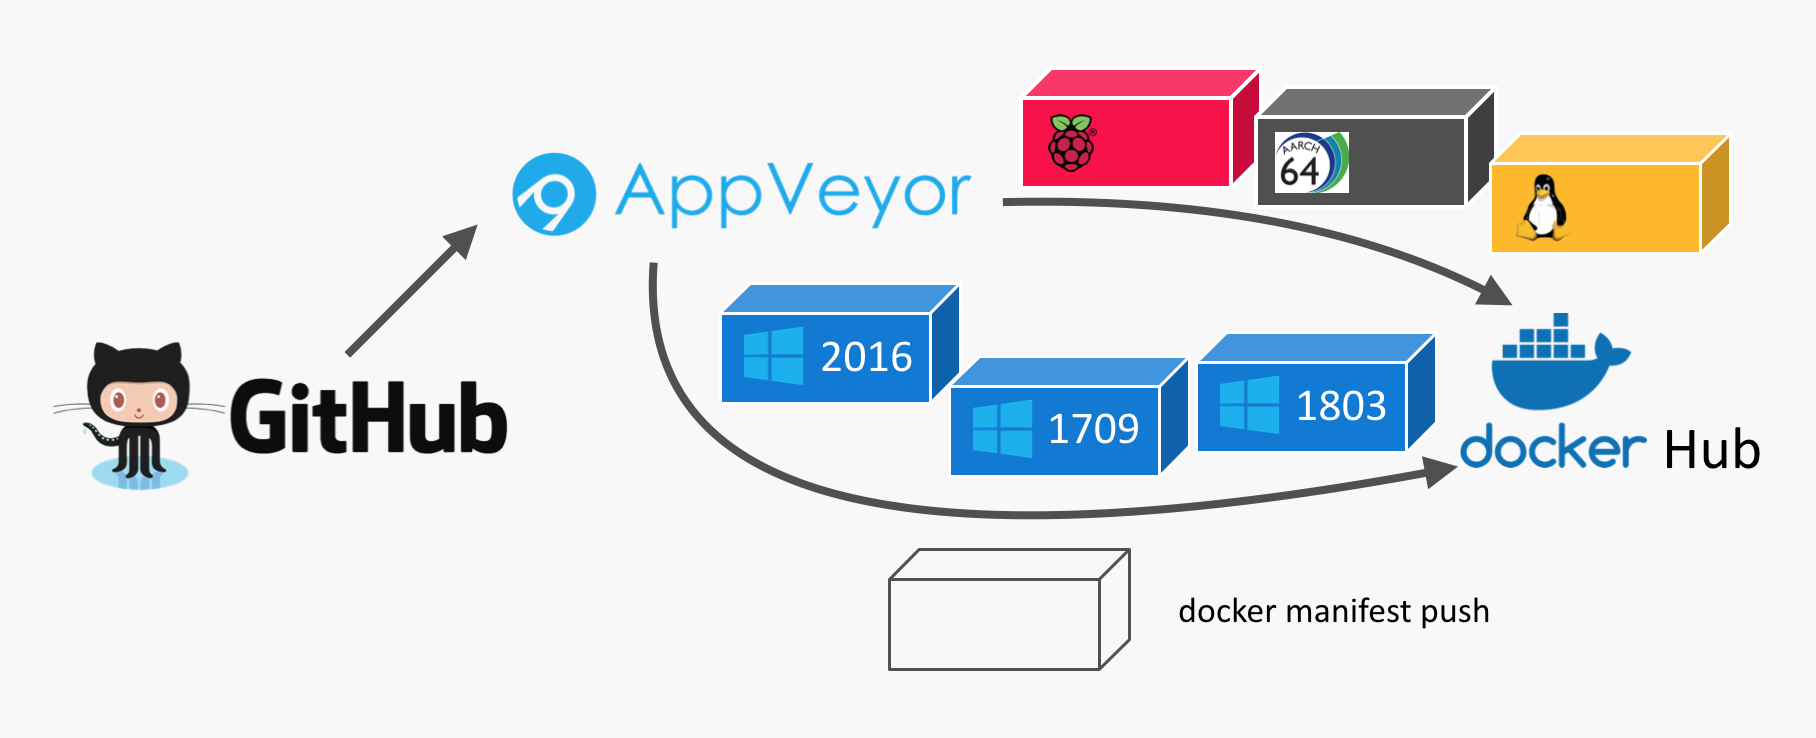
This blog post shows the details about a Linux and Windows builds and how you can combine that to a multi-arch Docker image.
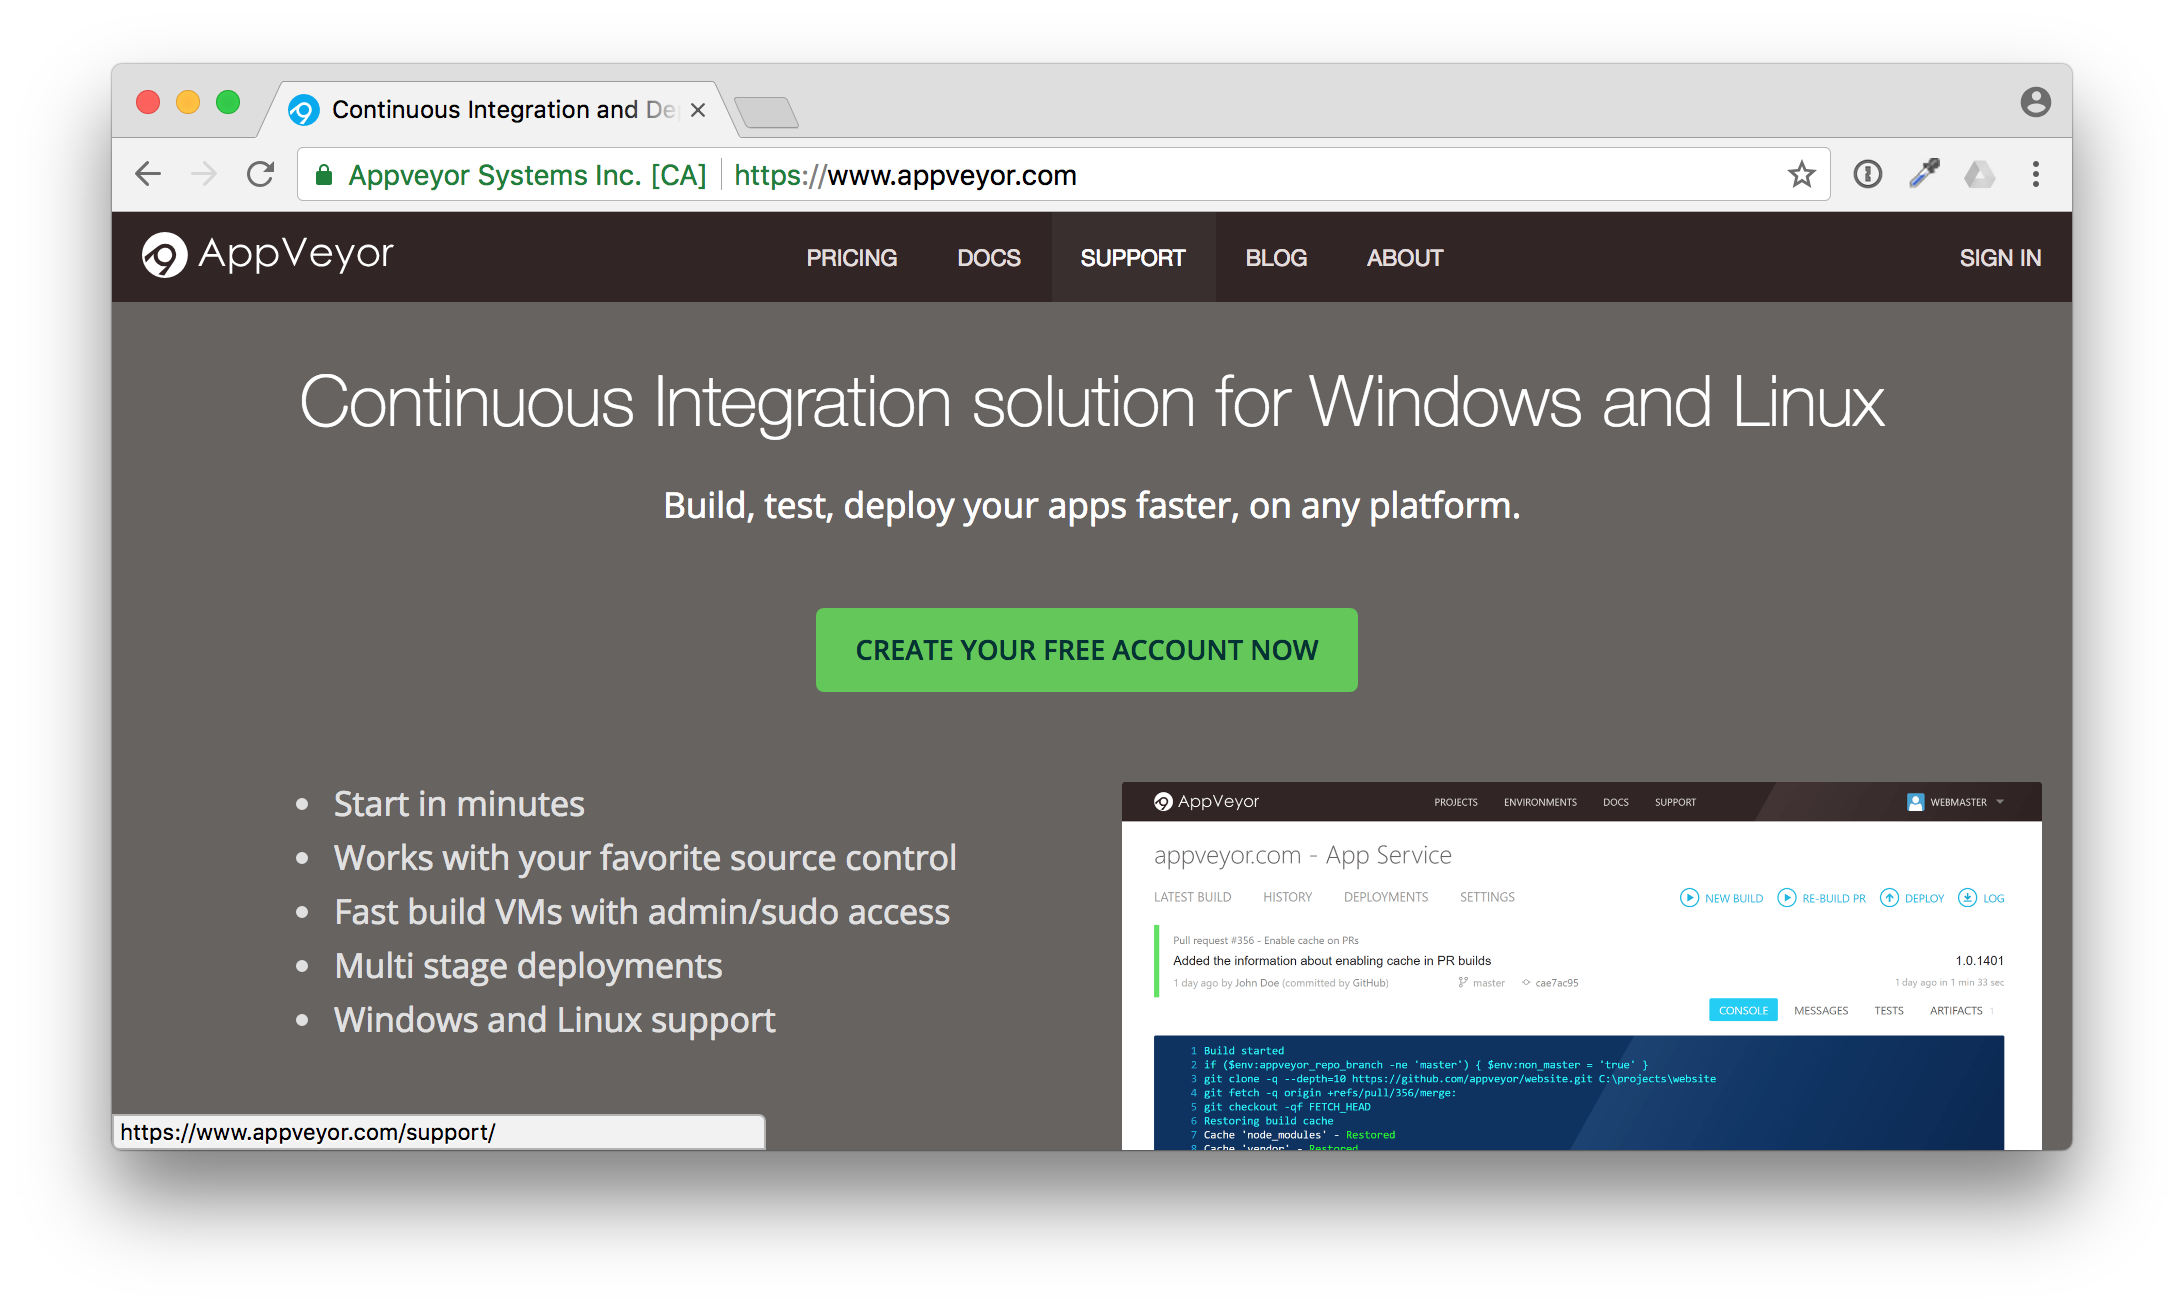
What is AppVeyor?
But first we have to start with AppVeyor. The GitHub market place shows a lot of offerings for continuous integration. This is what you normally want to have automatic tests for each Git commit or pull request you receive.
AppVeyor is my #1 place to go if I want Windows builds. I use it for several years now, you can do your .NET builds, native C/C++ builds and even Windows Containers with it. It is really easy to attach it to your GitHub repo with a YAML file.
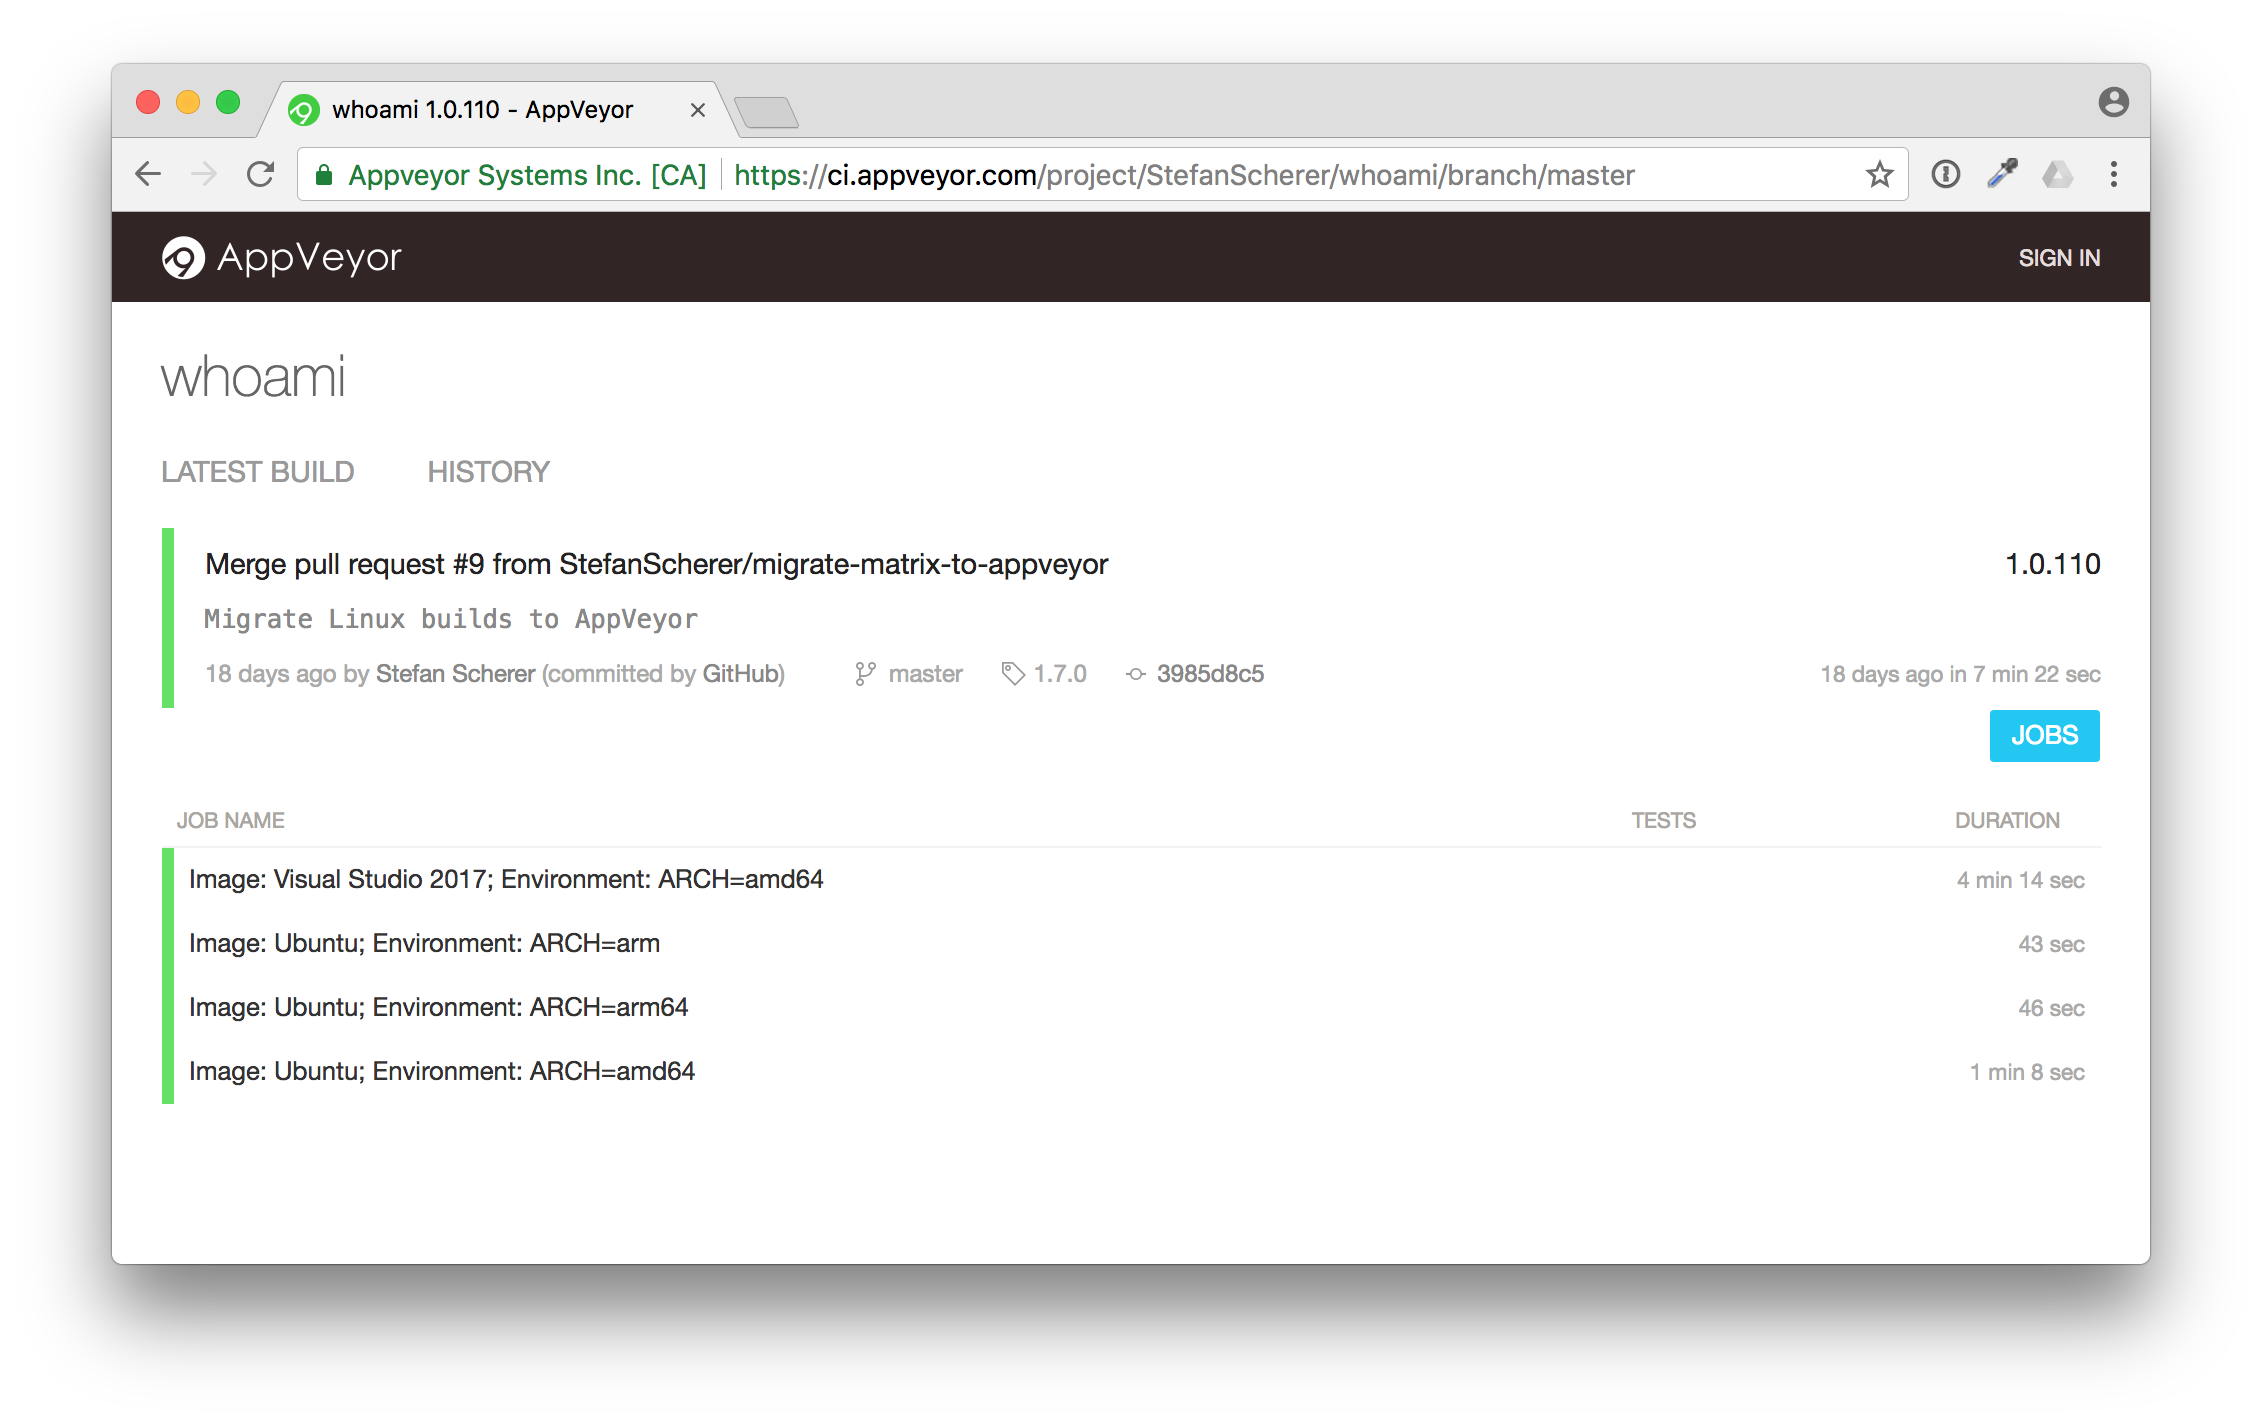
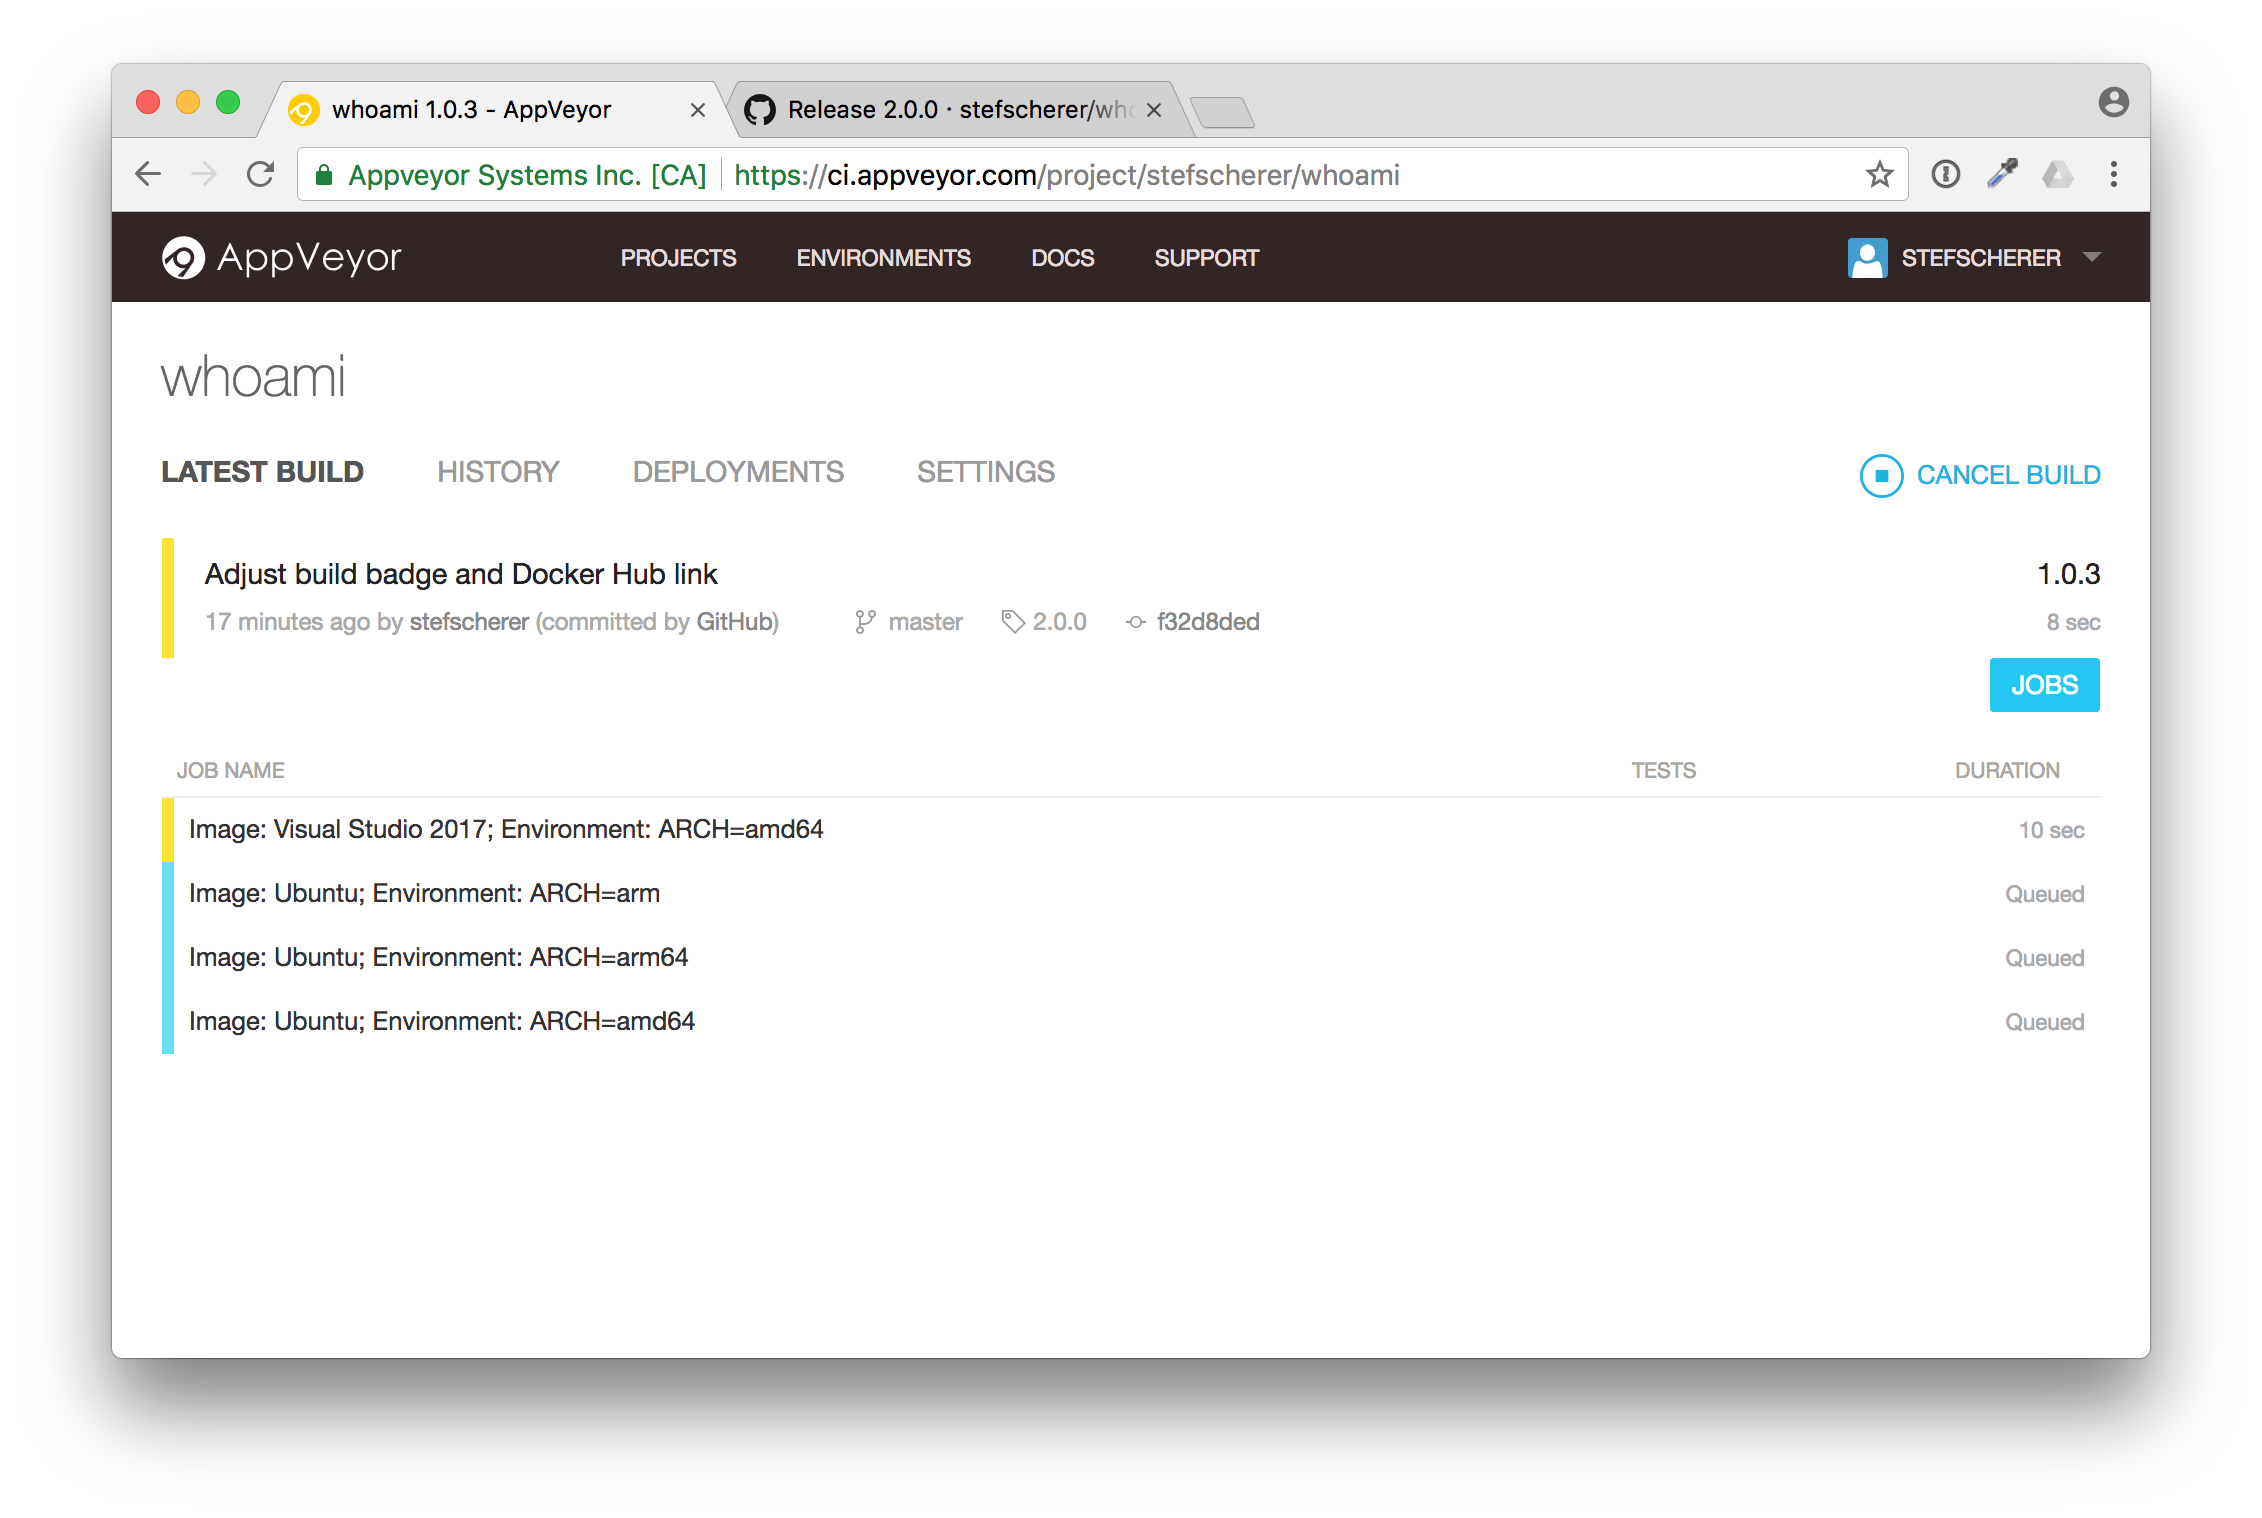
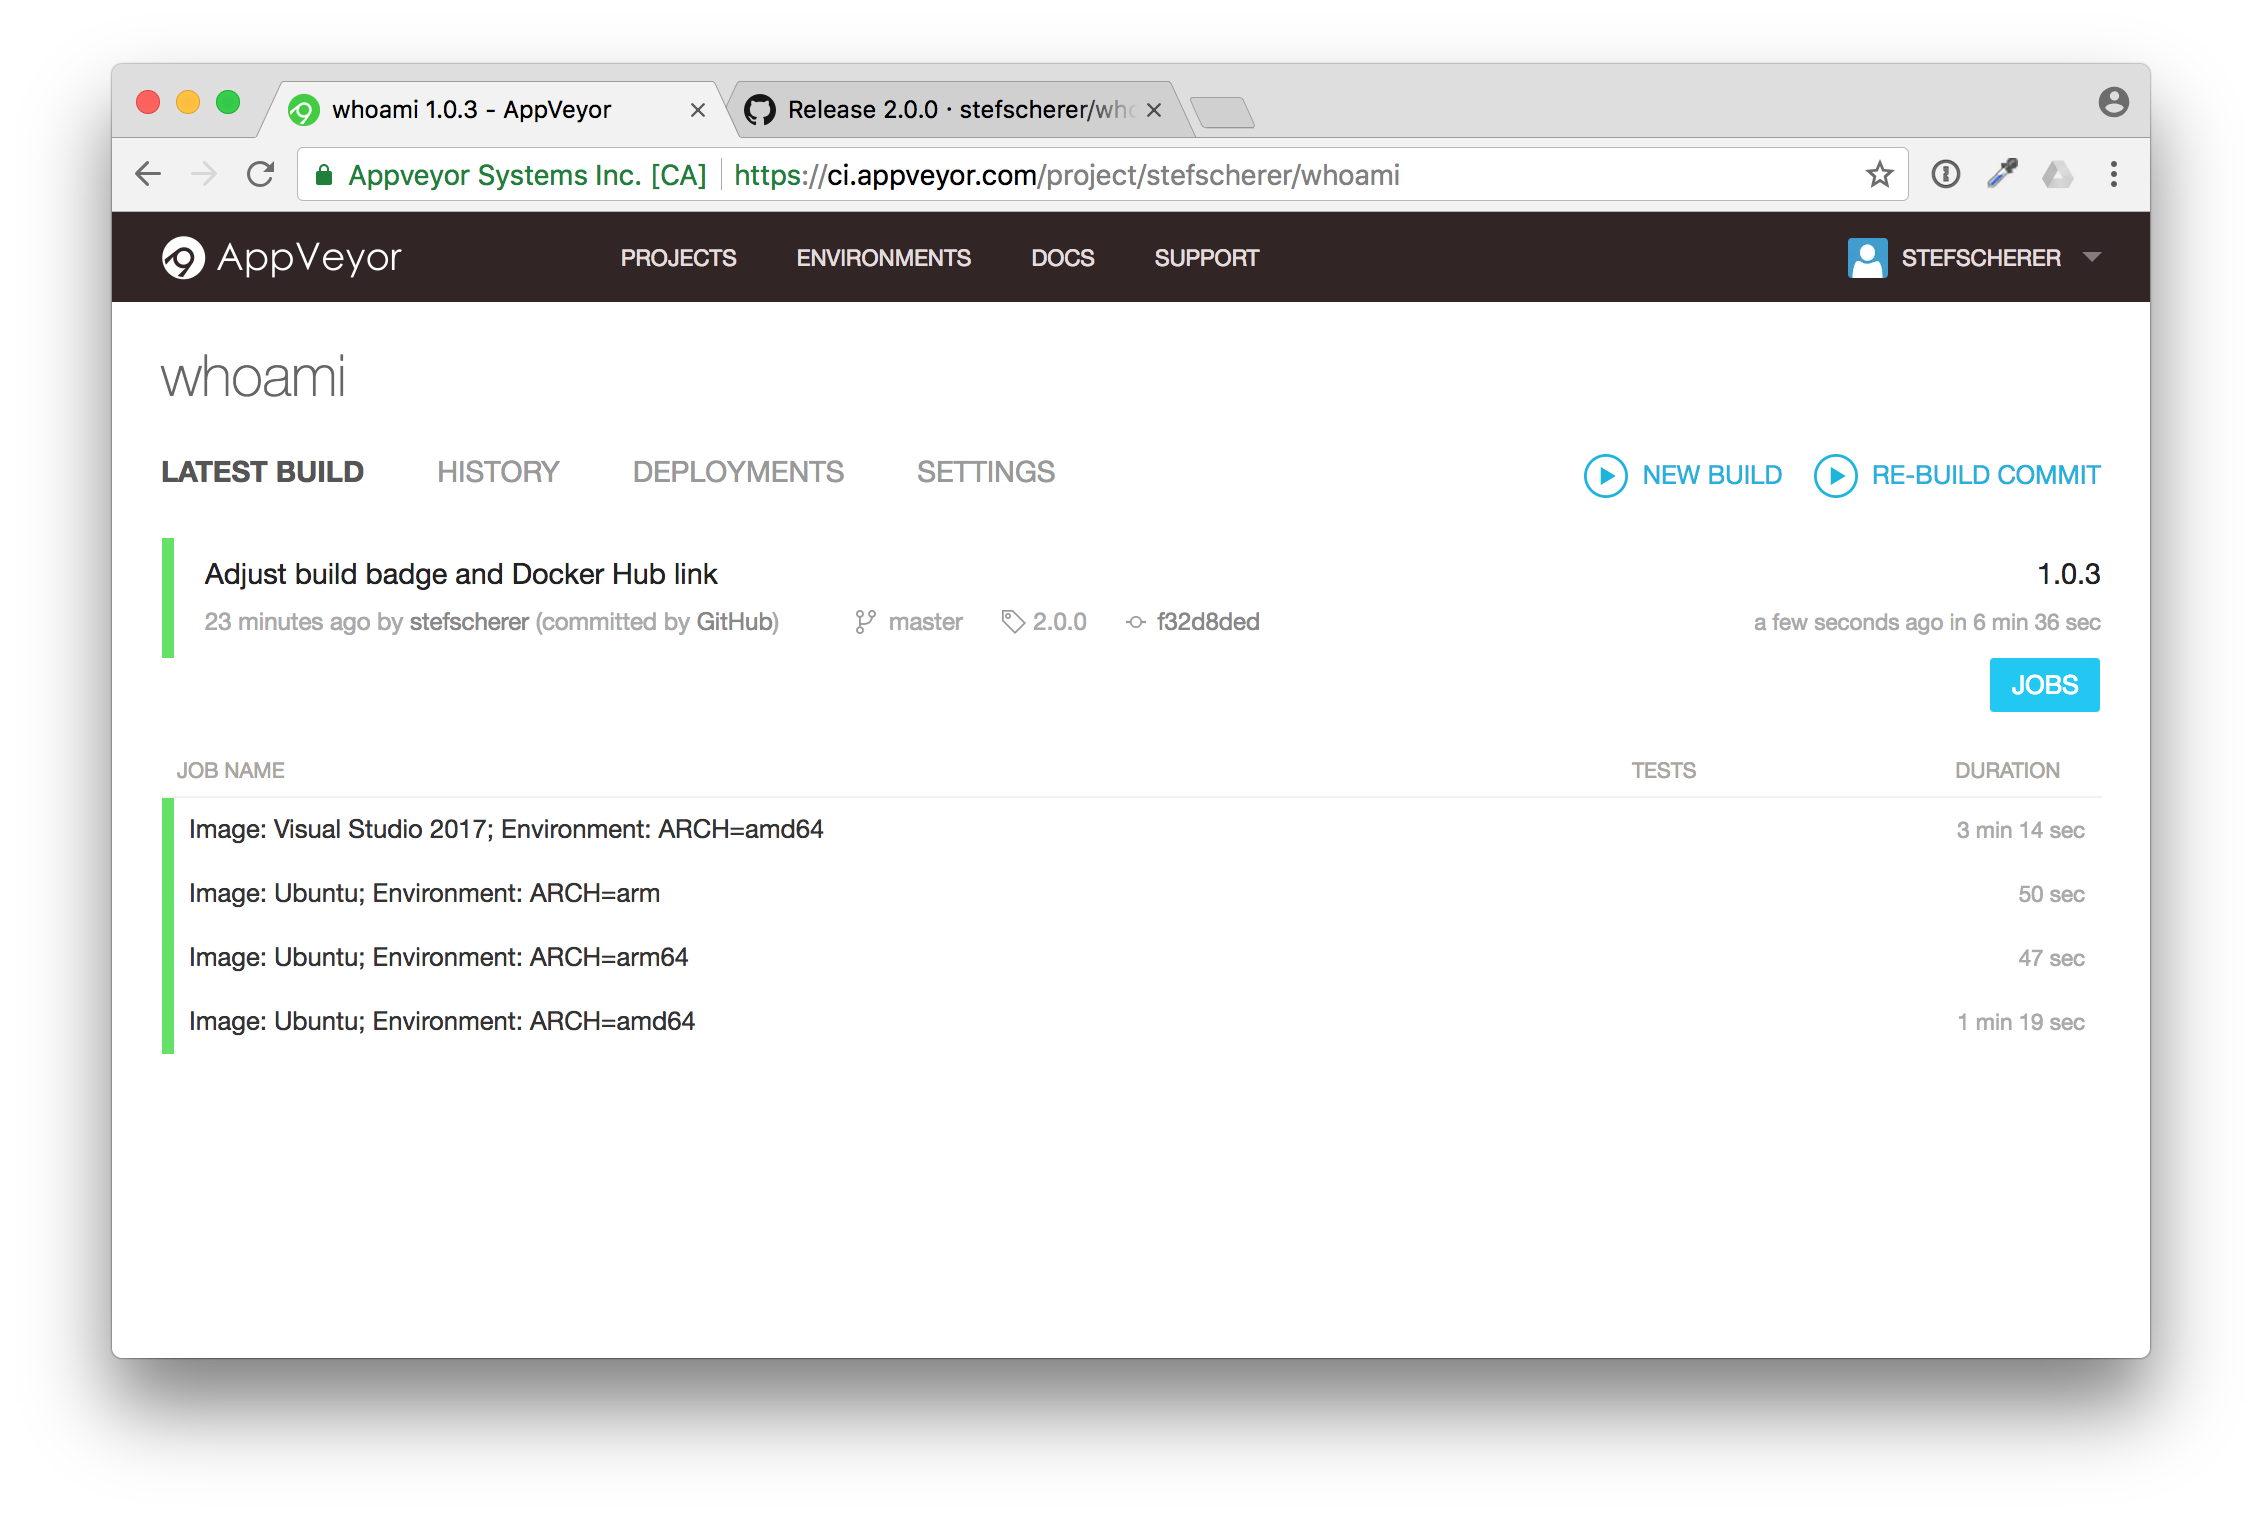
Whoami
After the announcement for the new Linux build agents I looked into my sample whoami repo that builds a multi-arch Docker image that works both for Linux and Windows. I was curious to find out how the Linux builds work on AppVeyor. Because then I can just use one CI provider instead of two different.
The CI pipeline before that evening looked like this.
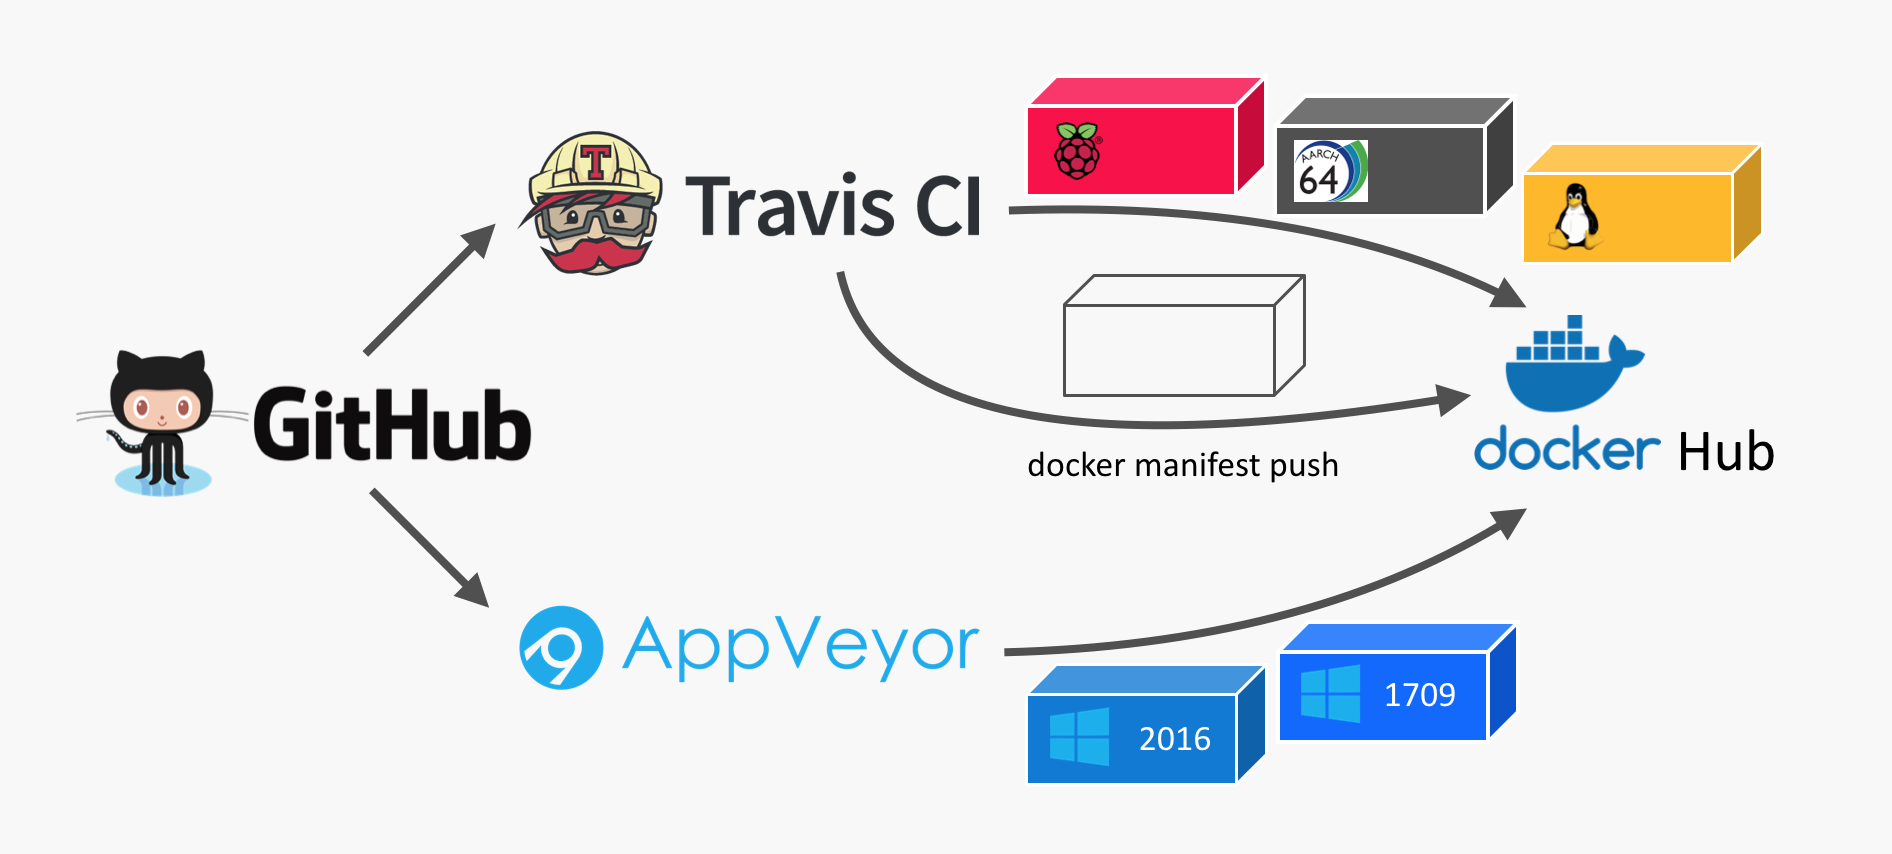
I used Travis CI for all the Linux builds. There was a build matrix to build Linux Docker images for three different CPU architectures: x64, arm and arm64.
For the Windows builds I already used AppVeyor as they provider Docker builds as well.
The difficult part was to synchronise all builds to run the final step to create a Docker manifest that combines all Docker images to just one manifest.
Two YAMLs
I opened the two YAML files that describe the CI pipeline for each service:
appveyor.ymlfor Windows on the left side.travis.ymlfor Linux on the right side
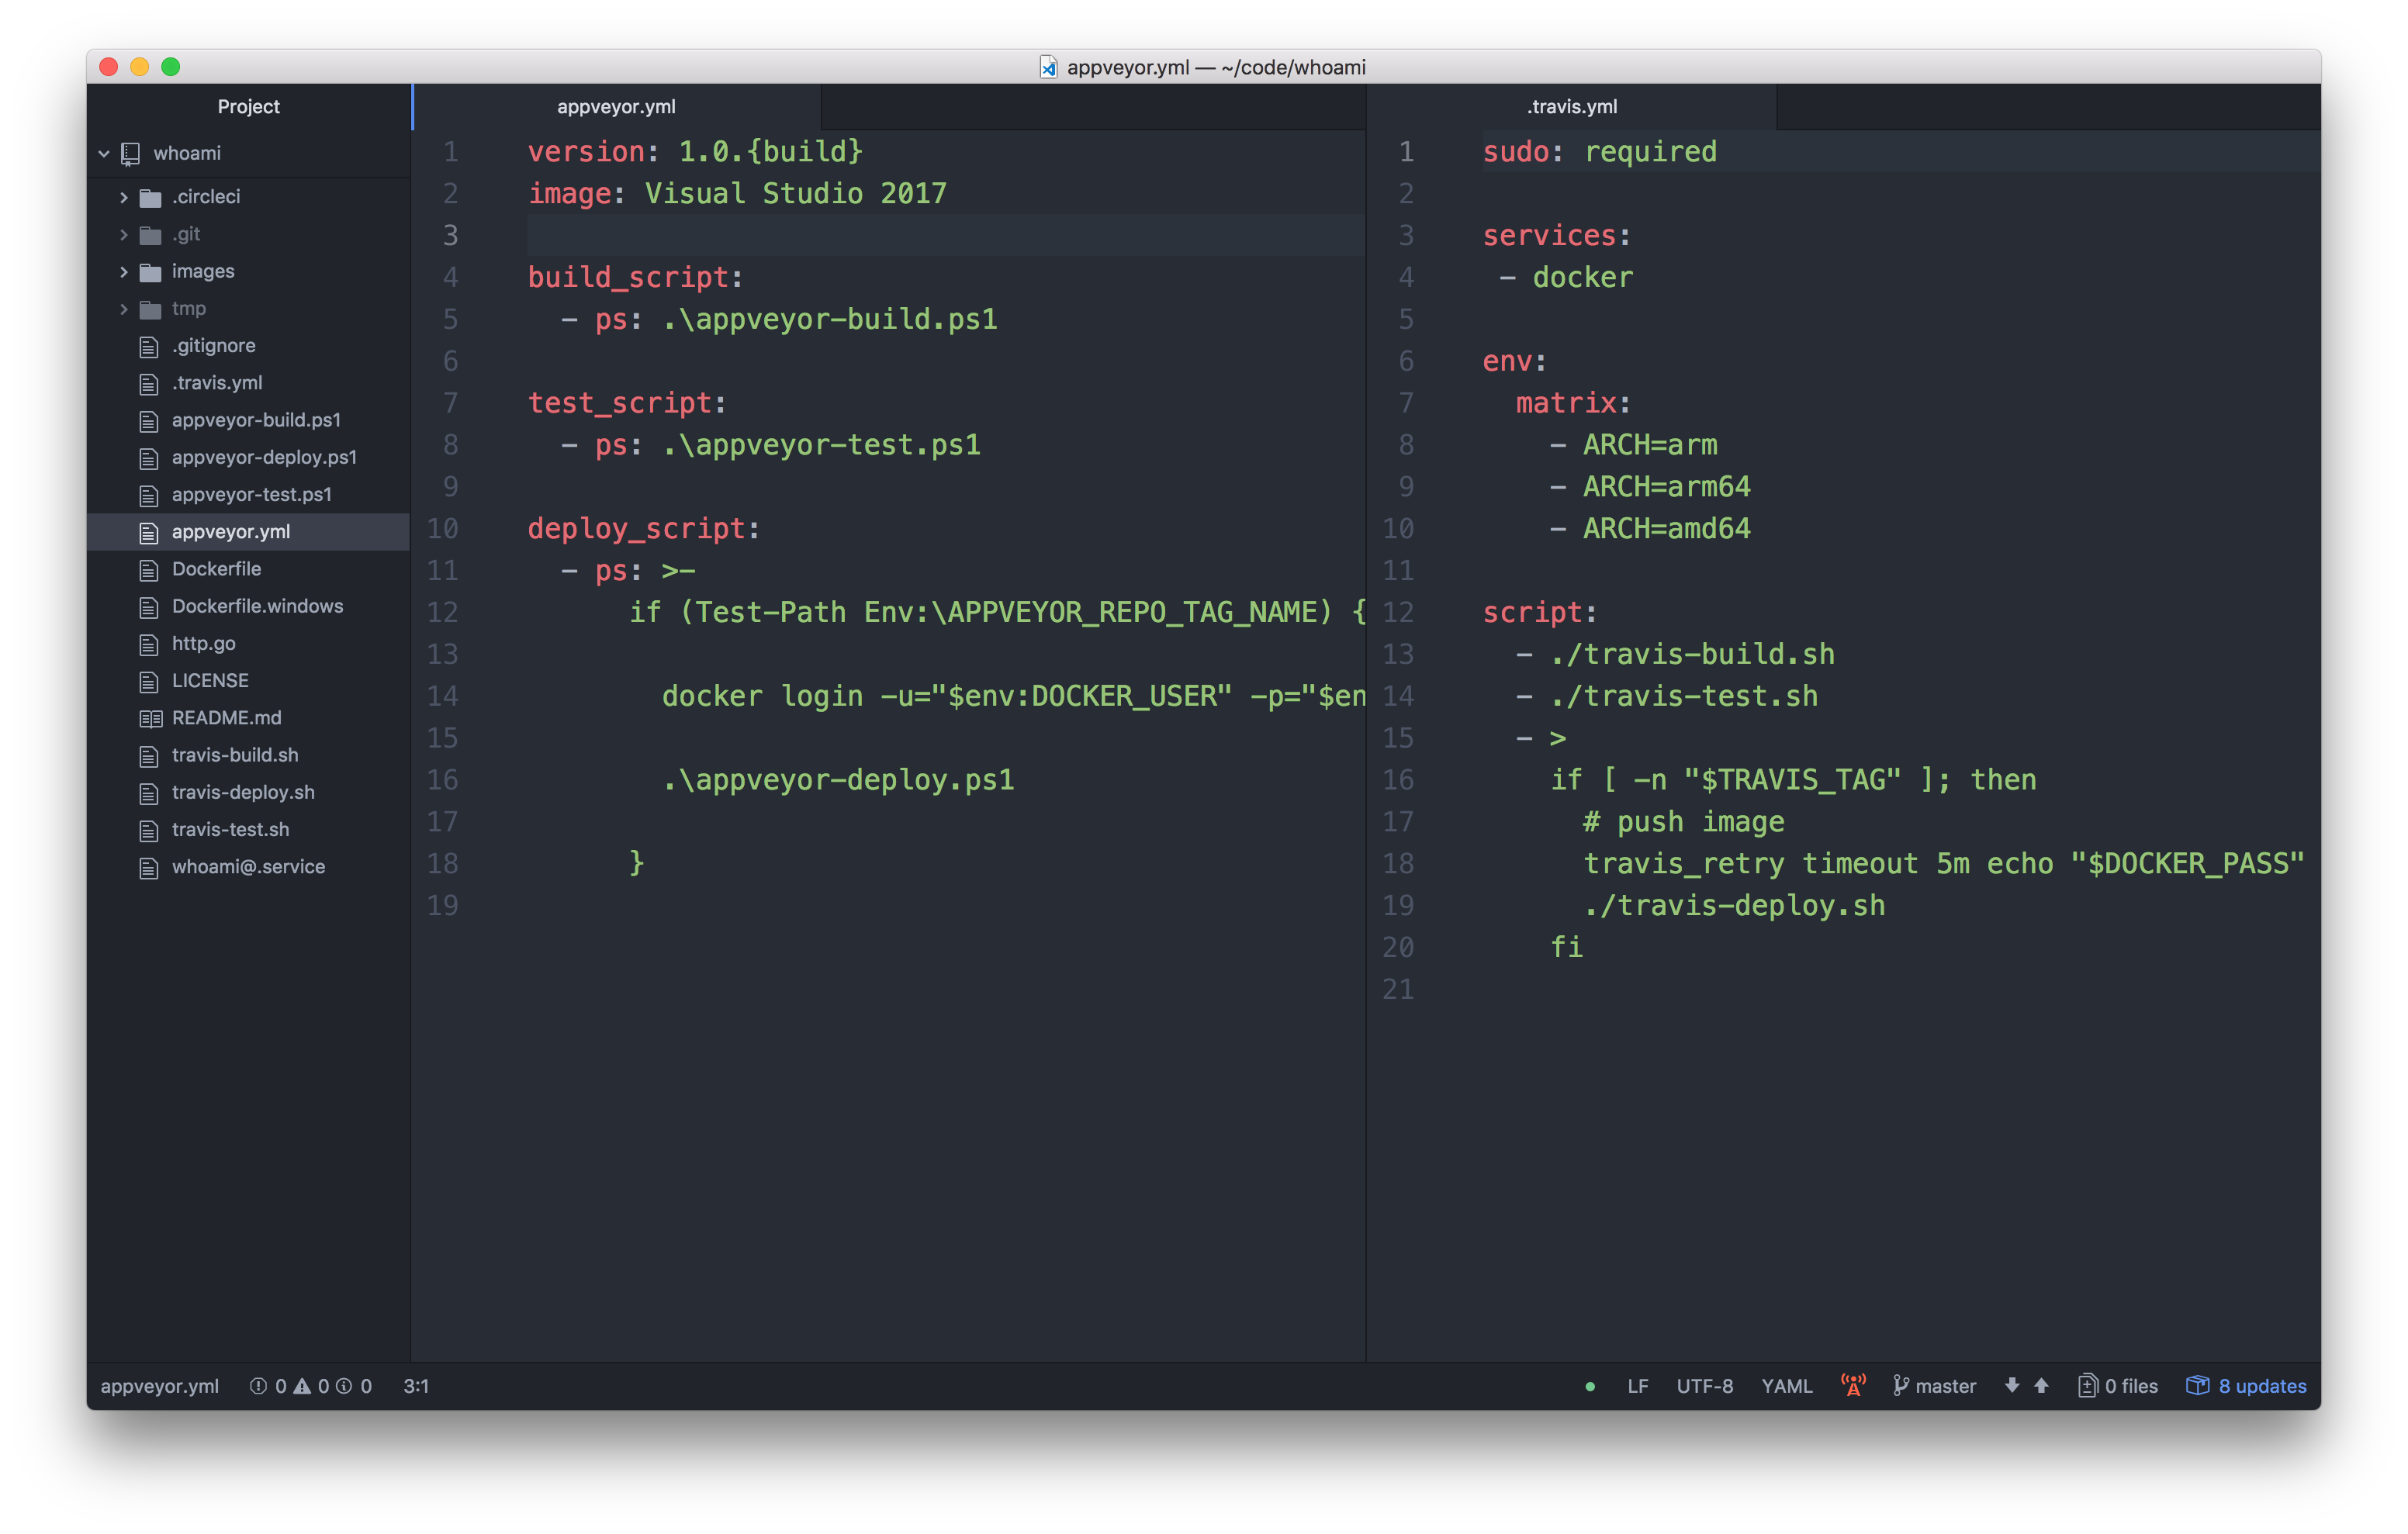
The YAML have a similar structure. There are three steps
- build
- test
- deploy (if it's a tagged release build)
And the Travis build has a build matrix for three variants.
I started to draft the updated appveyor.yml how it could look like when the Linux build gets migrated from the .travis.yml into it.
PowerShell and BASH mixture
The first idea was to just re-use the Windows PowerShell scripts and the Linux BASH scripts and call in from one YAML.
Hm, now the appveyor.yml looked messy. You can tell with ps: that you want to run PowerShell, with sh: you can choose BASH.
With the environment variable APPVEYOR_YML_DISABLE_PS_LINUX: true you can turn off PowerShell support for Linux.
But it really looked ugly.
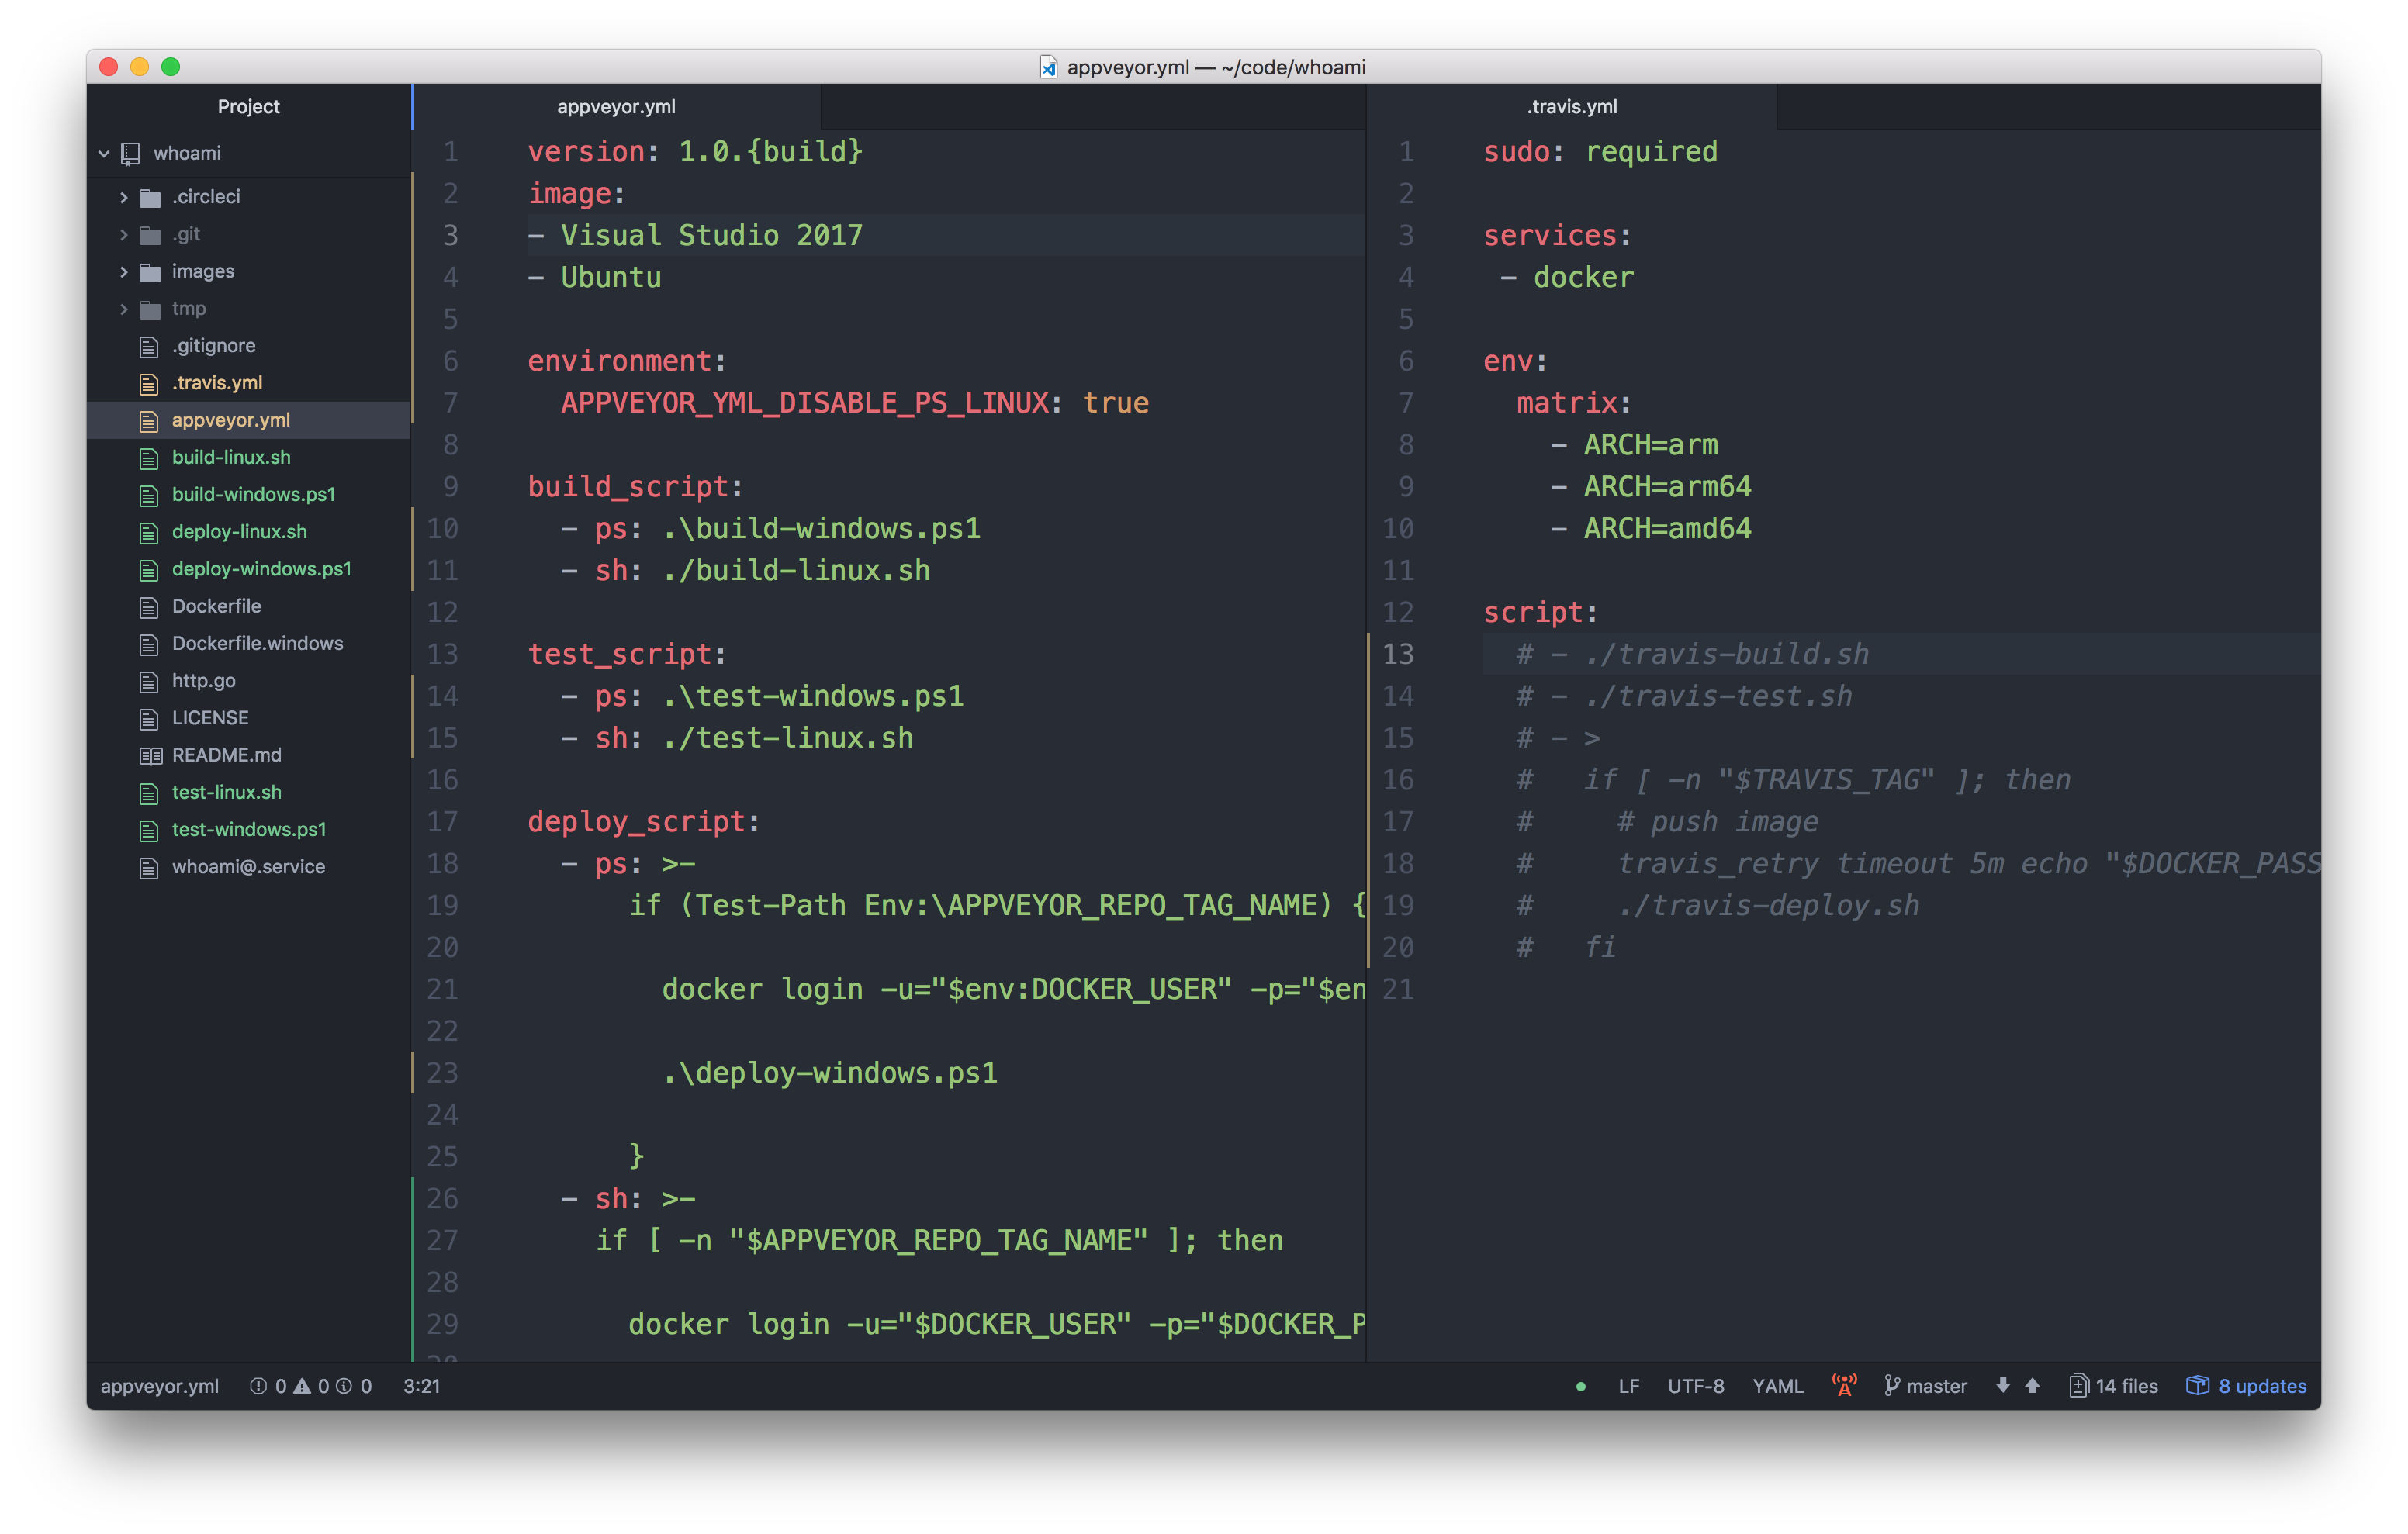
PowerShell on Linux, really?
Microsoft has announced PowerShell support on Linux months ago. But I only smiled upto now. What should I do with just another script language on Linux, I thought? It only made sense when you come from Windows and don't want to learn BASH.
But looking at this mixed YAML mixture I thought: "Hey, let's try PowerShell on Linux here" to have a platform independent script.
I just edited the YAML file how it should look like.
Much cleaner. Oh, what about these Unix slashes? But cool, they really work in PowerShell, even on Windows.
The only tricky part was integrating the Travis build matrix into the AppVeyor build matrix. My use-case is running one Windows build, but three Linux builds configured by an environment variable.
With some excludes (thanks to AppVeyor support) the YAML now looks like this
And hey, the build matrix in AppVeyor looked promising.
- Windows, amd64
- Linux, arm
- Linux, arm64
- Linux, amd64
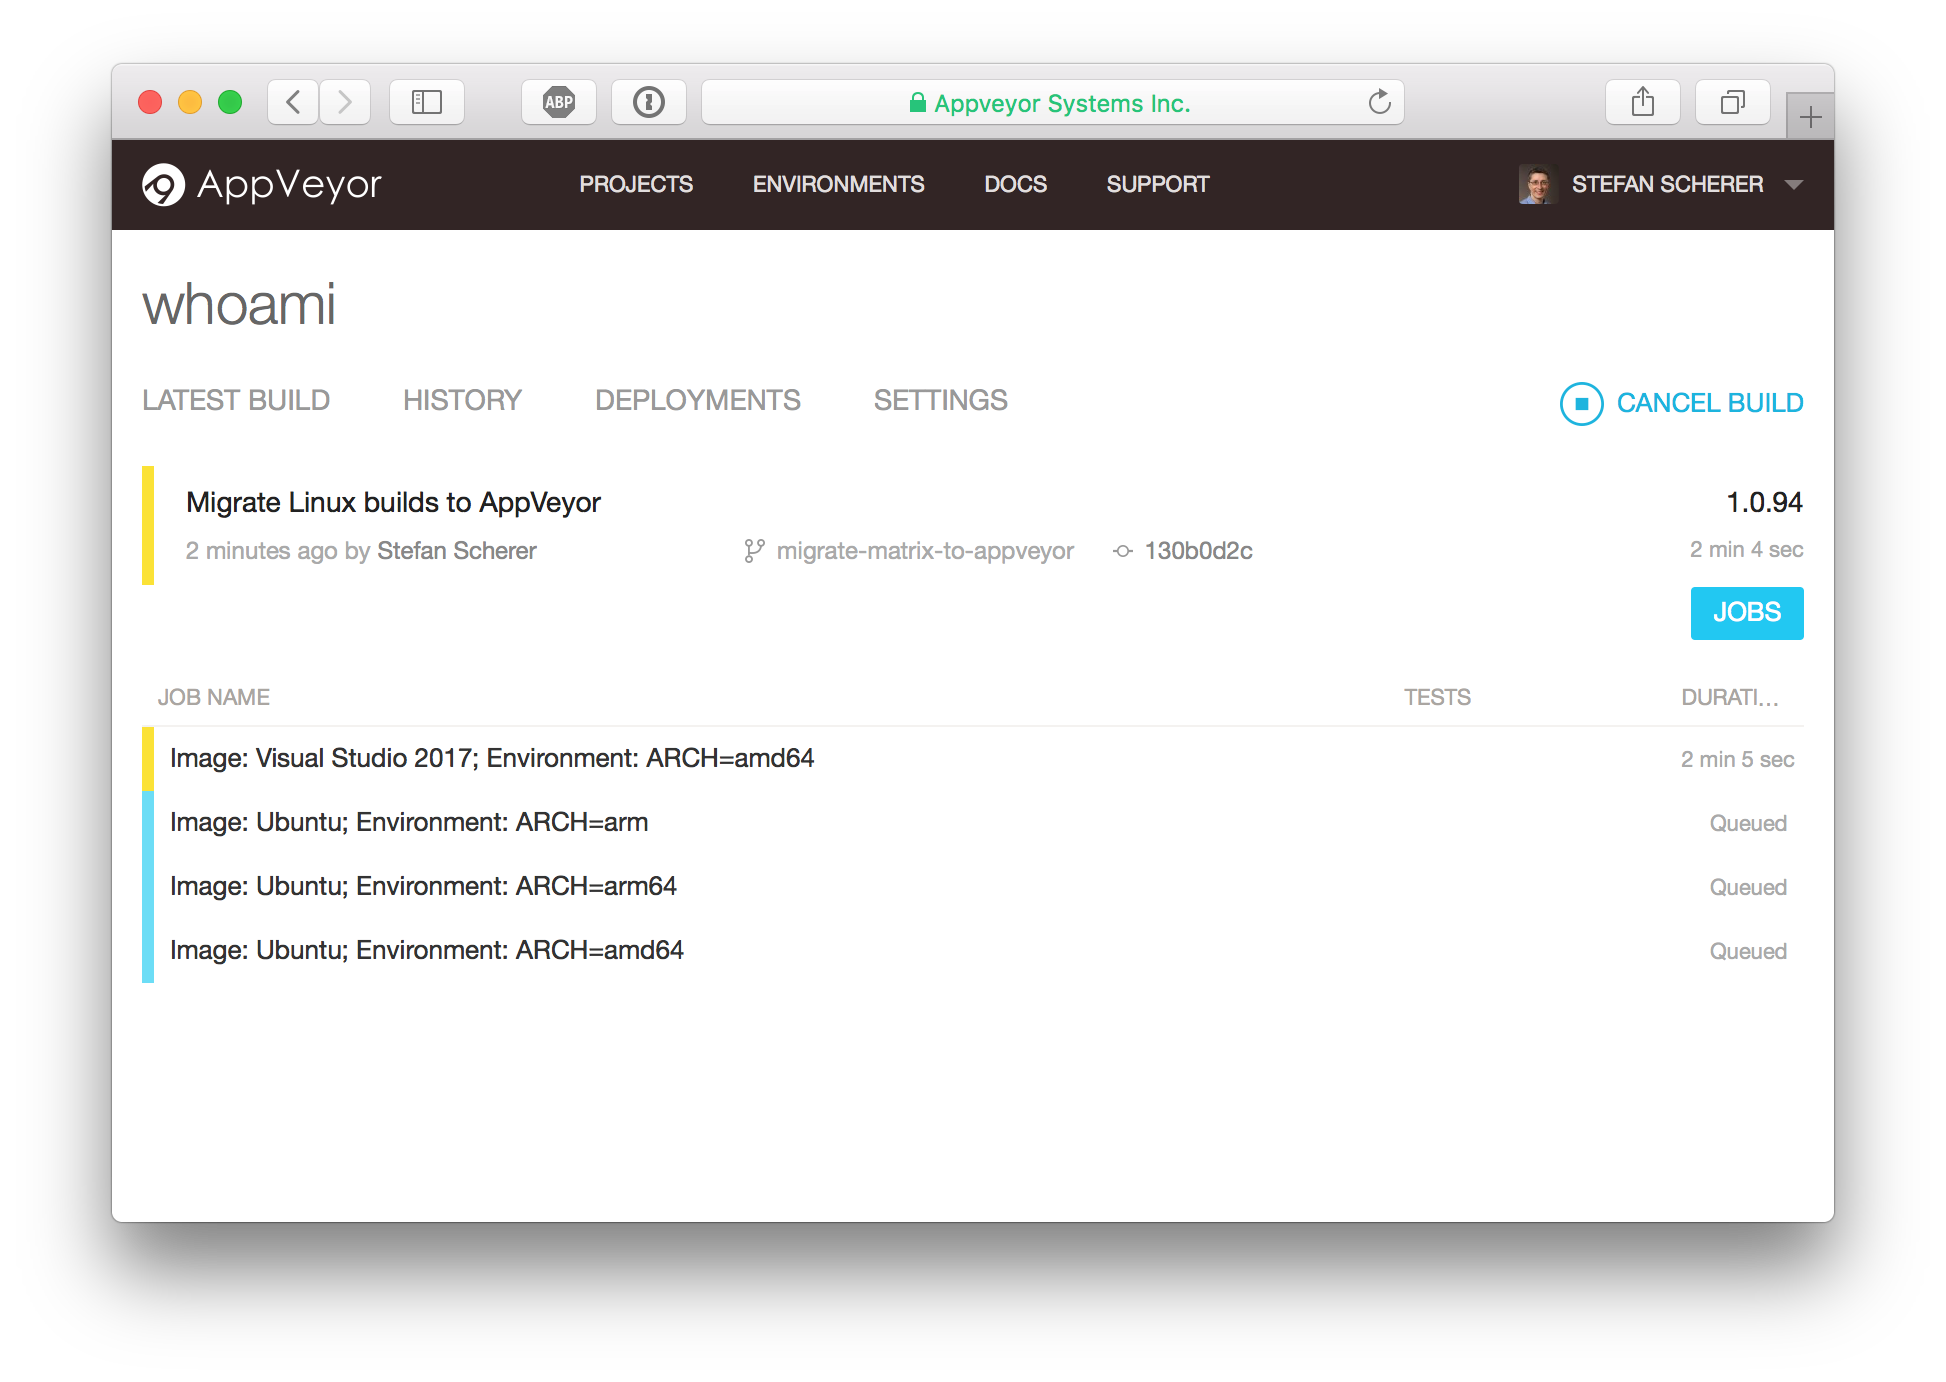
The updated AppVeyor only CI pipeline now looks like this.
The three Windows images are done in a different way. Once there are different Docker build agents to support 1709 and 1803 images I can move that to the build matrix as well.
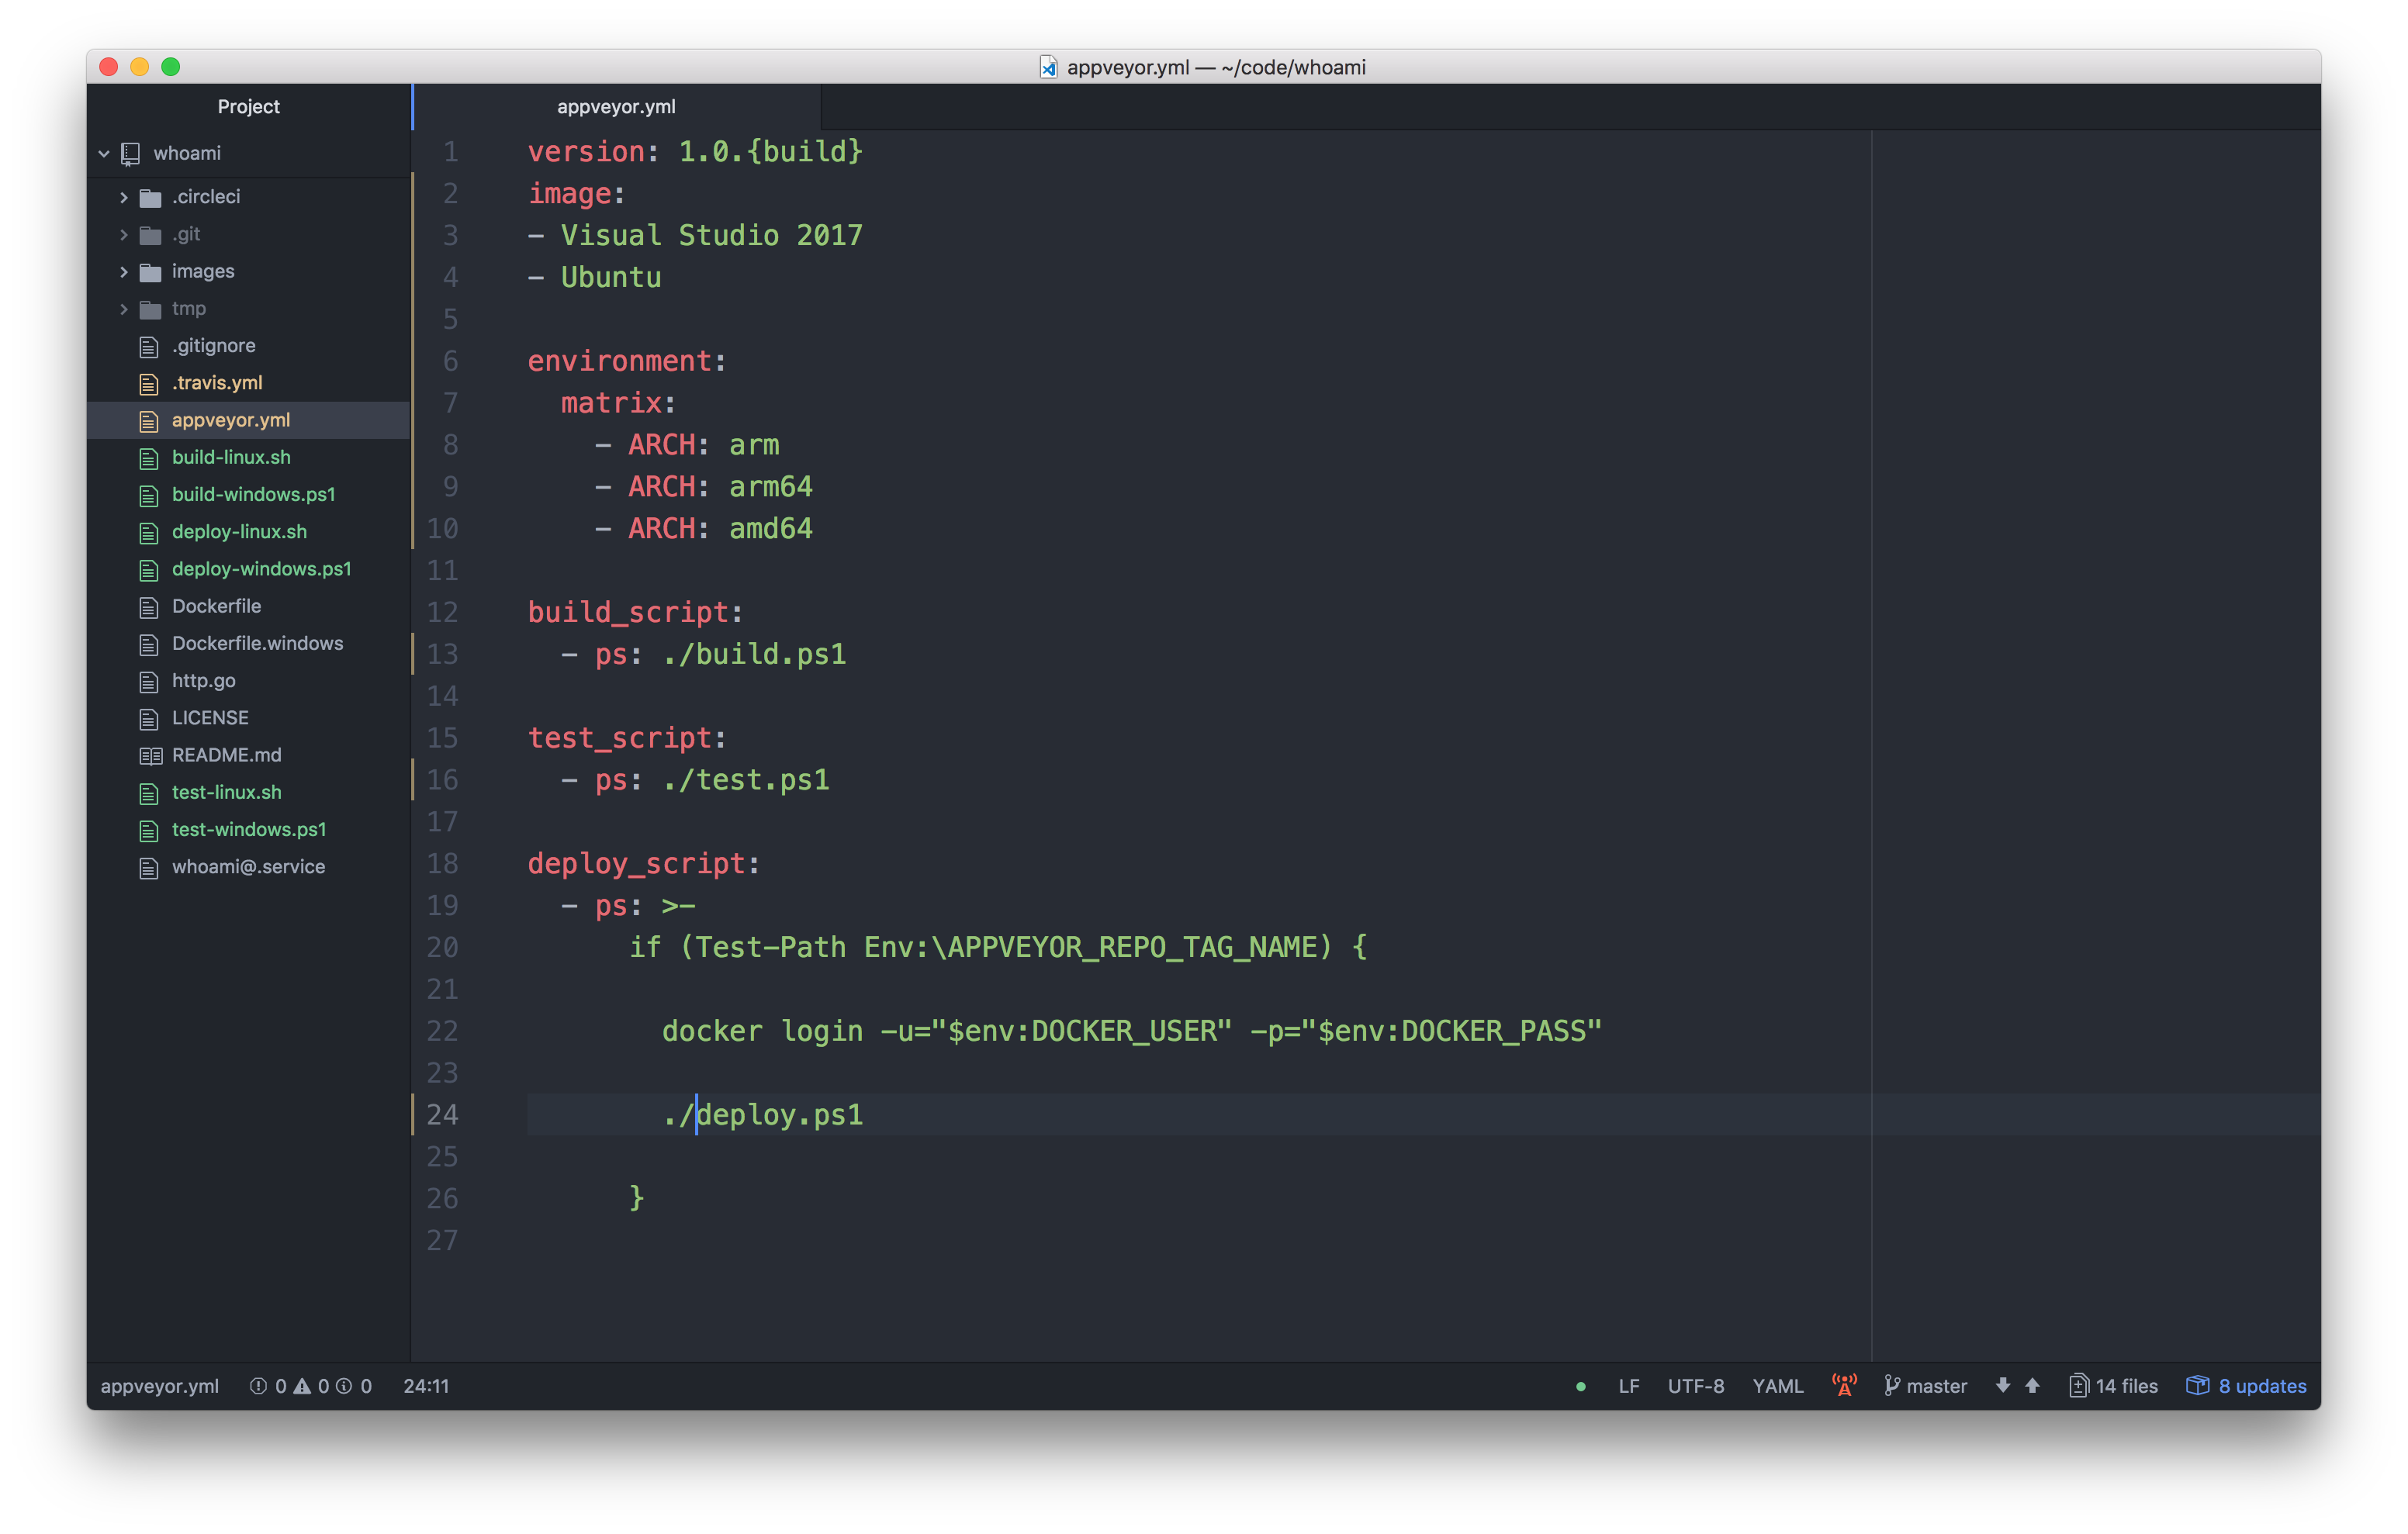
appveyor.yml
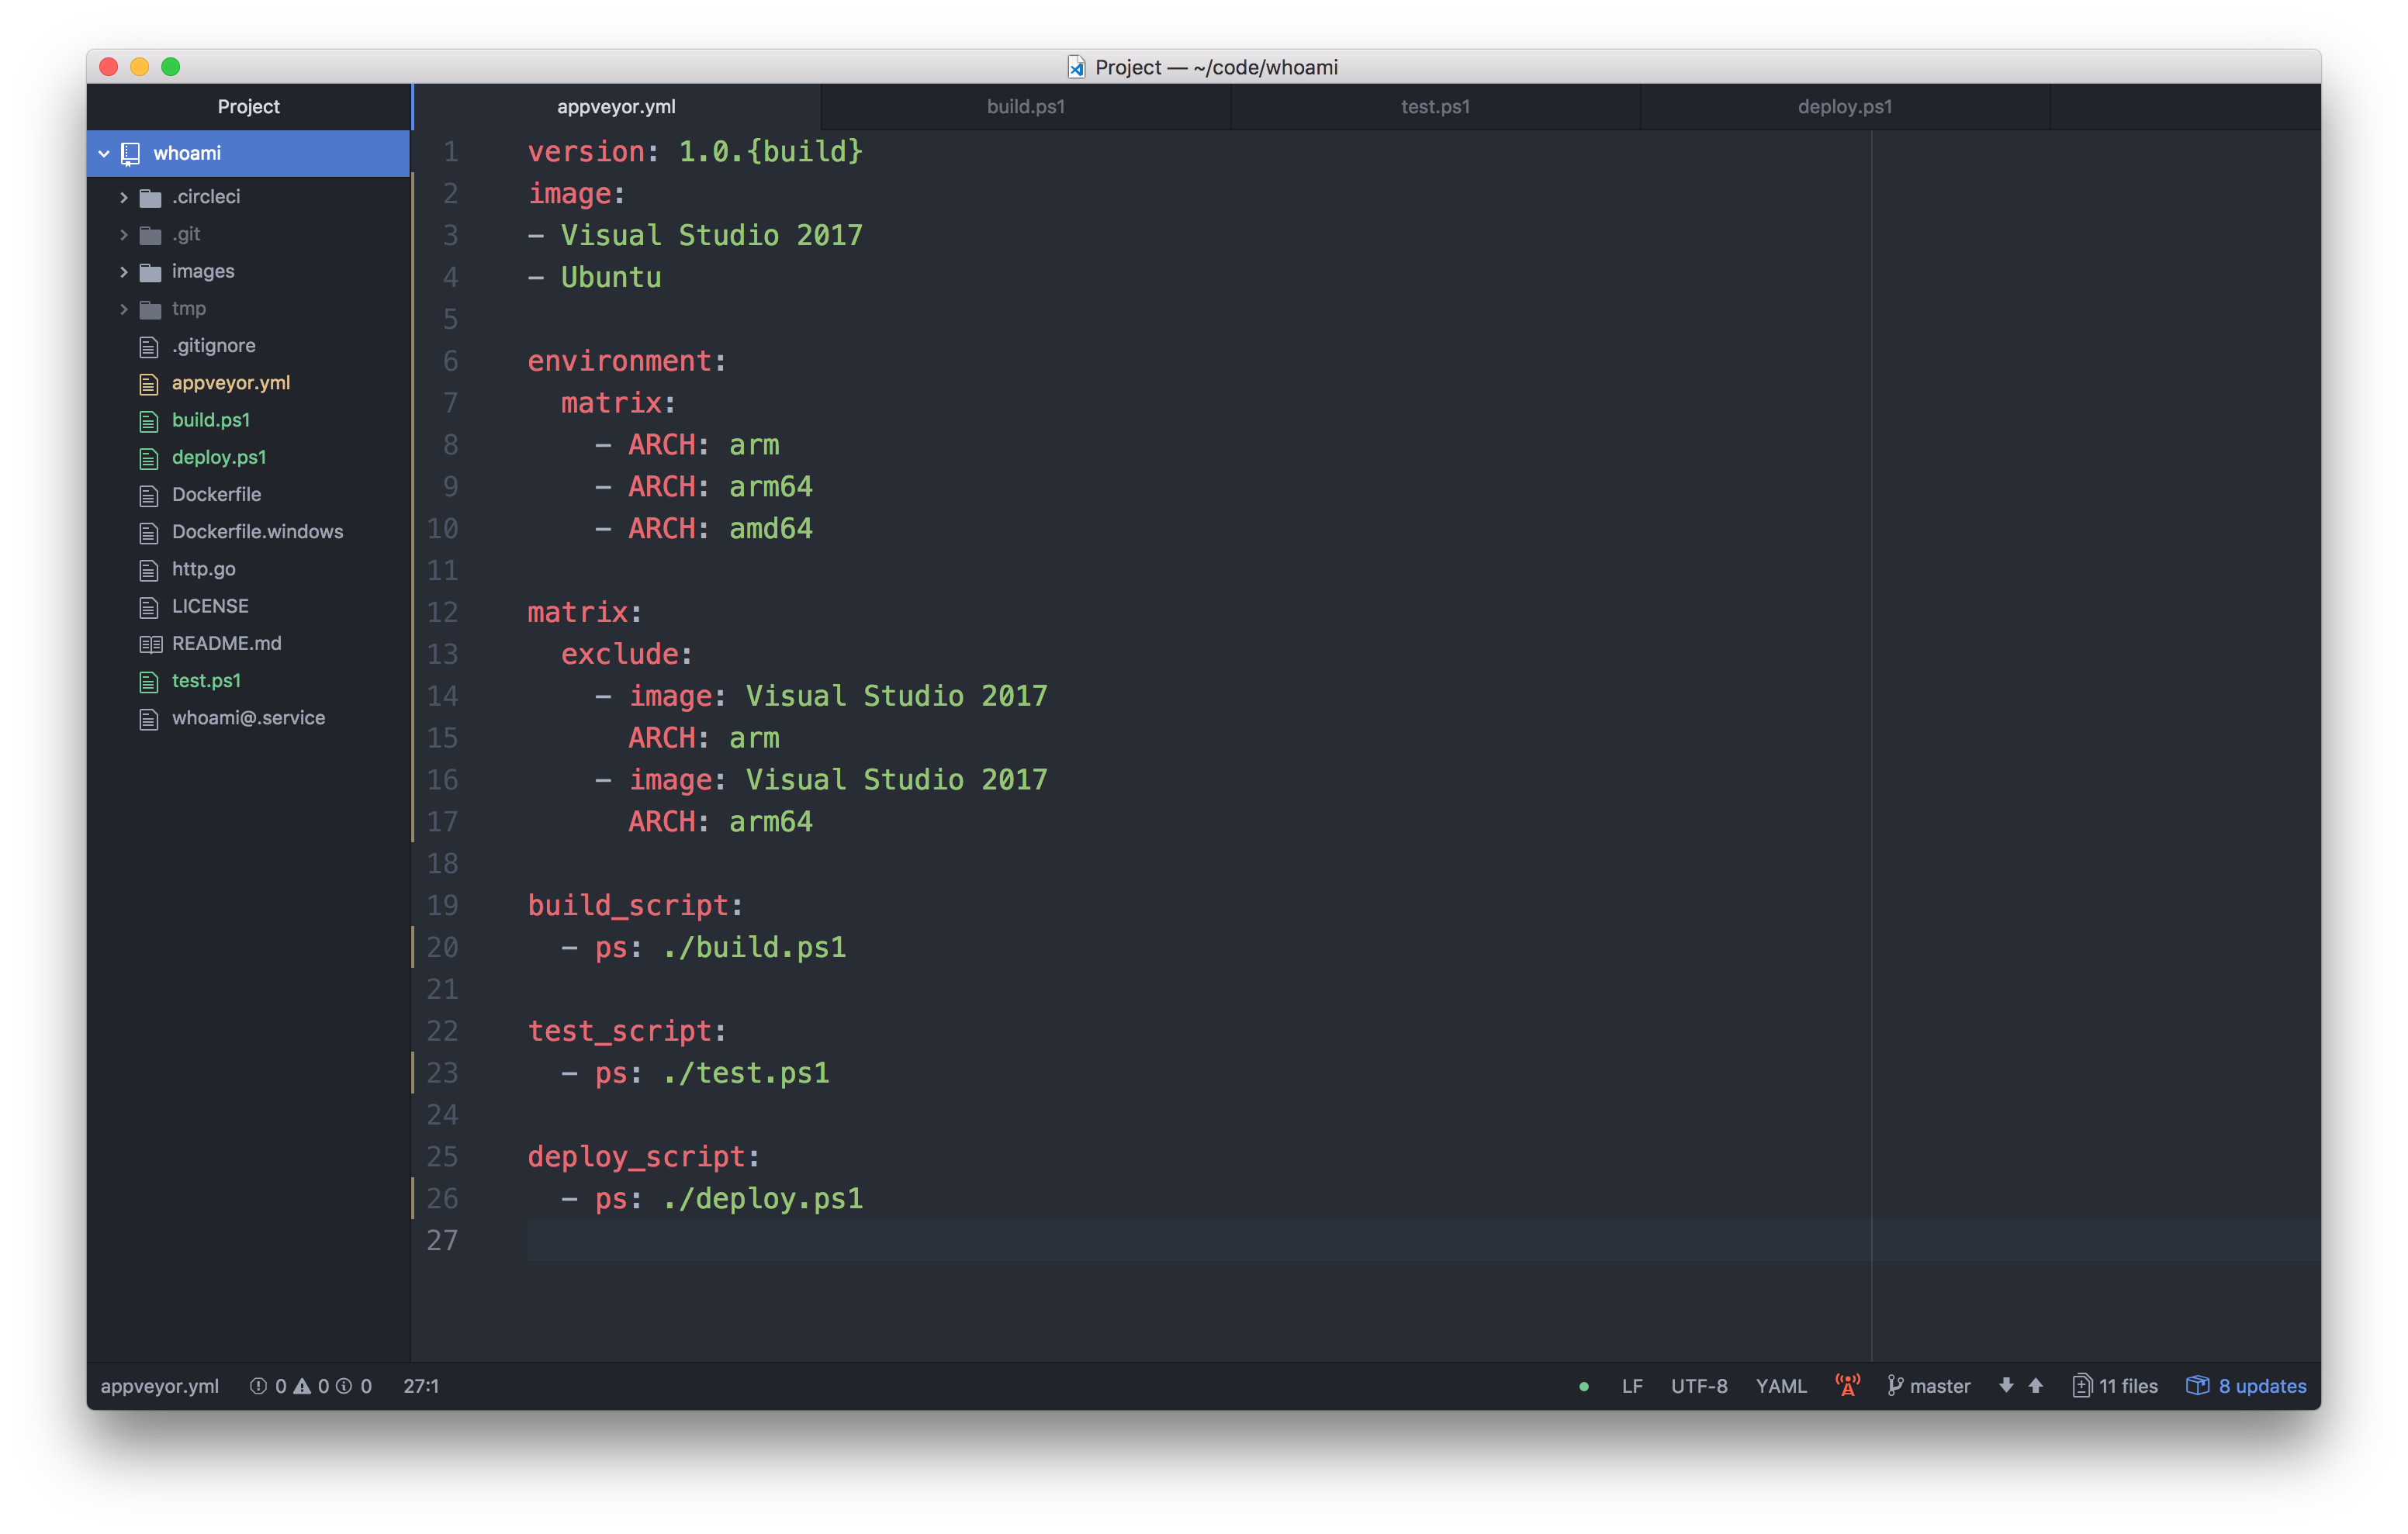
This is the appveyor.yml to define a matrix build for three Linux builds and one Windows build.
version: 1.0.{build}
image:
- Visual Studio 2017
- Ubuntu

environment:
  matrix:
    - ARCH: arm
    - ARCH: arm64
    - ARCH: amd64

matrix:
  exclude:
    - image: Visual Studio 2017
      ARCH: arm
    - image: Visual Studio 2017
      ARCH: arm64

build_script:
  - ps: ./build.ps1

test_script:
  - ps: ./test.ps1

deploy_script:
  - ps: ./deploy.ps1
build.ps1
The platform independent build script has the docker build command. As the Dockerfile differs for Windows I have to choose a different name as well add the build argument for the Linux build. But with the $isWindows variable you can easily check whether this script runs in the Windows agent or the Linux agent.
$ErrorActionPreference = 'Stop';
Write-Host Starting build

if ($isWindows) {
  docker build --pull -t whoami -f Dockerfile.windows .
} else {
  docker build -t whoami --build-arg "arch=$env:ARCH" .
}

docker images
test.ps1
The platform independent test script skips the ARM images, I haven't tested QEMU in the Linux builder that could help to even run the ARM images in the x64 Linux build agent.
The test starts the container. We could add a Invoke-WebRequest call to check if the web server responds with 200 OK. But this test is enough for now.
Write-Host Starting test

if ($env:ARCH -ne "amd64") {
  Write-Host "Arch $env:ARCH detected. Skip testing."
  exit 0
}

$ErrorActionPreference = 'SilentlyContinue';
docker kill whoamitest
docker rm -f whoamitest

$ErrorActionPreference = 'Stop';
Write-Host Starting container
docker run --name whoamitest -p 8080:8080 -d whoami
Start-Sleep 10

docker logs whoamitest

$ErrorActionPreference = 'SilentlyContinue';
docker kill whoamitest
docker rm -f whoamitest
deploy.ps1
The platform independent deploy script first pushes each platform specific image from each build agent.
The last build agent in the matrix, it's the Linux amd64 variant, then creates the manifest list and also pushes the manifest list to Docker Hub.
It first stops if there is no tagged build. So only GitHub releases will be pushed to Docker Hub.
$ErrorActionPreference = 'Stop';

if (! (Test-Path Env:\APPVEYOR_REPO_TAG_NAME)) {
  Write-Host "No version tag detected. Skip publishing."
  exit 0
}
Then we define the Docker image name for the final Docker image (the manifest list, to be exact):
$image = "stefanscherer/whoami"

Write-Host Starting deploy
(Experimental) batteries included
To create the manifest list I use the Docker CLI to avoid downloading extra tools. But we have to enable experimental features in Docker CLI first:
if (!(Test-Path ~/.docker)) { mkdir ~/.docker }
'{ "experimental": "enabled" }' | Out-File ~/.docker/config.json -Encoding Ascii
I showed these experimental feature in several talks. But here is a small overview. In addition to docker push - or docker image push there are two new commands: docker manifest create and docker manifest push:
For the next steps we need to be logged in with the Docker Hub account.
docker login -u="$env:DOCKER_USER" -p="$env:DOCKER_PASS"
Push the platform specific image
Now the script tags and pushes the platform specific Docker image with a correpsonding tag name.
$os = If ($isWindows) {"windows"} Else {"linux"}
docker tag whoami "$($image):$os-$env:ARCH-$env:APPVEYOR_REPO_TAG_NAME"
docker push "$($image):$os-$env:ARCH-$env:APPVEYOR_REPO_TAG_NAME"
Windows build: rebase-docker-image
For the Windows build I additionally run my rebase-docker-image tool. This is a hacker tool to replace the Windows base image from a given image with another version of the Windows base image. This works only in a few cases, but the whoami Golang binary and Dockerfile is safe for such hacks as this app really doesn't depend on the specific underlying base image. You can read more about that tool in my blog post PoC: How to build images for 1709 without 1709.
We create both a 1709 and 1803 variant as long as there is no AppVeyor build agent that is able to produce 'native' Docker builds for that.
if ($isWindows) {
  # Windows
  Write-Host "Rebasing image to produce 1709 variant"
  npm install -g rebase-docker-image
  rebase-docker-image `
    "$($image):$os-$env:ARCH-$env:APPVEYOR_REPO_TAG_NAME" `
    -t "$($image):$os-$env:ARCH-$env:APPVEYOR_REPO_TAG_NAME-1709" `
    -b microsoft/nanoserver:1709

  Write-Host "Rebasing image to produce 1803 variant"
  npm install -g rebase-docker-image
  rebase-docker-image `
    "$($image):$os-$env:ARCH-$env:APPVEYOR_REPO_TAG_NAME" `
    -t "$($image):$os-$env:ARCH-$env:APPVEYOR_REPO_TAG_NAME-1803" `
    -b microsoft/nanoserver:1803

}
Linux build: Create and push manifest list
The Linux amd64 build agent runs as the last one in the matrix build, so it's easy to create the manifest list. All platform specific Docker images are already pushed to Docker Hub.
We run docker manifest create and then docker manifest push for the target image name.
else {
  # Linux
  if ($env:ARCH -eq "amd64") {
    # The last in the build matrix
    docker -D manifest create "$($image):$env:APPVEYOR_REPO_TAG_NAME" `
      "$($image):linux-amd64-$env:APPVEYOR_REPO_TAG_NAME" `
      "$($image):linux-arm-$env:APPVEYOR_REPO_TAG_NAME" `
      "$($image):linux-arm64-$env:APPVEYOR_REPO_TAG_NAME" `
      "$($image):windows-amd64-$env:APPVEYOR_REPO_TAG_NAME" `
      "$($image):windows-amd64-$env:APPVEYOR_REPO_TAG_NAME-1709" `
      "$($image):windows-amd64-$env:APPVEYOR_REPO_TAG_NAME-1803"
    docker manifest annotate "$($image):$env:APPVEYOR_REPO_TAG_NAME" "$($image):linux-arm-$env:APPVEYOR_REPO_TAG_NAME" --os linux --arch arm --variant v6
    docker manifest annotate "$($image):$env:APPVEYOR_REPO_TAG_NAME" "$($image):linux-arm64-$env:APPVEYOR_REPO_TAG_NAME" --os linux --arch arm64 --variant v8
    docker manifest push "$($image):$env:APPVEYOR_REPO_TAG_NAME"

    Write-Host "Pushing manifest $($image):latest"
    docker -D manifest create "$($image):latest" `
      "$($image):linux-amd64-$env:APPVEYOR_REPO_TAG_NAME" `
      "$($image):linux-arm-$env:APPVEYOR_REPO_TAG_NAME" `
      "$($image):linux-arm64-$env:APPVEYOR_REPO_TAG_NAME" `
      "$($image):windows-amd64-$env:APPVEYOR_REPO_TAG_NAME" `
      "$($image):windows-amd64-$env:APPVEYOR_REPO_TAG_NAME-1709" `
      "$($image):windows-amd64-$env:APPVEYOR_REPO_TAG_NAME-1803"
    docker manifest annotate "$($image):latest" "$($image):linux-arm-$env:APPVEYOR_REPO_TAG_NAME" --os linux --arch arm --variant v6
    docker manifest annotate "$($image):latest" "$($image):linux-arm64-$env:APPVEYOR_REPO_TAG_NAME" --os linux --arch arm64 --variant v8
    docker manifest push "$($image):latest"
  }
}
Check the resulting image
With the Docker image mplatform/mquery from Docker Captain Phil Estes you can inspect such multi-arch images.
$ docker run --rm mplatform/mquery stefanscherer/whoami
Image: stefanscherer/whoami
 * Manifest List: Yes
 * Supported platforms:
   - linux/amd64
   - linux/arm/v6
   - linux/arm64/v8
   - windows/amd64:10.0.14393.2248
   - windows/amd64:10.0.16299.431
   - windows/amd64:10.0.17134.48
As you can see this image provides three Linux and three Windows variants. Windows can choose the best fit to the Windows kernel version to avoid running Windows Containers in Hyper-V mode.
Now try this image on any platform with
docker run -d -p 8080:8080 stefanscherer/whoami
It will work on your Raspberry Pi, running HypriotOS or manually installed Docker. It will work on any Linux cloud machine, it will work in Docker for Mac or Docker 4 Windows.
Then access the published port 8080 with a browser. You will see that it shows the container name and the OS and CPU architecture name of the compiled binary.
If you have a use-case for such a multi-arch / multi-os image and want to provide it to your community, fork my GitHub repo and also fork the AppVeyor build pipeline. It's really easy to get started.
I hope you enjoyed this blog post and I would be happy if you share it with your friends. I'm @stefscherer on Twitter.
]]>Maybe you find an interesting project on GitHub and want to build it your own. How can you do that? Maybe the project is written in a programming language that you are not familiar with. Or it uses a lot of tools to build that you don't have locally. Of
]]>Maybe you find an interesting project on GitHub and want to build it your own. How can you do that? Maybe the project is written in a programming language that you are not familiar with. Or it uses a lot of tools to build that you don't have locally. Of course you have hear of Docker to put all build tools and dependencies into a container. But what if the project doesn't provide a Dockerfile?
Sometimes it is easier to just look at the repo. Does it have some green build badges in the README.md? That is a good first hint that they use a CI pipeline. Look for YAML files that show you which CI service the project uses.
I'll show you an example with one of my GitHub repos. This project builds a Docker image with a simple web server, it's written in Golang, bla bla bla...
The point is, there is a CI pipeline for AppVeyor and the corresponding YAML file also is in my repo. Let's have a look how you can fork my repo and fork the build pipeline.
What is AppVeyor?
The GitHub market place shows a lot of offerings for continuous integration. This is what you normally want to have automatic tests for each Git commit or pull request you receive.
AppVeyor is my #1 place to go if I want Windows builds. It is really easy to attach it to your GitHub repo with a YAML file.
It can be as simple as this example appveyor.yml file.
version: 1.0.{build}
image:
- Visual Studio 2017

build_script:
  - ps: ./build.ps1

test_script:
  - ps: ./test.ps1

deploy_script:
  - ps: ./deploy.ps1
Forking build pipelines
What is the advantage to write a YAML file you may ask. Well I really like to share not only my code, but also my pipeline with the community. Others can fork my repo and only need a few clicks to attach the fork and have the complete pipeline up and running for themselves.
Whoami example
In the next screenshots I will show you how easy it is to setup a build pipeline for a repo that you have seen the first time.
Go to the GitHub repo https://github.com/StefanScherer/whoami.
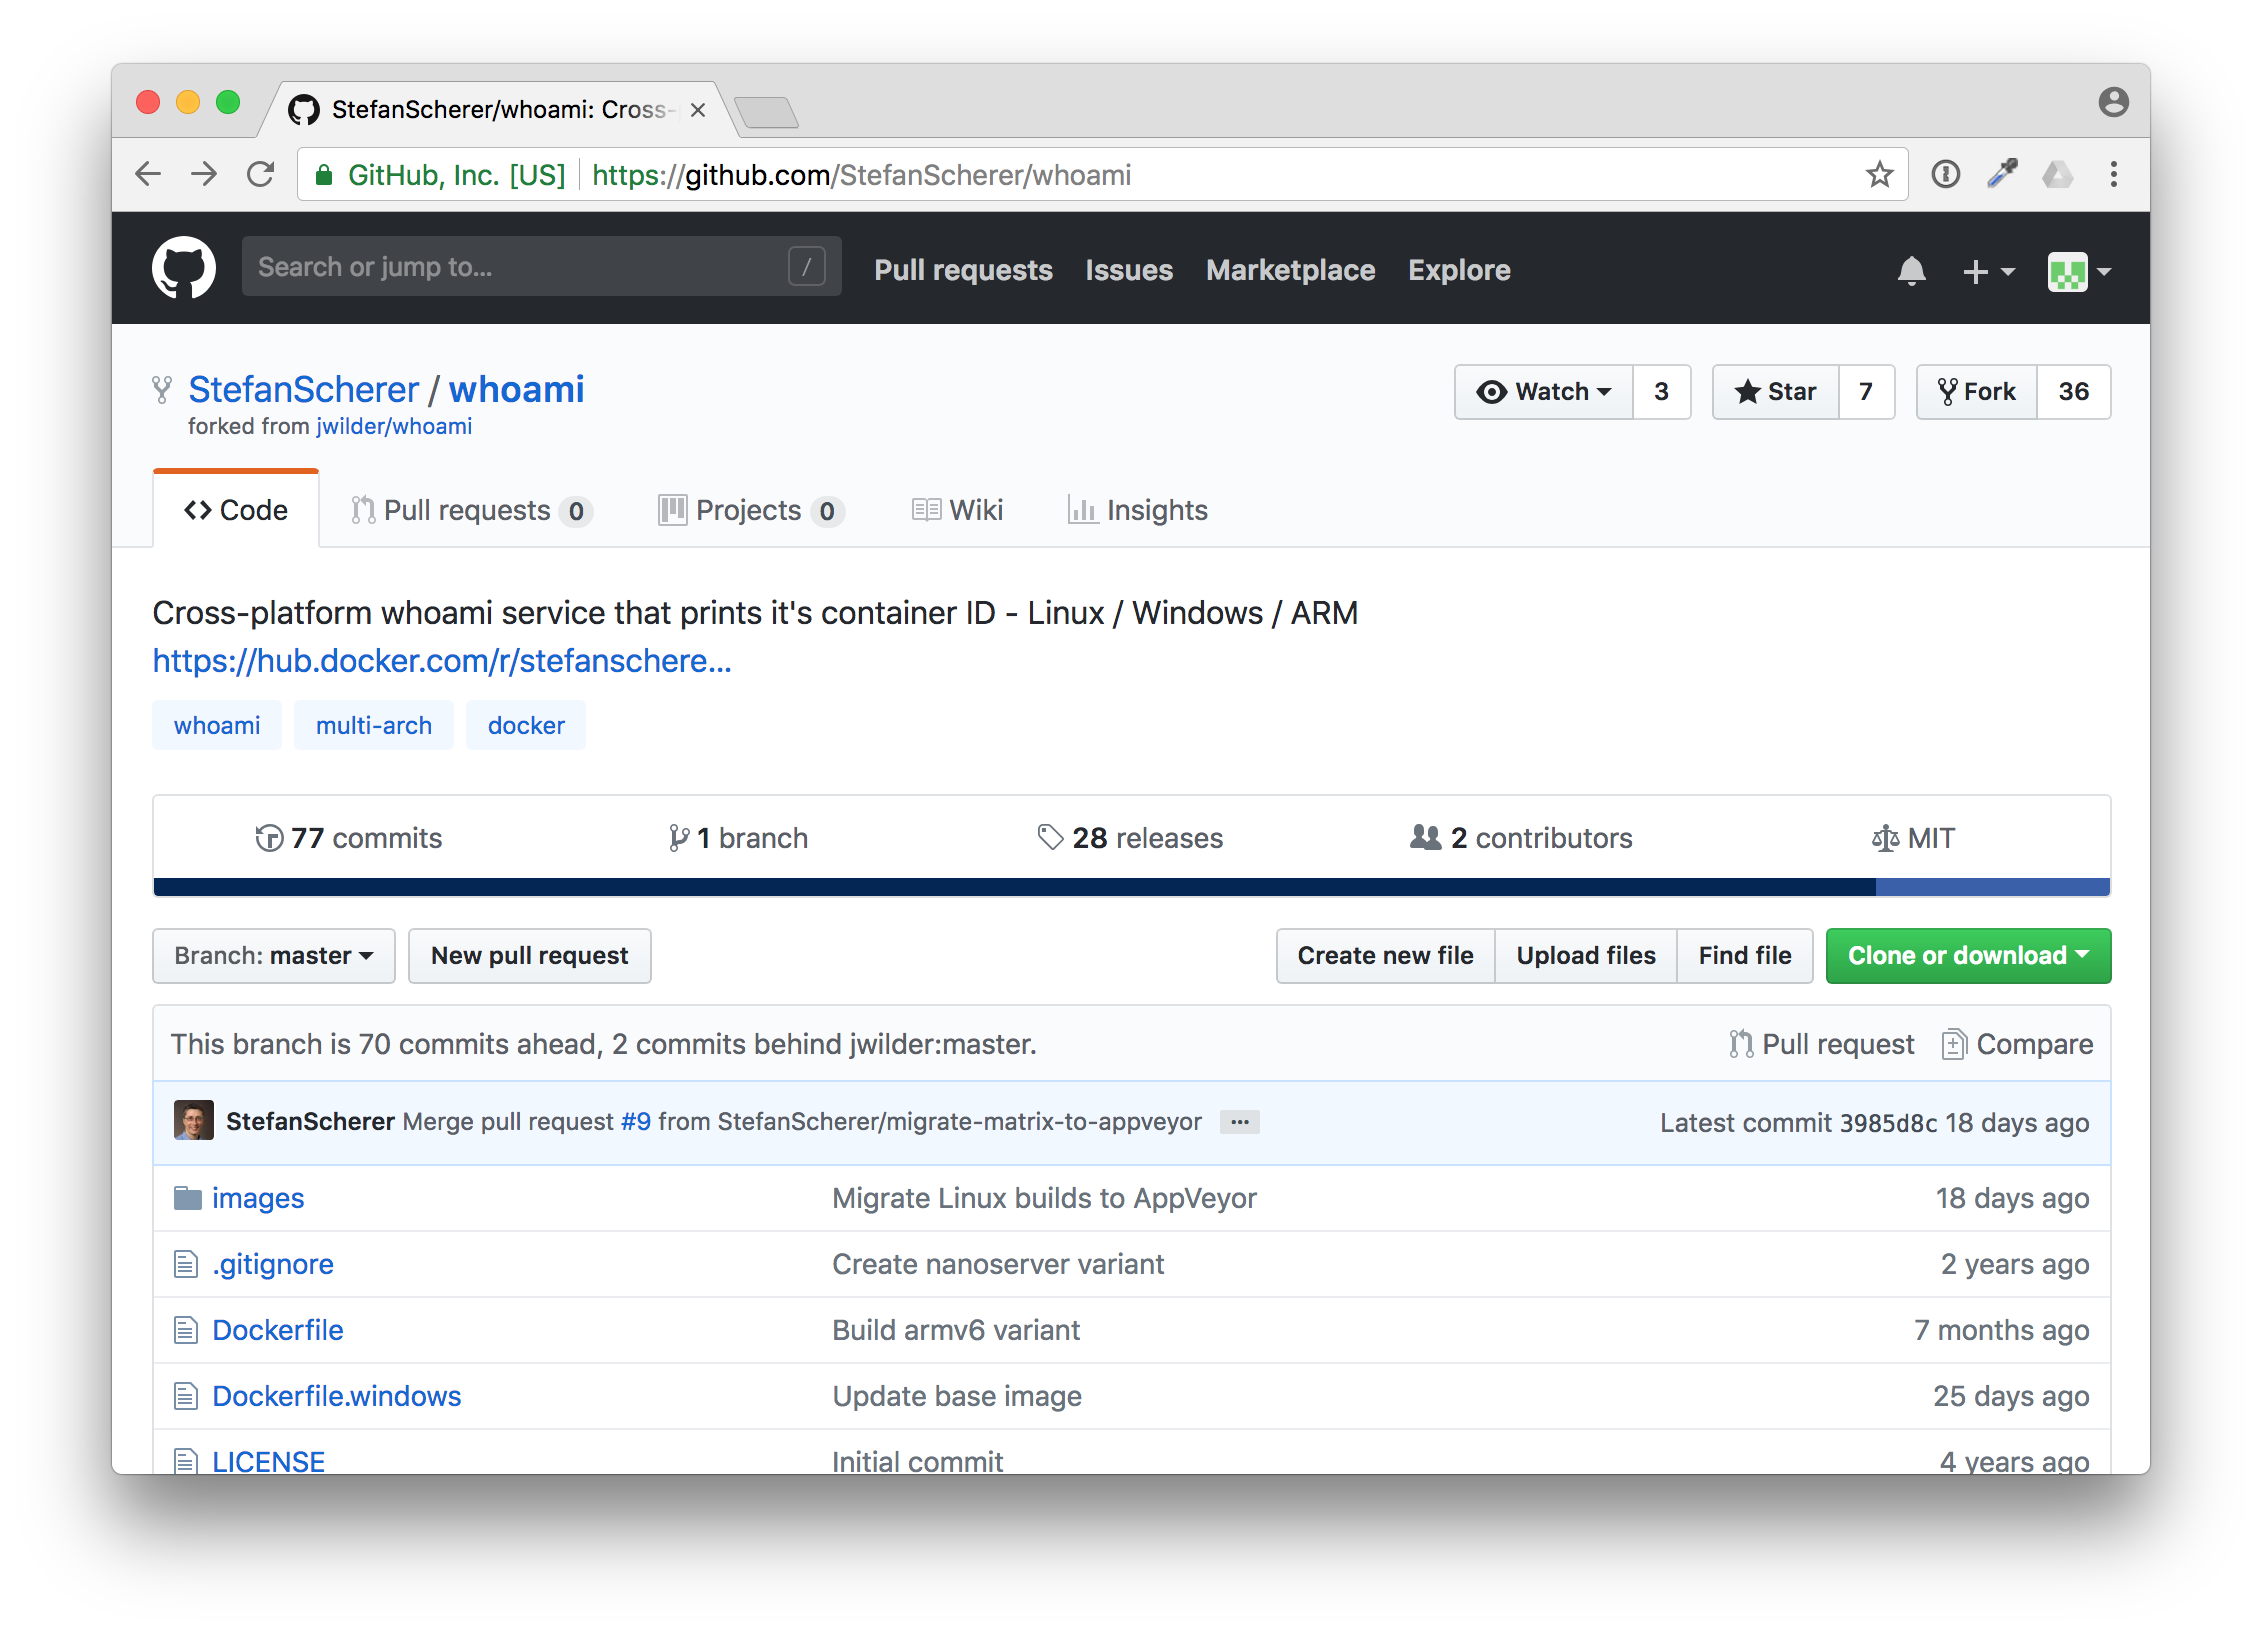
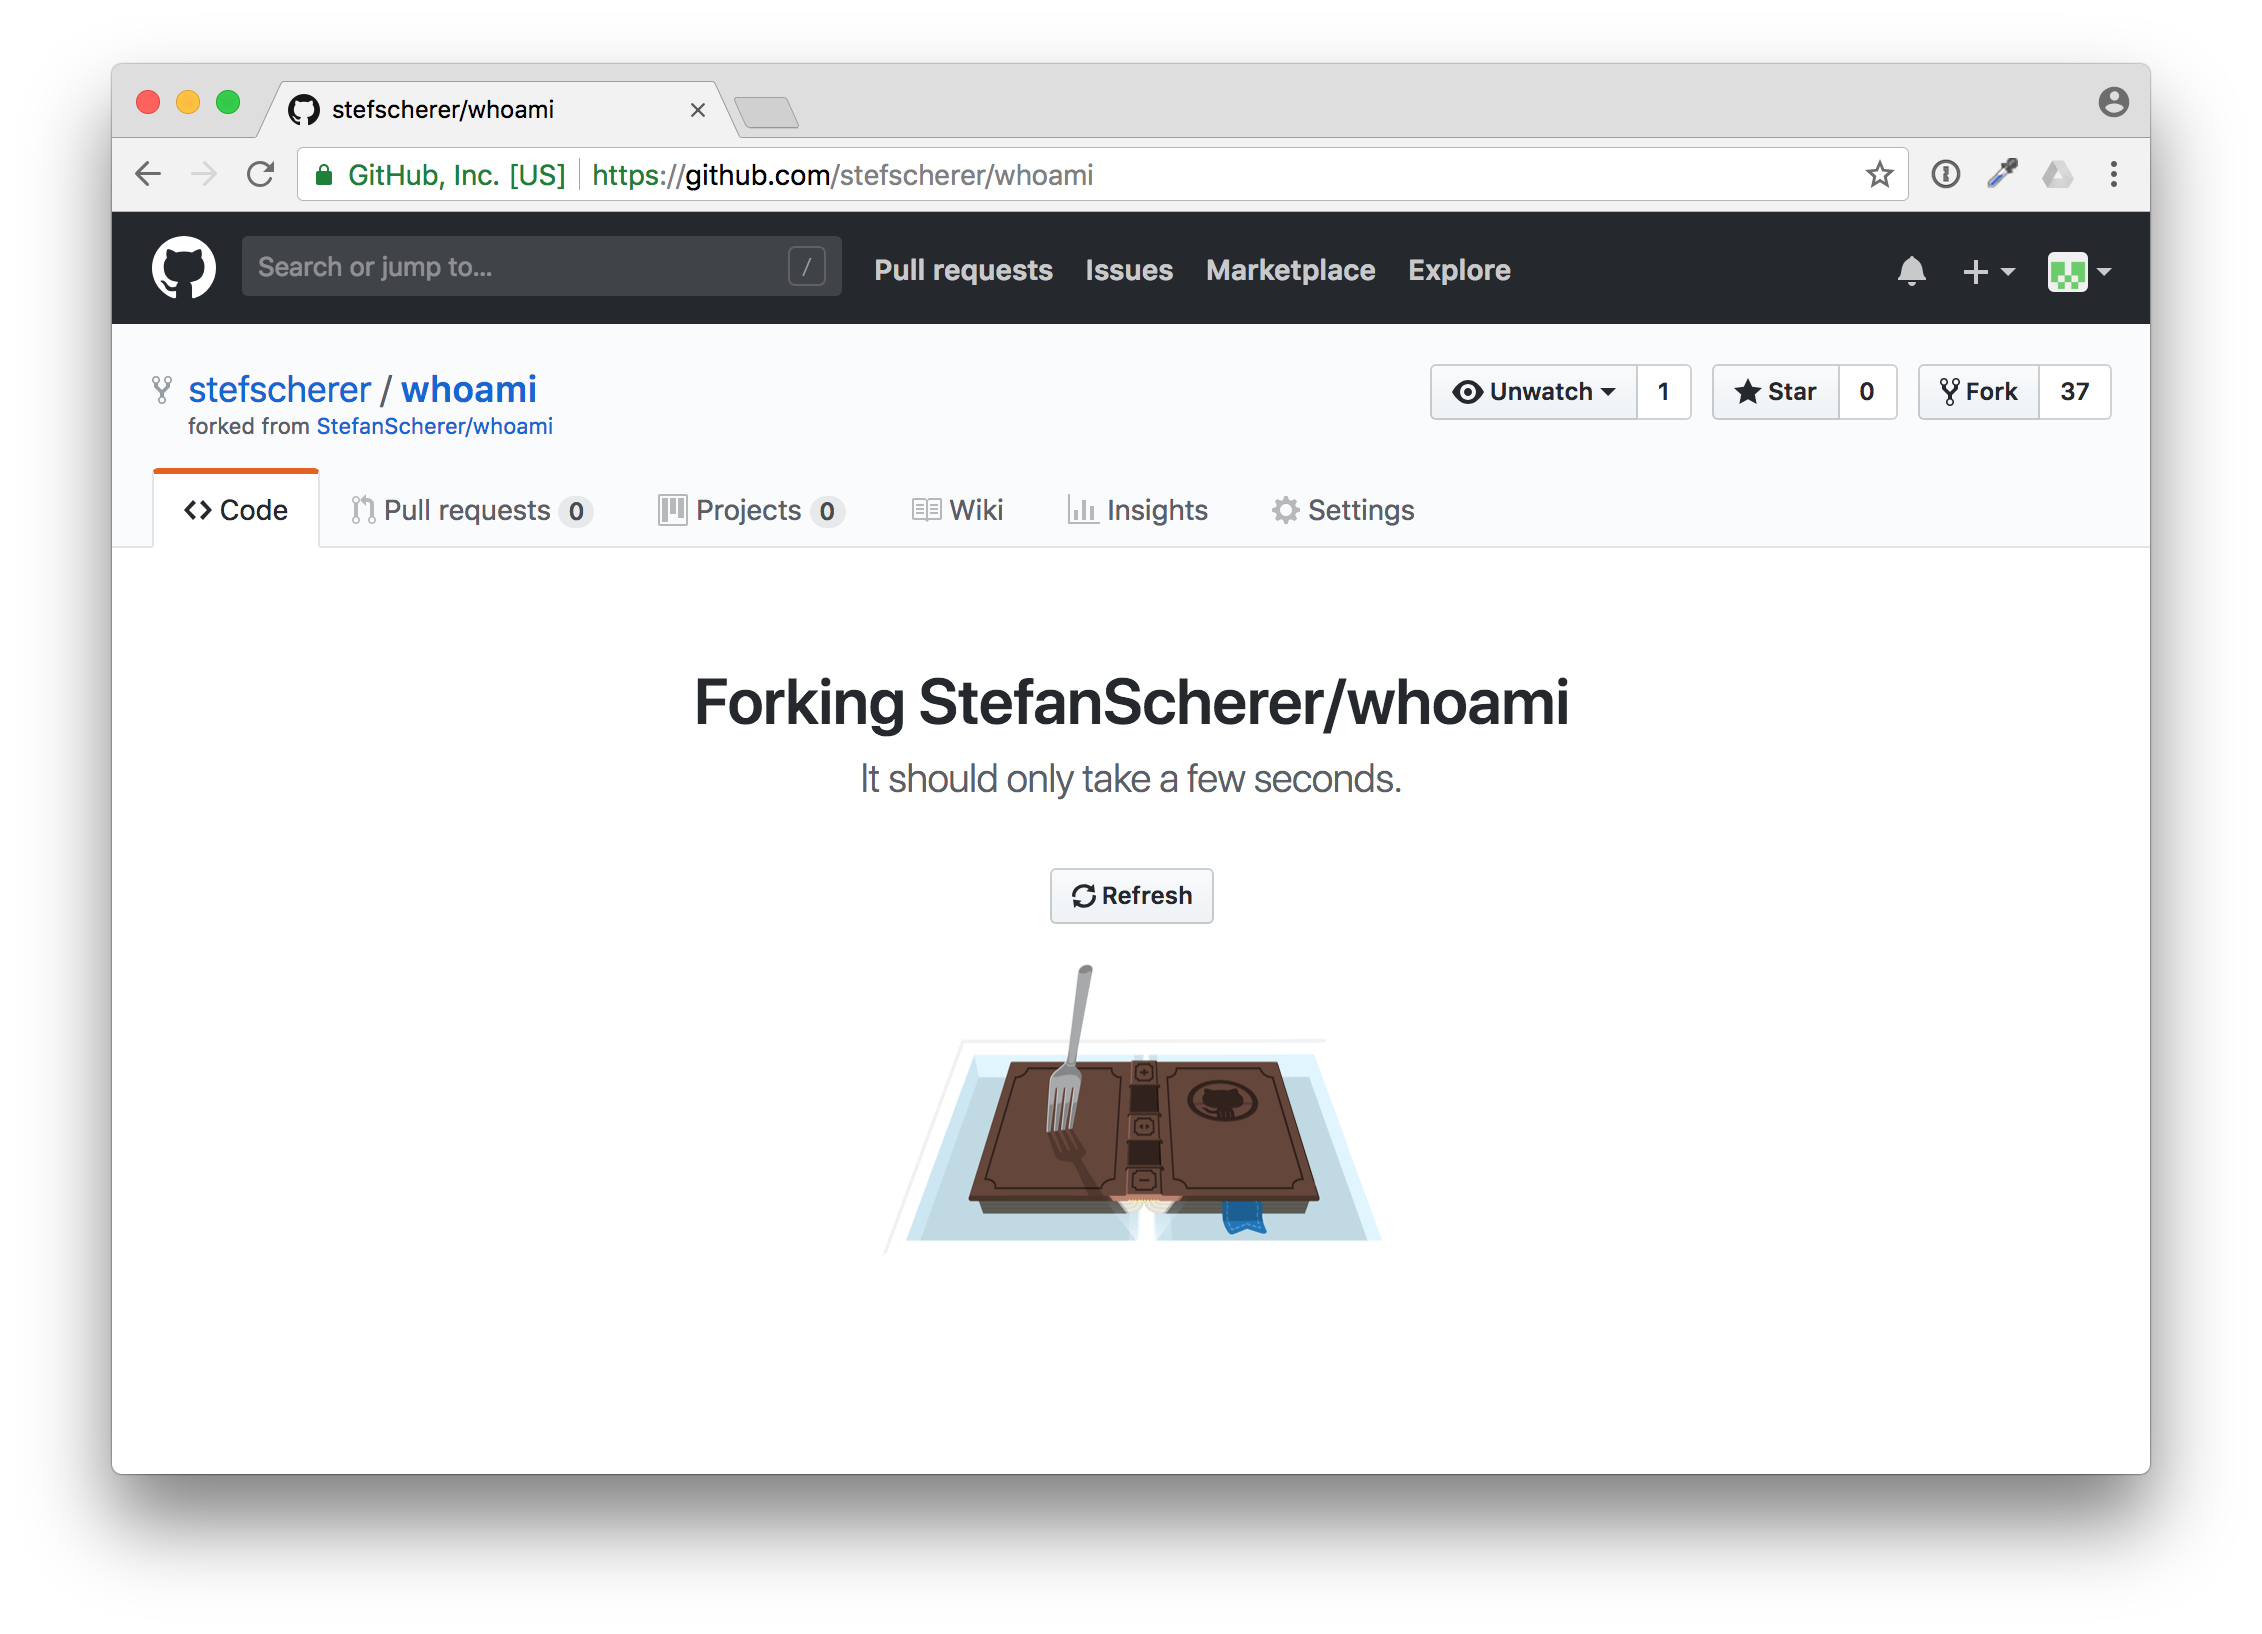
You can fork it to your own GitHub account with the "Fork" button. GitHub will prepare the fork for you.
Now scroll down to the README.md. The next thing is to attach the pipeline to your fork.
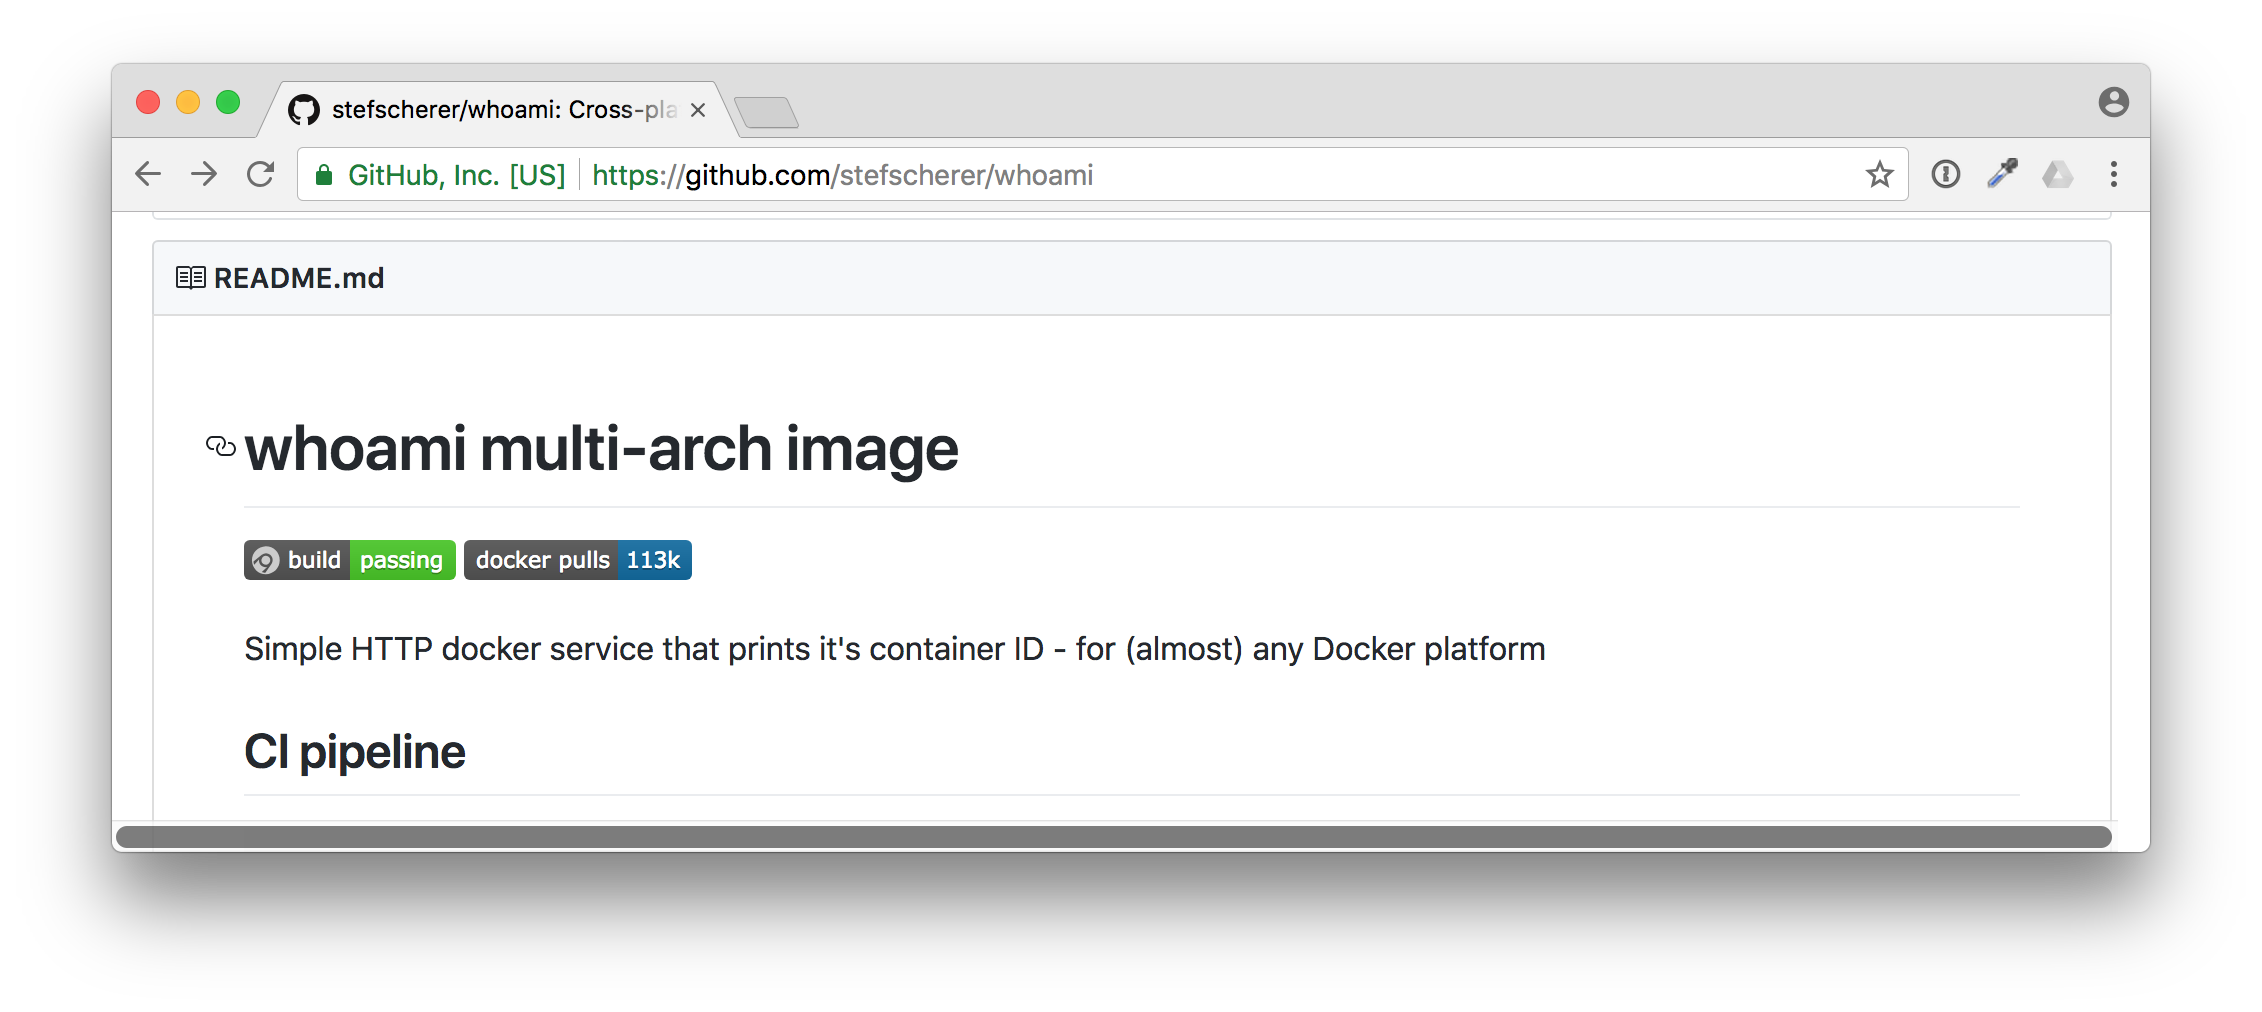
Just click on the the AppVeyor build badge to jump to the AppVeyor site, maybe open a new tab as we need the GitHub site later as well.
Now you can see the build status of my repo. This is not your fork yet, but we now can sign in to AppVeyor.
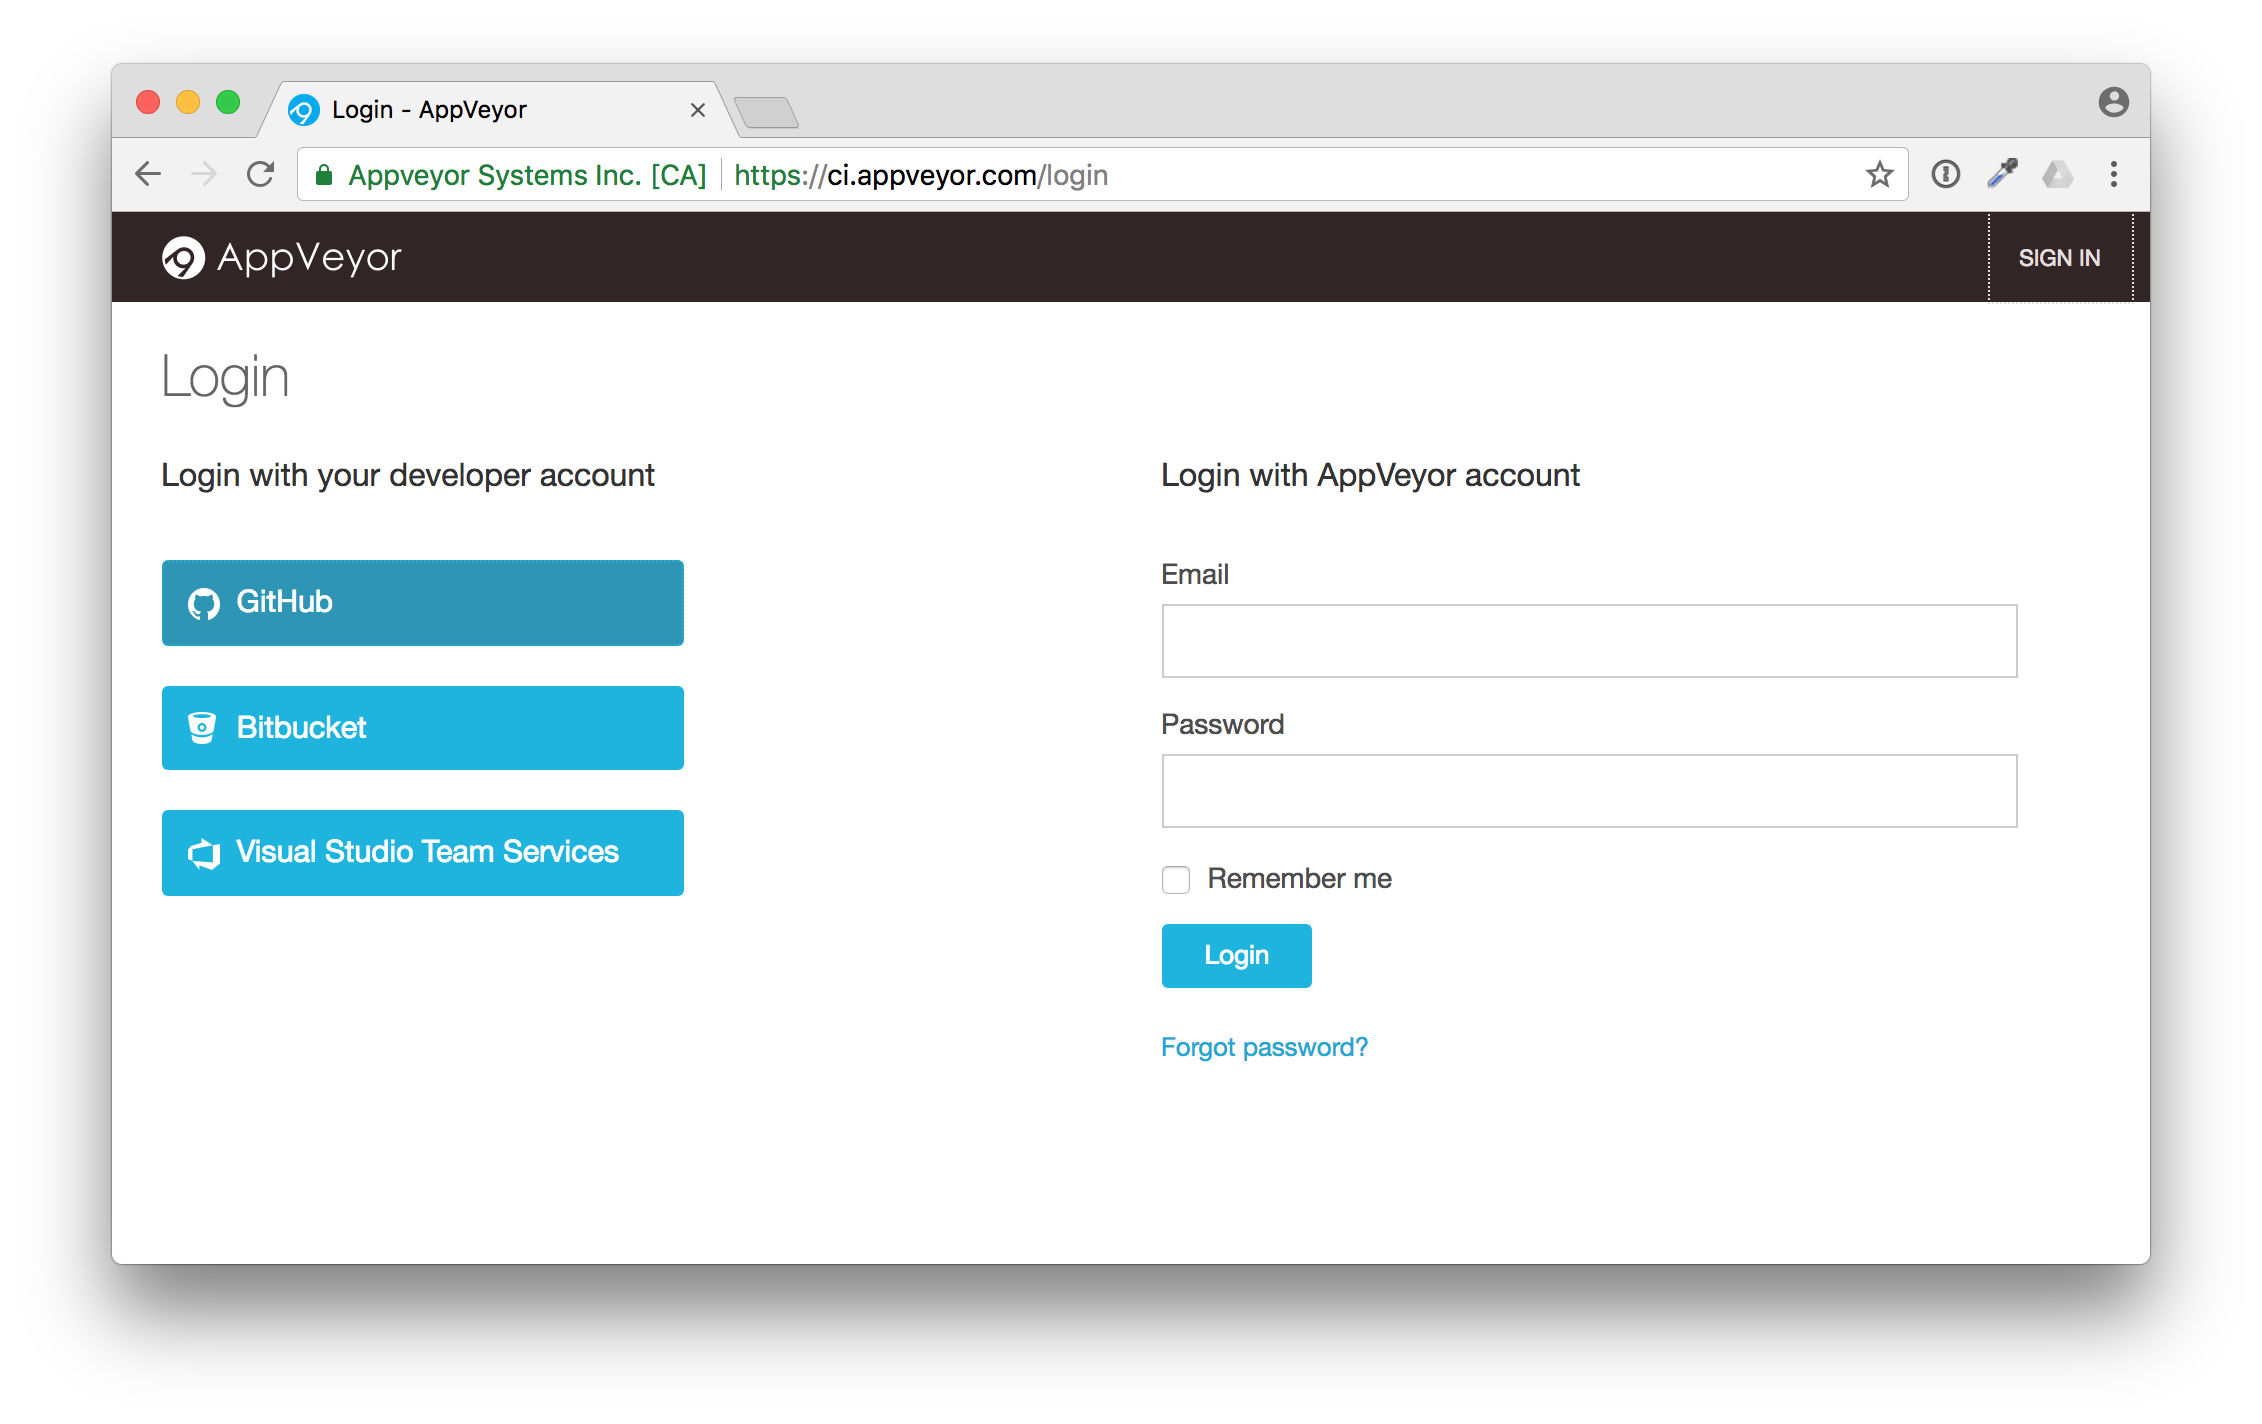
Click on "SIGN IN" in the top right corner. AppVeyor will ask you how to sign in. Just use GitHub.
Now GitHub will ask you if you want to give AppVeyor read-only access to your user data and public teams.
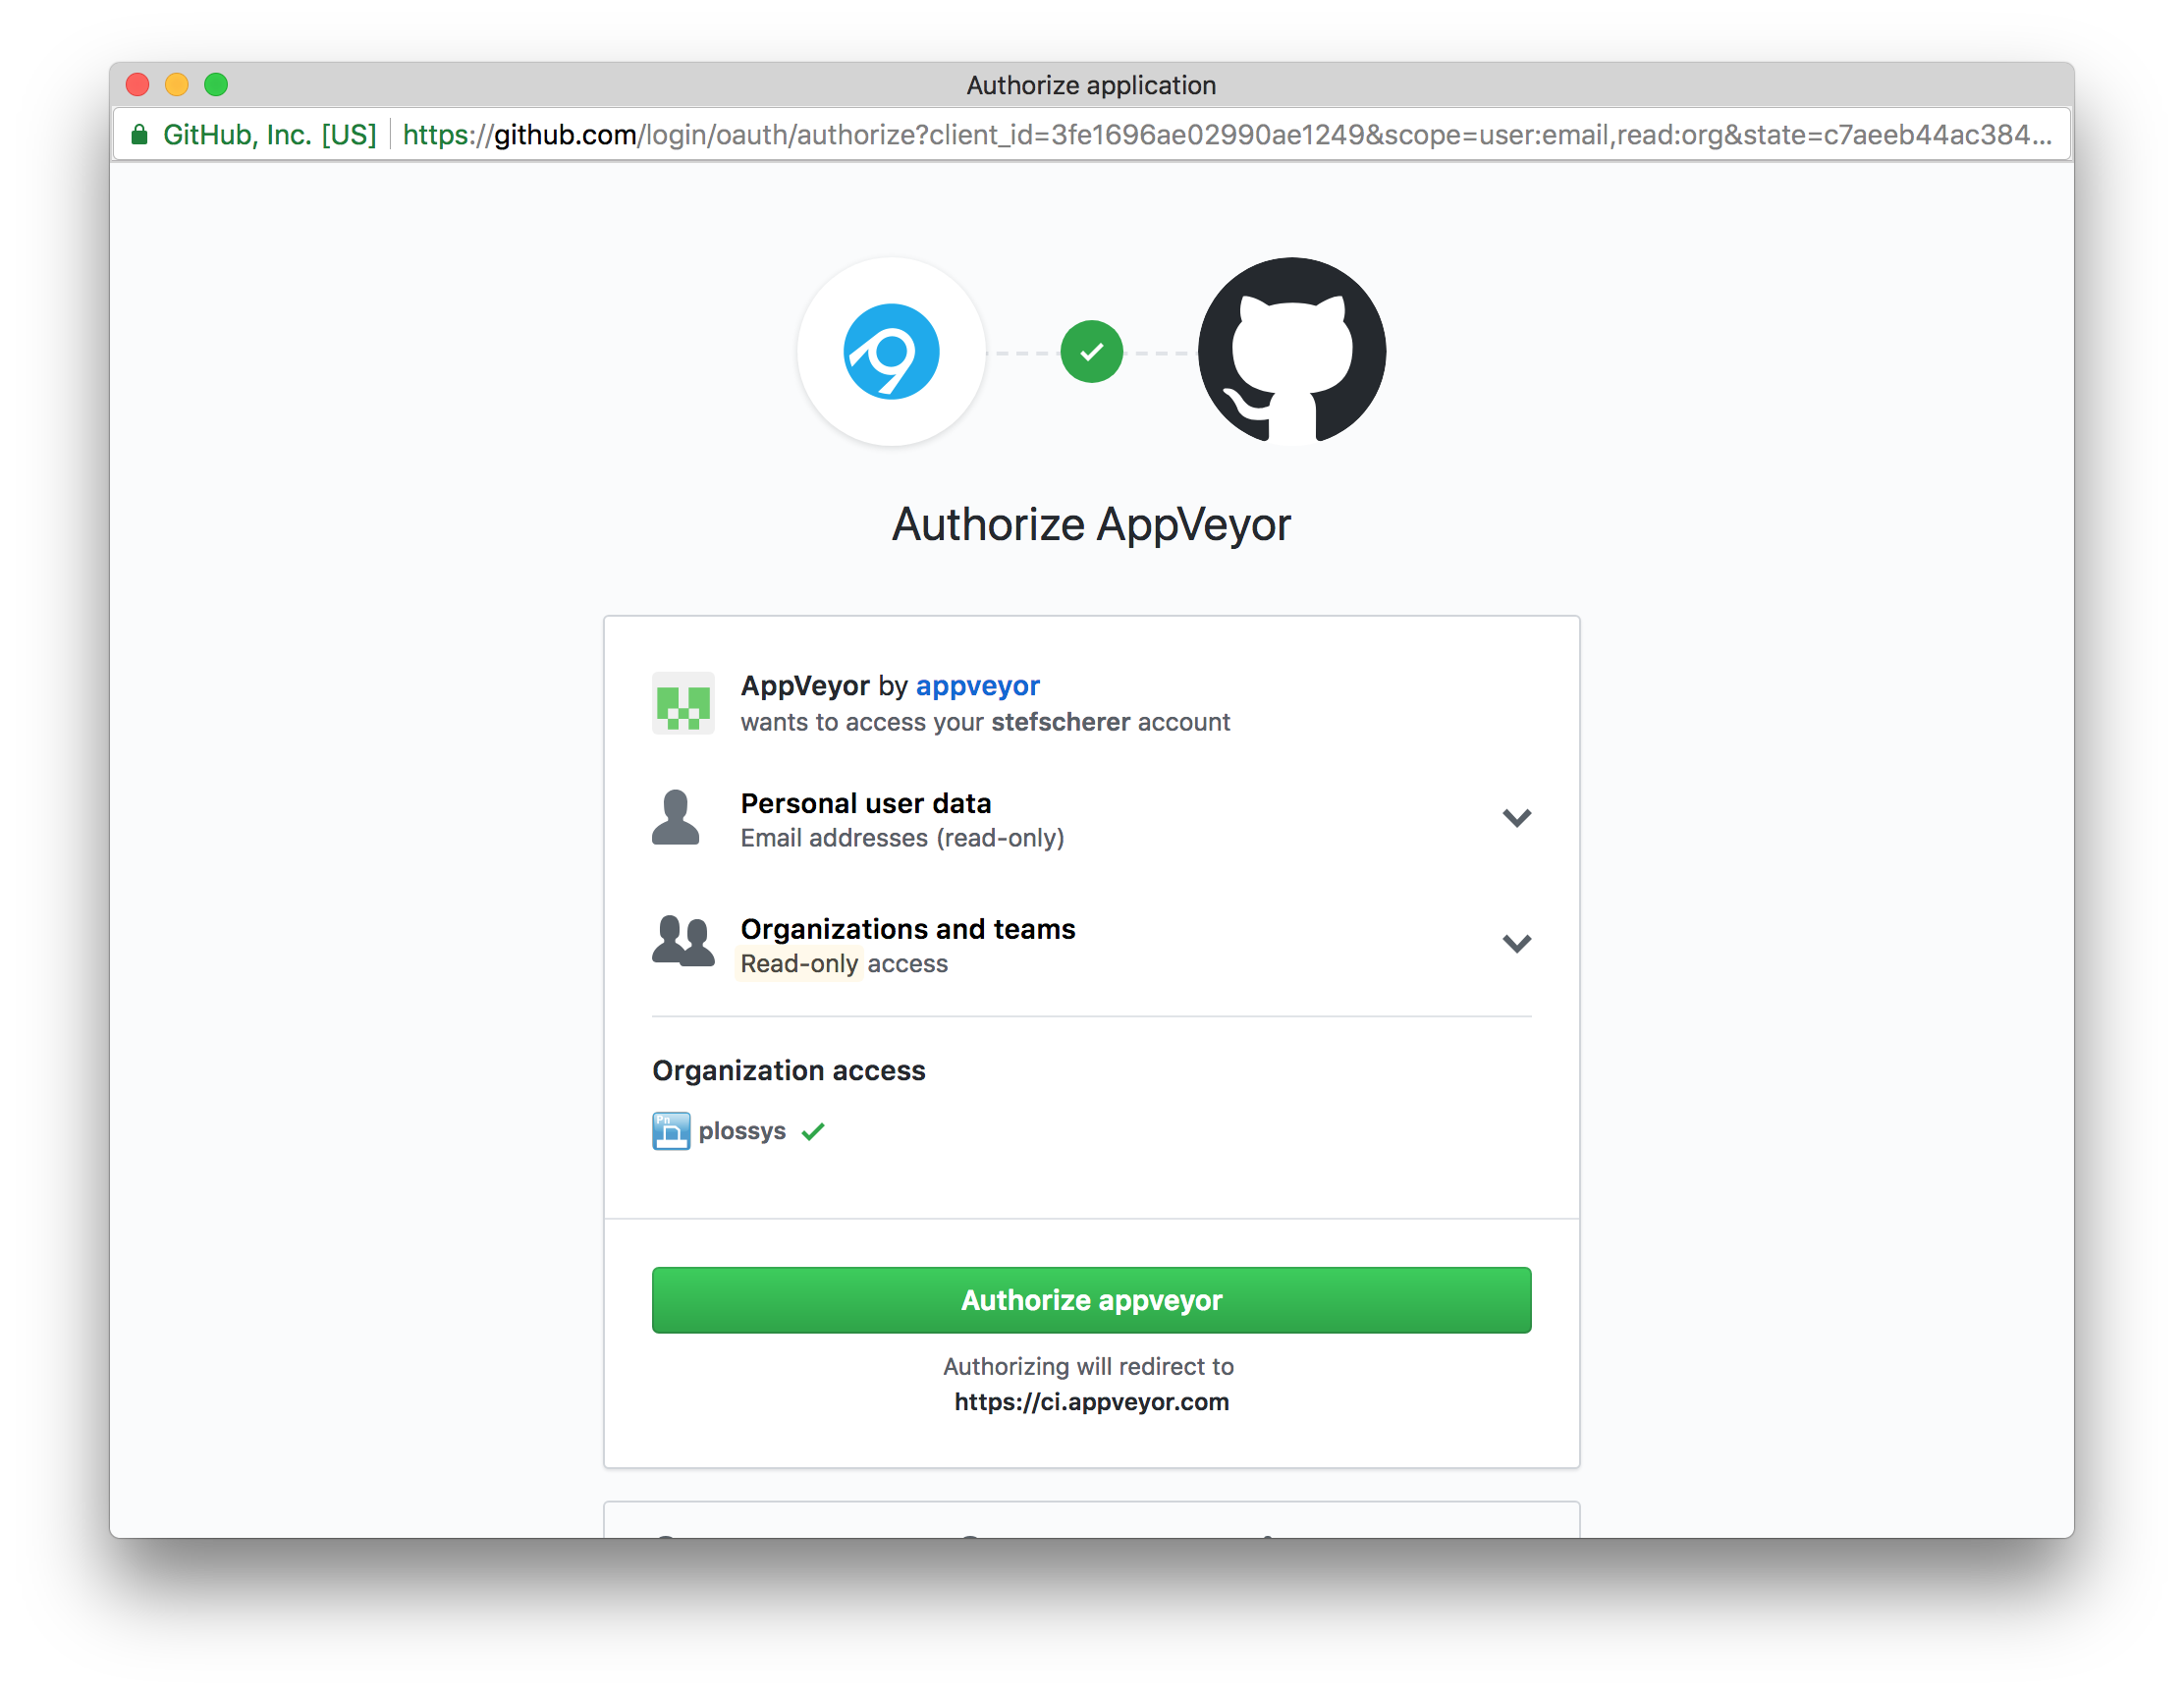
After that you have connected AppVeyor to your account.
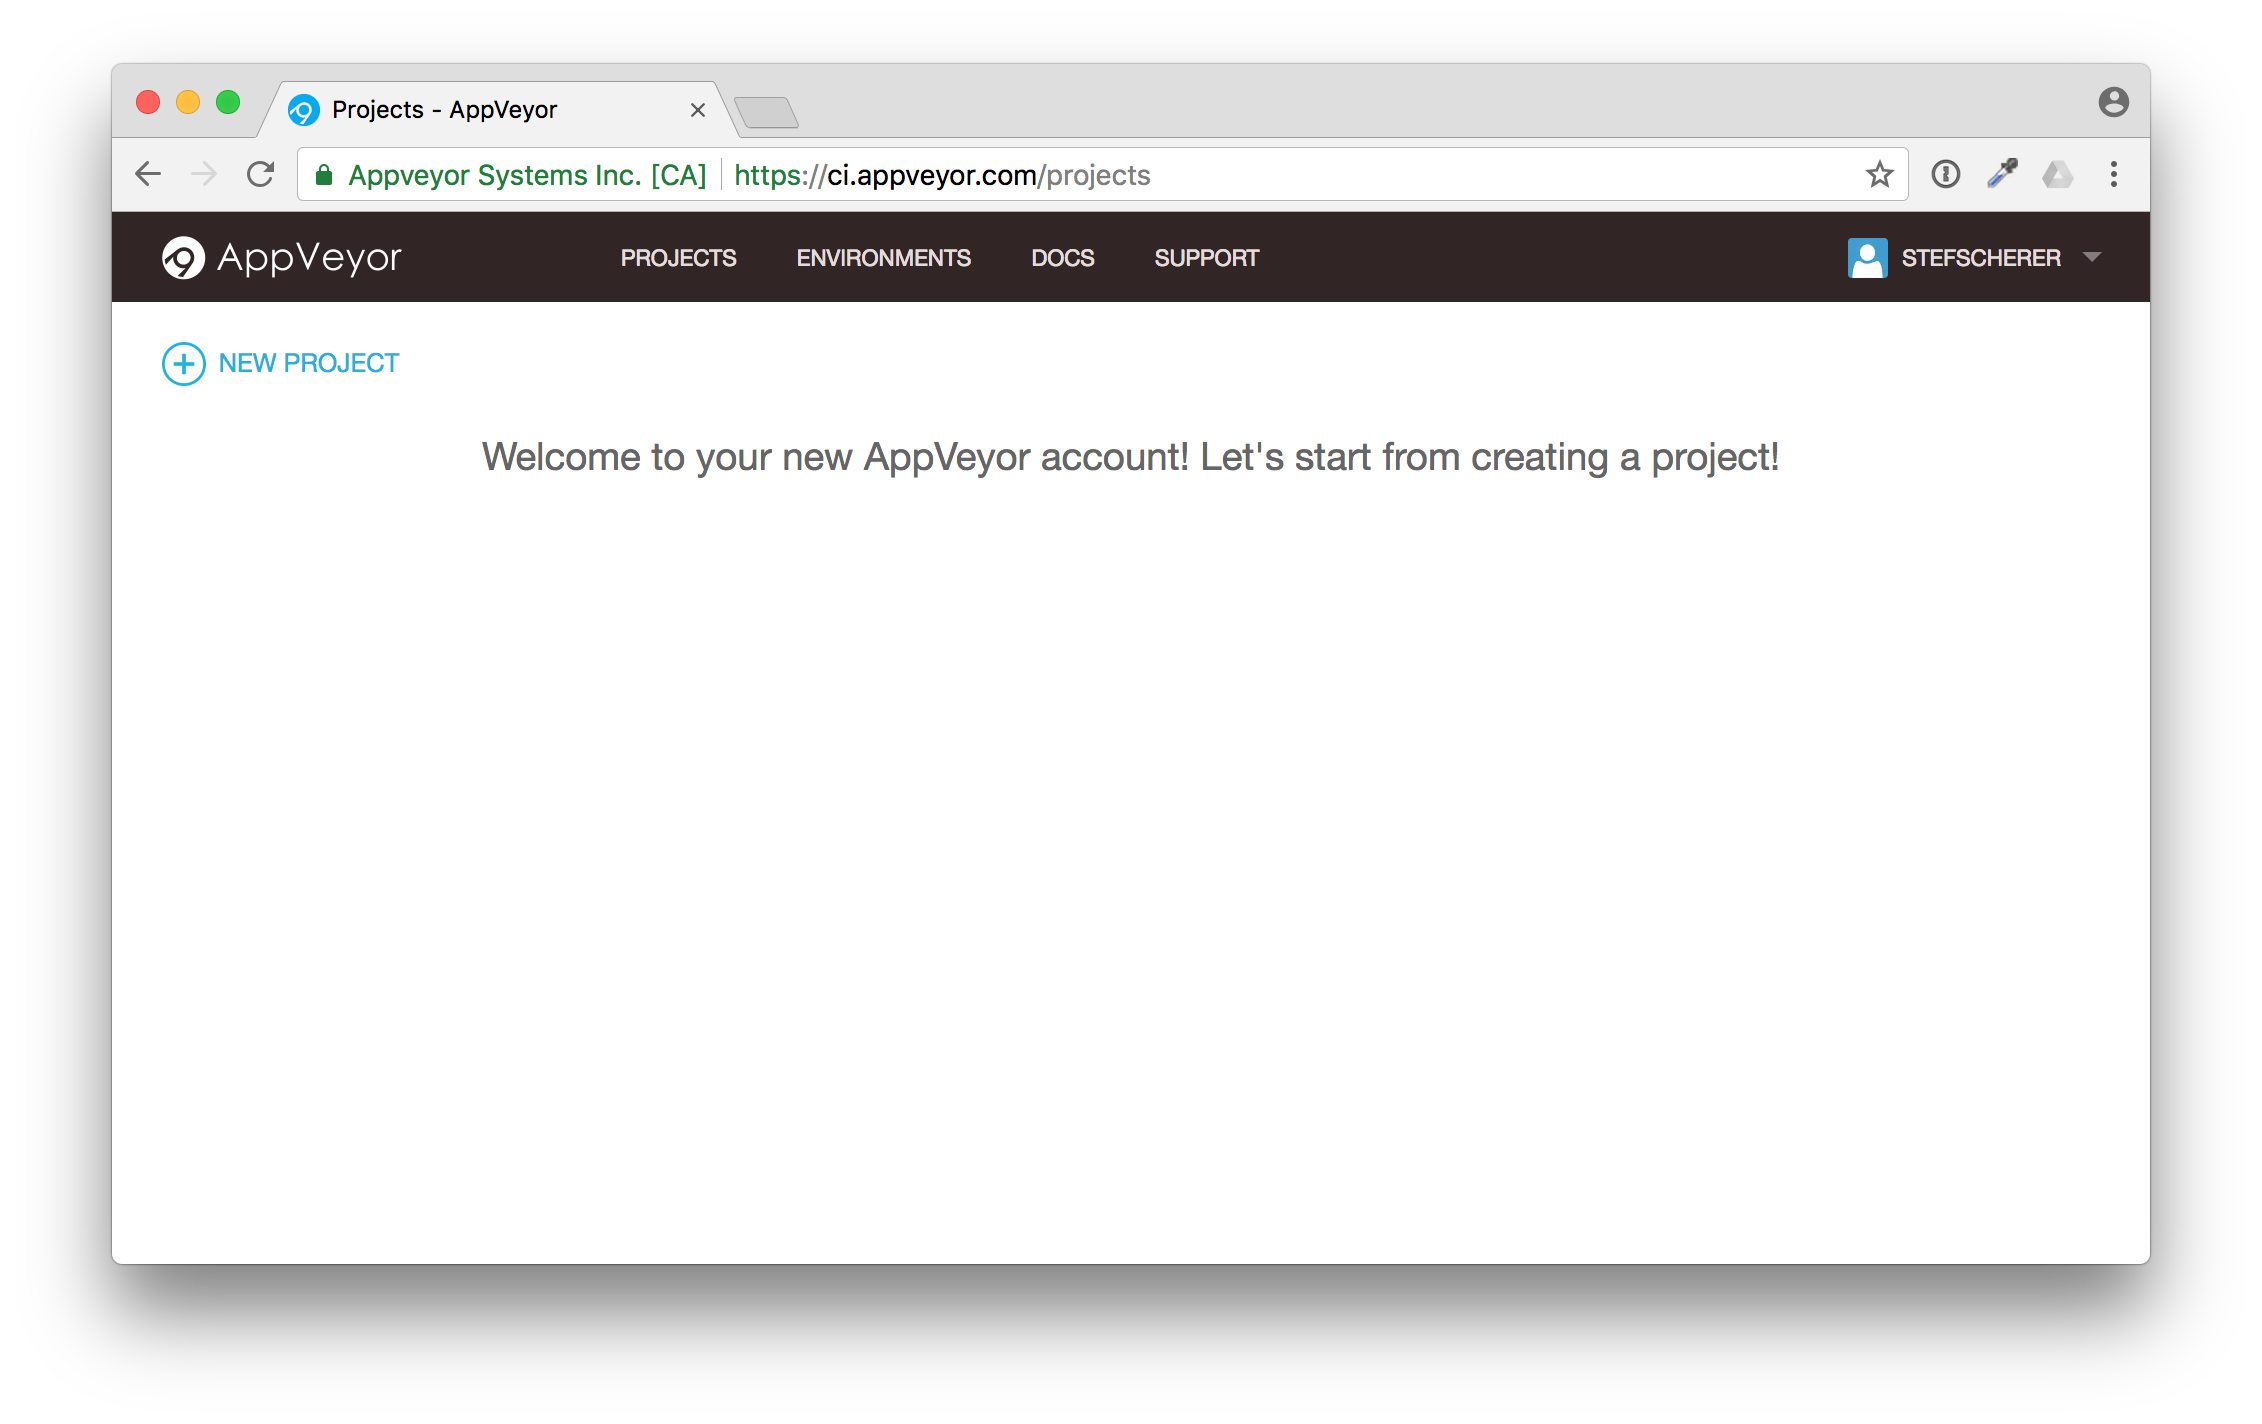
Now this has to be done only once. After that you can add the forked repo to build on AppVeyor. Click on "NEW PROJECT" in the top left corner.
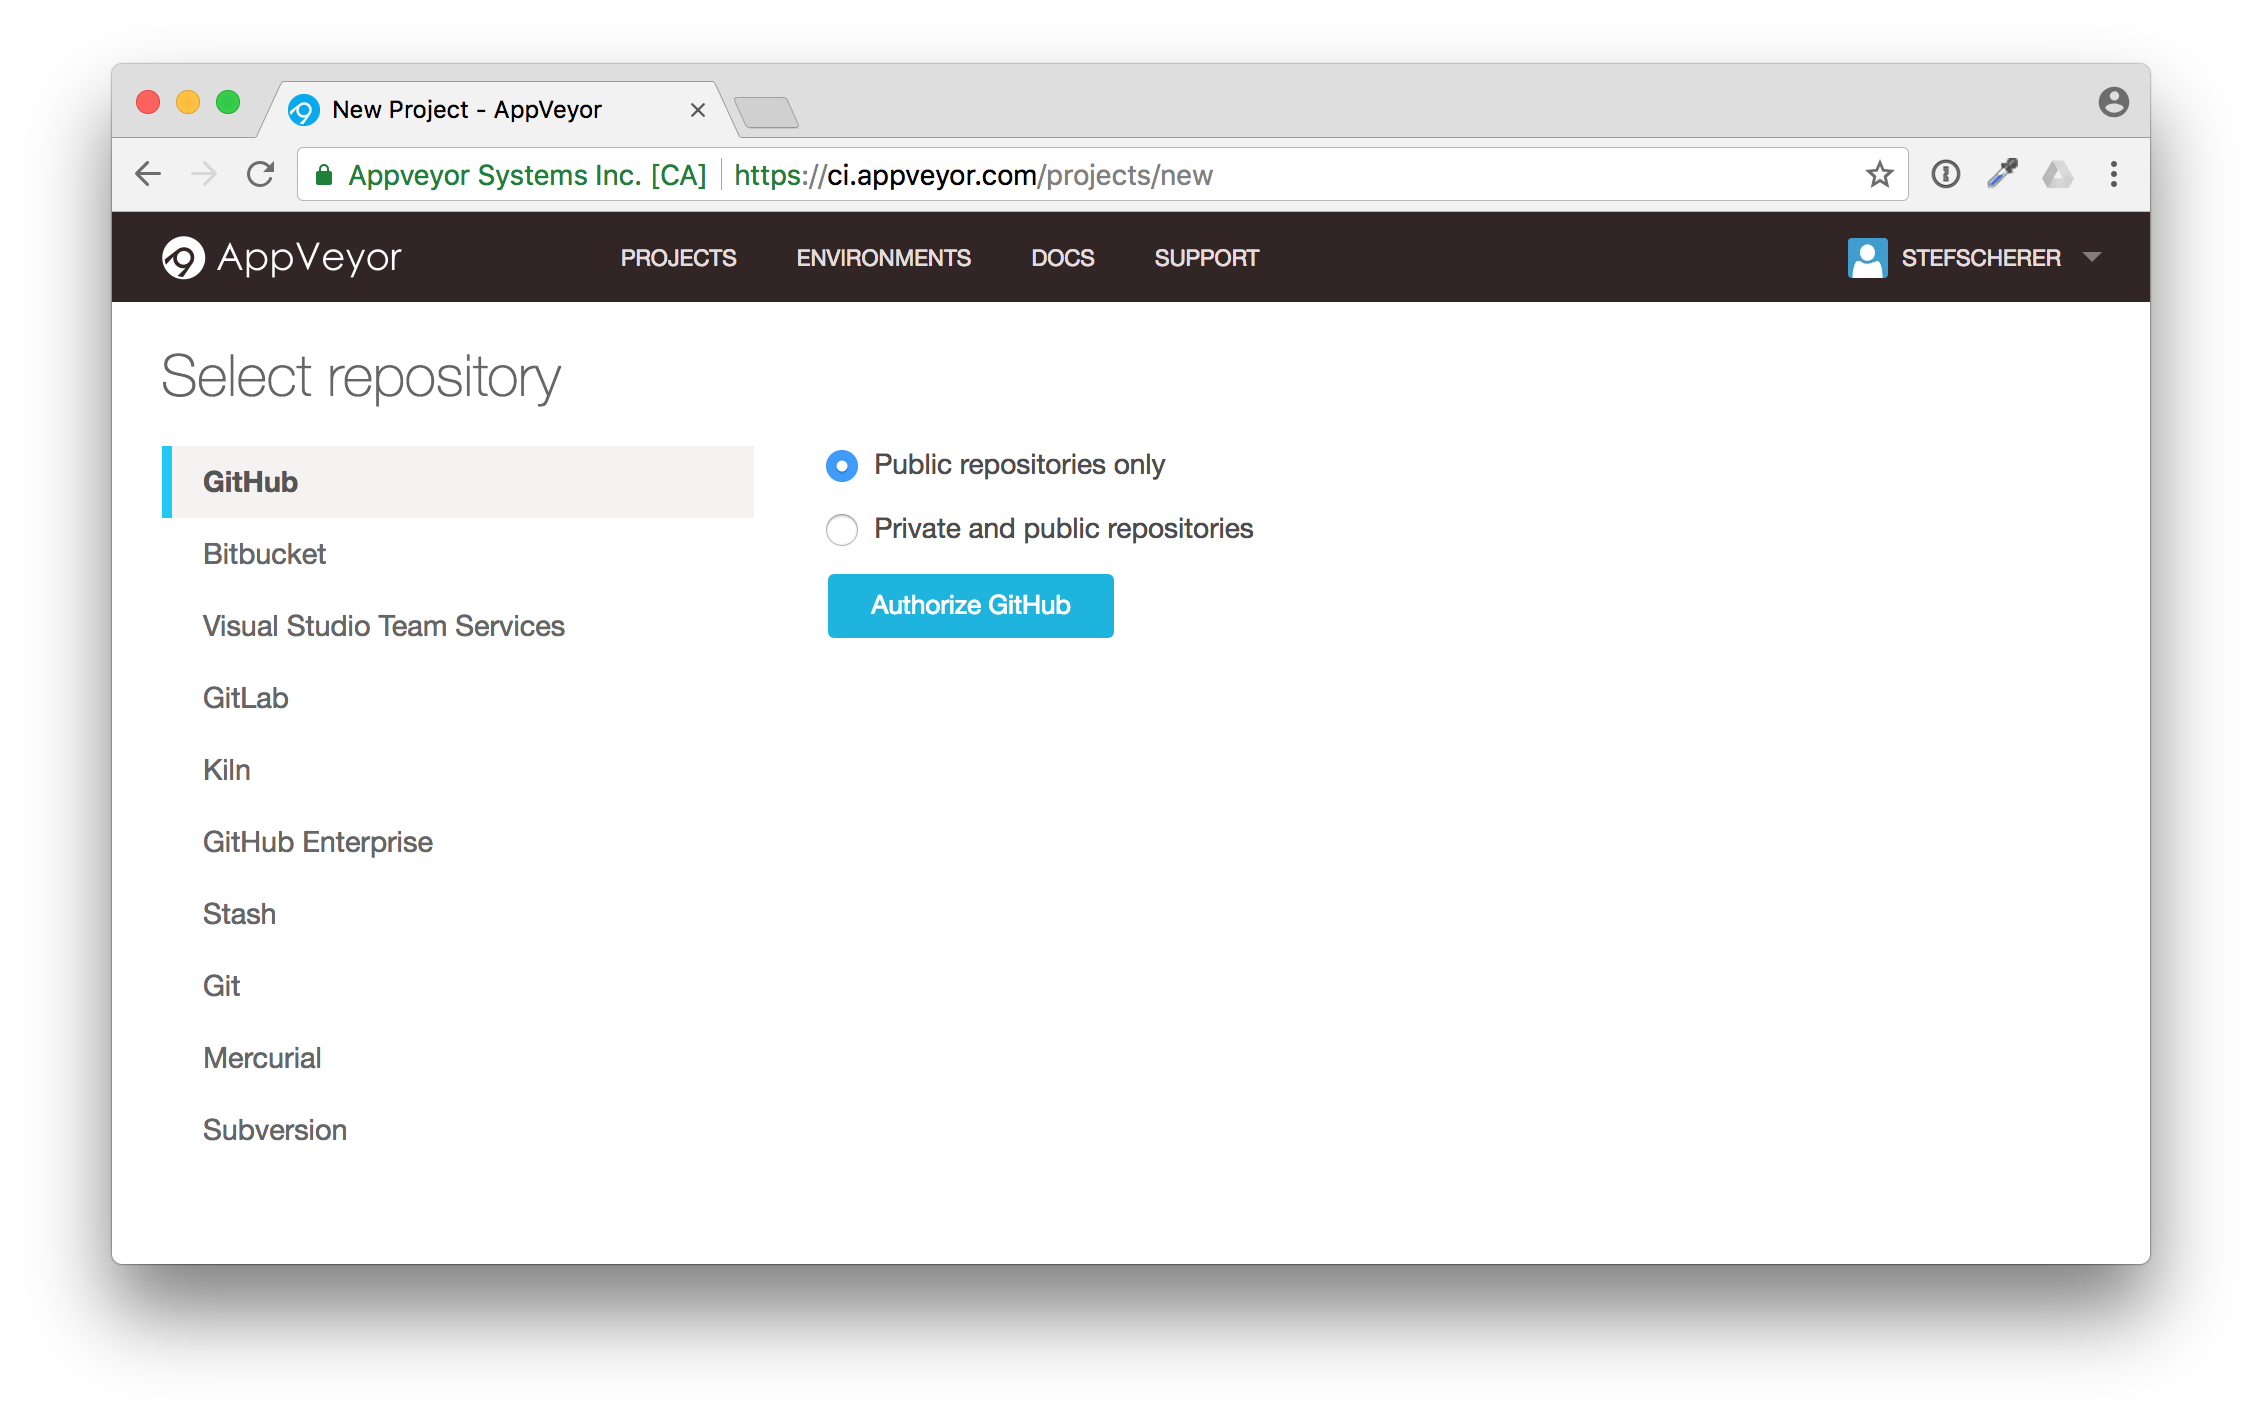
You can choose between several version control systems. As you have forked a GitHub repo, click on "GitHub" and then on "Authorize GitHub".
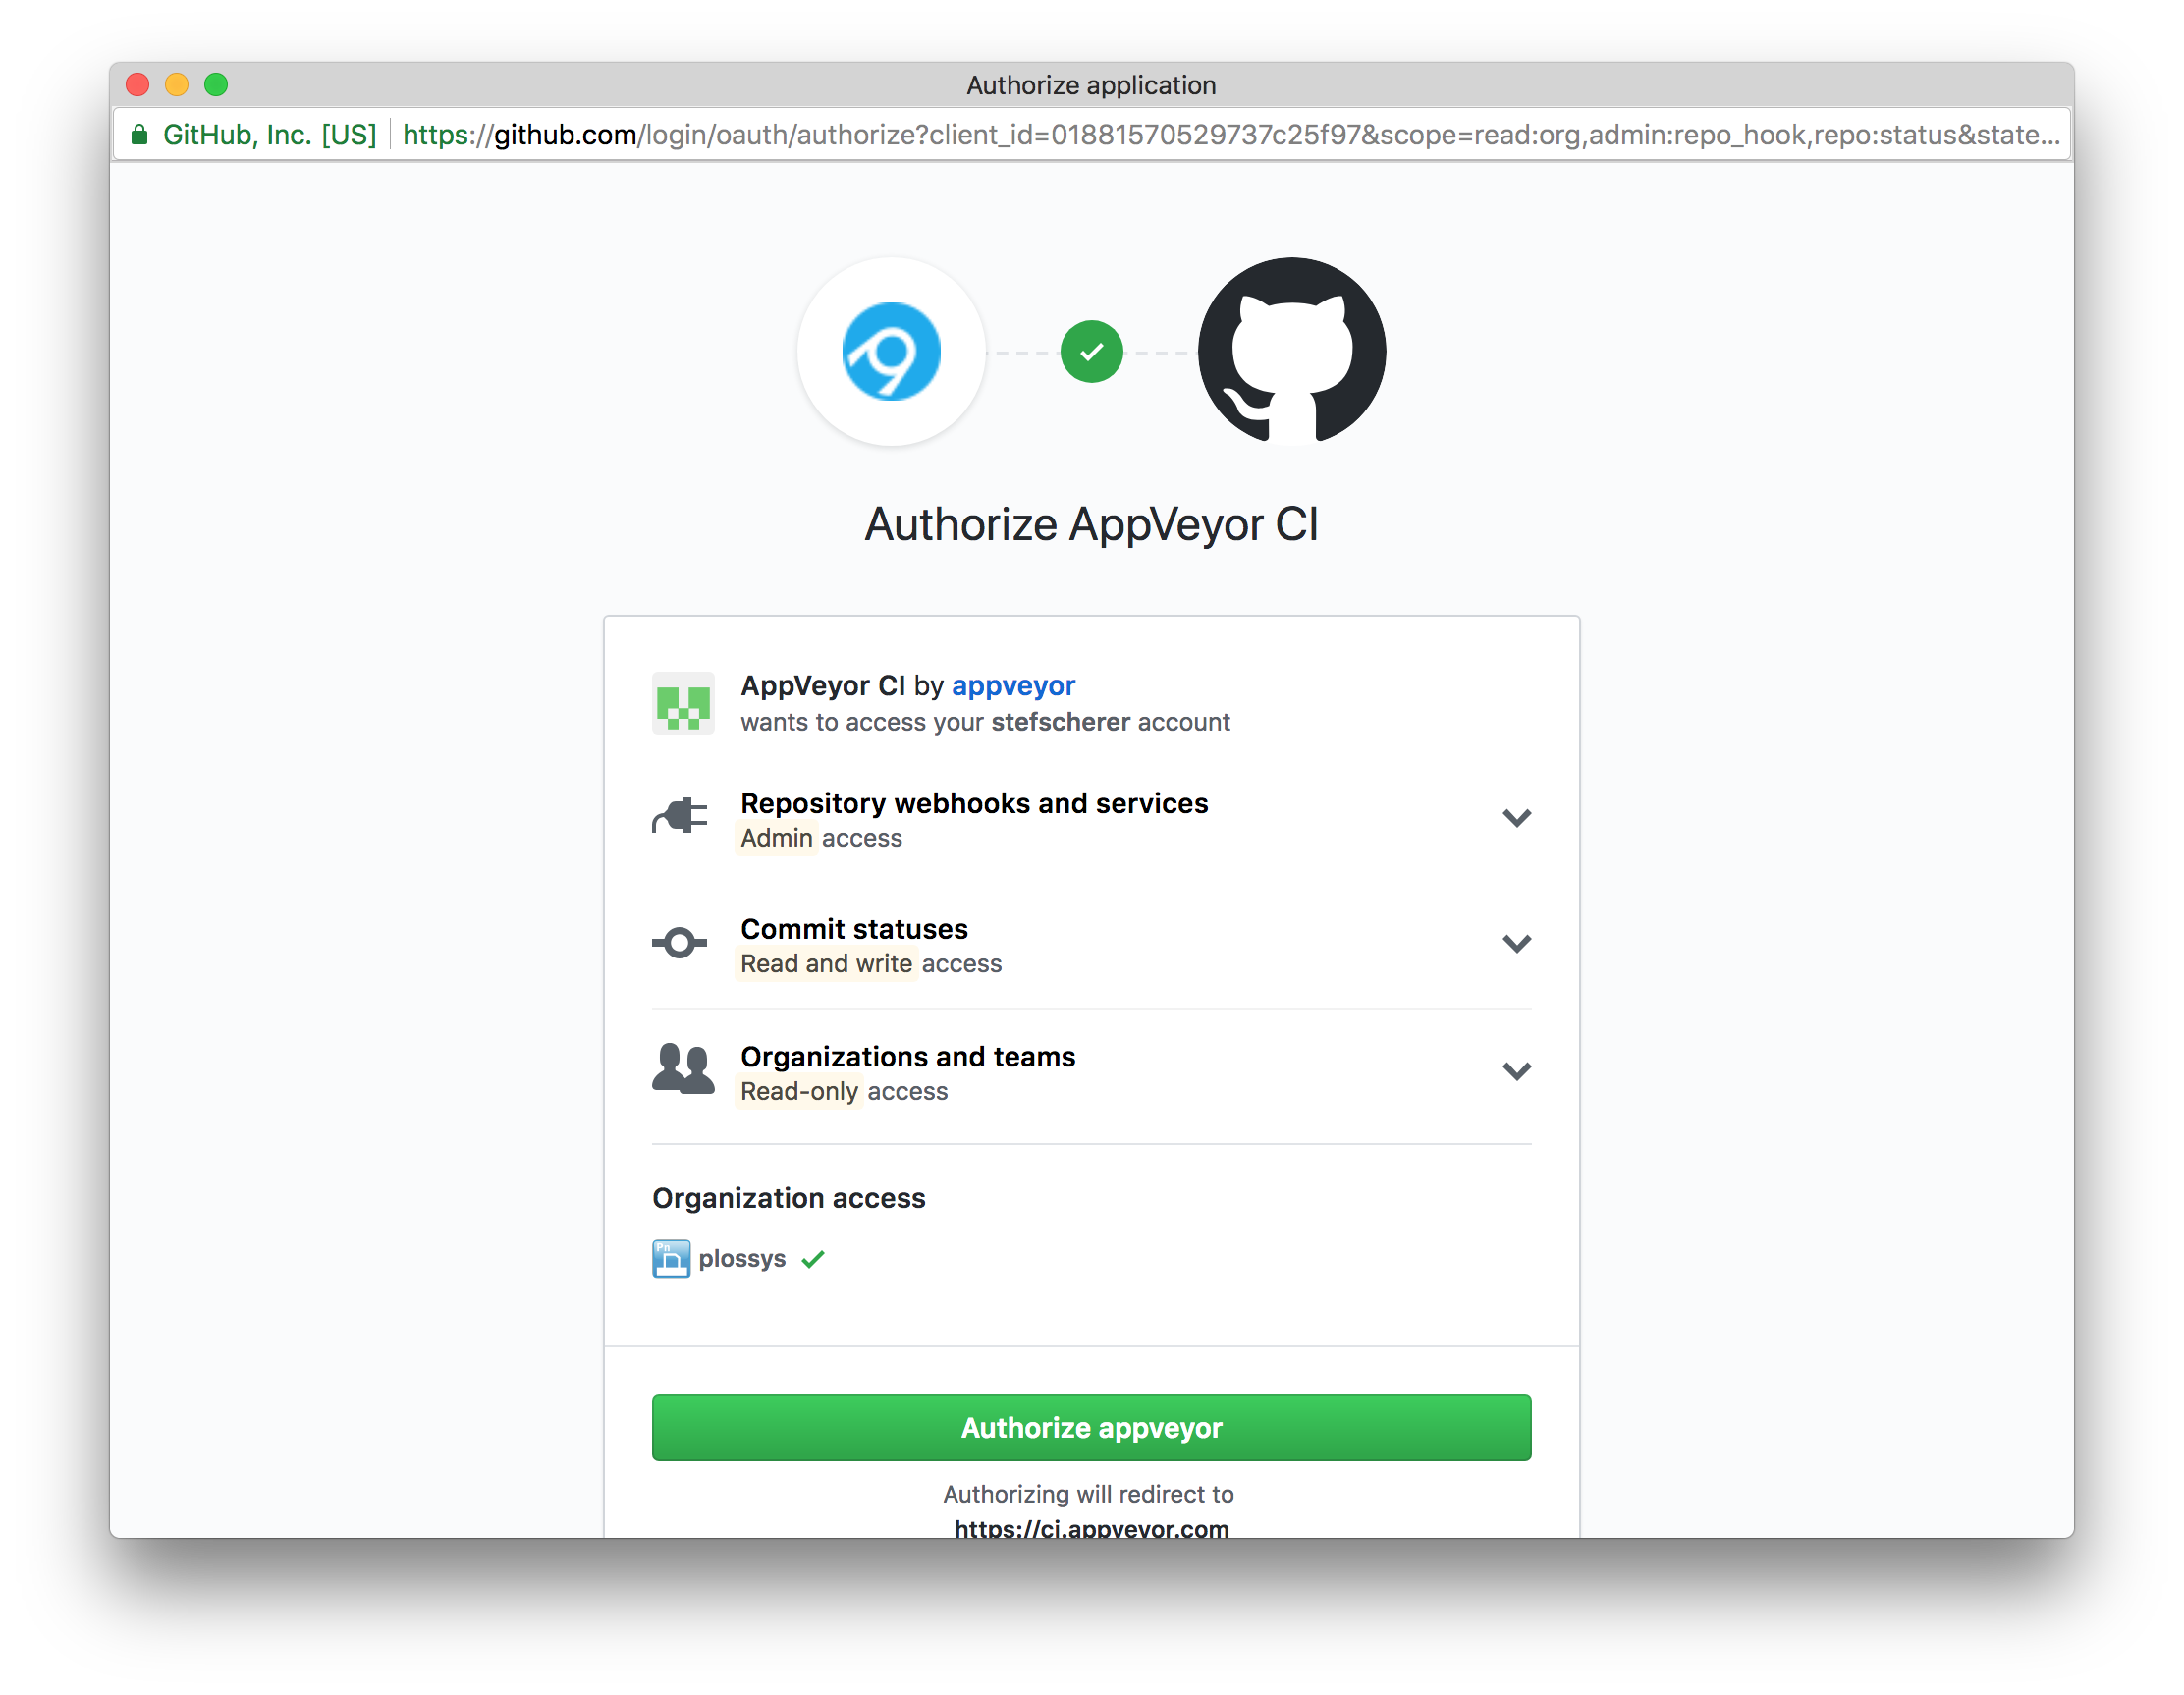
AppVeyor needs some more access rights to add the Web hook for you and to send commit statuses. Click on "Authorize appveyor" to grant access.
Now you will see a list of GitHub repos of your GitHub account.
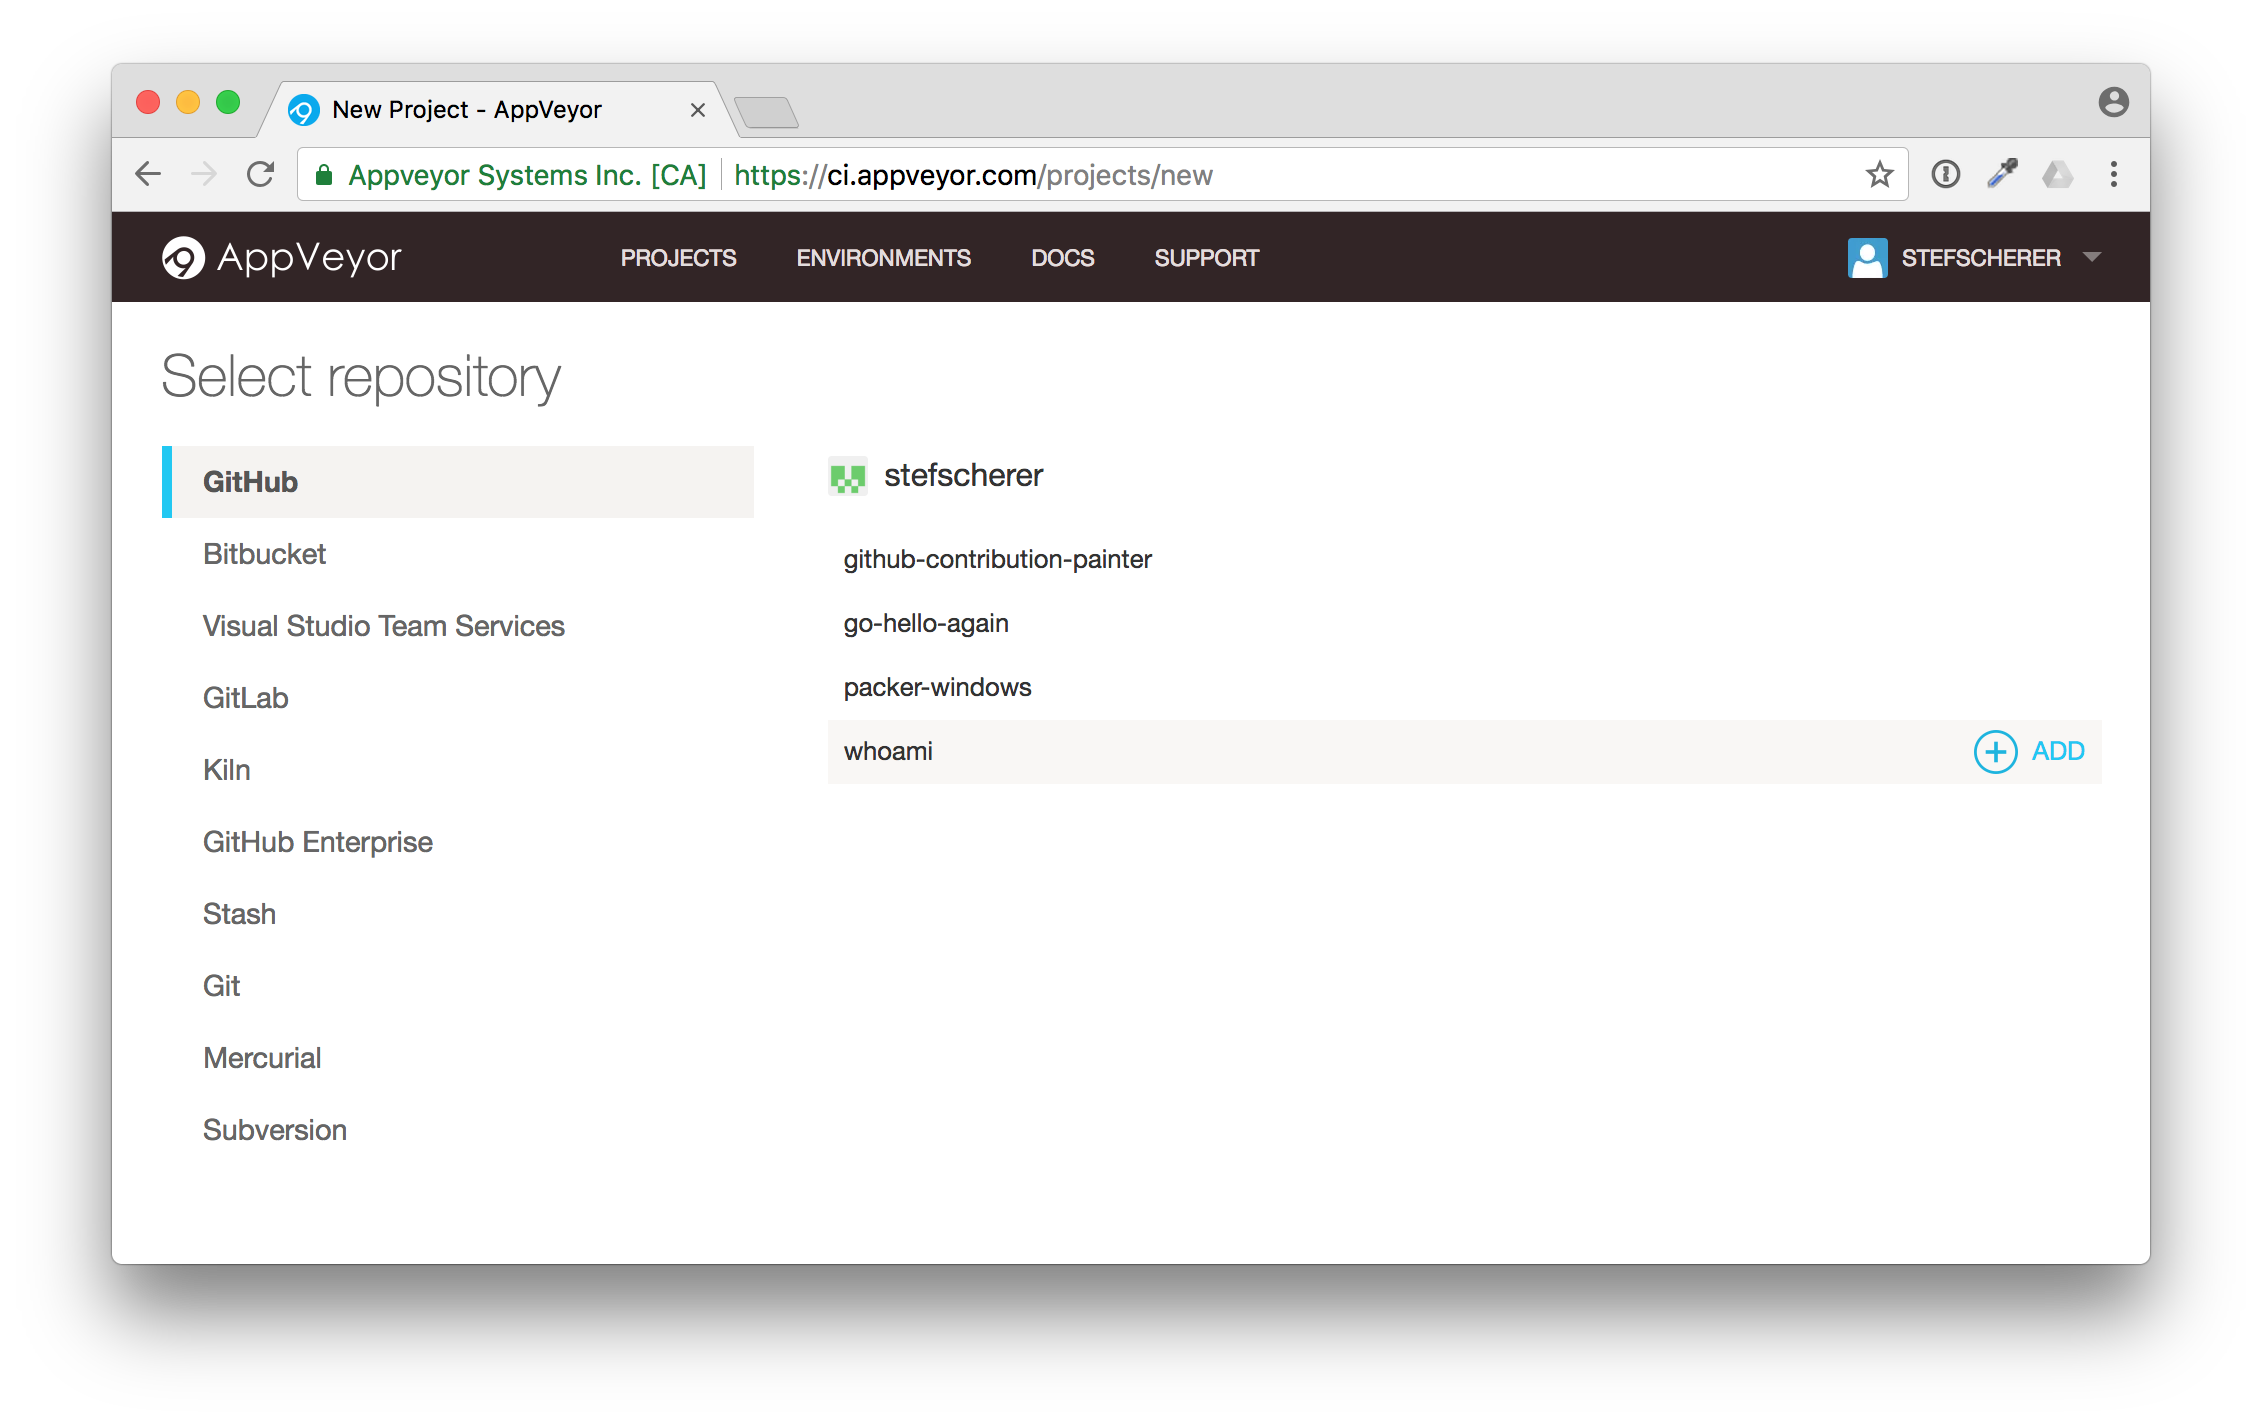
Move to the "whoami" repo and click on the "+ Add" button on the right side. The UI isn't the best here, I often missed the Add link for my first projects.
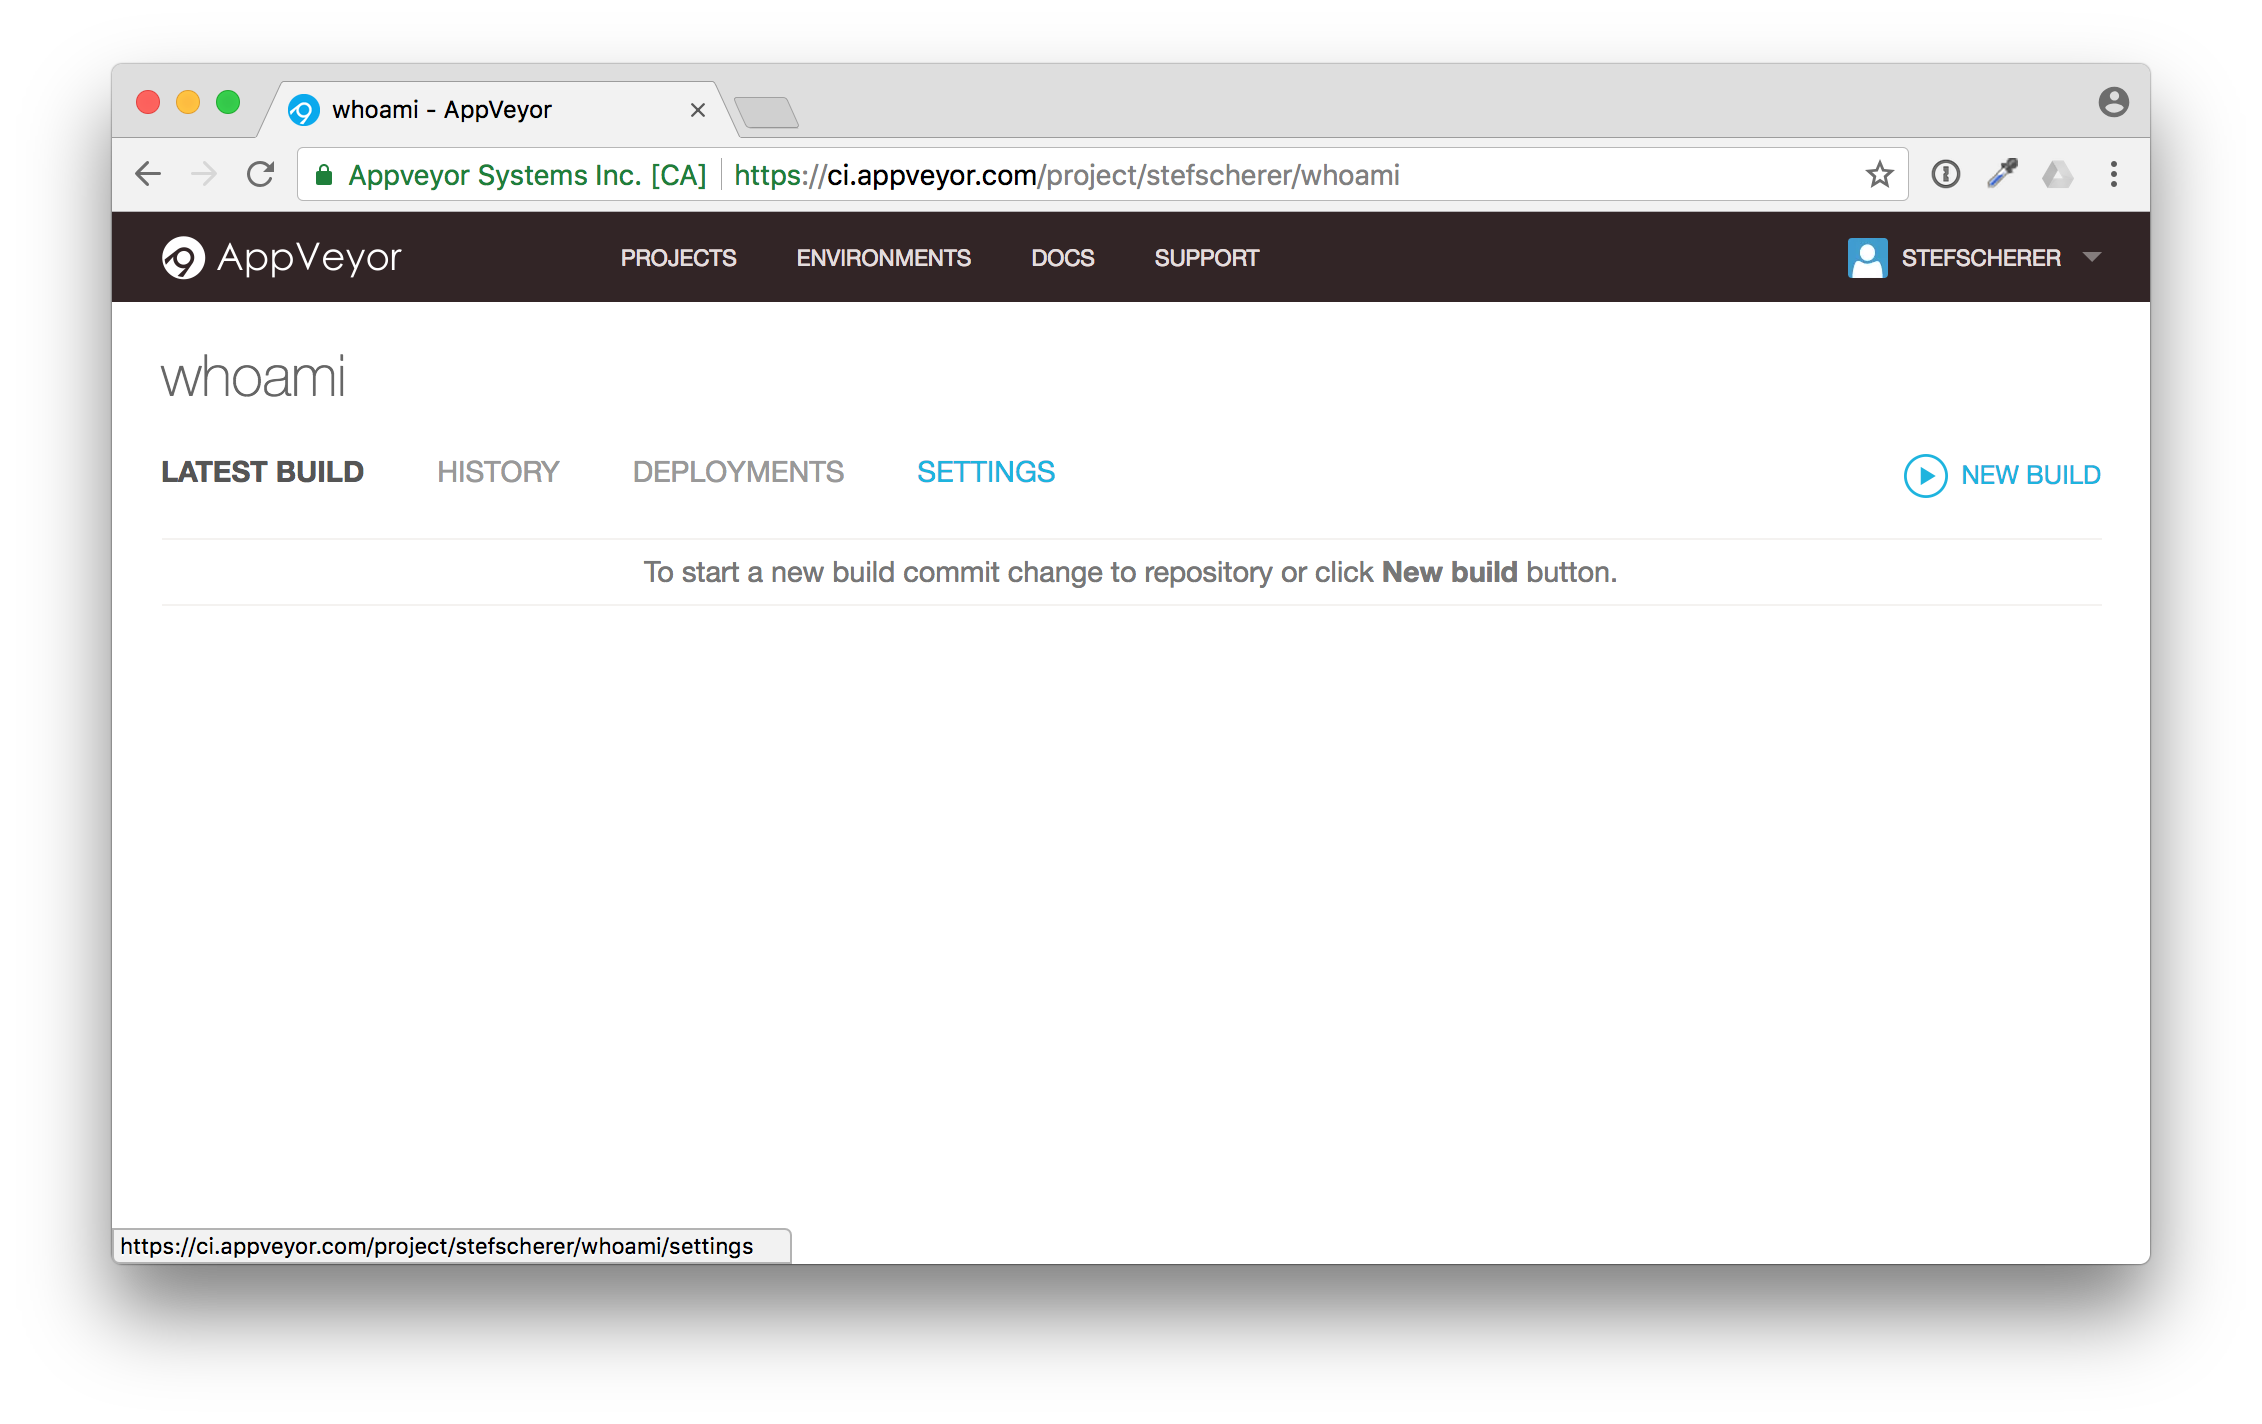
Congratulations! You have the build pipeline up and running. No VM's to setup, no installation required. You didn't have to clone the repo to your local machine yet.
Each Git commit will now trigger a build on AppVeyor with the appveyor.yml file that comes with the sources in the GitHub repo. You don't have to think what steps you have to do to build this project.
Adjust the fork
Adjust README.md
The first change should be to adjust the build badge in the README.md to link to your forked build.
Let's do that in the browser, so you still don't have to clone the repo to you local machine.
But first we have to grab the build badge link. Go to "Settings" and then to "Badges". You will see some samples, pick the Sample Markdown code
![]()
Now head over to the GitHub browser tab and edit the README.md file.
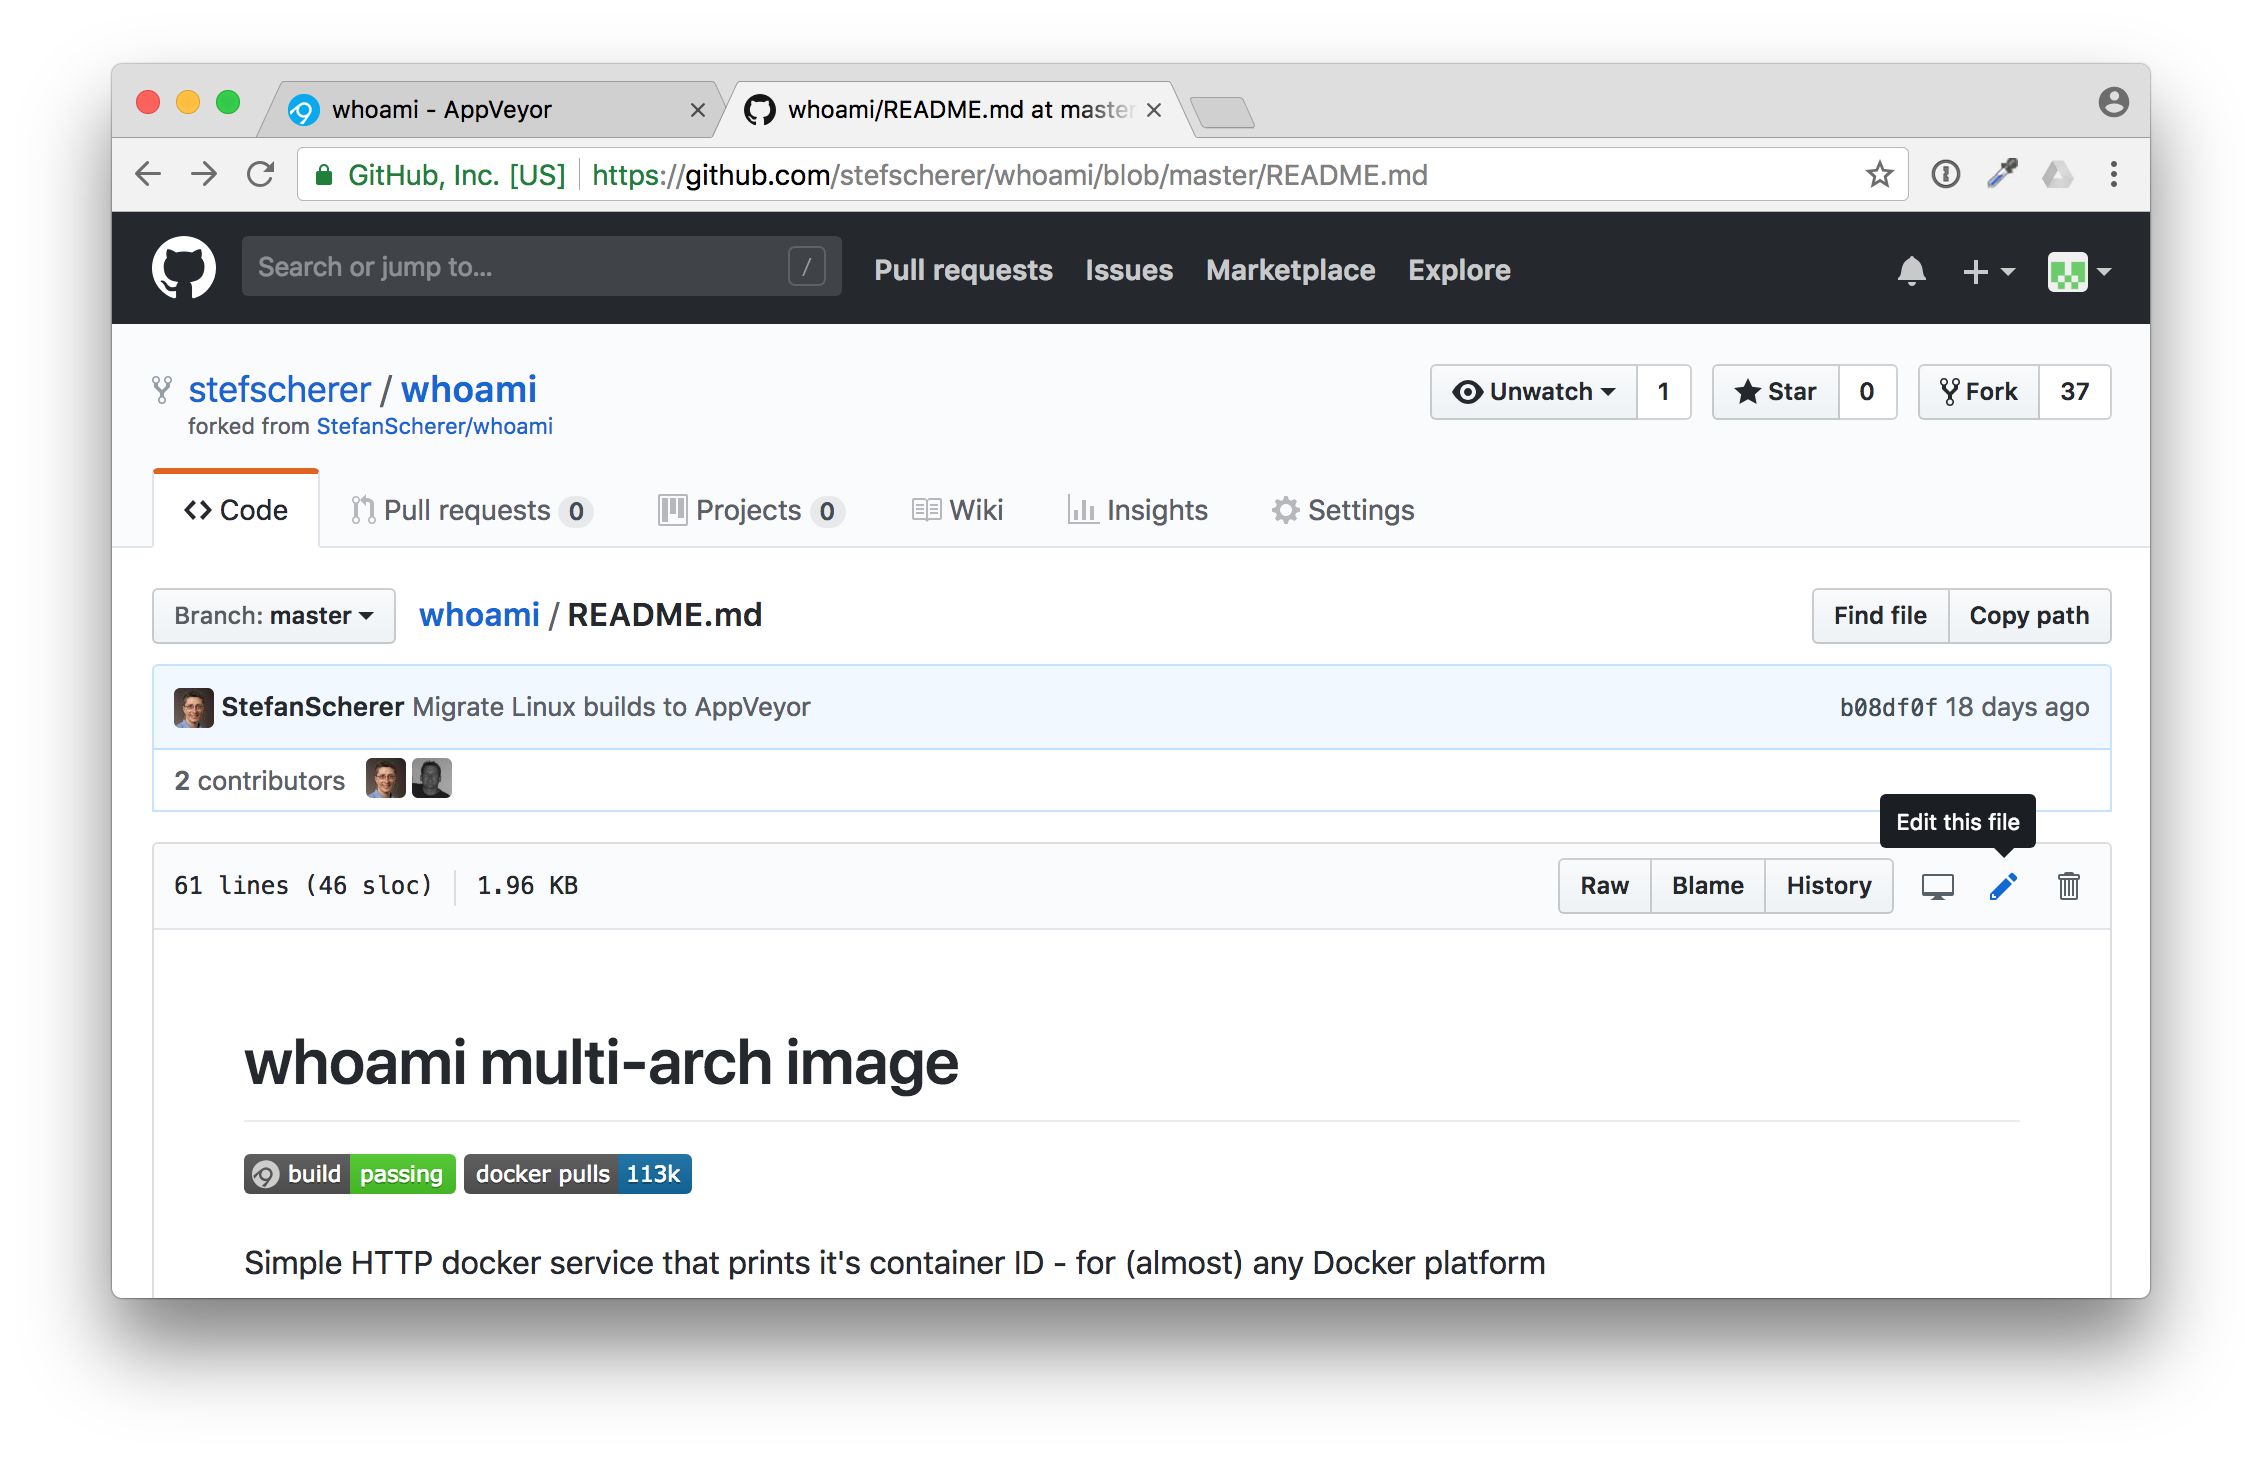
In this editor paste the new build badge link. Also adjust the Docker Hub badge to point to your desired Docker Hub image name. After that scroll down and commit the changes.
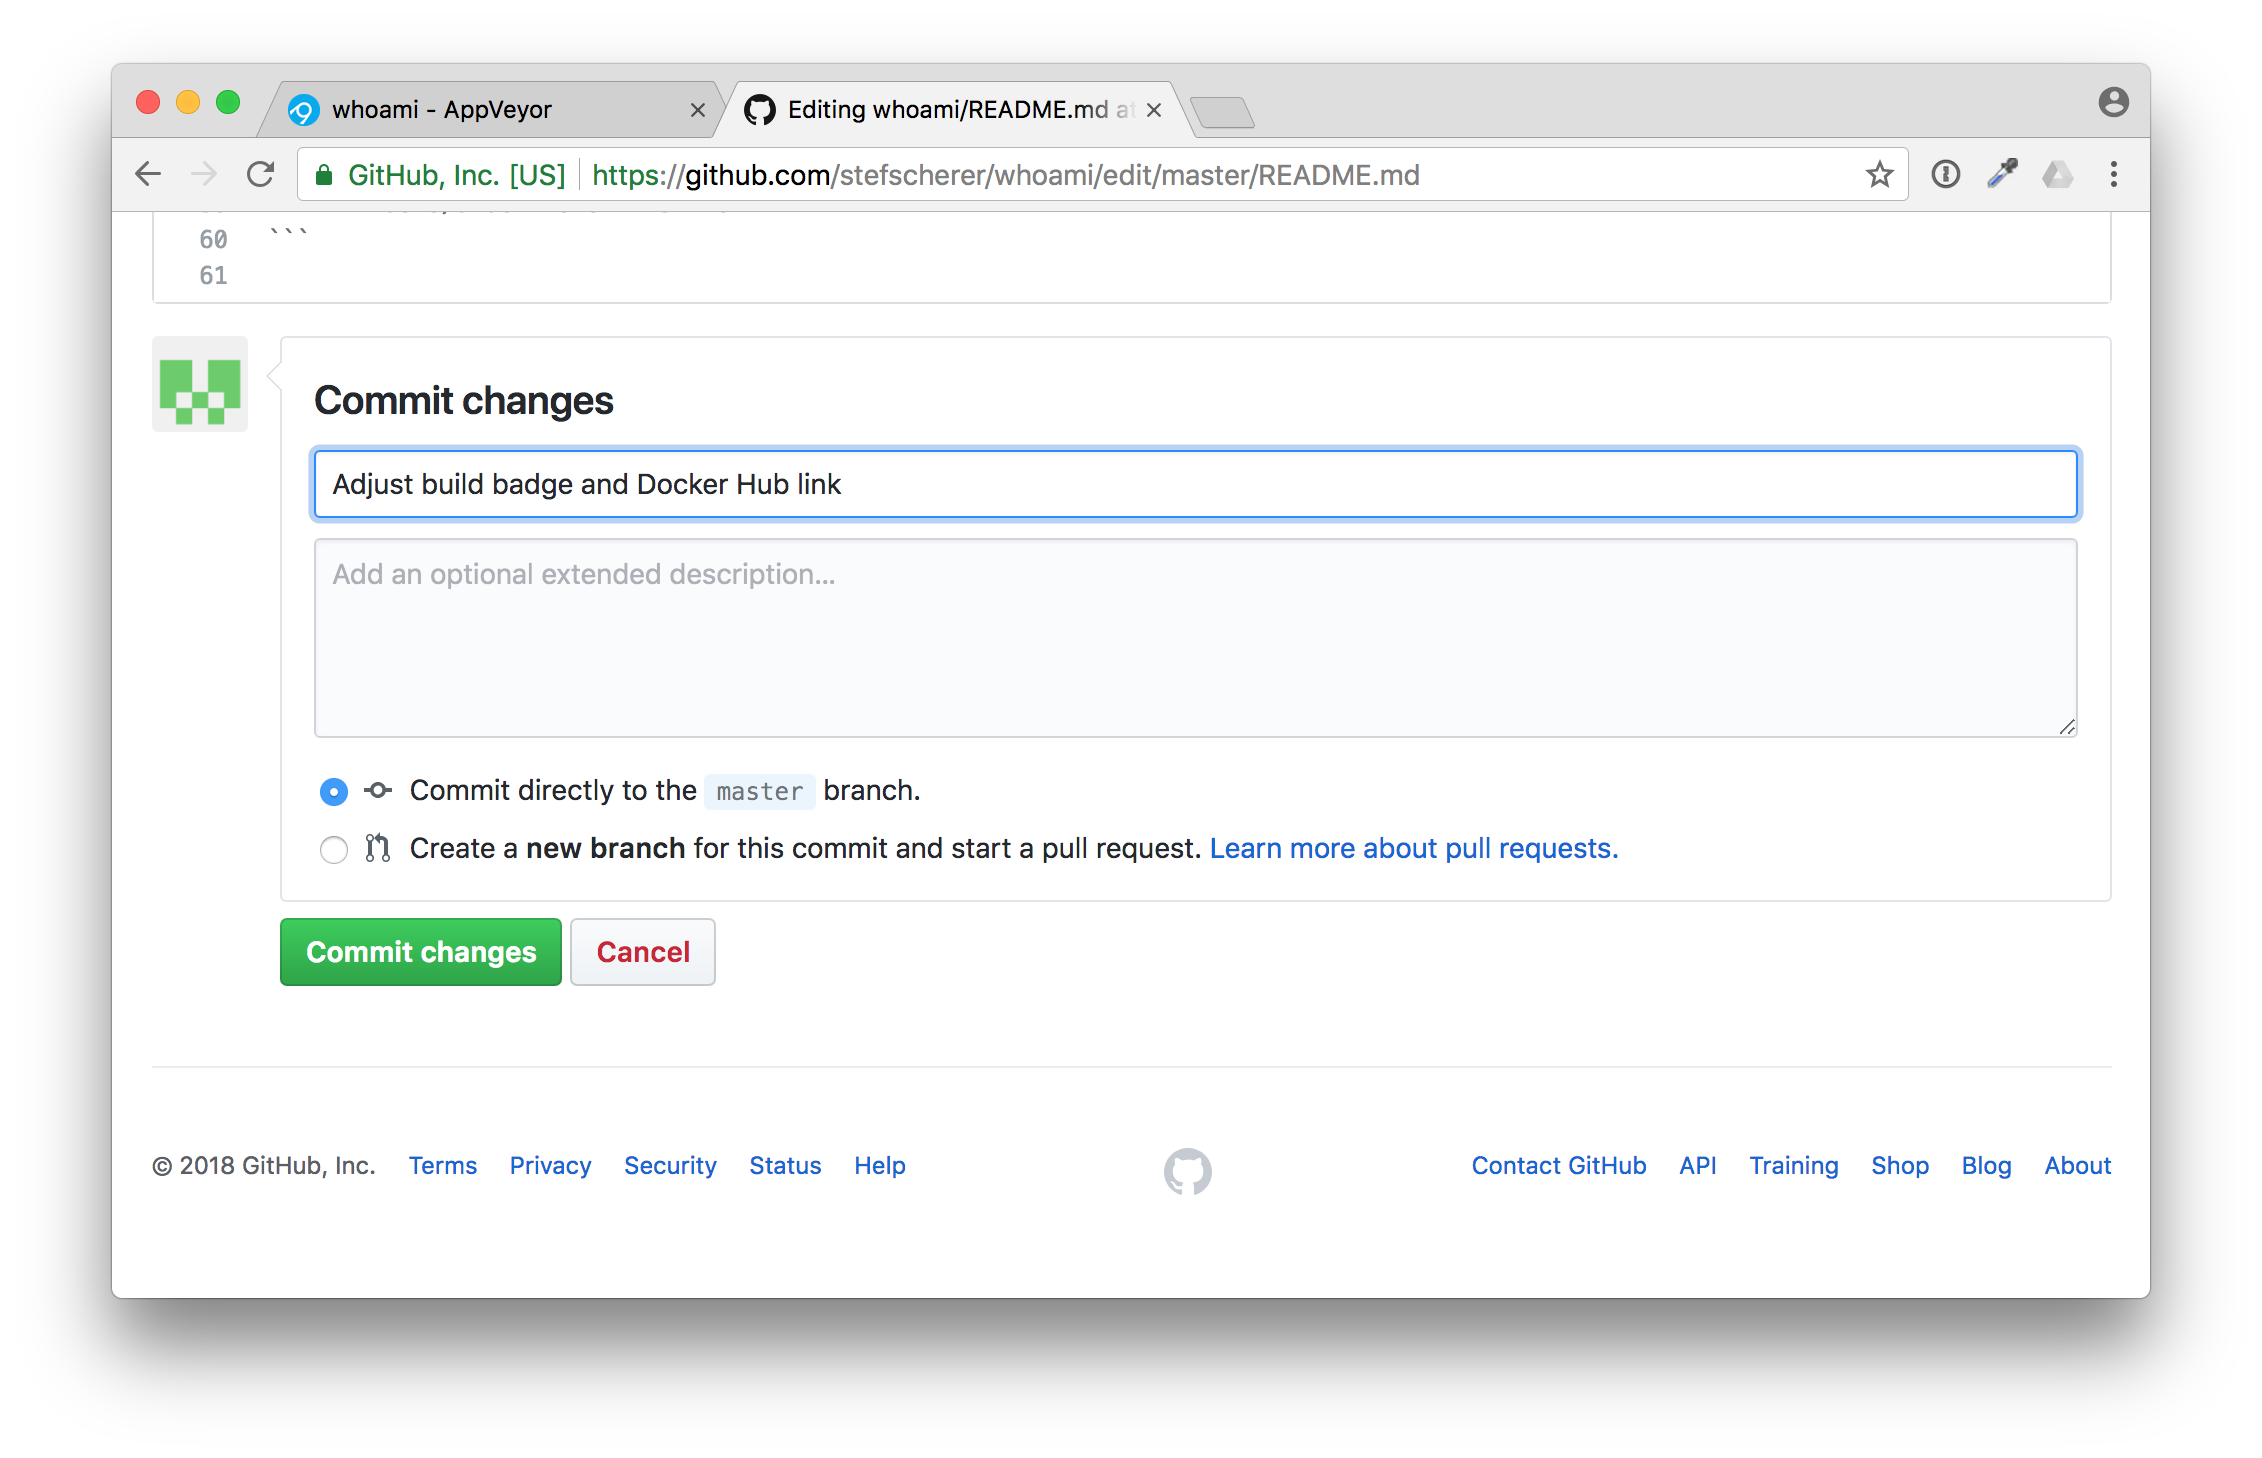
Head back to AppVeyor and you will see your first build running.
Isn't that fantastic? You just triggered a build from your browser. You can follow the build (it's a matrix build, we will have a closer look in the next blog post).
After a while the build is green.

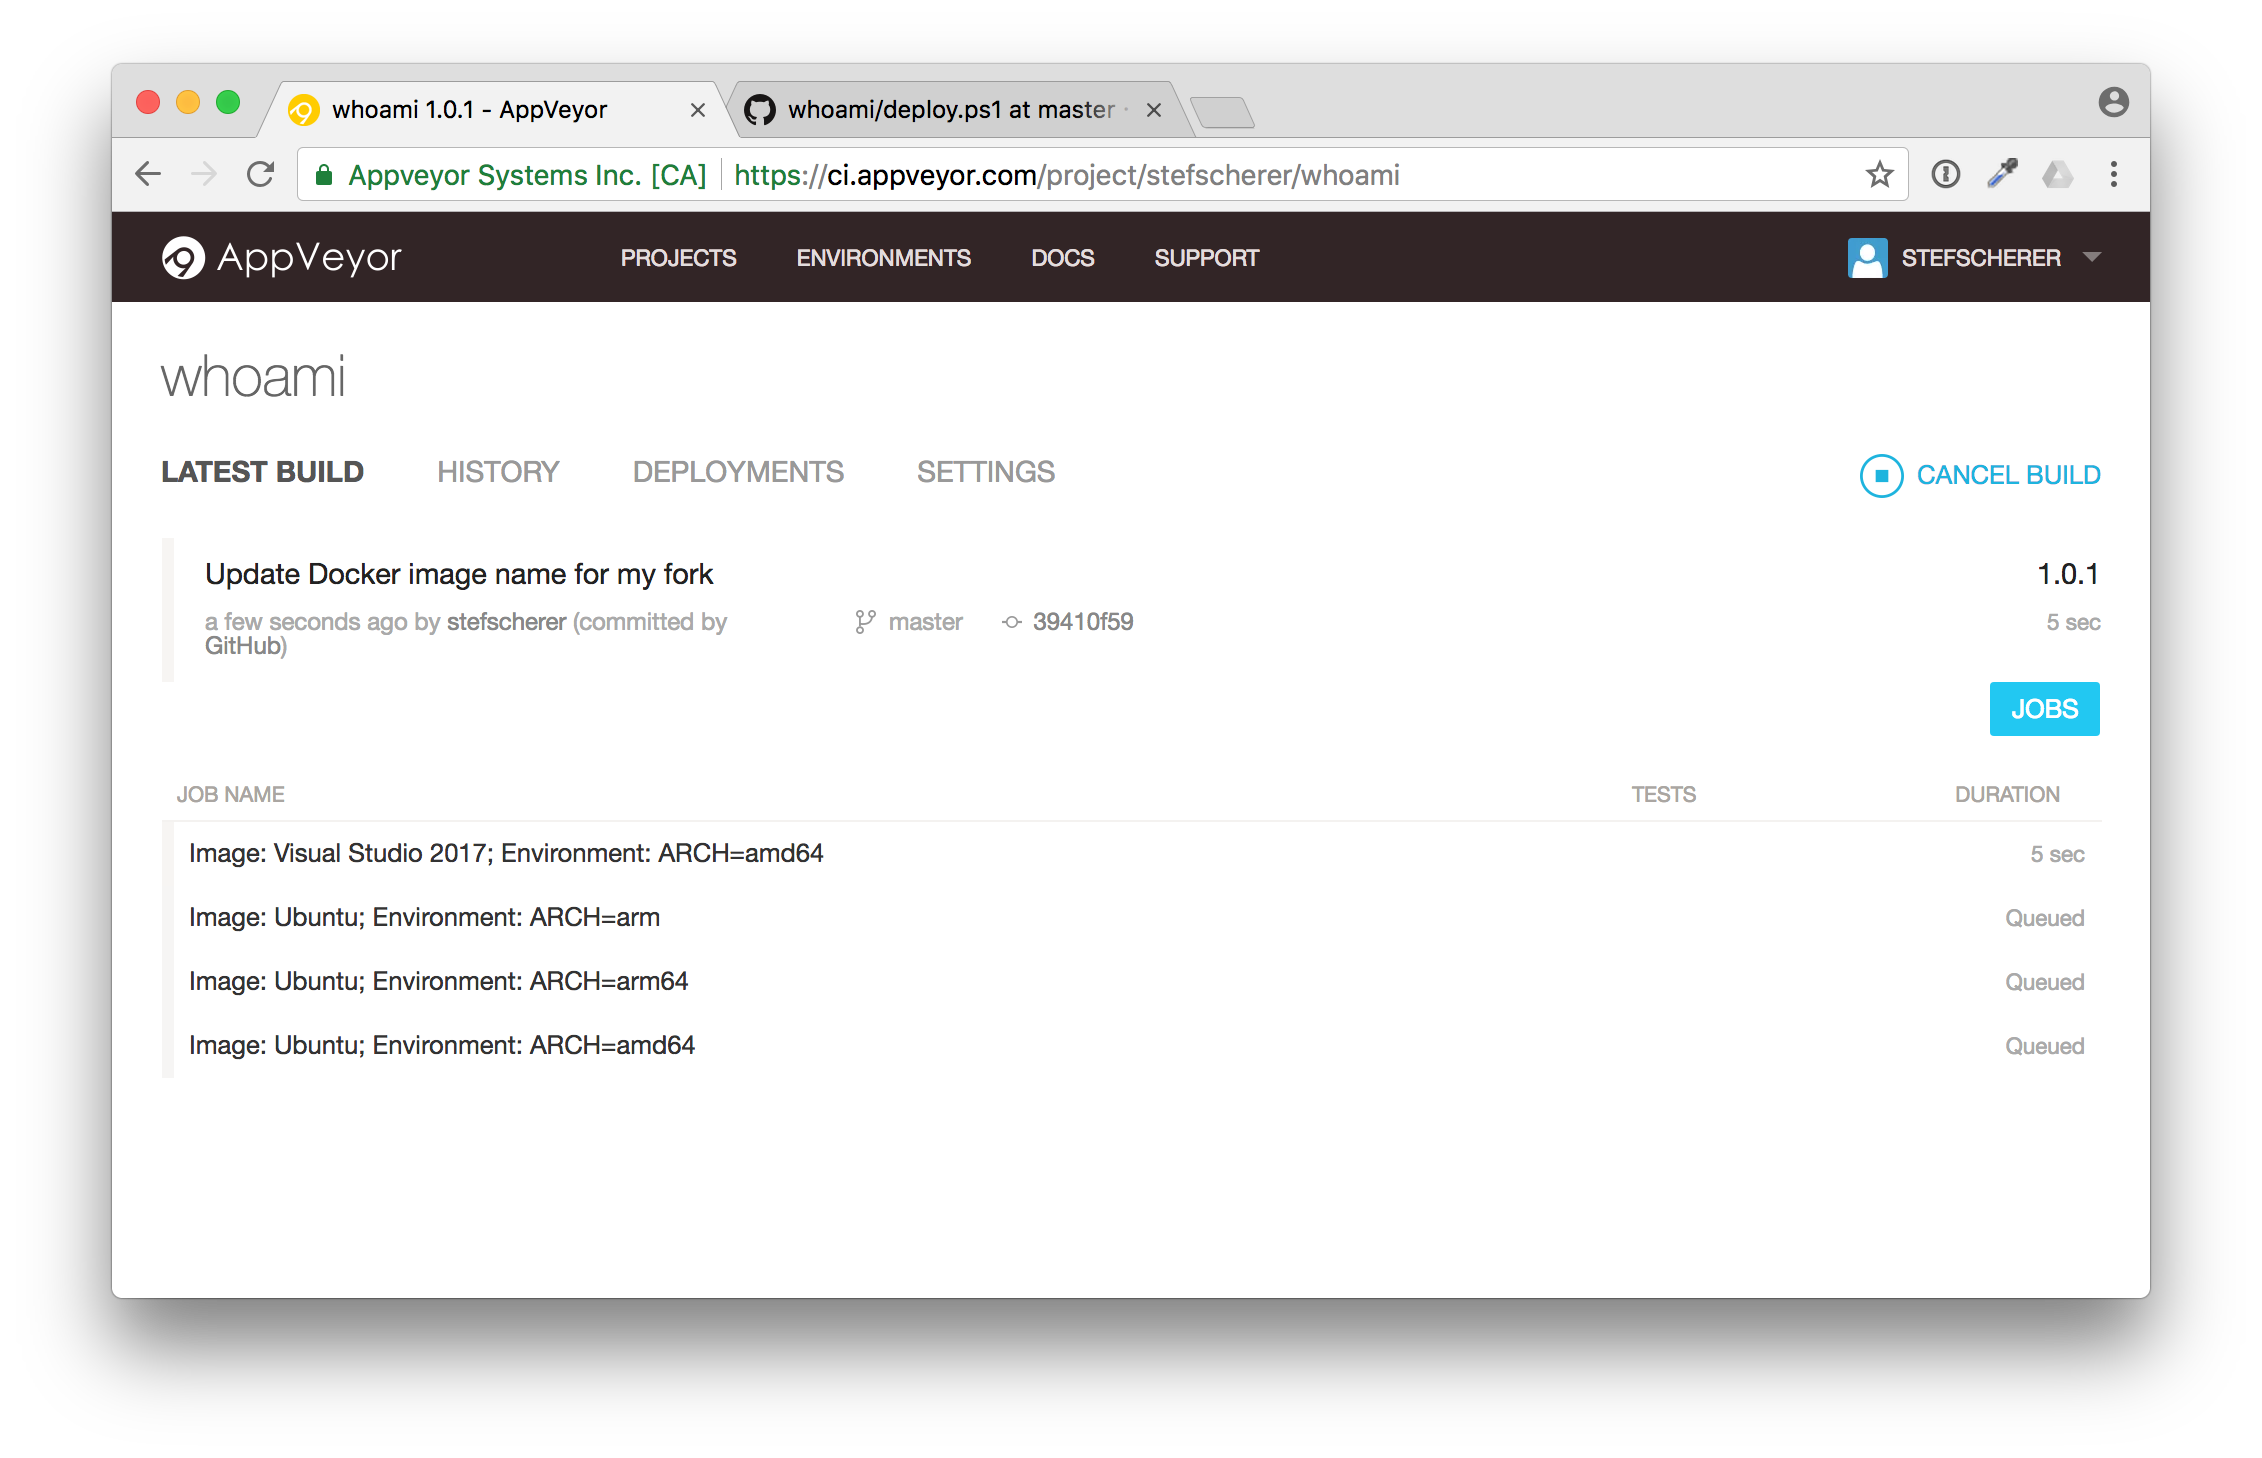
Adjust deploy.ps1
The second change in the forked repo is to adjust the Docker image name to deploy it to Docker Hub for when you start a GitHub release build.
Head over to GitHub browser tab and edit the deploy.ps1 script.
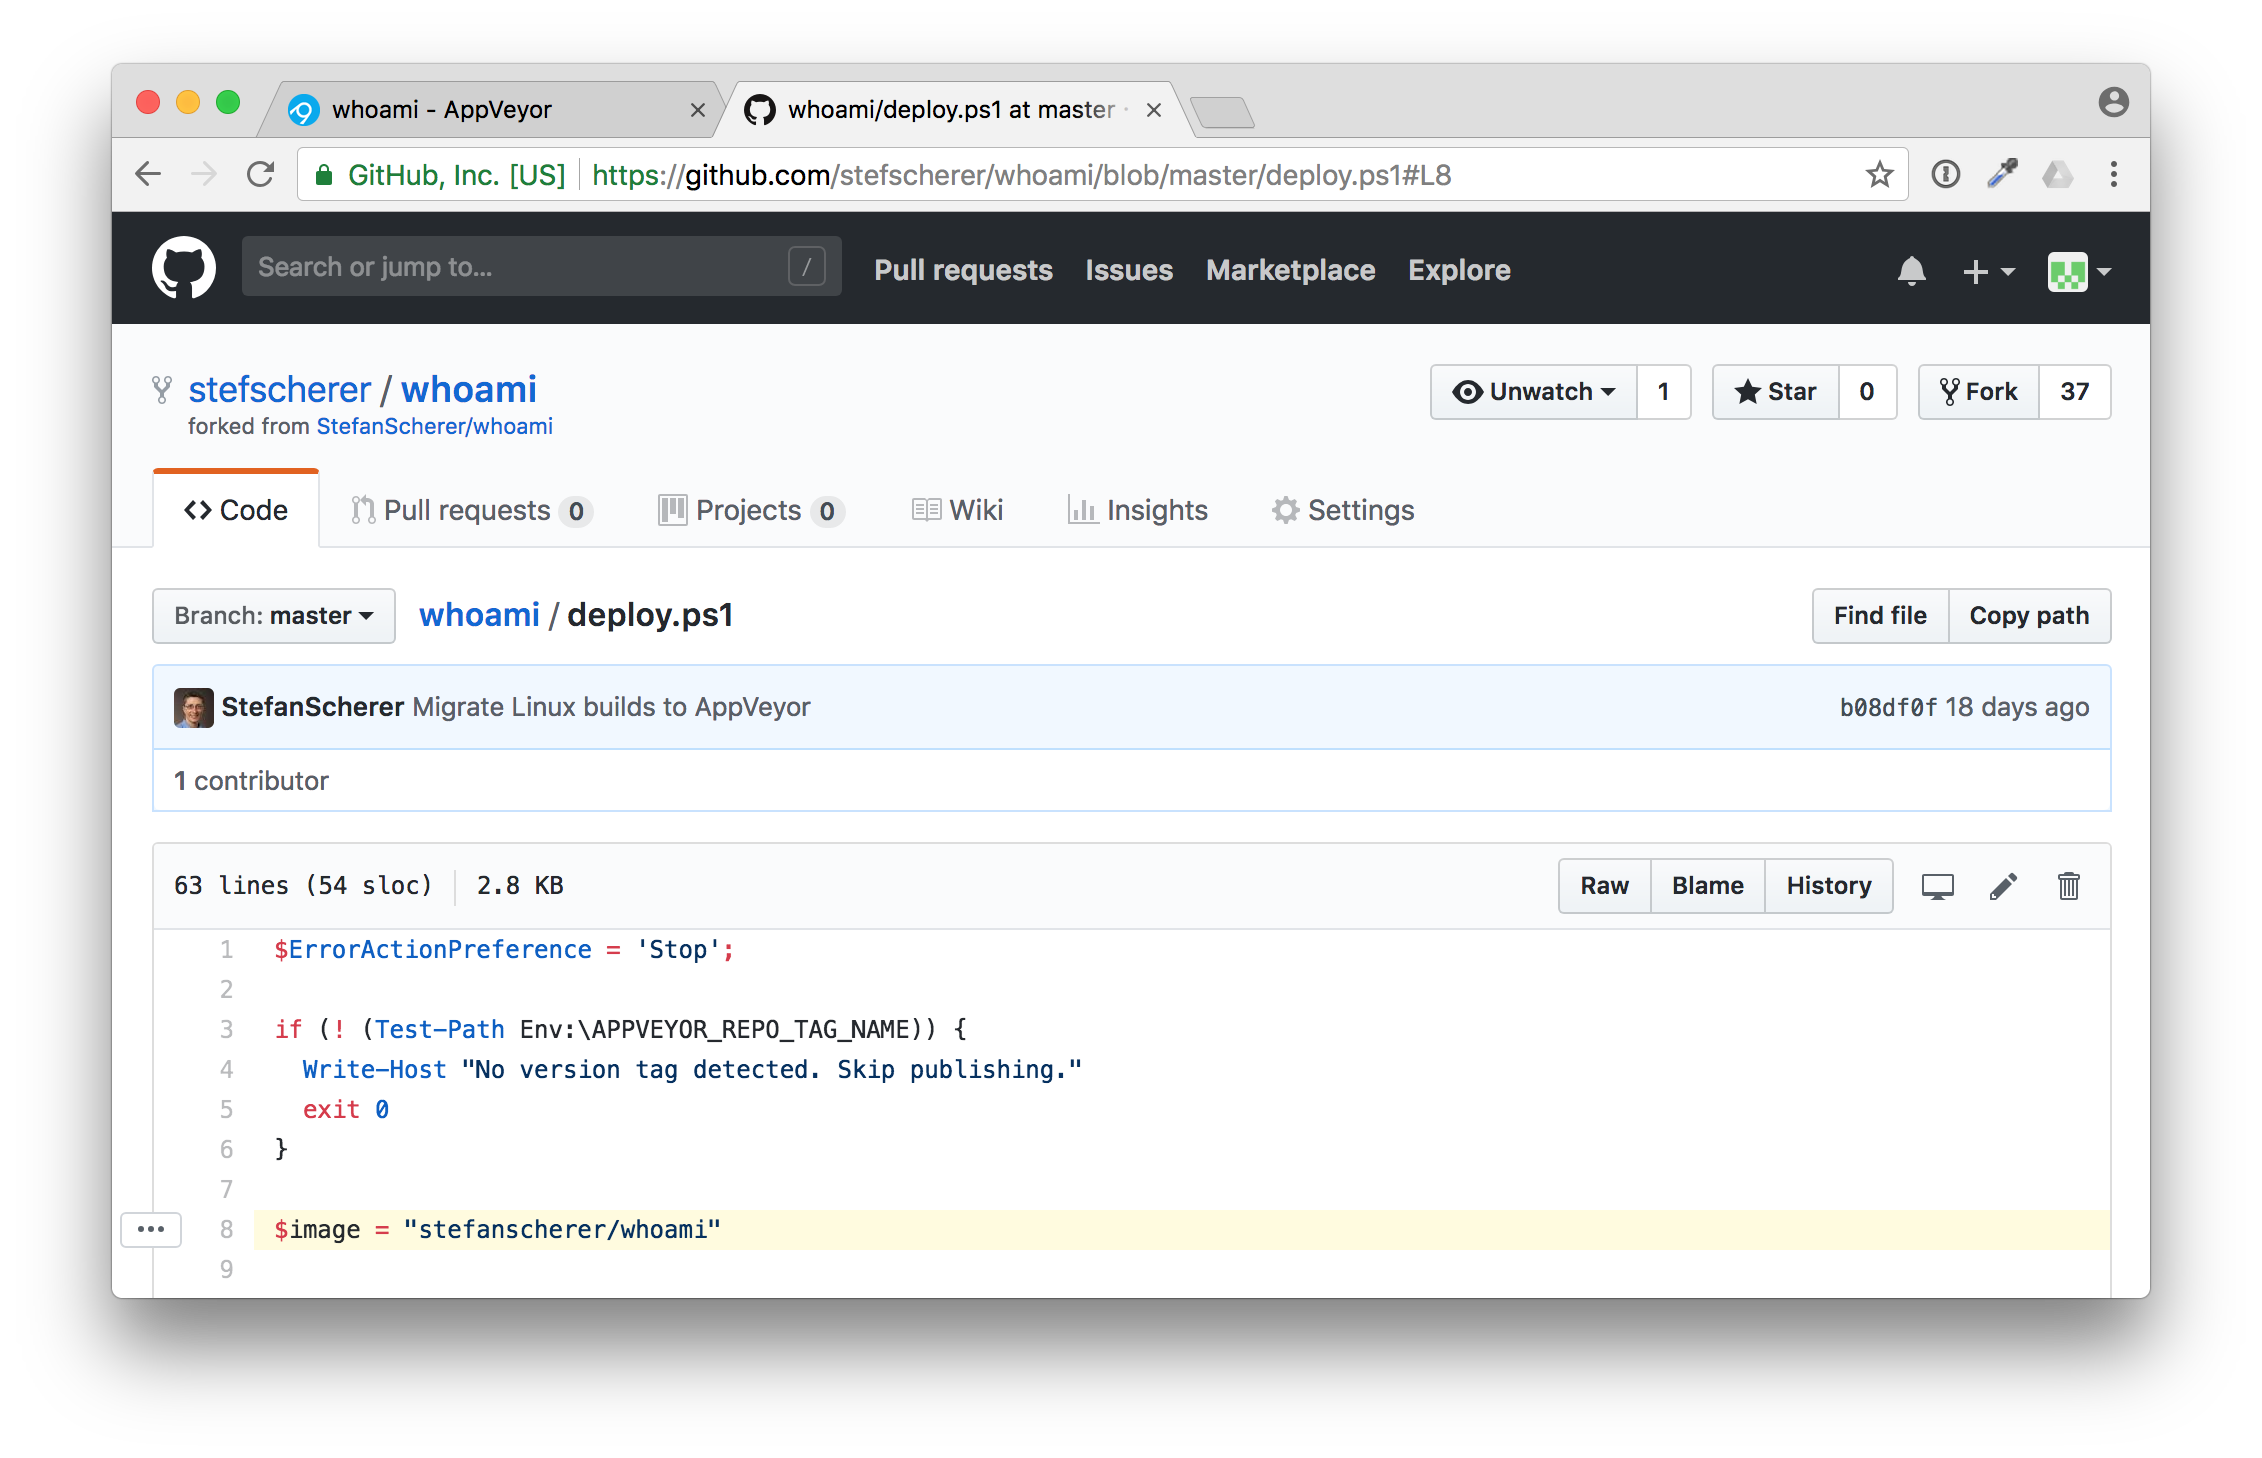
In line 8 you have to adjust the $image variable to fit your needs.
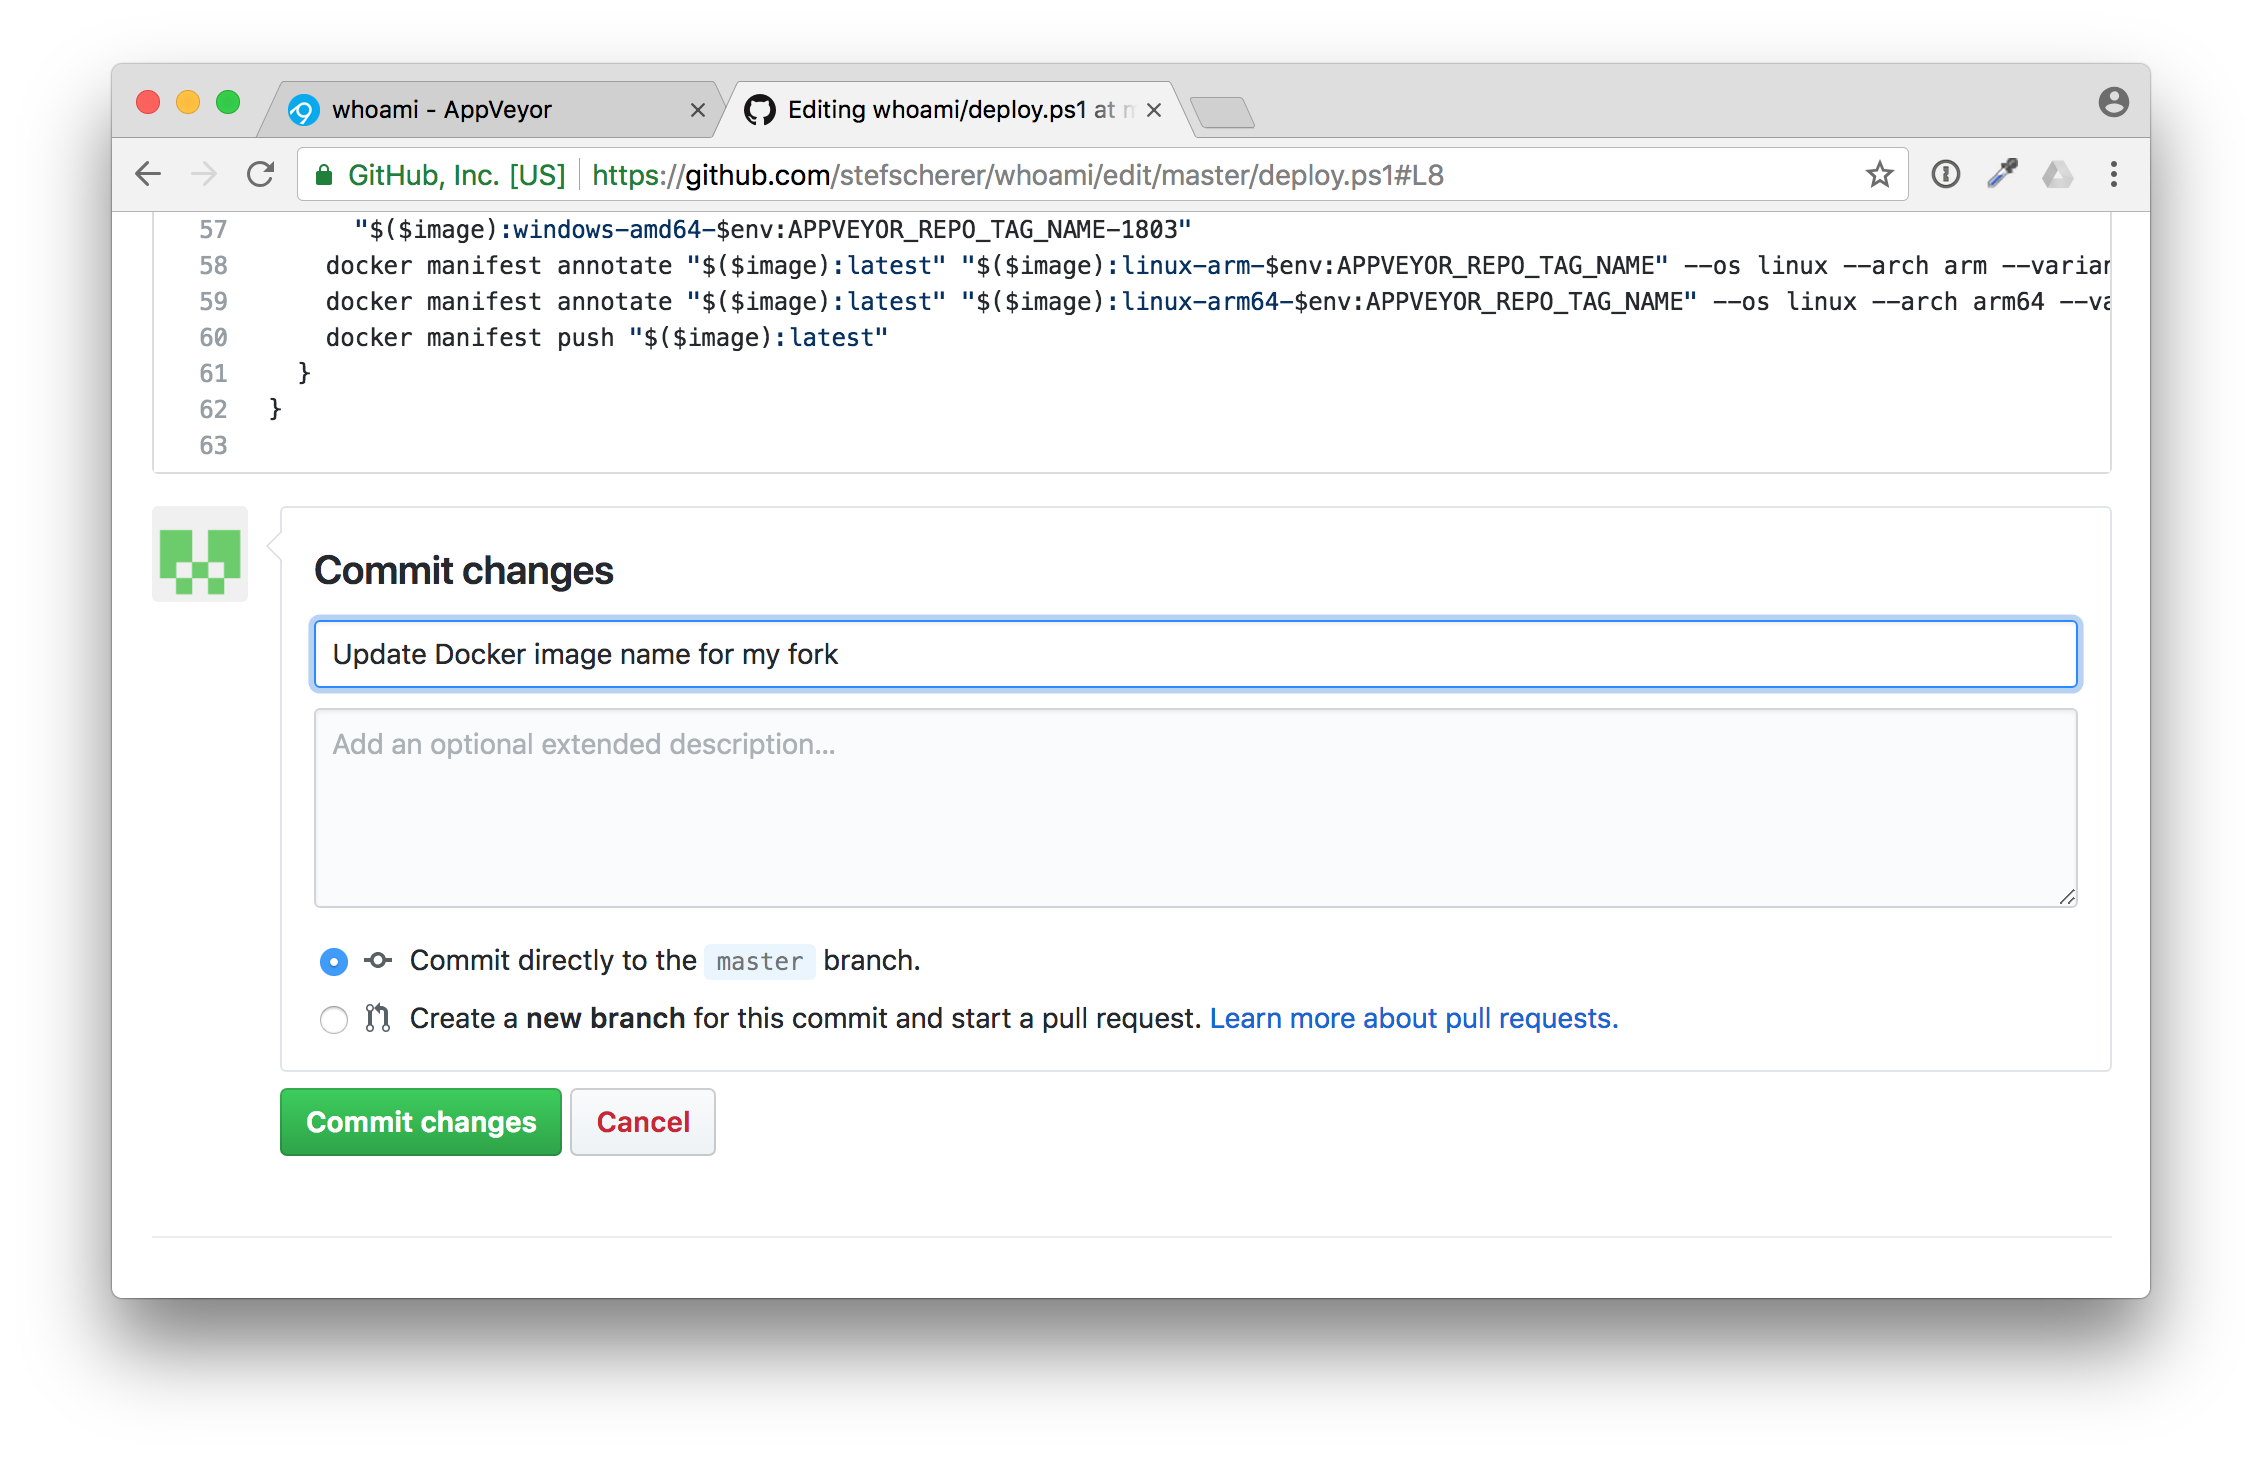
After that commit the changes, a second build will be triggered. But nothing more happens in the second build.
Tell me a secret
The appveyor.yml is configured to deploy the Docker image only during a release build. For such releases AppVeyor needs access to your Docker registry you want to push to. In our case it's the Docker Hub.
This is done with secret environment variables. You can either use secrets in the appveyor.yml or just edit the environment variables in the AppVeyor browser tab. I'll show you the latter how to do it.
Go to "SETTINGS" and click the "Environment" tab. We need to add two environment variables
- DOCKER_USER
- DOCKER_PASS
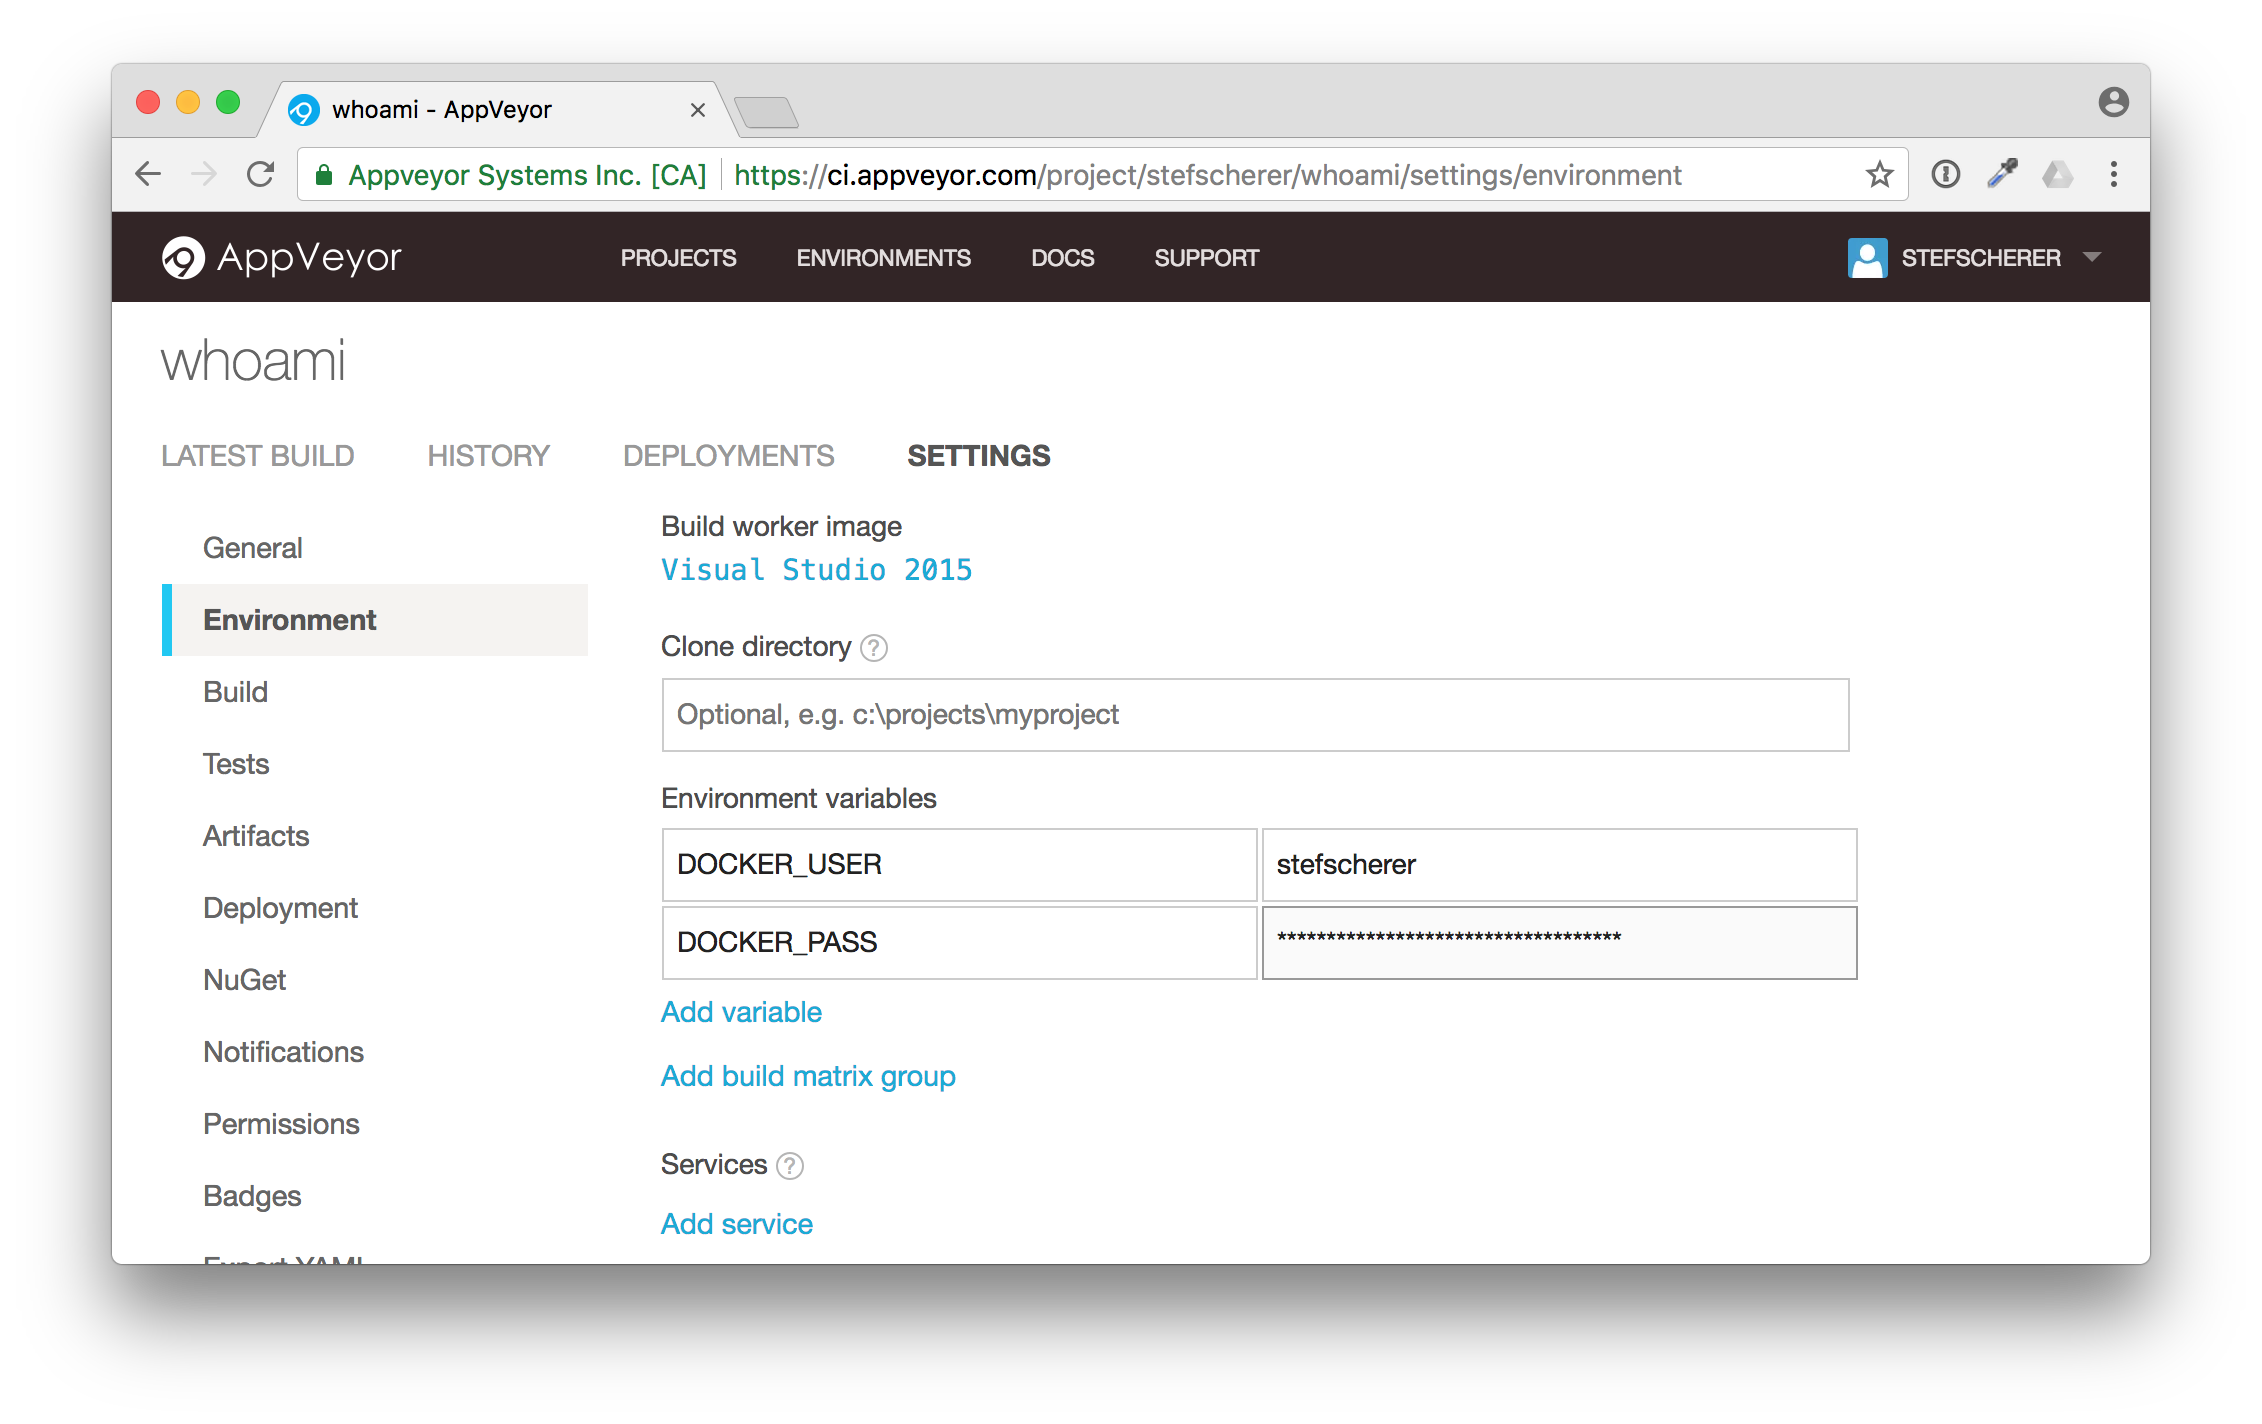
Then scroll down and click on "Save". This is the second thing that could be improved in the UI. You often don't see this "Save" button.
If you don't like to add your real Docker Hub account a good practise is to use another Docker Hub account for just the pushes and grant that account write access to only the Docker Hub images you want to.
Release it!
Now, the build pipeline is set up in AppVeyor, as you have seen, the build and minimal tests were green. Now it's time to release the first Docker image.
Go to your forked GitHub repo again. There is a link to the "releases". Click on "releases".

You have forked all the tags, but not the releases. Now let's "Draft a new release" to trigger a build.
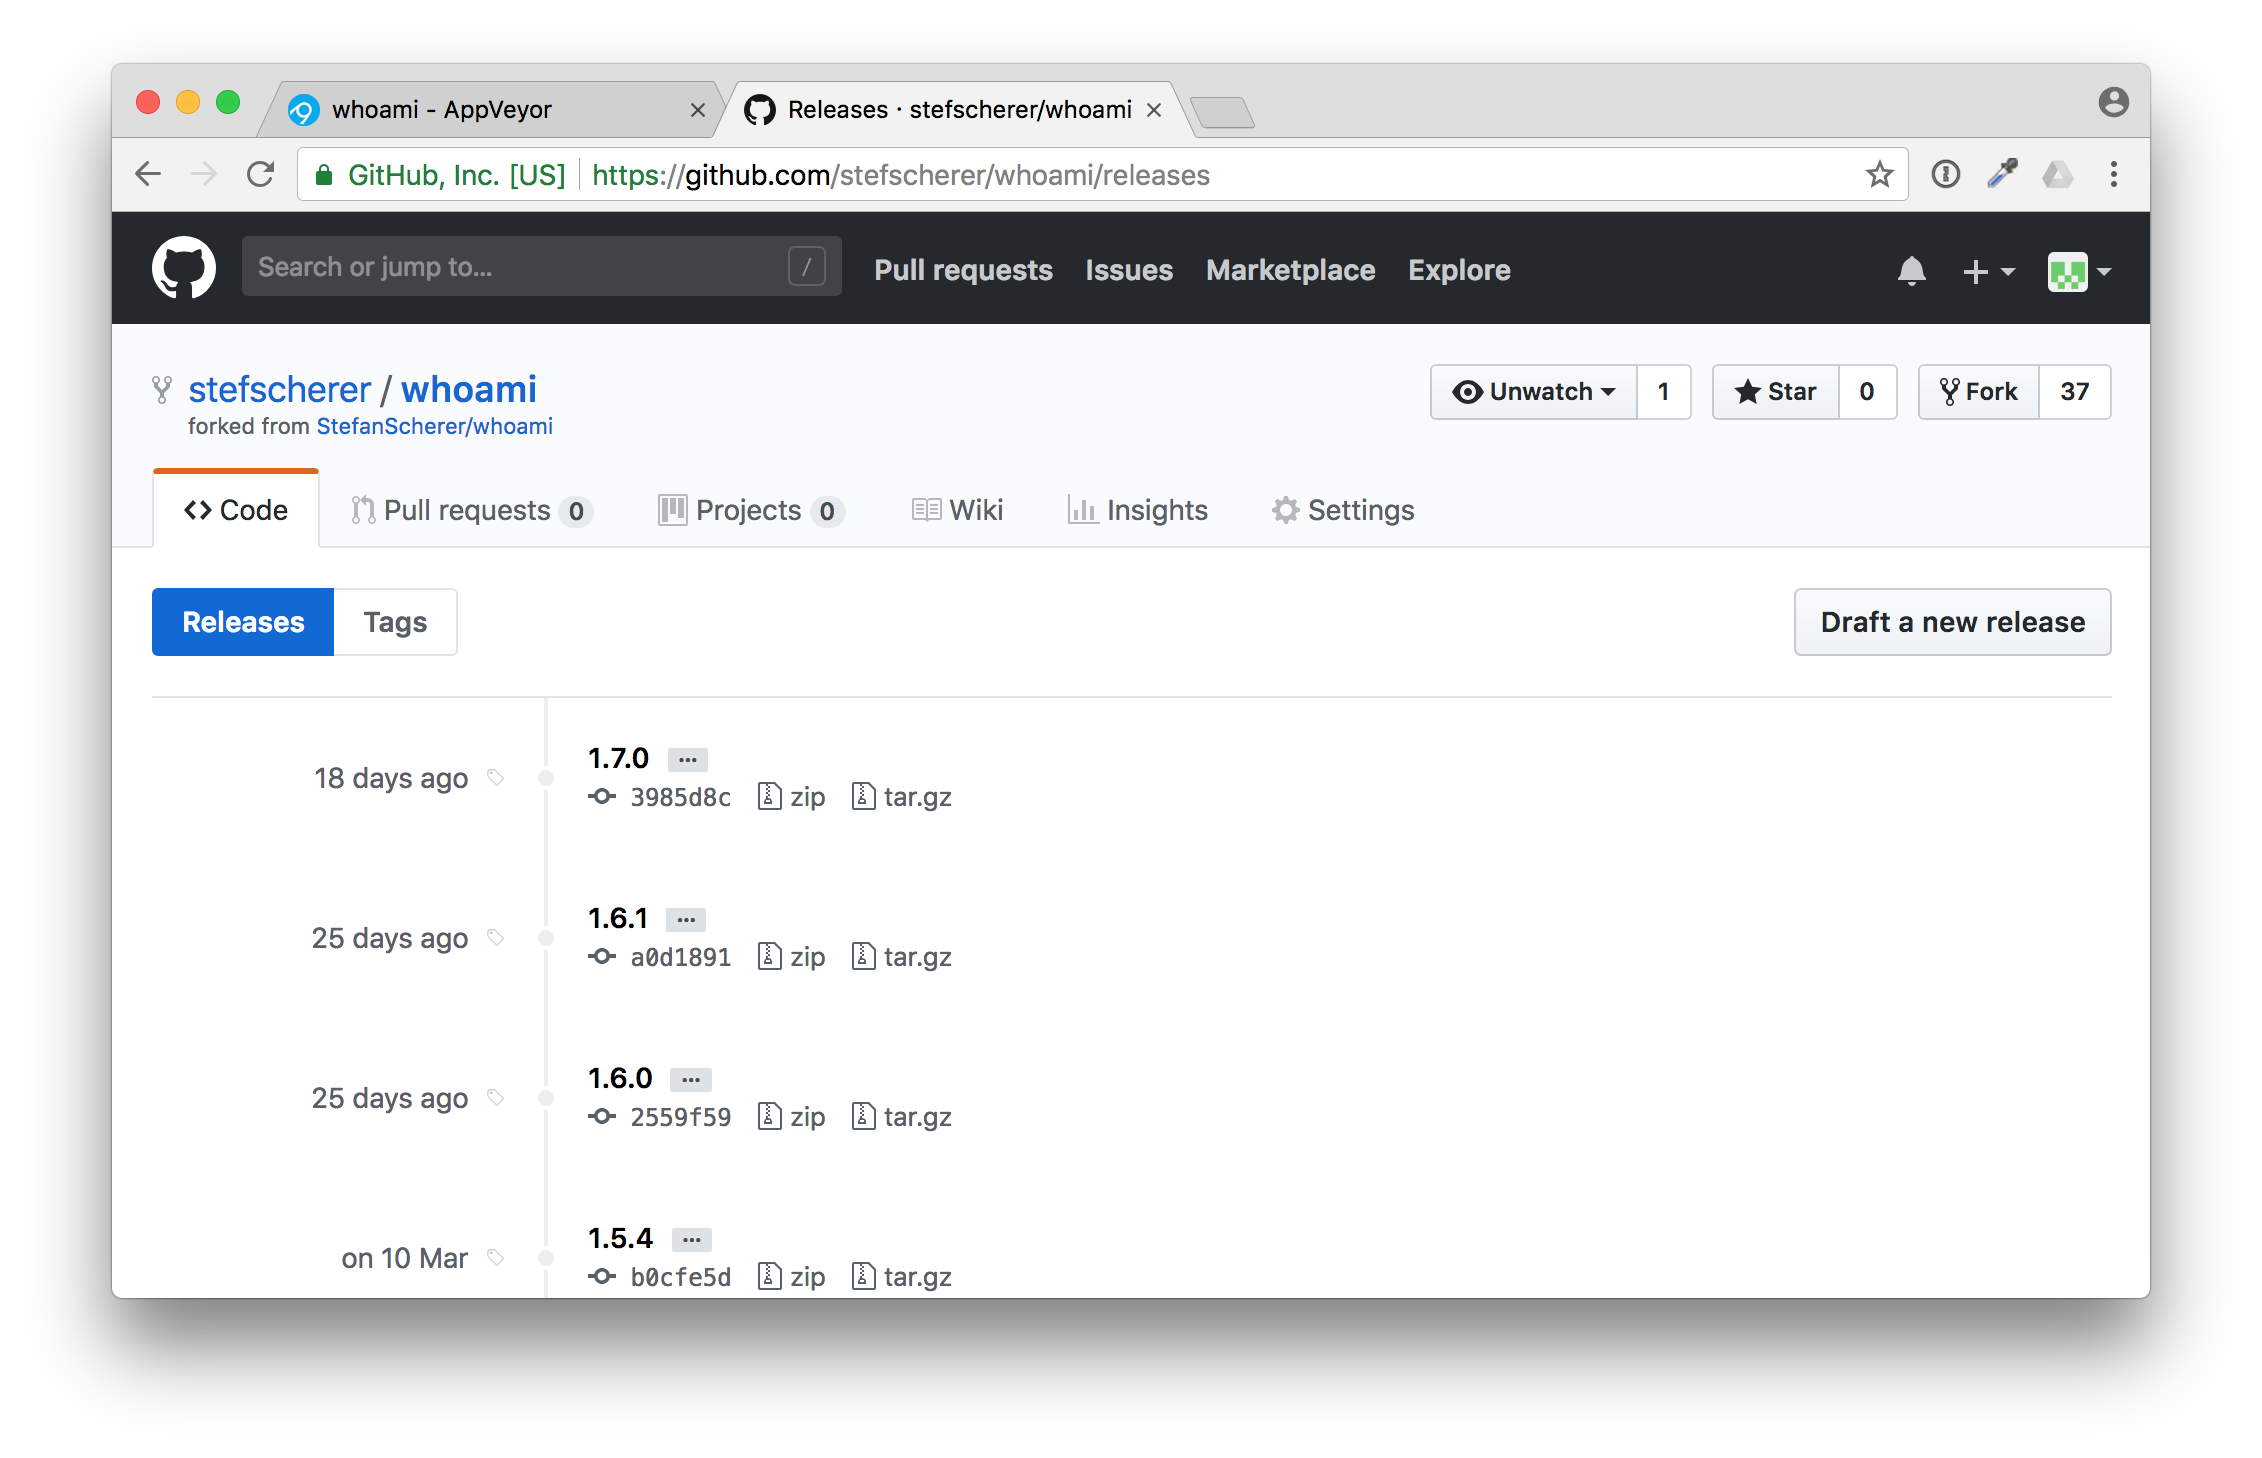
Use for example "2.0.0" as new release and tag name, enter some useful description.
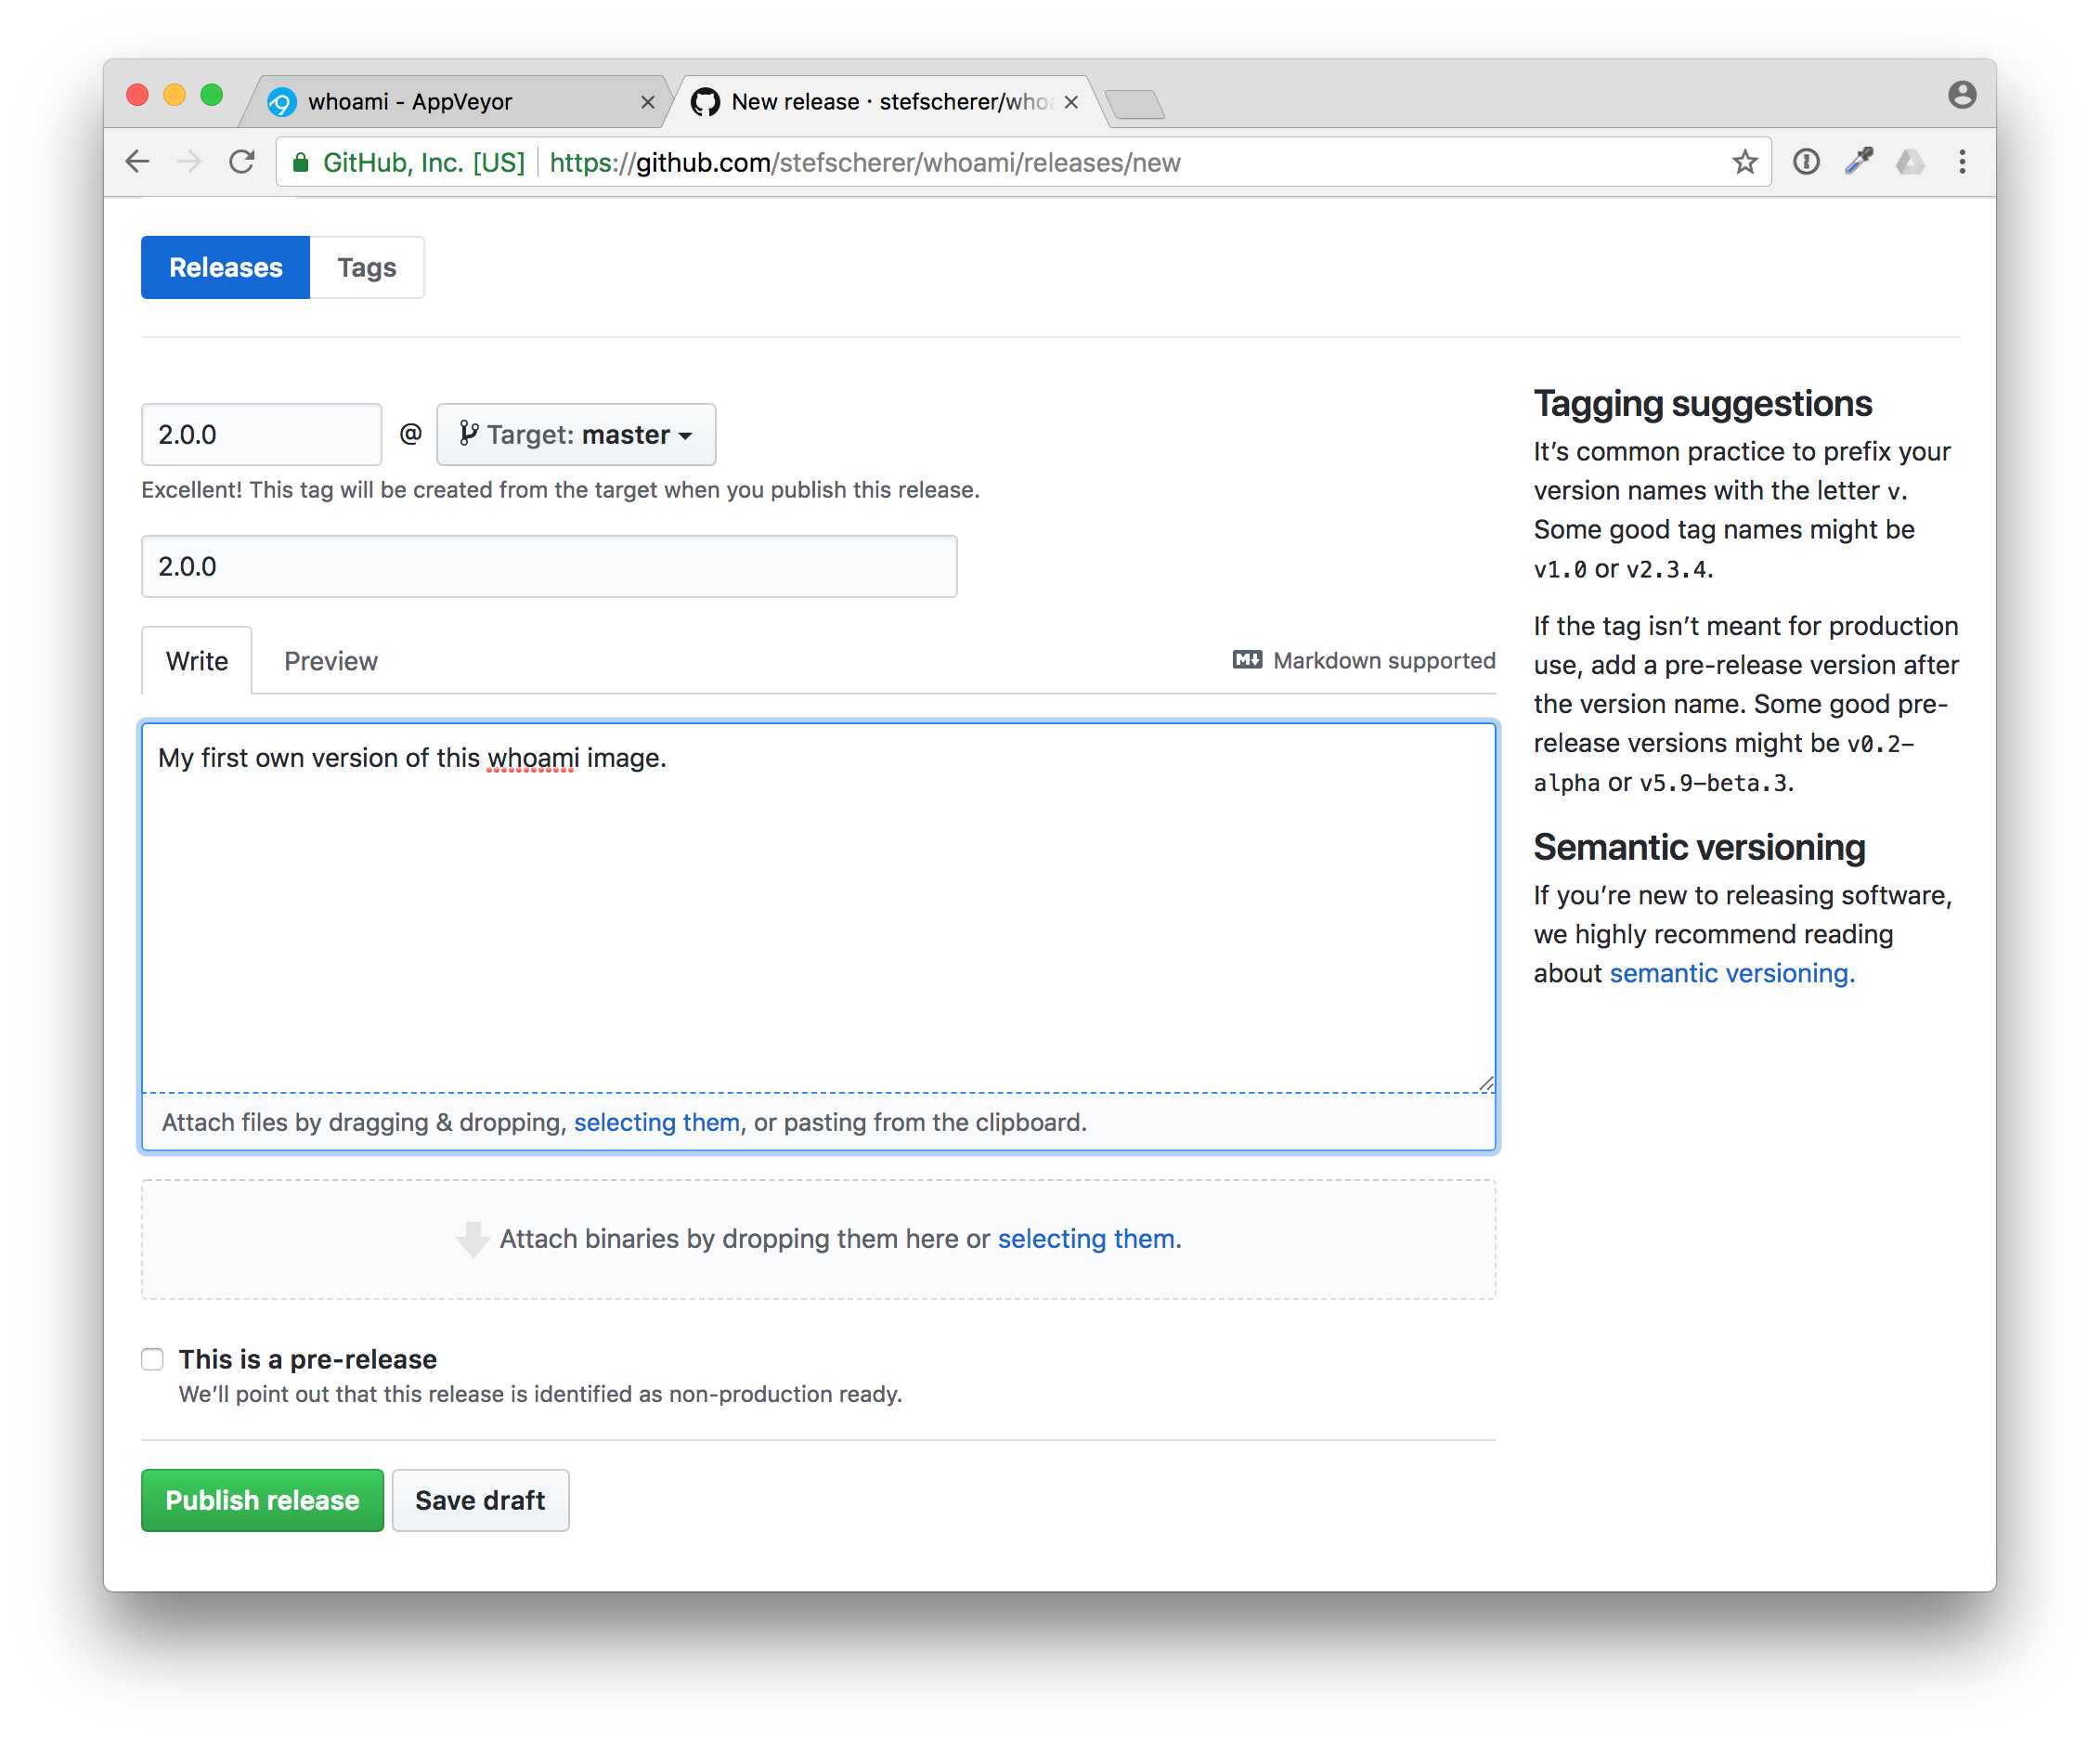
Then press "Publish release". This also triggers a new build in AppVeyor, this time a tagged build.
In AppVeyor you can see the tag name "2.0.0"
You now also can follow the build, but I'll explain it in more detail in the next blog post. After some minutes the build is completed and green.
Now, do we really have a Docker image pushed to Docker Hub? Let's check. Go back to your GitHub repo and check if the Docker Hub badge also works.
And yes, there it is. You have successfully published a Docker image from an application you don't really have to understand the language or how to setup the build steps for that.
That's the "let me do it" first approach. Now you have time to look at all the files. Start with the appveyor.yml, the YAML is the start of the build pipeline.
Or start with the application code which is written in Golang.
TL/DR: Share your YAML
In this blog post you have seen how important it is to share not only the code, but also the build pipeline. You have learned to watch out for YAML files. There are other CI services out there, but the pattern is almost the same. Look for .travis.yml, .circleci/config.yml and similar names.
If you liked this blog post please share it with your friends. You can follow me on Twitter @stefscherer as well.
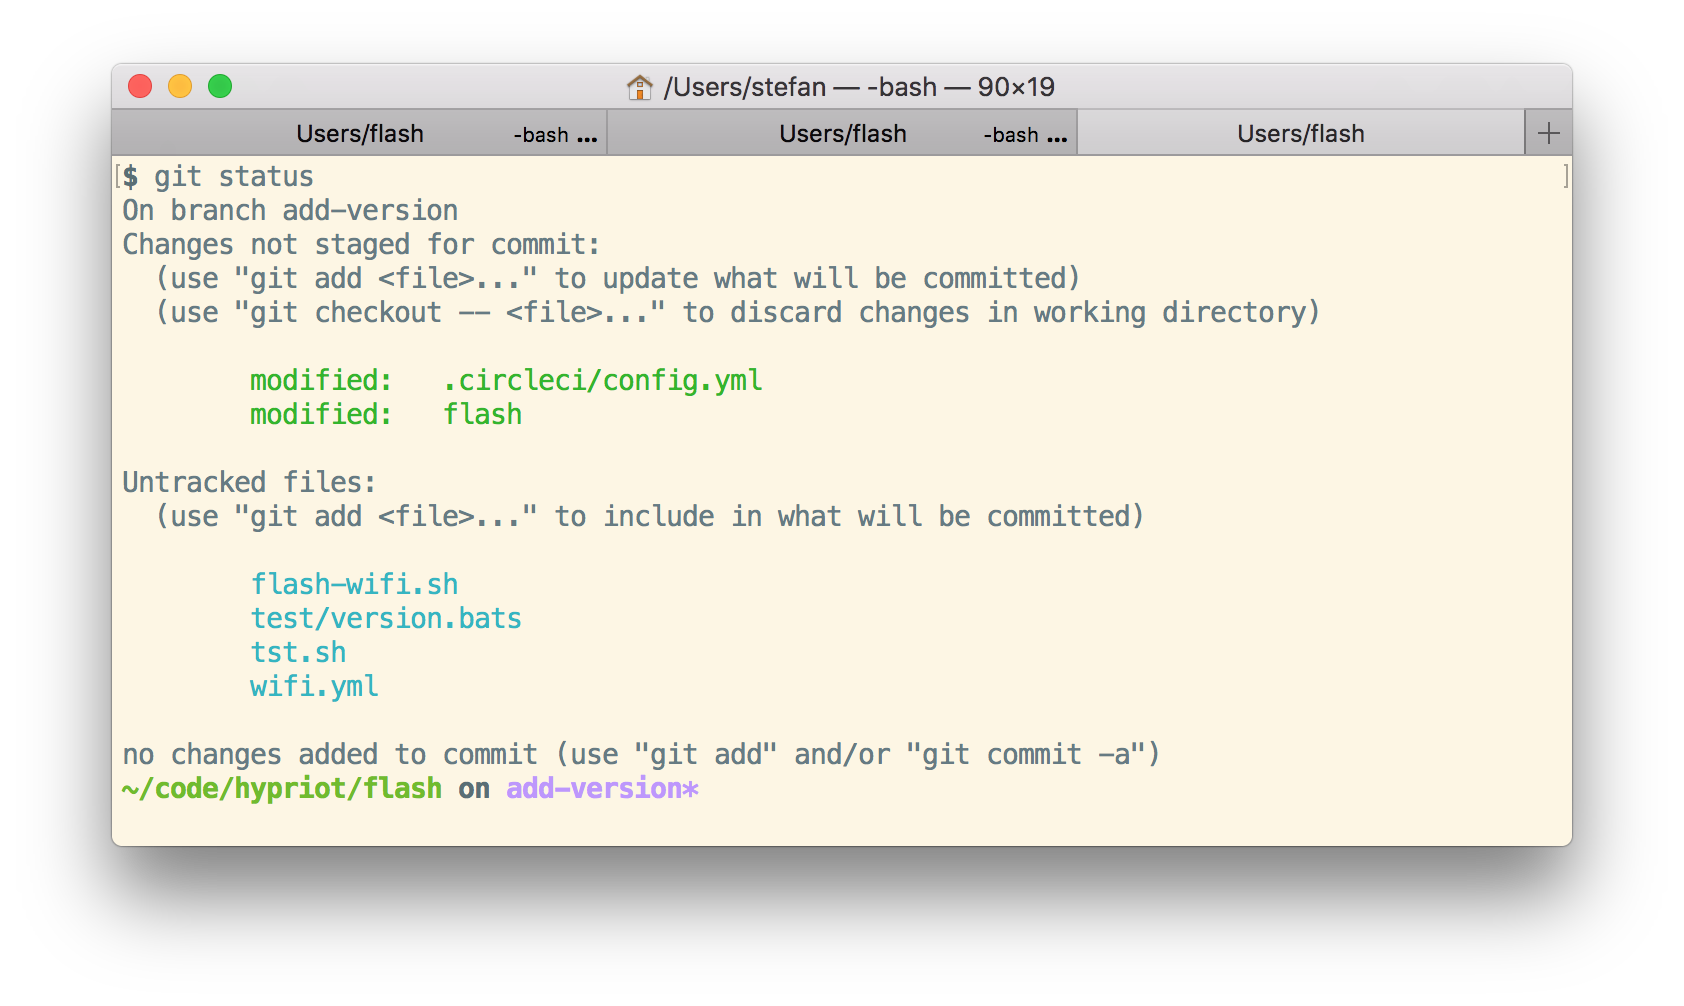
]]>What a wonderful day. I just changed some code in one of my weekend projects and then it happened. I totally screwed it up, I accidentally pushed some secrets to a GitHub pull request. Yes, ship happens. We're all humans and make mistakes. We normally blog about success, but I
]]>What a wonderful day. I just changed some code in one of my weekend projects and then it happened. I totally screwed it up, I accidentally pushed some secrets to a GitHub pull request. Yes, ship happens. We're all humans and make mistakes. We normally blog about success, but I use my mistake to talk about how to fix this and how to prevent it from happening in the future again.
The bad mistake
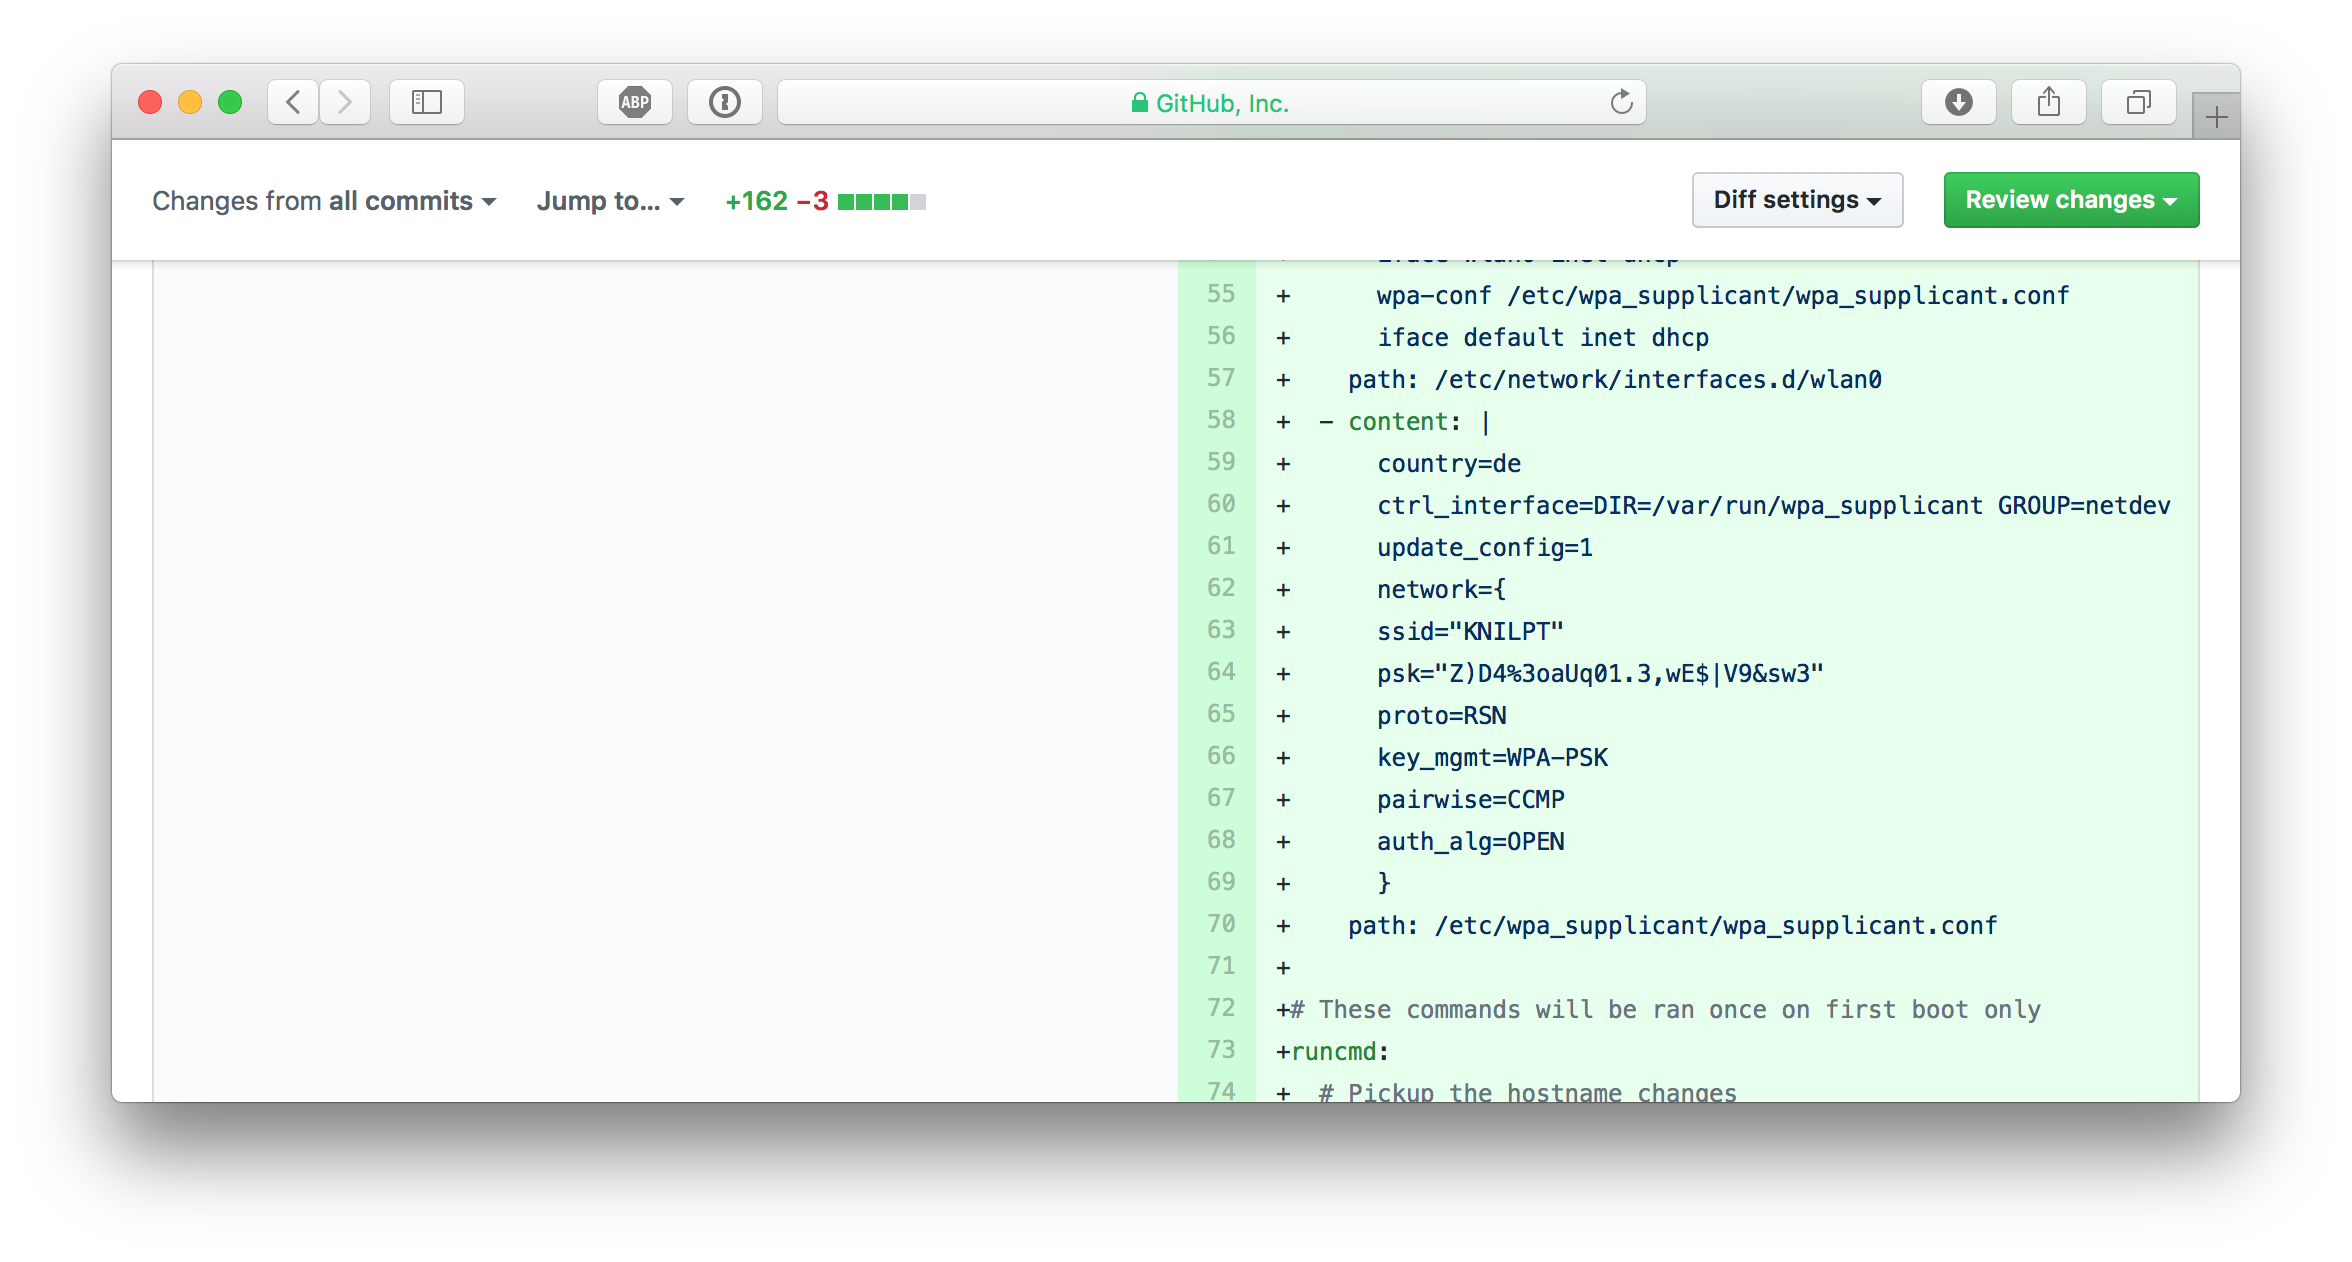
Well, I edited some code of my flash script to flash Raspberry Pi SD cards. This tool can also inject configuration to boot your Pi without any manual interaction to a specified hostname, or add your WiFi settings so it can join your wireless network automatically.
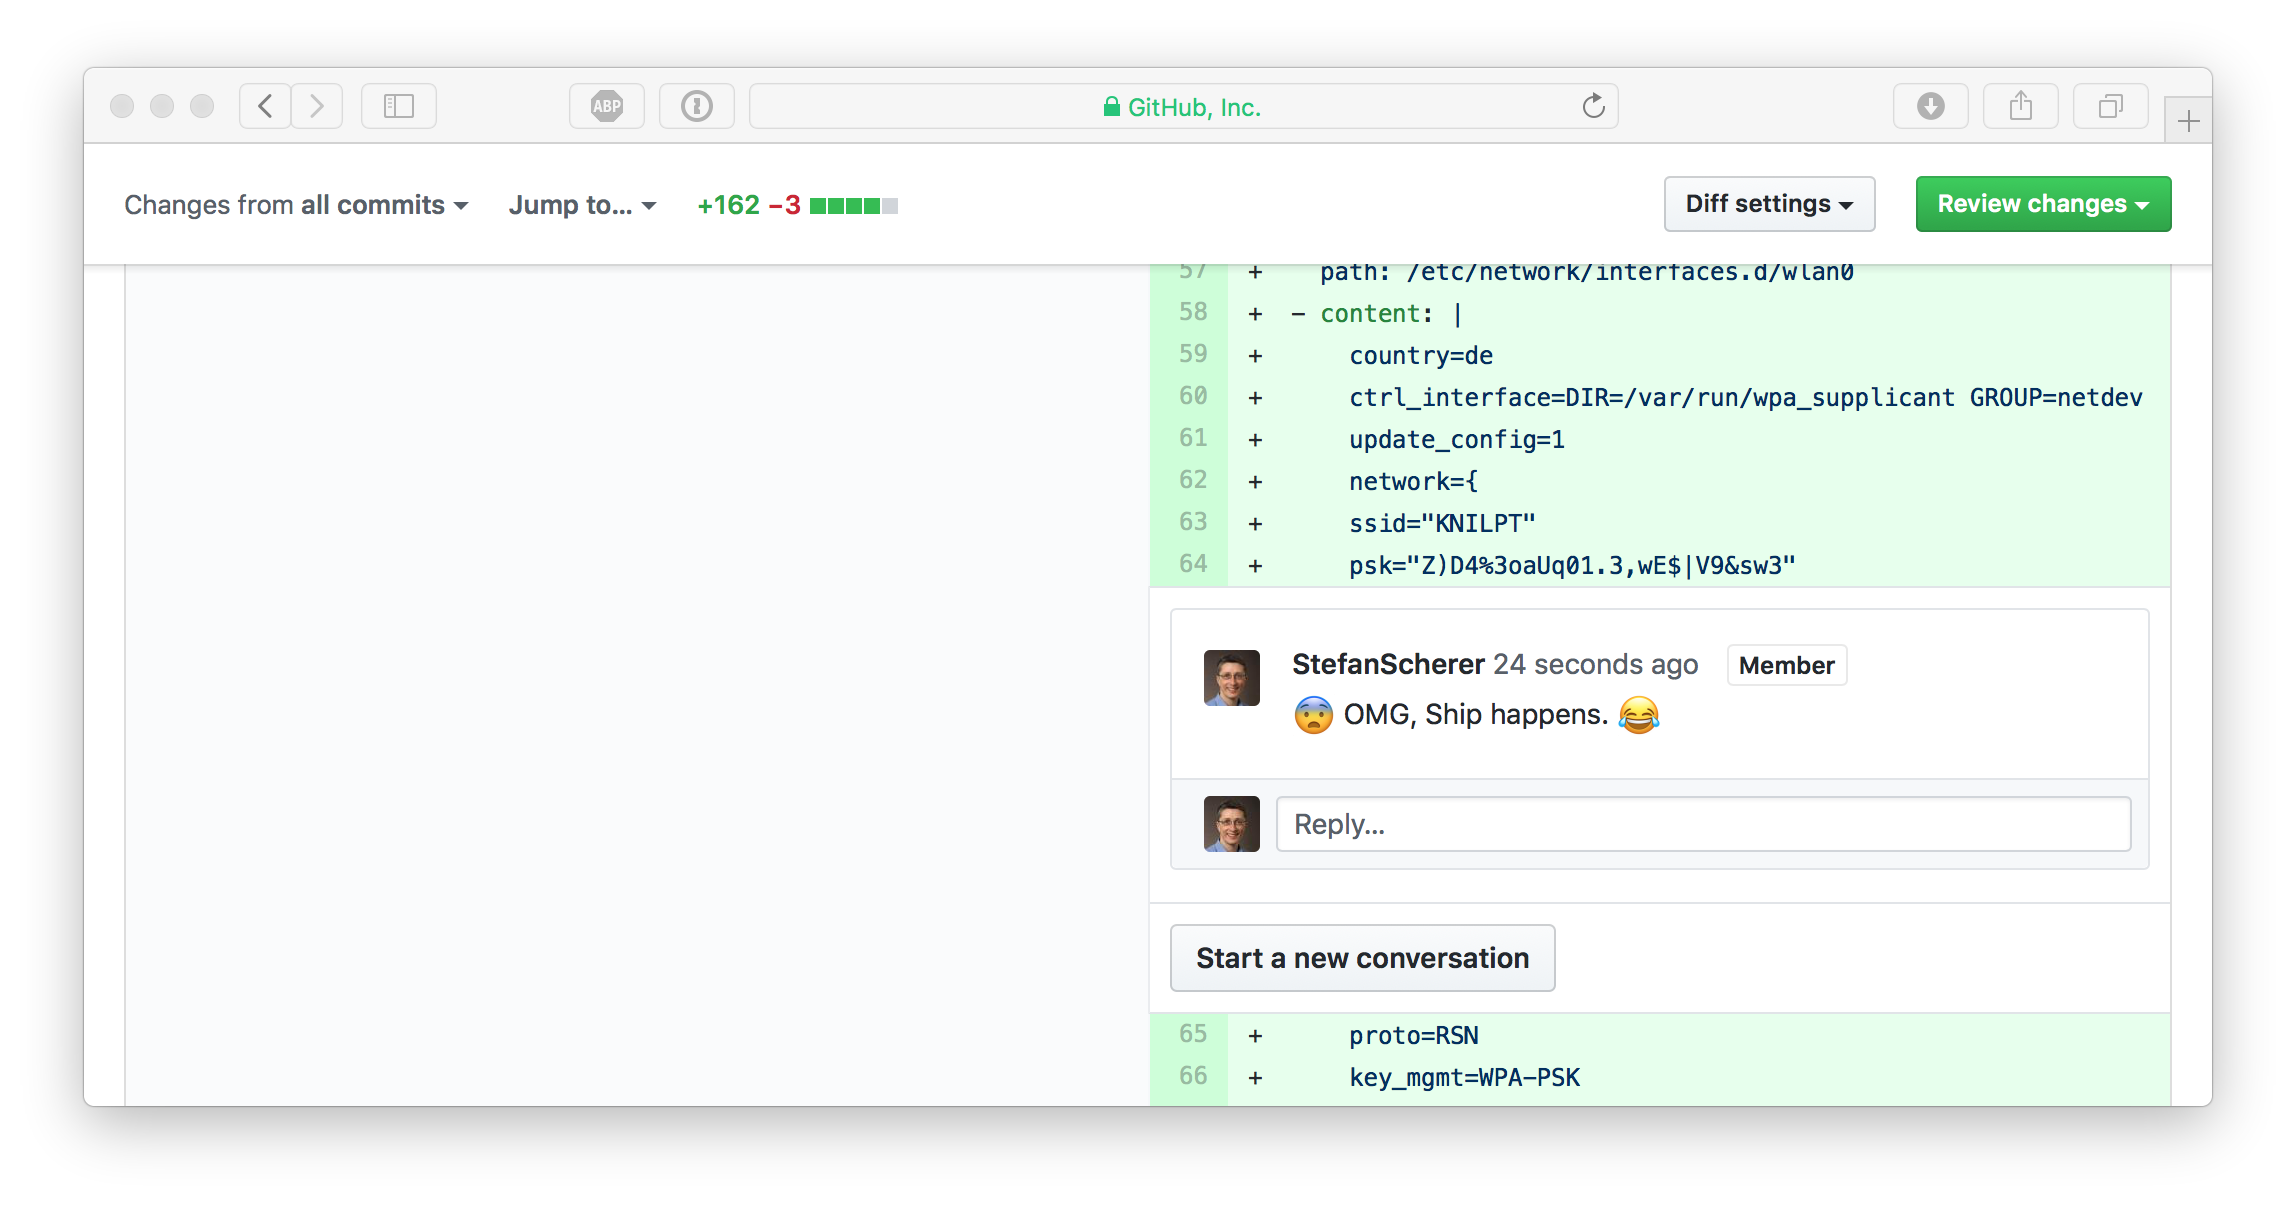
I pushed some code to a work-in-progress pull request when I saw my mistake on GitHub:
WTF, how did I ... ?
Well, for convenience reasons I kept a configuration file in the repo to easily flash a new SD card image with WiFi settings. And I can't really remember, but I eventually typed git add . and git push some minutes ago without recognising that this was a really, really bad idea.
Panic, what next?
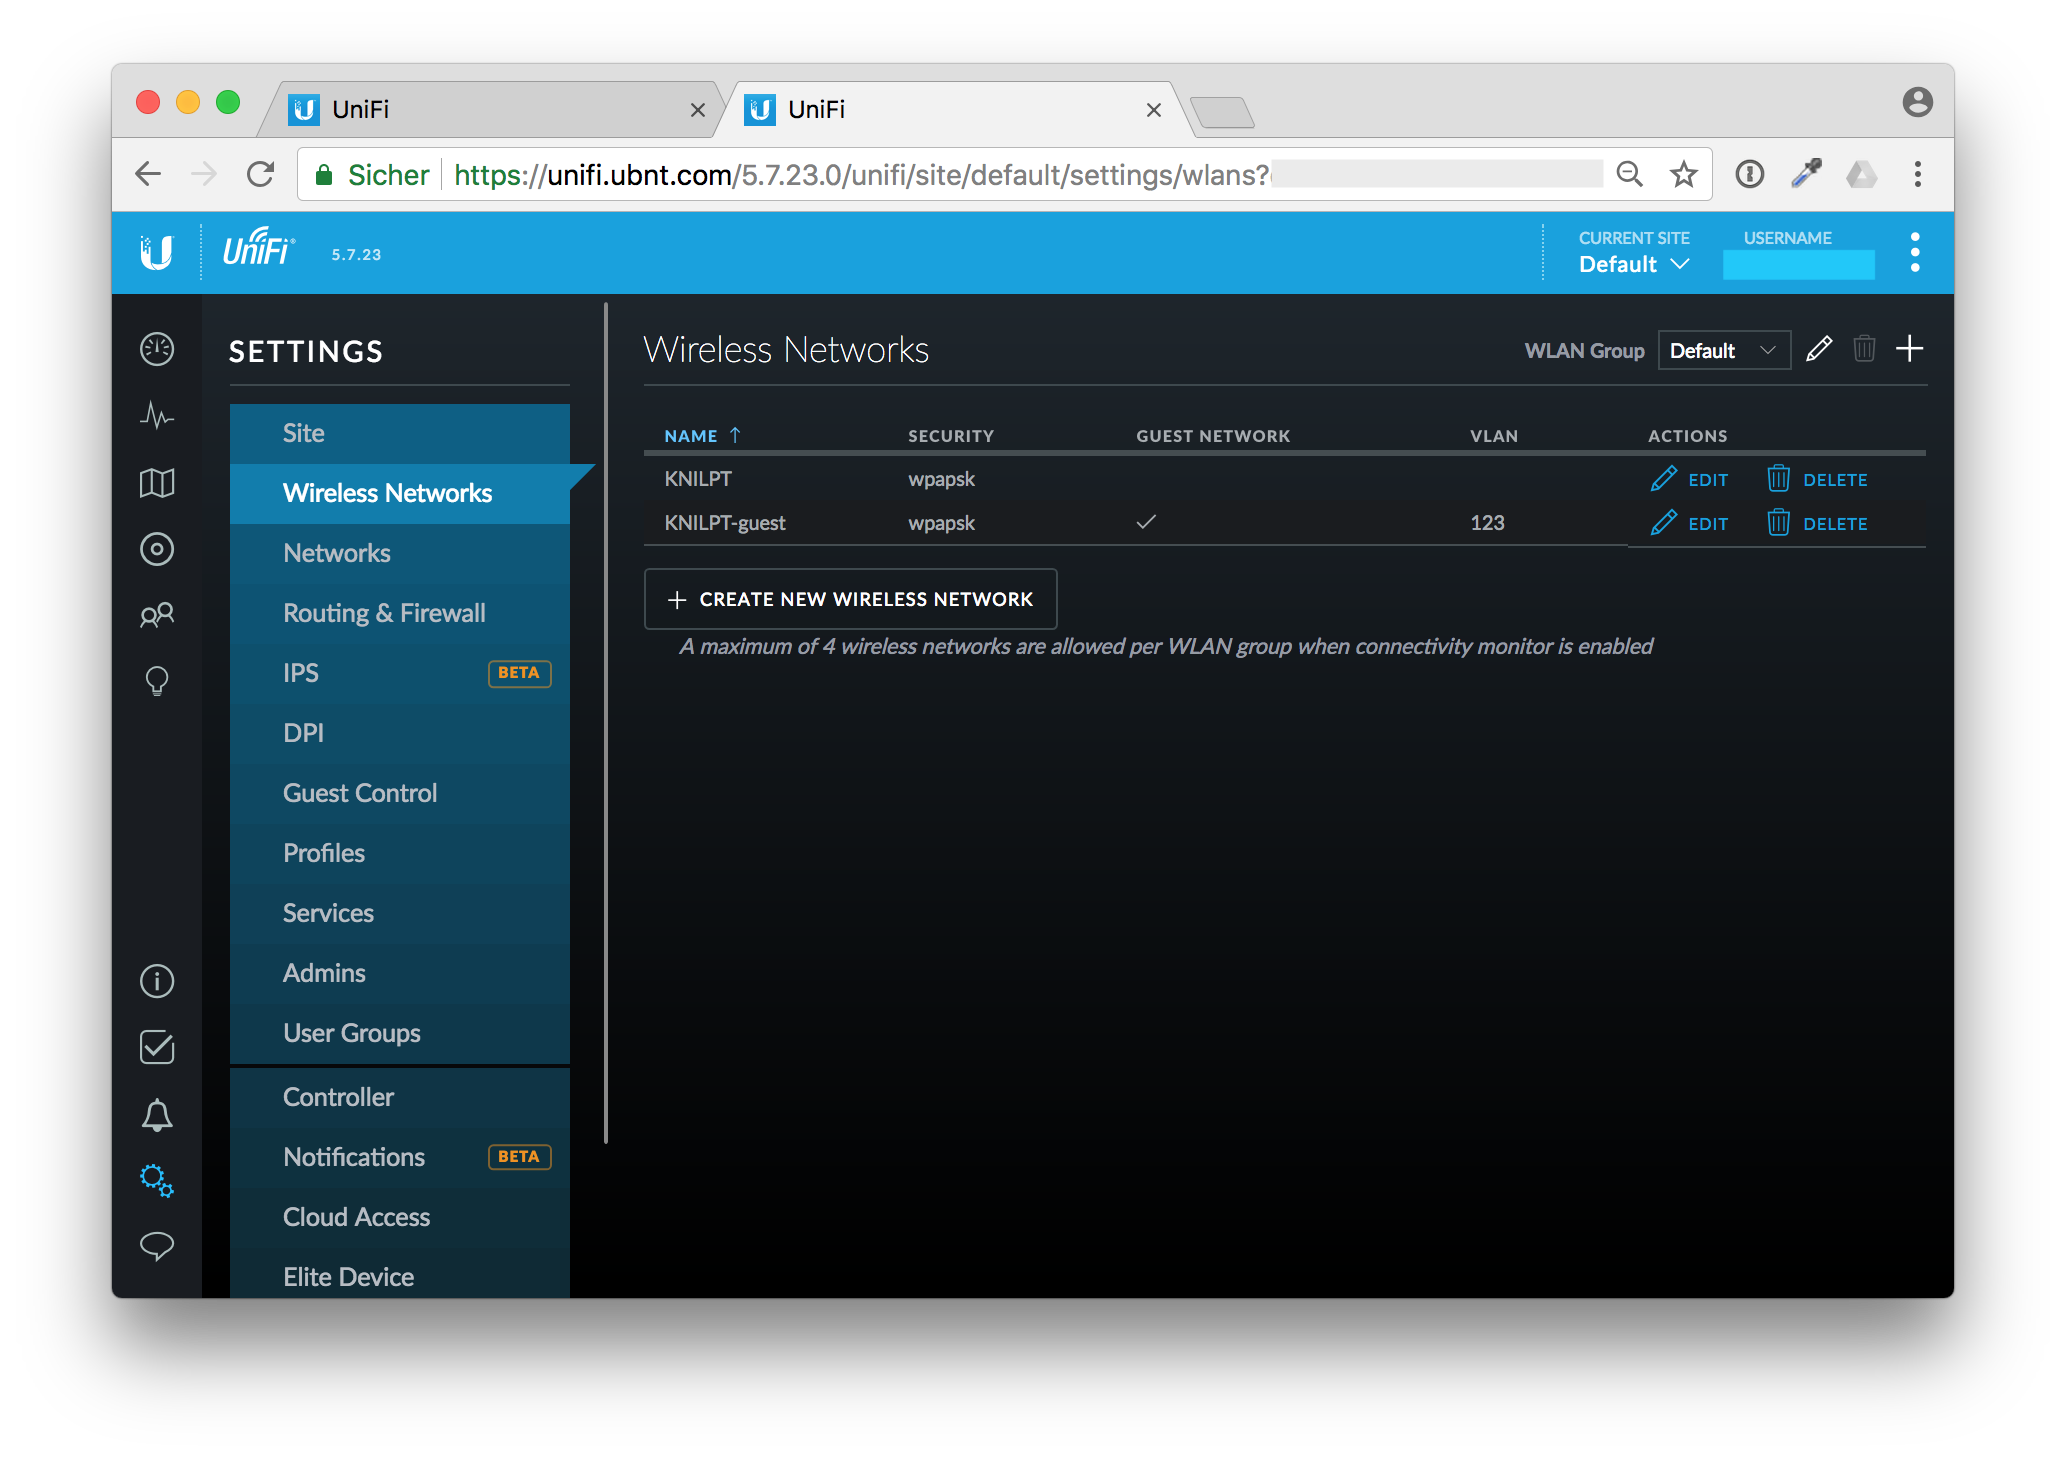
I immediatelly went to my Ubiquity Cloud controller and changed the Wireless Network Security Key.
But that was the next mistake. OK, I've changed the security key. But after a moment I realized that I also have some unattended boxes lying around in my house that use the old key to connect to my WiFi. My AirPort Express boxes for example are connected wirelessly.
Calm down, think, and organize
OK, changing the Security Key as first step is probably not the best idea. I don't want to run to each box with a patch cable to reconfigure it. Instead I've changed the key back to the old, compromised one and reconfigured all my wireless devices that I can reach through WiFi.
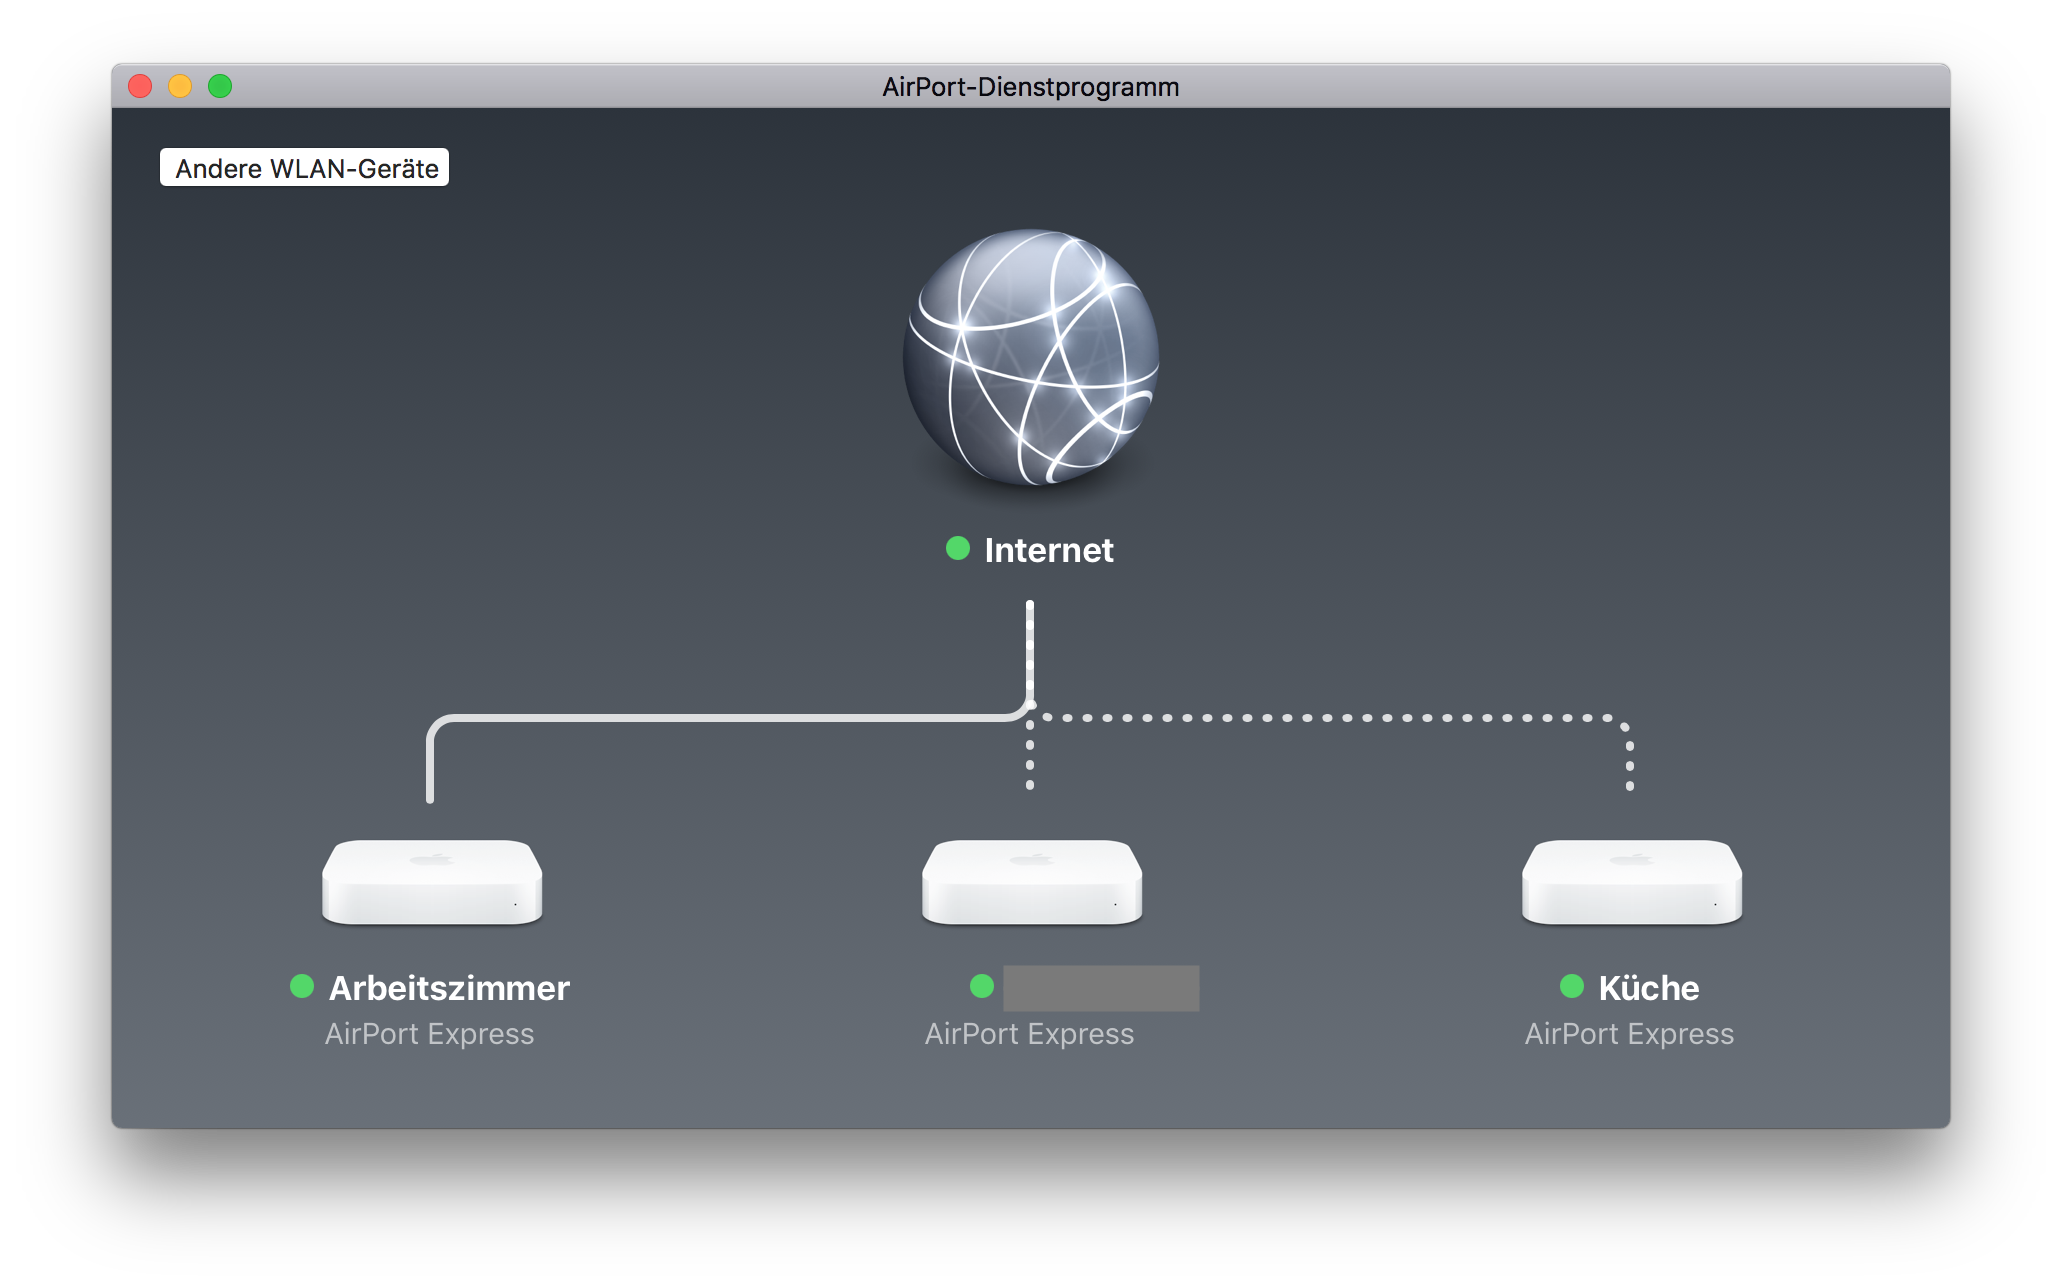
Reconfigure wireless devices first
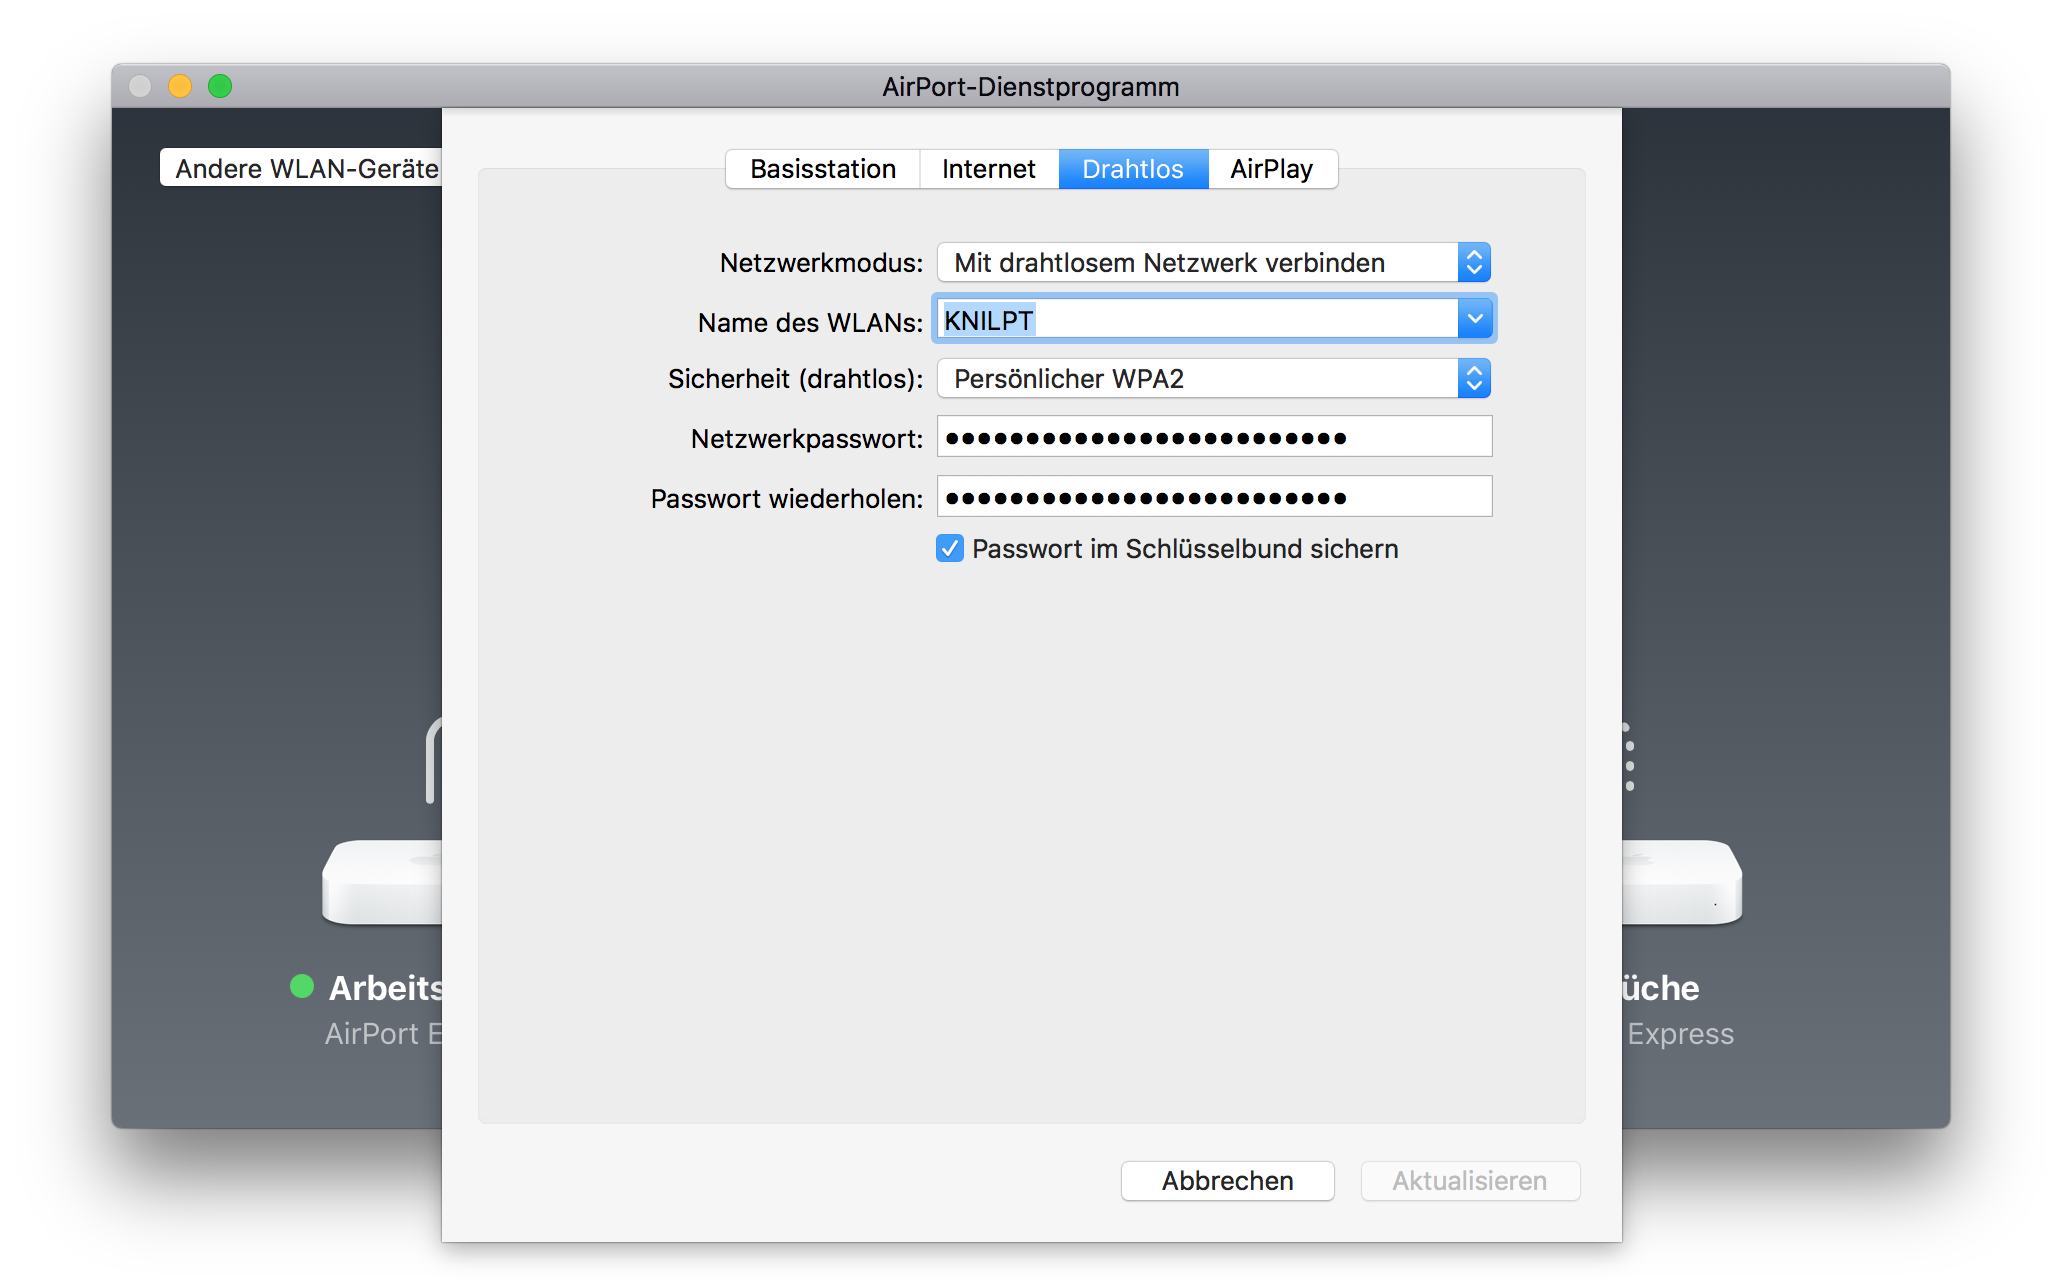
The devices with the dotted lines are connected through WiFi. Edit the wireless network password with the AirPort app on your Mac.
After that change they will drop out of WiFi as they now have the new, but not actually working password.
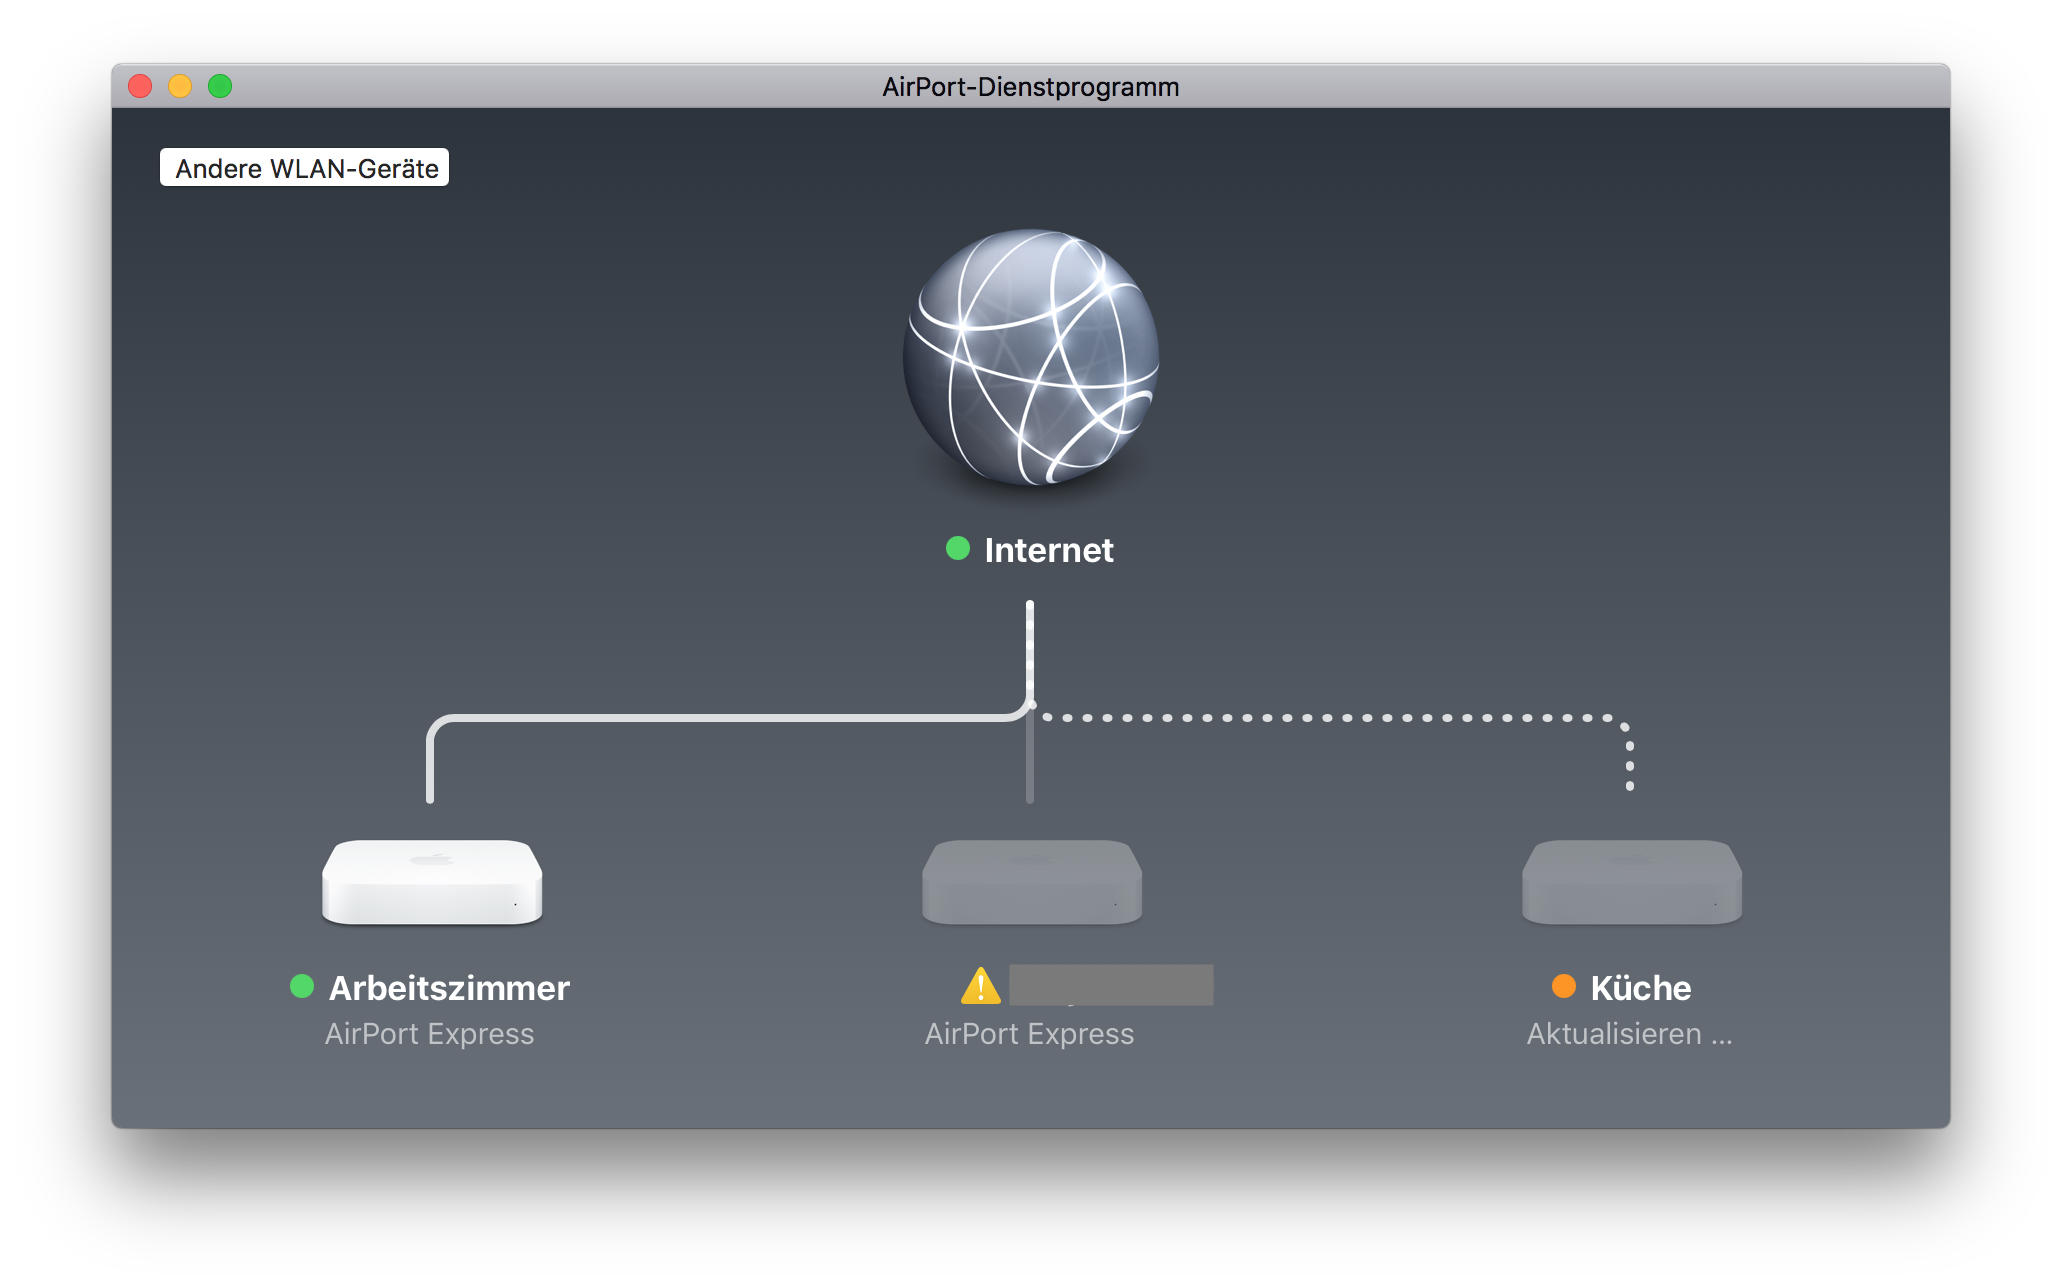
Repeat that for all devices and think of other wireless devices that you can update without climbing up ladders or other hidden places.
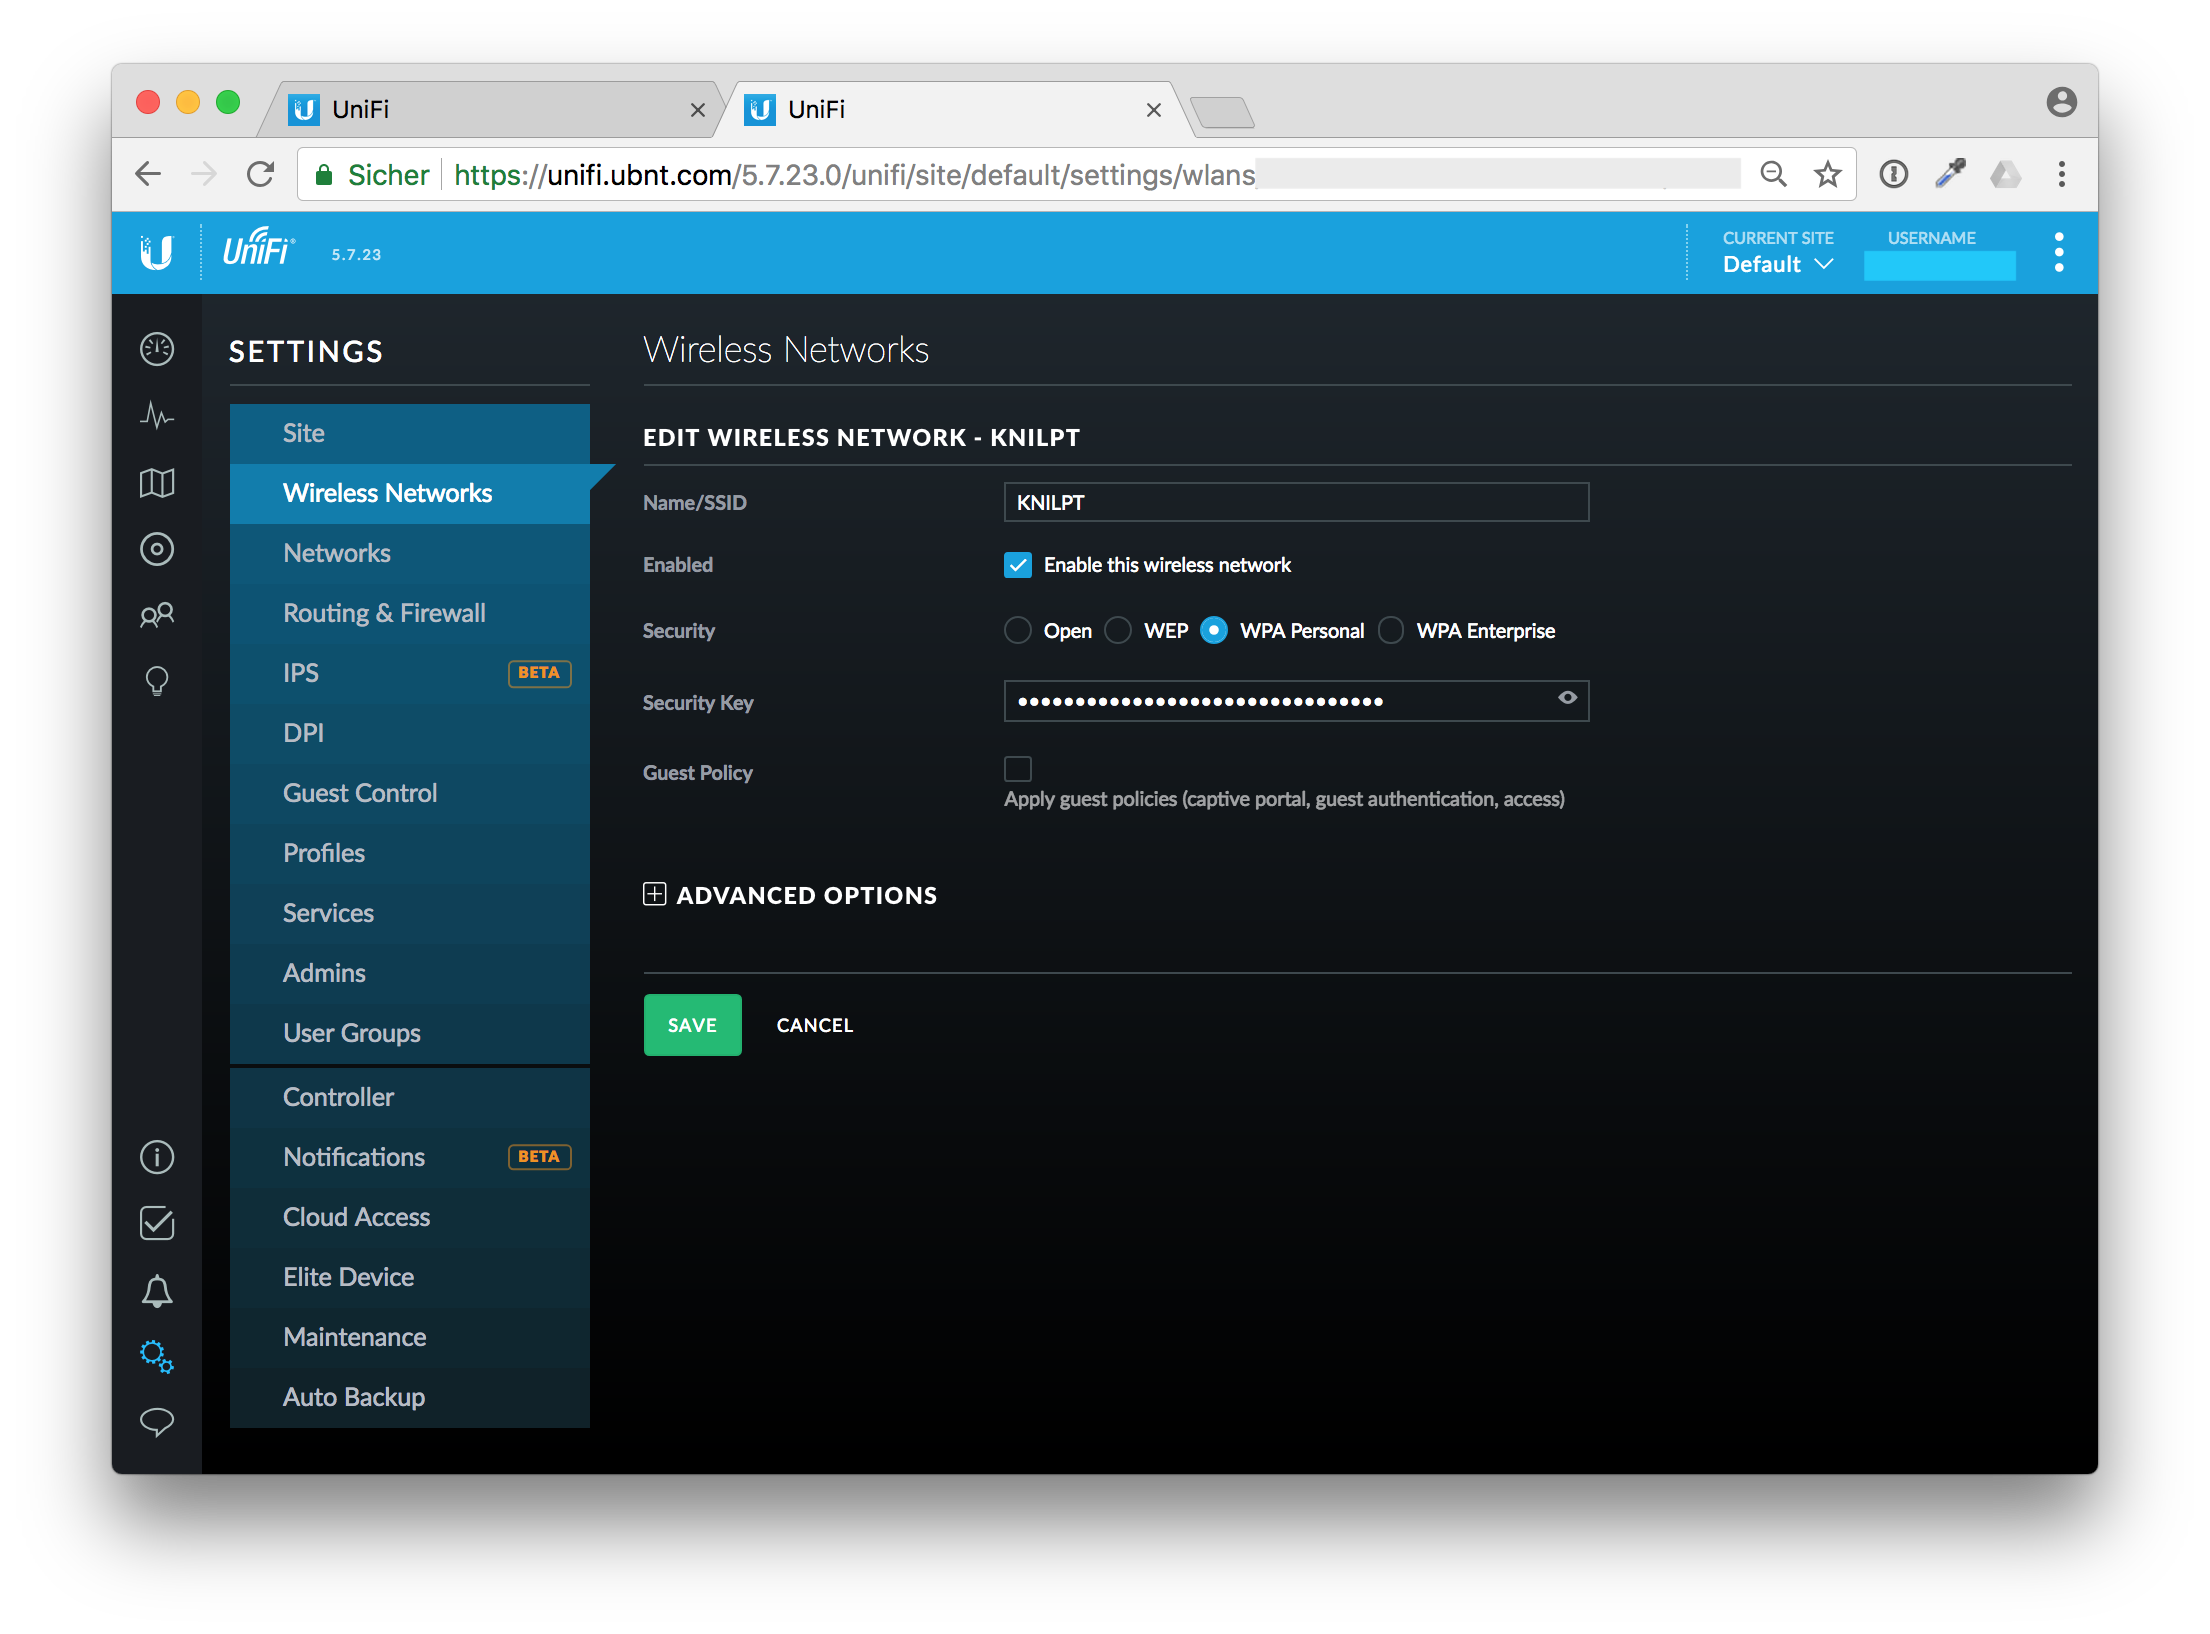
Change your WiFi security key
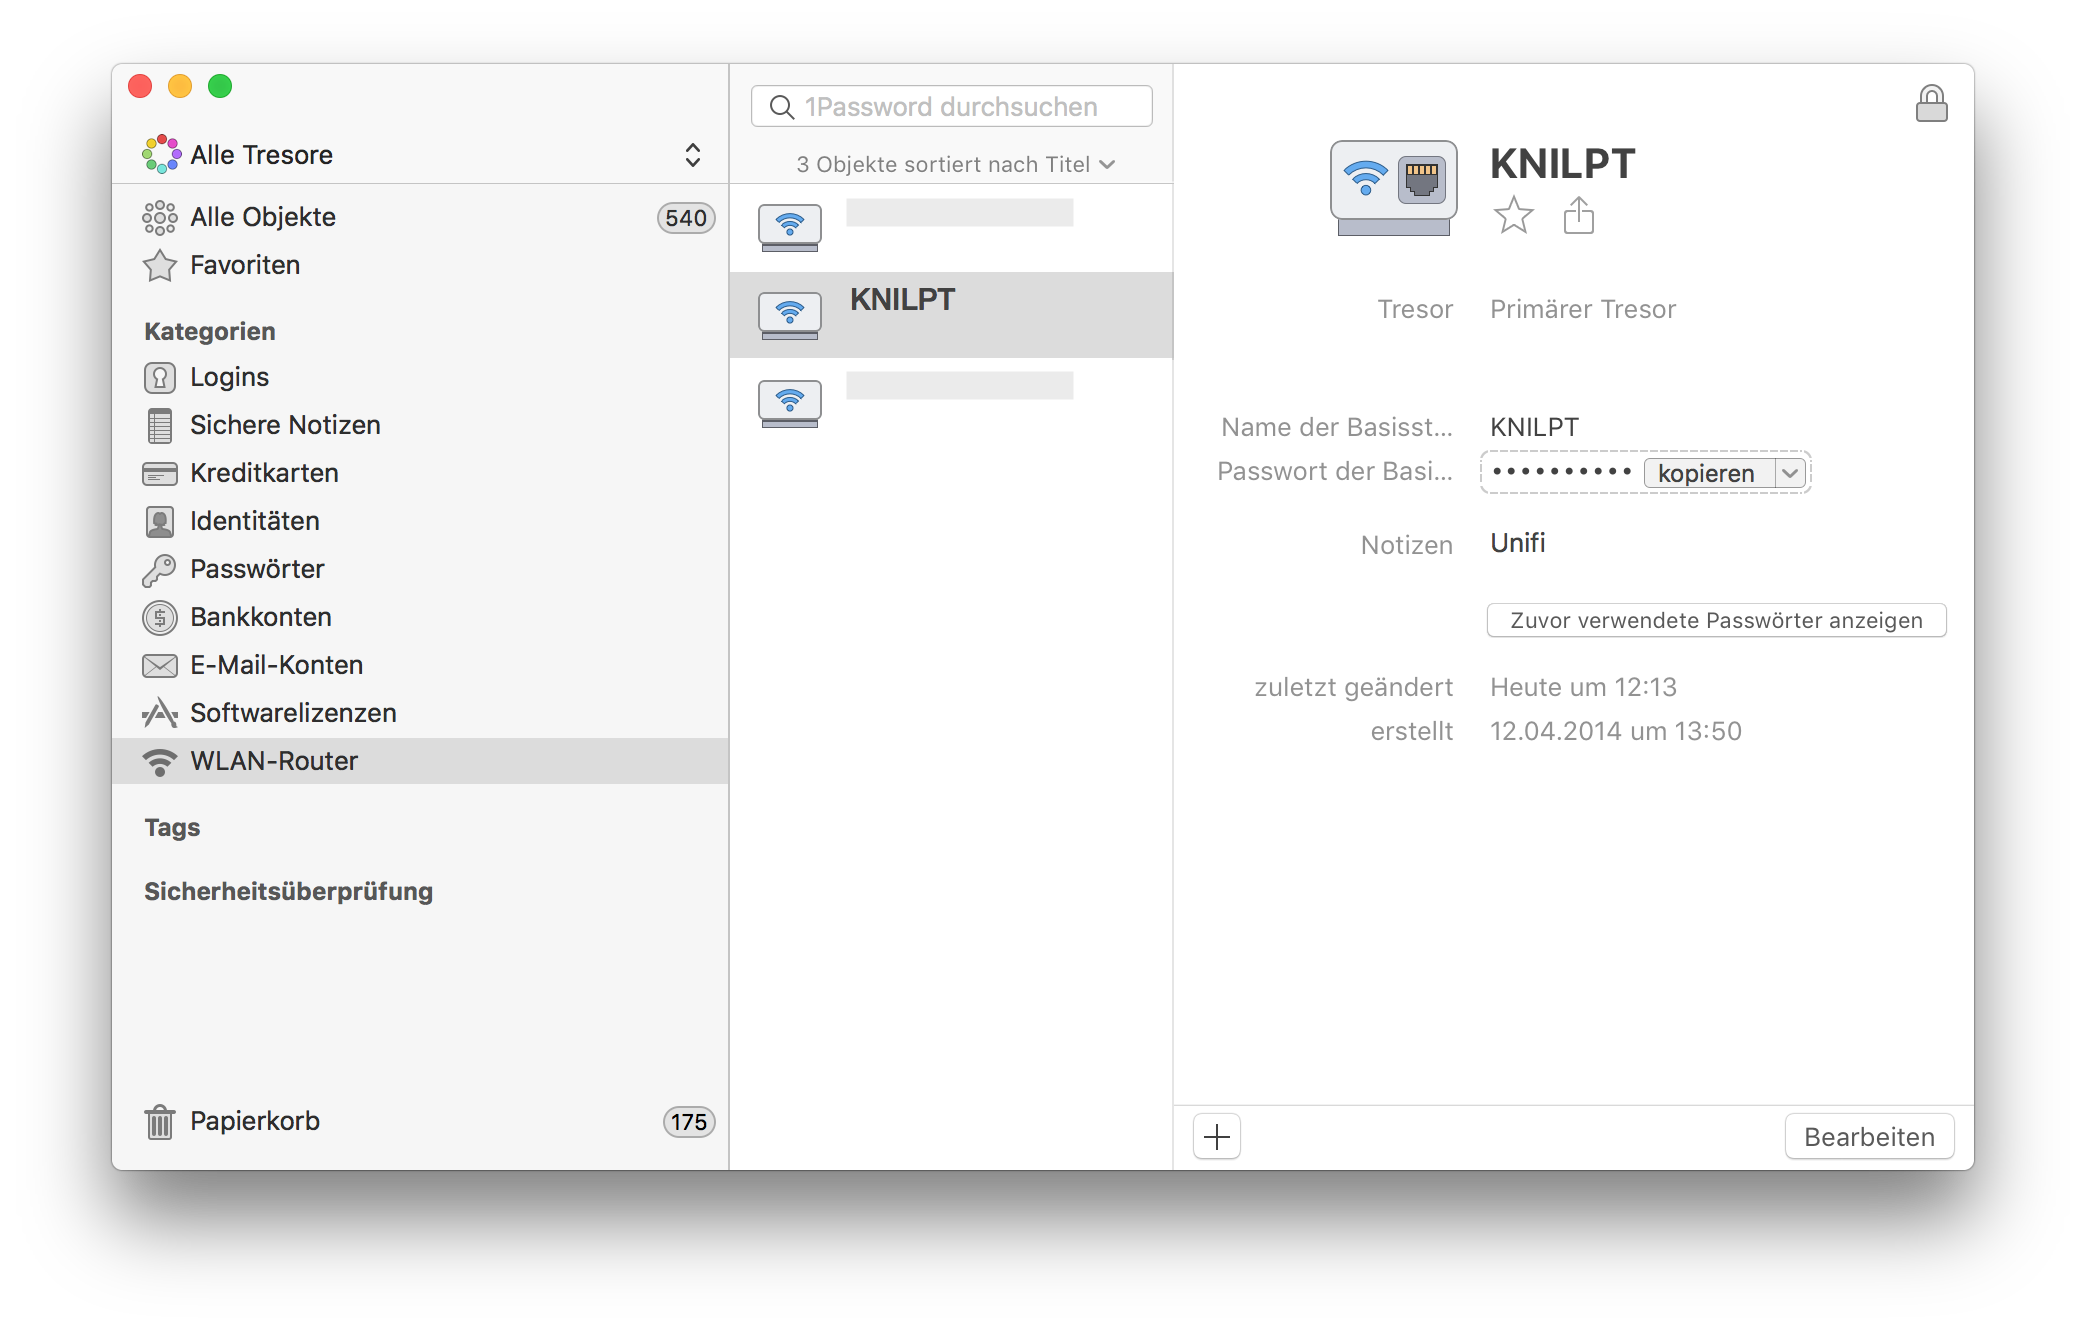
After that I changed the wireless security key in the Unify cloud controller. Save the new WiFi key in your password manager, I use 1Password
After reconnecting to the new and now secure WiFi with the updated key I thought of the next steps. OK, the whole family has to update their smartphones and tables to connect to the WiFi again. That is managable. Now I'm coming to the next phase.
Cleaning up
The next steps was to clean up the pull request to get rid of the accidentally added files. You might think when you are quick nobody has seen your change and you can skip changing your WiFi secret at all. I'll prove you wrong in the next few minutes.
First I commented on my mistake to laugh at it, that's just relieving.
Remove files, remove commits
Now it's time to clean up the pull request branch and remove the unwanted files. We could just do git rm wifi.yml, but this will be added as a new commit to Git. Git has a history of each commit. I also want to get rid of these old commits.
These were my steps to cleanup the pull request branch.
I first squashed the pull request to one commit.
git rebase -i $(git merge-base $(git rev-parse --abbrev-ref HEAD) master)
Then in the editor just pick the first commit and change all other commits to squash.
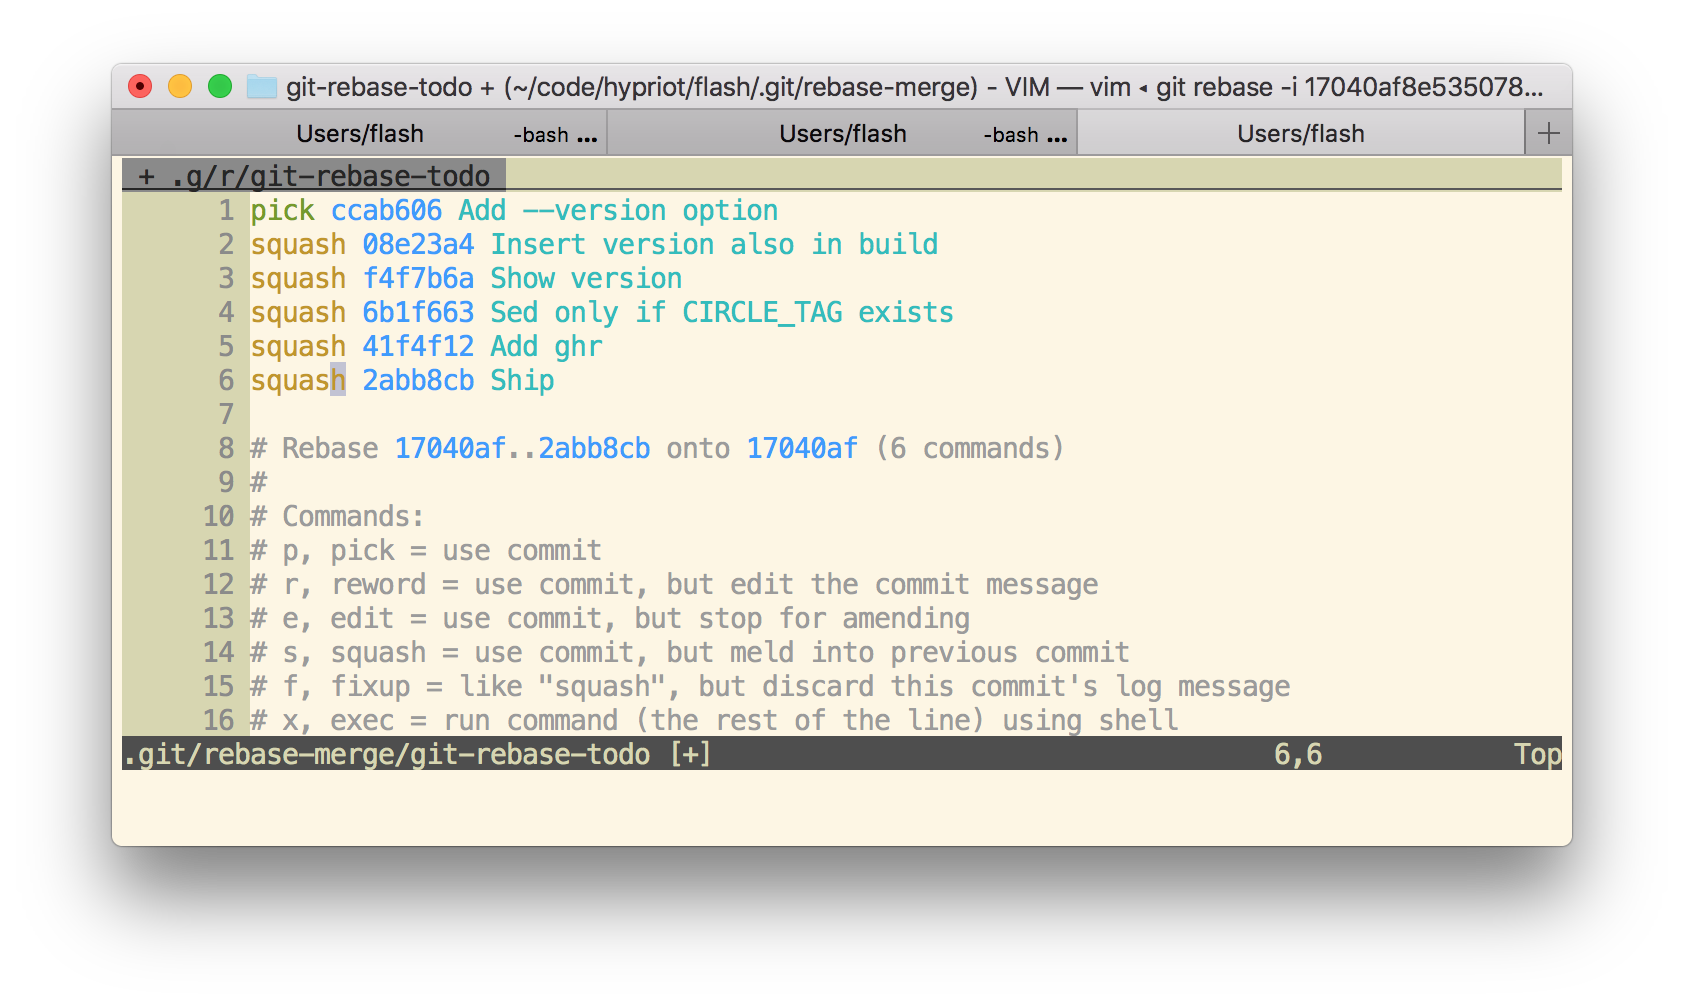
Now I have only one commit. This commit can be easily undone with
git reset HEAD~1
Then add your secret files to the .gitignore file and add everything and commit it again.
Now your local pull request branch has only the files wanted in one single commit. But GitHub still stores the secret files. With the next command we'll fix that.
git push -f
When things went bad sometimes a git push -f is needed. But beware: This will overwrite the history in your Git repo. You really have to know what are you doing here. Don't use git push -f in a panic. Calm down first. Otherwise you will make it even worse.
But to remove the unwanted commits you need to overwrite the pull request branch.
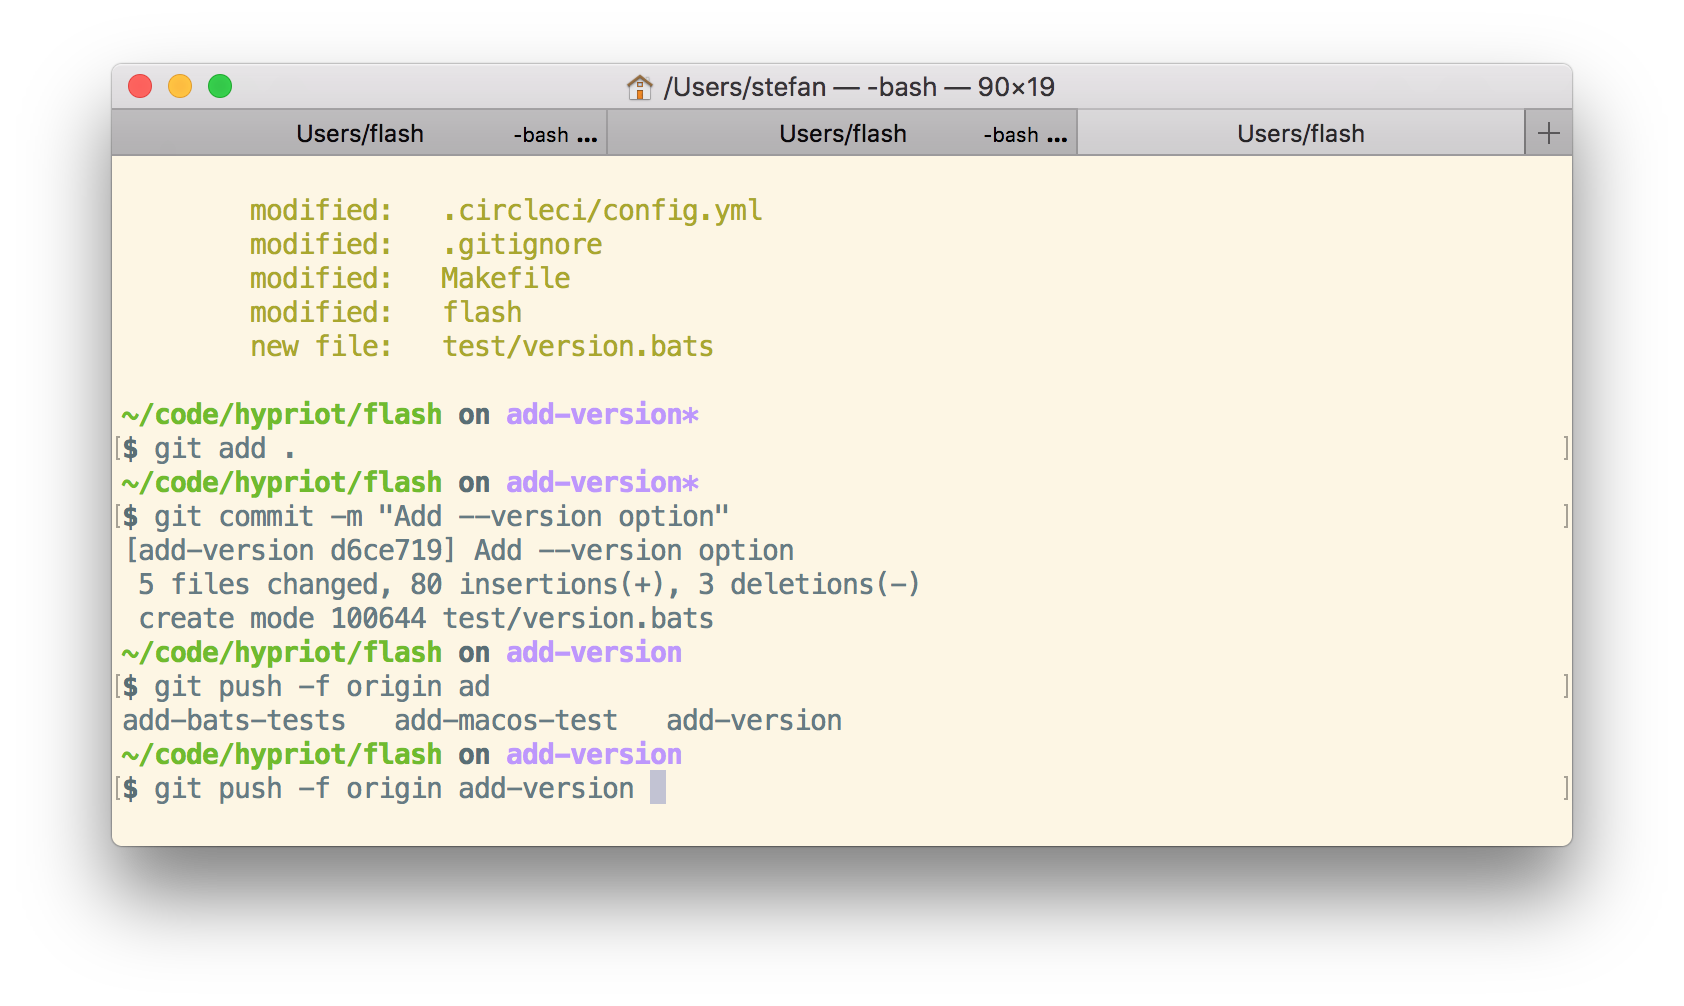
git push -f origin add-version
Everything concealed? No way
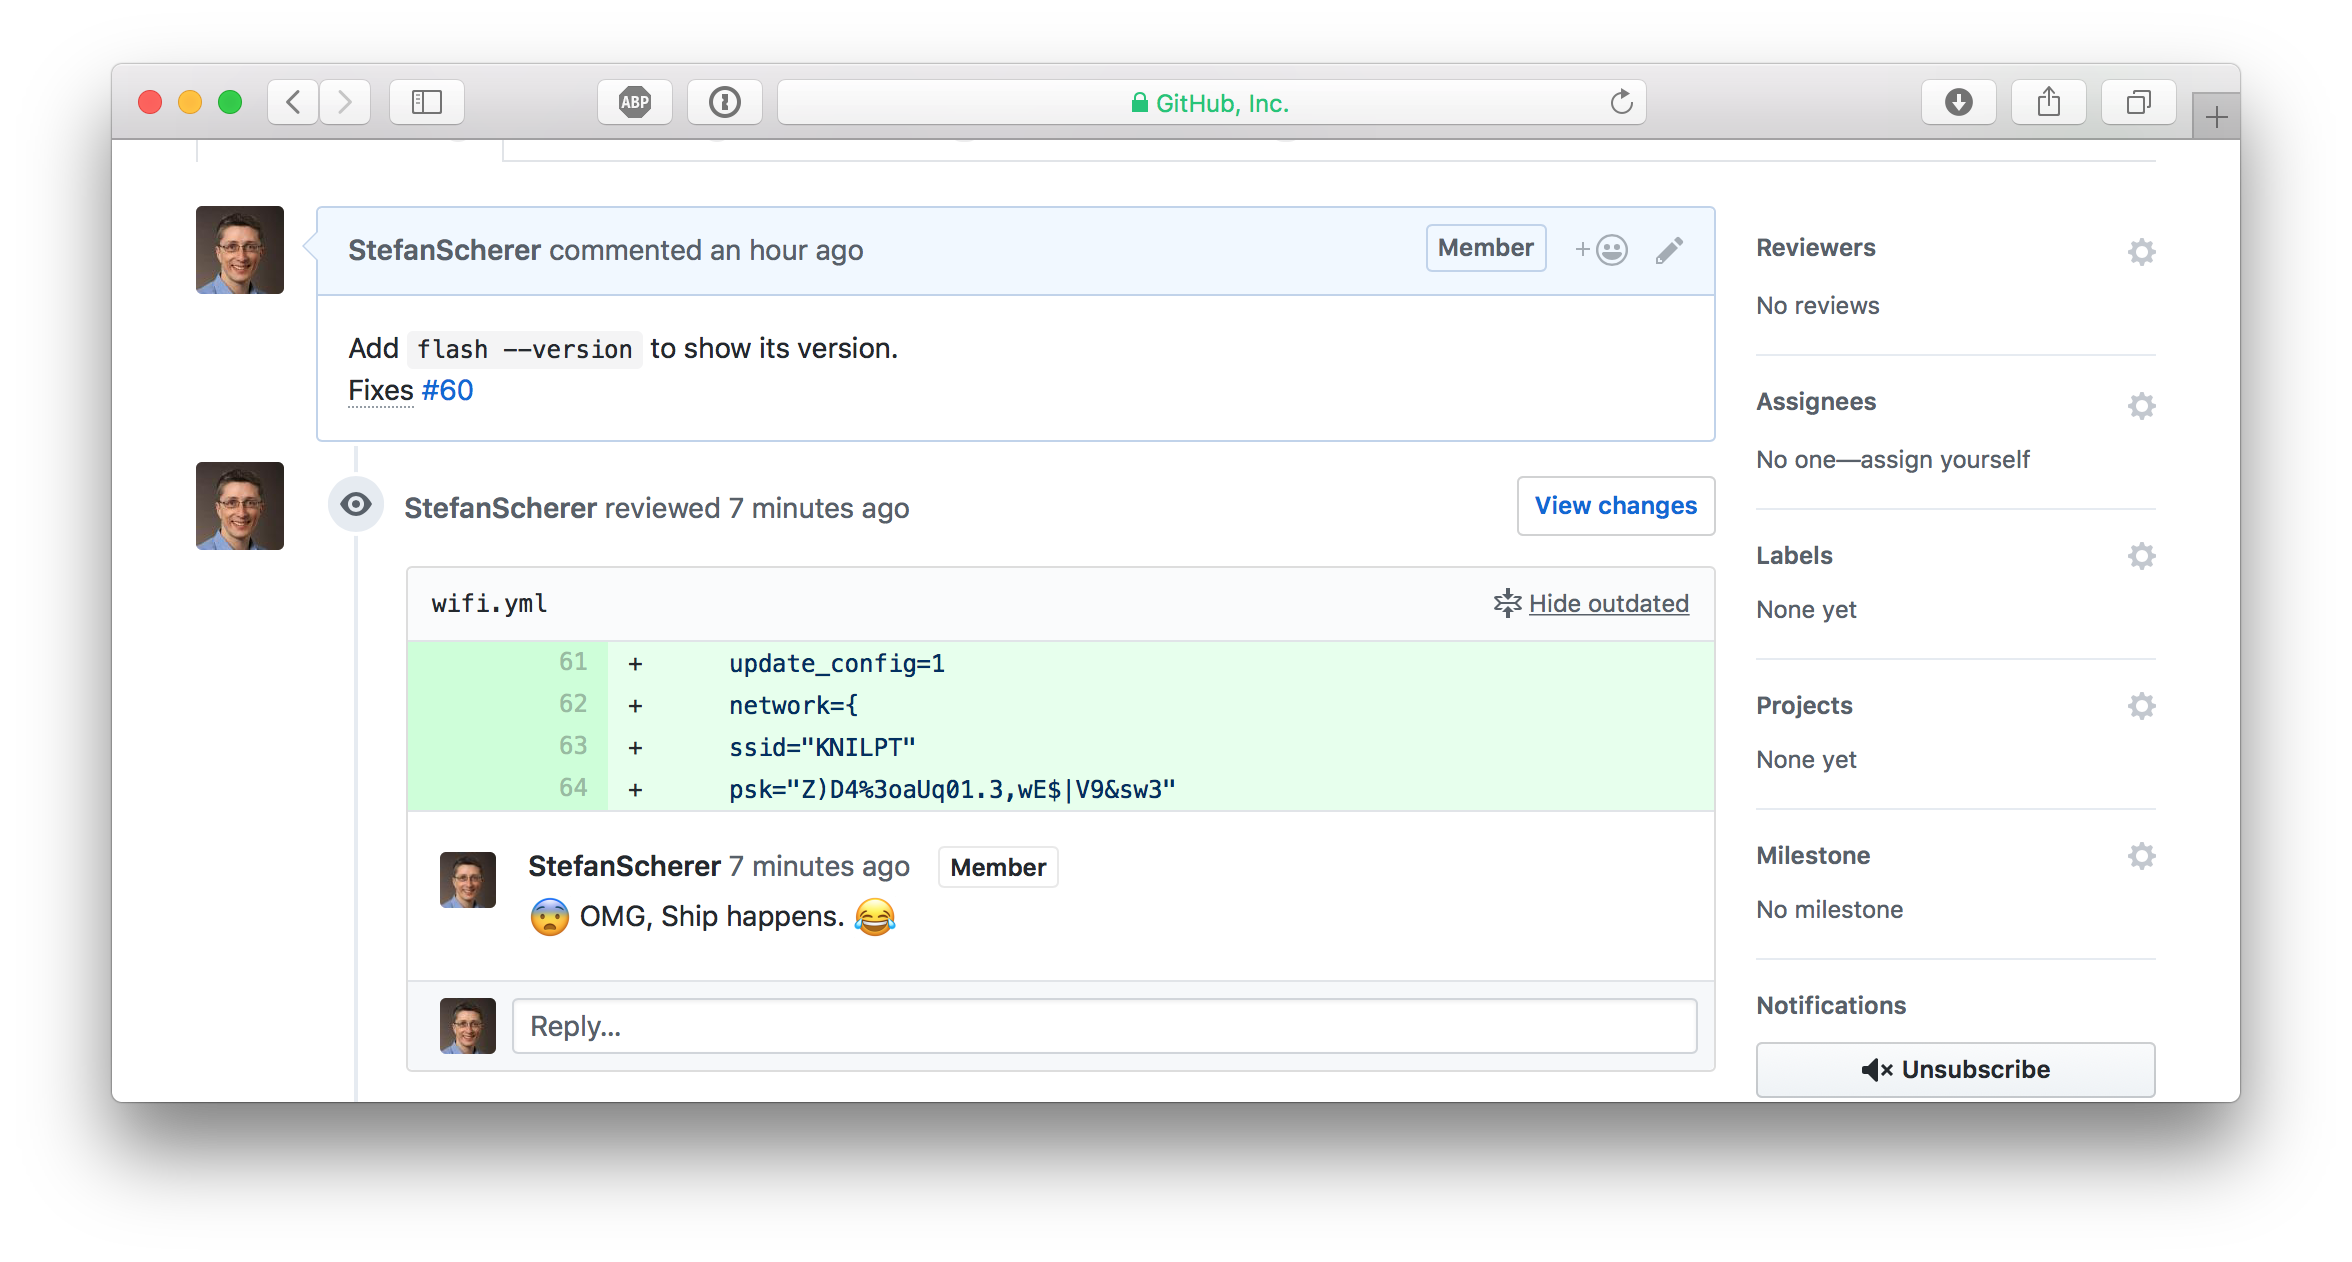
When you now look at the GitHub pull request you might think that every secret vanished and it's safe to keep the old WiFi password. No, GitHub has an incredible database, don't think that that this information was removed.
Each pull request can be commented and even after a git push -f some of the comments got outdated on source that no longer exist. But this is still visible and retrievable.
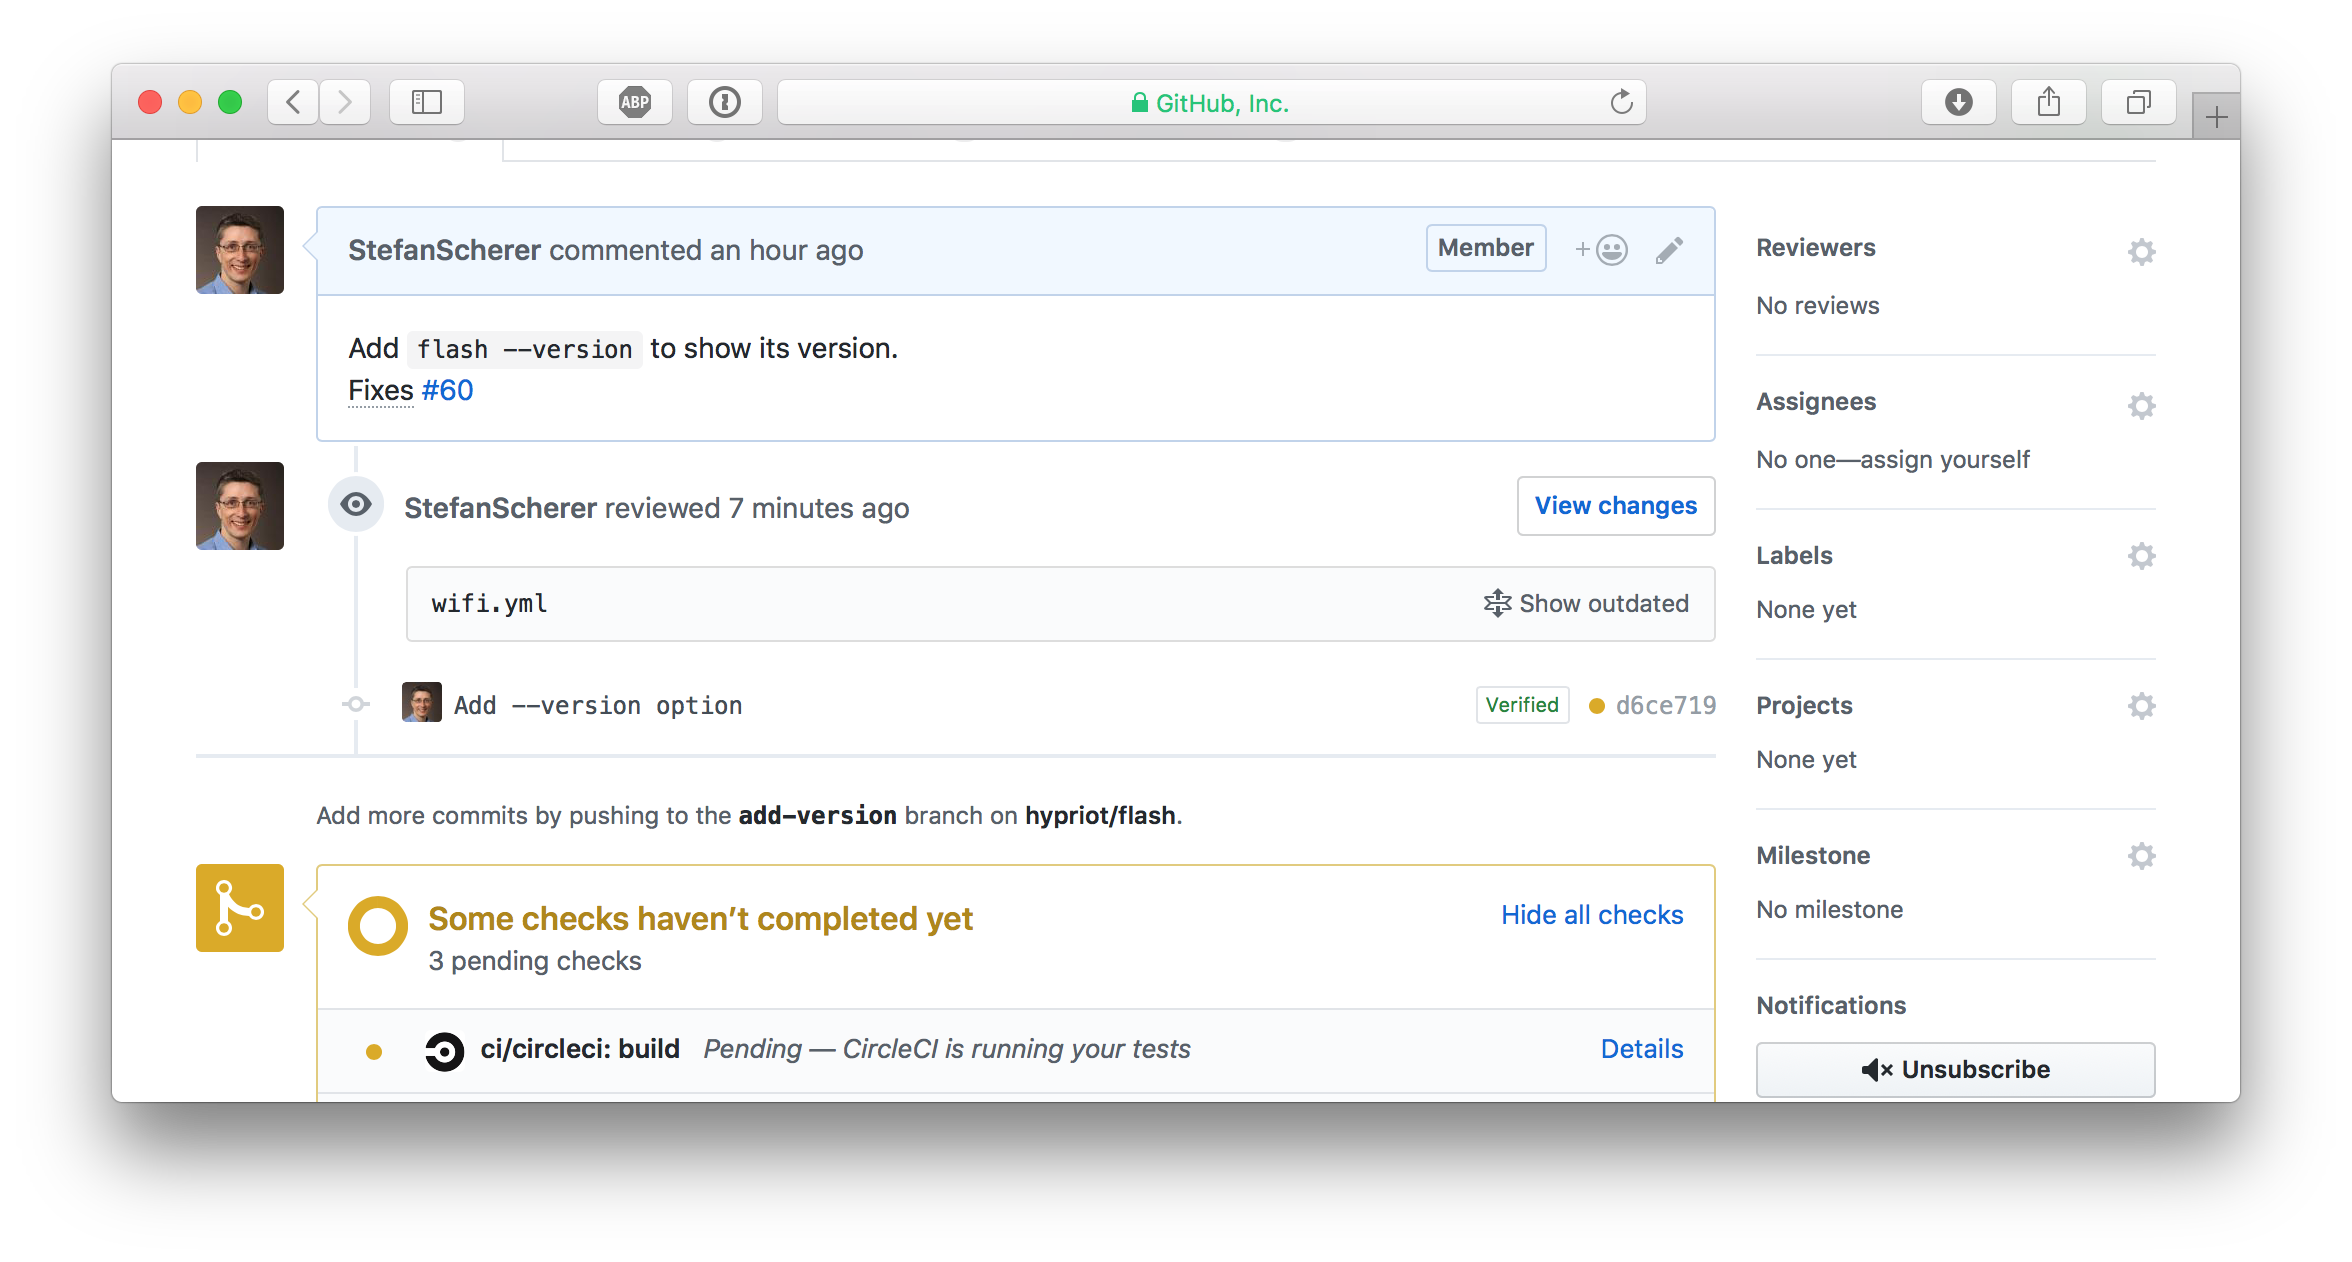
Look closer, there is a "Show outdated" link. You can open this
So whenever such a data breach happens, be prepared to change your secrets. If it hurts, do it more often.
Understanding the cause
After all this disaster recovery and cleanup there is still something to learn. What was the root cause and how can I prevent to make the same mistake again?
git add .
The git add . command adds all modified and also untracked files and git push pushes all this code to GitHub into your already open pull request branch.
Yes, I'm lazy and often commit everything as I'm normally work on one thing in a project.
I normally recognize such secret files from adding them, but as I realised the hard way is that you will type git add . at some point in a hurry without even recognizing it.
I scrolled up my terminal and found the situation where everything went wrong very soon.
This is a bad smell having untracked files.
What can this be fixed?
- Learn to not use
git add .. I don't think that will work as I'm trained to type this and it's hard to break a habit. - Maybe prevent
git add .?, see Stack Overflow I'm not going this hard way. - Don't leave untracked files in your repo, yeah that sounds better.
- Add local secret files to your
.gitignorefile. So agit add .is harmless. - Don't create such local secret files at all. Well you want something automated and just need config files with secrets.
- Create local files without the secrets and inject secrets on the fly. That also sounds like a good plan.
I'll look closer into the last idea to inject secrets on the fly. Don't leave secrets unprotected on your harddrive. Use command line interfaces for your password managers.
- Use
pass- Pass: The Standard Unix Password Manager that keeps secrets in GPG encrypted files which are also under version control in a separate Git repo. - I'll also have a look at the 1Password command line tool
op.
You cannot change the past, you only can learn to make it better in the future.
I hope you find this blog post useful and I love to hear your feedback and experience about similar mistakes or better tips how to protect yourself from doing mistakes. Just drop a comment below or ping me on Twitter @stefscherer.
]]>Running applications in Windows containers keeps your server clean. The container image must contain all the dependencies that the application needs to run, for example all its DLL's. But sometimes it's hard to figure out why an application doesn't run in a container. Here's my way to find out what's
]]>Running applications in Windows containers keeps your server clean. The container image must contain all the dependencies that the application needs to run, for example all its DLL's. But sometimes it's hard to figure out why an application doesn't run in a container. Here's my way to find out what's missing.
Process Monitor
To find out what's going on in a Windows Container I often use the Sysinternals Process Monitor. It can capture all major syscalls in Windows such as file activity, starting processes, registry and networking activity.
But how can we use procmon to monitor inside a Windows container?
Well, I heard today that you can run procmon from command line to start and stop capturing events. I tried running procmon in a Windows container, but it doesn't work correctly at the moment.
So the next possibilty is to run procmon on the container host.
On Windows 10 you only have Hyper-V containers. These are "black boxes" from your host operating system. The Process Monitor cannot look inside Hyper-V containers.
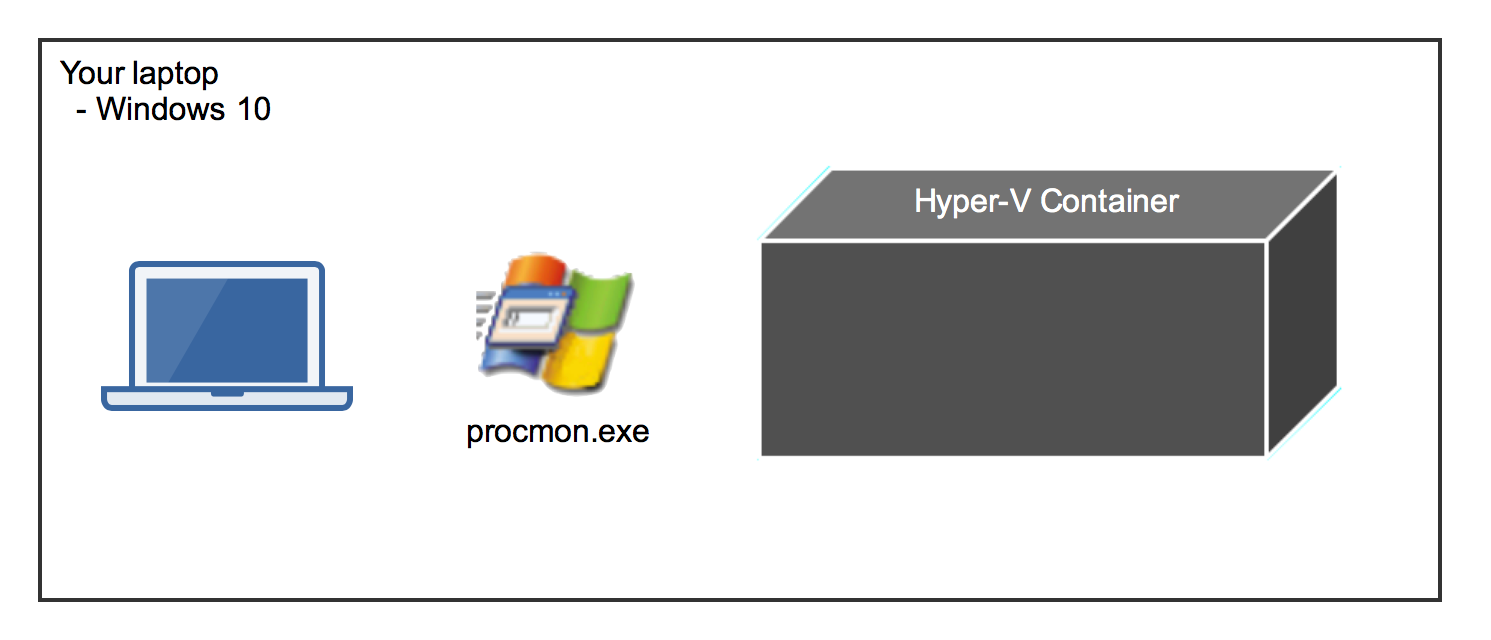
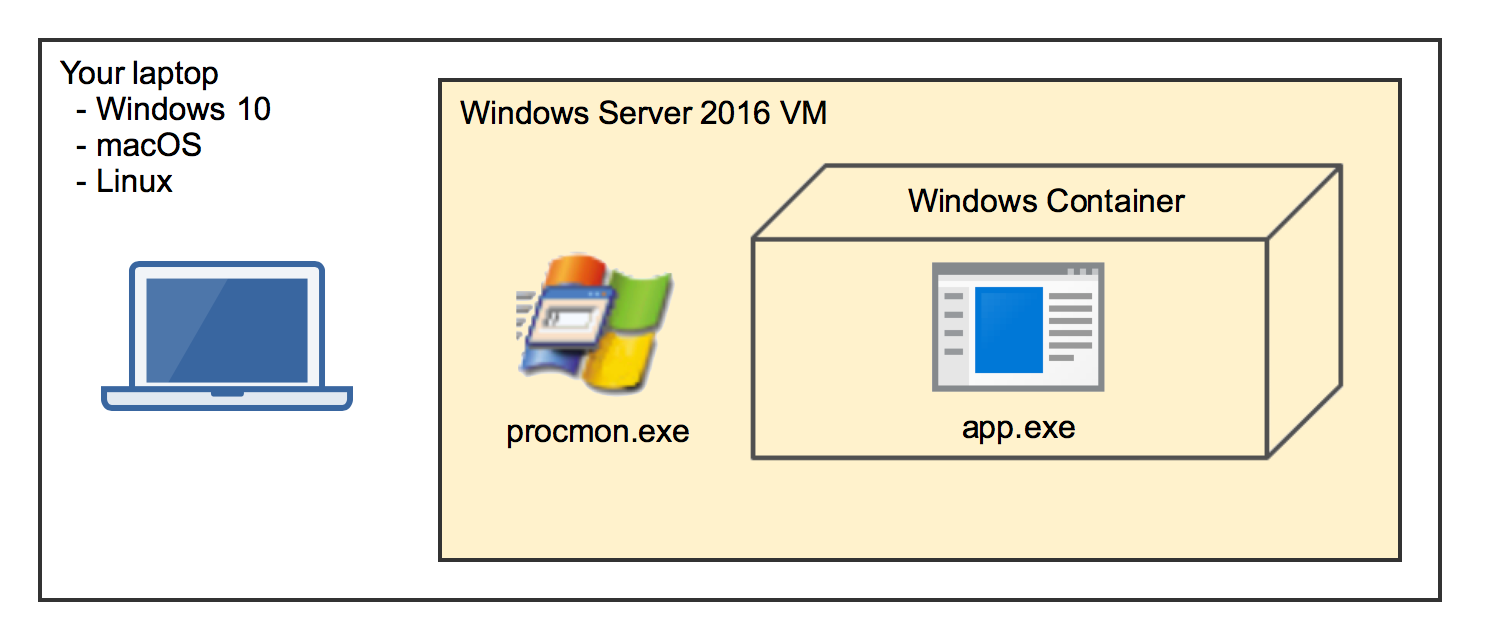
To investigate a Windows container we need the "normal" Windows containers without running in Hyper-V isolation. The best solution I came up with is to run a Windows Server 2016 VM and install Process Monitor inside that VM.
When you run a Windows container you can see the container processes in the Task Manager of the Server 2016 VM. And Process Monitor can also see what these processes are doing. We have made some containers out of "glass" to look inside.
Example: PostgreSQL
Let's try this out and put the PostgreSQL database server into a Windows container.
The following Dockerfile downloads the ZIP file of PostgreSQL 10.2, extracts all files and removes the ZIP file again.
# escape=`
FROM microsoft/windowsservercore:10.0.14393.2007 AS download

SHELL ["powershell", "-Command", "$ErrorActionPreference = 'Stop'; $ProgressPreference = 'SilentlyContinue';"]

ENV PG_VERSION 10.2-1

RUN Invoke-WebRequest $('https://get.enterprisedb.com/postgresql/postgresql-{0}-windows-x64-binaries.zip' -f $env:PG_VERSION) -OutFile 'postgres.zip' -UseBasicParsing ; `
    Expand-Archive postgres.zip -DestinationPath C:\ ; `
    Remove-Item postgres.zip
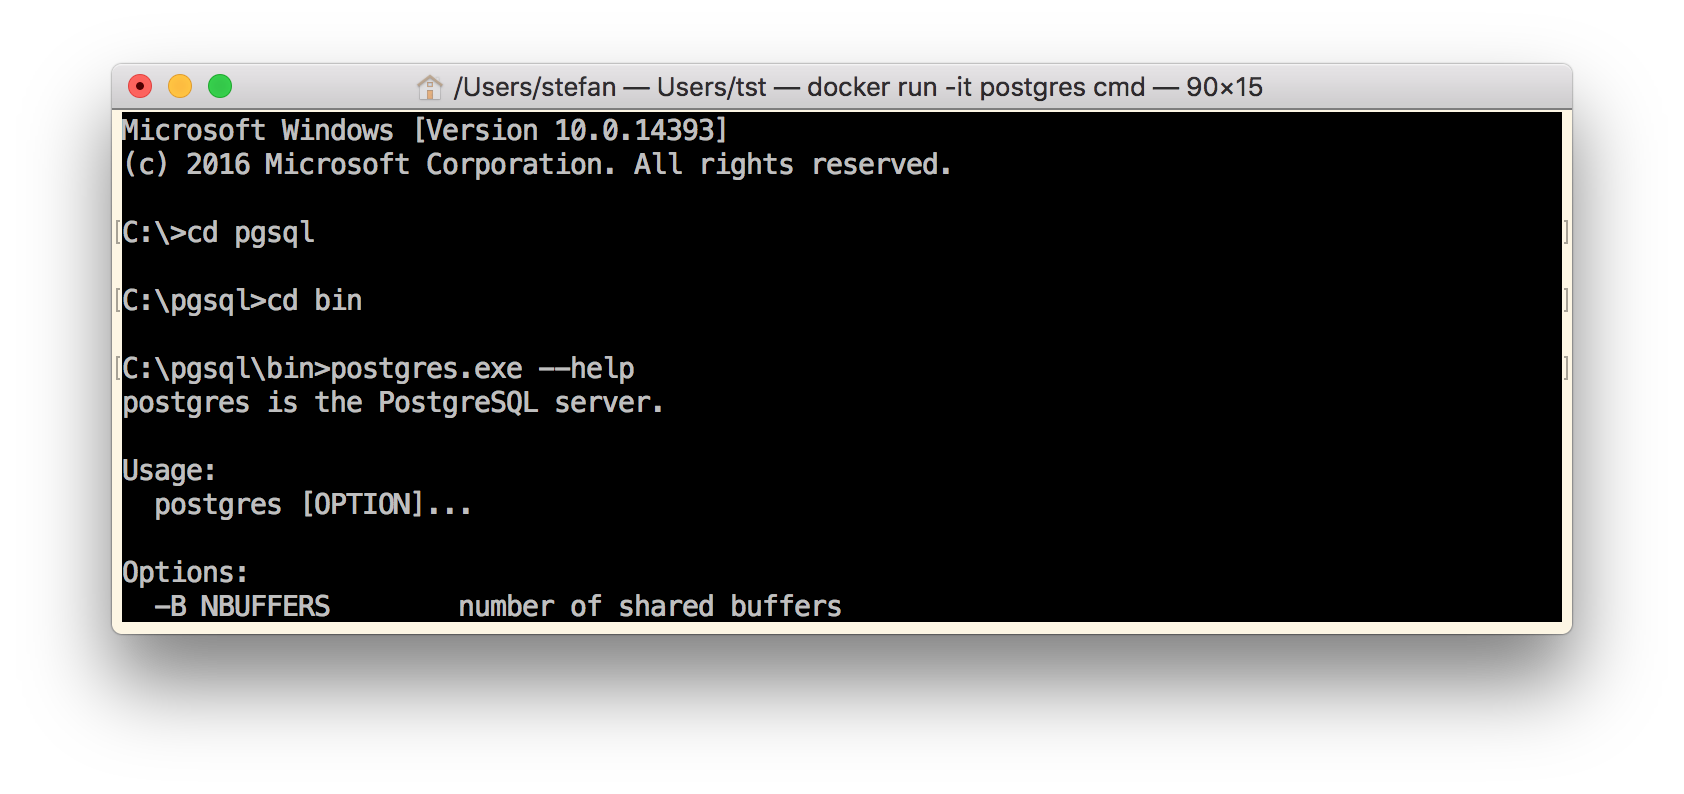
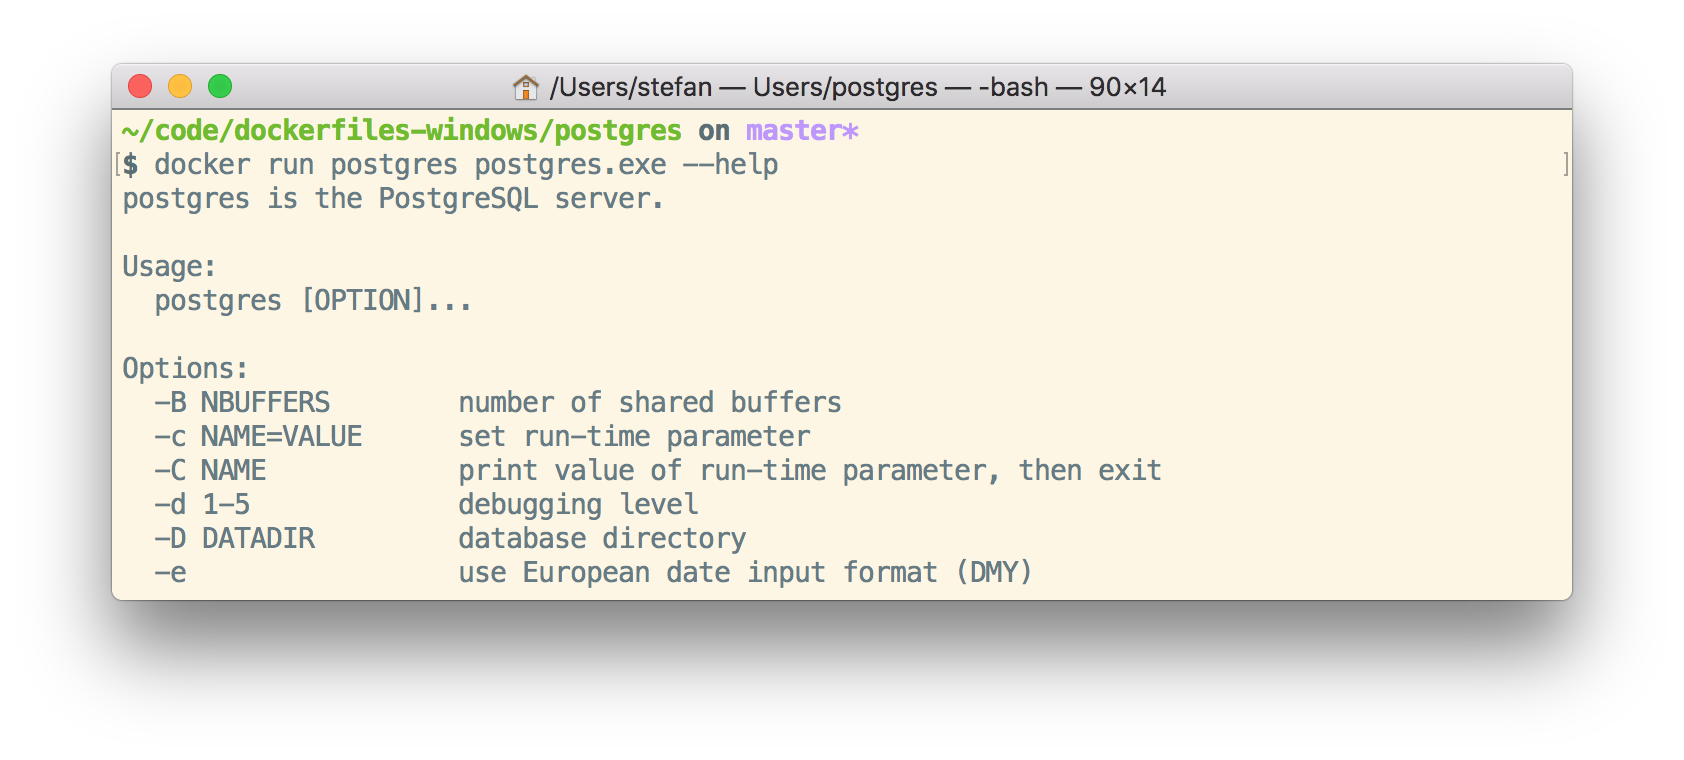
Now build and run a first container to try out the postgres.exe inside the container.
docker build -t postgres .
docker run -it postgres cmd
Navigate into C:\pgsql\bin folder and run postgres.exe -h.
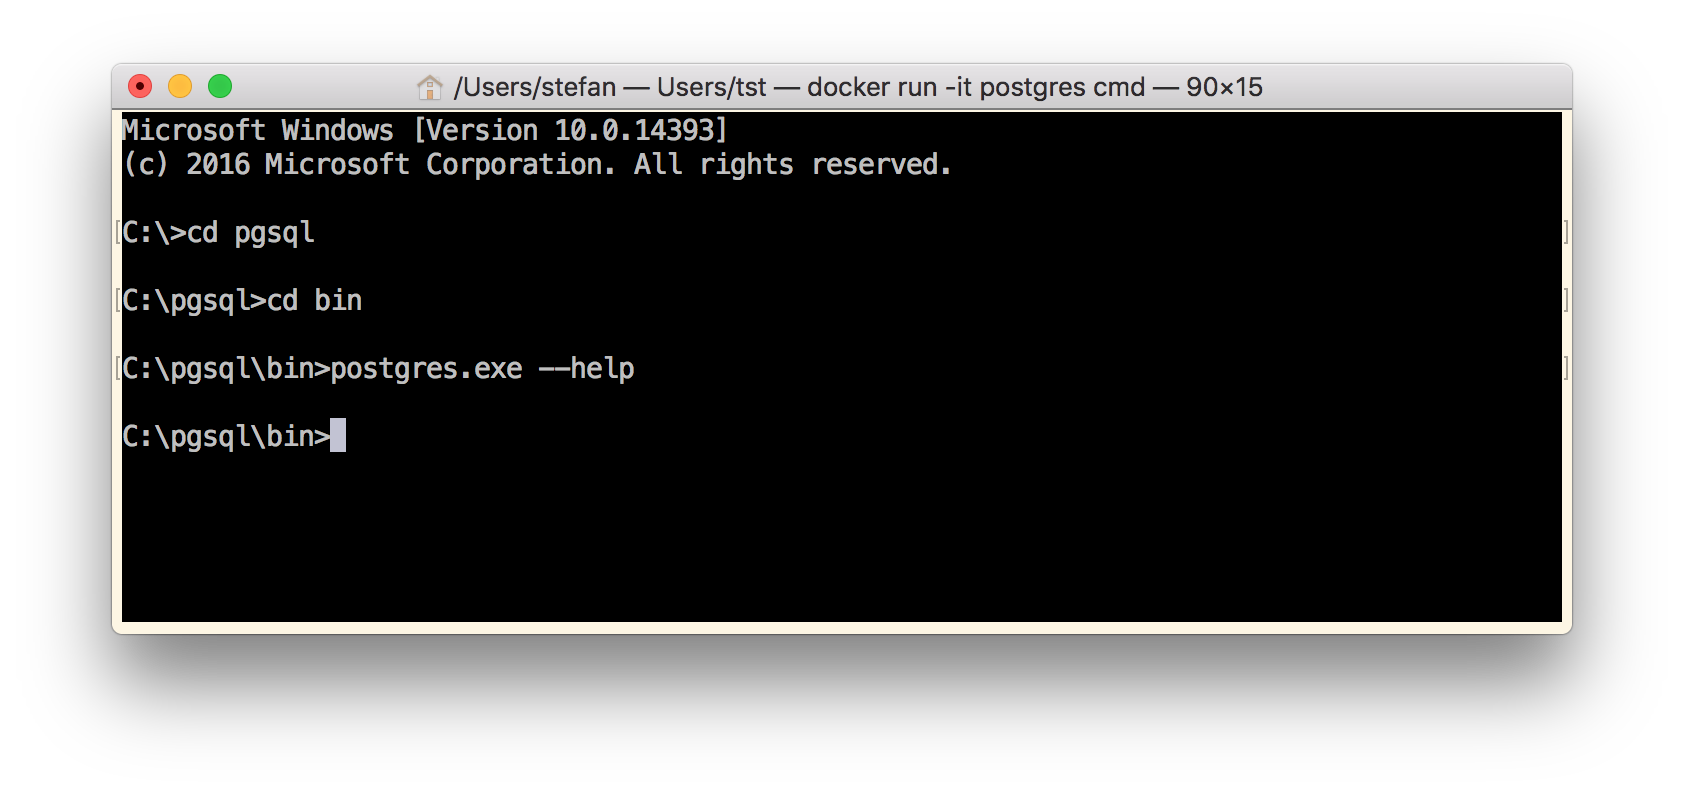
As you can see, nothing happens. No output. You just are back to the CMD prompt.
Now it's time to install procmon.exe on the container host and run it.
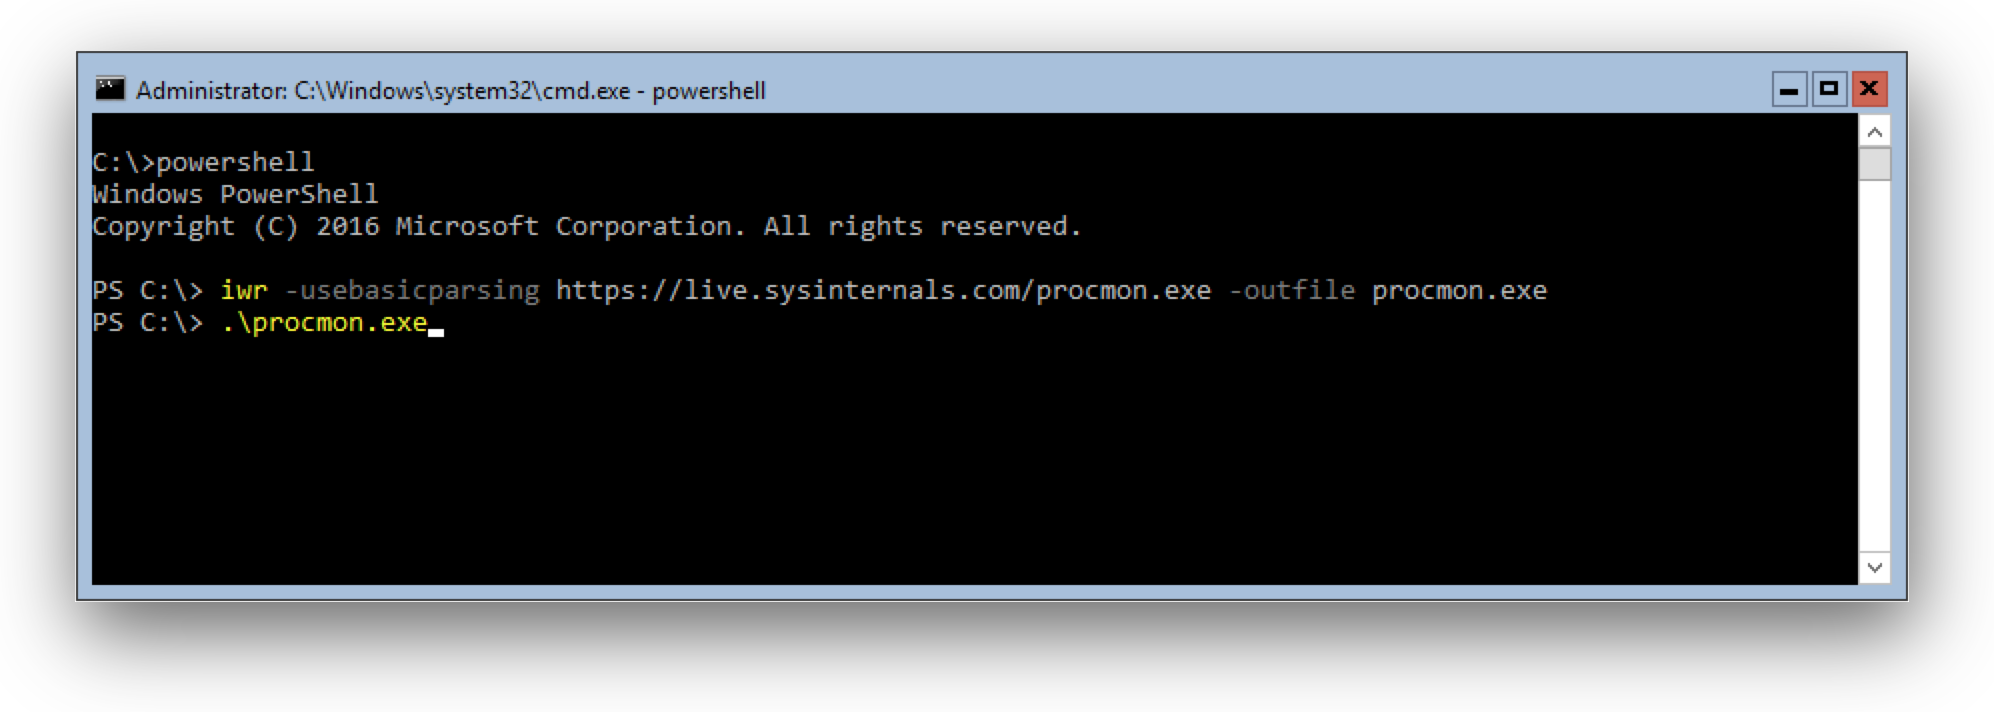
Open a PowerShell terminal in your Windows Server 2016 VM and run
iwr -usebasicparsing https://live.sysinternals.com/procmon.exe -outfile procmon.exe
Now run procmon.exe and define a filter to see only file activity looking for DLL files and start capturing.
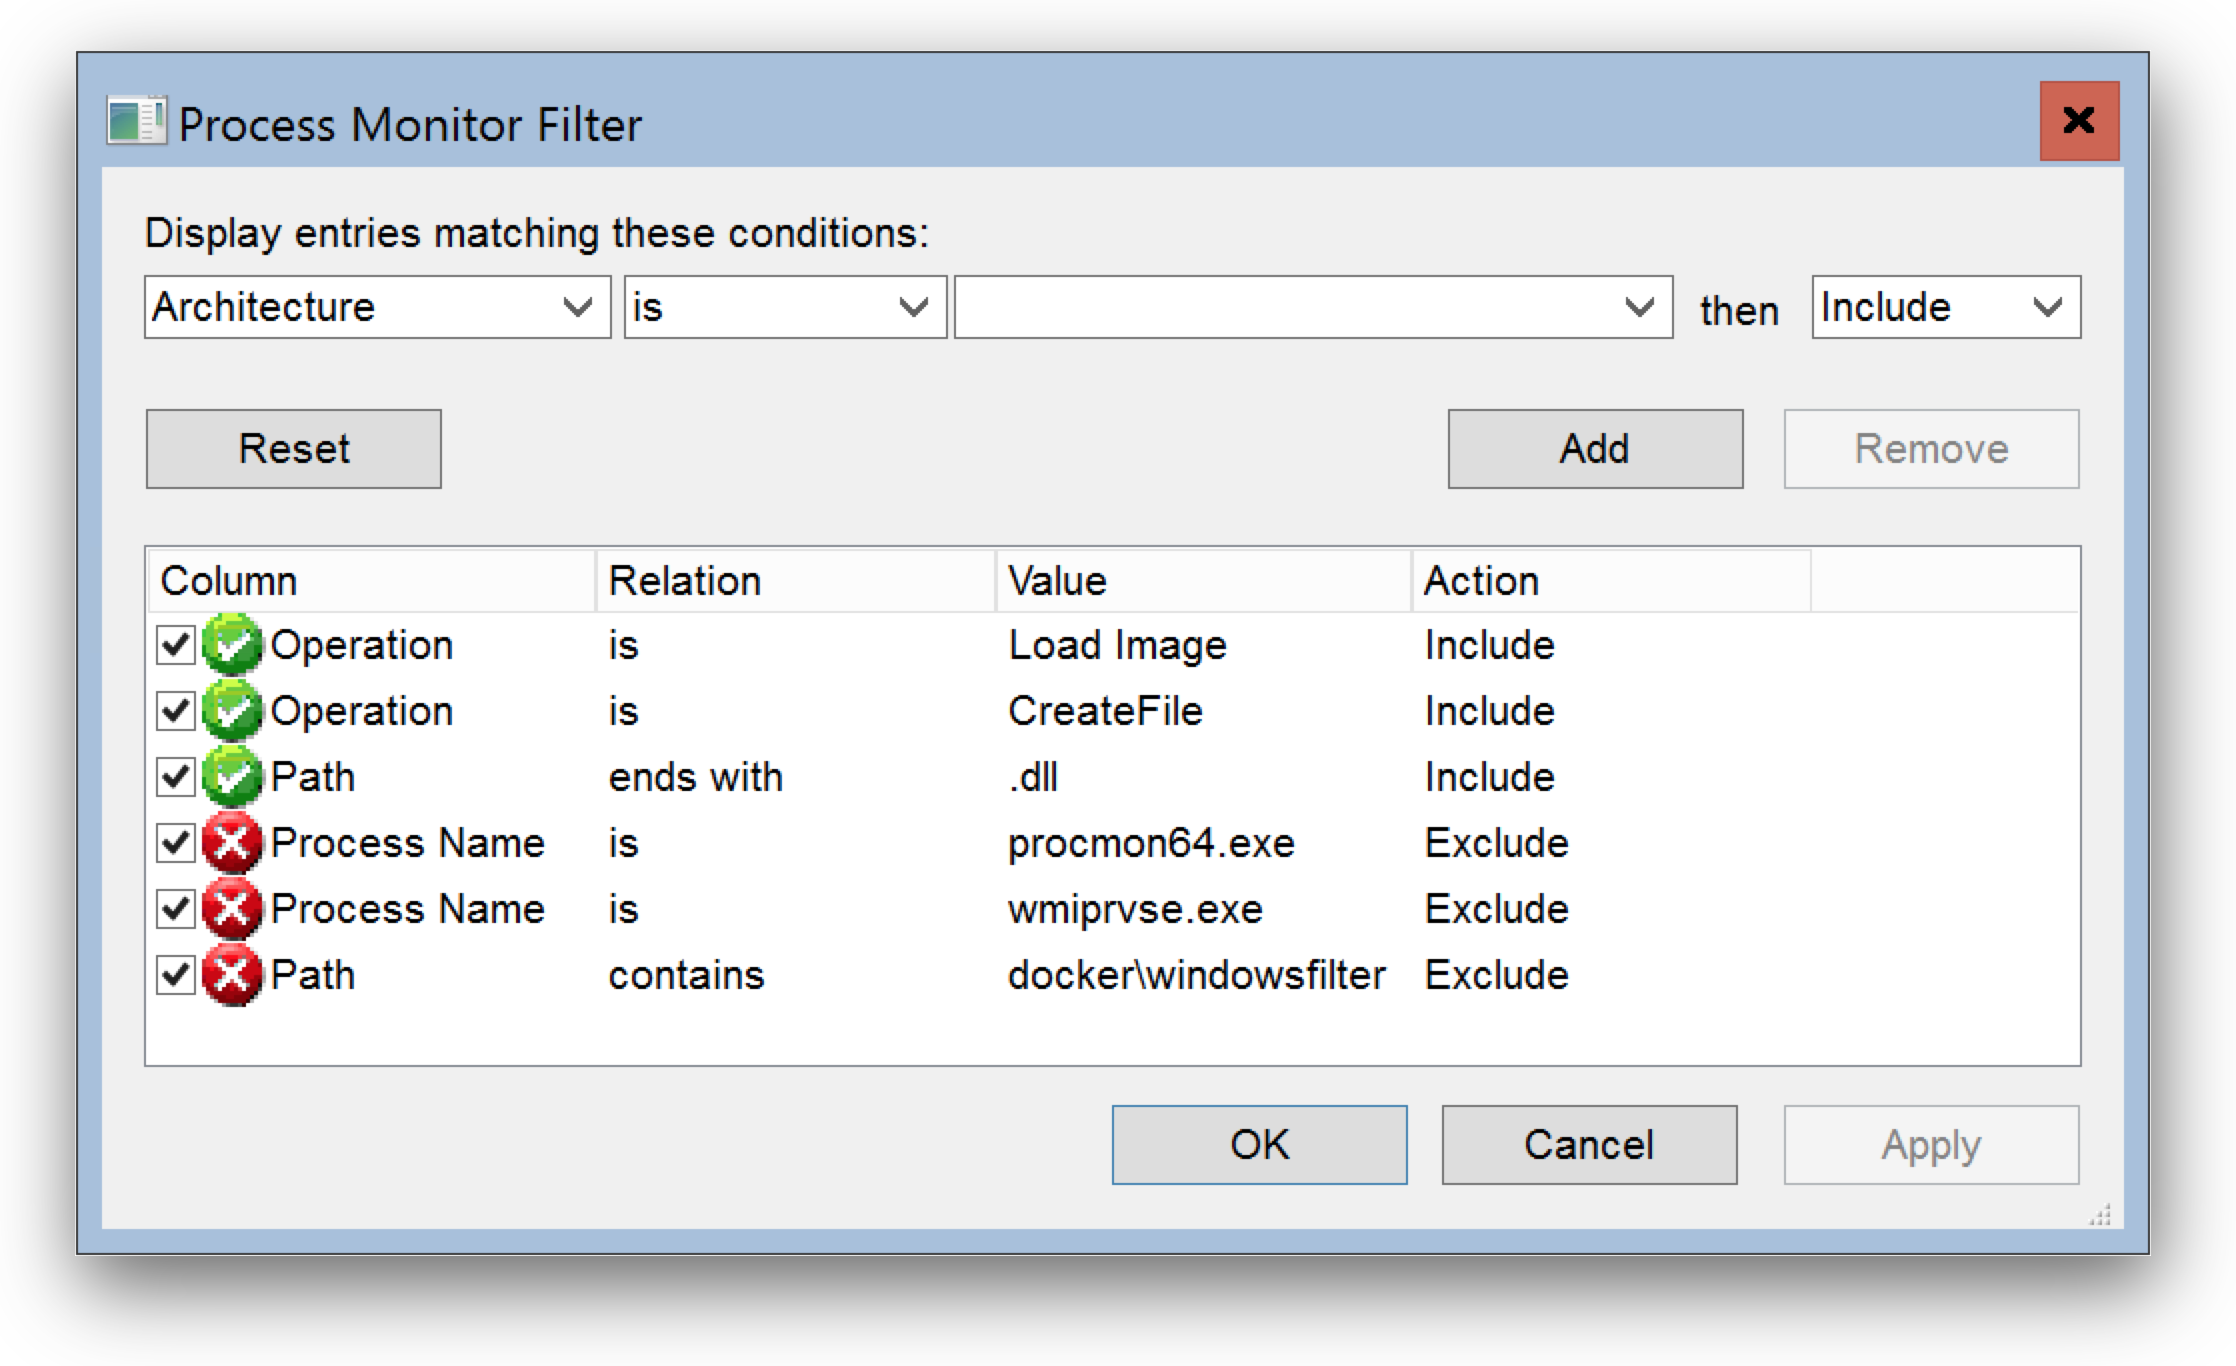
I have a prepared filter available for download: depends.PMF
Go to Filter, then Organize Filters... and then Import...
Now in your container run postgres.exe -h again.
As you can see Process Monitor captures file access to \Device\Harddisk\VolumeXX\psql\bin\ which is a folder in your container.
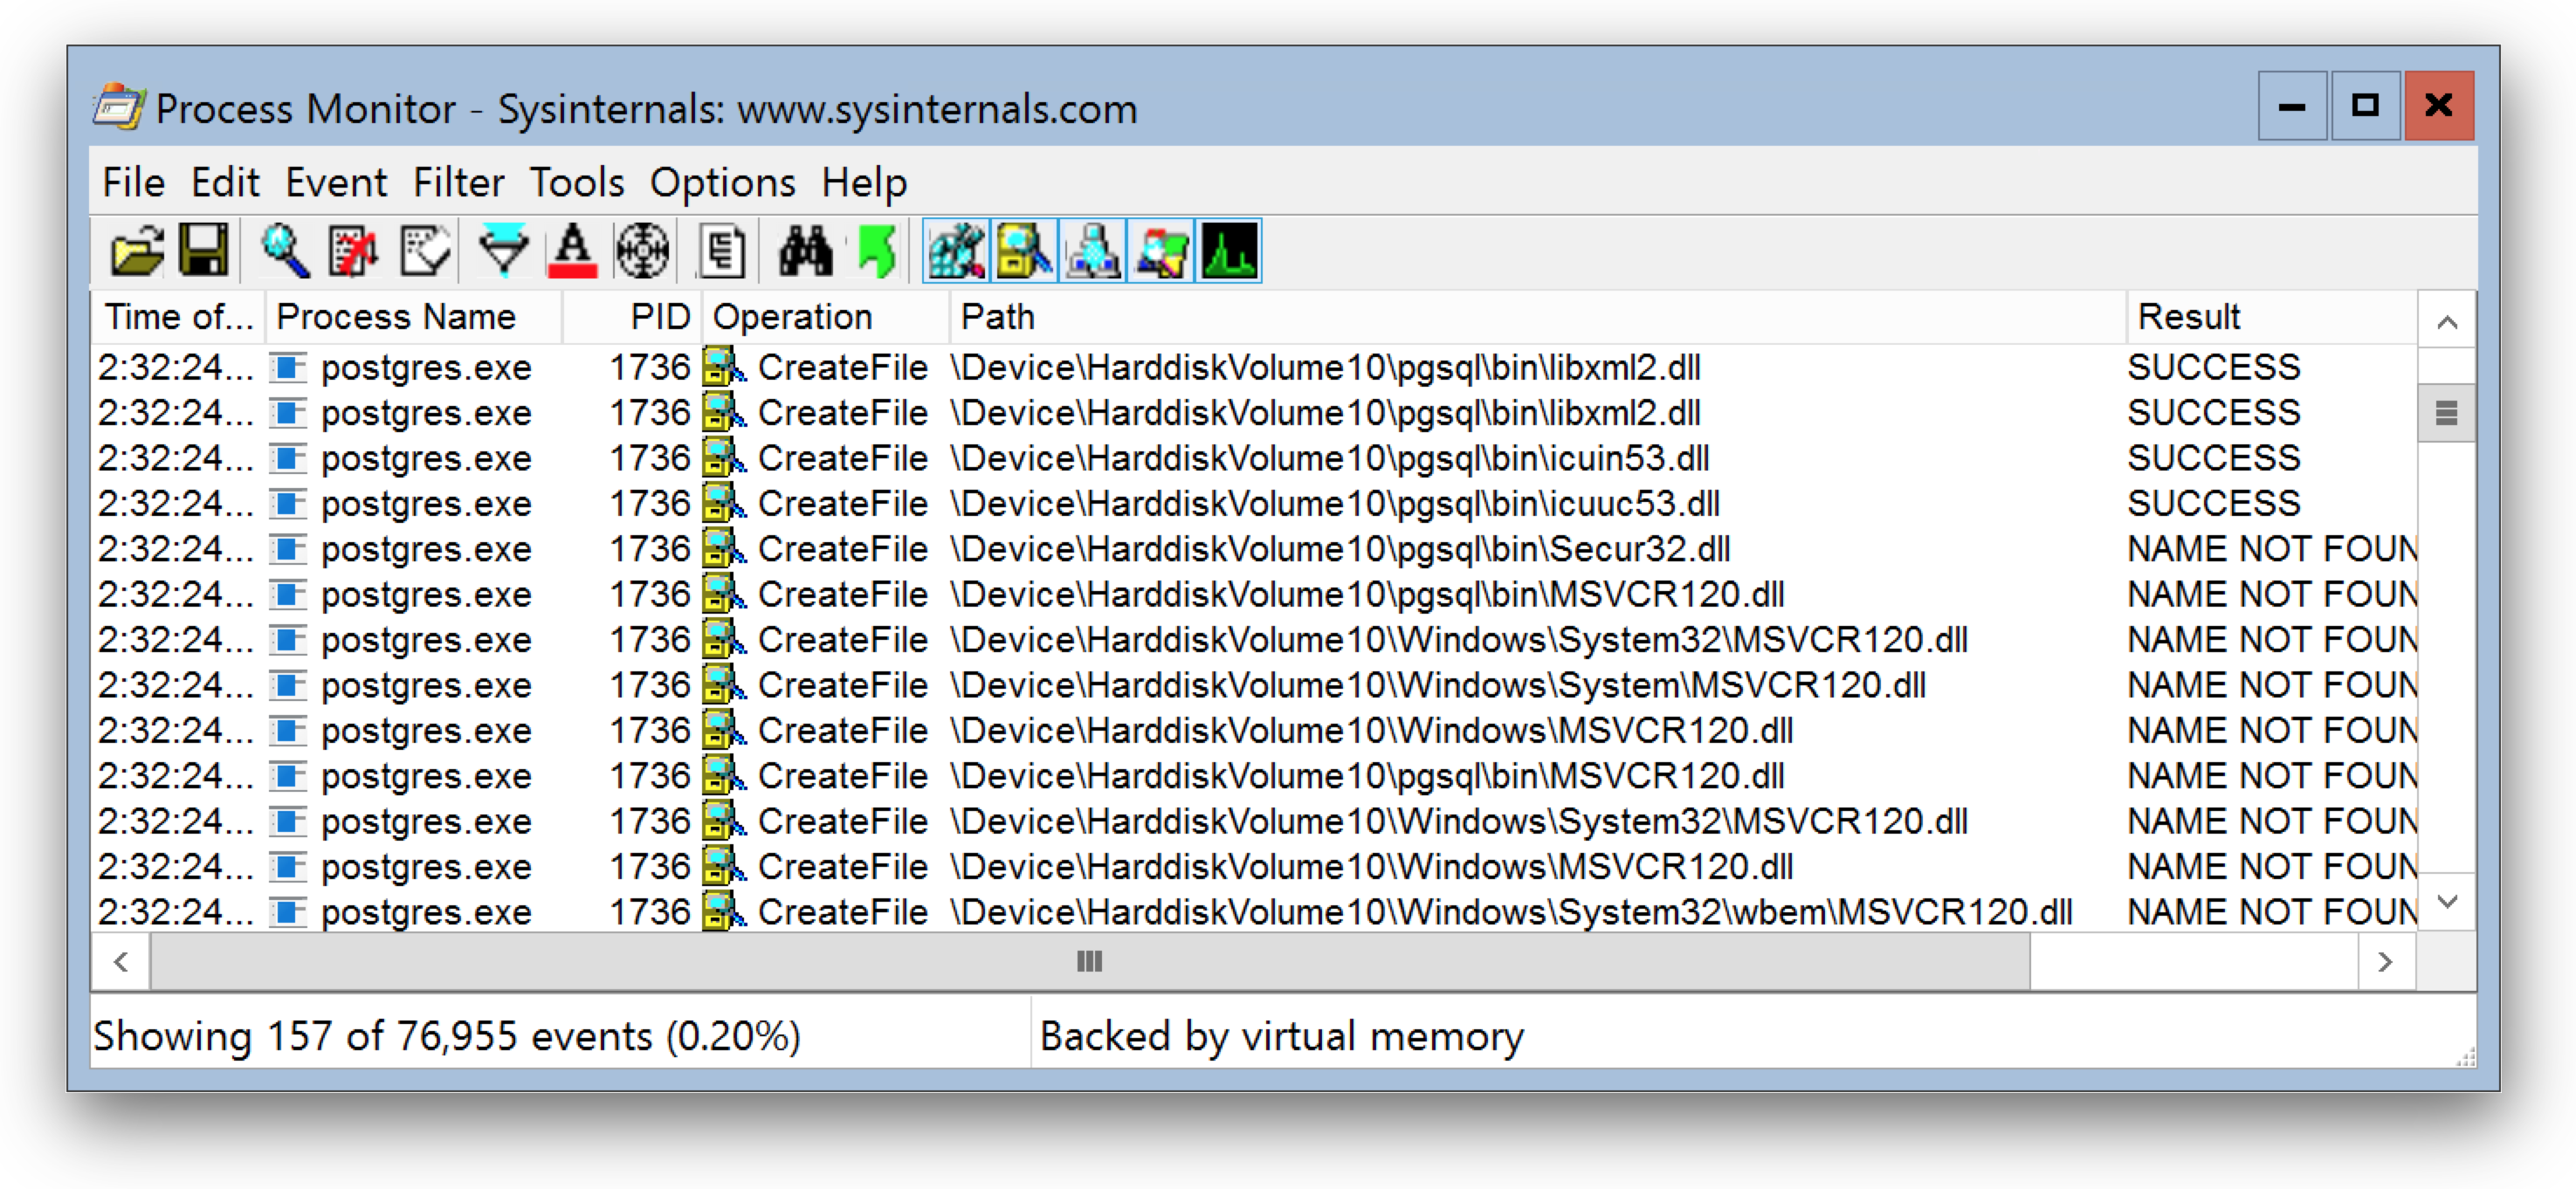
The interesting part is which DLL's cannot be found here. The MSVCR120.dll is missing, the Visual Studio Runtime DLL's.
For other applications you might have to look for config files or folders that are missing that stops your app from running in a Windows container.
Let's append the missing runtime in the Dockerfile with the next few lines:
RUN Invoke-WebRequest 'http://download.microsoft.com/download/0/5/6/056DCDA9-D667-4E27-8001-8A0C6971D6B1/vcredist_x64.exe' -OutFile vcredist_x64.exe ; `
    Start-Process vcredist_x64.exe -ArgumentList '/install', '/passive', '/norestart' -NoNewWindow -Wait ; `
    Remove-Item vcredist_x64.exe
Build the image and run another container and see if it works now.
Yes, this time we see the postgres.exe usage, so it seems we have solved all our dependency problems.
Go NanoServer
Now we have a Windows Server Core image with PostgreSQL server. The image size is now 11.1GByte. Let's go one step further and make it a much smaller NanoServer image.
In NanoServer we cannot run MSI packages or vcredist installers, and soon there is also no PowerShell. But with a so called multi-stage build it's easy to COPY deploy the PostgreSQL binaries and dependencies into a fresh NanoServer image.
We append some more lines to our Dockerfile. Most important line is the second FROM line to start a new stage with the smaller NanoServer image.
FROM microsoft/nanoserver:10.0.14393.2007
Then we COPY the pgsql folder from the first stage into the NanoServer image, as well as the important runtime DLL's.
COPY --from=download /pgsql /pgsql
COPY --from=download /windows/system32/msvcp120.dll /pgsql/bin/msvcp120.dll
COPY --from=download /windows/system32/msvcr120.dll /pgsql/bin/msvcr120.dll
Set the PATH variable to have all tools accessible, expose the standard port and define a command.
RUN setx /M PATH "C:\pgsql\bin;%PATH%"

EXPOSE 5432
CMD ["postgres"]
Now build the image again and try it out with
docker run postgres postgres.exe --help
We still see the usage, so the binaries also work fine in NanoServer. The final postgres images is down at 1.64GByte.
If you do this with a NanoServer 1709 or Insider image the sizes is even smaller at 738MByte. You can have a look at the compressed sizes on the Docker Hub at stefanscherer/postgres-windows.
Conclusion
Process Monitor can help you find issues that prevent applications to run properly in Windows containers. Run it from a Server 2016 container host to observe your or a foreign application.
I hope you find this blog post useful and I love to hear your feedback and experience about Windows containers. Just drop a comment below or ping me on Twitter @stefscherer.
]]>There may be different ways to run the Windows Insider Server Preview builds in Azure. Here's my approach to run a Windows Docker engine with the latest Insider build.
Build the Azure VM
On your local machine clone the packer-windows repo which has a Terraform template to build an Azure
]]>There may be different ways to run the Windows Insider Server Preview builds in Azure. Here's my approach to run a Windows Docker engine with the latest Insider build.
Build the Azure VM
On your local machine clone the packer-windows repo which has a Terraform template to build an Azure VM. The template chooses a V3 machine which is able to run nested VM's.
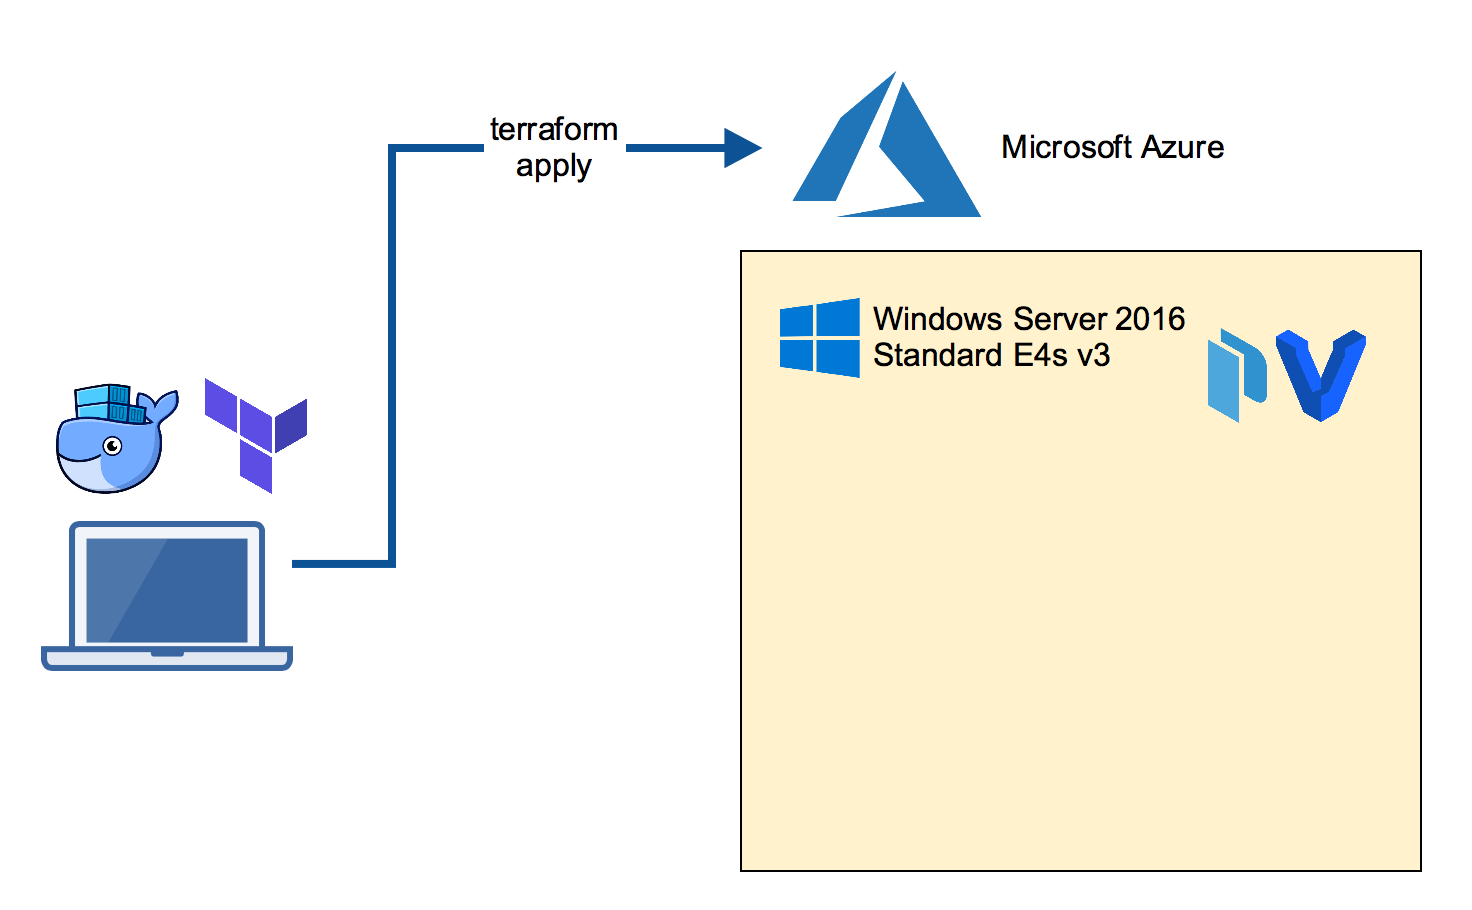
You need Terraform on your local machine which can be installed with a package manager.
Mac:
brew install terraform
Windows:
choco install terraform
Now clone the GitHub repo and go to the template.
git clone https://github.com/StefanScherer/packer-windows
cd packer-windows/nested/terraform
Adjust the variables.tf file with resource group name, account name and password, region and other things. You also need some information for Terraform to create resources in your Azure account. Please read the Azure Provider documentation for details how to obtain these values.
export ARM_SUBSCRIPTION_ID="uuid"
export ARM_CLIENT_ID="uuid"
export ARM_CLIENT_SECRET="uuid"
export ARM_TENANT_ID="uuid"

terraform apply
This command will take some minutes until the VM is up and running. It also runs a provision script to install further tools for you.
RDP into the Packer builder VM
Now log into the Azure VM with a RDP client. This VM has Hyper-V installed as well as Packer and Vagrant, the tools we will use next.
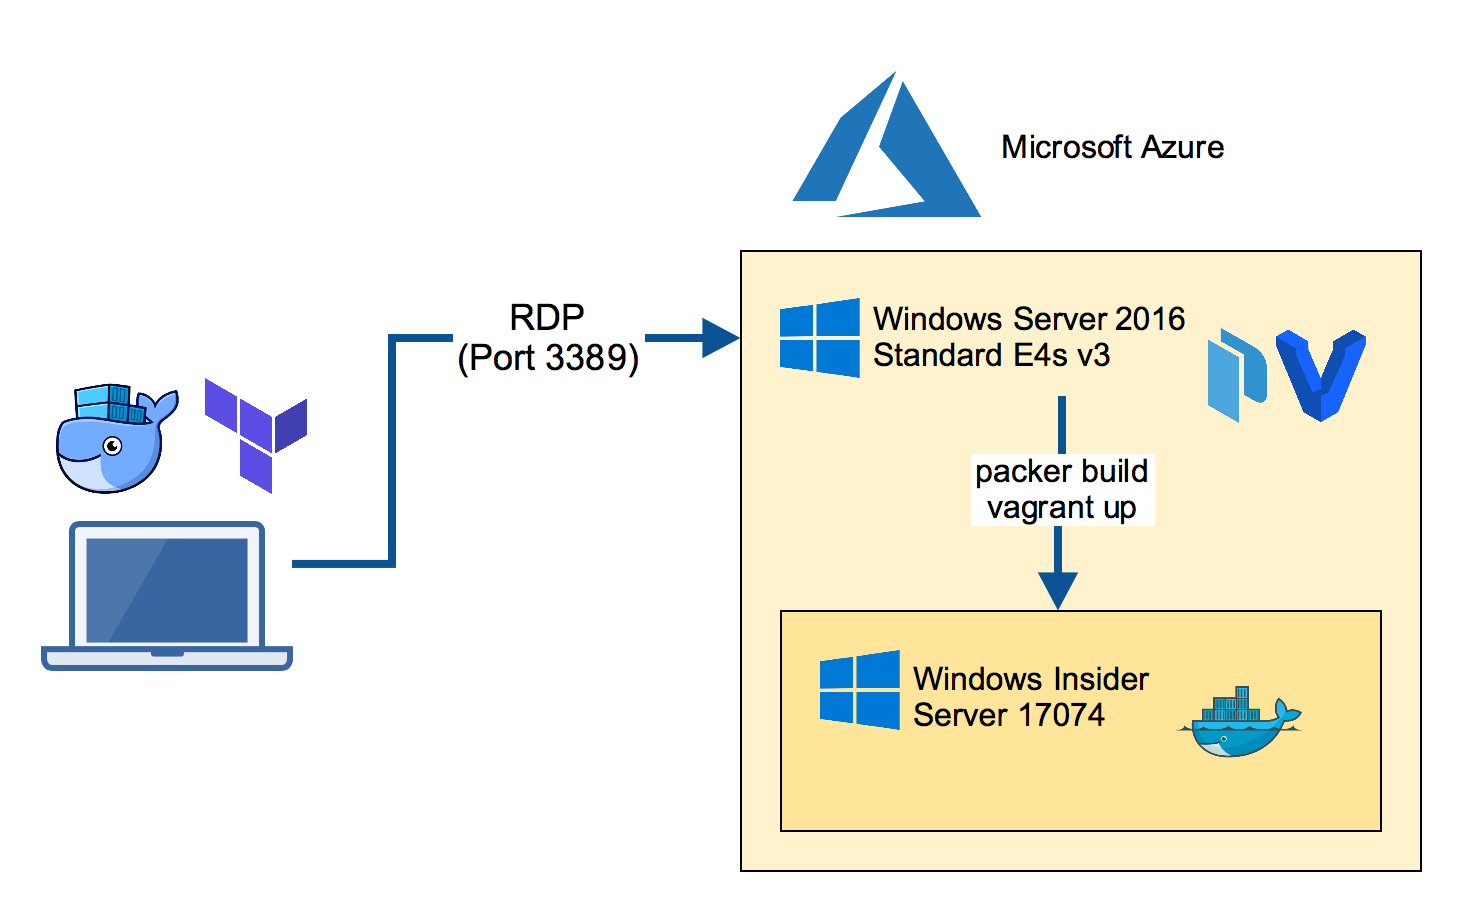
Build the Insider VM
The next step is to build the Windows Insider Server VM. We will use Packer for the task. This produces a Vagrant box file that can be re-used locally on a Windows 10 machine.
Clone the packer-windows repo and run the Packer build with the manually downloaded Insider ISO file.
git clone https://github.com/StefanScherer/packer-windows
cd packer-windows

packer build --only=hyperv-iso --var iso_url=~/Downloads/Windows_InsiderPreview_Server_2_17074.iso windows_server_insider_docker.json
This command will take some minutes as it also downloads the Insider Docker images to have them cached when you start a new VM.
Add the box file so it can be used by Vagrant.
vagrant box add windows_server_insider_docker windows_server_insider_docker_hyperv.box
Boot the Insider VM
Now we're using Vagrant to boot the Insider VM. I'll use my windows-docker-machine Vagrant template which I also use locally on a Mac or Windows 10 laptop.
git clone https://github.com/StefanScherer/windows-docker-machine
cd windows-docker-machine
vagrant plugin install vagrant-reload

vagrant up --provider hyperv insider
This will spin up a VM and creates TLS certificates for the Docker engine running in the Windows Insider Server VM.
You could use it from the Azure VM, but we want to make the nested VM reachable from our laptop.
Now retrieve the IP address of this nested VM to add some port mappings so we can access the nested VM from our local machine.
vagrant ssh-config
Use the IP address shown for the next commands, eg. 192.168.0.10
netsh interface portproxy add v4tov4 listenport=2376 listenaddress=0.0.0.0 connectport=2376 connectaddress=192.168.0.10
netsh interface portproxy add v4tov4 listenport=9000 listenaddress=0.0.0.0 connectport=9000 connectaddress=192.168.0.10
netsh interface portproxy add v4tov4 listenport=3390 listenaddress=0.0.0.0 connectport=3389 connectaddress=192.168.0.10
Create Docker TLS for external use
As we want to access this Docker engine from our local laptop we have to re-create the TLS certs with the FQDN of the Azure VM.
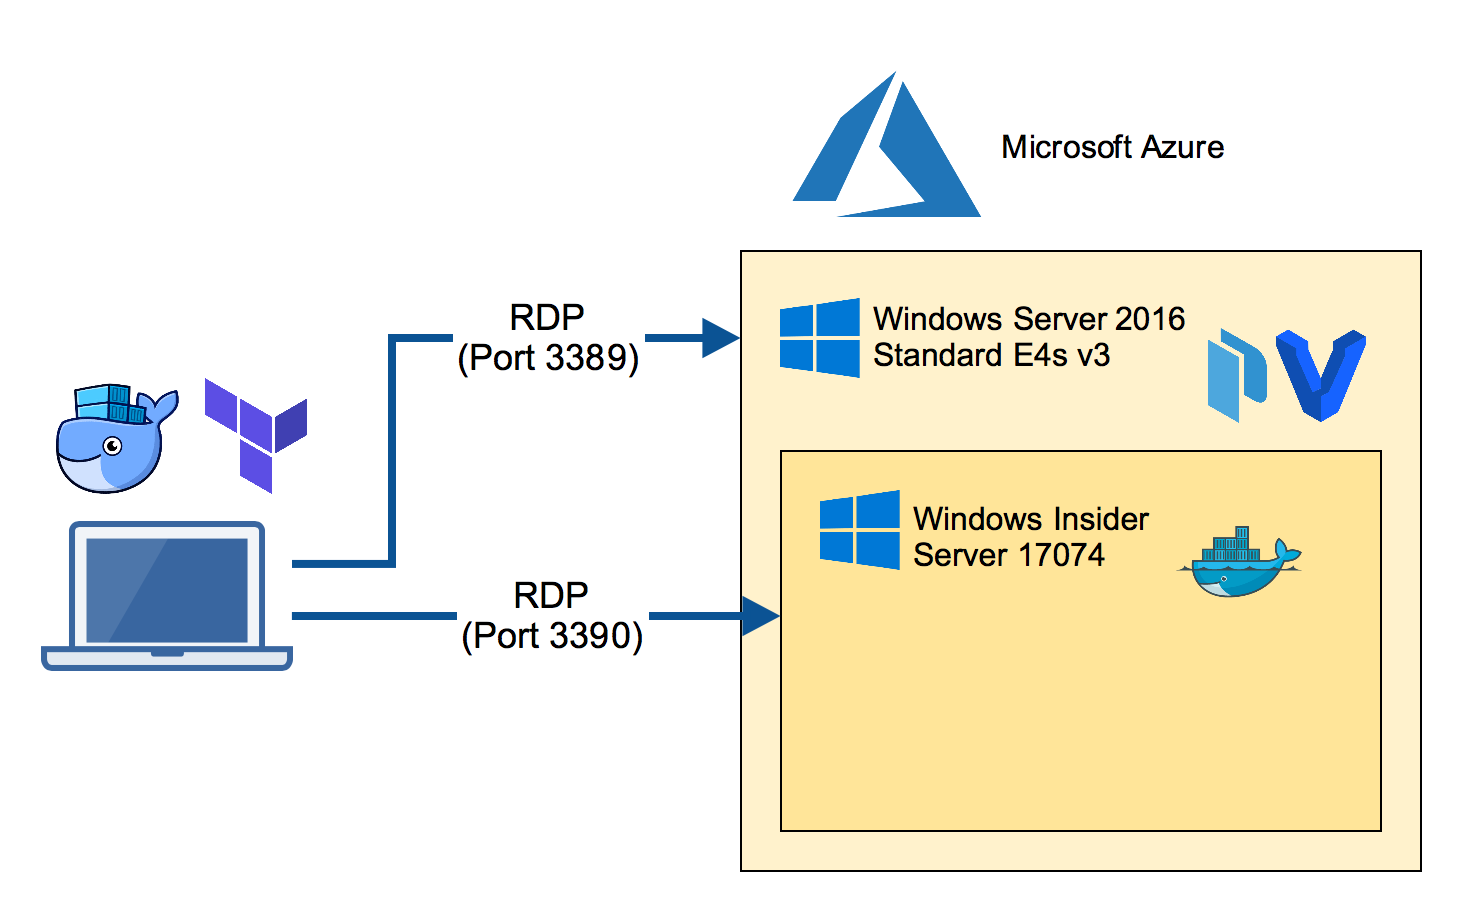
Now RDP into the nested VM through port 3390 from your laptop.
You will see a CMD terminal. Run powershell to enter a PowerShell terminal.
Run the create-machine.ps1 provision script again with the IP address and the FQDN of the Azure VM. Also specify the path of your local home directory (in my case -machineHome /Users/stefan) to make the docker-machine configuration work.
C:\Users\demo\insider-docker-machine\scripts\create-machine.ps1 -machineHome /Users/stefan -machineName az-insider -machineIp 1.2.3.4 -machineFqdn az-insider-01.westeurope.cloudapp.azure.com
Run Docker containers
You can copy the generated TLS certificates from the nested VM through the RDP session back to your home directory in $HOME/.docker/machine/machines folder.
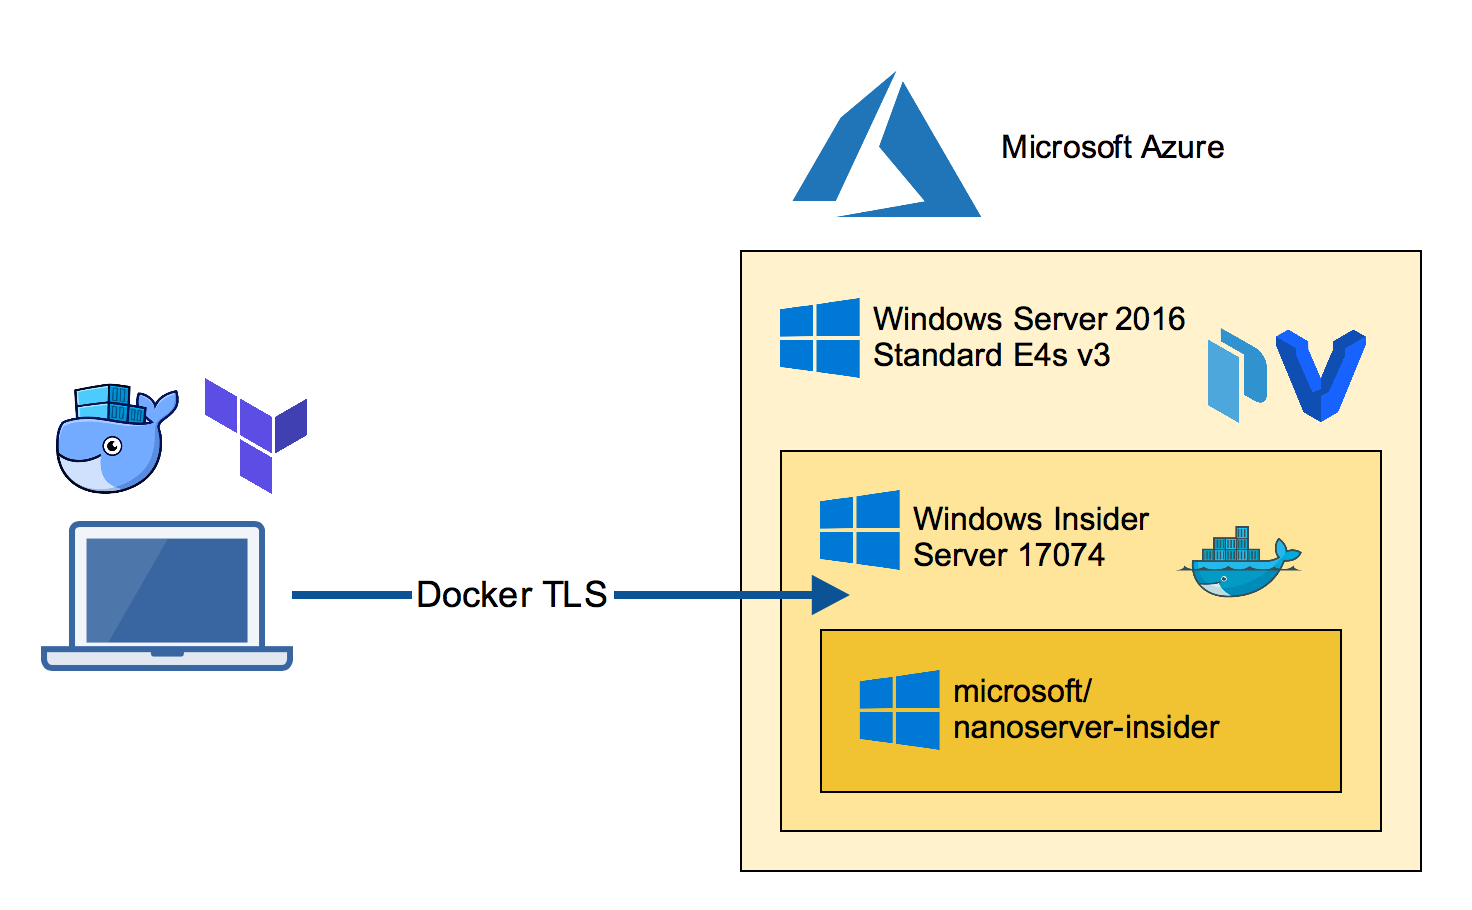
Then you can easily switch the Docker environment variables locally on your
Mac:
eval $(docker-machine env az-insider)
or Windows:
docker-machine env az-insider | iex
Now you should be able to run Docker commands like
docker images
docker run -it microsoft/nanoserver-insider cmd
Conclusion
We have used a lot of tools to create this setup. If you do this only once it seems to be more step than needed. But keep in mind the Insider builds are shipped regularly so you will do some steps again and again.
To repeat some of these steps tools like Packer and Vagrant can help you go faster building VM's as Docker helps you go faster to ship your apps.
- Packer helps you repeat building a VM from new ISO.
- Vagrant helps you repeat booting fresh VMs. Destroy early and often. Rebuild is cheap.
- Docker helps you repeat creating and running applications.
If you have another approach to run Insider builds in Azure please let me know. I love to hear your story. Please use the comments below if you have questions or want to share your setup.
If you liked this blog post please share it with your friends. You can follow me on Twitter @stefscherer to stay updated with Windows containers.
]]>Last week a major pull request to support Linux Containers on Windows (LCOW) has landed in master branch of the Docker project. With that feature enabled you will be able to run both Linux and Windows containers side-by-side with a single Docker engine.
So let's have a look how a
]]>Last week a major pull request to support Linux Containers on Windows (LCOW) has landed in master branch of the Docker project. With that feature enabled you will be able to run both Linux and Windows containers side-by-side with a single Docker engine.
So let's have a look how a Windows 10 developer machine will look like in near future.
- The Docker command
docker pslists all your running Linux and Windows containers. - You can use volumes to share data between containers and the host.
- The containers can talk to each other over the container networks.
- You can publish ports to your host and use localhost. But wait, this is still a Windows Insider feature coming to Windows 10 1803 release.
Running Linux containers
At the moment you need to specify the --platform option to pull Linux images. This option is also needed when the specific Docker images is a multi-arch image for both Linux and Windows.
docker pull --platform linux alpine
Once you have pulled Linux images you can run them without the --platform option.
docker run alpine uname -a
To allow Windows run Linux containers a small Hyper-V VM is needed. The LinuxKit project provides an image for LCOW at https://github.com/linuxkit/lcow.
Shared volumes
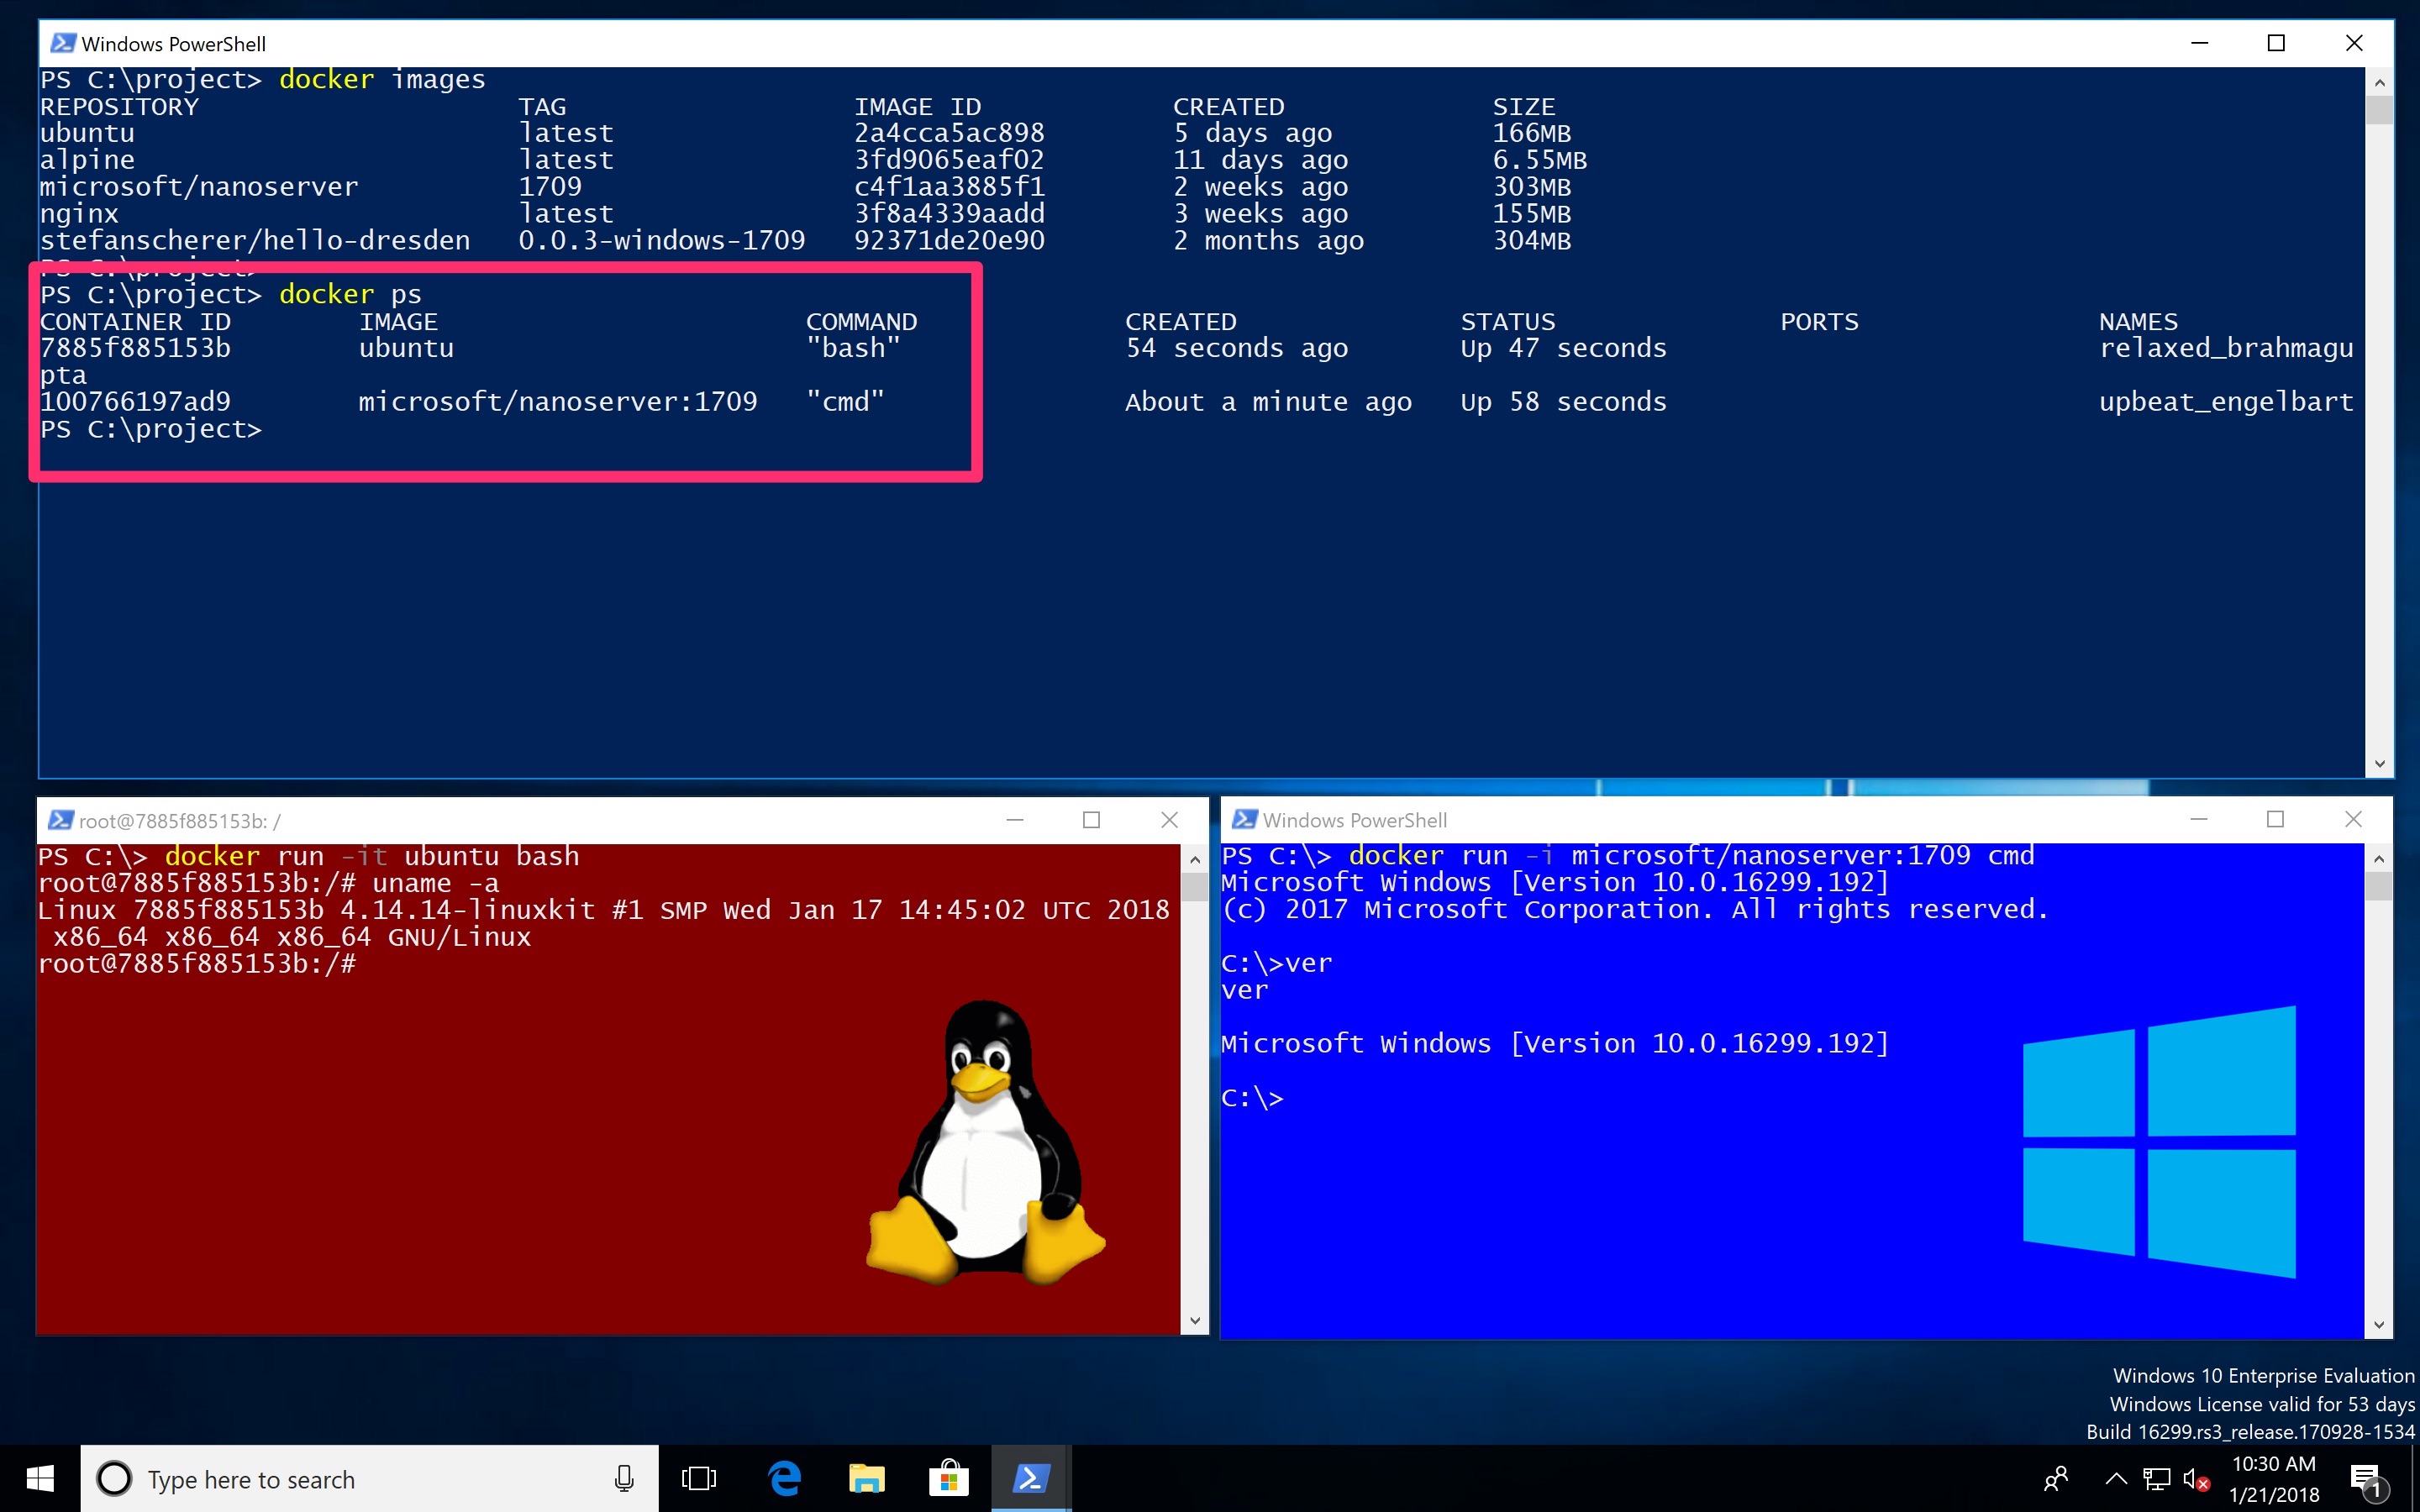
Let's see how containers of different platforms can share data in a simple way. You can bind mount a volume into Linux and Windows containers.
The following example shares a folder from the host with a Linux and Windows container.
First create a folder on the Windows 10 host:
cd \
mkdir host
Run a Linux container
On the Windows 10 host run a Linux container and bind mount the folder as /test in the Linux container.
docker run -it -v C:\host:/test alpine sh
In the Linux container create a file in that mounted volume.
uname -a > test/hello-from-linux.txt
Run a Windows container
On the Windows 10 host run a Windows container and bind mount the folder as C:\test in the Windows container.
docker run -i -v C:\host:C:\test microsoft/nanoserver:1709 cmd
In the Windows container create a file in that mounted volume.
ver > test\hello-from-windows.txt
Result
On the Windows 10 host list the files in the shared folder
PS C:\> dir host


    Directory: C:\host


Mode                LastWriteTime         Length Name
----                -------------         ------ ----
-a----        1/21/2018   4:32 AM             85 hello-from-linux.txt
-a----        1/21/2018   4:33 AM             46 hello-from-windows.txt
This is super convenient for development environments to share configuration files or even source code.
Drafting mixed workloads
With Docker Compose you can spin up a mixed container environment. I just did these first steps to spin up a Linux and Windows web server.
version: "3.2"

services:

  web1:
    image: nginx
    volumes:
      - type: bind
        source: C:\host
        target: /test
    ports:
      - 80:80

  web2:
    image: stefanscherer/hello-dresden:0.0.3-windows-1709
    volumes:
      - type: bind
        source: C:\host
        target: C:\test
    ports:
      - 81:3000

networks:
  default:
    external:
      name: nat
Think of a Linux database and a Window front end, or vice versa...
Build your own LCOW test environment
If you want to try LCOW yourself I suggest to spin up a fresh Windows 10 1709 VM.
Azure
I have tested LCOW with a Windows 10 1709 VM in Azure. Choose a V3 machine to have nested hypervisor which you will need to run Hyper-V containers.
Containers and Hyper-V
Enable the Containers feature and Hyper-V feature:
Enable-WindowsOptionalFeature -Online -FeatureName containers -All -NoRestart
Enable-WindowsOptionalFeature -Online -FeatureName Microsoft-Hyper-V -All -NoRestart
LinuxKit
Now install the LinuxKit image for LCOW. I have catched the latest from a CircleCI artifact, but soon there will be a new release in the linuxkit/lcow repo.
Invoke-WebRequest -OutFile "$env:TEMP\linuxkit-lcow.zip" "https://23-111085629-gh.circle-artifacts.com/0/release.zip"
Expand-Archive -Path "$env:TEMP\linuxkit-lcow.zip" -DestinationPath "$env:ProgramFiles\Linux Containers" -Force
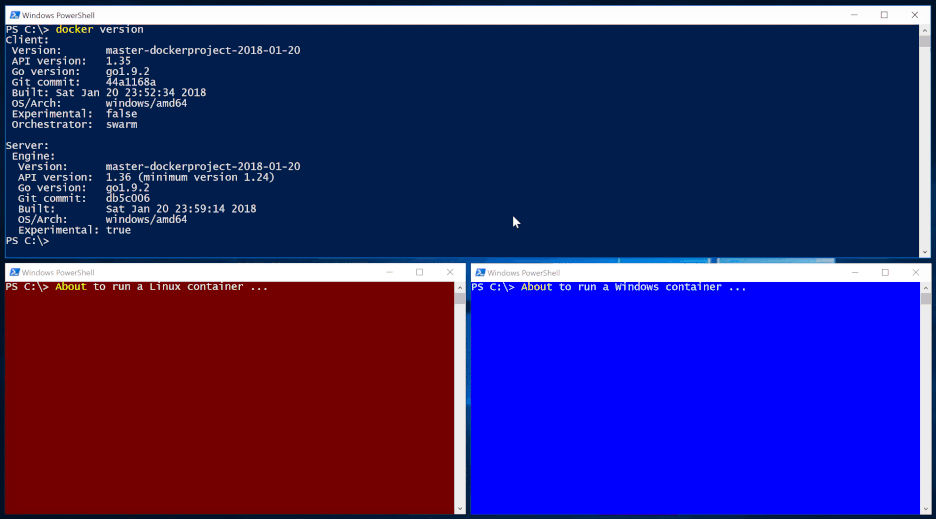
Docker nightly build
Now download and install the Docker engine. As this pull request only landed in master branch we have to use the nightly build for now.
Invoke-WebRequest -OutFile "$env:TEMP\docker-master.zip" "https://master.dockerproject.com/windows/x86_64/docker.zip"
Expand-Archive -Path "$env:TEMP\docker-master.zip" -DestinationPath $env:ProgramFiles -Force
The next command installs the Docker service and enables the experimental features.
. $env:ProgramFiles\docker\dockerd.exe --register-service --experimental
Set the PATH variable to have the Docker CLI available.
[Environment]::SetEnvironmentVariable("Path", $env:Path + ";$($env:ProgramFiles)\docker", [EnvironmentVariableTarget]::Machine)
Now reboot the machine to finish the Containers and Hyper-V installation. After the reboot the Docker engine should be up and running and the Docker CLI can be used from the PowerShell terminal.
Local Vagrant environment
If you have Vagrant installed with Hyper-V or VMware as your hypervisor, you can spin up a local test environment with a few commands.
First clone my GitHub repo docker-windows-box which has a LCOW environment to play with.
git clone https://github.com/StefanScherer/docker-windows-box
cd docker-windows-box
cd lcow
vagrant up
This will download the Vagrant base box if needed, spins up the Windows 10 VM and automatically installs all features shown above.
Conclusion
With all these new Docker features coming to Windows in the next few months, Windows 10 is evolving to the most interesting developer platform in 2018.
Imagine what's possible: Use a docker-compose.yml to spin up a mixed scenario with Linux and Windows containers, live debug your app from Visual Studio Code, and much more.
If you liked this blog post please share it with your friends. You can follow me on Twitter @stefscherer to stay updated with Windows containers.
]]>First of all: Happy Halloween! In this blog post you'll see some spooky things - or magic? Anyway I found a way to build Windows Docker images based on the new 1709 images without running on 1709. Sounds weird?
]]>Disclaimer: The tools and described workflow to build such images on
First of all: Happy Halloween! In this blog post you'll see some spooky things - or magic? Anyway I found a way to build Windows Docker images based on the new 1709 images without running on 1709. Sounds weird?
Disclaimer: The tools and described workflow to build such images on old Windows Server versions may break at any time. It works for me and some special cases, but it does not mean it works for any other use-case.
The 2016 <-> 1709 gap
As you might know from my previous blog post there is a gap between the old and new Windows images. You cannot pull the new 1709 Docker images on current Windows Server 2016. This means you also cannot build images without updating your build machines to Windows Server 1709.
AppVeyor
My favorite CI service for Windows is AppVeyor. They provide a Windows Server 2016 build agent with Docker and the latest base images installed. So it is very simple and convenient to build your Windows Docker images there. For example all my dockerfiles-windows Dockerfiles are built there and the images are pushed to Docker Hub.
I guess it will take a while until we can choose another build agent to start building for 1709 there.
But what should I do in the meantime?
- Should I build all 1709 images manually on a local VM?
- Or spin up a VM in Azure? It is possible since today.
But then I don't have the nice GitHub integration. And I have to do all the maintenance of a CI server (cleaning up disk space and so on) myself. Oh I don't want to go that way.
Docker images have layers
Let's have a closer look at how a Docker image looks like. Each Docker image contains of one or more layers. Each layer is read-only. Any change will be done in a new layer on top of the underlying ones.
For example the Windows Docker image of a Node.js application looks more or less like this:
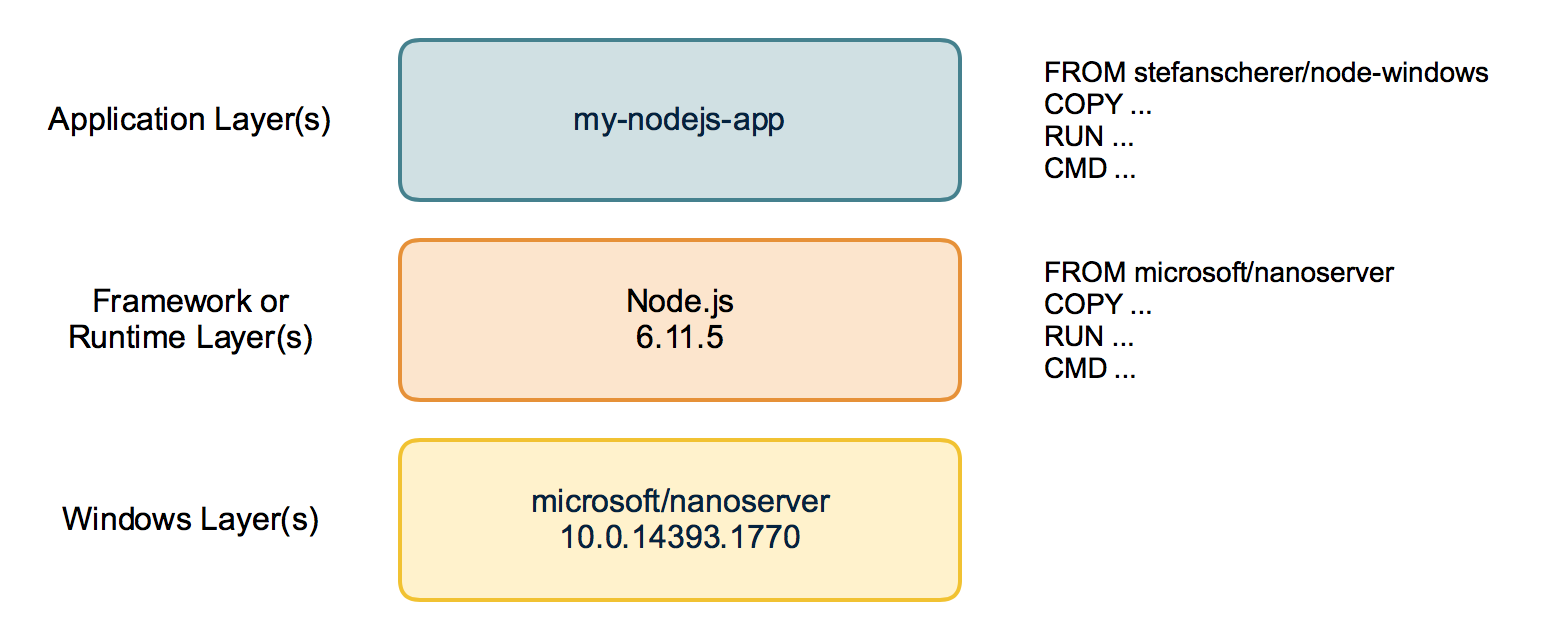
At the bottom you find the Windows base image, then we add the Node.js runtime. Then we can add our application code on top of that. This is how a Dockerfile works. Every FROM, RUN, ... is an extra layer.
Technically all layers are just tarballs with files and directories in it. So when the application and framework layer are independent from the OS system layer it should be possible to rearrange them with a new OS layer.
Rebase Docker image
That is what I have tried to find out. I studied the Docker Hub API and wrote a proof of concept to "rebase" a given Windows Docker image to swap the old Windows OS layers with another one.
The tool works only with information from Docker Hub so it only retrieves metadata and pushes a new manifest back to the Docker Hub. This avoids downloading hundreds of megabytes for the old nanoserver images.
Use cases
- Easily apply Windows Updates to an existing Windows app in seconds. Only the update layer will be swapped.
- Provide your app for all available Windows Update layers to avoid download.
- Sync multiple images based on different Windows Update layers to the current to avoid downloading several different udpate layers for a multi-container application.
- Create images for Server 1709 without having a machine for it.
Limits
- You cannot move an app from a windowsservercore image to the nanoserver image.
- You also cannot move PowerShell scripts into the 1709 nanoserver image as there is no PowerShell installed.
- Your framework or application layer may has modified the Windows registry at build time. It then carries the old registry that may not fit to new base layer.
- Moving such old application layers on top of new base layers is some kind of time travel. Be warned that this tool may create corrupt images.
You can find the rebase-docker-image tool on GitHub. It is a Node.js command line tool which is also available on NPM.
The usage looks like this:
$ rebase-docker-image \
    stefanscherer/hello-freiburg:windows \
    -t stefanscherer/hello-freiburg:1709 \
    -b microsoft/nanoserver:1709
You specify the existing image, eg. "stefanscherer/hello-freiburg:windows" which is based on nanoserver 10.0.14393.x.
With the -t option you specify the target image name that where the final manifest should be pushed.
The -b option specifies the base image you want to use, so most of the time the "microsoft/nanoserver:1709" image.

When we run the tool it does its job in only a few seconds:
Retrieving information about source image stefanscherer/hello-freiburg:windows
Retrieving information about source base image microsoft/nanoserver:10.0.14393.1715
Retrieving information about target base image microsoft/nanoserver:1709
Rebasing image
Pushing target image stefanscherer/hello-freiburg:1709
Done.
Now on a Windows Server 1709 we can run the application.
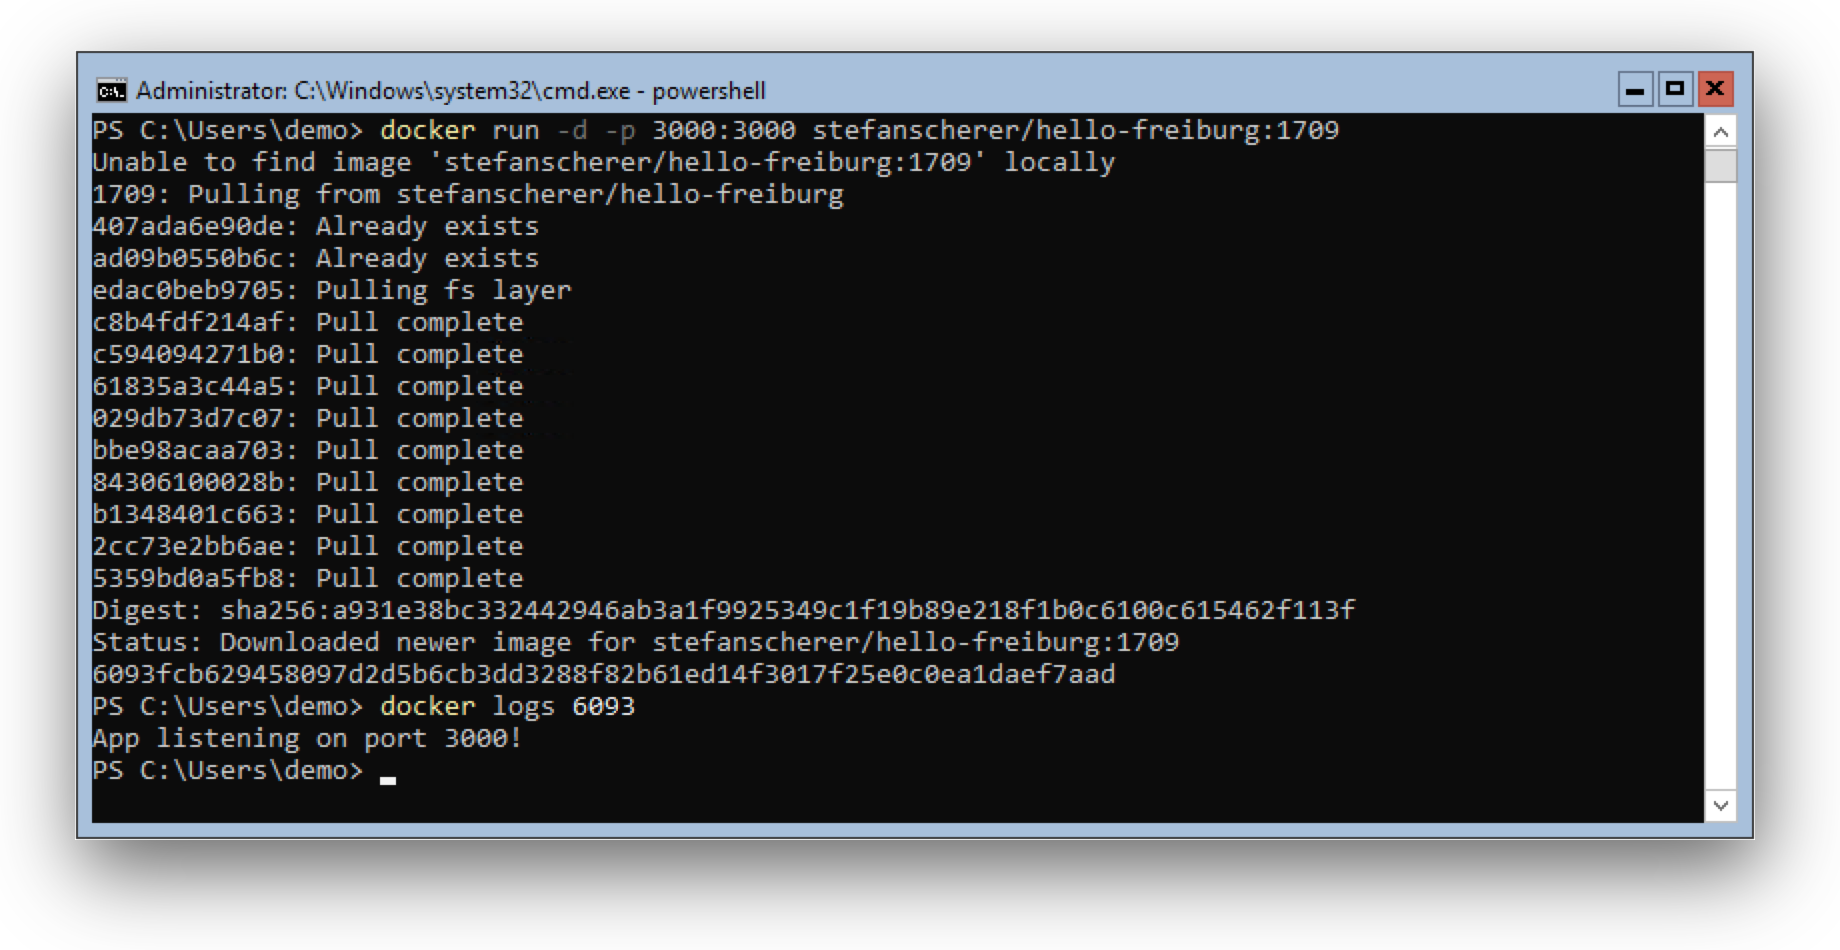
I tried this tool with some other Windows Docker images and was able to rebase the golang:1.9-nanoserver image to have a Golang build environment for 1709 without rebuilding the Golang image by myself.
But I also found situations where the rebase didn't work, so don't expect it to work everywhere.
AppVeyor CI pipeline
I also want to show you a small CI pipeline using AppVeyor to build a Windows image with curl.exe installed and provide two variants of that Docker image, one for the old nanoserver and one with the nanoserver:1709 image.
The Dockerfile uses a multi-stage build. In the first stage we download and extract curl and its DLL's. The second stage starts again with the empty nanoserver (the fat one for Windows Server 2016) and then we just COPY deploy the binary into the fresh image. An ENTRYOINT finishes the final image.
FROM microsoft/nanoserver AS download
ENV CURL_VERSION 7.56.1
WORKDIR /curl
ADD https://skanthak.homepage.t-online.de/download/curl-$CURL_VERSION.cab curl.cab
RUN expand /R curl.cab /F:* .

FROM microsoft/nanoserver
COPY --from=download /curl/AMD64/ /
COPY --from=download /curl/CURL.LIC /
ENTRYPOINT ["curl.exe"]
This image can be built on AppVeyor and pushed to the Docker Hub.
The push.ps1 script pushes this image to Docker Hub.
docker push stefanscherer/curl-windows:$version-2016
Then the rebase tool will be installed and the 1709 variant will be pushed as well to Docker Hub.
npm install -g rebase-docker-image
rebase-docker-image `
  stefanscherer/curl-windows:$version-2016 `
  -t stefanscherer/curl-windows:$version-1709 `
  -b microsoft/nanoserver:1709
To provide my users the best experience I also draft a manifest list, just like we did for multi-arch images at the Captains Hack day. The final "tag" then contains both Windows OS variants.
On Windows you can use Chocolatey to install the manifest-tool. In the future this feature will be integrated into the Docker CLI as "docker manifest" command.
choco install -y manifest-tool
manifest-tool push from-spec manifest.yml
The manifest.yml lists both images and joins them together to the final stefanscherer/curl-windows image.
image: stefanscherer/curl-windows:7.56.1
tags: ['7.56', '7', 'latest']
manifests:
  -
    image: stefanscherer/curl-windows:7.56.1-2016
    platform:
      architecture: amd64
      os: windows
  -
    image: stefanscherer/curl-windows:7.56.1-1709
    platform:
      architecture: amd64
      os: windows
So on both Windows Server 2016 and Windows Server 1709 the users can run the same image and it will work.
PS C:\Users\demo> docker run stefanscherer/curl-windows
curl: try 'curl --help' or 'curl --manual' for more information
This requires the next Docker 17.10 EE version to work correctly, but it should be available soon. With older Docker engines it may pick the wrong version of the list of Docker images and fail running it.
Conclusion
This way to "rebase" Docker images works astonishingly good, but keep in mind that this is not a general purpose solution. It is always better to use the correct version on the host to rebuild your Docker images the official way.
Please use the comment below if you have further questions or share what you think about that idea.
Stefan
@stefscherer
Today Microsoft has released Windows Server 1709 in Azure. The ISO file is also available in the MSDN subscription to build local VM's. But spinning up a cloud VM makes it easier for more people.
So let's go to Azure and create a new machine. The interesting VM for me
]]>Today Microsoft has released Windows Server 1709 in Azure. The ISO file is also available in the MSDN subscription to build local VM's. But spinning up a cloud VM makes it easier for more people.
So let's go to Azure and create a new machine. The interesting VM for me is "Windows Server, version 1709 with Containers" as it comes with Docker preinstalled.
After a few minutes you can RDP into the machine. But watch out, it is only a Windows Server Core, so there is no full desktop. But for a Docker host this is good enough.
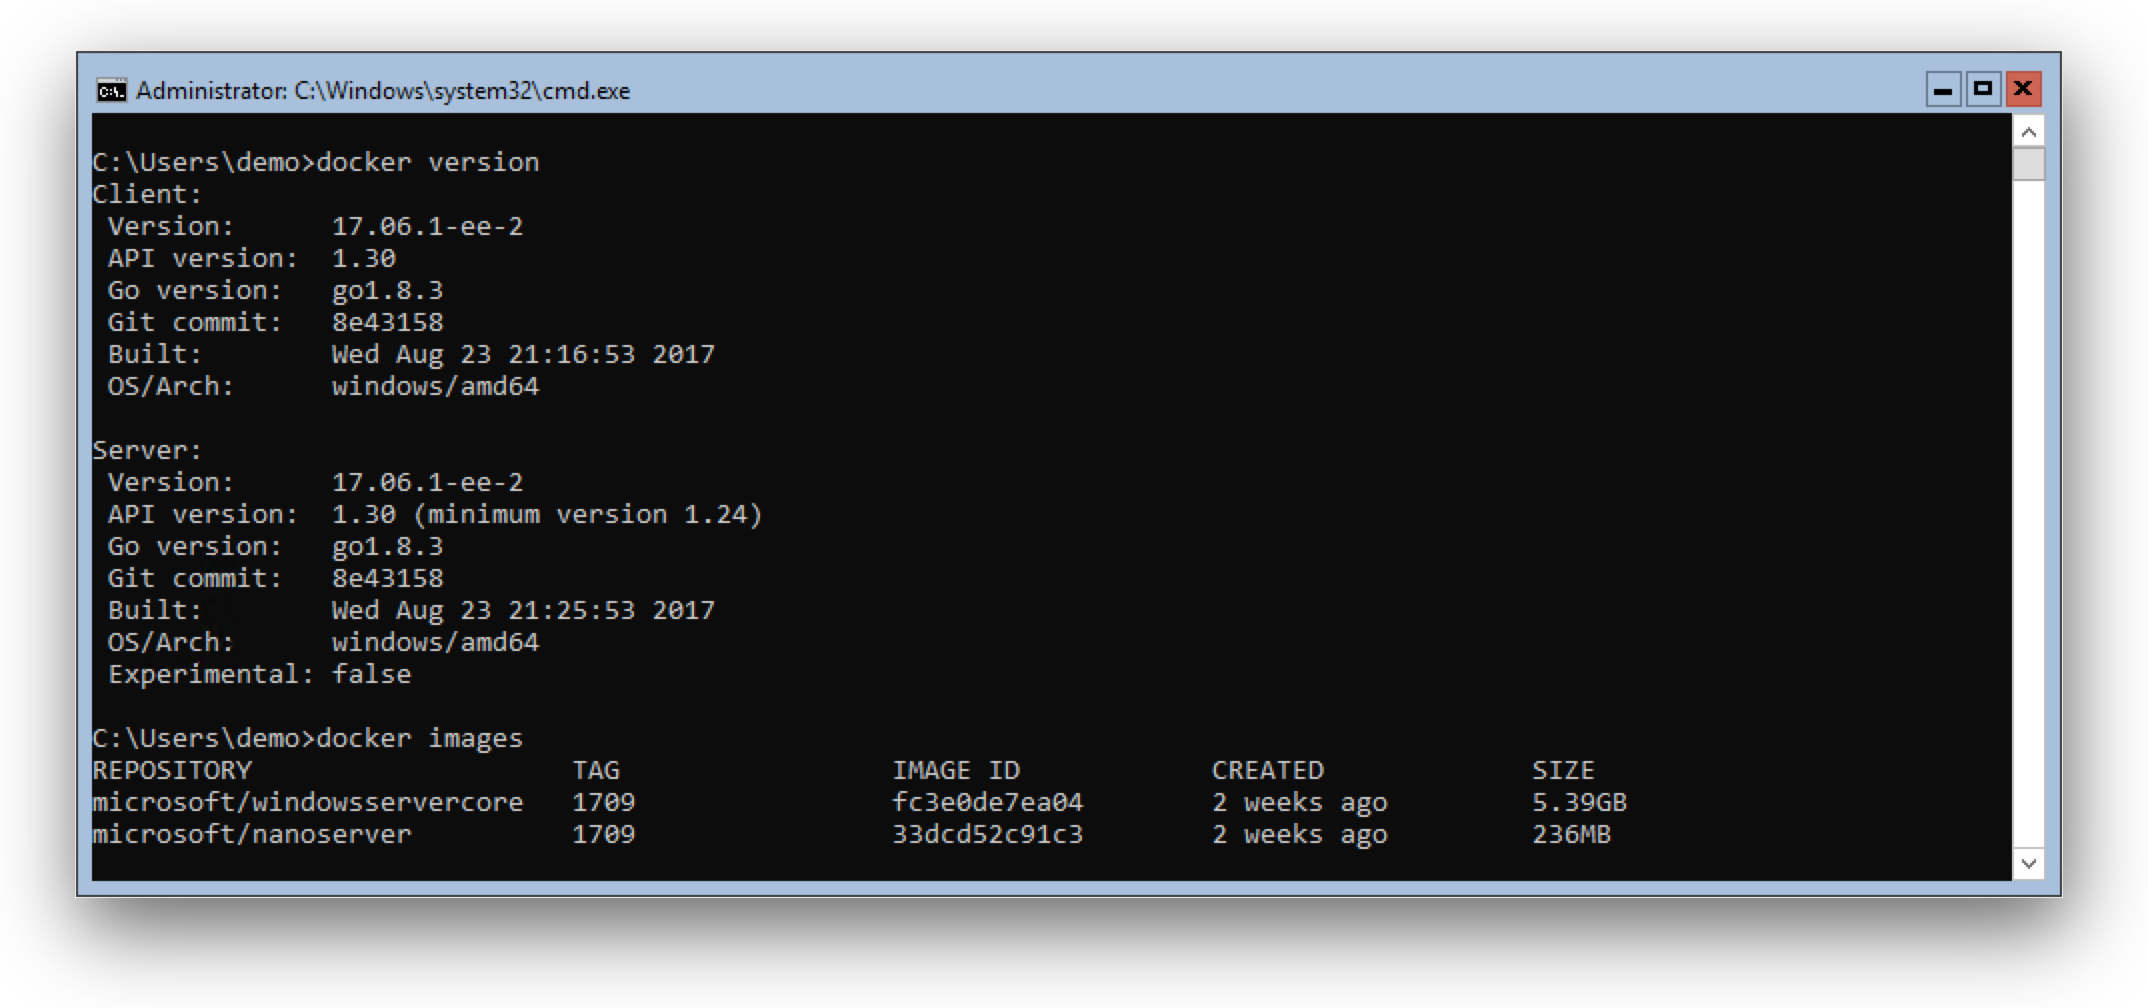
As you can see the VM comes with the latest Docker 17.06.1 EE and the new 1709 base images installed.
Smaller "1709" base images
On great news is that the base images got smaller. For comparison here are the images of a Windows Server 2016:

So with Windows Server 1709 the WindowsServerCore image is only 1/2 the size of the original. And for the NanoServer image is about 1/4 with only 93 MB on the Docker Hub.
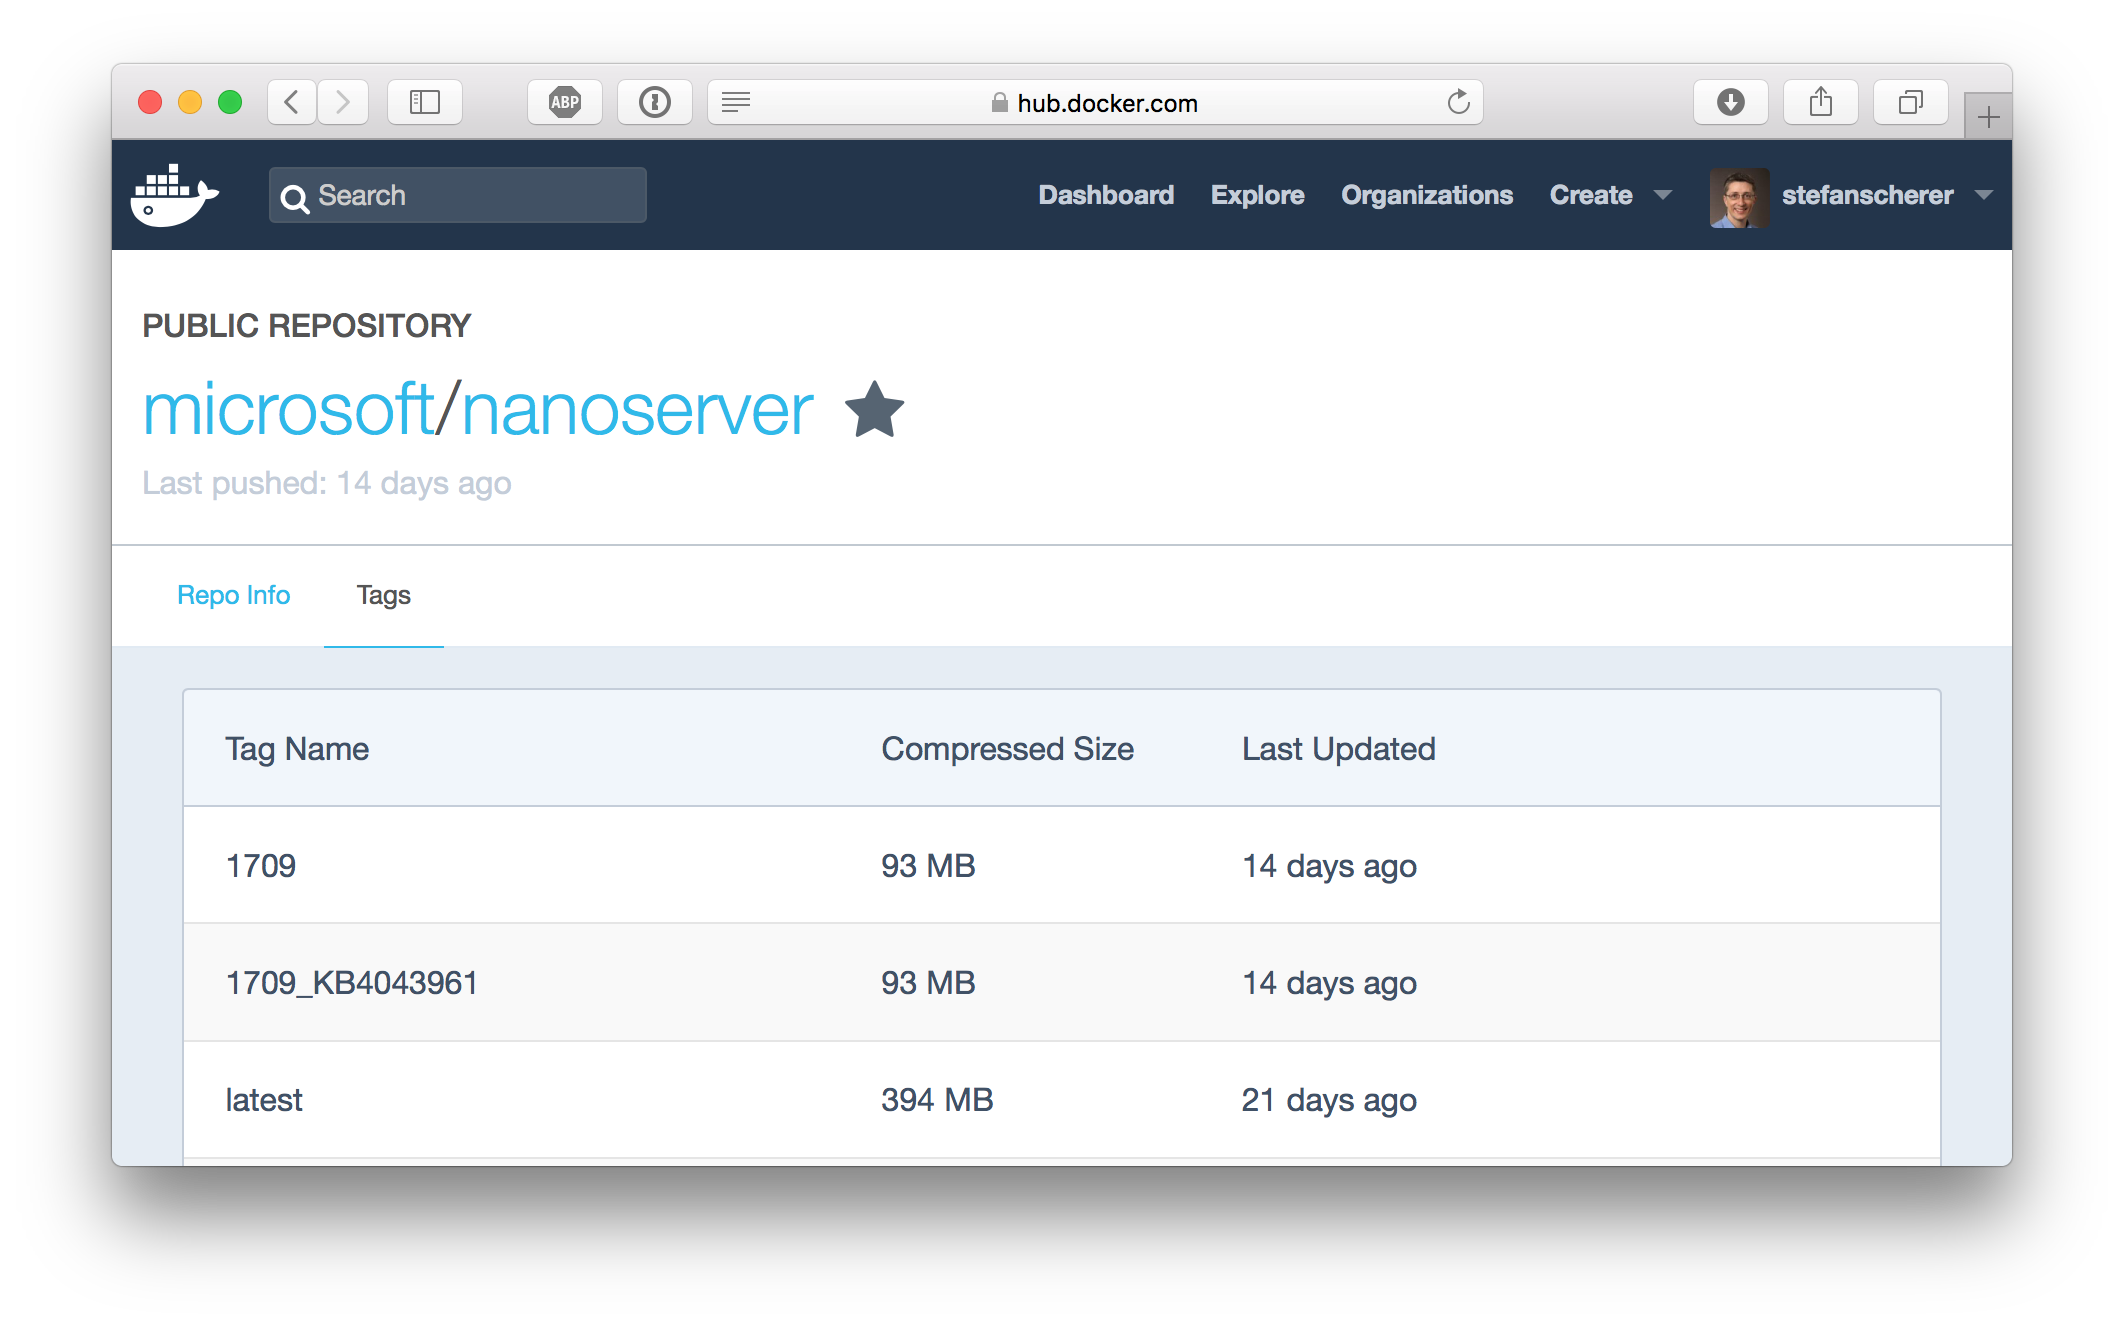
That makes the NanoServer image really attractive to deploy modern microservices with it. As you can see, the "latest" tag is still pointing to the old image. As the 1709 release is a semi-annual release supported for the next 18 months and the current Windows Server 2016 is the LTS version, the latest tags still remain to the older, thicker images.
So when you want to go small, then use the "1709" tags:
- microsoft/windowsservercore:1709
- microsoft/nanoserver:1709
Where is PowerShell?
The small size of the NanoServer image comes with a cost: There is no PowerShell installed inside the NanoServer image.
So is that really a problem?
Yes and no. Some people have started to write Dockerfiles and installed software using PowerShell in the RUN instructions. This will be a breaking change.
The good news is that there will be a PowerShell Docker image based on the small nanoserver:
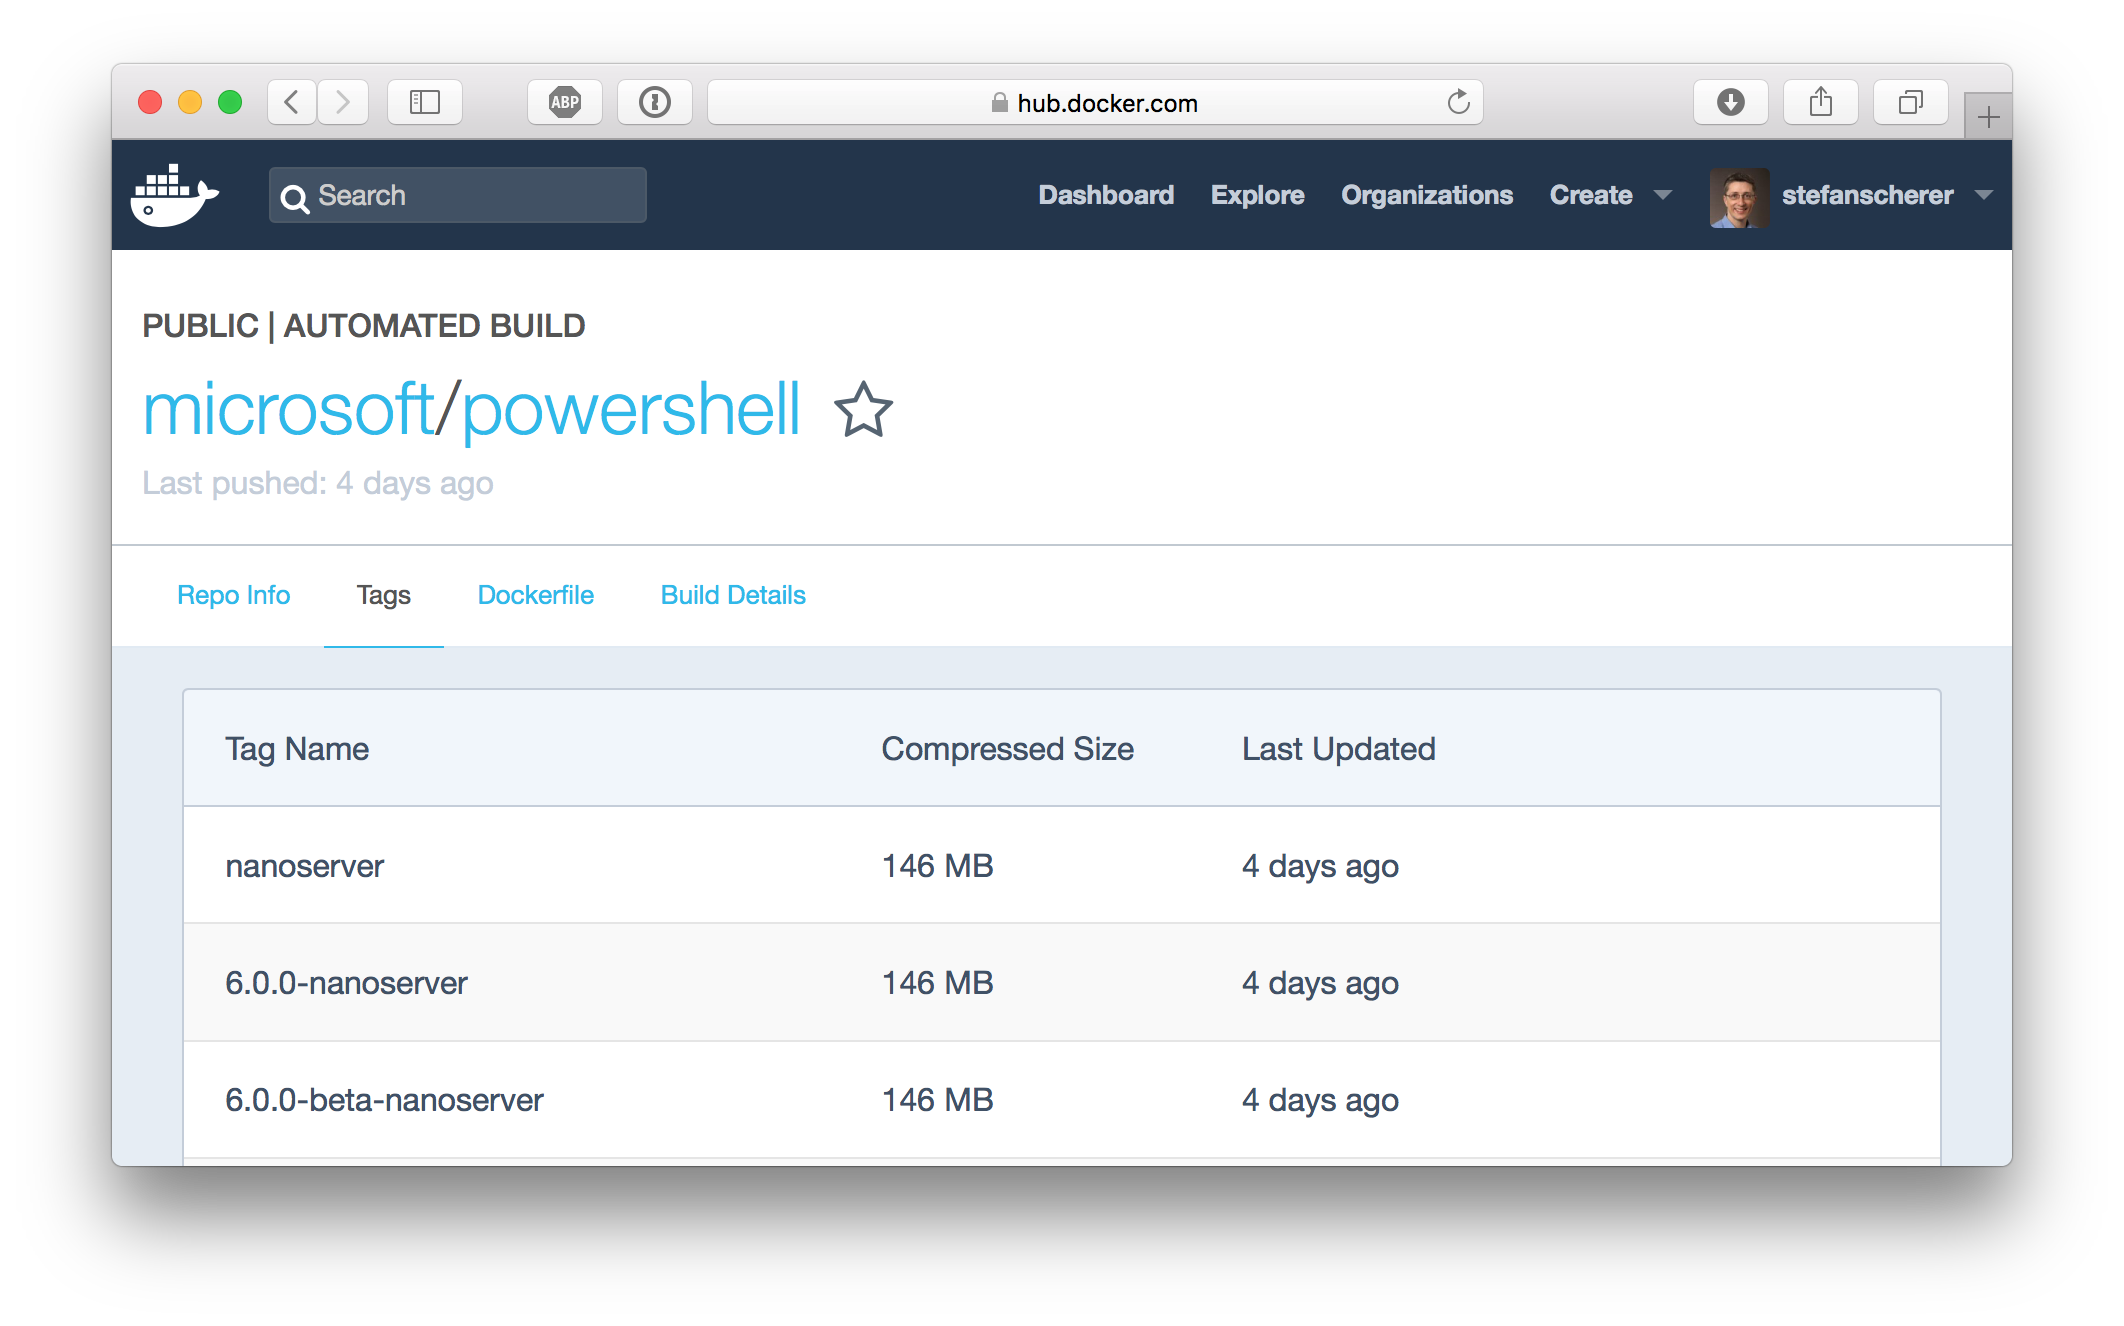
Currently there is PowerShell 6.0.0 Beta 9 available and you can run it with
docker run -it microsoft/powershell:nanoserver
As you can see PowerShell takes 53 MB on top of the 93 MB nanoserver.
So if you really want to deploy your software with PowerShell, then you might use this base image in your FROM instruction.
But if you deploy a Golang, Node.js, .NET Core application you probably don't need PowerShell.
My experience with Windows Dockerfiles is that the common tasks are
- downloading a file, zip, tarball from the internet
- extracting the archive
- Setting an environment variable like PATH
These steps could be done with tools like curl (yes, I think of the real one and not the curl alias in PowerShell :-) and some other tools like unzip, tar, ... that are way smaller than the complete PowerShell runtime.
I did a small proof of concept to put some of the tools mentioned into a NanoServer image. You can find the Dockerfile an others in my dockerfiles-windows GitHub repo.
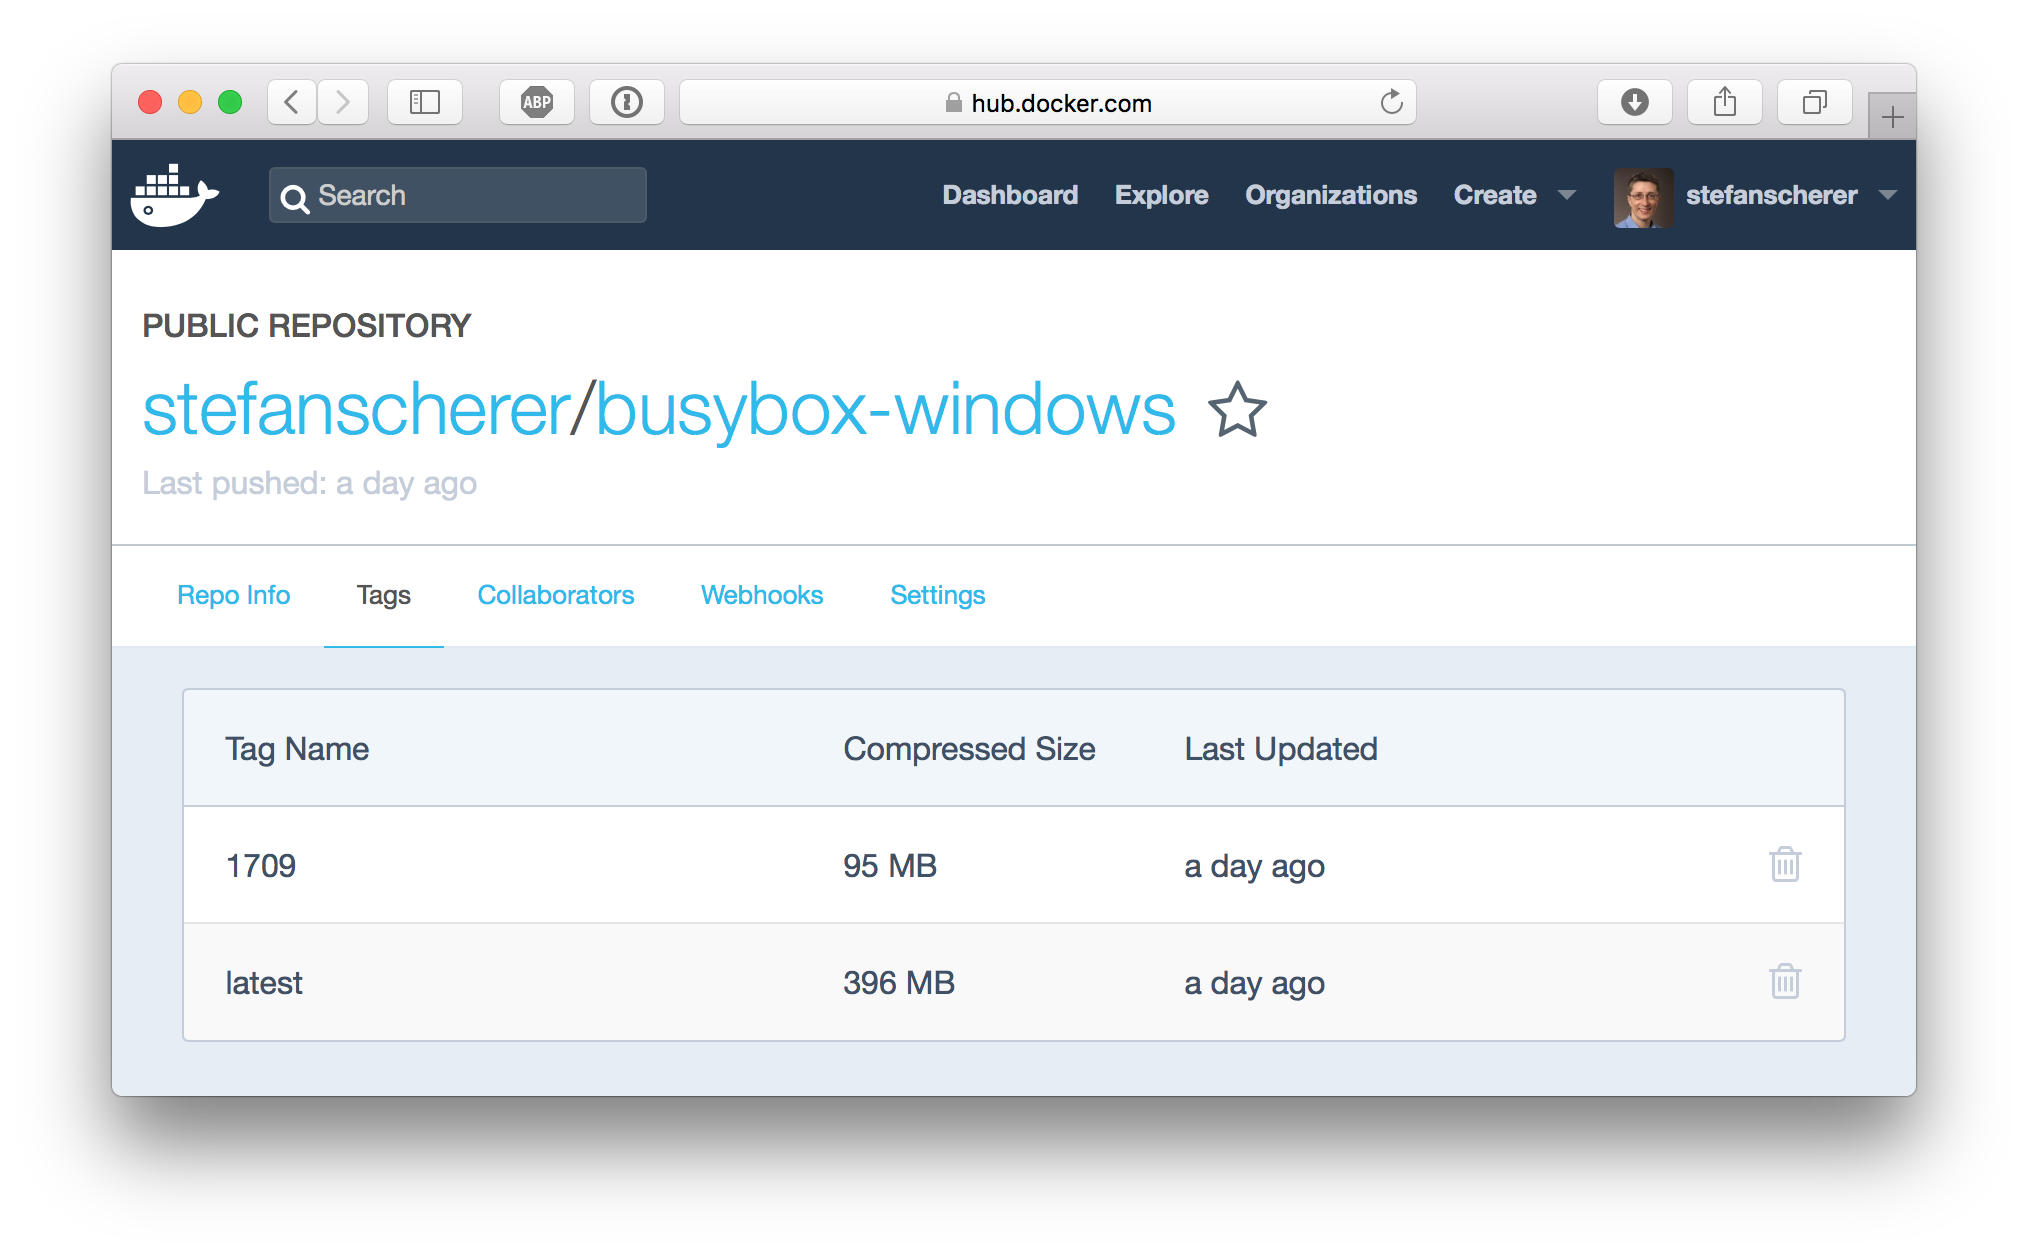
As you can see it only takes about 2 MB to have download and extracting tools. The remaining cmd.exe in the NanoServer image is still good enough to run these tools in the RUN instructions of a Dockerfile.
Multi-stage builds
Another approach to build small images based on NanoServer comes with Docker 17.06. You can use multi-stage builds which brings you so much power and flexibility into a Dockerfile.
You can start with a bigger image, for example the PowerShell image or even the much bigger WindowServerCore image. In that stage of the Dockerfile you have all scripting languages or even build tools or MSI support.
The final stage then uses the smallest NanoServer use COPY deploy instructions for your production image.
Can I use my old images on Server 1709?
Well, it depends. Let's test this with a popular application from portainer.io. When we try to run the application on a Windows Server 1709 we get the following error message: The operating system of the container does not match the operating sytem of the host.
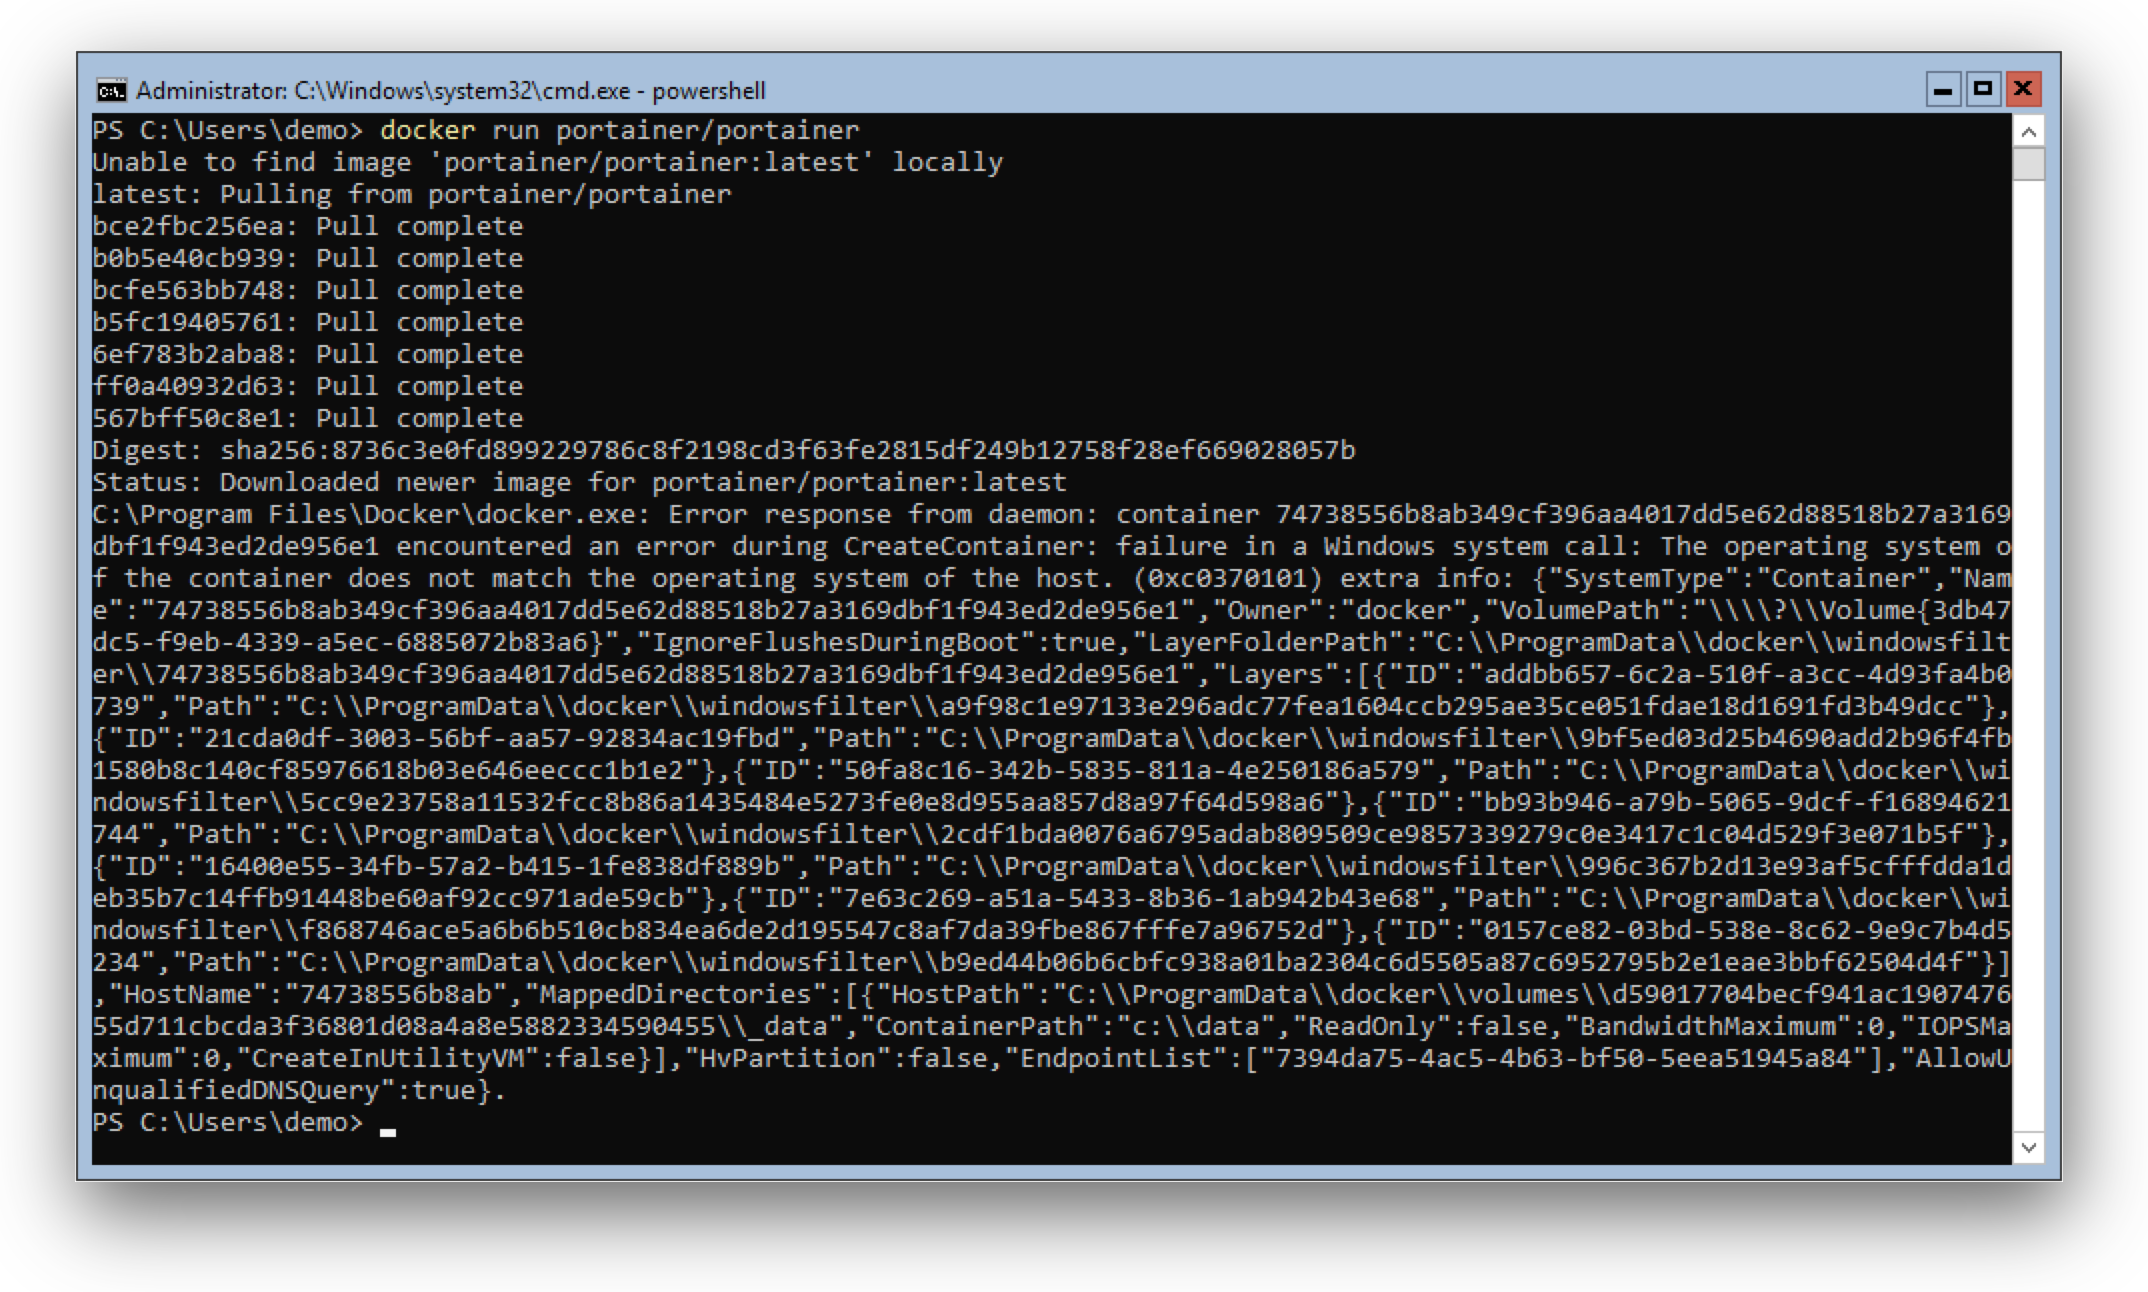
We can make it work when we run the old container with Hyper-V isolation:
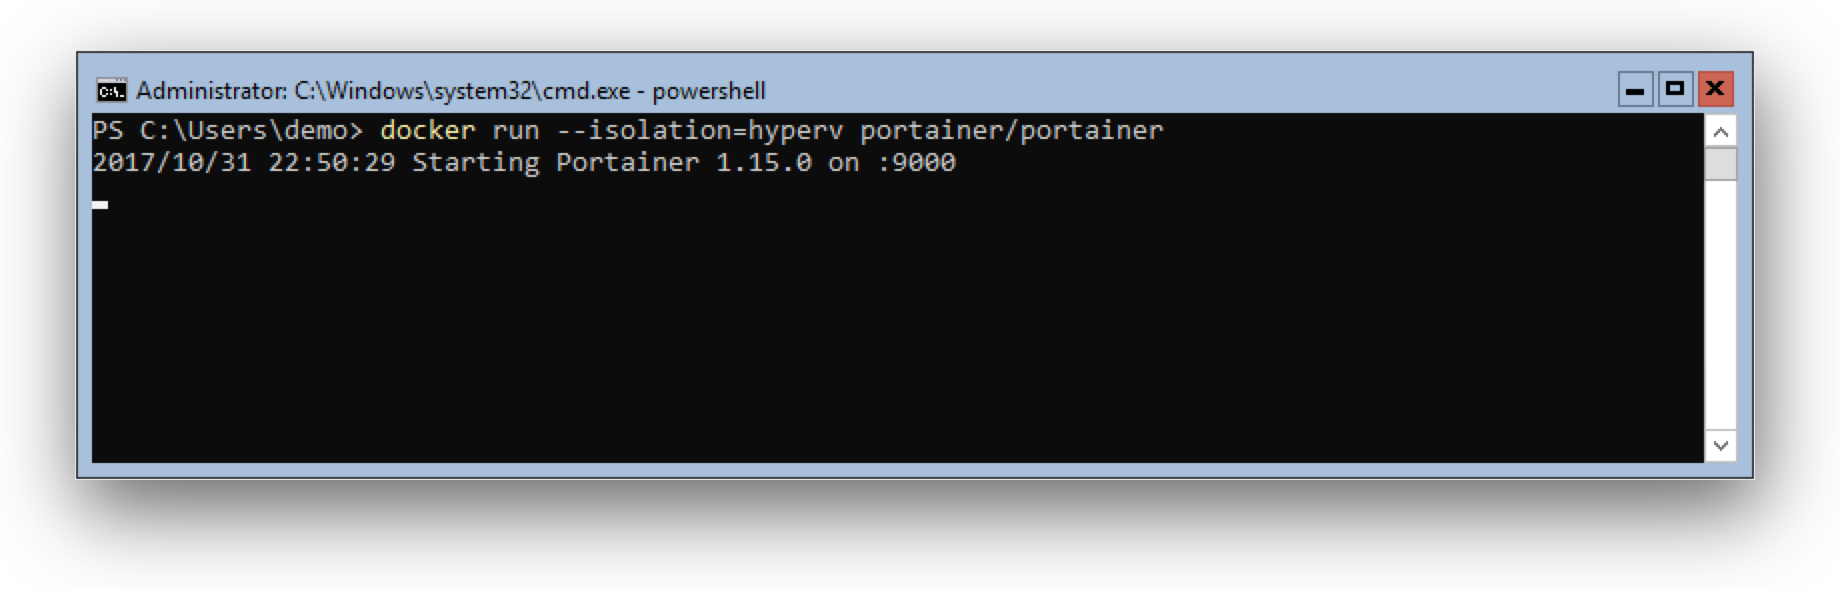
For the Hyper-V isolation we need Hyper-V installed. This works in Azure with the v3 machines that allows nested virtualization. If you are using Windows 10 1709 with Hyper-V then you also can run old images in Docker 4 Windows.
But there are many other situations where you are out of luck:
- other cloud providers that does not have nested virtualization
- VirtualBox
So my recommendation is to create new Docker images based on 1709 that can be used with Windows 10 1709, or Windows Server 1709 even without Hyper-V. Another advantage is that your users have much smaller downloads and can run your apps much faster.
Can I use the 1709 images on Server 2016?
No. If you try to run one of the 1709 based images on a Windows Server 2016 you see the following error message. Even running it with --isolation=hyperv does not help here as the underlying VM compute of your host does not have all the new features needed.
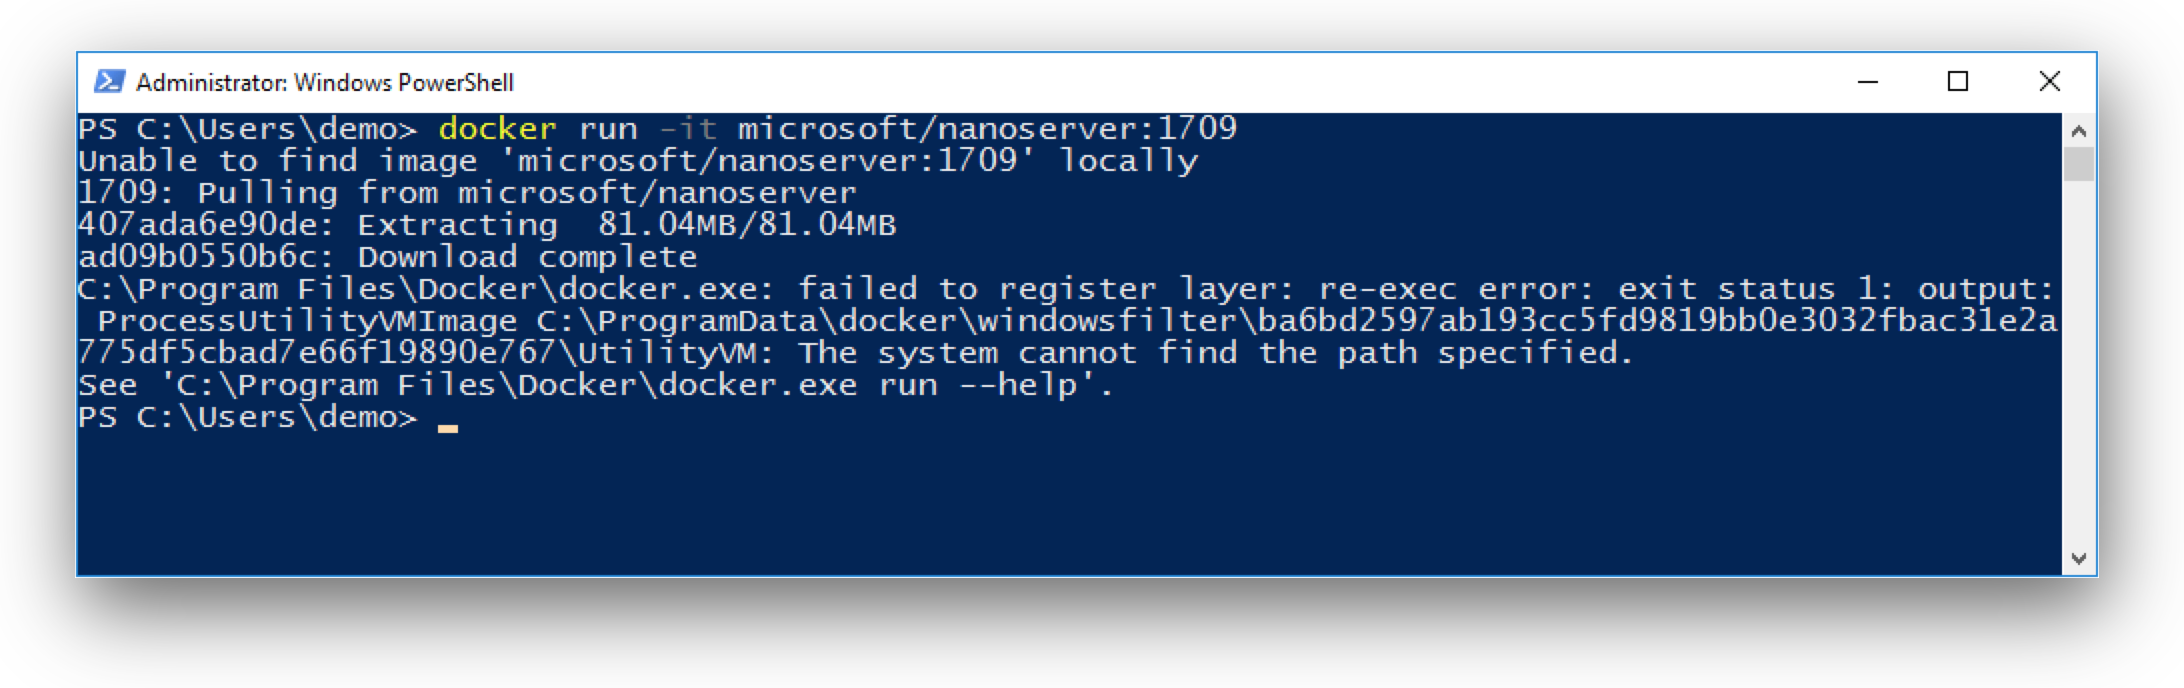
Conclusion
With Docker on Windows Server 1709 the container images get much smaller. Your downloads are faster and smaller, the containers start faster. If you're interested in Windows Containers then you should switch over to the new server version. The upcoming Linux Containers on Windows feature will run only on Windows 10 1709/Windows Server 1709 and above.
As a software vendor providing Windows Docker images you should provide both variants as people still use Windows 10 and Windows Server 2016 LTS. In a following blog post I'll show a way that makes it easy for your users to just run your container image regardless the host operating system they have.
I hope you are as excited as I am about the new features of the new Windows Server 1709. If you have questions feel free to drop a comment below.
Stefan
@stefscherer