Why Bring Forward Annotations is not visible for video annotations in PromoMats and Veeva Medical?
Answer:
When bringing forward video annotations (notes and links), Vault uses the same time signature and coordinates whenever possible.
By uploading a new version where the file type is different from the video files supported, Vault is not able to detect the timestamp of the annotations.
Therefore, the Bring Forward Annotation button is not visible even if the user has the permissions needed to do so:
The same situation happens when the new version uploaded is a video file and the previous file format is a different file format from the video.
The Bring Forward Annotation icon is not visible in this scenario neither:
How to view annotations on a video in PromoMats and Medical?
Answer:
In order to view annotations on a video, follow the steps below:
The View Annotation icon will display a number if there are any annotations. Click on Annotate:
Vault displays the Annotations mode by default in annotations exist. the annotations and filter, by default, on the right-hand side, click on the arrows to move in between the annotations.
Why the Bring Forward Annotations button is not visible in PromoMats and Medical?
Answer:
There several reasons why the action Bring Forward Annotations is not available in Vault:
There are no annotations created in the version from where a user is trying to Bring Forward Annotations.
When the number of annotations in the target version is 0, the Bring Forward Annotations action is not visible from the version where the user is trying to act.
The button is disabled while Vault is Automatically Bringing Forward Annotations. Vault displays a banner to indicate when the process of automatically bringing forward annotations is underway.
The button is disabled while document processing, such as Optical Character Recognition (OCR), is in progress.
The annotations left in the version from where a user is trying to Bring Forward Annotations are resolved annotations.
The resolved annotations are hidden so they do not show in the annotations when a user tries to bring forward annotations. If a user tries to bring forward annotations from a version where there are only resolved annotations, Bring Forward Annotations does not appear in the current version.
The user is missing Annotate permission in the state from where is trying to bring forward annotations.
If the user is missing Annotate permission in the state where the user is trying to bring forward annotations, the option is not available for them.
How to remove brought forward annotations in PromoMats and Medical?
Answer:
Annotate permission is needed.
Once annotations are brought forward on a given document version, the Remove brought forward annotations button appears in the toolbar. This function is useful when annotations are brought forward in error or have accidentally created duplicates.
The functionality Remove brought forward annotations allows a user to remove any brought forward annotations:
Open Annotate mode.
Select Remove brought forward annotations.
Click Continue.
The Remove action deletes all annotations that are brought forward from a previous version. This action also deletes any subsequent edits or replies to annotations that are brought forward. Once confirmed, the action cannot be undone. This does not remove annotations brought forward by other users, or annotations that were not brought forward.
Note that Admins and users who have the Remove Annotations permission can remove annotations brought forward by any user.
Annotate permission is needed to Comment Annotations. Annotate and Edit Relationships permissions is needed to create Link Annotations.
Vault includes limited annotation capabilities for video documents. There are different types of Video annotations: Comment Annotations, Link Annotations, and Claim Links (if applicable).
All annotations must be saved before resuming playback.
To create a Comment Annotation, please use the instructions below:
From the Annotation toolbar, click Select Tool and select Comment.
Play the video and pause it at the frame where the annotation must be placed.
Click and drag on top of the video to select an area to comment.
A Comment box appears. Enter the comment in the dialog box.
Optional: Add tags, notify a user, or change the color of the Comment (if configured by the company.)
Click Save.
Click the Play icon in the video player to resume playback.
To create a Link annotation, please use the instructions below:
From the Annotation toolbar, click Select Tool and select Link.
Play the video and pause it at the frame where the annotation must be placed.
Click Select Link Type and select Document.
Click and drag on the video to select an area to link.
Find the document by using the Search box, Filters, or scrolling through the list.
The options below are available to add a linked document:
a) To create a new anchor, click Select or create new anchor in this document. Clicking this link opens the document in a new window and allows you to select the area to be linked.
b) To link to a whole document, click the plus(+) icon next to the document state.
c) To use existing anchors, find them in the dialog and click the plus (+) icon. You can also click Select or create new anchor in this document to open a mini-browser and select an existing anchor by clicking the plus (+) icon on the anchor’s info card.
Once completed, click Close on the Select Anchors window.
To create a ClaimLink, please use the instructions below:
From the Annotation toolbar, click Select Tool and select Link.
Play the video and pause it at the frame where the annotation must be placed.
Click Select Link Type and select Claim.
Click and drag on the video to select an area to link
Find the Claim by using the Search box, Filters, or scrolling through the list.
Click the box next to the Claim and select Create.
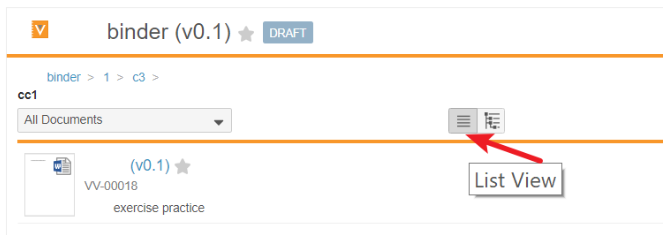
How to select documents from binders for bulk actions in Vault?
Answer:
To select binder documents for a bulk action:
Open a binder.
Navigate to the section containing the documents to edit.
Be sure the binder layout is set to List View.
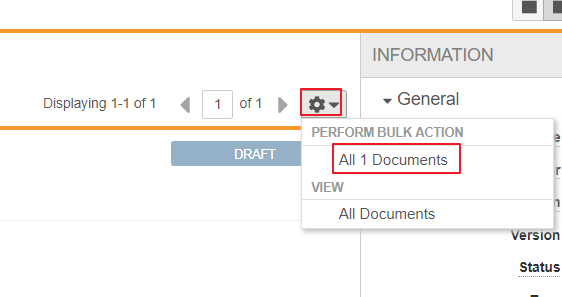
From the section’s Actions menu, above the list of documents, choose which set of documents to select. Only the documents visible on the current page, or all documents (up to 1000) can be chosen.
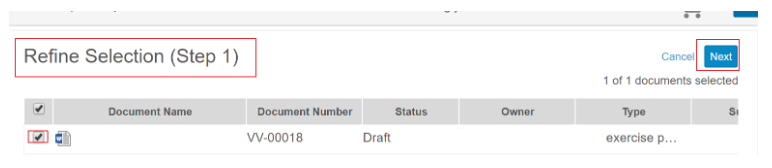
From the Refine Selection page, review the list of selected documents and deselect documents that should not be included.
Click Next and select the appropriate bulk action to take.
What is Duplicates Skipped when a user add Attachments in PromoMats and Medical?
Answer:
When a user adds an attachment within a document, Vault detects if other previously added files are the same in the targeted document. If Vault detects a duplicate file, Vault skips the file and the below warning message appears:
The file does not appear in the Attachments section.
The action is not recorded in the Audit Trail of the document affected.
Note: Vault evaluate the checksum for duplicates, and the filename only when existing attachments are waiting on MD5 checksum calculation.
If a user tries to add a duplicate attachment with the same content but renamed it differently, Vault does not prevent the user to add the file.
The integration between Google Drive™ and Vault allows users to collaborate on documents within the Google Drive™ workspace.
Users can check out, edit, checkin, and undo checked out files using Google Drive™. Vault automatically opens these file formats in Google Workspace Editor in the appropriate editor based on the file type:
.docx opens in Google Docs
.xlsx opens in Google Sheets
.pptx opens in Google Slides
Other file types open the file preview. Users can share, download, or move these files to a different location in their Google Drive™.
Users can share checked out documents with other users in Google Drive. The users available for collaboration are controlled by a user's Google Drive domain and do not reflect any sharing settings configured on the document in Vault.
Users must have the appropriate permissions on each document to perform the applicable action. For example, checking out a document to Google Drive requires the Edit Document permission. Users' ability to use Google Drive integration is limited by their permissions on each document.
Missing files in ZIP downloaded from Export All Files Option in PromoMats and Medical
Answer:
The default Windows application (Windows Explorer) that open the ZIP files may fail to display some of the compressed files.
The users can download the application WinZip or 7-Zip with internal authorization* and use it to open the ZIP file created by Vault.
*: Users might need internal authorization from the Pharma Company to download these applications.
Once the new application is installed, follow the steps below:
From the Vault ZIP file, right-click and select Open with --> Choose another app as shown below:
From Other Options, select the new application that was downloaded. Optionally, the user can tick the box Always use this app to open .zip files. Then, click OK.
The ZIP file opens and displays all files downloaded by Vault.
Note: Vault downloads only the documents the user has permission to view. The export_summary file indicates the documents excluded from the export and the reason.
What version document populates the Based On field in PromoMats and Veeva Medical?
Answer:
The field Based On populates always the version of the document from which the copy is made.
If the document the user made a copy from increases the version number, this is not reflected in the version indicated of the document under the field Based On.
By clicking on the document under the field Based On, Vault redirects the user to the version that the field indicates.
How to view the outcomes of all the Tasks in PromoMats and Medical?
Answer:
In the Timeline View, users can view up to 10 tasks per workflow. If a workflow has more than 10 tasks, the remaining tasks are shown at the bottom of the list.
Users with Report visibility can view the remaining tasks through the Workflow History Report.
Users without Report permissions can contact the Workflow Owner to inquire about the remaining tasks.
What permissions are required to create CrossLinks between two documents in PromoMats and Veeva Medical?
Answer:
The user requires active access to both Vaults in order to create the CrossLink between two documents, for example:
The user creates a CrossLink in Vault A (Crosslink document) and chooses the document from Vault B (source document).
The user also requires a View Document and View Content on the document level in Vault B in order to create the CrossLink in Vault A, and Edit Document permission in the document within the Vault A and B.
Users also require Create CrossLink permission in their security profile and access to at least one other Vault in their domain. CrossLink Documents can not be created by a user with an External User license.
How can admins migrate an email template created using Bee Editor and still be able to edit the template in the target Vault?
Answer:
Creating BEE Content
A Content Admin that would like to migrate BEE content to a different Vault must have access to a Veeva Vault with BEE embedded.
Enable BEE functionality in the source Vault using the configuration steps mentioned here.
In the source Vault, from the top-right corner of the screen, click Create -> Placeholder.
In the Choose document type field select the Email Template option.
Click Next. Complete all of the required fields for the Email Template and click Save.
In the top-right corner of the screen, click the ellipsis -> Edit Email.
The embedded BEE editor is launched.
Edit the email using the right-hand pane to drag and drop elements into the email template.
Keep track of any images that were placed within the Email Template. These image files must be sent to the target Vault and loaded into the Email Template in that Vault instance.
Once editing is completed, click Save in the top right corner of the screen.
Click the Document Files icon on the right. Then, click Download on the Source Document in the dropdown menu to download the HTML document of the email template.
Next, click the ellipsis next to Email Editor to download the Email Editor rendition (JSON document) of the Email Template.
Download the Assets.
In the right-hand pane click Document Information. Next, expand the Assets section by clicking on the Assets header.
Click the download icon to download the images that were used in the email template.
As previously mentioned, the images used in the Email Template must be passed to the target Vault. The zip that was downloaded from the Assets header contains all images used within the Email Template.
The HTML document of the Email Template, JSON document of the Email Template, and all image files that were included in the Email Template must be passed on to the target Vault.
Loading BEE Content Into the Target Vault
To load BEE content into the target Vault, a Content Admin will require the following:
The HTML of the Email Template. In Vault, this is referred to as the Source Document (downloaded in step 7 above).
The Email Editor rendition (JSON file) of the Email Template (downloaded in step 8 above).
Any images that exist in the Email Template (downloaded in step 9 above).
Once a Content Admin has these files, the following steps should be followed to upload BEE content to the target Vault:
In the target Vault, from the top-right corner of the screen, click Create -> Upload.
Upload the HTML of the Email Template. In the Choose document type field select the Email Template option.
Click Next. Complete all of the required fields for the Email Template and click Save.
On the right-hand pane click Document Files.
Click the + icon next to the Renditions section.
Choose Email Editor for the rendition type.
Select Choose a File and navigate to the JSON document of the Email Template and select it.
Click Upload.
Click the ellipsis in the top-right corner of the screen then Edit Email.
The following steps must be repeated for every image that exists in the Email Template.
Select the image element in the left-hand pane, choose Change Image.
From the BEE File Manager, click Upload and upload the image that is being changed to the BEE image library. Once the image is uploaded, it will be available in the BEE File Manager. Select the newly uploaded image and click Insert.
Once all images have been updated, click Save.
If the document does not re-render, choose the ellipsis and choose Re-render Document.
Note: If the document is being duplicated in the same Vault, disregard step 6 through 8 of the Loading BEE Content Into the Target Vault section.
How to show overprinting in PDF Source Files in PromoMats and Veeva Medical?
Answer:
Flattening files before uploading them into Vault can avoid potential issues as flattening removes transparency information and converts images and text to a format that Vault can interpret and render.
At times, when a user attempts to flatten a document, the Print Preview window may not display any images or text, and Vault does not render the PDF Source File properly:
To solve this, users can enable the Simulate Overprinting option as follows:
Open the PDF Source File in Acrobat
Select File > Print
Select Microsoft Print To PDF as the printer
Open Advanced options.
In the Output section, select Simulate Overprinting, and clickOK.
Print and save as a PDF copy to replace the Viewable Rendition in Vault.
Why custom icons do not display correctly in PromoMats when using BEE Editor?
Answer:
When users add custom icons to an email template, these icons may either not appear, appear as a blank square, or as a broken image icon:
When the custom icon is added to the email template as a URL, or if the user uses social icons, this issue does not happen as the HTML source for these icons includes URLs stored on a website.
However, any images uploaded to BEE Editor and used as customs icons are not automatically added to the Assets folder that Vault creates when the user saves an email template in BEE Editor.
To resolve this, the user needs to do the following:
Download the Assets folder.
Modify the folder manually to include any relevant icons.
Why a viewable rendition is not generated for password-protected files in PromoMats and Veeva Medical?
Answer:
If a Microsoft Office™ file is protected by a password, Vault cannot generate the viewable rendition.
The following message is displayed in the Viewable Rendition:
Using password protection on Microsoft Office™ files that require viewable renditions is possible, as long as the file settings are limited to protecting file editing.
What are Rendition Types in PromoMats and Medical?
Answer:
Renditions are files, other than the source file, that users can add to documents. The Viewable Rendition type is available by default in all applications.
Document types can have multiple renditions:
A list of renditions appears in the Doc Info page in the Files section under Renditions.
The Edit Fields permission is needed to add or remove renditions while the Mange Viewable Rendition permission is needed to delete, upload, or re-render a document's Viewable Rendition.
What is the Duplicate Content report in PromoMats and Veeva Medical?
Answer:
The Duplicate Content report is a One-Click report that provides information about a document duplicates in a Vault. Vault detects duplicates by performing a checksum on source files and using this as a unique identifier; viewable renditions are not included.
Users access this report from the All Actions menu instead of from the Reports tab.
There are two ways to access the report:
The report can be accessed from the document's All Actions menu (ellipsis) in the Doc Info:
The report can be accessed from the document's All Actions menu (ellipsis) in the Library:
The report opens in the Reports tab:
Note: An Admin user must enable Duplicate Content Detection in the Vault.
The user must have View Document permissions for the document to view this report.
What are the Value Limits in the Filter of a Report in PromoMats and Medical?
Answer:
When creating a Report and adding a filter on a multi-select object-type document field, the system does not add the total number of values in Vault. Each filter has a limit of 100 values.
When Select All is chosen for a field with numerous values, only the first 100 values are picked to use as Filter.
In order to obtain the wanted results, the user can copy the report and include the remainder values in a second report.
Why Advanced Logic Syntax is not Valid in a Report in PromoMats and Veeva Medical?
Answer:
Advanced Logic is a feature which allows the users to get a wider selection of records within a report. The connectors OR and AND must be used in the proper way.
There are many reasons why the syntax of the connecter is not valid:
The filters used in the report do not have a corresponding number. These filters include roles, formula fields, and relationship concerns.
The applied filter is not counted and the syntax fails to validate.
The selected report type does not support the Advanced Logic feature. If the report type is one of the report types listed below, the Advanced Logic feature does not appear in the Filters:
Workflow Multi-pass Document relationship Binder Read and Understood
The connector AND is used in different field objects. By running the report with fields used in different objects, there are no records found in the report.
What role is given to a user when sharing a report in PromoMats and Veeva Medical?
Answer:
There are three types of roles a user can be given when sharing a report.
Viewer: Viewers have read-only access to reports. They can only run and view the report, or make a copy of it.
Editor: Editors can modify, share, and delete a report. They have all the same rights as the user who created the report.
Owner: Owners have all of the permissions of editors and viewers. Only owners can assign other users or roles to beOwners, or edit the schedule of flash reports
What is the Glossary feature in PromoMats and Veeva Medical?
Answer:
A glossary is a set of terms and their definitions. When this feature is enabled in Vault, users can select words and short phrases, or enter a word or phrase in the search bar, and look for approved Glossary Definitions within Vault, or in approved external search engines.
How to use the Glossary feature in PromoMats and Veeva Medical?
Answer:
Users must have View Content permission on the document to search the glossary and copy Glossary Definitions.
The glossary opens to the left of the document by clicking the Glossary () button, or by pressing CTRL+G on Windows™ or CMD+G on Mac.
Users can perform a search by manually entering and editing text in the Search Glossary field, or by holding down the G key and selecting text in View or Annotate mode.
Apart from the approved glossary definitions, Vault also displays search results from an external search engine if one has been configured. By clicking the external search link, users can view the search results in a pop-up window.
Clicking on the Copy Definition () button allows users to copy a Glossary Definition.
To close the glossary, click the Glossary button, or press CTRL+G on Windows™ or CMD+G on Mac.
The glossary is not accessible in the Notes and Thumbnail views, on video documents, and on token-based or public viewers.
Vault Product Support or Global Service Center may ask for clearing the all-time browser history, selecting all items, except Passwords in order to help to resolve Veeva Vault related issues.
Note: Clearing browser history removes records of the websites that were visited, including their URLs. This action can also clear associated data like cookies, cached files, and saved passwords. This can lead to improved webbrowser performance and resolution of various issues. Clearing the Browser History is considered a common troubleshooting step.
After performing this action, Vault End Users and System Administrators will need to log into their web services again, thus Veeva Vault.
How to Delete the browsing history in various Webbrowsers?
Answer:
Steps for deleting the browsing history depends on the webbrowser utilized.
The general steps are as follows:
For the time range, select "All time".
Uncheck the box for "Passwords" (if available).
Check the rest of the items.
Click the links below to read the instructions to delete the Browsing History for each Webbrowser. Right click and open the screenshots in a new tab to view them in full screen.
Users with a basic Security Profile (username and password) can log in by using username and password.
To log in to the Vault Mobile App, users need to enter their username and click Next.
Then, users are prompted to enter their password:
Optional: for iOS devices that support biometric authentication, touch or face ID can be enabled on the login screen (only available to users of basic security policies).
Users with a Single-Sign On (SSO) Security Profile need to havean OAuth profile on their authorization servers configured by their Vault admins. In that case, users will be automatically redirected to the organisation's identity provider’s login page when they enter their credentials.
Why is specifying relevant rendering issues important before re-rendering a Vault document?
Answer:
When an end-user chooses Re-render Document in the Actions Menu, the following options appear:
The user can select relevant issues listed in the information pop-up to help Vault better understand the specific rendition problem. Then, it attempts to render a more accurate viewable rendition based on the choice made. Without any choices being made, Vault simply tries to re-render the document using the existing rendition settings.
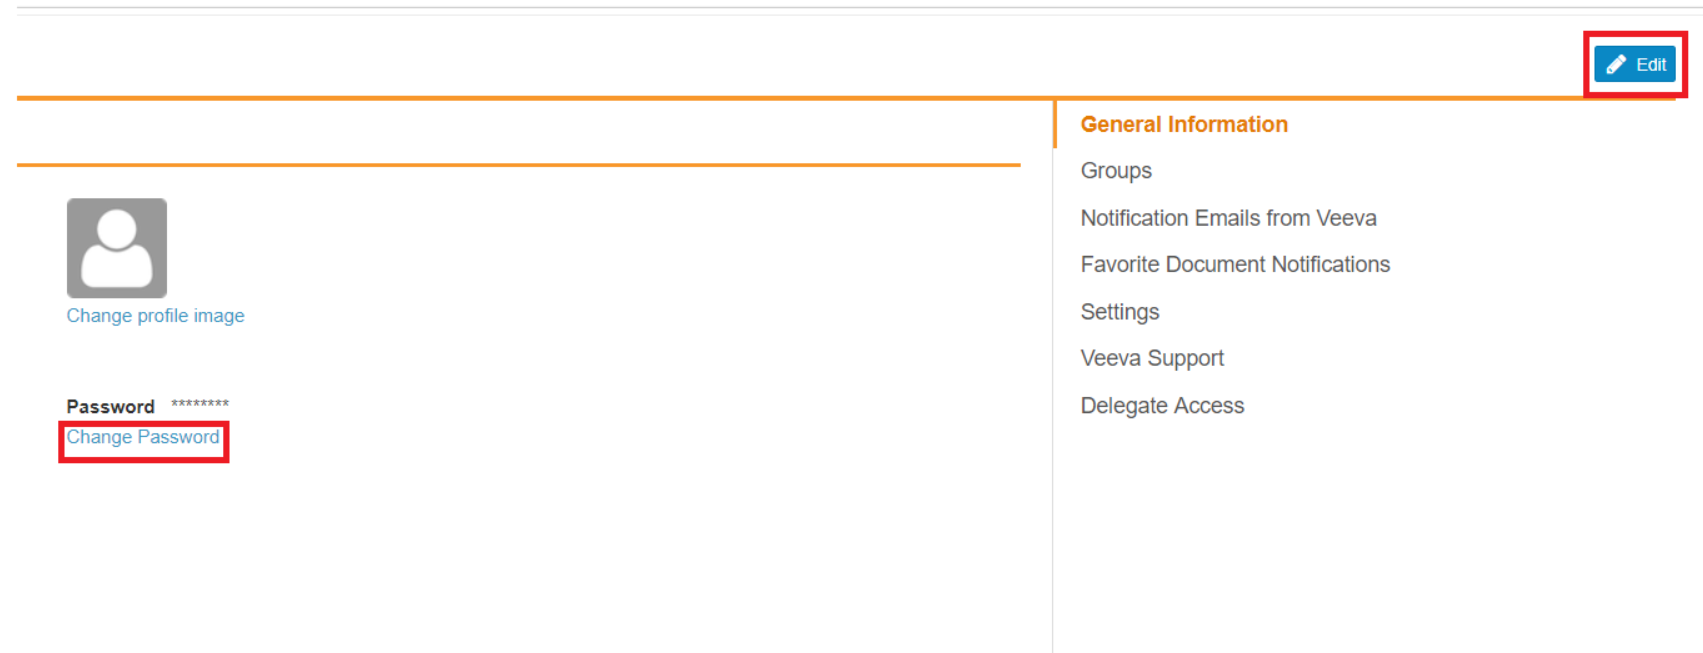
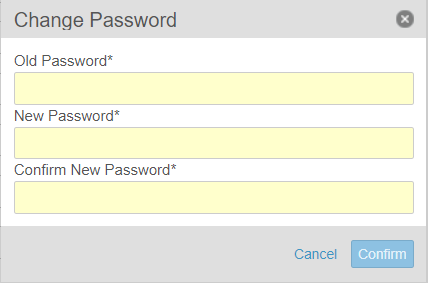
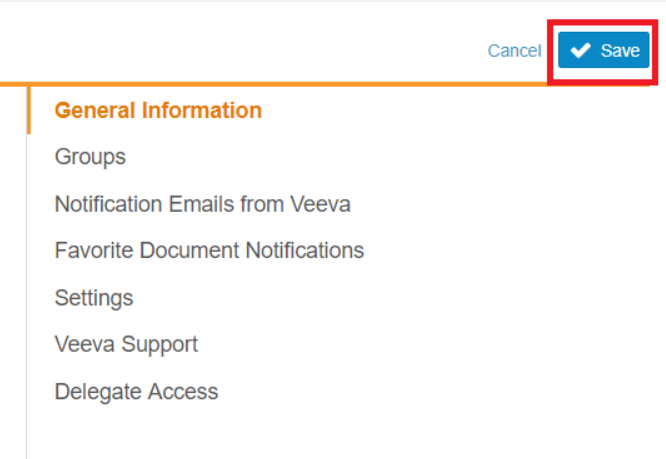
What actions can be taken when delegate access is granted in PromoMats and Medical?
Answer:
A delegate can perform all actions that the delegated can, except:
Completing Read & Understood workflow tasks
Updating user profile
Delegates have access to the delegated administrative privileges.
While an account is delegated, Vault sends notifications to both the account owner and delegates. Notifications sent to delegates do not include links to Vault content. Delegates must sign in to Vault to access the content.
Note that delegated access works only between two profiles.
Example:
If Teresa delegates to Thomas, and Thomas delegates to Gladys, Gladys does not have access to Teresa’s account. However, delegates can modify delegate access settings in order to re-delegate the account.
Veeva CRM users logging into Salesforce online are now being prompted with a Salesforce identify verification requirement, where they were not previously required to. The Salesforce dialog box states:
Verify Your Identity
You're trying to log in to Salesforce. To make sure your Salesforce account is secure, we have to verify your identity.
Enter the verification code we emailed to <user email address>.
This is occurring for users who do not use MFA or SSO, and in Salesforce Orgs where MFA requirements are disabled.
Root Cause:
Salesforce is updating its login security for all customers and will now require Device Activation for users who do not log in with Multi-Factor Authentication (MFA) or Single Sign-On (SSO). This change will primarily affect admin and support users who share logins. Once the update is active in your org, users who log in without MFA or SSO will be prompted to verify their identity if they haven’t already verified the device they’re using.
The rollout for this began the week of October 17, 2025.
Salesforce's announcement regarding this is available at:
Device Activation is a Salesforce security feature that verifies a user’s identity when logging in from a new or unrecognized browser, device, or location.
Typically, the user receives a verification code via email during login.
If stronger authentication methods (e.g., Salesforce Authenticator, Security Key, or SMS) are enabled, those are used instead.
Once verified, the device is recognized and users aren’t prompted again unless something changes (e.g., new device, cleared cache, or updated IP range).
What’s changing: Salesforce is now enforcing Device Activation more frequently in certain orgs to strengthen account security.
For Production and Sandbox orgs, Device Activation will now be required for username/password logins if:
Your defined Org or Profile IP ranges cover more than 16,777,216 total IP addresses, or
Multi-Factor Authentication (MFA) is not enforced for the user.
What’s not changing:
Logins with SSO are not affected.
Users with MFA enabled will not be prompted for Device Activation.
API logins such as those for integration users are not affected.
Solution:
Details on meeting the new Salesforce requirements can be found at the linked Salesforce Help page mentioned above, and listed in the Related Documentation section at the bottom of this article.
To summarize, the options to resolve this issue are:
1. Review and tighten IP ranges
Go to Setup → Security → Network Access and Profile → Login IP Ranges.
Limit ranges to those used by your company or VPN.
2. Enable MFA
MFA-enforced users won’t see additional Device Activation prompts.
3. Ensure all other users have a valid email access
If Device Activation is triggered, users will need access to their registered email or authenticator to complete login.
It is important to note that for all Free and Trial Orgs, Scratch Orgs and Non-Sandbox Demo Orgs (Non-Revenue), device Activation will be prompted regardless of the IP address range configured for the Org or User’s Profile.
Device Activation: Temporary Override Request Process (Updated)
If a customer requests to disable the device activation change, you must immediately open an SFDC case requesting a temporary override (up to 30 days).
To ensure the request is processed, the SFDC case must include the following three details:
Reason: The specific reason why Device Activation is not possible for the customer.
Impact: The business impact that will result if the override is not granted.
Resolution Plan & Timeline: The customer's detailed resolution plan for enabling Device Activation, including a specific end date within the maximum 30-day limit. 30 days is the maximum allowed time for an expedited approval. Requests without end date will be rejected.
Important Note: The request will be added to a process queue, so the change will not take effect immediately.
How to start a Legacy Workflow in PromoMats and Medical?
Answer:
To start a Legacy Workflow, the user needs a Security Profile including Workflow: Start permission and the State Behavior of Execute in the Atomic Security for the State are required.
To start a Legacy Workflow, please use the following instructions:
From the document, click on the Workflow Actions menu on the right side of the screen.
Select the appropriate workflow.
Enter the reviewers and any required information, then click Start.
The Show Active Workflow button will appear next to the document name.
Note: If the Workflow Actions menu does not appear, the user does not have the correct permissions to perform the action.
What are the types of Users associated with a Document Workflow within PromoMats and Medical?
Answer:
There are various types of users associated with a workflow:
Workflow Owner (or Workflow Initiator) is the user who starts the workflow. This user can reassign all workflow tasks, add new participants, email participants, and cancel the workflow.
Task Owner is the user assigned to a specific task in the workflow. This user can reassign or complete tasks owned by the user. Note that the license type and security profile restrictions may prevent some users from completing certain tasks.
Workflow Participants are all users with an assigned task in the workflow. The Workflow Owner assigns users to specific roles when starting the workflow. The roles and associated users then appear under Sharing Settings in the Doc Info page.
How do you add task comments in PromoMats and Medical?
Answer:
Task Comments can be added when completing a task. Within the task completion dialog, click Add Comments.
Once the verdict and comments have been entered, select Complete.
Task Comments have a maximum character limit of 500.
The comments appear in the Active Workflows view and are visible to all workflow participants. Once the workflow is complete, the Task Comments can be viewed from the Timeline view.
In the event, the issue persists on any web browsers, try clearing all-time browser history/cache (Passwords History is not necessary to be removed) and restart the computer. The steps of clearing the browser/history cache vary among web browsers. Refer to each browser's online help for steps to do this.
In the event, the issue still persists, uninstall the application and remove the folder: [driveletter]:\Users\[Users_username]\AppData\Local\VeevaCRMEngage\
From a global organizational perspective, the following configuration is recommended:
The Welcome Page at https://engage.veeva.com must be allowed listed or added to the Trusted Sites.
In order for the CRM Engage app to auto-upgrade, be sure the following folders and outbound/inbound TCP connections are allowed listed, or trusted by the Security Suite (Antivirus/Firewall) software in use:
Allow popups/site redirections in the web browser.
Upgrade the web browser in use to the latest version. Download and use the Chromium Microsoft Edge.
Be sure that the Operating System is on the latest version and the latest updates are installed, If applicable.
It is recommended to upgrade all hardware drivers to the latest versions.
In case the issue still persists, it is recommended to try using Google Chrome to test if the CRM Desktop Application is working with it. In the event, it works and the CRM Desktop Application is on the latest version (setup.exe is run), the issue is most likely caused by the unique company setup implemented around Internet Explorer or Microsoft Edge. Veeva has no control and authorization over such setups. It is recommended to contact the Local IT Administrator team in these cases.
Notes:
Please use the new Windows 10 UI Control Panel in the event manual uninstallation is attempted.
In the event, the end-user does not have access to perform the actions listed above, or assistance is required to perform the aforementioned actions, please contact the local IT Administrator team.
When a Support Ticket is closed, it is marked with a Reason for Closing Field within the ticket. This field can be populated with a number of different values. Because of this, we want to define the values to make it clearer to our customers.
For L2-L3 tickets processed by Product Support:
Product Support - Reason for Closing
Configuration Fixed
Configuration was changed to resolve the issue
Functionality Confirmed
The standard behavior of the product was confirmed or explained
Task Completed
The task requested was completed
Product Issue Fixed
A modification to the product or system was made to correct the issue
RCA/IR Provided
The RCA/IR (Root Cause Analysis / Incident Report) was released
External System Issue
The issue reported was not caused by a Veeva System
Outside of Support Scope - Veeva Connect
The ticket requester was directed to Veeva Connect
Outside of Support Scope - Account Team
The ticket requester was directed to their Account Team
Outside of Support Scope - Services Team
The ticket requester was directed to Managed Services
Resolved by Customer
The ticket requester solved the problem on their own
Duplicate
The ticket was a duplicate and either closed or merged into another ticket
For L1 tickets processed by the GSC (Global Support Center):
GSC - Reason for Closing
Task
This issue was related to a task request
Issue Resolved
The question was answered or the issue resolved by Veeva
Enhancement Request
The enhancement request was documented and shared with Product
Resolved by Customer
The ticket requester solved the problem on their own
Outside of Support Scope
The ticket requester was redirected to another team at Veeva or at the customer site
Duplicate
The ticket was a duplicate of another ticket
No Response
No response was received from the ticket requester
We have implemented a native federated search engine to help our customers find the information they need more easily. In addition, when they search for knowledge articles, it will show them the source of the content:
Articles - written by Support Agents
Product Help - broken down by product pages that contain that exact word or phrase
Community posts
The following example shows a search on Vault id. The search engine tries to find all articles that contain the word Vault or the word Id anywhere within the article. On the right-hand side of the screenshot, the Search Results display brief previews of content matching the search criteria. Based on the Source that is selected on the left, the right side list of results changes.
This search shows that numerous results matched that criteria. Notice that 3209 Articles are returned due to a wide search range.
To refine the search, enter "Vault id" as the search criteria. The double quotes are used in the search criteria to allow the search engine to find any content that contains that phrase. The sources of the resulting content appear on the left side of the search results. Notice that 36 Articles are returned due to a narrow search range based on that exact phrase.
How to Submit a Product Enhancement Request for Veeva Products?
The process for submitting tickets to Veeva Support and Services groups is updated on the Veeva Product Support Portal. The new process will help us better support you.
Submit tickets to Veeva Support and Services using one of these articles: