The post Pricing Your Services for Profitability appeared first on Powercmd.
]]>Profit depends entirely on price. Income must cover all costs, including the owner’s pay. It must also pay for growth and serve as a reserve. Low prices only create more work without more profit. This prevents any real investment and keeps the business stagnant.
Your price also tells clients what you are worth. A higher price suggests higher quality. A very low price makes you look inexperienced. It can actually lose you clients who want a professional.
Correct pricing allows you to pay yourself properly. It lets you buy the necessary tools and training. For a small business owner, a pricing error doesn’t just affect the company. It affects your personal income and stability.
We will walk through a clear pricing process: find your true costs, set a target price, analyze service profitability, and schedule price reviews. Following these steps makes pricing a strategic asset, not a guess.
Understanding Your True Costs
You need to know what your service actually costs to deliver. It’s more than just materials. Your total cost has three parts: direct costs, overhead, and your time. If you miss one, you will underprice your work.
1. Direct Costs of Delivering Services
These are the expenses directly tied to a specific client project. They are variable, meaning they increase with each job you take. Common examples include:
- Software/Licenses: Project-specific subscriptions.
- Materials & Supplies: Physical products used.
- Subcontractor/Freelancer Fees: Payments to others you hire to complete elements of the project.
- Transaction Fees: Credit card processing or platform fees for that project’s payment.
- Direct Labor (if you have employees): The wages for the hours your staff spend on the project.
Action: Track every dollar spent for individual projects over a quarter. This will give you an accurate average direct cost per service type.
2. Overhead Expenses (The Cost of Being in Business)
Overhead expenses are the fixed costs of running your business every month. These include rent, utilities, software subscriptions, insurance, marketing costs, and office supplies. These costs don’t change with the number of clients. They must be included in your prices.
Action: Calculate your total monthly overhead. Divide this number by the total billable hours you work each month. This gives you an overhead cost per hour. Add this amount to your hourly rate or project price.
3. Your Time Has Value Too
A critical, often missed cost is your own compensation. You need to pay yourself a market salary for your work, distinct from any business profit.
- Research your market-rate salary.
- Account for non-billable hours. To earn $80,000 with only 60% billable time, your rates must cover it all.
Action: Calculate your personal hourly cost: (Target Salary ÷ Annual Billable Hours). For example, $80,000 ÷ 1,200 billable hours = $66.67/hour. This is a cost, not yet your price.
Your true hourly cost is: Direct Costs + Overhead + Your Pay. Only after covering these three can you add profit.
Calculating Break-Even and Target Margins
Knowing your true costs gives you your financial baseline—the break-even point. This is the minimum you must charge to keep the lights on without going backwards. But a business that only breaks even has no future. The next step is to build in a healthy profit margin to fund growth and reward risk.
What You Need to Charge to Stay in Business (Break-Even)
Your break-even rate is the price at which total revenue for a service equals the total costs (direct, overhead, and your salary) of providing it. Zero profit, zero loss.
- For Hourly Billing: Your break-even hourly rate is the sum calculated at the end of the previous section. Using our example: $66.67 (your salary cost) + Overhead Cost Per Hour (let’s say $25) = $91.67/hour. Direct costs would be added on top of this hourly quote.
- For Project-Based Billing: Estimate the total hours for a project. Multiply by your break-even hourly rate. Then add the estimated direct costs for that project.
Example: A 20-hour project: 20 hrs x $91.67 = $1,833.40 + $200 in direct costs = $2,033.40 break-even project price.
Charging at or near break-even is a survival tactic, not a strategy. It leaves no buffer for error, no funds for investment, and no financial reward for ownership.
Building in Profit Margin
Profit is essential. It is not a bonus; it’s what allows your business to function and grow. Profit lets you reinvest in tools and training, save for emergencies, fund marketing, and pay yourself for the risk of ownership.
To include profit, set a target margin. For service businesses, a net profit margin of 15-30% is a common and reasonable goal.
How to Apply a Target Margin:
Determine Your Target: Let’s choose a 20% net profit margin.
Calculate Your Target Price: Use this formula: Price = Total Costs ÷ (1 – Target Profit Margin).
Using our project example: Total Cost = $2,033.40.
Target Price = $2,033.40 ÷ (1 – 0.20) = $2,033.40 ÷ 0.80 = $2,541.75.
The price of $2,541.75 guarantees a $508.35 profit (20%) after expenses. This shifts the purpose of pricing from simple cost recovery to actively generating profit for the future.
Analyzing Profitability by Service

Not all services are created equal. Some may be high-revenue but low-margin, consuming disproportionate time and resources. Others might be streamlined profit powerhouses. To price strategically and focus your efforts, you must analyze profitability at the service line level.
Which Services Make You the Most Money?
Revenue is just the top-line number—it tells you how much comes in, not what you get to keep. To understand your real profitability, you need to drill down and calculate the Profit Per Service.
This means breaking down each offering you have, like a “Website Audit,” “Social Media Management Package,” or “Quarterly Tax Filing.” For a clear period (a month, a quarter), you need to track five key figures for each one:
- Total Revenue Generated from that service.
- Total Direct Costs (materials, software specific to the project, subcontractor fees).
- Total Time Invested in hours, by you and any employees.
- Allocated Overhead (Your Overhead Cost Per Hour multiplied by the total hours spent).
- Labor Cost (Your or your employees’ hourly cost multiplied by the hours spent).
Service Profit = Revenue – (Direct Costs + Allocated Overhead + Labor Cost).
This analysis often reveals surprises:
- The “Loss Leader” Trap: A service you thought was popular actually loses money when all costs are considered.
- The Hidden Gem: A straightforward, repeatable service that clients love and delivers high margins.
- The Resource Hog: A complex service that, while high-priced, consumes so much time and overhead that its profitability is mediocre.
Visualizing Service Line Performance
Numbers in a spreadsheet can be abstract. Creating visual dashboards makes trends and opportunities instantly clear. You can create charts showing:
- Profit Margin by Service: A bar chart ranking services from highest to lowest margin.
- Revenue vs. Profit Contribution: A scatter plot showing which services are high in both, high in one but not the other, or low in both.
- Time Investment vs. Profit: Highlights whether you’re being adequately paid for your most intensive work.
For service businesses using QuickBooks, this is where connecting financial data to a business intelligence platform becomes especially useful. Solutions explained at https://quickbooks-topowerbi.com/ show how cost and revenue data can be automatically pulled into customizable visual dashboards.
This move away from manual analysis provides real-time insight into which services are most profitable. This clarity helps you make better decisions about where to allocate your sales and marketing efforts.
Acting on this analysis allows you to: refine pricing on underperforming services, promote your high-margin offerings more aggressively, simplify or bundle low-margin services, and ultimately streamline your service mix for maximum profit.
Adjusting Pricing Over Time
Your initial pricing is a starting point. Markets change, your experience grows, and your costs rise. A fixed price will eventually hurt your margins. To stay profitable, you must proactively adjust your rates.
Key times to review and adjust pricing:
- Annual cost adjustments to maintain profit margins.
- When your skills and results improve and add more client value.
- When client demand exceeds your availability.
- After a major service update or redesign.
Implementing a price increase is a test of your business’s confidence. Do it wrong, and you create friction. Do it right, and you strengthen your position. The strategy differs for current clients versus new ones.
For existing clients, transparency and advance notice are mandatory. Link the change to your commitment to service quality or increased operating costs. Providing a short grace period at the previous rate helps smooth the change and shows appreciation for their business.
For new business, there are no exceptions. Your updated pricing should be live everywhere—on your website, in your quotes, in your brochures. This establishes your worth from the very first conversation.
Critically, as your prices go up, your messaging must level up. Stop selling time and start selling transformation. Talk about the problems you solve and the financial or strategic benefits you deliver. This value-based communication makes the higher price an easy “yes” for the right clients.
Institutionalize this by putting price reviews on your calendar annually. This transforms pricing from a reactive, anxiety-inducing choice into a proactive business strategy. It’s how you ensure your financial growth keeps up with the value you’ve worked hard to build.
Conclusion
Profitable pricing is a two-step process. First, determine your complete costs of doing business. Second, set prices that cover those costs and add a specific profit margin. This profit is what allows the business to invest and grow over time.
However, the work doesn’t stop at calculation. The strategic art of pricing involves continuous analysis. By dissecting which services truly drive your profit, you can make intelligent decisions about where to focus your energy, which offerings to refine, and where your true competitive advantage lies.
Pricing should be a constant activity. Adjust your rates regularly to reflect your increasing expertise and changing costs. These adjustments are a sign of a solid, well-managed business.
When you systematically work through cost analysis, set target margins, and review service profitability, you stop competing on price alone. You begin to compete based on the superior value you offer.
This structured approach is the foundation for a profitable operation. It leads to a business that can withstand challenges, scale effectively, and command respect. Managing your pricing strategically is how you ensure long-term success.
The post Pricing Your Services for Profitability appeared first on Powercmd.
]]>The post API Wunderground: Unleashing the Power in PowerShell appeared first on Powercmd.
]]>Weather information is valuable for a wide range of applications, from planning outdoor activities to automating weather-dependent tasks. Join us in discovering the capabilities and practical uses of the Wunderground API in PowerShell scripting.
Getting Started with the Wunderground API
Understanding the Wunderground API
The Wunderground API (API Wunderground) provides access to a vast repository of weather data, including current conditions, forecasts, historical weather patterns, and more. It’s a treasure trove for weather enthusiasts and developers seeking to incorporate weather information into their applications.
Obtaining an API Key
To access the Wunderground API, you’ll need an API key, which serves as your authentication credential. You can obtain a free API key by signing up on the Wunderground developer portal (https://www.wunderground.com/weather/api/).
API Usage Policy
Before diving into scripting with the Wunderground API, it’s essential to review their usage policy to ensure compliance. Different levels of access are available, so be sure to choose the one that suits your needs.
Building Your First Wunderground-Powered Script
Preparing Your PowerShell Environment
Start by launching your PowerShell environment and ensuring that you have the necessary modules and permissions to make web requests. PowerShell’s `Invoke-RestMethod` cmdlet will be your gateway to the Wunderground API.
Crafting Your API Request
Begin by constructing an API request URL using your API key and specifying the desired location or weather-related data. For example, to retrieve current conditions for New York City, your API request URL might look like this:
```powershell

$apiKey = "YOUR_API_KEY"

$location = "New_York_NY"

$requestUrl = "http://api.wunderground.com/api/$apiKey/conditions/q/$location.json"

```
Making the API Call
Execute your API request using PowerShell’s `Invoke-RestMethod` cmdlet:
```powershell

$response = Invoke-RestMethod -Uri $requestUrl -Method Get

```
The response will contain a wealth of weather-related data that you can parse and utilize in your scripts.
Discover more in this video for beginners
Parsing and Using Weather Data
Exploring the API Response
Take a closer look at the data returned by the Wunderground API. It will include information such as temperature, humidity, wind speed, and more. Understanding the structure of the response is crucial for extracting the data you need.
Extracting Specific Weather Information
Use PowerShell to extract specific weather information from the API response. For instance, to retrieve the current temperature in Fahrenheit:
```powershell

$currentTempFahrenheit = $response.current_observation.temp_f

Write-Host "Current Temperature (Fahrenheit): $currentTempFahrenheit°F"

```
Exploring Advanced Features of the Wunderground API
Forecast Data
The Wunderground API offers a comprehensive range of forecast data, including daily and hourly forecasts. You can access forecasts for specific dates and times, making it invaluable for planning purposes. Explore the API documentation to learn how to retrieve forecast data tailored to your needs.
Historical Weather Data
Need historical weather data for analysis or research? The Wunderground API provides historical weather information, allowing you to access past weather conditions and trends. This feature is particularly useful for climate studies, research projects, or simply satisfying your curiosity about past weather events.
Location-Based Queries
The API supports location-based queries, enabling you to retrieve weather data for specific regions, cities, or even coordinates. Whether you’re planning a road trip, checking the weather at a vacation destination, or monitoring weather conditions at multiple locations, the Wunderground API has you covered.
Custom Alerts and Notifications
Stay informed about weather events with custom alerts and notifications. You can set up alerts based on specific weather criteria, ensuring that you receive timely information about conditions that matter to you. Incorporate this feature into your PowerShell scripts to automate weather-related alerts.
Advanced Scripting with Wunderground API
- Script Automation. Take your weather-powered scripts to the next level by automating tasks based on weather conditions. For example, you can create scripts that adjust thermostat settings, send email notifications about weather changes, or update your website with real-time weather data;
- Weather-Dependent Actions. Design scripts that trigger actions based on weather conditions. Whether it’s controlling irrigation systems, managing energy consumption, or adjusting outdoor lighting, you can use the Wunderground API to make your scripts weather-aware;
- Data Visualization. Combine the power of PowerShell and the Wunderground API to create captivating data visualizations. Generate charts, graphs, or interactive displays that showcase weather trends, forecasts, and historical data. Visualizations can be particularly useful for educational or analytical purposes.
Conclusion
In this exploration of the Wunderground API, you’ve expanded your knowledge beyond the basics, discovering advanced features and applications.
As you continue to experiment and develop weather-driven scripts, you’ll find that the ability to harness real-time weather information adds a dynamic dimension to your automation efforts.
Whether you’re automating your home, enhancing your travel plans, or conducting weather-related research, the Wunderground API equips you with the tools you need for success.
The post API Wunderground: Unleashing the Power in PowerShell appeared first on Powercmd.
]]>The post Command Name Mastery: Deciphering PowerShell appeared first on Powercmd.
]]>In this comprehensive guide, we will unravel the intricacies of PowerShell command discovery, equipping you with the knowledge to efficiently locate and employ the commands you need. Let’s embark on this journey to demystify the world of PowerShell command names.
Understanding Command Names in PowerShell
The Significance of Command Names
Command names are the cornerstone of PowerShell. They are the key to unlocking the language’s vast potential. A command name is essentially the name of a PowerShell cmdlet, function, or script that instructs PowerShell to perform specific actions.
The Anatomy of a Command Name
A typical PowerShell command name consists of a verb and a noun, separated by a hyphen. For example, “Get-Process,” where “Get” is the verb indicating the action, and “Process” is the noun specifying the target.
Verb Categories
PowerShell classifies verbs into specific categories to maintain consistency and clarity. Some common verb categories include “Get” for retrieving data, “Set” for modifying data, “New” for creating new instances, and “Remove” for deleting data.
Efficient Command Discovery
Get-Help: Your Command Discovery Companion
The “Get-Help” cmdlet is your trusted companion in discovering PowerShell command names. It provides detailed information about cmdlets, functions, and scripts. To learn more about a specific command, simply use:
```powershell

Get-Help Command-Name

```
Replace “Command-Name” with the name of the command you want to explore. This command will display a wealth of information, including a description, syntax, parameters, and examples.
Watch here how to change computer name PowerShell Computer Name Commands
Tab Completion: A Time-Saving Technique
PowerShell offers tab completion, a feature that can significantly expedite your command discovery process. Begin typing a command name, and then press the “Tab” key. PowerShell will automatically suggest command names that match what you’ve typed so far. Keep pressing “Tab” to cycle through the options until you find the one you need.
Online Resources and Communities
Leverage online resources and PowerShell communities to enhance your command discovery journey. Websites, forums, and social media platforms dedicated to PowerShell are treasure troves of information. You can find discussions, examples, and real-world scenarios where command names are used effectively.
Best Practices for Efficient Command Utilization
Practice Makes Perfect
The more you use PowerShell, the more familiar you will become with command names. Regular practice and hands-on scripting are key to mastering command discovery.
Build a Command Library
Create your personal command library or cheat sheet. Document frequently used command names, their descriptions, and common use cases. This resource will be invaluable as you continue your PowerShell journey.
Exploring the PowerShell Ecosystem
Exploring Modules
PowerShell modules are collections of cmdlets, functions, and scripts that extend the core functionality of PowerShell. They provide a wealth of additional command names tailored for specific tasks. You can discover and explore modules using the following commands:
- To list all installed modules:
 ```powershell

 Get-Module -ListAvailable

```- To import a module and access its command names:
 ```powershell

 Import-Module Module-Name

 ```
Replace “Module-Name” with the name of the module you want to use.
Online Galleries and Repositories
Online galleries and repositories, such as the PowerShell Gallery (https://www.powershellgallery.com/), host a vast collection of PowerShell modules and scripts. These resources allow you to discover and download pre-built command names to streamline your scripting tasks.
Advanced Command Discovery Techniques
Aliases: Shortcuts to Command Names
PowerShell provides aliases, which are alternative names or shortcuts for command names. While aliases can save you time, they can also be confusing if overused. You can view a list of aliases and their corresponding command names using:
```powershell

Get-Alias

```
Searching Command Names
When searching for specific command names or keywords, you can use the “Get-Command” cmdlet with the “-Name” parameter:
```powershell

Get-Command -Name *Keyword*

```
Replace “Keyword” with your search term, and PowerShell will return a list of matching command names.
Conclusion
Command discovery is the gateway to harnessing the full potential of PowerShell. Whether you are a beginner or an experienced scripter, mastering command names is an ongoing process. As you delve deeper into PowerShell’s capabilities, you will realize its limitless potential for automation, administration, and task simplification.
By continually expanding your knowledge of command names and adopting best practices, you are well on your way to becoming a PowerShell expert.
Embrace the power of PowerShell’s command discovery, and watch as your scripting abilities grow, enabling you to conquer even the most complex automation challenges with confidence and precision.
The post Command Name Mastery: Deciphering PowerShell appeared first on Powercmd.
]]>The post Mastering the PowerShell ‘Do While’ Loop for Efficiency appeared first on Powercmd.
]]>PowerShell’s ‘Do While’ loop is a gateway to executing repetitive tasks, a mechanism to ensure that specific conditions are met before moving forward, and a bridge between automation and precision. Whether you’re a sysadmin streamlining system management tasks, a developer automating deployment procedures, or a data analyst processing vast datasets, understanding and harnessing this loop is essential.
Utilizing Loops for Disk Information in PowerShell
In our journey, we harnessed the power of loops to efficiently retrieve and display information about the disks in our system. The loop we employed, known as a ForEach loop, allowed us to iterate through an array of objects, in this case, the $disks collection. Let’s delve deeper into this process and explore the code used:
The ForEach Loop in Action
The ForEach loop is a versatile construct in PowerShell that enables us to work with each item in a collection individually. In our specific scenario, we declared the variable $disk to represent the current item from the $disks array. This loop structure is defined as follows:
ForEach ($item in $collection) { $item.Property }
Here, $item represents the current item within the collection, and we can access its properties using $item.Property. In our case, $disk stands for the current disk in the loop.
Displaying Disk Information
With the ForEach loop in place, we can effortlessly retrieve and showcase detailed disk information. Here’s how we did it:
- Device ID: We used $disk.DeviceID to display the unique identifier of each disk;
- Free Space: By dividing $disk.FreeSpace by 1GB, we obtained the available free space on the disk and formatted it to show it in gigabytes with two decimal places;
- Total Size: Similarly, we calculated the total size of the disk by dividing $disk.Size by 1GB and formatting it accordingly;
- % Free: To provide a percentage of free space compared to the total size, we divided $disk.FreeSpace by $disk.Size and presented it as a whole number percentage;
- Volume Name: $disk.VolumeName allowed us to retrieve and display the name of the volume associated with each disk;
- Drive Type: For this, we used the Get-WMIInfo function to translate the numerical drive type into a human-readable format. This operation was performed for each disk in the loop.
The Versatility of PowerShell Loops
While the ForEach loop was our choice for displaying disk information, PowerShell offers various types of loops, each tailored to different tasks. It’s important to select the most appropriate loop for your specific needs. In PowerShell, you can also use loops like For, While, and Do-While for diverse scenarios.
Here’s a quick reference for the types of loops you can explore:
- For Loop: Use when you know the exact number of iterations required;
- While Loop: Ideal for situations where you want to continue iterating as long as a certain condition is met;
- Do-While Loop: Works similarly to the While loop but ensures at least one execution of the loop’s code block.
A Handy Note
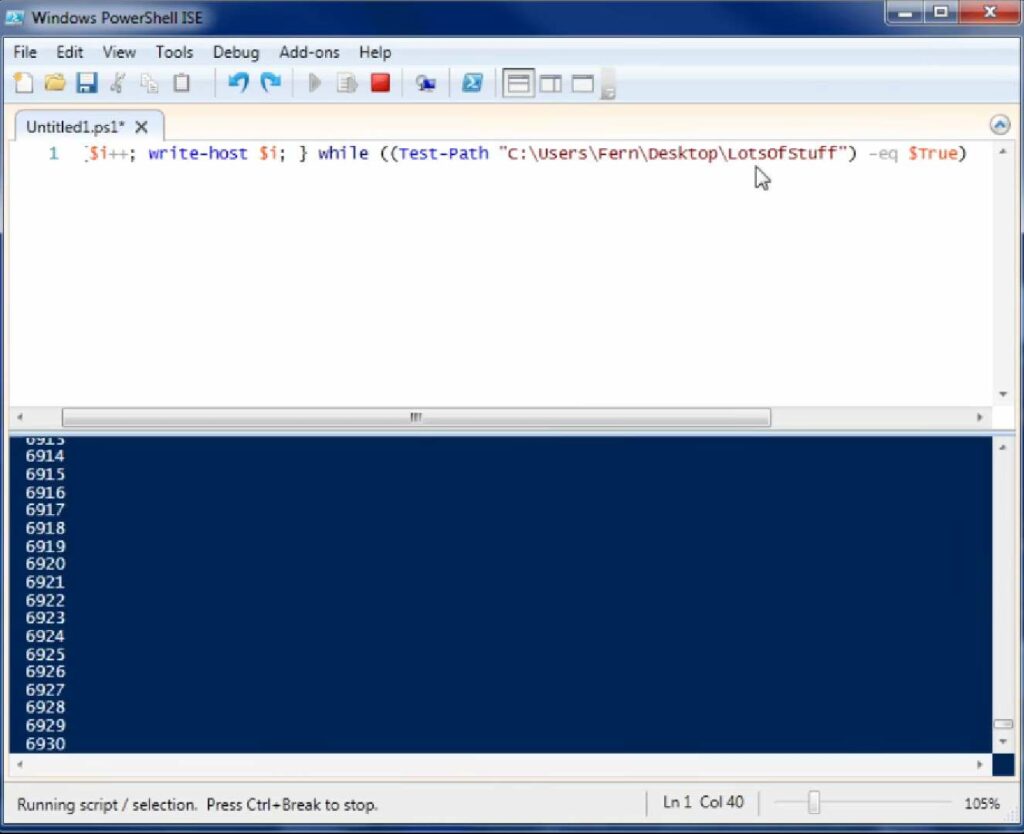
Before we move forward with our PowerShell adventures, it’s essential to remember that running code with infinite loops can be troublesome. If you ever find yourself stuck in an infinite loop, simply use CTRL+C to break out of it and regain control of your PowerShell session.
Now that we’ve harnessed the power of loops in PowerShell, we’re well-equipped to tackle various tasks efficiently and effectively in our scripting journey. Next, let’s explore further PowerShell capabilities and best practices!
Unveiling the Power of the ForEach Loop in PowerShell
If you’re diving into the world of PowerShell, you’re in for a treat with the ForEach loop. This loop is your ticket to effortlessly traversing arrays or collections, giving you the power to manipulate and extract information with ease. So, what exactly does it do, and how can you leverage its capabilities? Let’s explore.
The ForEach Loop Demystified
At its core, the ForEach loop is a workhorse that cycles through each element within an array or collection. It’s like having a dedicated guide to show you around a treasure trove of data. To make it work for you, you define an element or item to serve as a placeholder for the current object in the loop. This element can be customized to reflect the nature of the items you’re dealing with, making your code more intuitive.
Loop Setup – Step by Step
Setting up a ForEach loop is a breeze. Here’s a breakdown of the structure:
ForEach (item/element in array/collection) {
    Do-Stuff
}
Item/Element: This is your chosen placeholder, tailored to the specifics of your task.
Array/Collection: The object or array you intend to explore.
A Practical Example
Let’s put theory into practice with a real-world example:
$processes = Get-Process
$i = 1

ForEach ($process in $processes) {
    Write-Host "Process[$i]'s Name is $($process.Name)"
    $i++
}
Output:
Process[1]'s Name is ProcessName1
Process[2]'s Name is ProcessName2
...
In this scenario, we’ve declared $processes to hold the results of Get-Process. Our ForEach loop features $process as the placeholder and $processes as the array to iterate through. The action taken is to display the current value of $i along with the name of the current process. We increment $i by 1 with $i++.
Exploring ForEach-Object
While the classic ForEach loop works wonders, there’s a pipeline variation known as ForEach-Object. This version simplifies your code and is particularly handy when dealing with complex commands and piped input.
To employ ForEach-Object, run your desired command and pipe it to ForEach-Object. Then, make use of the special placeholder variable in PowerShell, $_, to manipulate the current element in the array.
Here’s an illustration:
$i = 1

Get-Process | ForEach-Object {
    Write-Host "Process[$i]'s Name is $($_.Name)"
    $i++
}
This snippet accomplishes the same tasks as the classic ForEach loop but offers an alternative approach.
Pro Tip: Storing commands in variables and using the ForEach loop is often my preference. However, ForEach-Object shines when advanced commands and piped input are in play.
Knowing When to Deploy a ForEach Loop
The golden question: when should you reach for the ForEach loop in your PowerShell arsenal? Here’s a rule of thumb:
Use a ForEach loop when:
- You need to perform actions on an array of items;
- Tasks range from deleting specific files to displaying information;
- Your goal is to interact with each element individually, unleashing the full potential of PowerShell’s scripting capabilities.
Exploring the Power of the For Loop
The for loop is a fundamental construct in programming, allowing you to execute actions repeatedly until a specific condition is met. It’s like having a reliable assistant that performs tasks tirelessly as long as certain conditions hold true. Let’s dive deeper into how it works and explore its flexibility and use cases.
Setting up a for loop is akin to orchestrating a performance. You specify when it should begin (init), the condition that dictates whether it continues, and what to do after each cycle (repeat). Here’s the basic structure:
for (init; condition; repeat) {
    Do-Stuff
}- Init: This is where you define the starting point, typically initializing a variable that will be used within the loop;
- Condition: The loop will persist as long as this statement remains true;
- Repeat: After each iteration, this action is executed.
Examples in Action
Let’s delve into an example to illustrate how these components come together:
for ($i = 1; $i -le 15; $i++) {
    Write-Host "This is the color for [$i]" -ForegroundColor $i
}- Init: $i is set to 1;
- Condition: The loop continues while $i is less than or equal to 15;
- Repeat: $i is incremented by 1 after each iteration.
You’ll witness a colorful display as the loop iterates through values 1 to 15.
Unleashing the Flexibility
For loops offer remarkable flexibility. You can specify any or none of the conditions for init, condition, and repeat, resulting in diverse use cases. Here’s an example of a minimalistic for loop:
for () {
    Write-Host "Wheeeeeeeeeeeeeeee!"
}
In this scenario, there are no initialization or repeat actions; it’s a simple loop that continues indefinitely until interrupted (remember, CTRL+C is your friend here).
Furthermore, you can define these elements outside of the loop statement, as shown below:
$i = 0

for (; $i -le 20;) {
    Write-Host "`$i is [$i] iterations old!"
    $i++
}
When to Harness the Power
For loops shine when you need to execute the same set of code multiple times for various reasons. They offer fine-grained control over how many iterations occur. To illustrate this, consider the alternative to the earlier ForEach loop using Get-Process:
$processes = Get-Process

for ($i = 0; $i -le $processes.count; $i++) {
    Write-Host "Process[$i]'s Name is $($processes[$i].Name)"
}- Condition: The loop continues until $i is less than or equal to the number of processes;
- Customization: We modify the Write-Host statement to display information from the $processes array, utilizing the current value of $i. Remember, in PowerShell, arrays start at 0, hence the init as $i = 0.
Understanding the While Loop in PowerShell
The While loop in PowerShell is a powerful construct that allows you to execute a set of actions repeatedly as long as a specified condition remains true. It’s a fundamental building block for automating tasks, and it can be applied to a wide range of scenarios. Let’s delve into the details of how the While loop works and when it’s best to use it.
Loop Setup
Setting up a While loop in PowerShell is straightforward. Here’s the basic structure:
While (condition) {
    # Code to execute as long as the condition is true
}
The heart of the While loop is the condition, which can be any statement or expression that evaluates to either true or false. While the condition is true, the code block within the loop is executed.
Example: Managing Notepad Instances
To illustrate the While loop in action, let’s consider a scenario involving Notepad.exe. We want to open Notepad windows until we reach a specific count. Here’s the code:
$notepad = Get-Process Notepad

While ($notepad.Count -le 5) {
    Write-Host "Starting Notepad, current count is: $($notepad.Count + 1)"
    Start-Process Notepad.exe
    $notepad = Get-Process Notepad
}
In this example, we initialize the $notepad variable with the result of Get-Process Notepad. Then, we create a While loop with the condition that $notepad.Count is less than or equal to 5. As long as this condition holds true, the loop will continue executing.
Within the loop, we display the current count of open Notepad windows, start a new Notepad window using Start-Process, and update the $notepad variable to reflect the updated count of Notepad processes. This step is crucial to prevent an infinite loop.
When to Use a While Loop
While loops are particularly useful when you need to perform actions based on a dynamic condition. Here are some common scenarios where While loops come in handy:
- Process Management: Use a While loop to continuously monitor and manage processes. In the example, we ensured a specific number of Notepad instances were running;
- Job Processing: While loops can be employed to manage PowerShell jobs efficiently. Although this topic isn’t covered in detail here, it’s a powerful use case worth exploring;
- Dynamic Data Processing: When dealing with data that changes over time, a While loop can help automate tasks until a specific data condition is met;
- Continuous Monitoring: For tasks that require ongoing monitoring, such as checking for system resource thresholds, a While loop can be invaluable.
‘Do While’ Loop in PowerShell
The ‘Do While’ loop in PowerShell stands as a pivotal construct, allowing the execution of specific actions as long as a predefined condition holds true. It holds a distinctive edge over the conventional ‘While’ loop, guaranteeing that the actions nested within the ‘Do’ block are executed a minimum of one time, irrespective of the initial condition’s truth value. Conversely, in a ‘While’ loop, actions are bypassed entirely when the governing condition is false from the outset.
Constructing the Loop
For constructing a ‘Do While’ loop, the ‘Do’ keyword initiates the declaration of intended actions, encapsulated within curly braces:
Do {
    Action-Commands
} While (condition)
Here, ‘Action-Commands’ represent the executable actions, and the ‘While’ keyword followed by a condition dictates the continuation of the loop based on the truthiness of the stated condition.
Illustrative Examples
To vividly illustrate, consider an example where the ‘Do’ block’s actions are executed before evaluating the given condition.
Execute the subsequent code, where $i is initialized to 14, as a selection:
$i = 14
Do {
    Write-Host "Executing at least once! `$i = $i"
} While ($i -gt 15)
Here, since $i is never above 15, it exemplifies the unique trait of the ‘Do While’ loop, executing the block at least once even when the condition is false initially.
Another demonstrative example can be as follows, where $i is initiated with a value of 0:
$i = 0
Do {
    Write-Host "Iteration in progress! `$i = $i"
    $i++
} While ($i -le 15)
This exemplar continually increments $i as long as it remains below or equal to 15, emphasizing the continuous evaluation aspect of the ‘Do While’ loop.
Practical Applicability
The practical deployment of the ‘Do While’ loop becomes highly pertinent when there is a requisite to execute the ‘Do’ block’s actions at least once, notwithstanding the initial state of the conditional expression. It offers an edge in scenarios where the immediate execution of actions is paramount, even when the accompanying ‘While’ condition is initially untrue. It ensures that the loop’s actions are undertaken before the condition’s evaluation, granting it enhanced utility in scripting scenarios requiring at least one execution of the action block, such as initializing variables or setting up environments.
The ‘Do While’ loop, with its inherent trait of action execution before condition evaluation, emerges as a crucial tool for programmers, enhancing flexibility and offering more granular control in the execution flow of PowerShell scripts. Its meticulous use can significantly aid in creating robust, flexible, and efficient scripts, accommodating varied programming needs and scenarios.
The Do Until Loop: A Detailed Overview
The Do Until loop is a distinctive programming construct, utilized to execute a sequence of commands up until a specified condition is met or evaluates as true. In essence, it functions as the inverse of the Do While loop, providing a method for the automated execution of tasks based on distinct conditional parameters. Although the Do While loop and the Do Until loop share similarities, it is crucial to note that in the Do Until loop, the stated actions will be carried out at least once, even if the condition is true from the beginning.
Structural Framework
The structural representation of the Do Until loop is as follows:
Do {
   Execute-Commands
} Until (Specific-Condition)
This formulation resembles the Do While loop closely, with the primary distinction being the use of the keyword ‘Until’ instead of ‘While’. This subtle change in keyword represents a significant shift in the looping logic and operational execution.
Practical Illustration
To comprehend the Do Until loop’s functionality more profoundly, consider this pragmatic example:
Do {
    $application = Get-Process ApplicationName
    Start-Process ApplicationName.exe
    Write-Host "Launching Application, current instance count is: $($application.Count + 1)"
    $application = Get-Process ApplicationName
} Until ($application.Count -eq DesiredCount)
In this illustration, the code will instigate the specified application until the total count of its instances reaches the predetermined DesiredCount, ensuring the application is launched the exact number of times required. It is vital for the user to execute only the segment of code within the Do Until block, avoiding running the entire script.
This example demonstrates the strategic alteration of conditional parameters using ‘-eq’ instead of ‘-le’. Therefore, the actions within the loop will continue to execute until the condition $application.Count is equivalent to DesiredCount.
Optimal Utilization of the Do Until Loop
While the Do Until loop might not be a frequent choice for every programmer, it holds significant value in certain scenarios. It is ideally implemented when there is a necessity to execute a series of commands repeatedly until a predefined condition is met or a certain value is achieved. These conditions can be as diverse as waiting for a specific process to start running or attaining a particular numeric value in a variable.
The application of the Do Until loop is especially beneficial when the number of iterations is unknown, or the condition depends on external factors or user input, offering flexibility and control over the execution of blocks of code based on dynamic or unpredictable circumstances.
Exploration of Comparison Operators
Comparison operators play a pivotal role in programming and scripting languages, serving as the tools to assess the relationships between different values. They assess and compare the variables or values on each side, delivering a result based on the specific conditions they are meant to evaluate. Below is an exploration of different comparison operators that enable users to facilitate conditional logic, paving the way for more dynamic and responsive programming structures.
1. Equality Operator: -eq
The -eq operator is instrumental in assessing whether two values or variables are equivalent to each other. It is the cornerstone for validating equivalency and is expressed as follows:
2 -eq 2This would yield a result of True, signifying the equality of the two values.
2. Inequality Operator: -ne
Serving as the counterpoint to -eq, the -ne operator evaluates whether two values are disparate. For instance, the expression:
2 -ne 3would return True, illustrating that the values are not equal.
3. Greater-than Operator: -gt
The -gt operator scrutinizes values to ascertain if one is superior to the other. A typical illustration is:
3 -gt 2This would confirm the superiority of the first value over the second, returning True.
4. Greater-than or Equal-to Operator: -ge
The -ge operator meticulously evaluates whether a value is either greater than or equivalent to another value. A representation of this is:
4 -ge 4Yielding True, it confirms the fulfillment of either of the stated conditions.
5. Less-than Operator: -lt
The -lt operator is vital for comparing if one value is inferior to another. An example of its application is:
1 -lt 2This would result in True, indicating the first value’s inferiority.
6. Less-than or Equal-to Operator: -le
The -le operator serves to determine if a value is either less than or congruent to another value. Exemplifying this:
2 -le 2The output, True, denotes the fulfillment of at least one of the criteria.
7. Wildcard Comparison Operator: -like
The -like operator allows for a more flexible approach to comparison by accommodating wildcard comparisons. It proves invaluable when exact matches are elusive. For instance:
'computer' -like '*comp*'This would return True, revealing a partial match within the string.
8. Negative Wildcard Comparison Operator: -notlike
Conversely, the -notlike operator seeks disparities within the string, employing wildcard comparisons. Example:
'technology' -notlike '*techx*'This would yield True, confirming the absence of the specified sequence within the string.
Additional Insights
To delve deeper into the intricacies and functionalities of comparison operators, the following command can be deployed:
Get-Help About_Comparison_OperatorsUtilizing these operators efficiently enables developers to introduce more conditional variety and logic into their scripts, optimizing control flow and improving the responsiveness and versatility of their programs. It is crucial for programmers, both novice and experienced, to understand and master the use of these operators to navigate and manipulate conditional statements effectively within their coding environment.
Conclusion
In conclusion, the “Do-While” loop in PowerShell is a powerful and flexible construct that adds a dynamic dimension to your scripting and automation tasks. It allows you to repeatedly execute a block of code as long as a specified condition remains true, providing a robust mechanism for automating tasks, handling user input, and managing data processing.
Throughout this article, we’ve explored the syntax and usage of the “Do-While” loop, highlighting its key features and showcasing practical examples. We’ve seen how it can be employed to iterate through arrays, validate user input, and address a wide range of real-world scenarios efficiently.
By mastering the “Do-While” loop, you empower yourself with a valuable tool in your PowerShell scripting toolkit. It enables you to create more dynamic and responsive scripts, enhancing your ability to automate tasks and streamline your workflow. Whether you’re a beginner or an experienced PowerShell user, understanding and utilizing the “Do-While” loop will undoubtedly contribute to your scripting prowess.
The post Mastering the PowerShell ‘Do While’ Loop for Efficiency appeared first on Powercmd.
]]>The post Unlocking the Potential of PowerShell’s Input Pipelines appeared first on Powercmd.
]]>Within the confines of this article, we shall embark on a comprehensive exploration of the fundamental topic of PowerShell pipeline input. This journey will illuminate how this feature empowers users to execute intricate tasks with a touch of grace and unparalleled efficiency. Whether you find yourself a seasoned veteran or a newcomer seeking to unlock the boundless potential of this commanding scripting language, grasping the pipeline’s handling of input is an imperative cornerstone in your quest to master the art of automation.
As we delve deeper into the intricacies of PowerShell’s pipeline input, prepare to embark on a voyage of discovery. By the time we conclude, you will have unveiled the enigmatic facets of this feature and witnessed how it possesses the transformative capability to elevate your scripting prowess to unprecedented heights. Join us in this enlightening journey as we decode the mysteries surrounding PowerShell’s pipeline input, uncovering its capacity to transcend boundaries and amplify your scripting skills.
Comprehending the PowerShell Pipeline
In the PowerShell scripting environment, a key component is the pipeline. The pipeline employs the operator ‘|’, allowing the conduction of commands in a sequence where the output of one command can be used as the input for the following command. This tool enables the seamless linking of multiple commands, tailored to accomplish the desired task efficiently.
Structural Essence of the Pipeline
The foundational structure of the pipeline can be envisioned as follows:
Command1 (output)
→
∣
Command2 (output)
→
∣
Command3
Command1 (output)
∣
Command2 (output)
∣
Command3
Practical Implementation of the Pipeline
To commence exploring the pipeline’s utility, consider the command Get-Process. This command unveils a list displaying all the processes currently running, providing varied information pertaining to each process, enabling users to assess system performance and monitor activities.
Refinement and Sorting
Suppose one wishes to focus solely on the first ten processes and desires them sorted based on CPU usage. For this refinement, the following command sequence can be used:
Get-Process
∣
Sort-Object CPU -Descending
∣
Select-Object -First 10
Get-Process∣Sort-Object CPU -Descending∣Select-Object -First 10
Here, Get-Process is linked to Sort-Object through the pipeline, allowing the sorting of processes based on CPU usage in descending order, and subsequently piped to Select-Object to narrow down the results to the first ten.
To explore the opposite end of the spectrum, one can simply alter the final segment of the command to -Last 10 to visualize the last ten results:
Get-Process
∣
Sort-Object CPU -Descending
∣
Select-Object -Last 10
Get-Process∣Sort-Object CPU -Descending∣Select-Object -Last 10
Visualization Enhancement
For users aspiring for a more visually distinctive representation, the concluded command can be further piped to Out-GridView. This presents the information in a grid view, offering a structured and clear presentation of the results:
Get-Process
∣
Sort-Object CPU -Descending
∣
Select-Object -Last 10
∣
Out-GridView
Get-Process∣Sort-Object CPU -Descending∣Select-Object -Last 10∣Out-GridView
Accepting Pipeline Input in PowerShell Functions
Embracing the incorporation of pipeline input within your PowerShell scripts can substantially elevate their adaptability and utility. This capability empowers you to effortlessly manipulate data originating from diverse origins, enabling efficient execution of operations. Within the following discourse, we shall delve into the art of harnessing pipeline input, employing parameter attributes, and delineating the multifaceted segments within a PowerShell function.
Enhancing Pipeline Input with Parameter Attributes
Within the domain of PowerShell’s pipeline, there exists an elegant approach to seamlessly integrate input data – the incorporation of parameter attributes within the [cmdletbinding()] section of your script. This pivotal juncture presents two widely embraced parameter attributes at your disposal:
Embracing ValueFromPipeline: This attribute readily accepts input values directly streamed through the pipeline.
Unleashing the Potential of ValueFromPipeline
The ValueFromPipeline parameter attribute serves as your conduit to tap into the formidable capabilities of the PowerShell pipeline. It gracefully captures all values transmitted via the pipeline. To illustrate its functionality, consider the following illustrative scenario:
function Write-PipeLineInfoValue {
    [cmdletbinding()]
    param(
        [parameter(
            Mandatory         = $true,
            ValueFromPipeline = $true)]
        $pipelineInput
    )

    Begin {
        # Code in the Begin block runs once at the start and is suitable for setting up variables.
        Write-Host `n"The begin {} block runs once at the start, and is good for setting up variables."
        Write-Host "-------------------------------------------------------------------------------"
    }

    Process {
        # Code in the Process block handles pipeline input.
        # It's advisable to process each element individually in a ForEach loop.
        ForEach ($inputItem in $pipelineInput) {
            Write-Host "Processing [$($inputItem.Name)] information"

            if ($inputItem.Path) {
                Write-Host "Path: $($inputItem.Path)`n"
            } else {
                Write-Host "No path found!"`n -ForegroundColor Red
            }
        }
    }

    End {
        # Code in the End block runs once at the end and is perfect for cleanup tasks.
        Write-Host "-------------------------------------------------------------------------------"
        Write-Host "The end {} block runs once at the end, and is good for cleanup tasks."`n
    }
}

Get-Process | Select-Object -First 10 | Write-PipeLineInfoValue
Results of Pipeline Input Processing
When you accept pipeline input, it is primarily handled within the Process {} block of your function. However, you can also utilize the Begin {} and End {} blocks for additional control:
The Begin {} block: This block runs once when the function is invoked. It’s where you can set up variables and perform initial setup tasks.
Begin {
    Write-Host `n"The begin {} block runs once at the start, and is good for setting up variables."
    Write-Host "-------------------------------------------------------------------------------"
}
The Process {} block: This is where the pipeline input is processed. It’s advisable to handle each pipeline element individually using a ForEach loop.
Process {
    ForEach ($inputItem in $pipelineInput) {
        # Processing logic for each input item
    }
}
The End {} block: Code within this block runs after all pipeline elements are processed. It's a suitable place for cleanup tasks and finalization.

powershell
Copy code
End {
    Write-Host "-------------------------------------------------------------------------------"
    Write-Host "The end {} block runs once at the end, and is good for cleanup tasks."`n
}
Grasping the intricacies of these building blocks and employing the ValueFromPipeline parameter attribute enhances the adaptability and performance of your PowerShell functions when dealing with pipeline input.
Parameter Attribute – ValueFromPipelineByPropertyName
In the realm of PowerShell, a profound grasp of parameter attributes becomes imperative to unlock the true capabilities of your scripts and functions. Among these attributes, there emerges a standout known as “ValueFromPipelineByPropertyName.” This particular attribute distinguishes itself with an intriguing twist—it discriminately embraces input from the pipeline by scrutinizing property name correlations. Let’s embark on a deeper exploration of this captivating attribute and discern how it can elevate your prowess in the art of PowerShell scripting.
How it Works
When you designate a parameter with ValueFromPipelineByPropertyName, you’re essentially telling PowerShell to filter incoming pipeline objects, considering only those whose property names align with the parameter’s name. For instance, let’s take a look at this illustrative example:
function Write-PipeLineInfoPropertyName {
    [cmdletbinding()]
    param(
        [parameter(
            Mandatory                       = $true,
            ValueFromPipelineByPropertyName = $true)]
        [string[]]
        $Name
    )

    Begin {
        Write-Host `n"The begin {} block runs once at the start, and is good for setting up variables."
        Write-Host "-------------------------------------------------------------------------------"
    }

    Process {
        ForEach ($input in $name) {
            Write-Host "Value of input's Name property: [$($input)]"
        }
    }

    End {
        Write-Host "-------------------------------------------------------------------------------"
        Write-Host "The end {} block runs once at the end, and is good for cleanup tasks."`n
    }
}
Practical Application
Now that we understand how this parameter attribute operates, let’s explore some practical applications:
1. Computer Management
Imagine you need to perform actions on a list of specific computers. By piping this list to a function that utilizes ValueFromPipelineByPropertyName, you can effortlessly execute actions on each computer, simplifying complex tasks like remote management and administration.
2. Logging Functions
If you have a logging function that can process bulk messages or commands, you can easily pipe these commands to it. This allows for efficient log file creation and management, streamlining the monitoring and troubleshooting process.
3. Flexibility and Choice
PowerShell offers multiple ways to accomplish tasks, and piping commands together is just one approach. Depending on your specific needs and preferences, you can decide whether using ValueFromPipelineByPropertyName is the most elegant solution or if there’s a better alternative for your particular scenario.
Conclusion
To sum up, the essence of the PowerShell scripting language hinges on the foundational and formidable concept of the PowerShell pipeline input. This concept serves as the central axis, enabling a fluid and effortless exchange of data between cmdlets, thereby facilitating the creation of sophisticated and highly efficient automation scripts with remarkable simplicity. By granting the privilege of utilizing the output from one cmdlet as the raw material for another, PowerShell bestows upon users the capability to execute an extensive array of tasks, spanning from elementary data manipulation to intricate system administration.
The post Unlocking the Potential of PowerShell’s Input Pipelines appeared first on Powercmd.
]]>The post Tailoring Your PowerShell Experience appeared first on Powercmd.
]]>Welcome to the world of customizing PowerShell, where you can transform this already formidable tool into a finely tuned instrument tailored to your specific needs. In this article, we will delve deep into the art of PowerShell customization, exploring the myriad ways in which you can personalize your PowerShell environment, scripts, and functions to enhance your productivity, boost your efficiency, and simplify the management of your systems.
Understanding the Essence of PowerShell: A Detailed Overview
PowerShell, developed by Microsoft, acts as a multifaceted framework, offering a platform to execute automation tasks, general scripting, and a plethora of other functionalities, expanding the horizons of what one can achieve with it. It operates based on the .NET framework and is ingrained with extensive compatibility, enabling interaction with virtually all functions and features within the Windows operating system.
Evolution and Integration of PowerShell
PowerShell continues to evolve and integrate new features and capabilities, ensuring it stays current and versatile. It doesn’t just operate in isolation; it allows the integration of traditional commands, such as ping, but simultaneously offers more advanced and robust options, like Test-Connection, providing users with a versatile array of tools to accomplish various tasks efficiently.
Object-Oriented Nature of PowerShell
PowerShell is structured as an object-oriented programming language, characterized by its vast range of features. In the context of PowerShell, every element manipulated is an object, directly or indirectly. This characteristic implies that users can extract information from objects through properties and influence them through methods. The object-oriented nature allows for the streamlined handling of data, facilitating the execution of intricate tasks with precision and efficiency.
Interactivity and Scripting in PowerShell
PowerShell can be utilized in two primary manners:
Interactive Mode via the Shell:
This mode is instrumental when unraveling or deciphering specific issues and is particularly useful for troubleshooting. The interactive shell becomes a powerful tool when users need immediate responses or when experimenting with new commands or scripts, allowing for real-time adjustments and testing.
Scripting Language Mode:
In this mode, users have the opportunity to generate powerful scripts using editors like PowerShell ISE. Scripting is crucial for automating repetitive tasks, managing configurations, and processing data, which results in enhanced productivity and reduced risk of errors.
Choosing an Editor for PowerShell
When it comes to choosing an editor to work with PowerShell, Visual Studio Code is gaining popularity among users. While the setup might require a bit more effort, the array of advanced features it offers makes the initial time investment worthwhile. Visual Studio Code serves as an optimal choice for those seeking a robust and feature-rich environment to develop scripts and manage code.
PowerShell’s Comprehensive Abilities
PowerShell’s comprehensive capabilities extend far beyond simple command execution. It paves the way for the creation of highly complex scripts, capable of manipulating and interfacing with various system components and services. Its versatility is highlighted by its adaptability, allowing it to cater to a wide range of requirements, from system administrators to developers, providing an invaluable tool in managing and optimizing system performance and functionality.
PowerShell Versions: A Comprehensive Guide
PowerShell, the versatile and powerful scripting language and automation framework developed by Microsoft, has seen various versions over the years. Understanding which version you have and which ones are compatible with your Windows operating system can greatly enhance your scripting capabilities. In this guide, we’ll delve into the nuances of PowerShell versions and how to check your current version.
Windows 7: The Starting Point
Default Version: Windows 7 comes with Windows PowerShell version 2.0 pre-installed.
Upgrading to the Latest: If you’re still using Windows 7 and wish to experience the latest features of PowerShell (currently at version 5.0 at the time of writing), you’ll need to install the Windows Management Framework update.
Windows 8: A Unique Versioning Scenario
Windows 8 introduces an interesting twist to PowerShell versioning:
Range of Versions: Windows 8 allows you to run PowerShell versions 2.0 through 3.0, but it restricts you from running versions 4.0 and above.
Windows 8.1: Embracing Version 5.0
Progression: Windows 8.1 takes a leap forward, permitting you to run PowerShell version 5.0.
Windows 10: PowerShell Integration
- Default Version: Windows 10 comes with PowerShell version 5.0 pre-installed, seamlessly integrated into the operating system;
- Staying Current: With Windows 10’s automated update system, keeping your PowerShell version up to date (5.1 and beyond) is almost effortless.
PowerShell Core: Cross-Platform Versatility
PowerShell Core, a cross-platform iteration of PowerShell, is designed to work on Windows, macOS, and Linux. It has its own versioning structure, which may differ from Windows PowerShell.
Check Your PowerShell Version: A Step-by-Step Guide
Now that you’re aware of the PowerShell versions in different Windows environments, let’s explore how to check your current version:
- Open PowerShell: To begin, open PowerShell by hitting the Windows key or clicking the Start icon/button. Type in ‘PowerShell’ and select ‘Windows PowerShell.’;
- Pin to Taskbar: Consider pinning PowerShell to your taskbar for quick and easy access. This convenient tip can save you time in the long run;
- Using the $host Variable: PowerShell stores version information in a dedicated variable, $host. To check your PowerShell version, type “$host” into your console and press Enter. This will display detailed host information, including the version;
- Retrieve the Latest Version: If you’re only interested in the version number, type “$host.Version” to display the Version property exclusively;
- Major Version Check: To specifically retrieve the major version, use “$host.Version.Major.”
Functionality of PowerShell: An In-depth Exploration
PowerShell operates primarily through the execution of commands, offering an interpretative lens to comprehend the resulting output effectively. It employs a structure where every element either exists as or is transformed into an object. Here, an object can be perceived as an entity upon which actions can be performed using various methods, and from which information can be obtained through properties.
Grasping the Essentials of PowerShell
Before delving into the customization of the environment using PowerShell, it is crucial to understand some fundamental concepts. A significant aspect of learning PowerShell is experiential, focusing on practical engagement rather than purely theoretical understanding. Thus, don’t be overly concerned about mastering the terminologies from the get-go; instead, explore and learn through implementation.
The Simplicity of ‘Hello World’
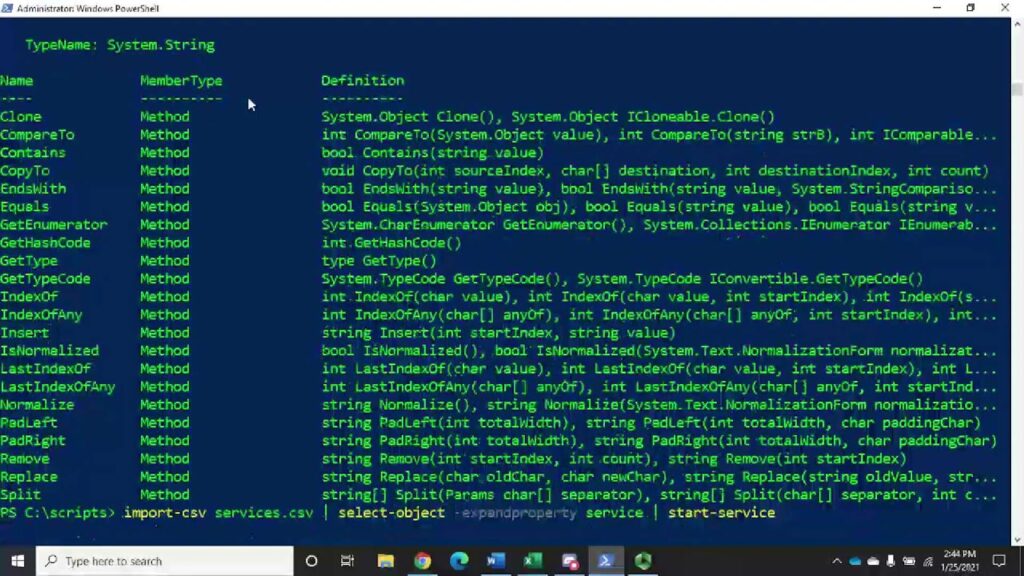
Even a seemingly straightforward string like ‘Hello World’ is converted into an object in PowerShell, enabling users to act upon it. For instance, inputting the command ‘hello world’.Length will return 11, demonstrating the string length.
The string ‘Hello World’ is considered an object in PowerShell, allowing for various actions and retrievals of information through pipes and Get-Member. Piping is performed by utilizing the “|” character to pass the results of the preceding input to the subsequent command. When ‘Hello World’ is piped to Get-Member, the object type is revealed as System.String, along with a list of its associated methods and properties.
Executing Methods and Understanding Objects
To execute a method on an object, it is necessary to append a dot followed by the method name after the object, for example, ‘Hello World’.ToUpper. However, to execute it correctly, a pair of parentheses is required after the method name, and occasionally, varying values can be included within these parentheses to incorporate overload options.
Exploring the Get-Member command showcases its utility in revealing the properties and methods contained within an object, making it an indispensable tool in PowerShell. With the knowledge of these basics, users can experiment and explore further functionalities of PowerShell, learning more about the capabilities and utilities it offers.
Detailed Exploration of Object Types and Method Application
Each object in PowerShell is associated with numerous methods and properties, and users can explore these by adding a dot after the object name and specifying the desired method or property. This is crucial for understanding the various possibilities and actions that can be performed on an object, enabling users to utilize PowerShell more effectively.
Practical Learning and Exploration
Through hands-on experience and experimentation, users can delve deeper into the intricate workings of PowerShell, discovering its extensive capabilities and learning how to harness them efficiently. Practical learning provides insights into the numerous functionalities of PowerShell, from simple string manipulations to advanced environmental customizations.
Exploring Ping vs. Test-Connection: Unveiling the Power of PowerShell Networking Tools
When it comes to network diagnostics and troubleshooting in PowerShell, two go-to commands are ‘Ping’ and ‘Test-Connection.’ While ‘Ping’ is undoubtedly a household name for anyone dealing with network issues, ‘Test-Connection’ offers a deeper dive into network testing capabilities. Let’s embark on a journey to understand the nuances and potentials of these commands.
Ping: A Familiar Friend
Ping, a widely known utility, serves as the initial tool to check network connectivity. By typing ‘Ping Google.com’ into your PowerShell terminal, you can initiate a simple connection test to the Google server. This provides a quick insight into whether you can reach Google’s servers or not. But let’s not stop there; there’s more to explore.
Tips for Effective Pinging:
- Specify the number of packets to send using the ‘-n’ option: Ping Google.com -n 5 sends five packets for more reliable results;
- Understand response times: Analyze the ‘Round-Trip Time’ to gauge network performance;
- Use ‘-t’ for continuous pinging: Ping Google.com -t allows you to continuously monitor the connection.
Test-Connection: The Powerhouse of Network Testing
Now, let’s shift our focus to the versatile ‘Test-Connection’ command. Executing ‘Test-Connection Google.com’ will reveal a richer set of information compared to ‘Ping.’ This includes details on packet loss, response times, and more. But what makes ‘Test-Connection’ stand out?
Unveiling the Power of Test-Connection:
- Accessing Help: To unlock the full potential of ‘Test-Connection,’ use ‘Get-Help Test-Connection.’ It provides insights into various options and functionalities;
- Updating Help Files: If you encounter missing help files, run PowerShell as Administrator and execute ‘Update-Help’ to ensure you have the latest guidance;
- Utilizing ‘-ComputerName’ Parameter: This parameter accepts strings or string arrays, enabling you to test multiple hosts simultaneously.
Harnessing the ‘-ComputerName’ Parameter:
To test multiple hosts efficiently, create a string array using the following command:
[System.Collections.ArrayList]$testArray = @()Add hosts to the array:
$testArray.Add('192.168.1.1')
$testArray.Add('google.com')
$testArray.Add('qwertyuiop.asdf')
To prevent index output, pipe the ‘Add’ method to ‘Out-Null’:
$testArray.Add('yahoo.com') | Out-NullTo display array values, use:
$testArrayExecute ‘Test-Connection’ with your array:
Test-Connection -ComputerName $testArrayAdding Conditional Logic:
You can use ‘Test-Connection’ within conditional statements, such as:
if (Test-Connection Google.com) {Write-Host "Success!"}This script block will execute if ‘Test-Connection Google.com’ returns true, allowing you to automate actions based on network status.
Customizing Your PowerShell Environment: A Comprehensive Guide
Are you ready to transform your PowerShell console into a personalized powerhouse? Let’s dive into the exciting world of customizing your PowerShell environment, from tweaking the appearance to fine-tuning your user profile for a seamless experience.
Customize Your Environment Appearance
Your PowerShell environment doesn’t have to be dull and monotonous. With a few simple steps, you can tailor it to your preferences:
- Open PowerShell Console: Begin by opening your PowerShell console. You can do this by searching for “PowerShell” in the Windows search bar or by pressing Windows Key + X and selecting “Windows Terminal” or “Windows PowerShell.”;
- Access Properties: Once your console is open, right-click on the title bar at the top of the window. This will reveal a menu with various options;
- Select Properties: Click on “Properties” from the menu to access the customization options;
- Font Customization: Inside the Properties window, navigate to the “Font” tab. Here, you can adjust the font style and size to your liking. Choose a font that enhances readability during your PowerShell sessions;
- Color Customization: Next, move to the “Colors” tab. This is where you can unleash your creativity. Customize the foreground and background colors to create a visually appealing and distinctive PowerShell console;
- Save Your Settings: Once you’re satisfied with your customizations, make sure to save your settings. You can now enjoy a personalized and visually pleasing PowerShell environment every time you open it.
Customizing Your Profile for a Tailored Experience
PowerShell’s profile files allow you to automate tasks and personalize your console’s behavior. Let’s explore how to customize your user profile:
- Understanding Profile Files: PowerShell uses profile files to load scripts automatically when you start the console. These profiles can vary depending on the host, but we’ll focus on the user profile across all hosts;
- Check Your Profile: To view your current user profile for all hosts, use the $profile.CurrentUserAllHosts command. It will provide you with the path to your profile script;
- Create the Profile: If your profile doesn’t exist yet, you can create it using the following commands;
- New-Item -Path C:\Users\<YourUsername>\Documents\ -ItemType Directory -Name WindowsPowerShell;
- New-Item -Path C:\Users\<YourUsername>\Documents\WindowsPowerShell\ -ItemType File -Name profile.ps1;
- Replace <YourUsername> with your actual Windows username.
Automate Profile Creation: For a quick and automated setup, use the following commands, which dynamically detect your user profile path:
New-Item -Path "$((Get-ChildItem ENV:\UserProfile).Value)\Documents\" -ItemType Directory -Name WindowsPowerShell
New-Item -Path "$((Get-ChildItem
ENV:\UserProfile).Value)\Documents\WindowsPowerShell” -ItemType File -Name profile.ps1
Edit Your Profile: To open and edit your profile file, use the Start-Process cmdlet:
Start-Process $profile.CurrentUserAllHostsCustomize Your Profile Script: Now, you can add custom code to your profile.ps1 file. Here’s an example to get you started:
$foregroundColor = 'white'
$time = Get-Date
$psVersion = $host.Version.Major
$curUser = (Get-ChildItem Env:\USERNAME).Value
$curComp = (Get-ChildItem Env:\COMPUTERNAME).Value

# Customized welcome message
Write-Host "Greetings, $curUser!" -foregroundColor $foregroundColor
Write-Host "It is: $($time.ToLongDateString())"
Write-Host "You're running PowerShell version: $psVersion" -foregroundColor Green
Write-Host "Your computer name is: $curComp" -foregroundColor Green
Write-Host "Happy scripting!" `n

# Customized prompt function
function Prompt {
    $curtime = Get-Date

    Write-Host -NoNewLine "p" -foregroundColor $foregroundColor
    Write-Host -NoNewLine "$" -foregroundColor Green
    Write-Host -NoNewLine "[" -foregroundColor Yellow
    Write-Host -NoNewLine ("{0}" -f (Get-Date)) -foregroundColor $foregroundColor
    Write-Host -NoNewLine "]" -foregroundColor Yellow
    Write-Host -NoNewLine ">" -foregroundColor Red

    $host.UI.RawUI.WindowTitle = "PS >> User: $curUser >> Current DIR: $((Get-Location).Path)"

    Return " "
}
Save and Restart: Once you’ve added your customizations, save the profile.ps1 file and close your PowerShell console. Reopen it to see the changes take effect.
Conclusion
Now, every time you use PowerShell, your customized profile script will enhance your experience by displaying personalized greetings, information, and an eye-catching prompt. Your PowerShell environment is uniquely yours, reflecting your style and preferences. Enjoy scripting in style!
The post Tailoring Your PowerShell Experience appeared first on Powercmd.
]]>The post Effortless Setup: Installing ElvUI in 2018 appeared first on Powercmd.
]]>In this comprehensive guide, we will walk you through the process of installing ElvUI in the year 2018. While the WoW landscape may have evolved since then, this guide will serve as a valuable resource for those who prefer to experience the game as it was during that period. Whether you’re a returning player looking to refresh your UI or a new player eager to explore the world of Azeroth with a polished and functional interface, this step-by-step tutorial will ensure you have ElvUI up and running in no time. Let’s dive in and unlock the potential of this beloved enhancement!
Utilizing the Module Effectively
Navigating and leveraging the functionality of the module is designed to be user-friendly and straightforward, allowing individuals with varying levels of technical proficiency to interact with it with ease.
1. Assessing for Updates without Installation
To merely verify whether any new updates are available without executing the installation, the following command is to be used:
Invoke-ElvUICheck -OnlyCheck -Verbose
This command allows users to be well-informed of the availability of any potential enhancements or fixes without necessarily modifying the existing setup, allowing for informed decision-making regarding the installation of updates.
2. Reviewing and Updating as Necessary
When a user wishes to check for updates and is amenable to installing them if available, the command below should be applied:
Invoke-ElvUICheck -Verbose
This operation not only checks for available updates but also installs them, ensuring the module is always up-to-date with the latest features and optimizations, thereby maintaining its effectiveness and reliability.
3. Installing if Absent
In circumstances where the module is not present, it can be conveniently installed using the following command:
Invoke-ElvUICheck -InstallIfDoesntExist -VerboseThis command ensures the availability of the module, enabling users to benefit from its features even if it was initially absent, ensuring seamless access to its utilities.
Contributing Thoughts and Solutions
Users are encouraged to actively participate by sharing their thoughts, suggestions, and creative ideas to enhance the module’s functionality and user experience. Contributions are not only welcomed but are crucial in refining and expanding the module’s capabilities and addressing the diverse needs of the user base.
Addressing Concerns and Queries
For any issues encountered or clarifications needed, users are encouraged to reach out and communicate their concerns. Providing feedback on any challenges faced or discrepancies noticed is imperative in refining the tool and fostering an environment of continuous improvement and user satisfaction.
This module aims to be versatile, user-friendly, and efficient, striving to cater to the varied needs of its users by maintaining an open channel for communication and feedback. Thus, whether it’s a technical glitch, a suggestion for improvement, or a novel idea, users are urged to convey their thoughts to ensure the optimal evolution of the module, allowing it to be more valuable and beneficial for the wider community.
Exploring the Depths of Module Functionality
Welcome to a deep dive into the fascinating world of module functionality. This module serves a dual purpose – it not only aids in streamlining tasks but also empowers users to create Pester tests with ease. As we delve deeper into this, you can explore the code and tests by visiting the dedicated GitHub repository for this module.
Invoke-Pester Output
When you invoke Pester tests in the folder associated with this module, you’ll encounter essential information and validation. The results are well-organized and include:
- pester.PNG: Visual representation of test results;
- Get-WowInstallPath.tests.ps1: A test file with basic tests to ensure the correctness of the code.
In the Get-WowInstallPath.tests.ps1 file, we employ Pester’s capabilities to validate the paths returned by the functions. This is crucial for ensuring the reliability of the module’s core functionality.
Let’s break down what’s happening in the tests:
Get-WowInstallPath Function
The Get-WowInstallPath function is pivotal in discovering the World of Warcraft (WoW) installation path. While currently, it uses the Windows registry for this purpose, future Mac support will introduce a different approach. Here’s a snippet of the code:
function Get-WoWInstallPath {
    [cmdletbinding()]
    param(

    )

    Write-Verbose "Attempting to find WoW install path..."

    try {
        # Code to retrieve WoW install path
        # ...
        return $wowInstallInfo
    }
    catch {
        # Error handling
        # ...
    }
}
This function returns both the WoW install path and the location of the addons folder, which is vital for modding enthusiasts.
Finding ElvUI Version
The module also excels at determining the version number of ElvUI, a popular World of Warcraft user interface modification. This is achieved through two distinct methods: remote and local.
Remote (Get-RemoteElvUiVersion)
The remote method utilizes web scraping with Invoke-WebRequest to extract ElvUI version information from the official website. Although this method may be susceptible to changes on the website, it currently works effectively. Here’s a look at the code:

function Get-RemoteElvUiVersion {
    [cmdletbinding()]
    param(

    )

    try {
        # Code for remote version retrieval
        # ...
        return $remoteElvInfo
    }
    catch {
        # Error handling
        # ...
    }
}
This function provides details such as the filename, version, and a download link for the latest ElvUI version.
Local (Get-LocalElvUiVersion)
The local version check, on the other hand, examines the contents of the ElvUI.toc file within the addons folder. It meticulously searches for the ‘## Version’ line and extracts the version number. The robust error handling ensures issues are promptly identified. Here’s the code snippet:
function Get-LocalElvUiVersion {
    [cmdletbinding()]
    param(
        [string]
        $addonsFolder
    )

    [double]$localVersion = 0.0

    if ((Test-Path $addonsFolder)) {
        try {
            # Code for local version retrieval
            # ...
            return $localVersion
        }
        catch [System.Management.Automation.ItemNotFoundException] {
            # Error handling
            # ...
        }
        catch {
            # Error handling
            # ...
        }
    } else {
        throw "Unable to access WoW addon folder [$addonsFolder]!"
    }
}
This function ensures that even without an internet connection, you can reliably obtain the ElvUI version.
Conclusion
If you’ve made it this far, your interest in understanding the intricacies of this module is much appreciated! If you crave more in-depth insights into its inner workings or have specific questions, don’t hesitate to leave a comment. Your feedback fuels further exploration and refinement of this powerful tool. Happy coding!
The post Effortless Setup: Installing ElvUI in 2018 appeared first on Powercmd.
]]>The post Unleash the Power of Web Requests with Invoke-WebRequest appeared first on Powercmd.
]]>Invoke-WebRequest, often hailed as a hidden gem within the PowerShell arsenal, is a versatile cmdlet that opens a gateway to the World Wide Web from the comfort of your command line. This powerful tool equips you with the capability to retrieve web content, interact with REST APIs, scrape data from websites, and even perform web-based authentication, all within the familiar environment of PowerShell.
As we delve into this comprehensive guide, we will uncover the intricacies of Invoke-WebRequest, exploring its myriad applications, tips, and tricks. Whether you’re seeking to automate repetitive web-related tasks, extract valuable data from online sources, or enhance your web development toolkit, this article will serve as your essential companion on your journey to mastering Invoke-WebRequest. So, fasten your seatbelts, as we embark on a fascinating journey through the digital realm.
Downloading a File: A Step-by-Step Guide for Tech Enthusiasts
So, you’re eager to download a file, and in this thrilling example, we’re diving into the world of World of Warcraft to grab the ElvUI addon. But here’s the twist – we’re going to do it with some PowerShell magic!
PowerShell Setup:
First things first, we need to set up PowerShell to work its wonders. We’ll fetch the download link using Invoke-WebRequest:
$downloadURL = 'http://www.tukui.org/dl.php'
$downloadRequest = Invoke-WebRequest -Uri $downloadURL
Now, let’s break down what’s happening here. We set the $downloadURL variable to hold the URL of the webpage we want to visit. Then, we use $downloadRequest to store the results of the Invoke-WebRequest cmdlet, fetching the page content from the given URL.
Exploring the Content:
Before we proceed further, let’s take a peek into what’s inside $downloadRequest. It’s like unwrapping a treasure chest! We’ll initially focus on the Links property, which conveniently holds all the links found on the website:
$downloadRequest.LinksThis is a goldmine for us, as it makes parsing through links a breeze. But wait, there’s more to uncover!
Hunting for ElvUI:
Now, let’s embark on a quest to find the ElvUI download link hidden among the myriad of links. To do this, we’ll filter the links using Where-Object and look for those containing keywords like “Elv” and “Download”:
$elvLink = ($downloadRequest.Links | Where-Object {$_ -like '*elv*' -and $_ -like '*download*'}).hrefBingo! We’ve tracked down the elusive ElvUI download link and stored it in the $elvLink variable. Victory is within reach!
Two Ways to Download:
Now, the time has come to claim your prize. There are two methods at your disposal:
Method 1: Using Contents Property
In this approach, we’ll use Invoke-WebRequest to fetch the file’s content and then write all the bytes to a file. It goes like this:
$fileName = $elvLink.Substring($elvLink.LastIndexOf('/')+1)
$downloadRequest = Invoke-WebRequest -Uri $elvLink
$fileContents = $downloadRequest.Content
The code above extracts the file name from the link and stores the content in the $fileContents variable. But we’re not done yet.
To complete the mission, we need to write those precious bytes to a file using [io.file]::WriteAllBytes:
[io.file]::WriteAllBytes("c:\download\$fileName",$fileContents)Method 2: Using -OutFile Parameter
Alternatively, you can opt for a more streamlined approach by using the -OutFile parameter with Invoke-WebRequest. Here’s how:
$fileName = $elvLink.Substring($elvLink.LastIndexOf('/')+1)
$downloadRequest = Invoke-WebRequest -Uri $elvLink -OutFile "C:\download\$fileName" -PassThru
Don’t forget to add -PassThru if you want to retain the request results in the $downloadRequest variable.
Success! You’ve Got the File:
Now, the moment of truth! Run the code, and voilà! You should now find the downloaded file nestled comfortably in “C:\download”.
A Word of Validation:
The $downloadRequest variable holds the results of the request. You can use this to verify that everything went according to plan. Always a handy tool for a tech-savvy adventurer.
Exploring File Downloads with Redirects
Downloading files from websites that employ redirects can be a bit of a puzzle. Today, we’ll use the example of downloading WinPython to uncover the secrets behind dealing with these redirects. We’ll walk you through the process, step by step.
Understanding Invoke-WebRequest Parameters
Before we dive into the code, let’s dissect some key parameters of the Invoke-WebRequest cmdlet:
- MaximumRedirection 0: This nifty parameter prevents automatic redirection. Setting it to zero allows us to manually manage redirection data;
- ErrorAction SilentlyContinue: By using this, we’re telling PowerShell to overlook redirection errors. However, keep in mind that this might hide other potential errors. It’s the price we pay for keeping our data tidy in the $downloadRequest variable;
- UserAgent [Microsoft.PowerShell.Commands.PSUserAgent]::FireFox: Including this parameter sends along a user agent string for FireFox, making the download possible on certain websites where it otherwise might not work.
The Initial Code
Here’s the initial setup:
$downloadURL     = 'https://sourceforge.net/projects/winpython/files/latest/download?source=frontpage&position=4'
$downloadRequest = Invoke-WebRequest -Uri $downloadURL -MaximumRedirection 0 -UserAgent [Microsoft.PowerShell.Commands.PSUserAgent]::FireFox -ErrorAction SilentlyContinue
Now, let’s break down the code further:
1. Retrieving the Redirect Link
The status description should ideally be “Found.” This tells us that there’s a redirect link stored in the header information, accessible via $downloadRequest.Headers.Location. If it’s found, we proceed.
2. Extracting the File Name
We delve into the content property and extract the file name. The $fileName variable uses Select-String to locate a string that matches the pattern ‘WinPython-.+exe’. This gives us the file name we’re after.
Adding Logic for Unexpected Responses
To handle unexpected responses, we’ve included a couple of Switch statements:
Switch ($downloadRequest.StatusDescription) {
    'Found' {
        # Code for handling redirection
    }
    Default {
        # Code for handling unexpected status descriptions
    }
}

Switch ($downloadRequest.BaseResponse.ContentType) {
    'application/octet-stream' {
        # Code for handling downloadable content
    }
    Default {
        # Code for handling unexpected content types
    }
}
Now, let’s run the full code, and we’ll check ‘C:\download’ to verify the results!
Tracking the Progress
While the download is in progress, a progress indicator will be displayed. Please note that sometimes it may not accurately represent the actual progress.
Upon completion, we’ve successfully downloaded all 277MB of WinPython and saved it to the appropriate location. You’ve successfully navigated the maze of redirects and emerged victorious!
Exploring Web Content with PowerShell’s Invoke-WebRequest
When working with web content in PowerShell, the Invoke-WebRequest cmdlet becomes your trusty sidekick. It allows you to fetch data from websites and interact with it programmatically. In this guide, we will dive into the intricacies of parsing web content using Invoke-WebRequest and show you how to extract valuable information. Our primary focus will be on the PowerShell subreddit, where we’ll gather post titles and their associated links. Let’s embark on this journey step by step.
Setting Up Your Web Request
Before we delve into parsing, we need to establish a connection with the target website. In our case, it’s the PowerShell subreddit. We define the URL we want to work with and use Invoke-WebRequest to fetch its content. Here’s how you set it up:
$parseURL = 'http://www.reddit.com/r/powershell'
$webRequest = Invoke-WebRequest -Uri $parseURL
Now that we have the web content, let’s examine the $webRequest variable. It holds a wealth of information that we can explore to our advantage.
Inspecting the Web Content
- RawContent: This property gives us the content in its raw form, including header data. Useful when you need to analyze the complete response from the server;
- Forms: Discover any forms present on the web page. This will be crucial when dealing with interactive websites that require user input;
- Headers: This property contains just the returned header information. Useful for examining the metadata associated with the web page;
- Images: If there are images on the page, this property stores them. Valuable for scraping images from websites;
- InputFields: Identify any input fields found on the website. This is crucial for interacting with web forms;
- Links: Extract all the links found on the website. It’s provided in an easy-to-iterate format, making it handy for navigating through linked content;
- ParsedHTML: This property opens the door to the Document Object Model (DOM) of the web page. The DOM is a structured representation of the data on the website. Think of it as a virtual blueprint of the web page’s elements.
To explore these properties further and uncover more hidden gems, you can use the Get-Member cmdlet. However, for the scope of this article, we’ll concentrate on the properties mentioned above.
Digging Deeper with ParsedHTML
Our main objective is to extract titles and links from the PowerShell subreddit. To accomplish this, we need to interact with the DOM, and the ParsedHTML property provides us with the means to do so. Let’s proceed step by step:
Identifying the Elements: To extract the titles and links, we need to identify the HTML elements that contain this information. Using browser developer tools (like Edge’s F12), we can inspect the web page and determine that the titles are enclosed in a <p> tag with the class “title.”
Accessing the DOM: We can use PowerShell to access the DOM and search for all instances of <p> tags with the “title” class. Here’s how you can do it:
$titles = $webRequest.ParsedHTML.getElementsByTagName('p') | Where-Object {$_.ClassName -eq 'title'}This code retrieves all the elements that match our criteria and stores them in the $titles variable.
Extracting Text: To verify that we have captured the title information, we can extract the text from these elements:
$titles | Select-Object -ExpandProperty OuterTextThis will display the titles of the posts on the PowerShell subreddit.
Extracting Titles from Web Content: A PowerShell Solution
Step 1: Retrieving Titles
One of the initial challenges is obtaining the titles while excluding any appended text, such as “(self.PowerShell).” Here’s how we can tackle this issue:
- We start by utilizing a web request object, $webRequest, to retrieve the web content;
- We use the getElementsByTagName(‘p’) method to target HTML elements of type ‘p.’;
- To filter only the titles, we employ the Where-Object cmdlet, checking if the element’s class is ‘title.’
Now, let’s enhance this process further by performing the following steps:
- Initialize variables like $splitTitle, $splitCount, and $fixedTitle for better code organization;
- Split the title into an array using whitespace as the delimiter ($splitTitle);
- Determine the number of elements in the array ($splitCount);
- Nullify the last element in the array, effectively removing the unwanted text;
- Join the array back together and trim any extra whitespace to obtain the cleaned title.
This approach allows us to obtain titles without extraneous information, ensuring the accuracy and usefulness of the extracted data.
Step 2: Matching Titles with Links
With the titles successfully retrieved, our next objective is to associate each title with its corresponding link. Here’s how we can achieve this:
- Upon inspecting the web content, we discover that the outerText property of the links matches our titles stored in $titles;
- We create a custom object that includes an index, title, and link for each matched pair.
To facilitate this process, we need to perform some string manipulation on the links to extract the URL and ensure it’s properly formatted. Follow these steps:
- Initialize an index variable $i to ensure proper iteration;
- Create a .NET ArrayList to store our custom objects, named $prettyLinks;
- Iterate through each title in the $titles array;
- For each title, search through the Links property of $webRequest to find matching titles;
- Perform the necessary string manipulations to extract and format the link URL;
- Create a custom object containing the index, title, and link;
- Add the custom object to the $prettyLinks array;
- This approach results in a well-structured array of custom objects that pair titles with their corresponding links, providing a cohesive and organized dataset.
Now, let’s take a closer look at the code and the contents of the $prettyLinks variable to observe the successful execution of our solution.
Insightful Exploration of Object and Data Utility
The given object is laden with potential, extending a versatile range of functionalities and utilities. This attribute of availability presents a myriad of possibilities on the effective use and manipulation of the attached information. The object can be tailored, manipulated, and applied in multiple domains, enabling users to harness its capacities to meet diverse needs and resolve a spectrum of issues. The myriad implications of the object span across various fields, demonstrating its inherent adaptability and the potential to unlock new dimensions of information processing.
A Glimpse into Practical Implementation
For those who are curious about leveraging the object’s capabilities, below is an illustrative example showcasing how one might deploy the provided code:
$browsing = $true

While ($browsing) {
    $selection = $null
    Write-Host "Choose a [#] from the list of titles below!"`n -ForegroundColor Black -BackgroundColor Green

    ForEach ($element in $elegantLinks) {
        Write-Host "[$($element.Index)] $($element.Title)"`n
    }

    Try {
        [int]$selection = Read-Host 'Indicate your choice with [#]. To exit, press "q"'

        if ($selection -lt $elegantLinks.Count) {
            Start-Process $elegantLinks[$selection].Link
        } else {
            $browsing = $false
            Write-Host 'Invalid option or "q" selected, browsing terminated!' -ForegroundColor Red -BackgroundColor DarkBlue
        }
    }

    Catch {
        $browsing = $false
        Write-Host 'Invalid option or "q" selected, browsing terminated!' -ForegroundColor Red -BackgroundColor DarkBlue
    }
}
This illustrative snippet is engineered to perpetuate a loop until the user opts to exit by entering “q” or selecting an invalid option. It meticulously enumerates all available titles, prompting the user to specify the desired one by its associated number. Upon receiving the input, it initiates the default web browser, navigating directly to the corresponding link of the selected title.
Versatile Applications of the Data
This instance is merely a fragment of the plethora of applications and implementations available. A series of screenshots have been provided to visually represent the dynamic functionality and diverse applications of the code in real-time scenarios. These visual aids serve to depict the multifaceted nature of the object and how it can be seamlessly integrated into different domains to extract value and solve complex problems.
User Interaction Examples
Example 1:
- User Input: 17;
- Outcome: The process is initiated successfully, rendering the expected outcome.
Example 2:
- User Input: q;
- Outcome: The system recognizes the termination command, and the browsing session is concluded gracefully.
Understanding Form Handling with Invoke-WebRequest
Working with web forms using PowerShell’s Invoke-WebRequest offers a powerful way to interact with websites, automate tasks, and extract valuable information. In this guide, we’ll delve into the world of web forms and demonstrate how to harness their potential. We’ll use an example involving Reddit to illustrate each step comprehensively.
1. Retrieving Web Forms
When you visit a web page, there are often forms waiting to be filled out and submitted. Invoke-WebRequest allows us to interact with these forms programmatically. To begin, let’s explore how to obtain and manipulate these forms.
$webRequest = Invoke-WebRequest 'http://www.reddit.com'
$searchForm = $webRequest.Forms[0]
$webRequest stores the content of the Reddit homepage.
$webRequest.Forms contains an array of forms present on the page.
$searchForm now holds the specific form we're interested in.
2. Understanding Form Properties
Forms have essential properties that guide our interactions. Knowing these properties is key to effectively working with web forms:
- Method: This property dictates how the request should be sent. Common methods are GET and POST;
- Action: It specifies the URL where the request is sent. Sometimes it’s a full URL; other times, it’s a part we need to combine with the main URL;
- Fields: This is a hash table containing the data we want to submit in the request.
Let’s inspect these properties for our $searchForm:
$searchForm.Method
$searchForm.Action
$searchForm.Fields
3. Modifying Form Data
Once we’ve identified the form and its properties, we can manipulate its data. For instance, if we want to search Reddit for “PowerShell,” we can set the “q” field like this:
$searchForm.Fields.q = 'PowerShell'It’s crucial to double-check our modifications to ensure they are as intended:
$searchForm.Fields4. Sending the Request
Now, let’s format our request and initiate the Reddit search:
$searchReddit = Invoke-WebRequest -Uri $searchForm.Action -Method $searchForm.Method -Body $searchForm.FieldsBreaking down the request:
- Uri: We use $searchForm.Action to specify the full URL;
- Method: We utilize $searchForm.Method to ensure we use the correct HTTP method, as specified by the form;
- Body: We employ $searchForm.Fields to send the data as key-value pairs, in this case, “q” = “PowerShell.”
5. Validating and Parsing Results
With the search request completed, we can validate the data and even extract specific information from the results. For instance, to retrieve links from the search results:
$searchReddit.Links | Where-Object {$_.Class -eq 'search-title may-blank'} | Select-Object InnerText, HrefThis code filters the links with the specified class and extracts their inner text and URLs.
6. Complete Example
Here’s the entire code example for searching Reddit with PowerShell:
$webRequest          = Invoke-WebRequest 'http://www.reddit.com'
$searchForm          = $webRequest.Forms[0]
$searchForm.Fields.q = 'PowerShell'
$searchReddit        = Invoke-WebRequest -Uri $searchForm.Action -Method $searchForm.Method -Body $searchForm.Fields

$searchReddit.Links | Where-Object {$_.Class -eq 'search-title may-blank'} | Select-Object InnerText, Href
By following these steps, you can harness the power of Invoke-WebRequest to automate web interactions, gather data, and streamline your workflow. Experiment with different websites and forms to unlock endless possibilities for automation and information retrieval.
Accessing Websites through Scripted Login Procedures
Employing Invoke-WebRequest proves instrumental in scripting access to various websites, enabling automated interaction with web resources. This methodological approach entails a few essential steps, to ensure smooth and effective execution. Below is a comprehensive guide on these steps, designed to assist users in creating, refining, and utilizing scripted login procedures.
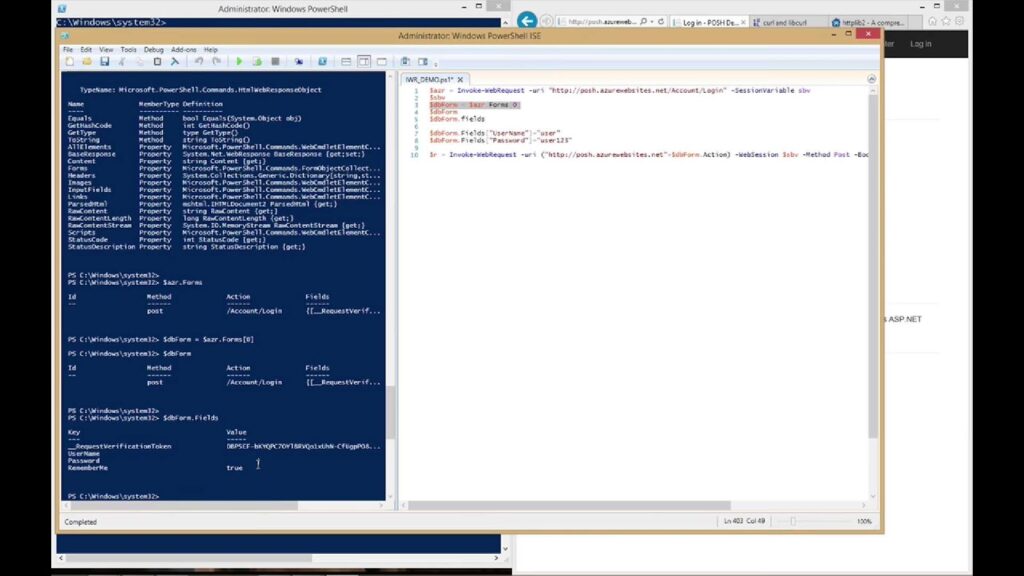
1. Employing an Appropriate User Agent
Typically, setting the userAgent to Firefox is highly recommended. Even though this step isn’t mandatory for every website, adopting it promotes the secure and general compatibility of scripts with various sites, mitigating the risk of access denial due to unrecognized or unsupported user agents. Firefox is widely accepted and recognized by a myriad of websites, ensuring a higher success rate during scripted interactions.
2. Initializing a Session Variable
The utilization of the sessionVariable parameter is pivotal, as it facilitates the creation of a variable responsible for maintaining the session and storing cookies. This ensures the persistence of the session throughout the interaction, allowing seamless navigation and transaction between different sections or pages of the website without the need to repeatedly login. Proper session management is crucial for automation scripts, especially when dealing with websites that have complex navigation structures and stringent session policies.
3. Form Population with Login Details
The correct form needs to be identified and populated with the necessary login details. The credentials can be securely stored in the $credential variable through the Get-Credential command. For instance, if one is to interact with Reddit, the credentials can be stored as follows:
$credential = Get-Credential
$uaString   = [Microsoft.PowerShell.Commands.PSUserAgent]::FireFox
$webRequest = Invoke-WebRequest -Uri 'www.reddit.com' -SessionVariable webSession -UserAgent $uaString
Important Remark
While utilizing the -SessionVariable parameter, the “$” symbol should not be included in the variable name. This is crucial to avoid syntax errors and ensure the proper functioning of the script.
4. Identification and Utilization of Correct Forms
The $webRequest.Forms command is used to access all forms on the website. Identifying the correct form is vital for successful login. For example, the ID of the needed form on Reddit is “login_login-main.” This knowledge enables the extraction of the specific form as shown below:
$loginForm = $webRequest.Forms | Where-Object {$_.Id -eq 'login_login-main'}5. Verification of the LoginForm Fields
After acquiring the desired form, verifying $loginForm.Fields is essential to confirm its relevance and to discern the properties that need to be set. Thorough verification ensures that the scripts interact with the correct elements on the page, preventing errors and unintended consequences during execution. It also helps in understanding the structure of the form, facilitating the accurate population of the required fields with the appropriate values.
Setting Up and Logging In to a Website Using PowerShell
In this comprehensive guide, we’ll walk you through the process of setting up and logging in to a website using PowerShell. We’ll use practical code examples to illustrate each step. By the end of this tutorial, you’ll have a clear understanding of how to automate website logins using PowerShell.
Step 1: Storing Credentials
First, let’s store the login credentials in a secure manner. This ensures that sensitive information, such as the username and password, remains protected. To do this, we use the Get-Credential cmdlet.
$credential = Get-CredentialTip: For added security, consider exporting your credentials to an XML file and importing them when needed.
Step 2: Setting User Agent
To mimic a web browser, we’ll set the User Agent string to simulate a Firefox browser. This is done using the [Microsoft.PowerShell.Commands.PSUserAgent]::FireFox string.
$uaString = [Microsoft.PowerShell.Commands.PSUserAgent]::FireFoxStep 3: Initial Web Request
Now, let’s initiate a web request to the target website, in this case, ‘www.reddit.com’. We create a session variable, $webSession, to store cookies for the current session.
$webRequest = Invoke-WebRequest -Uri 'www.reddit.com' -SessionVariable webSession -UserAgent $uaStringInsight: This initial request sets up a session for maintaining state information, including cookies.
Step 4: Gathering Login Form Details
To log in, we need to locate and gather details about the login form on the website. We do this by inspecting the HTML and identifying the form’s unique identifier, in this case, ‘login_login-main’.
$loginForm = $webRequest.Forms | Where-Object {$_.Id -eq 'login_login-main'}Step 5: Populating User and Password Fields
To populate the user and password fields of the login form, we assign the values from the $credential variable.
$loginForm.Fields.user = $credential.UserName
$loginForm.Fields.passwd = $credential.GetNetworkCredential().Password
Caution: Storing the password in the hash table as plain text is not recommended for security reasons. Consider more secure methods for handling passwords in production code.
Step 6: Attempting Login
Now, we’re ready to attempt the login using the gathered information and the web session we established.
$webRequest = Invoke-WebRequest -Uri $loginForm.Action -Method $loginForm.Method -Body $loginForm.Fields -WebSession $webSession -UserAgent $uaStringStep 7: Verifying Login
To verify if the login was successful, we check if the username appears in any of the web page’s links.
if ($webRequest.Links | Where-Object {$_ -like ('*' + $credential.UserName + '*')}) {
    Write-Host "Login verified!"
} else {
    Write-Host 'Login unsuccessful!' -ForegroundColor Red -BackgroundColor DarkBlue
}
Note: This verification method may vary depending on the website’s structure.
Step 8: Using the Authenticated Session
With a successful login, you now have an authenticated session stored in $webSession. You can use this session to browse or interact with the website further.
Conclusion
In conclusion, Invoke-WebRequest is a powerful cmdlet in PowerShell that plays a crucial role in enabling automation, data retrieval, and web interaction within the Windows environment. Throughout this article, we have explored the various capabilities and applications of Invoke-WebRequest, including its ability to send HTTP requests, retrieve web content, and interact with RESTful APIs. We’ve also delved into its essential parameters, such as headers, cookies, and authentication, which allow for fine-grained control over web interactions.
As we’ve seen, Invoke-WebRequest is a versatile tool that can be used for a wide range of tasks, from web scraping and data extraction to monitoring and automating web-based workflows. Its integration with PowerShell makes it an invaluable asset for system administrators, developers, and IT professionals seeking to streamline their processes and access web resources efficiently.
To harness the full potential of Invoke-WebRequest, it’s essential to continue exploring its capabilities and experimenting with real-world scenarios. With a solid understanding of this cmdlet, users can unlock new possibilities in their PowerShell scripts and automate web-related tasks with ease. As technology evolves, Invoke-WebRequest remains a reliable and essential component of the PowerShell toolkit, helping users navigate the ever-expanding web-driven landscape of modern computing.
The post Unleash the Power of Web Requests with Invoke-WebRequest appeared first on Powercmd.
]]>The post PowerShell ValidateSet: Dive into Parameter Validation appeared first on Powercmd.
]]>Why Use ValidateSet?
Imagine you’re crafting a PowerShell script, and you want to ensure that a particular parameter accepts only a specific set of values. This is where ValidateSet shines. It not only enforces input constraints but also enhances user experience by offering auto-suggestions as users tab through the options.
Here are scenarios where ValidateSet proves invaluable:
- Active Directory Operations: When working with scripts that interact with Active Directory, you often want to limit the choices for certain parameters, such as user roles or group names;
- API Integration: Scripts interfacing with APIs frequently require parameters that accept a predefined set of values, ensuring compatibility with the external service;
- Web Parsing: In web scraping or parsing scripts, you might want to restrict options for parameters like data sources, output formats, or specific parsing modes;
- Enhanced Script Clarity: By offloading logic to parameter validation, you can streamline your script, making it more readable and easier to maintain. Additionally, it simplifies error handling by providing predefined validation checks.
Using ValidateSet
Implementing ValidateSet is a breeze. You need to add a simple line above your parameter declaration like so:
| [ValidateSet(‘Option1’, ‘Option2’, ‘Option3’)] |
This declaration ensures that the input for the associated parameter is limited to the provided options. Let’s illustrate how it works with a straightforward function:
| function Write-Color { [cmdletbinding()] param( [Parameter(Mandatory)] [ValidateSet(‘Green’, ‘Blue’, ‘Red’)] [string] $color, $message ) Write-Host $message -ForegroundColor $color} |
In this example, the $color parameter is constrained to accept only three values: ‘Green,’ ‘Blue,’ or ‘Red.’
Here’s how you can use this function:
| Write-Color -color Blue -Message “Validate: Blue”Write-Color -color Red -Message “Validate: Red”Write-Color -color Green -Message “Validate: Green” |
As expected, the function works flawlessly for the specified color options.
Enhanced User Experience
A remarkable feature of ValidateSet is its ability to provide users with visual prompts. When you use a function with ValidateSet in an integrated scripting environment (ISE), you’ll notice that it generates a visual list of available options as you type. This dynamic feature significantly improves user interaction and minimizes input errors.
Moreover, when you’re working in the PowerShell console specify the -color parameter and then press the tab key, it auto-completes the available options. This not only saves time but also reduces the chances of input mistakes.
Limitations and Workarounds
While ValidateSet is a robust tool, it does have certain limitations that you should be aware of:
- Default Values: If you set a default value for a parameter outside the array of valid options, PowerShell won’t flag it as an error. For example, if you set a default color to ‘Black’ in our previous function, PowerShell won’t raise an error even though ‘Black’ is not in the ValidateSet. It’s essential to be cautious when setting defaults;
- Custom Error Messages: Another limitation is the inability to generate custom error messages within the function based on user input. However, you can address this by wrapping the function call in a Try/Catch block outside the function. This way, you can capture errors and execute specific error-handling code. Here’s an example:
| function Write-Color { [cmdletbinding()] param( [Parameter()] [ValidateSet(‘Green’, ‘Blue’, ‘Red’)] [string] $color, $message ) Write-Host $message -ForegroundColor $color} Try { Write-Color -color Yellow -message “This will not work!”}Catch [System.Management.Automation.ParameterBindingException] { $errorMessage = $_.Exception.Message Write-Host “Error: [$errorMessage]” -ForegroundColor Red -BackgroundColor DarkBlue # Add your custom error-handling code here} |
In this example, the custom error message captures the issue when an invalid color is provided.
Video Guide
To finally answer all your questions, we have prepared a special video for you. Enjoy watching it!
Taking Parameter Validation to the Next Level
In the previous sections, we explored the power of the ValidateSet attribute in PowerShell to constrain the input of a parameter to a predefined set of values. This simple yet effective technique can enhance your scripts in various scenarios. However, PowerShell offers more advanced parameter validation options to take your scripting skills to the next level.
Let’s delve into some additional parameter validation techniques that can help you build robust and user-friendly scripts.
- ValidatePattern: Using Regular Expressions
While ValidateSet restricts input to a predefined list, ValidatePattern allows you to use regular expressions for more flexible validation. Regular expressions are patterns used to match character combinations in strings. By incorporating regular expressions into your parameter validation, you can enforce complex input requirements.
Here’s a quick example of how to use ValidatePattern:
| function Validate-Email { [cmdletbinding()] param( [Parameter(Mandatory)] [ValidatePattern(“^\w+([-+.’]\w+)*@\w+([-.]\w+)*\.\w+([-.]\w+)*$”)] [string]$email ) Write-Host “Valid email address: $email”} |
In this example, we validate whether the provided input matches the pattern of a valid email address.
- ValidateRange: Enforcing Numeric Ranges
ValidateRange is particularly useful when dealing with numeric parameters. It allows you to specify a minimum and maximum value to constrain input within a specific range. This ensures that your script receives valid numeric input.
Here’s an example of using ValidateRange:
| function Validate-Age { [cmdletbinding()] param( [Parameter(Mandatory)] [ValidateRange(18, 99)] [int]$age ) Write-Host “Valid age: $age”} |
In this function, the age parameter is validated to ensure it falls within the range of 18 to 99.
- ValidateLength: Controlling String Length
When working with string parameters, you might want to enforce a specific length constraint. ValidateLength allows you to define the minimum and maximum length for string input.
Here’s an example:
| function Validate-Password { [cmdletbinding()] param( [Parameter(Mandatory)] [ValidateLength(8, 20)] [string]$password ) Write-Host “Valid password: $password”} |
This function ensures that the provided password string is between 8 and 20 characters long.
- ValidateScript: Custom Validation Logic
Sometimes, predefined validation attributes might not cover your specific validation needs. In such cases, you can use ValidateScript to provide custom validation logic using a script block.
Here’s an example:
| function Validate-Domain { [cmdletbinding()] param( [Parameter(Mandatory)] [ValidateScript({ if ($_ -match “^\w+\.(com|org|net)$”) { $true } else { throw “Invalid domain format: $_” } })] [string]$domain ) Write-Host “Valid domain: $domain”} |
In this function, we use a custom script block to validate whether the input matches a specific domain format.
Conclusion
PowerShell’s ValidateSet is a versatile and user-friendly feature that enhances the quality and usability of your scripts. By restricting parameter input to predefined values, you can minimize errors, improve script clarity, and create a more pleasant experience for users. While it has a few limitations, creative use of Try/Catch blocks can help you handle errors effectively. So, go ahead and incorporate ValidateSet into your PowerShell scripts to take full advantage of this powerful parameter validation tool.
Unleash the potential of ValidateSet in your PowerShell scripts, and watch your automation tasks become more robust and user-friendly. Happy scripting!
The post PowerShell ValidateSet: Dive into Parameter Validation appeared first on Powercmd.
]]>The post Mastering Error Handling: A Comprehensive Guide appeared first on Powercmd.
]]>Understanding PowerShell Errors
In PowerShell, errors are stored in the automatic variable $error. To get a count of errors encountered in your session, use $error.count. These errors are essentially an array, and you can access the first error with $error[0]. To delve deeper into the first error, you can use $error[0] | Get-Member. Here, we can inspect the command that caused the error via $error[0].InvocationInfo. The Line property within InvocationInfo contains the full command that triggered the error.
To access the exception that caused the error, you can use $error[0].Exception. Further details about the exception are available through $error[0].Exception | Get-Member. This information includes the TypeName, which becomes useful when handling specific errors. To obtain the exception’s message in string format, use $error[0].Exception.Message.
Types of Errors in PowerShell
Terminating Errors
Terminating errors indicate that the script cannot proceed due to encountered issues. Without error handling, these errors are displayed in the familiar red text, effectively halting the script’s execution. Terminating errors terminates pipeline output, except for the error message.
An example of a terminating error occurs when calling a non-existent command:
| Get-TerminatingError |
Non-Terminating Errors
In contrast, non-terminating errors do not stop the pipeline’s execution. PowerShell’s internal handling manages these errors, making them inaccessible for error handling. However, there are ways to force non-terminating errors to become terminating, allowing for error capture.
For instance, consider a non-terminating error like access denied to a subfolder when listing all folders and subfolders in “C:\Windows\appcompat”:
| Get-ChildItem -Path ‘C:\Windows\appcompat’ -Recurse |
Forcing Non-Terminating Errors to Terminate
There are methods to compel non-terminating errors to become terminating errors, enabling custom error handling. This feature is not always required, but can be handy when needed.
$ErrorActionPreference
At the session level, you can control non-terminating errors’ behavior using the $ErrorActionPreference variable, which offers various values:
- Stop: Display the error and halt execution;
- Inquire: Display the error and prompt to continue;
- Continue (Default): Display the error and continue execution;
- Suspend: Designed for workflows, suspends the job for investigation;
- Silently Continue: Suppresses error display and continues execution.
For example:
| Get-ChildItem -Path ‘C:\Windows\appcompat’ -Recurse; Write-Host ‘Test’ |
With non-terminating errors, the subsequent command is executed, resulting in ‘Test’ output. However, setting $ErrorActionPreference to ‘Stop’ transforms the non-terminating error into a terminating one:
| $ErrorActionPreference = ‘Stop’Get-ChildItem -Path ‘C:\Windows\appcompat’ -Recurse; Write-Host ‘Test’ |
Now, the next command doesn’t execute, showcasing the effectiveness of error handling.
Command’s -ErrorAction Parameter
Cmdlets, functions, scripts, and modules using [cmdletbinding()] enable the use of the -ErrorAction common parameter. This parameter allows you to specify actions when an error occurs, including:
- Stop: Display the error and halt execution;
- Inquire: Display the error and prompt to continue;
- Continue (Default): Display the error and continue execution;
- Suspend: Designed for workflows, suspends the job for investigation;
- SilentlyContinue: Suppresses error display and continues execution;
- Ignore: Similar to SilentlyContinue, but doesn’t add the message to the $error automatic variable.
Implementing Error Handling Strategies
Validation
The most straightforward method for handling errors is validation through conditional statements, like the if statement. Validation helps prevent errors before they occur.
| if (Get-ChildItem Z:\ -ErrorAction SilentlyContinue) { Write-Host ‘I can list the contents of Z!’} else { Write-Host ‘I cannot list the contents of Z!’} |
In this example, the -ErrorAction common parameter with the value SilentlyContinue suppresses the error display, allowing the if statement to perform validation.
You can also use variables with if statements to check for emptiness:
| $myVariable = $null if ($myVariable) { Write-Host “We have information! Let’s do stuff.”} else { Write-Host “`$myVariable is empty :(“} |
Try/Catch/Finally Blocks
Try, Catch, and Finally, blocks are essential for managing terminating errors effectively. They provide structured error handling:
- Try Block: Contains the code to execute;
- Catch Block: Handles exceptions and executes specific code when an error occurs. The current error is accessible through $_;
- Finally Block: Contains cleanup tasks and runs after the error event (optional).
| Try { $command = ‘Invoke-FakeCommand’ Write-Host “Attempting to run: [Invoke-Expression -Command $command]”`n Invoke-Expression -Command $command}Catch { Write-Host $_.Exception.Message`n}Finally { Write-Host “Clean up: `$command = `$null”`n $command = $null} |
The Try block executes the code, the Catch block handles the exception, and the Finally block performs cleanup.
Catch Specific Errors
To handle specific exceptions, specify the exception type in the Catch block. This allows you to customize error handling for different scenarios.
| Try { Get-ThisWontWork}Catch [System.Management.Automation.CommandNotFoundException] { Write-Host “Command not found!”`n -ForegroundColor Red Write-Host “Message: [$($_.Exception.Message)”] -ForegroundColor Red -BackgroundColor DarkBlue} |
In this example, a System.Management.Automation.CommandNotFoundException is caught, and specific actions are taken.
Get Detailed Error Information
Obtaining detailed error information is crucial for creating specific Catch blocks. A custom function can simplify this process:
| function Get-ErrorInformation { [cmdletbinding()] param($incomingError) if ($incomingError -and (($incomingError| Get-Member | Select-Object -ExpandProperty TypeName -Unique) -eq ‘System.Management.Automation.ErrorRecord’)) { Write-Host `n” Error information:”`n Write-Host `t”Exception type for catch: [$($IncomingError.Exception | Get-Member | Select-Object -ExpandProperty TypeName -Unique)]”`n if ($incomingError.InvocationInfo.Line) { Write-Host `t”Command: [$($incomingError.InvocationInfo.Line.Trim())]”` } else { Write-Host `t”Unable to get command information! Multiple catch blocks can do this :(“`n } Write-Host `t”Exception: [$($incomingError.Exception.Message)]”`n Write-Host `t”Target Object: [$($incomingError.TargetObject)]”`n } Else { Write-Host “Please include a valid error record when using this function!” -ForegroundColor Red -BackgroundColor DarkBlue }} |
With this function, you can simplify error handling and create specific Catch blocks. Use it like this:
| Try { Get-ChildItem -Path Z:\ -ErrorAction Stop Get-ThisWontWork}Catch [System.Management.Automation.CommandNotFoundException] { Write-Host ‘Command not found Catch block executed!’ }Catch [System.Management.Automation.DriveNotFoundException] { Write-Host ‘Get-ChildItem drive not found Catch block executed!’}Catch { Get-ErrorInformation -incomingError $_} |
This allows you to capture specific error information effectively.
Video Guide
To finally answer all your questions, we have prepared a special video for you. Enjoy watching it!
Conclusion
Handling errors in PowerShell is essential for creating robust and reliable scripts. Understanding the types of errors, forcing non-terminating errors to terminate, and implementing error handling techniques like validation and Try/Catch/Finally blocks can save you time and prevent unexpected issues. By mastering error handling, you ensure that your automation tasks run smoothly and securely, even in challenging scenarios.
The post Mastering Error Handling: A Comprehensive Guide appeared first on Powercmd.
]]>