In this chapter you will learn:
- How to use the Model Context Protocol, MCP to split up your server capabilities into a server and a client
- Create tools, resources and prompts on the server.
- Consume the server using both the inspector tool and a written client.
If you haven't already, set up your development environment. Here's how you can do it: Setup your environment.
This video explains Model Context Protocol.
🎥 Click on the image above to watch a short video about MCP
Note
Our story so far. You are a mechanic from 1860s London. You were working on your automaton and received a letter from Charles Babbage that ended up taking you to a library where you picked up a time travel device. Throughout your travels in time you've ended up in Florence, where you met Leonardo Da Vinci. You also went to the Aztec empire and this is where the story continues.
See Lesson 1 if you want to catch up with the story from the beginning.
Note
While we recommend going through the story (it's fun!), click here if you'd prefer to jump straight to the technical content.
Our heroes, having just learned about tools and "tool-calling" during their meeting with Amelia Earhart, are now returning to Ada Lovelace's mansion to discuss their newfound knowledge. A flash of light envelops our heroes as the time beetle transports them back to Ada's present. They find themselves in the basement of Ada Lovelace's mansion. Charles Babbage is not present, but Ada is there waiting for them. She is excited to hear about their journey and the knowledge they've gained.
Ada Lovelace: "Welcome back! I trust your journey was enlightening."
You: "It was! Meeting with Mrs. Earhart was quite the experience. She taught us about the importance of tools and how to use them effectively."
Ada Lovelace: "There are few people who understand the importance of tools better than Amelia. I trust you've also upgraded her Time Beetle?"
You: "Yes, we did! So what's next on the agenda?"
Ada Lovelace: "Tool calling is definitely a powerful concept, one that improves your device. However, it lacks a certain "finesse" shall we say. We need to learn how to make it scale, we need a protocol. I know just the fellow to help us with that. His name is Scipio Africanus, a great military strategist from ancient Rome. Too bad he spent all his time with military strategy, I'm sure he would have been a brilliant engineer. Off you go.
You: "Scipio Africanus? I think I remember him from history class.
Ada Lovelace: "Good then, why are you still here? Time is of the essence. Ta ta"
The swirling of light envelops you again and you find yourself in a large room with a large table in the middle. The walls are adorned with maps and military strategies. Scipio Africanus is standing at the table, deep in thought. He looks up as you enter. "Ada te misit/Ada sent you?"

Scipio Africanus, also known as Publius Cornelius Scipio Africanus, was a prominent Roman general and statesman who lived from 236 BC to 183 BC. He is best known for his decisive role in the Second Punic War against Carthage and his victory over Hannibal at the Battle of Zama in 202 BC. His life and career exemplify the qualities of leadership, strategic brilliance, and resilience. His contributions to Rome's military and political spheres left a lasting impact on the Roman Empire.
If you want to interact with Scipio, run the Characters app.
Important
This is entirely fictional; the responses are generated by AI. Responsible AI disclaimer
Steps:
- Start a
- Navigate to /app in the repo root.
- Locate the console and run
npm installfollowed bynpm start. - Once it appears, select the "Open in Browser" button.
- Chat with Scipio.
For a more detailed explanation of the app, see Detailed app explanation.
Note
If you're running the project locally on your machine, please review the QuickStart guide to get a GitHub personal access token setup and replace the key in the code.
Time Beetle: The protocol Ada spoke of is called the Model Context Protocol (MCP). It's a protocol that allows you to decentralize your application architecture, making it more scalable and resilient by adding resources on a server, or multiple servers even, and offload these from the client. I'll let Scipio explain the idea to you.
You: "Yes, Ada sent us. She said you could help us with a protocol?"
Scipio: "Protocol? I've spent my life developing strategies for battle. But I suppose a protocol is like a strategy. It helps you organize and manage your resources effectively and ensures communication between them".
Let's talk about flanking maneuvers, infiltration, and the use of cavalry.
You: "Ok, go on?"
Scipio: "In battle, we often use flanking maneuvers to attack the enemy from the sides or rear. This disrupts their formations and gives us an advantage. The reason being that the enemy is not prepared for an attack from the side and tends to focus all their attention on the front.
You: "Hm, I guess that's similar to having an app doing too much work up front on a single server. Flanking maneuvers would be like distributing the load across multiple servers, right?"
Scipio: "Exactly! By distributing the load, you reduce the risk of a single point of failure and improve overall system resilience. It makes it easier to manage and use resources effectively.
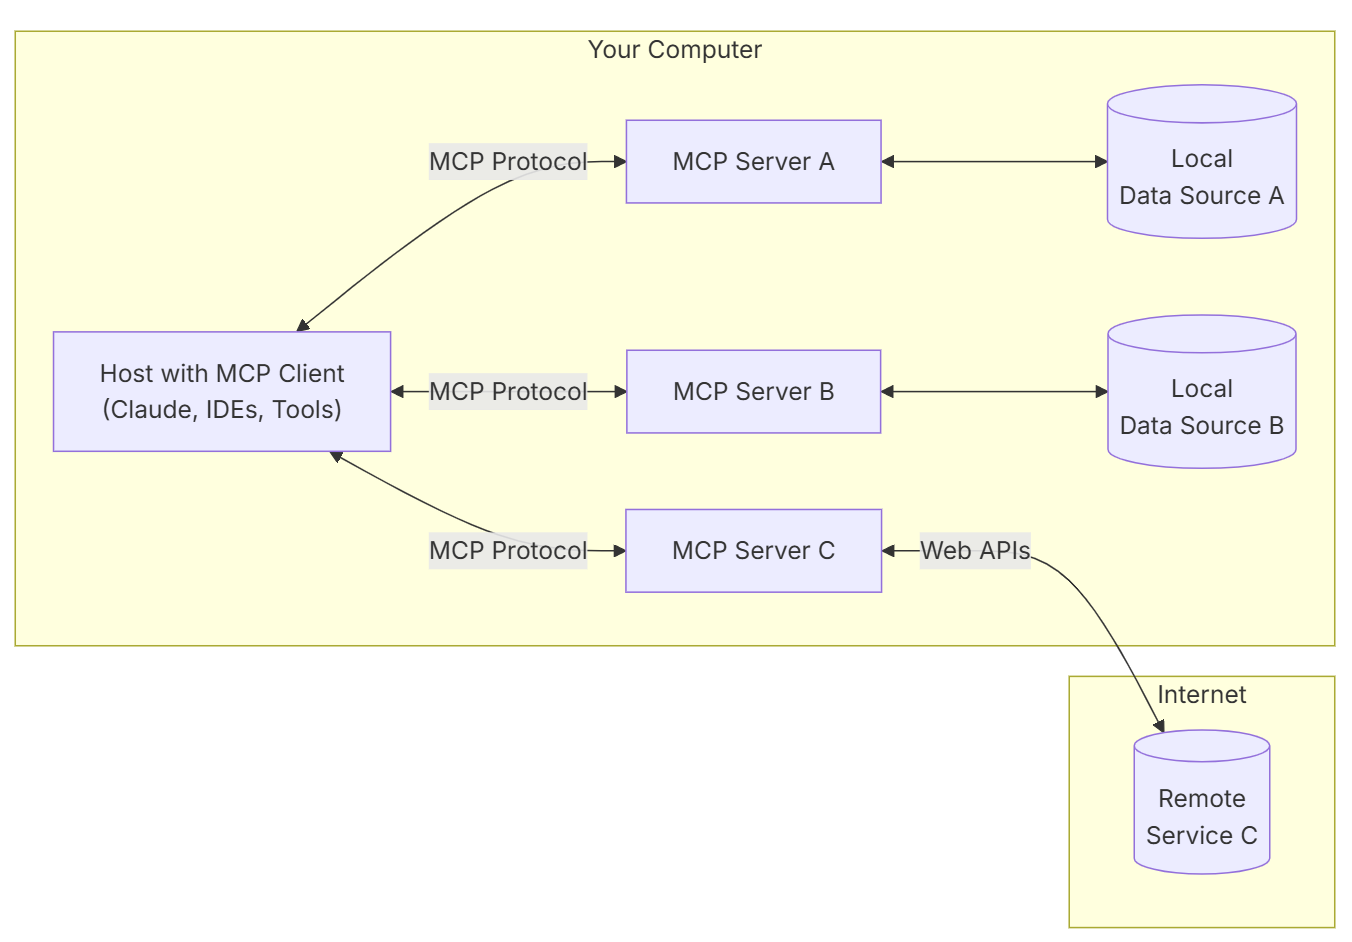
Time Beetle: "To add to Scipio's point, the Model Context Protocol (MCP) is a way to decentralize your application architecture. It allows you to break down your application into smaller, more manageable components that can operate independently. Here are some important concepts to keep in mind:
- MCP Hosts: Programs like IDEs, for example GitHub Copilot in Visual Studio Code or Claude Desktop that initiates a connection to the server or servers.
- MCP Clients: Protocol clients that maintain 1:1 connections with MCP servers.
- MCP Servers: Lightweight programs that expose specific capabilities through MCP.
- Local Data Sources: Files, databases, and services on your computer that MCP servers can securely access.
- Remote Services: External systems available over the internet (e.g., APIs) that MCP servers can connect to.
and here's a quick overview of the MCP architecture:
To build a server, you need to know about the core building blocks, those are:
-
Tools: Tools are things that compute something for you, they take an input, perform a computation and produces and output. Typically this is a calculation or placing an order or similar action.
-
Resources: A resource is static data, usually that means application settings, database schemas or some other static file on a server for example.
-
Prompts. Prompts, or prompt templates, are like a recipe that you can reuse. The idea is by using such a recipe, you could then send it parameters and feed that into an LLM and accomplish something like for example generating a product description for example.
You: "And what about infiltration?"
Scipio: "Infiltration is about using small units to infiltrate enemy lines, that way you find out more about the enemy and cause confusion.
You: "Sounds to me like we can use this way of thinking to find out more about our servers, what tools, prompts and resources they have.
To sum things up, I should:
- Use flanking maneuvers, or in my case break down features by app functionality into several different MCP servers so that I can distribute servers after area of usage. Thereby, it's easier to scale and manage the app. Such servers can even be updated independently of each other.
- Use infiltration, or in my case, figure out what these servers are doing, in terms of tools, prompts and resources. This way I can make sure I'm interacting with the right server and using the right tools for the job.
You: "Time Beetle, am I understanding things correctly?"
Time Beetle: "Yes, you are. Scipio's strategies can be applied to your application architecture. If you want, I can teach you the specifics of the Model Context Protocol (MCP) and how to implement it in your application?
You: "Yes, please!"
Time Beetle: "Good, let's start with creating a server"
Time Beetle: "To create your first MCP server, you need two libraries @modelcontextprotocol/sdk and zod:
- The
@modelcontextprotocol/sdklibrary provides the necessary tools to create and manage MCP servers. zodis a TypeScript-first schema declaration and validation library that helps you define and validate the data structures used in your MCP server.
npm install @modelcontextprotocol/sdk zodHere's a simple example of how to create an MCP server using these libraries:
import { McpServer, ResourceTemplate } from "@modelcontextprotocol/sdk/server/mcp.js";
import { StdioServerTransport } from "@modelcontextprotocol/sdk/server/stdio.js";
import { z } from "zod";

// Create an MCP server
const server = new McpServer({
  name: "Demo",
  version: "1.0.0"
});
The preceding code does the following:
- Imports the necessary classes and functions from the
@modelcontextprotocol/sdklibrary. - Creates a server instance. The
McpServerclass is used to create the server, and it takes an object with the server's name and version as parameters.
You: "This doesn't do much right?"
Time Beetle: "No, not yet. But we can add resources and tools to it. A tool is something that can be used to perform a specific task, while a resource is something that can be used to provide data or functionality to the tool. Let's add some below:
server.tool("add",
   { a: z.number(), b: z.number() },
   async ({ a, b }) => ({
     content: [{ type: "text", text: String(a + b) }]
   })
 );
In the preceding code, we:
- Defined a tool named "add" that takes two numbers as input and returns their sum as output.
- Described the input parameters and its validation using zod. The
z.number()function is used to validate the input data, ensuring that bothaandbare numbers. - The
asyncfunction is used to perform the addition and return the result in a specific format.
You: "Interesting, so the tool is like a function that can be called by the MCP client?"
Time Beetle: "Exactly! The MCP client can call this tool and pass the required parameters. Let's add a resource to the server as well:
server.resource(
   "greeting",
   new ResourceTemplate("greeting://{name}", { list: undefined }),
   async (uri, { name }) => ({
     contents: [{
       uri: uri.href,
       text: `Hello, ${name}!`
     }]
   })
 );
In this code, we:
- Defined a resource named "greeting" that takes a name as input and returns a greeting message.
- Used a resource template to define how to call the resource
greeting://{name}. This schema is used to define the resource's URI format, which includes a placeholder for the name. - The
asyncfunction is used to generate the greeting message based on the provided name.
You: "So, the resource is like a data source, this could be a database, file or even an API? If this was a for a file I would use a file:// URI?" like so:
server.resource(
   "file",
   new ResourceTemplate("file://{path}", { list: undefined }),
   async (uri, { path }) => ({
     // do something with the file at path, e.g., read its contents
     contents: [{
       uri: uri.href,
       text: `File at ${path}`
     }]
   })
 );
Time Beetle: "Yes, exactly! The resource can be anything that provides data or functionality to the MCP server. You can define resources for files, databases, APIs, or any other data source you want to use."
Now, let's add a transport layer to the server so it can communicate with clients."
// Start receiving messages on stdin and sending messages on stdout
const transport = new StdioServerTransport();
await server.connect(transport);
In this code, we:
- Created a transport layer using the
StdioServerTransportclass, which allows the server to communicate with clients through standard input and output and runs on your local machine. There are also other transports like SSE and streaming HTTP which allows you to run remotely on a server, more on that later. - Called the
connectmethod to establish the connection between the server and the transport layer.
You: "Ok, so now we have a server, how do we run and test it?"
You: "Scipio, have you tested your tactics?"
Scipio: "Of course! Testing is crucial in any strategy. You should always test your tactics before deploying them. In fact, I remember a specific battle where I used a new tactic and it failed miserably called the Battle of the Trebia. I learned my lesson and never made that mistake again."
You: "So how do I test my MCP server?"
Time Beetle: "You can test your MCP server by running it in a terminal by running the inspector like so:
npx @modelcontextprotocol/inspector node build/index.jsAbove, we are using the @modelcontextprotocol/inspector package to run the MCP server. We provide the argument node build/index.js to specify the entry point of the server. This will start the MCP server and allow you to interact with it through the inspector.
You: "And how do I interact with it?"
Time Beetle: "This starts a web server on port 6274. You can access the inspector by opening your web browser and navigating to http://localhost:6274. The inspector provides a user-friendly interface for interacting with your MCP server, allowing you to test the tools and resources you've defined."
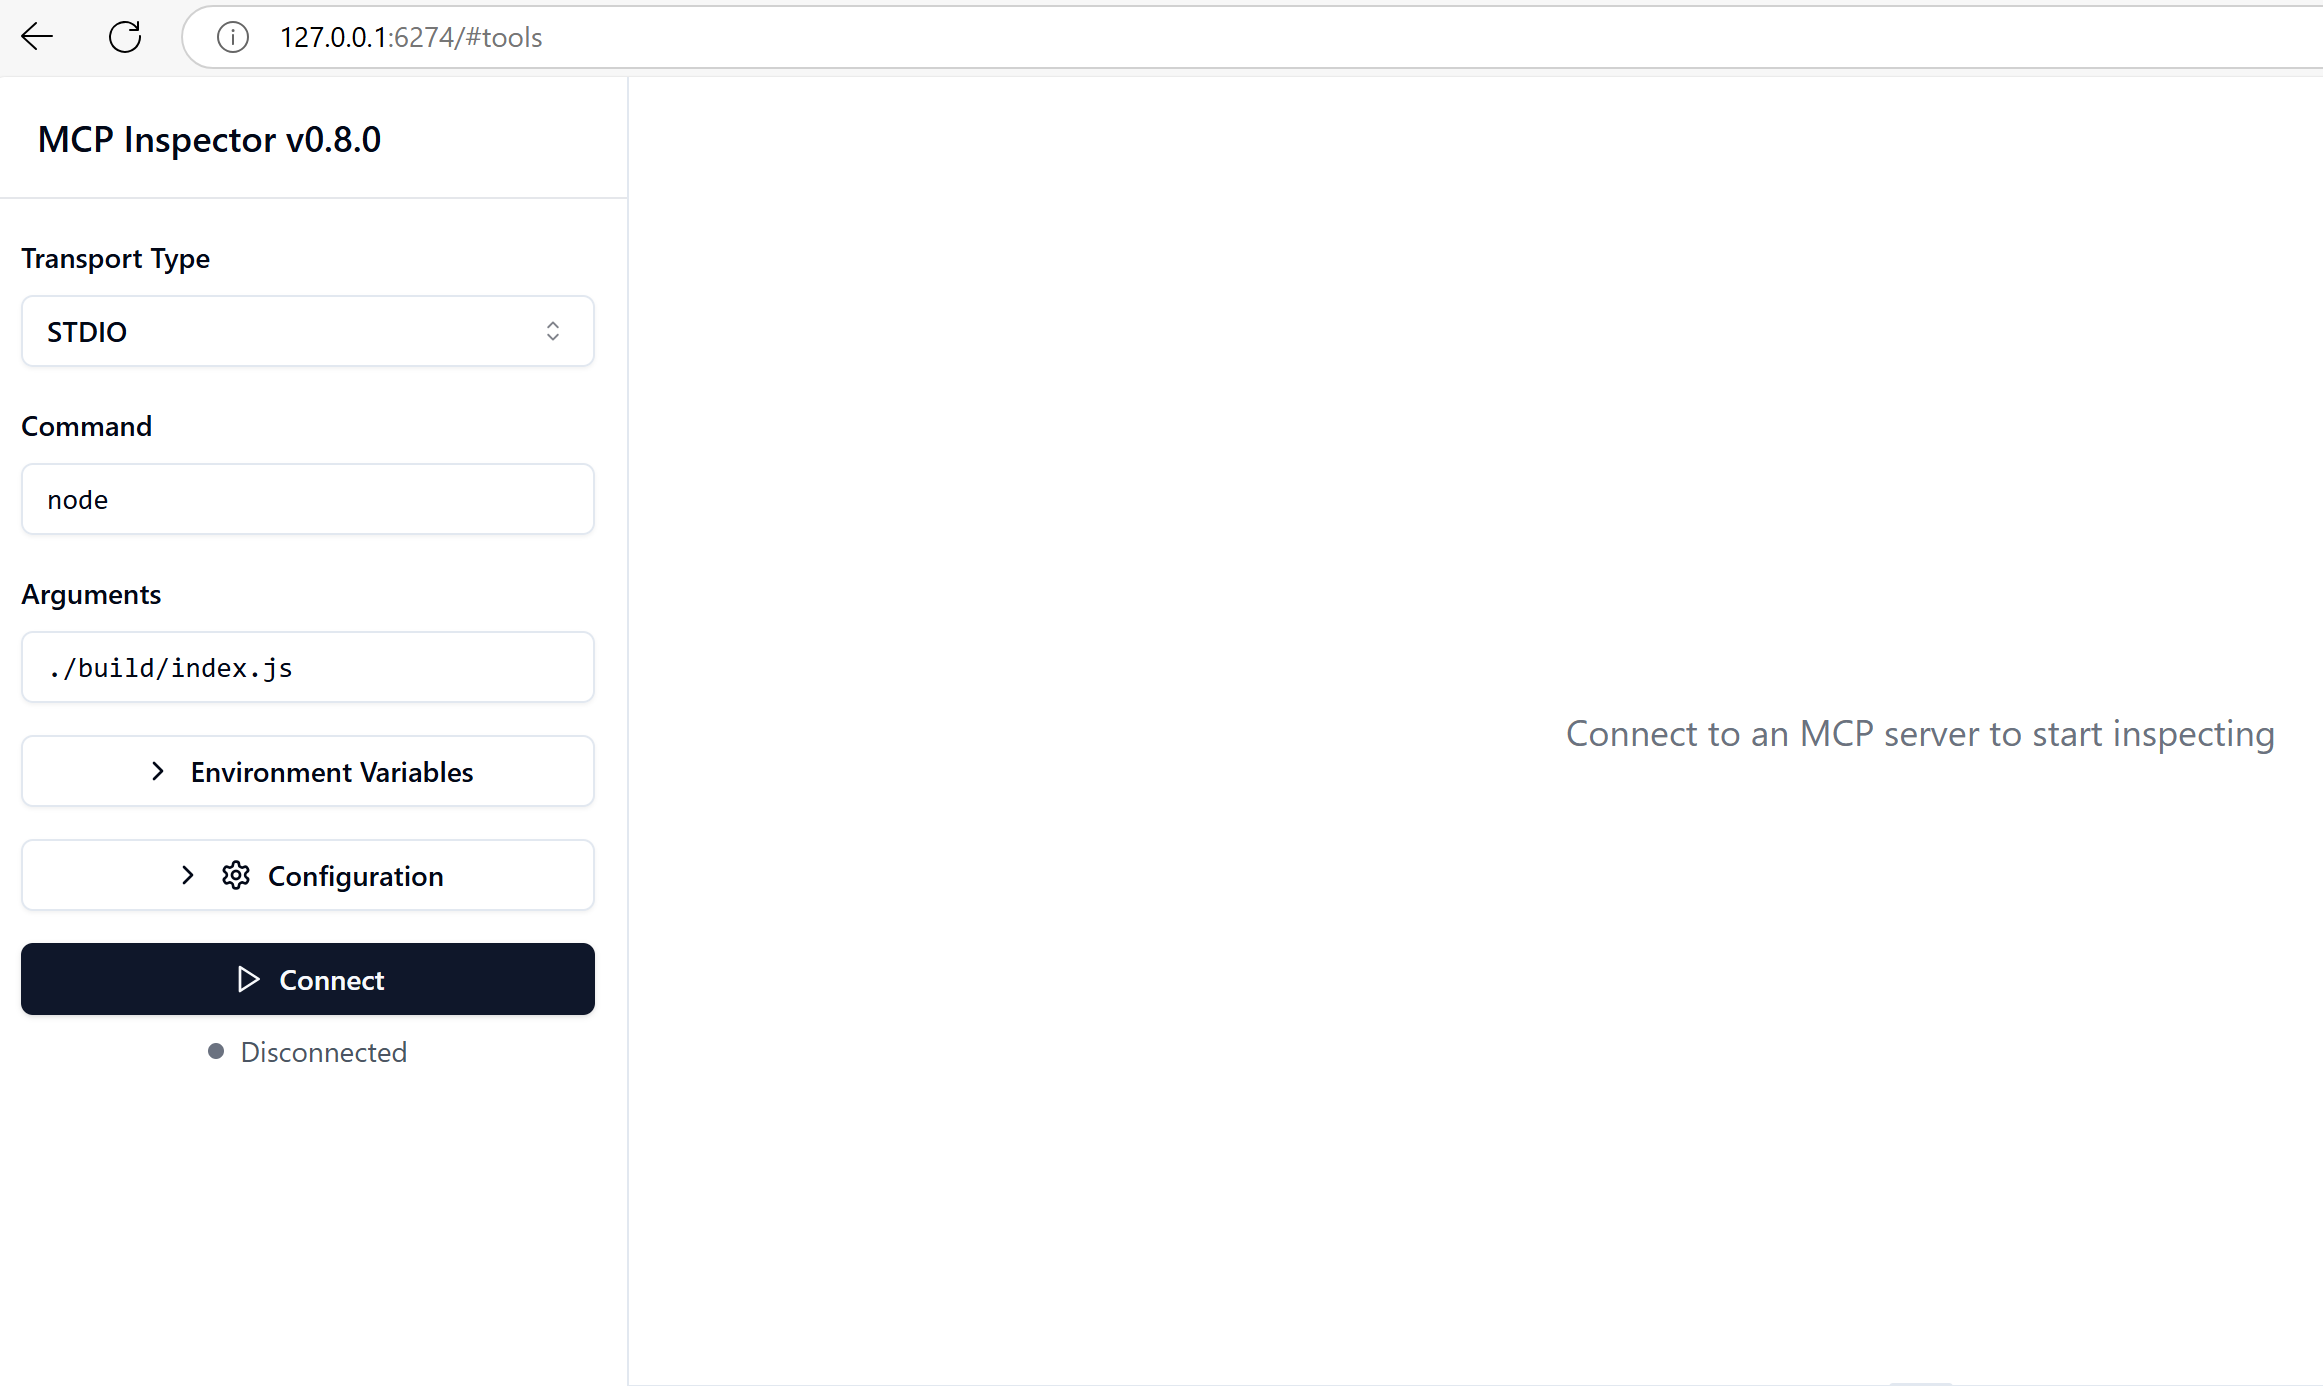
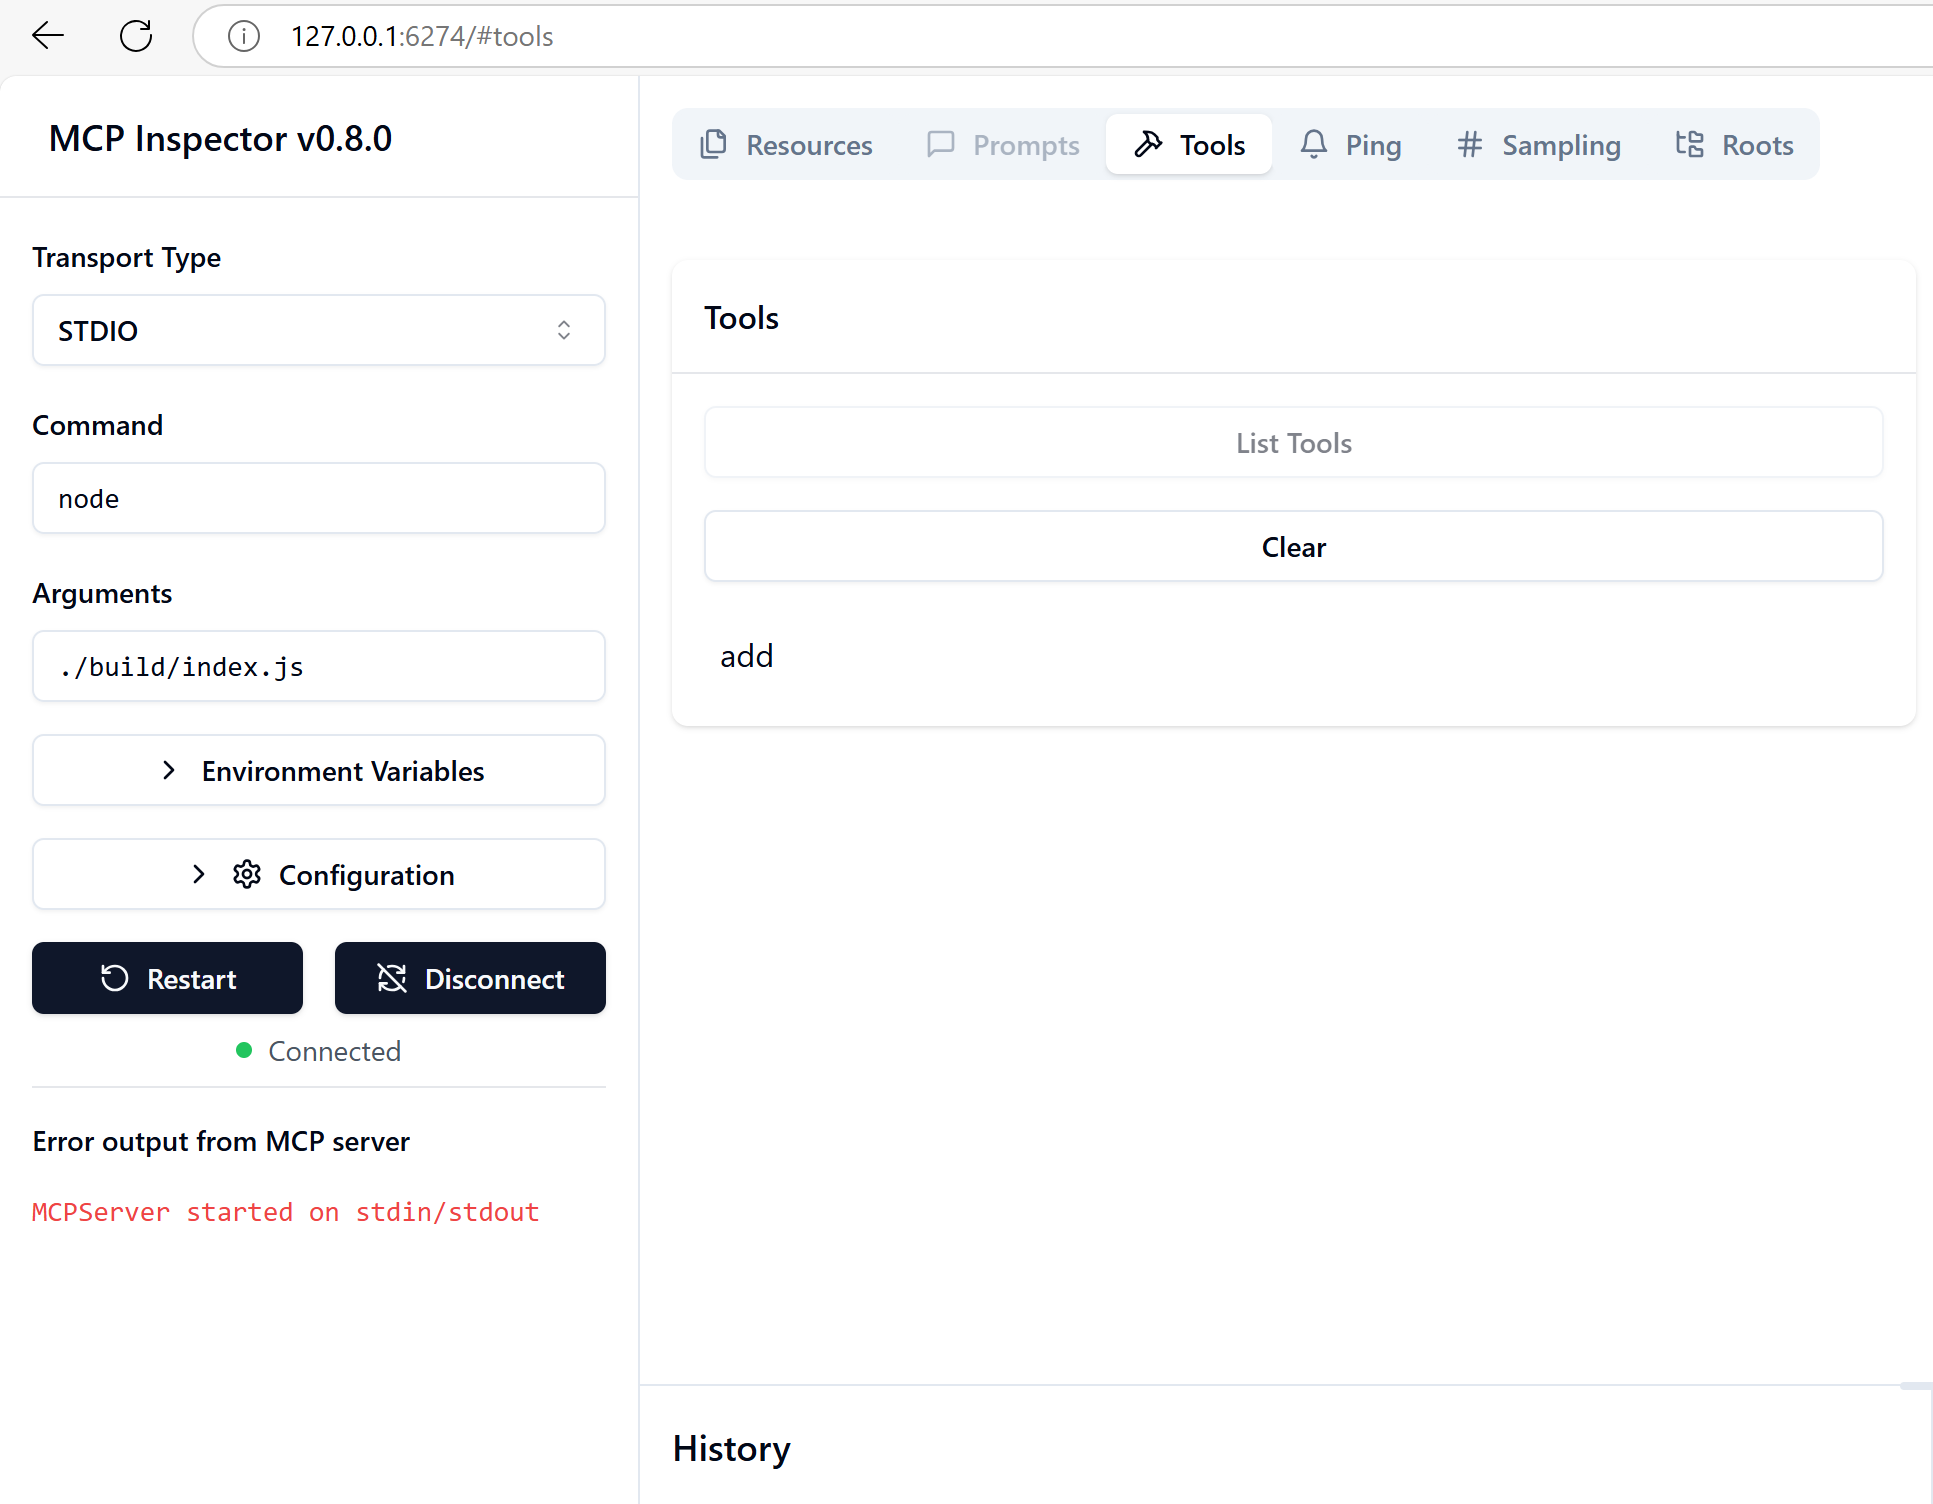
Time Beetle: Select to "Connect" and you should see the window below:
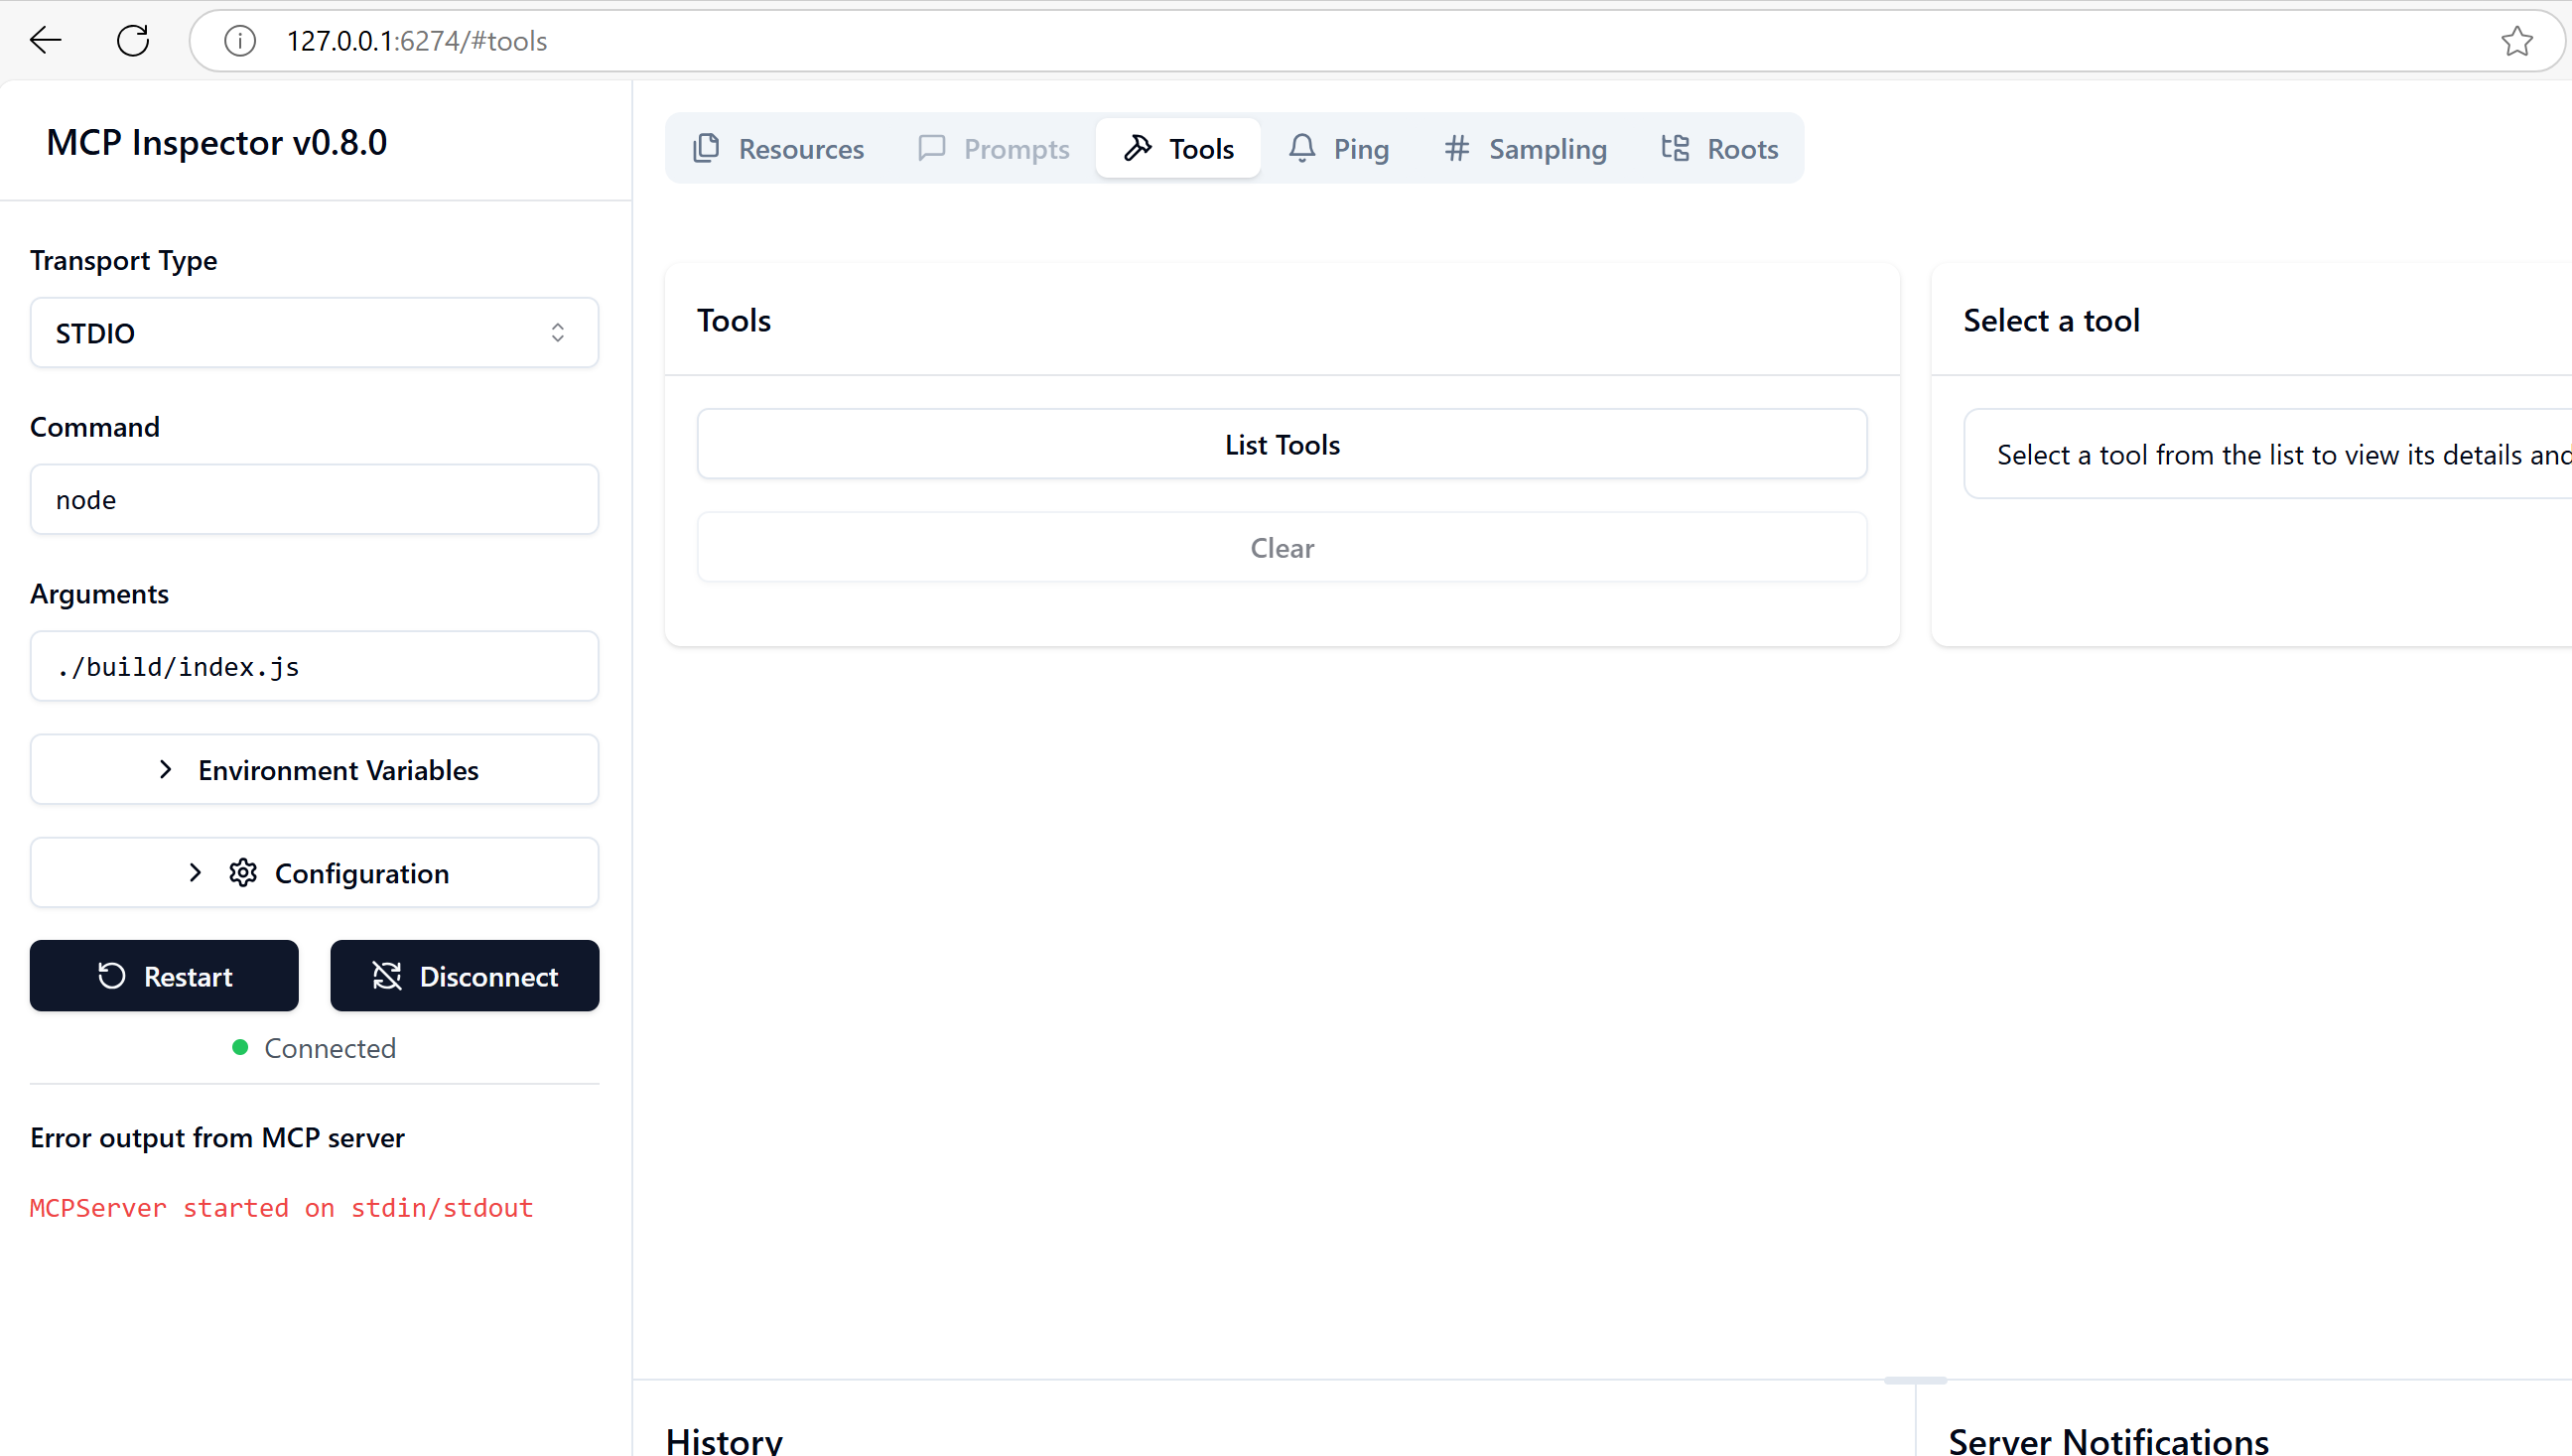
It should say you're connected. Now you can interact with tools or resources next.
Time Beetle: "Next, we want to list the tools and resources available on the server. You can do this by selecting "List tools", to see what tools are available:
Now you should see the "add" tool listed. You can also list the resources by selecting the "Resources" tab.
Time Beetle: "To run the tool, select the "add" tool from the list. Fill in the parameters in the dialog that appears on the right side of the screen. For example, you can enter a=5 and b=10 to add these two numbers together. Click "Run Tool" to execute the tool. You should see the result in the output area below. The result should be 15."
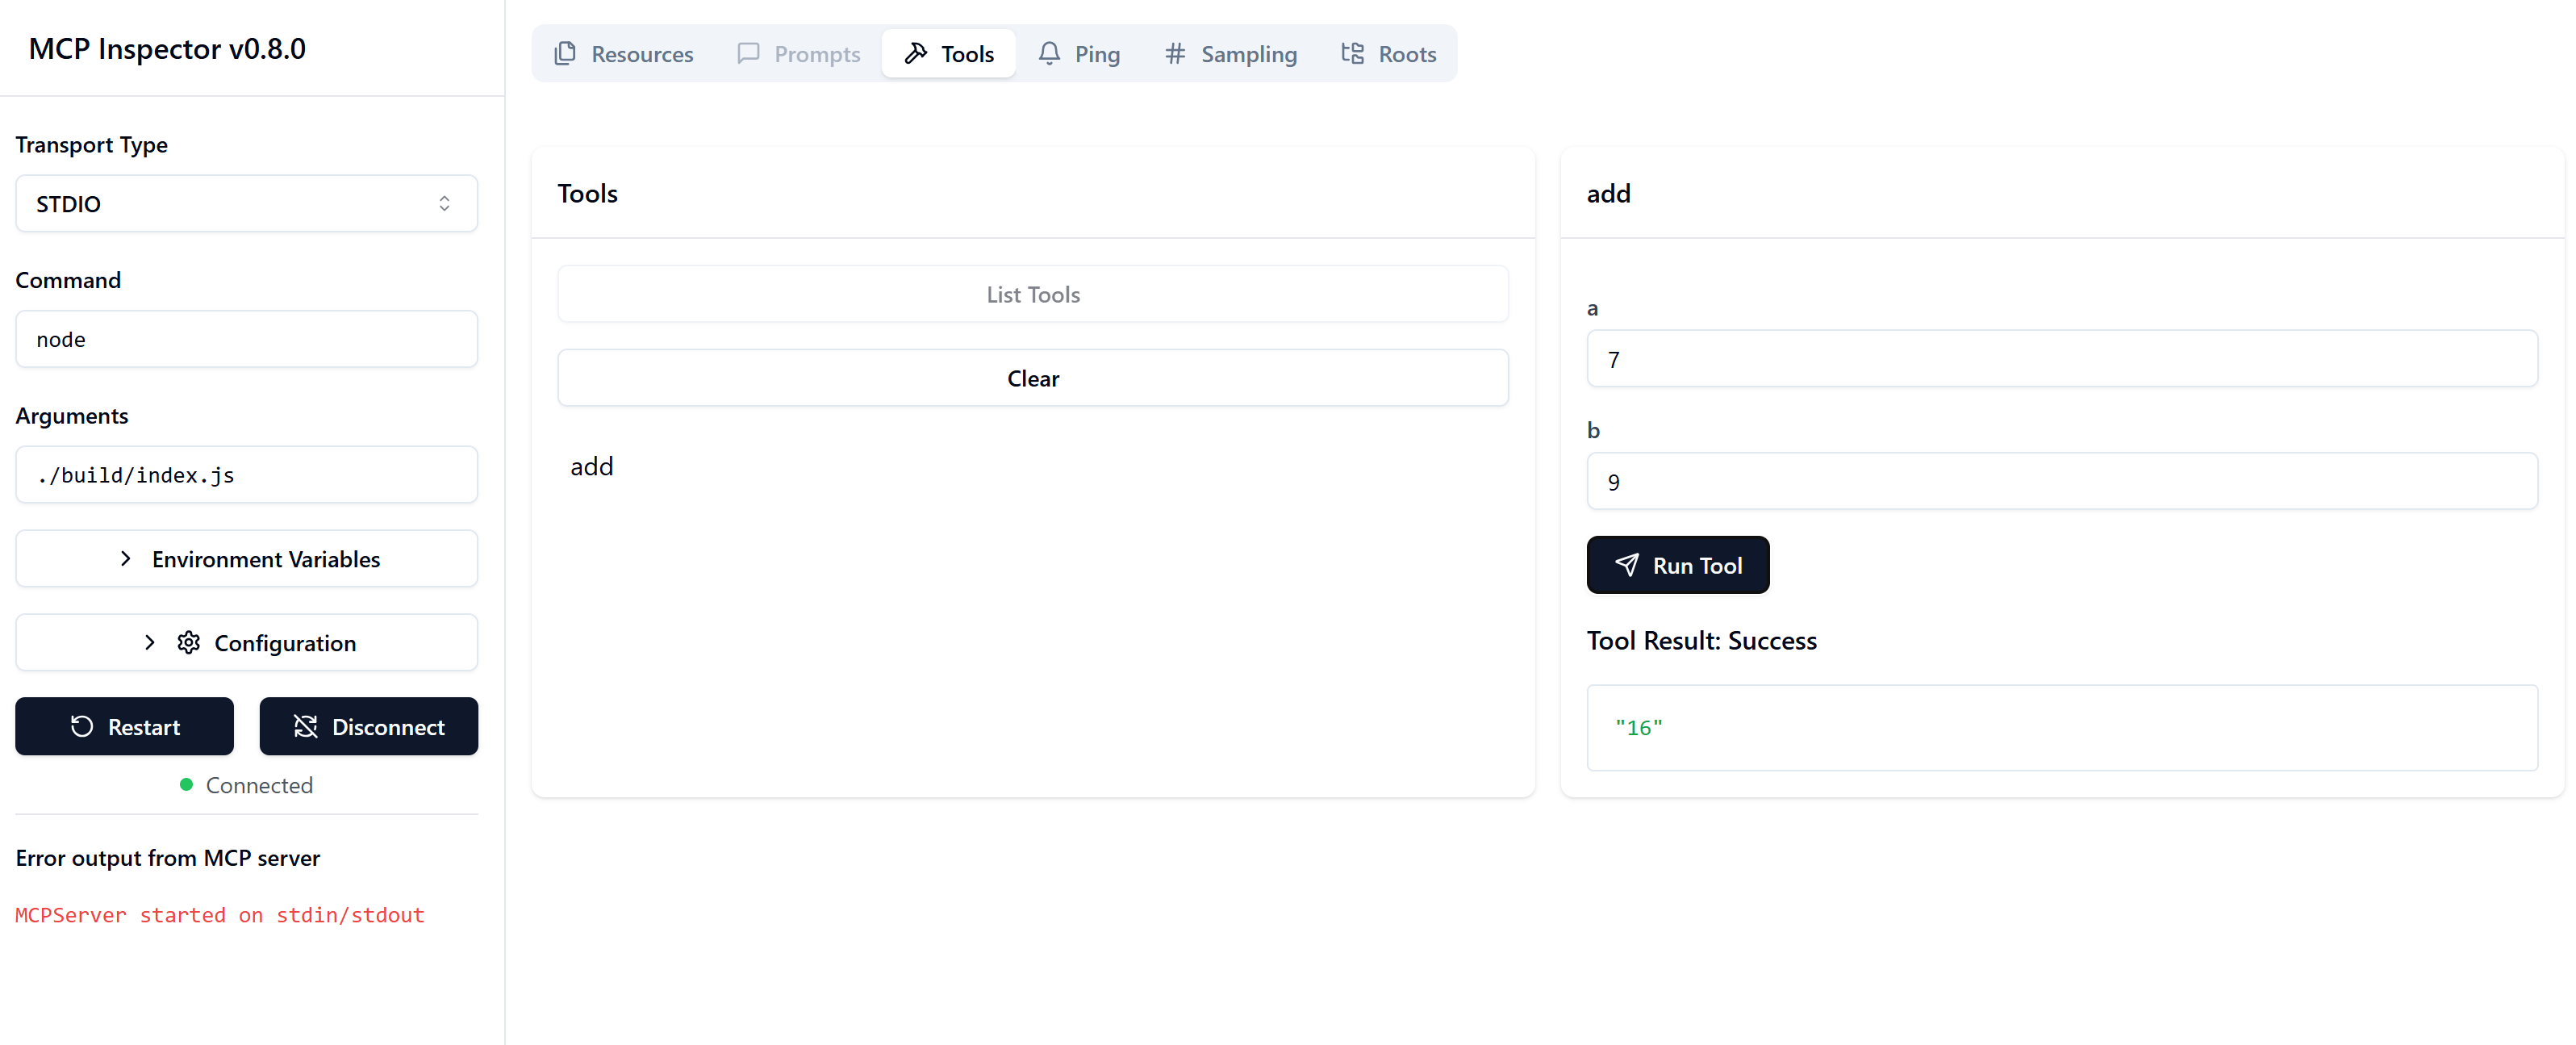
Scipio: "Interesting, I wish I could test my strategies like this. Seems very useful."
You: "Right, it really does! I can see how this would be useful for testing and debugging."
Time Beetle: "You can also create a client that connects to the MCP server and interacts with it. Here's an example of how to create a simple MCP client using the @modelcontextprotocol/sdk library:
import { Client } from "@modelcontextprotocol/sdk/client/index.js";
import { StdioClientTransport } from "@modelcontextprotocol/sdk/client/stdio.js";

const transport = new StdioClientTransport({
  command: "node",
  args: ["server.js"]
});

const client = new Client(
  {
    name: "example-client",
    version: "1.0.0"
  }
);

await client.connect(transport);
In the preceding code, we:
- Created a transport layer using the
StdioClientTransportclass, which allows the client to communicate with the MCP server through standard input and output. - Initiated a new
Clientinstance with a name and version. - Connected the client to the transport layer using the
connectmethod.
You: "Let me guess, there's a lot more we can do with the client?"
Time Beetle: Yes, let's talk about that next. The MCP client can be used to interact with the server, call tools, and access resources.
Time Beetle: "There are generally two scenarios you want to cover, listing tools and resources, and calling them. Here's how to do that:
// List prompts
const prompts = await client.listPrompts();

// List resources
const resources = await client.listResources();

// list tools
const tools = await client.listTools();You: This is great, then I know what capabilities the server has. But how do I call them?
Time Beetle: "Right, let me dive into a specific example, tools first. So you start by asking what tools you have, then you can store that response and then call the tool you want. Here's an example:
So when you list tools, you get a response on the following format:
  {
    "name": "<tool name>",
    "description": "<description>".
    "inputSchema": {
       "type":"object",
       "properties":{
          "a":{
            "type":"number"
          },
          "b":{
            "type":"number"
          }},
          "required":["a","b"],
          "additionalProperties":false,
          "$schema":"http://json-schema.org/draft-07/schema#"
      }
  }
which means, if you have a tool add, your response, listing tools, looks like so:
{
    "name": "add",
    "description": "Adding two numbers".
    "inputSchema": {
       "type":"object",
       "properties":{
          "a":{
            "type":"number"
          },
          "b":{
            "type":"number"
          }},
          "required":["a","b"],
          "additionalProperties":false,
          "$schema":"http://json-schema.org/draft-07/schema#"
      }
}You: "Ok, good, I guess I can store that in a variable and then call the tool I want?"
Time Beetle: "Exactly! Let's look at how a tool can be called next:"
// List tools
const { tools } = await client.listTools();

const addTool = tools[0]; // Assuming the first tool is "add"
const subtractTool = tools[1]; // Assuming the second tool is "subtract"

// Call a tool
const result = await client.callTool({
  name: addTool.name,
  arguments: {
    a: 5,
    b: 10
  }
});You: "Ok, makes sense. And what about resources?"
Time Beetle: "Resources are similar, but you need to provide the resource URI and any parameters it requires. Here's an example:
let resourceUri = "greeting://John"; // Replace with the actual resource URI

// call resource
// Read a resource
const name = "John Doe"; // Replace with the actual name

const resourceResult = await client.readResource({
  uri: `greeting:///${name}`,
});

console.log(resourceResult); // Hi John Doe!You: "I get it nice, although, you're thinking to yourself, I bet we can improve this somehow? Time Beetle, we can improve this right?
Time Beetle: Yes, but first things first, let's make Scipio happy. We need to have a chat with a Ms. Lamarr on our next stop.
Scipio: "You know, I have so many parchments and scrolls lying around. I could really use a tool to help me organize them. I also have this abacus that I use for calculations. Can you help me create a tool to manage my inventory?"
Here's a complete inventory of my scrolls:
- Scroll of Tactics.
- Scroll of food supply.
Oh, here's a Taxation scroll. Taxation is big thing, the Empire wants their cut of everything we acquire. Have you solved this in your time, don't answer that, I don't want to know.
The abacus tool, I need it to support the following operations:
- Add: Add two numbers together.
- Subtract: Subtract one number from another.
- Multiply: Multiply two numbers together.
- Divide: Divide one number by another.
Question: What are the different types of resources an MCP Server can expose?
A. Tools and Web endpoints
B. Tools and Resources
C. Tools, Resources and Prompts
Question: What are some ways you can test your MCP Server?
A. Inspector
B. A custom MCP client
C. Visual Studio Code
D. curl
E. All of the above
In this chapter, we've learned the following:
- Model Context Protocol, MCP, is a great way to offload capabilties into servers instead of putting all your features in one place. This allows for your apps to stay small and focused. The added bonus is that different teams can manage different servers also. Thanks to MCP being a protocol this additionally means that anyone out there looking to share capabilities and can do so in a common format.
- Additionally we looked into how to consume an MCP Server using the Inspector tool or a written client.