In Flask, models define the structure of data and handle database operations by mapping database tables to Python classes. ORM (Object Relational Mapping) is used which allows to interact with the database using Python code instead of writing SQL queries. Flask commonly uses SQLAlchemy as its ORM to manage data efficiently.
Creating Models using Flask-SQLAlchemy
To define models in Flask, we will use Flask-SQLAlchemy, which provides ORM support. Start by importing required modules and defining the create_app function to set up the application and initialize models.
Step 1: Install flask-sqlalchemy
Flask doesn't support ORM, but with the help of flask-sqlalchemy, we can achieve the ORM functionalities. Install flask-sqlalchemy extension (if not already installed) using:
pip install flask-sqlalchemy
Step 2: Import Necessary Modules
First we import the Flask and SQLAlchemy.
from flask import Flask, render_template, request, redirect, url_for
from flask_sqlalchemy import SQLAlchemy
import datetime
Step 3: Configure the Flask App and Database
app = Flask(__name__)
app.config['SQLALCHEMY_DATABASE_URI'] = 'sqlite:///event_database.db'
app.config['SQLALCHEMY_TRACK_MODIFICATIONS'] = False
Explanation:
- SQLALCHEMY_DATABASE_URI: Specifies the database location (SQLite in this case).
- SQLALCHEMY_TRACK_MODIFICATIONS: Disables unnecessary change tracking for better performance.
Step 4: Initialize the Database
Create a database object
try:
    os.makedirs(app.instance_path)
except OSError:
    pass
Step 5: Define a Model
Now, we define a model, which represents a table in the database.
class Event(db.Model):
    id = db.Column(db.Integer, primary_key=True)
    date = db.Column(db.DateTime, default=datetime.datetime.utcnow)
    event = db.Column(db.String(200), nullable=False)
Explanation:
- id: Auto-incrementing primary key.
- date: Stores event timestamps (defaults to the current time).
- event: Stores the event description, which cannot be null.
Step 6: Create the Database
Run the following inside an app context to generate the tables:
with app.app_context():
    db.create_all()
Explanation: This ensures all models are converted into database tables.
Step 7: Inserting Data into the Database
To add an event, create an instance of Event and commit it:
def add_event(event_description):
    new_event = Event(event=event_description)
    db.session.add(new_event)
    db.session.commit()
Explanation:
- new_event = Event(event=event_description): Creates a new event with the given description.
- db.session.add(new_event): Adds the new event to the database session.
- db.session.commit(): Commits the transaction, saving the event permanently.
Step 8: Querying the database
We use db.session in SQLAlchemy to fetch and store data.
- GET request: Fetches all events using db.session.execute(db.select(Event).order_by(Event.date)).scalars() and displays them.
- POST request: Adds a new event to the database.
@app.route('/', methods=['GET', 'POST'])
    def home():
        if(request.method == 'POST'):
            db.session.add(Event(date=datetime.datetime.now().__str__(), event=request.form['eventBox']))
            db.session.commit()
            return redirect(url_for('home'))
        return render_template('home.html', eventsList=db.session.execute(db.select(Event).order_by(Event.date)).scalars())

    return app
Explanation:
- db.session.add() adds new event
- db.session.commit() saves changes
- db.select(Event) fetches events
- order_by(Event.date) sorts by date
Flask app using Models
Let's build a simple Flask app "eventLog" where users can view and add events. The date and time are automatically stored when an event is added.
File structure
rootFolder
|_ eventLog
|_templates
| |_ home.html
|_app.py
app.py File
This application uses Flask-SQLAlchemy with SQLite to store events. We define a create_app function to configure the app, initialize the database and create the Event model. A route handles displaying and adding events and a CLI command is used to initialize the database.
from flask import Flask, redirect, url_for, render_template, request
import os
import datetime
import click
from flask_sqlalchemy import SQLAlchemy
from sqlalchemy.exc import IntegrityError
from sqlalchemy.orm import DeclarativeBase, Mapped, mapped_column

def create_app(test_config=None):

    app = Flask(__name__, instance_relative_config=True)

    app.config.from_pyfile('config.py', silent=True)
    app.config.from_mapping(SECRET_KEY='dev')

    try:
        os.makedirs(app.instance_path)
    except OSError:
        pass

    app.config["SQLALCHEMY_DATABASE_URI"] = "sqlite:///event_database.db"

    class Base(DeclarativeBase):
        pass

    db = SQLAlchemy(model_class=Base)
    db.init_app(app)

    class Event(db.Model):
        date = mapped_column(db.String, primary_key=True)
        event = mapped_column(db.String)

    @click.command('init-db')
    def init_db_command():
        """Command for initializing the database"""
        with app.app_context():
            db.create_all()
            click.echo('Database created successfully')

    app.cli.add_command(init_db_command)

    @app.route('/', methods=['GET', 'POST'])
    def home():
        if request.method == 'POST':
            db.session.add(Event(date=datetime.datetime.now().__str__(), event=request.form['eventBox']))
            db.session.commit()
            return redirect(url_for('home'))
        return render_template('home.html', eventsList=db.session.execute(db.select(Event).order_by(Event.date)).scalars())

    return app

if __name__ == "__main__":
    app = create_app()
    app.run(debug=True)
home.html (Jinja Template)
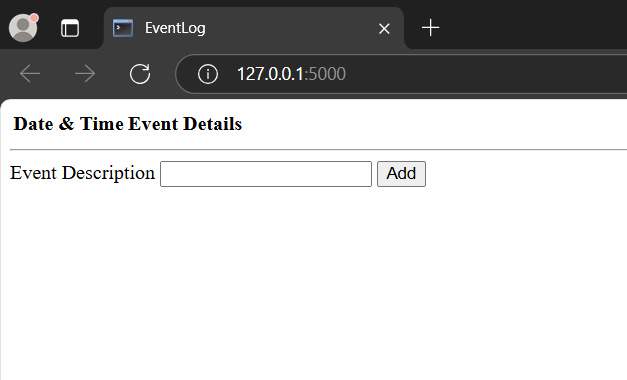
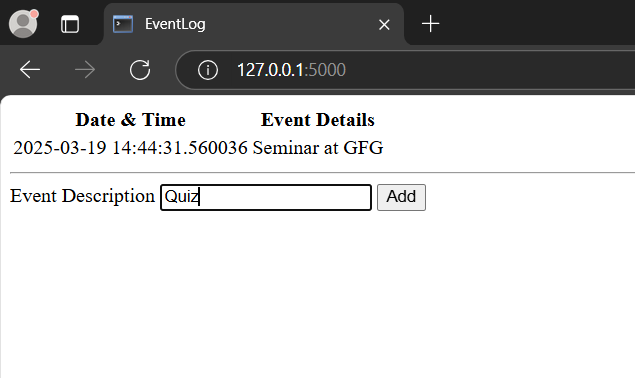
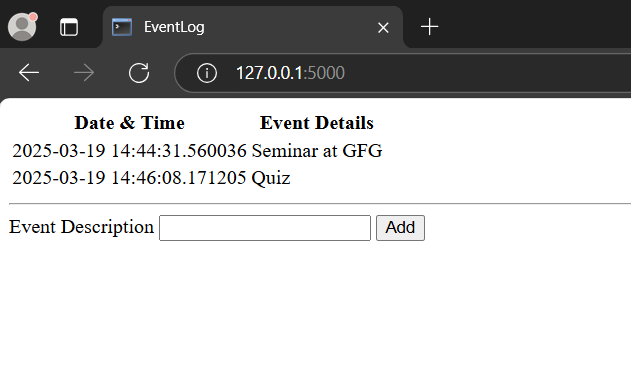
This HTML code creates a simple webpage to display an event log with a table showing date-time and event details.
- Jinja2 templating is used to loop through events from the Flask app and populate the table.
- A form allows users to add new events with a text input and submit button.
- An external "style.css" file is linked for styling.
<html>
    <head>
        <title>EventLog</title>
    </head>
    <body>
        <table>
            <tr>
                <th>Date & Time</th>
                <th>Event Details</th>
            </tr>
        {%-for row in eventsList-%}
            <tr>
                <td>{{row.date}}</td>
                <td>{{row.event}}</td>
            </tr>
        {%-endfor-%}
        </table>
        <hr/>
        <form method="post">
            <title>Add event</title>
            <label for="eventBox">Event Description</label>
            <input name="eventBox" id="eventBox" required/>
            <input type="submit" value = "Add">
        </form>
    </body>
</html>
Running the app
1. Activate the virtual environment:
venv\Scripts\activate
2. Create the database and tables:
flask init-db
3. Run the Flask app:
python app.py
This will start the app in debug mode at local host port 5000. Visit the following URL in browser:
http://127.0.0.1:5000/
Output