Creating Email Accounts in cPanel
If you want to have an email address associated with your domain name (like myname@mysite.com), you have to set up that email account in cPanel. Having an email address @mysite.com makes your site look more professional and helps you manage your website email separately from your personal email. Plus, setting up email in cPanel takes less than 10 minutes!
Creating an Email Account in cPanel
Watch this video or scroll down for further instructions:
- Log into the cPanel account for the domain you want to send and receive email from. If you haven’t set up a cPanel account yet, read Creating a cPanel User Account first.
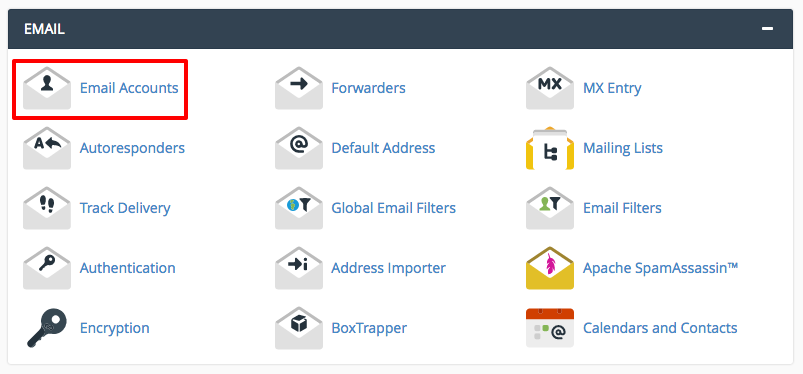
- In the Email section, click on Email Accounts.

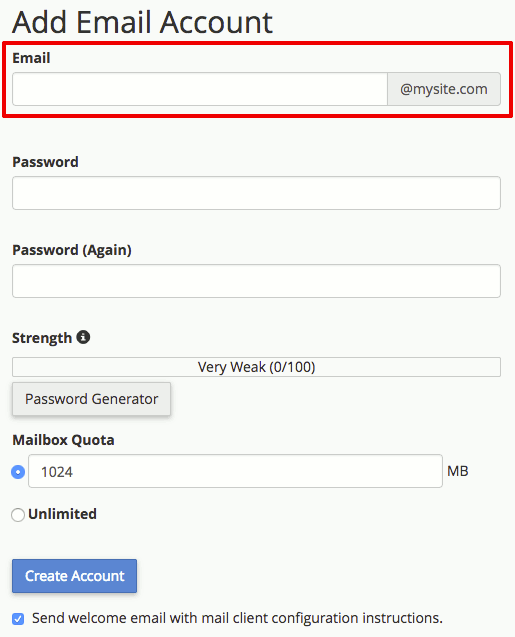
- Enter the email address you want to create. Then choose and confirm a strong password (for information on strong passwords, see Best Practice: Creating a Secure Password).

- Click Create Account.
If you scroll further down the page to Email Accounts, you should also see your new account listed. Before you log into your email for the first time, make sure your DNS records are updated.
DNS for Sending and Receiving Email
In order to send and receive email, you need to make sure there’s an appropriate MX record in your DNS. MX records, which specify what servers accept email for your website, are set up a little bit differently than A records. If you aren’t familiar with different types of DNS records, read What Are DNS Records? before changing anything involving your DNS. These directions assume that your DNS is hosted by Liquid Web. If you aren’t sure where your DNS records are hosted, see Where Is My DNS Hosted?
An MX record tells your mail client how email messages will be delivered to your inbox. Having multiple mail servers is definitely an advanced technique, so we won’t cover it here.
Every domain you will be sending mail to and from needs an MX record. Here’s how to add an MX record for your domain.
- Log into your Liquid Web account.
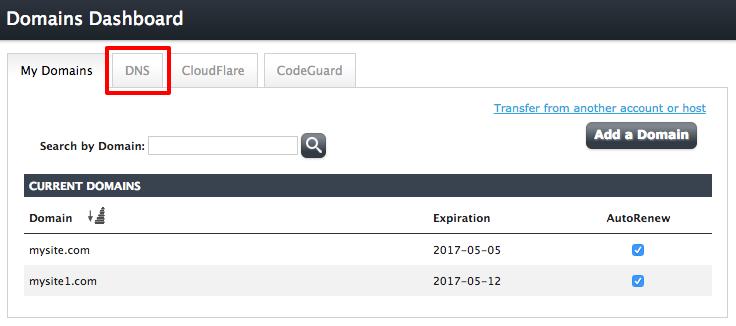
- In the left navigation menu, click on Domains.
- In your Domains Dashboard, click on the DNS tab.

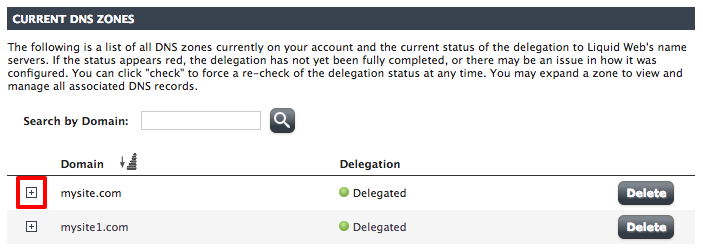
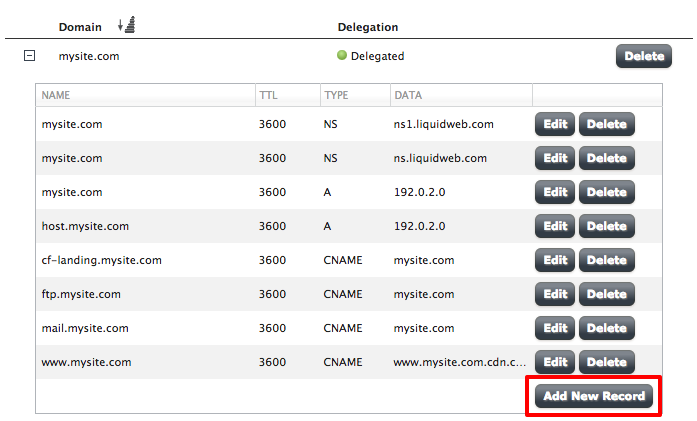
- Scroll down to the Current DNS Zones section, then click on the [+] next to the domain where you are setting up email.

- Click Add New Record at the bottom of the DNS information.

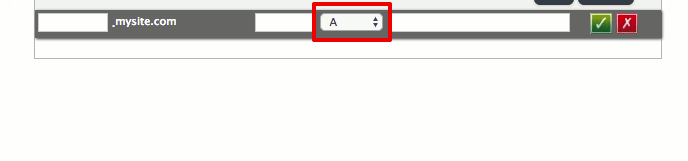
- From the dropdown menu, select MX. Two new input boxes should show up to the right of the record type you just selected.

- Now that you’ve selected the right record, you can go back to the start of the record and fill the rest in. Hovering your cursor over each input field will give you more information about that field.
- Name: This is the first field. When you’re setting up an MX record, you can leave this blank. Leaving it blank creates a record that applies to the whole domain.
- TTL: TTL stands for Time to Live. TTL stands for Time to Live. This is the time, in seconds, that it will take for any changes to the DNS record to go into effect. With a TTL of 3600, all changes to this example record should be refreshed every 3600 seconds (one hour). You can choose any TTL you’d like, but 3600 is a good starting point.
- Priority: The priority for MX records is a number that tells the server how important your particular mail server is in your DNS. Lower numbers mean a higher priority. It’s like running a race: first place gets there first. The default priority is 10. If you only have one mail server, the priority doesn’t matter: mail will always go through your only mail server! Setting up multiple mail servers is definitely an advanced technique.
- Exchange: This is your domain name, written as mysite.com

- Click the green checkmark to add your DNS record.

If you’d like to learn even more about managing DNS records in your Liquid Web account, check out Adding and Editing DNS Records.
Accessing Webmail
You can access your email from a webmail client or you can set up a desktop mail client like Mozilla Thunderbird or Outlook. Using webmail will allow you to immediately use your email. Test your email address as described below before setting up your desktop client.
- Log into your cPanel account.
- In the Email section, click on Email Accounts.
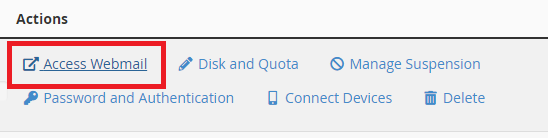
- Find the account you need and click Access Webmail from the Actions section.

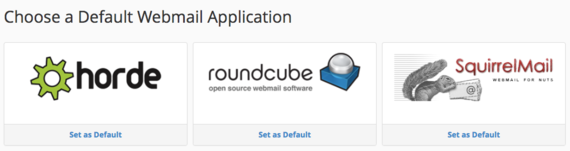
- You will have three webmail applications to choose from: Horde, Roundcube, and SquirrelMail. No matter which one you choose, you can switch between them at any time. Test them all out to see which one you like best.

- Whichever webmail client you click on will load and you’re ready to send email! Try it out by sending a test email to a different email address and by sending an email to your new email address. This will make sure you can send and receive email from your new address.

Tip: |
You don’t have to log into cPanel before logging into your webmail. Go to:mysite.com/webmail Then log in with your email address and your email password. |
Once you’ve accessed your email for the first time and sent a few test emails, you’re ready for Setting Up Your Desktop Email Client.