Using Custom Error Pages
Error pages are a part of any website. No matter what, website visitors will sometimes encounter error pages. If you use custom error pages, however, you can turn an error page into a positive user experience. This tutorial will show you how to add custom error pages to your websites.
Before you set up your error pages, you’ll need to create your error pages. You can do this however you’d like: hand coding your page, using a site builder, or another way. When you’re done building your error page, save the file so it an be uploaded to your server. If you are using cPanel to manage your error pages, you can only use HTML.
Once you create your error pages, you are ready to add them to your website. There are two ways to set up custom error pages:
- Using your control panel:
- Using the command line (Linux)
Using cPanel to Set Up Custom Error Pages

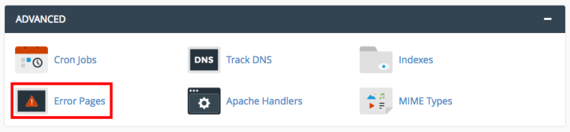
- Log into your cPanel account. On the home page, click on Error Pages in the Advanced section.

- Make sure the domain is correct for the error pages you want to customize. Click on an error code to start customizing the page.
- Copy and paste your error page HTML into the text field. Make sure to Save your work when you’re done and test your new error pages.
Using Plesk to Set Up Custom Error Pages
- Log into your Plesk account.
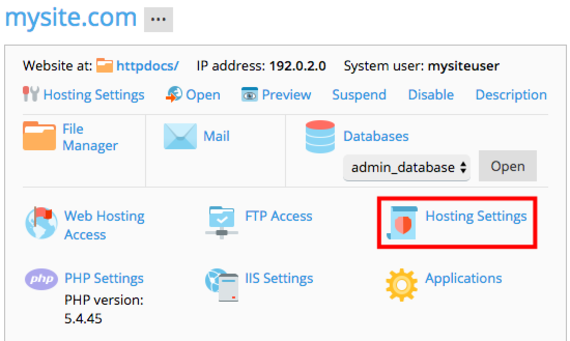
- Select the website where you want to use custom error pages. In Service Provider view, click on Domains in the left navigation menu and click on the domain you need. In Power User view, click on Websites & Domains in the left navigation menu.
- Click on Hosting Settings.

- Find Custom error documents in the list of hosting settings. Make sure the box is checked to allow custom error documents. Click OK to save your settings and return to the domain management page.
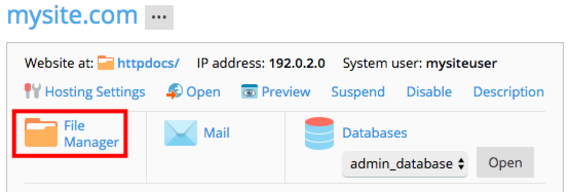
- Now, you’ll upload your custom error documents. Click on File Manager.

- In your home directory, click on the folder called error_docs. This is where all the default error documents are stored. There are two options here:

- Upload a new error page file with the same name as the default file, deleting the default file.
- Open the existing error page by clicking the menu icon

- Make sure to save your new files and test your new pages!


Troubleshooting: Using Different File Names and File Types
- From the domain management page, click on Virtual Directories.
- Click on the Error Documents tab. Here you’ll see a list of all the error pages and their file names.
- Choose the error page where you want to rename the default file. You’ll be able to change the file name, path, and file type a needed. Make sure to click OK when you’re done.
Using .htaccess to Set Up Custom Error Pages (Linux Only)
If you don’t want to use cPanel to manage your error pages, you can edit your website’s .htaccess instead. Before editing your htaccess file, make sure you’re also familiar with using the command line to access your server and edit data and familiar with FTP.
- Before editing your htaccess file, upload your customized error pages to your server. You can do this via FTP or by using the File Manager in cPanel or Using the File Manager in Plesk. Put these files in the public_html directory for your website.
- Log into your server via Secure Shell (SSH) using the terminal program of your choice.
- Open the htaccess file that corresponds with the domain where you want to use custom error pages.
- To this file, add this information:
# serve custom error pages
ErrorDocument 400 /errors/400.html
Replace /errors/400.html with the filepath to an error page you have uploaded. This example has “400,” for a 400 error.
- Add as many lines as needed, changing the error number and the file path as needed.
- When you’re done adding to your htaccess file, save and exit the file. Then, test your website to make sure your error pages are functioning.