Adding a Sender Policy Framework (SPF) Record
SPF records are a special type of DNS record. Specifically, it’s a list of servers that are allowed to send email from your domain. This prevents email address spoofing (when spammers send email that looks like it’s coming from your mailserver). Spammers spoof your address to make it more likely that recipients will open spam emails and less likely that the messages will be marked as spam.
There are two parts to adding an SPF record:
Writing Your SPF Record
All SPF records are stored in your DNS information as TXT records. If you aren’t familiar with DNS records, read What Are DNS Records? first.
SPF Record Syntax
Raw SPF records look like this:
domain.com. IN TXT "v=spf1 a mx ~all"
They look a little bit intimidating, but they can be easily broken down into different parts.
- domain.com is the domain the SPF record applies to. You create a separate SPF record for every domain you want to authenticate.
- IN TXT is the DNS record type.
- v=spf1 designates this record as an SPF record.
- a allows mail to be sent from the server that matches the domain’s main A record.
- mx allows mail to be sent from the domain that matches the email address’s MX records.
- ~all determines how mail is handled if it doesn’t match the other rules. The tilde (~) signifies that messages that don’t pass will be carefully scrutinized by other spam prevention techniques.
This default SPF record is simple but effective. You can use this record directly by replacing “domain.com” with your domain (remember to keep the ending period). There are, however a few other options.
- Adding ip4:ipaddress specifies an IPv4 that is allowed to send mail. To use this, replace “ipaddress” with your server’s IP address.
- Adding ip6:ipaddress specifies an IPv6 that is allowed to send mail. To use this, replace “ipaddress” with your server’s IP address.
- If you want mail that doesn’t pass your rules to be strongly rejected, use -all instead of ~all.
Premium Business Email and SPF Records |
If you are looking for how to create SPF Records in Premium Business Email, please see the Managing DNS for Premium Business Email article. |
Knowing how to read and create your own SPF records is helpful for troubleshooting. If your server has cPanel, you can auto-generate SPF records and then copy and paste them where they need to go. If you don’t have cPanel, you can write your own SPF records and check them on an online SPF record checker.
Auto-Generating Your SPF Record with cPanel (Linux Only)
cPanel has a pretty effective SPF record generator. If you use cPanel, we recommend using their SPF generator, even if you have to update the DNS record somewhere else.
- Log into the cPanel account where you want to create the SPF record. Remember, SPF records are tied to a domain, so each domain needs its own record. If you don’t have a cPanel account, read Creating a cPanel User Account first.
- Scroll down to Email and then click on Authentication.

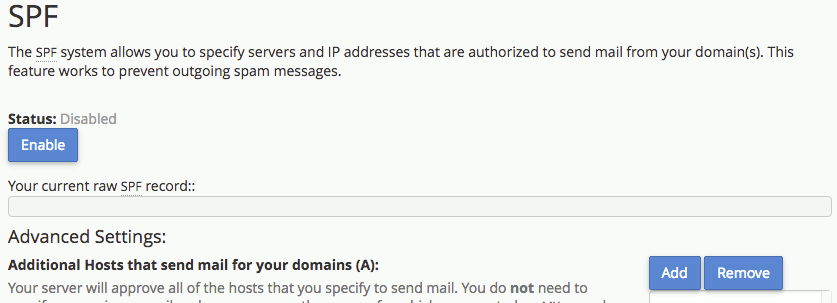
- On the Email Authentication page, you’ll see two different methods, DKIM and SPF. We recommend using both, but right now we’ll only cover SPF. If SPF shows Status: Disabled, click Enable to start creating your SPF record. Once you enable SPF, you’ll see a field called Your current raw SPF record. This record should look familiar! It has all the parts discussed earlier. cPanel also adds the server IP address by default. If you only use your server to send mail, this is all the information you need and you can add your record to your DNS as necessary. But, you can also add different modifiers to your record, too by adding Advanced Settings.

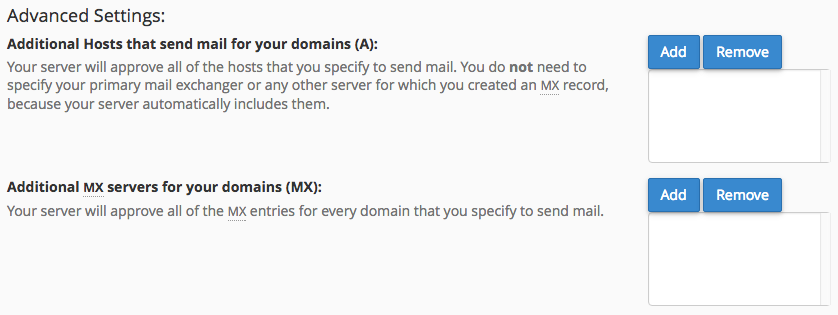
- cPanel walks you through adding more mail hosts, more MX records, additional IP addresses, and other domains you’d like to include. Simply click Add and fill in the domain name or IP address. cPanel will prompt you for the correct information.

- Once you have selected any advanced settings, you can choose to exclude all other domains from sending mail. If you want to do this, check the box next to All Entry (ALL).

- Once you have all the settings you want, click Update. You’ll see your new SPF record created for you!


So you have your SPF record generated by cPanel. What do you do with it? You need to add your SPF record to your DNS to start using SPF for email authentication.
Adding Your SPF Record to DNS
Now that you’ve created your SPF record, you need to add it to your DNS records. These directions are different depending on where your DNS is hosted:
- Your DNS is hosted at Liquid Web.
- Your DNS is hosted on the same server as your email (cPanel/WHM).
- Your DNS is hosted on the same server as your email (Plesk).
- Your DNS is hosted with another company.
If you don’t know where your DNS is hosted, read Where Is My DNS Hosted?
Your DNS Is Hosted at Liquid Web
If you are using Liquid Web’s nameservers, you can update your DNS records right in your Liquid Web account. Liquid Web’s nameservers are:
- ns.liquidweb.com
- ns1.liquidweb.com
- ns.sourcedns.com
- ns1.sourcedns.com
As long as your domain is using one of these nameservers, you’re good to go!
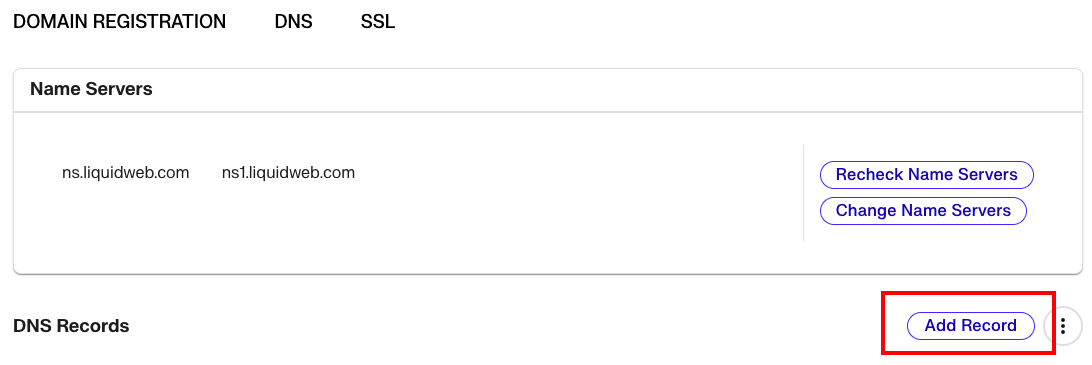
- Log into your Liquid Web account.
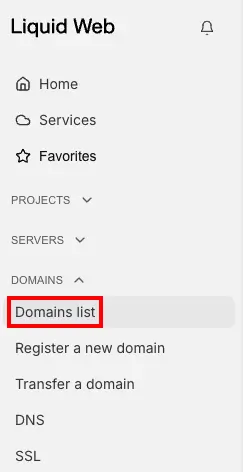
- In the left navigation menu, click on Domains list.

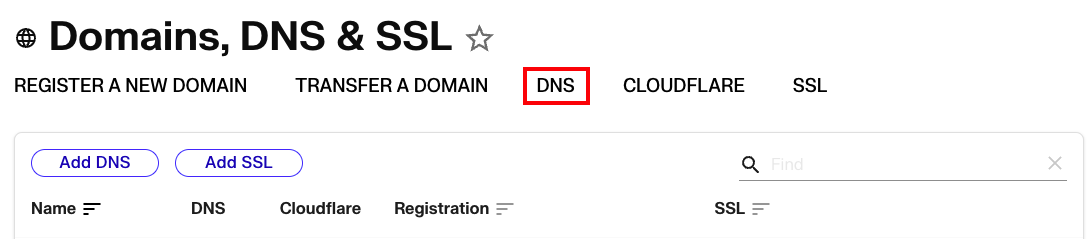
- The Domains Dashboard has five tabs along the top. Click on DNS.

- Select the Domain you’d like add an SPF Record for by clicking on the domain name. You’ll see a list of your current DNS records. At the top of the list of DNS records, you’ll see the Add Record button. Click Add Record.

- The first field in your new record is for the type. Choose TXT from the dropdown menu.

- The second field is the Subdomain name. Leave this field blank so that the SPF record applies to your whole domain.
- The third field is the Data field. Here, you’ll copy and paste the record cPanel created for you (or that you created). Enclose the data in quotation marks:
For cPanel email use: “v=spf1 +a +mx +ip4:192.0.2.0 ~all”
For Premium Business email use: “v=spf1 include:emailsrvr.com -all” - The last field is the time to live, or TTL. This is how quickly new changes will take effect. You can match this to your other DNS records (typically 3600 seconds, or one hour).
- Click the checkmark to save your text record.


Your DNS Is Hosted on the Same Server as Your Email (cPanel/WHM)
If you are using private nameservers on the same server as your email, cPanel will set up your SPF records automatically! So, once you follow the steps to auto-generate your SPF records, they are automatically added to your DNS zone in WHM. Just confirm they are correct in WHM:
- Log into WHM.
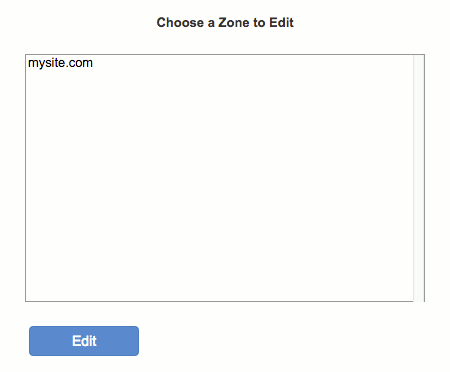
- In the search bar above the left navigation, search for “DNS.” Then, click on Edit DNS Zone.
- Click on the domain where you auto-generated the DNS record in cPanel, then click Edit.

- Scroll down and check to see that your SPF records are included. If they are, you’re all set!
- If the SPF record isn’t there, simply add a new record by copying and pasting the SPF record information into a new TXT record.
Your DNS Is Hosted on the Same Server as Your Email (Plesk)
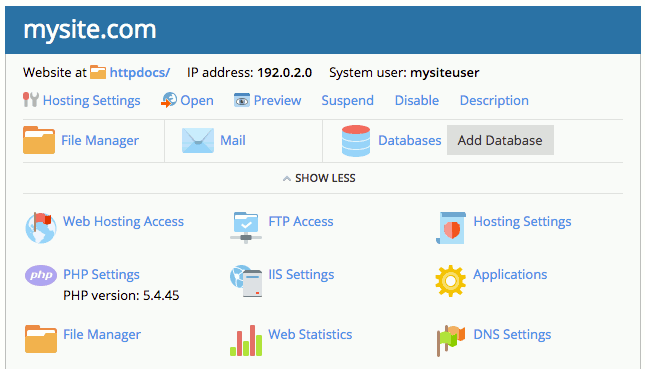
- Log into Plesk. If you aren’t familiar with Plesk, read Getting Started with Plesk.
- If you are in Service Provider view, click on Domains in the left navigation menu. Then, click on the domain where you’re adding an SPF record. If you are in Power User view, click on Websites & Domains and scroll down to find the domain where you’re adding an SPF record.
- When you find the domain, find and click on the icon for DNS Settings.

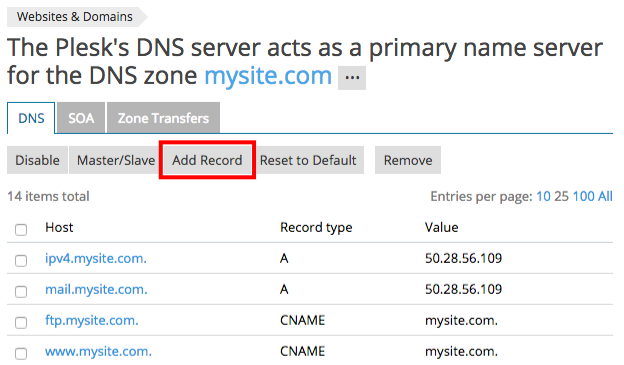
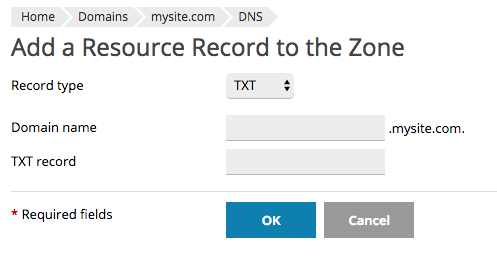
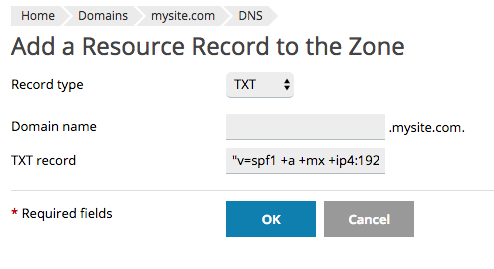
- Click on Add Record.

- From the Record Type dropdown menu, select TXT. Leave the Domain Name field blank to cover your whole domain.
- Paste the text from your SPF record into the TXT Record field. Enclose the data in quotation marks:
"v=spf1 +a +mx +ip4:192.0.2.0 ~all"
- Click OK.
- Once you have added your record, you’ll be brought back to the main DNS page. Click Update at the top of the page to save your DNS changes.


Your DNS Is Hosted with Another Company
If you registered your domain at another company and host your DNS there, you log into your account with that company to manage your DNS. Find their DNS record editor and enter your SPF record. Enclose the actual record data in quotation marks:
"v=spf1 +a +mx +ip4:192.0.2.0 ~all"