Troubleshooting in cPanel: FTP: Failed to Retrieve Directory Listing
Problem
When connecting to your server via FTP client, you’ll be able to use your credentials to connect to your FTP server, but the connection will time out before your directory listing can be retrieved. The full error will look like this:
Command:    PASV
Response:    227 Entering Passive Mode (203,206,183,174,214,224)
Command:    LIST
Error:    Connection timed out
Error:    Failed to retrieve directory listing
This is due to passive FTP settings. There are two ways to use FTP: active and passive. Active FTP is when your FTP client contacts your server and asks that your server connect to the FTP client to start moving files. So, the server is connecting to the client. For passive FTP, your FTP client contacts your server and asks to use passive FTP. Then, your server tells the FTP client what port to use for data transfer, and the FTP client connects to that port. In passive FTP, the client is connecting to the server.
Active and passive FTP both have pros and cons. Passive FTP is often easier to configure around firewalls, but it depends on your server setup. As long as you are using a secure connection, there is no difference in security between active and passive FTP.
Solution
This specific error is almost always related to firewall port problems. Your server either doesn’t have the right ports open or doesn’t allow connections to random ports. There are two solutions:
- Forcing active FTP: relatively simple, no command line knowledge necessary.
- Modifying your firewall settings: requires modifying configuration files via command line.
Forcing Active FTP
The easiest solution to this time-out error is to force your FTP client to use active FTP instead of passive FTP. This will be slightly different based on your FTP client, but can usually be found in a Settings menu. If you use Filezilla (one of the most common FTP clients), here are more precise instructions:
- Open Filezilla.
- Click on File and then Settings (Filezilla and then Settings for OS X). This will open your setting preferences.
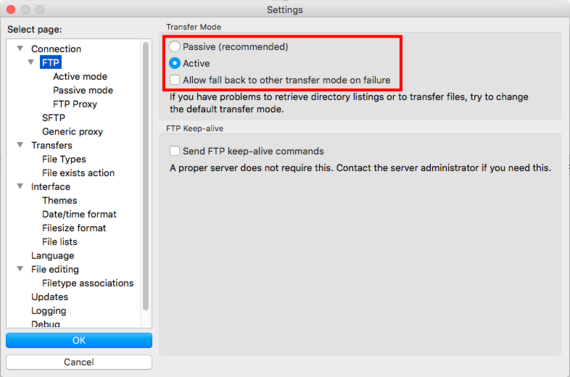
- In the pop box’s navigation menu, click on FTP.
- Select the radio button next to Active. Then, uncheck the box next to Allow fall back to other transfer modes on failure.

- Click OK to save your changes.
- Retry your FTP connection. If the connection works, you’re all set. If you still receive the same error or need to use passive FTP for a specific reason, keep reading!
Modifying Your Firewall Settings
The essential problem when using passive FTP is that the first query to connect to FTP gets through, accepting your login credentials, but the second query to set up a data transfer fails. This is because the second connection is set up over a random firewall port, which is often rejected by the firewall. To make passive FTP work properly, you’ll have to tell your FTP server (not your FTP client like Filezilla, but the FTP protocol on your server) what ports to connect through. Then, you need to tell your firewall which ports to allow these connections on. This process isn’t complicated, but it varies based on the FTP server and your firewall setup.
If you aren’t comfortable with logging into your server via SSH and making changes to configuration files via command line, don’t hesitate to contact the Most Helpful Humans in Hosting ™ for help.
Configuring Your FTP Server
cPanel uses two main FTP servers. The first step of this process is to find out which FTP server your server uses. You can do this easily in WHM.
- Log in to WHM.
- In the search bar, search for “FTP.” Then, click on FTP Server Selection.
- You will see either ProFTPD or Pure-FTPD selected. This is your FTP server.


With this information, you’re ready to change the configuration files.
- Using the terminal program of your choice, log into your server via SSH.
- Using a text editor (we like Vim), open your FTP server’s configuration file:
- If your server uses PureFTPD
/etc/pure-ftpd.conf
- If your server uses ProFTPD
/etc/proftpd.conf
- If your server uses PureFTPD
- In the configuration file, add this line of text (or if it already exists but is commented out, remove the # from the line) to the configuration file:
PassivePortRange 49152 65534
- Save and exit the configuration file.
- Now, you’ll prevent WHM from overwriting these settings in case you change things via WHM in the future. In the command line, type:
- If your server uses PureFTPD
echo "PassivePorts: 49152 65534" >> /var/cpanel/conf/pureftpd/main
/usr/local/cpanel/scripts/setupftpserver pure-ftpd --force
- If your server uses ProFTPD
echo "PassivePorts: 49152 65534" >> /var/cpanel/conf/proftpd/main
/usr/local/cpanel/scripts/setupftpserver proftpd --force
Then press Enter.
- If your server uses PureFTPD
- Now restart the FTP service by typing the appropriate command and pressing Enter:
- PureFTPD
service pure-ftpd restart
- ProFTPD
service proftpd restart
- PureFTPD
Your FTP server should now be ready to make passive FTP connections. Before you can connect, however, you have to open the same ports in your firewall that you designated in your FTP server configuration (49152 through 65534).
Opening Firewall Ports
Because you are already SSHed into your server, it makes sense to edit your firewall configurations via command line as well. You can also add the port numbers 49152-65534 to your CSF settings in WHM.
On a newer cPanel server, you will likely have one of two firewalls: APF or CSF. CSF is much more common than APF, especially if you have a newer server operating system. If you aren’t sure which firewall you have, you can run two simple commands to check for either one:
- To check for APF, type:
apf -t
and press Enter. If APF is installed, it will return a status.
- To check for CSF, type:
csf -v
and press Enter. If CSF is installed, it will return a version number.
Once you know if you’re using APF or CSF, you’re ready to add more ports to the configuration file. If you’re not using APF or CSF, contact the Most Helpful Humans in Hosting ™ and we’ll assist you.
- If you have logged out of your server, log back in via SSH.
- Using a text editor (we like Vim), open your firewall configuration file:
- If your server uses APF
/etc/apf/conf.apf
- If your server uses CSF
/etc/csf/csf.conf
- If your server uses APF
- Now, you’ll need to find the line that lists incoming port numbers and add the new ports.
- In APF, the line will look like this:
# Common inbound (ingress) TCP ports
IG_TCP_CPORTS="20,21,22,25,53,80,110,143,443,465,993,995,2082,2083,2084,2086,2087,2095,2096"
and you need to add to the list:
49152_65534
- In CSF, the line will look like this:
# Allow incoming TCP ports
TCP_IN = "20,21,22,25,53,80,110,143,443,465,993,995,2082,2083,2084,2086,2087,2095,2096"
and you need to add to the list:
49152:65534
- In APF, the line will look like this:
- Now, restart your firewall:
- APF
service apf restart
- CSF
csf -r
- APF
Once you’ve edited both your FTP server and firewall configurations, try logging into FTP using your FTP client. If you still get an error, you may also have the ports closed in your Storm firewall or a hardware firewall on your server.