Getting Started with InterWorx Web Panel
Control your server without being a command line guru with InterWorx. Even if you only host one website on your server, you can make many server-level adjustments keep your website running smoothly. You also use InterWorx to manage specific accounts on SiteWorx, your domain-level management system.
Logging into InterWorx for the First Time
When you created your server, a InterWorx account was automatically created. The easiest way to log into InterWorx is through your Liquid Web account.
- Log into your Liquid Web account. Your Server Overview should be the first thing you see when you log in.
- Under Your Hosting Infrastructure, click the [+] to the left of the server you’d like to log into.
- On the right there are three blue links: click on InterWorx.

- Enter the username and password provided by Liquid Web.
- Click Log In.
Navigating the InterWorx Interface
After you log into InterWorx, you’ll see a long list of navigation links to the left of your screen. Clicking on the navigation links will open additional menu items to help you manage your server.
You can also navigate InterWorx by using the search bar on the top left of the screen. It’s often faster to use the search bar than to click the navigation buttons. Search results show up immediately in a drop-down window as you type.
Important InterWorx Features
The first time you log into InterWorx, the list of options and features can be intimidating. Many of the features, however, are for advanced users or are more easily managed elsewhere. Let’s break down the most useful sections of InterWorx as you start to manage your server and create websites.
List SiteWorx Accounts
Click on SiteWorx in the left-hand navigation. Then, click on Accounts.

The Accounts section of InterWorx lists all of your active SiteWorx accounts. You can easily see which domains and accounts are on the server. Access any SiteWorx account by clicking on the SiteWorx link for that account.
If you click the edit link at the left of the account, you can modify a SiteWorx account. This includes changing the password, changing the IP address for the domain, modifying the account’s settings, and deleting the account.
Tip: |
| You can also log into SiteWorx for a domain by going directly to the login screen from your browser. Just enter your domain name or IP address and add :2443/siteworx at the end in your browser bar and press Enter to be directed to the InterWorx login screen. It should look something like this: example.com:2443/siteworx Remember to replace “example.com” with your domain name. Enter the SiteWorx user credentials and you’ll be logged into that account. |
Create a New SiteWorx Account/Domain
You can add SiteWorx accounts in the Account Management area by clicking the Add SiteWorx Account link at the top of the section. NodeWorx is great at managing server-level tasks. To manage each individual domain, however, you use SiteWorx. With SiteWorx, you can create email addresses, install services like WordPress, and control other aspects of your domain. See Creating a User Account/Domain in Interworx Web Panel for a full walkthrough of this process.
Firewall
InterWorx uses ConfigServer Security & Firewall (CSF) to provide firewall management on the server. To find CSF, go to the ConfigServer Plugin is in the left-hand navigation bar. Then, click on Security & Firewall. CSF is cool because it takes everything you’d see in a command line firewall configuration file and breaks it up to be more easily editable. Server firewalls are important because they help protect your server from outside threats.
If you look around at the ConfigServer Security & Firewall section, you’ll see many different options. Editing your firewall configuration files is an advanced technique, but it’s good to know you have the capability! The most important feature in CSF is blocking and unblocking IP addresses to increase your site’s security.
Another important part of your CSF configuration is the Firewall port configuration. Ports are like tiny holes in your firewall that let certain things, like email, reach your server. It’s important to have the ports open that you need, but not to leave extra ports open. Having extra ports open leaves your server vulnerable. The ports you’ll need for normal services are already open on your server, and any other ports are closed. Services that require opening other ports will have specific instructions on which ports to open. For more information about your InterWorx firewall, see Managing Your Firewall in InterWorx Web Panel.
Logs
Troubleshooting issues with your server almost always begins with checking the logs to identify specific errors. You can access all the important logs on the server by clicking Server, then Logs in the left navigation bar. Select the relevant log group from the drop-down menu and click Continue to see detailed information about that service.

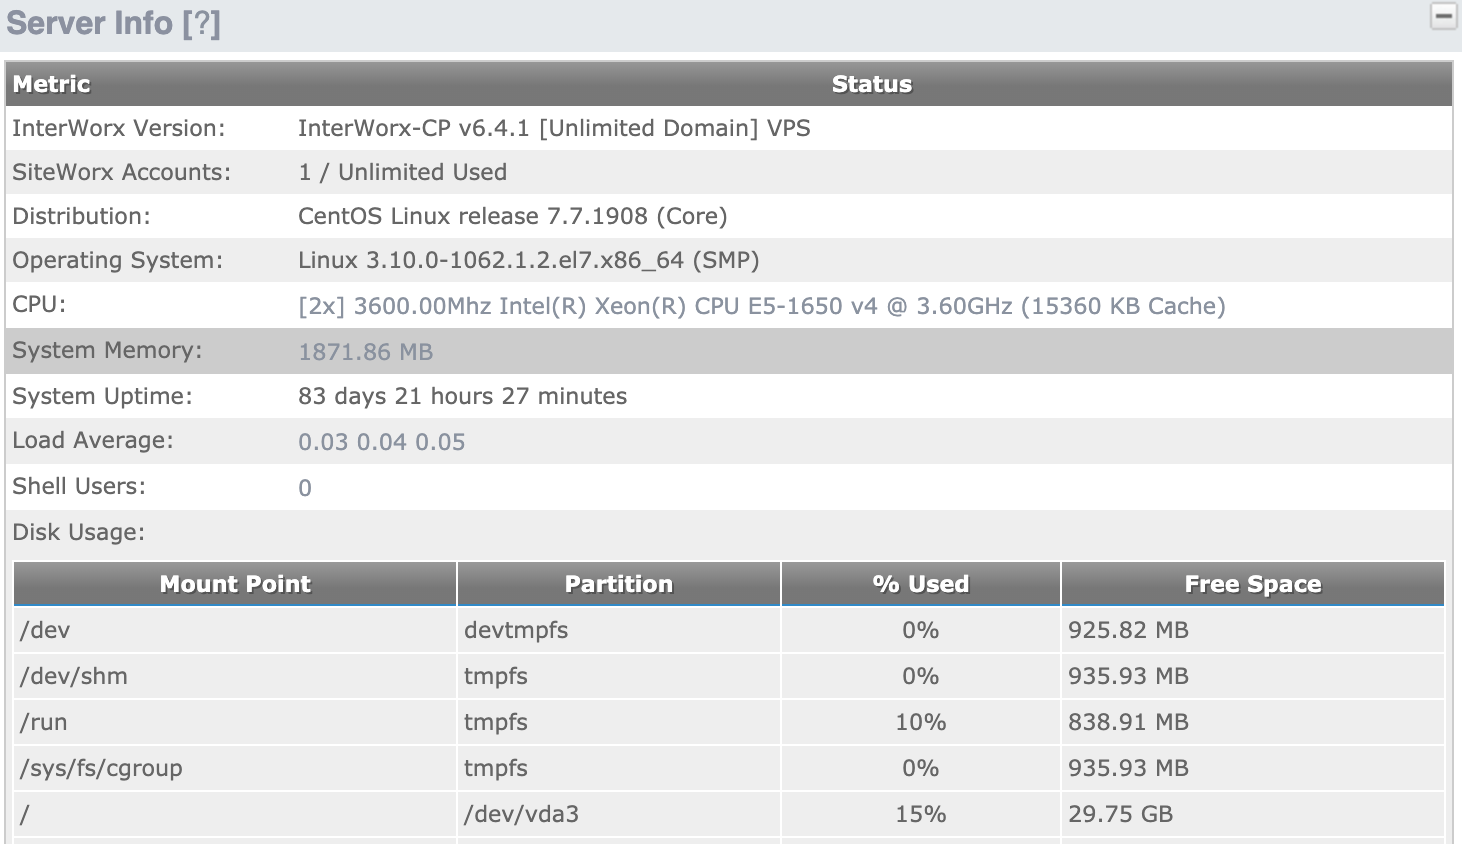
Finding Disk Usage
While this may not be an issue when you first start using your server, you’ll likely need to find disk usage statistics to help you manage the disk usage on your server at some point. InterWorx makes finding disk usage easy. Just login to control panel and expand the Server Info box on the main page. You’ll get a graphic display of all of your disk usage which can help you identify older files/folders that may be better located on a backup disk or other location.