Traceroute Command in Linux with Examples
Last Updated :
04 Nov, 2025
The traceroute command in Linux is a network diagnostic tool used to track the path that data packets take from your computer to a destination. It sends packets across the internet and shows you every "hop" (router or server) it passes through along the way, as well as how long each step takes.
Syntax of Traceroute
The basic syntax of the `traceroute`he command is as follows:
traceroute [options] destination
Examples of Traceroute Command
Traceroute is not installed by default in many Linux distributions, but you can easily install it. To use Traceroute, you need to install the Traceroute package. Here's how you can do it:
sudo apt install traceroute
When we executed the traceroute command it provides a detailed output that reveals the path taken by packets to reach the destination. Each line in the output represents a hop along the route, displaying the IP address of the router, its hostname (if available), and the round-trip time (RTT) for the probe.
1. Basic Traceroute Usage
To perform a basic traceroute operation to a destination, simply execute the following command:
traceroute google.com
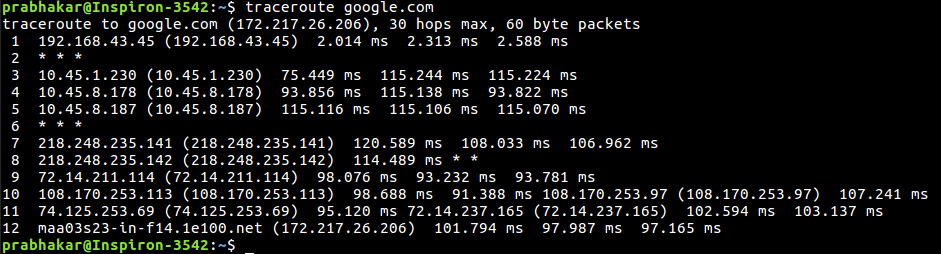
This command traces the route to the google.com domain, displaying the IP addresses and round-trip times for each hop along the path.
2. Using IPv4 With Traceroute
The -4 option allows users to specify the use of IPv4 when performing a traceroute operation. This is particularly useful when troubleshooting connectivity or network issues related to IPv4 addresses.
Syntax:
traceroute -4 google.com

Explanation: By using the `-4` option, traceroute exclusively employs IPv4 addresses to trace the route to the destination `google.com`
3. Using IPv6 With Traceroute
Conversely, the `-6` option instructs traceroute to use IPv6 addresses for the traceroute operation. This option is essential when dealing with networks that primarily utilize IPv6 addressing.
Syntax:
traceroute -6 google.com

Explanation: By specifying the `-6` option, traceroute utilizes IPv6 addresses to trace the route to the destination `google.com`.
4. Do Not Fragment Packet
The `-F` option prevents packet fragmentation during the traceroute operation. This can be beneficial when troubleshooting network connectivity issues related to packet fragmentation.
Syntax:
traceroute -F google.com

Explanation: By using the `-F` option, traceroute ensures that packets are not fragmented during the traceroute process to the destination `google.com`.
5. Starting From a Specific TTL (Time To Live)
The `-f` option allows users to specify the starting TTL (Time To Live) value for the traceroute operation. This option is helpful when you want to start tracing the route from a specific hop rather than the default starting point.
Syntax:
traceroute -f 10 google.com

Explanation: By providing the `-f` option followed by the TTL value (e.g., 10), traceroute initiates the traceroute operation from the specified hop to the destination `google.com`.
6. Routing the Packet Through a Gate
The -g option enables users to route the packet through a specific gateway during the traceroute operation. This is useful for directing traffic through a specific network path for diagnostic purposes.
Syntax:
traceroute -g 192.168.43.45 google.com

Explanation: By using the `-g` option followed by the gateway IP address, traceroute routes the packet through the specified gateway to reach the destination `google.com`.
7. Setting Maximum Number of Hops
The -m option allows users to set the maximum number of hops for the packet to reach the destination. By default, the maximum Timt to Live (TTL) value is set to 30.
Syntax:
traceroute -m 5 google.com

Explanation: By specifying the `-m` option followed by the desired TTL value (e.g., 5), traceroute limits the traceroute operation to a maximum of 5 hops to the destination `google.com`.
8. Disabling IP Address Resolution
The `-n` option instructs traceroute not to resolve IP addresses to their corresponding domain names. This can speed up the traceroute operation by skipping the Domain Name Server (DNS) resolution process.
Syntax:
traceroute -n google.com

Explanation: By using the `-n` option, traceroute displays IP addresses instead of resolving them to domain names during the traceroute operation to the destination `google.com`.
9. Setting Destination Port
The -p option allows users to specify the destination port to use during the traceroute operation. By default, the destination port is set to 33434. Syntax:
traceroute -p 20292 google.com

Explanation: By providing the `-p` option followed by the desired port number (e.g., 20292), traceroute uses the specified port for the traceroute operation to the destination `google.com`.
10. Setting Number of Probes per Hop
The -q option enables users to set the number of probes sent to each hop during the traceroute operation. By default, three probes are sent per hop.
Syntax:
traceroute -q 1 google.com

Explanation: By using the `-q` option followed by the desired number of probes (e.g., 1), traceroute sends the specified number of probes per hop during the traceroute operation to the destination `google.com`.
11. Setting Packet Length
Users can specify the full packet length using the `packetlen` option. By default, traceroute uses 60-byte packets.
Syntax:
traceroute google.com 100

Explanation: By providing the packet length value (e.g., 100), traceroute utilizes packets with the specified length during the traceroute operation to the destination `google.com`.
12. Displaying Help Messages
The --help option displays help messages and exits, providing users with information about the usage and available options of the traceroute command.
Syntax:
traceroute --help
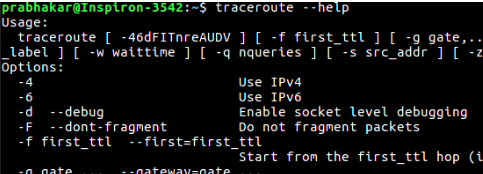 displaying help of traceroute
Explanation: By executing the `traceroute --help` command, traceroute displays help messages that detail the usage and available options of the traceroute command.
Options Available in Traceroute
Here are some options use with Traceroute
Option | Description |
|---|
-4 | Use IPv4 |
-6 | Use IPv6 |
-F | Do not fragment packet |
-f first_ttl | Start from the first TTL hop |
-g gate | Route the packet through gate |
-m max_ttl | Set the max number of hops |
-n | Do not resolve IP addresses to domain names |
-p port | Set the destination port |
-q nqueries | Set the number of probes per each hop |
packetlen | The full packet length |
--help | Display help messages and exit |
traceroute sends small test packets from your machine to the target destination. These packets are designed to expire quickly. When each packet expires, the router it passed through sends back a message. traceroute uses these messages to list all the routers along the path, along with how long each step takes.
How Traceroute Works (The "TTL Trick")
traceroute works by cleverly using a packet's Time To Live (TTL) value.
- To find Hop 1:
traceroute sends a packet with a TTL of 1. This tells the first router it reaches, "This packet can only live for 1 hop." The router (192.168.1.1) receives it, sees the TTL is 1, decrements it to 0, and drops the packet. It then sends an "ICMP Time Exceeded" error message back to your computer. Your computer receives this error, notes the router's IP and the RTT, and now knows the identity of Hop 1. - To find Hop 2:
traceroute sends a new packet with a TTL of 2. It passes Hop 1 (which decrements TTL to 1). When it hits Hop 2 (10.30.0.1), the router decrements the TTL to 0, drops it, and sends back a "Time Exceeded" error. Your computer now knows the identity of Hop 2. - And so on...: It repeats this process, incrementing the TTL by one each time, until a packet finally reaches the destination (
google.com). - Reaching the End: When the destination receives the packet, it sends back a "Destination Unreachable" message (because
traceroute uses an unused port by default). This is how your computer knows it has reached the end of the path.
What is the Difference Between Ping and Traceroute?
ping: Answers one question: "Are you there?" It's for checking if a single host is reachable and how long the total round-trip takes.traceroute: Answers the question: "How do I get to you?" It shows every step of the journey, allowing you to see where a failure or slowdown occurs.
What Factors Impact Hop Times?
- Physical Distance: More distance means more latency (longer hop times).
- Network Congestion: A router that is processing too much traffic will be slow to respond, increasing RTTs.
- Connection Type: Slower links (like DSL or satellite) will have higher latency than fiber optic links.
Explore
Getting Started with Linux
Installation with Linux
Linux Commands
Linux File System
Linux Kernel
Linux Networking Tools
Linux Process
Linux Firewall
Shell Scripting & Bash Scripting
Linux Administrator System