
Planet Python
Last update: December 15, 2025 01:43 PM UTC
December 15, 2025
Real Python
Quiz: Writing DataFrame-Agnostic Python Code With Narwhals
In this quiz, you’ll test your understanding of what the Narwhals library offers you.
By working through this quiz, you’ll revisit many of the concepts presented in the Writing DataFrame-Agnostic Code With Narwhals tutorial.
Remember, also, the official documentation is a great reference source for the latest Narwhals developments.
[ Improve Your Python With 🐍 Python Tricks 💌 – Get a short & sweet Python Trick delivered to your inbox every couple of days. >> Click here to learn more and see examples ]
December 15, 2025 12:00 PM UTC
Python GUIs
Getting Started With Flet for GUI Development — Your First Steps With the Flet Library for Desktop and Web Python GUIs
Getting started with a new GUI framework can feel daunting. This guide walks you through the essentials of Flet, from installation and a first app to widgets, layouts, and event handling.
With Flet, you can quickly build modern, high‑performance desktop, web, and mobile interfaces using Python.
Getting to Know Flet
Flet is a cross-platform GUI framework for Python. It enables the development of interactive applications that run as native desktop applications on Windows, macOS, and Linux. Flet apps also run in the browser and even as mobile apps. Flet uses Flutter under the hood, providing a modern look and feel with responsive layouts.
The library's key features include:
- Modern, consistent UI across desktop, web, and mobile
- No HTML, CSS, or JS required, only write pure Python
- Rich set of widgets for input, layout, data display, and interactivity
- Live reload for rapid development
- Built-in support for theming, navigation, and responsive design
- Easy event handling and state management
Flet is great for building different types of GUI apps, from utilities and dashboards to data-science tools, business apps, and even educational or hobby apps.
Installing Flet
You can install Flet from PyPI using the following pip command:
$ pip install flet
This command downloads and installs Flet into your current Python environment. That's it! You can now write your first app.
Writing Your First Flet GUI App
To build a Flet app, you typically follow these steps:
- Import
fletand define a function that takes aPageobject as an argument. - Add UI controls (widgets) to the page.
- Use
flet.app()to start the app by passing the function as an argument.
Here's a quick Hello, World! application in Flet:
import flet as ft

def main(page: ft.Page):
    page.title = "Flet First App"
    page.window.width = 200
    page.window.height = 100
    page.add(ft.Text("Hello, World!"))

ft.app(target=main)
In the main() function, we get the page object as an argument. This object represents the root of our GUI. Then, we set the title and window size and add a Text control that displays the "Hello, World!" text.
Use page.add() to add controls (UI elements or widgets) to your app. To manipulate the widgets, you can use page.controls, which is a list containing the controls that have been added to the page.
Run it! Here's what your first app looks like.
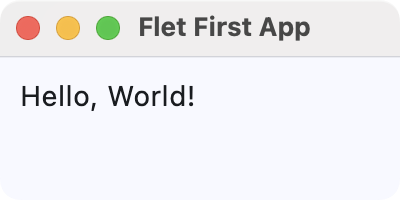 First Flet GUI application
You can run a Flet app as you'd run any Python app in the terminal. Additionally, Flet allows you to use the flet run command for live reload during development.
Exploring Flet Controls (Widgets)
Flet includes a wide variety of widgets, known as controls, in several categories. Some of these categories include the following:
In the following sections, you'll code simple examples showcasing a sample of each category's controls.
Buttons
Buttons are key components in any GUI application. Flet has several types of buttons that we can use in different situations, including the following:
FilledButton: A filled button without a shadow. Useful for important, final actions that complete a flow, like Save or Confirm.ElevatedButton: A filled tonal button with a shadow. Useful when you need visual separation from a patterned background.FloatingActionButton: A Material Design floating action button.
Here's an example that showcases these types of buttons:
import flet as ft

def main(page: ft.Page):
    page.title = "Flet Buttons Demo"
    page.window.width = 200
    page.window.height = 200

    page.add(ft.ElevatedButton("Elevated Button"))
    page.add(ft.FilledButton("Filled Button"))
    page.add(ft.FloatingActionButton(icon=ft.Icons.ADD))

ft.app(target=main)
Here, we call the add() method on our page object to add instances of ElevatedButton, FilledButton, and FloatingActionButton. Flet arranges these controls vertically by default.
Run it! You'll get a window that looks like the following.
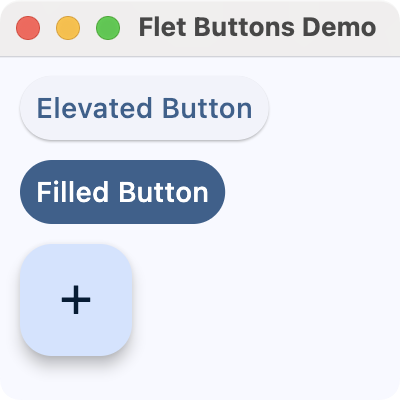 Flet buttons demo
Input and Selections
Input and selection controls enable users to enter data or select values in your app's GUI. Flet provides several commonly used controls in this category, including the following:
TextField: A common single-line or multi-line text entry control.Dropdown: A selection control that lets users pick a value from a list of options.Checkbox: A control for boolean input, often useful for preferences and agreement toggles.Radio: A selection radio button control commonly used inside aRadioGroupto choose a single option from a set.Slider: A control for selecting a numeric value along a track.Switch: A boolean on/off toggle.
Here's an example that showcases some of these input and selection controls:
import flet as ft

def main(page: ft.Page):
    page.title = "Flet Input and Selections Demo"
    page.window.width = 360
    page.window.height = 320

    name = ft.TextField(label="Name")
    agree = ft.Checkbox(label="I agree to the terms")
    level = ft.Slider(
        label="Experience level",
        min=0,
        max=10,
        divisions=10,
        value=5,
    )
    color = ft.Dropdown(
        label="Favorite color",
        options=[
            ft.dropdown.Option("Red"),
            ft.dropdown.Option("Green"),
            ft.dropdown.Option("Blue"),
        ],
    )
    framework = ft.RadioGroup(
        content=ft.Column(
            [
                ft.Radio(value="Flet", label="Flet"),
                ft.Radio(value="Tkinter", label="Tkinter"),
                ft.Radio(value="PyQt6", label="PyQt6"),
                ft.Radio(value="PySide6", label="PySide6"),
            ]
        )
    )
    notifications = ft.Switch(label="Enable notifications", value=True)

    page.add(
        ft.Text("Fill in the form and adjust the options:"),
        name,
        agree,
        level,
        color,
        framework,
        notifications,
    )

ft.app(target=main)
After setting the window's title and size, we create several input controls:
- A
TextFieldfor the user's name - A
Checkboxto agree to the terms - A
Sliderto select an experience level from 0 to 10 - A
Dropdownto pick a favorite color - A
RadioGroupwith several framework choices - A
Switchto enable or disable notifications, which defaults to ON
We add all these controls to the page using page.add(), preceded by a simple instruction text. Flet lays out the controls vertically (the default) in the order you pass them.
Run it! You'll see a simple form that uses text input, dropdowns, checkboxes, radio buttons, sliders, and switches.
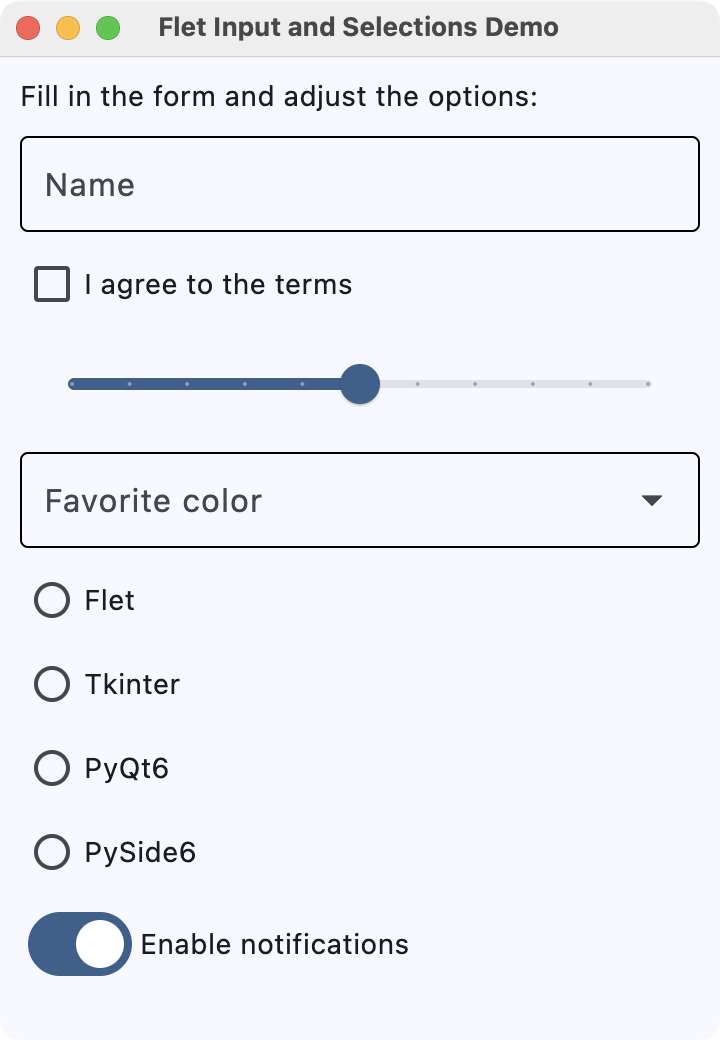 Flet input and selection controls demo
Navigation
Navigation controls allow users to move between different sections or views within an app. Flet provides several navigation controls, including the following:
NavigationBar: A bottom navigation bar with multiple destinations, which is useful for switching between three to five primary sections of your app.AppBar: A top app bar that can display a title, navigation icon, and action buttons.
Here's an example that uses NavigationBar to navigate between different views:
import flet as ft

def main(page: ft.Page):
    page.title = "Flet Navigation Bar Demo"
    page.window.width = 360
    page.window.height = 260

    info = ft.Text("You are on the Home tab")

    def on_nav_change(e):
        idx = page.navigation_bar.selected_index
        if idx == 0:
            info.value = "You are on the Home tab"
        elif idx == 1:
            info.value = "You are on the Search tab"
        else:
            info.value = "You are on the Profile tab"
        page.update()

    page.navigation_bar = ft.NavigationBar(
        selected_index=0,
        destinations=[
            ft.NavigationBarDestination(icon=ft.Icons.HOME, label="Home"),
            ft.NavigationBarDestination(icon=ft.Icons.SEARCH, label="Search"),
            ft.NavigationBarDestination(icon=ft.Icons.PERSON, label="Profile"),
        ],
        on_change=on_nav_change,
    )

    page.add(
        ft.Container(content=info, alignment=ft.alignment.center, padding=20),
    )

ft.app(target=main)
The NavigationBar has three tabs: Home, Search, and Profile, each with a representative icon that you provide using ft.Icons. Assigning this bar to page.navigation_bar tells Flet to display it as the app's bottom navigation component.
The behavior of the bar is controlled by the on_nav_change() callback (more on this in the section on events and callbacks). Whenever the user clicks a tab, Flet calls on_nav_change(), which updates the text with the appropriate message.
Run it! Click the different tabs to see the text on the page update as you navigate between sections.
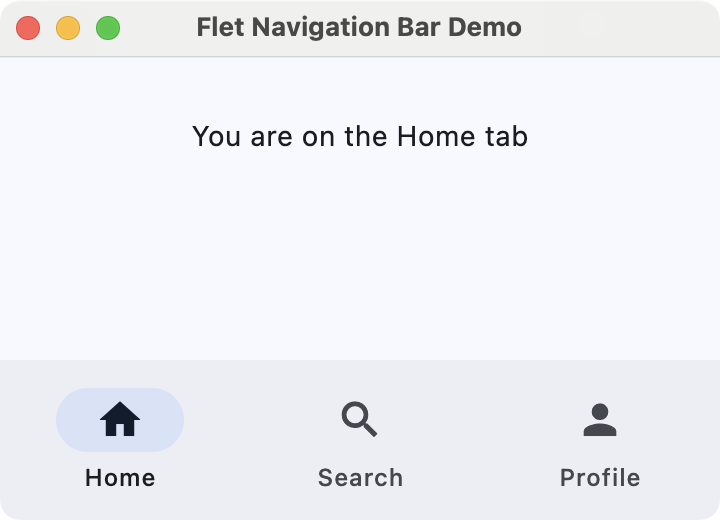 Flet navigation bar demo
Information Displays
We can use information-display controls to present content to the user, such as text, images, and rich list items. These controls help communicate status, context, and details without requiring user input.
Some common information-display controls include the following:
Text: The basic control for showing labels, paragraphs, and other readable text.Image: A control for displaying images from files, assets, or URLs.
Here's an example that combines these controls:
import flet as ft

def main(page: ft.Page):
    page.title = "Flet Information Displays Demo"
    page.window.width = 340
    page.window.height = 400

    header = ft.Text("Latest image", size=18)

    hero = ft.Image(
        src="https://picsum.photos/320/320",
        width=320,
        height=320,
        fit=ft.ImageFit.COVER,
    )

    page.add(
        header,
        hero,
    )

ft.app(target=main)
In main(), we create a Text widget called header to show "Latest image" with a larger font size. The hero variable is an Image control that loads an image from the URL https://picsum.photos/320/320.
We use a fixed width and height together with ImageFit.COVER so that the image fills its box while preserving aspect ratio and cropping if needed.
Run it! You'll see some text and a random image from Picsum.photos.
 Flet information display demo
Dialogs, Alerts, and Panels
Dialogs, alerts, and panels enable you to draw attention to important information or reveal additional details without leaving the current screen. They are useful for confirmations, warnings, and expandable content.
Some useful controls in this category are listed below:
AlertDialog: A modal dialog that asks the user to acknowledge information or make a decision.Banner: A prominent message bar displayed at the top of the page for important, non-modal information.DatePicker: A control that lets the user pick a calendar date in a pop-up dialog.TimePicker: A control for selecting a time of day from a dialog-style picker.
Here's an example that shows an alert dialog to ask for exit confirmation:
import flet as ft

def main(page: ft.Page):
    page.title = "Flet Dialog Demo"
    page.window.width = 300
    page.window.height = 300

    def on_dlg_button_click(e):
        if e.control.text == "Yes":
            page.window.close()
        page.close(dlg_modal)

    dlg_modal = ft.AlertDialog(
        modal=True,
        title=ft.Text("Confirmation"),
        content=ft.Text("Do you want to exit?"),
        actions=[
            ft.TextButton("Yes", on_click=on_dlg_button_click),
            ft.TextButton("No", on_click=on_dlg_button_click),
        ],
        actions_alignment=ft.MainAxisAlignment.END,
    )

    page.add(
        ft.ElevatedButton(
            "Exit",
            on_click=lambda e: page.open(dlg_modal),
        ),
    )

ft.app(target=main)
In this example, we first create an AlertDialog with a title, some content text, and two action buttons labeled Yes and No.
The on_dlg_button_click() callback checks which button was clicked and closes the application window if the user selects Yes. The page shows a single Exit button that opens the dialog. After the user responds, the dialog is closed.
Run it! Try clicking the button to open the dialog. You'll see a window similar to the one shown below.
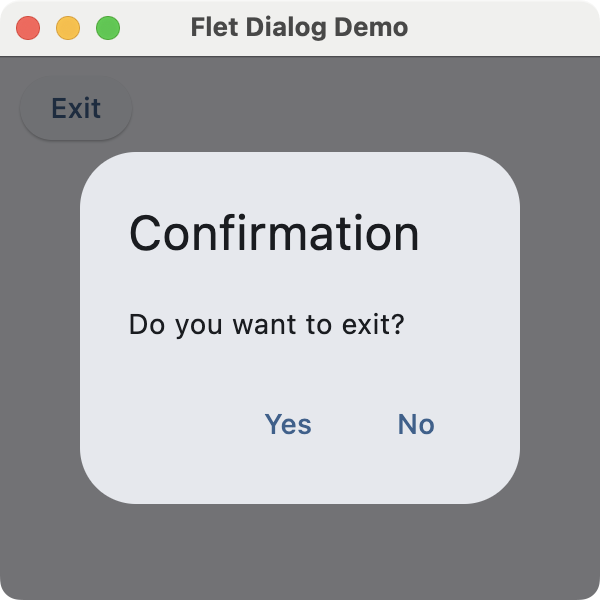 Flet dialog demo
Laying Out the GUI With Flet
Controls in this category are often described as container controls that can hold child controls. These controls enable you to arrange widgets on an app's GUI to create a well-organized and functional interface.
Flet has many container controls. Here are some of them:
Page: This control is the root of the control hierarchy or tree. It is also listed as an adaptive container control.Column: A container control used to arrange child controls in a column.Row: A container control used to arrange child controls horizontally in a row.Container: A container control that allows you to modify its size (e.g.,height) and appearance.Stack: A container control where properties likebottom,left,right, andtopallow you to place children in specific positions.Card: A container control with slightly rounded corners and an elevation shadow.
By default, Flet stacks widgets vertically using the Column container. Here's an example that demonstrates basic layout options in Flet:
import flet as ft

def main(page: ft.Page):
    page.title = "Flet Layouts Demo"
    page.window.width = 250
    page.window.height = 300

    main_layout = ft.Column(
        [
            ft.Text("1) Vertical layout:"),
            ft.ElevatedButton("Top"),
            ft.ElevatedButton("Middle"),
            ft.ElevatedButton("Bottom"),
            ft.Container(height=12),  # Spacer

            ft.Text("2) Horizontal layout:"),
            ft.Row(
                [
                    ft.ElevatedButton("Left"),
                    ft.ElevatedButton("Center"),
                    ft.ElevatedButton("Right"),
                ]
            ),
        ],
    )

    page.add(main_layout)

ft.app(target=main)
In this example, we use a Column object as the app's main layout. This layout stacks text labels and buttons vertically, while the inner Row object arranges three buttons horizontally. The Container object with a fixed height acts as a spacer between the vertical and horizontal sections.
Run it! You'll get a window like the one shown below.
 Flet layouts demo
Handling Events With Callbacks
Flet uses event handlers to manage user interactions and perform actions. Most controls accept an on_* argument, such as on_click or on_change, which you can set to a Python function or other callable that will be invoked when an event occurs on the target widget.
The example below provides a text input and a button. When you click the button, it opens a dialog displaying the input text:
import flet as ft

def main(page: ft.Page):
    page.title = "Flet Event & Callback Demo"
    page.window.width = 340
    page.window.height = 360

    def on_click(e):  # Event handler or callback function
        dialog_text.value = f'You typed: "{txt_input.value}"'
        page.open(dialog)
        page.update()

    txt_input = ft.TextField(label="Type something and press Click Me!")
    btn = ft.ElevatedButton("Click Me!", on_click=on_click)
    dialog_text = ft.Text("")
    dialog = ft.AlertDialog(
        modal=True,
        title=ft.Text("Dialog"),
        content=dialog_text,
        actions=[ft.TextButton("OK", on_click=lambda e: page.close(dialog))],
        open=False,
    )

    page.add(
        txt_input,
        btn,
    )

ft.app(target=main)
When you click the button, the on_click() handler or callback function is automatically called. It sets the dialog's text and opens the dialog. The dialog has an OK button that closes it by calling page.close(dialog).
Run it! You'll get a window like the one shown below.
 Flet callbacks
To see this app in action, type some text into the input and click the Click Me! button.
Conclusion
Flet offers a powerful and modern toolkit for developing GUI applications in Python. It allows you to create desktop and web GUIs from a single codebase. In this tutorial, you've learned the basics of using Flet for desktop apps, including controls, layouts, and event handling.
Try building your first Flet web app and experimenting with widgets, callbacks, layouts, and more!
For an in-depth guide to building Python GUIs with PySide6 see my book, Create GUI Applications with Python & Qt6.
December 15, 2025 06:00 AM UTC
Zato Blog
Microsoft Dataverse with Python and Zato Services
Microsoft Dataverse with Python and Zato Services


Overview
Microsoft Dataverse is a cloud-based data storage and management platform, often used with PowerApps and Dynamics 365.
Integrating Dataverse with Python via Zato enables automation, API orchestration, and seamless CRUD (Create, Read, Update, Delete) operations on any Dataverse object.
Below, you'll find practical code examples for working with Dataverse from Python, including detailed comments and explanations. The focus is on the "accounts" entity, but the same approach applies to any object in Dataverse.
Connecting to Dataverse and Retrieving Accounts
The main service class configures the Dataverse client and retrieves all accounts. Both the handle and get_accounts methods are shown together for clarity.
# -*- coding: utf-8 -*-

# Zato
from zato.common.typing_ import any_
from zato.server.service import DataverseClient, Service

class MyService(Service):

    def handle(self):

        # Set up Dataverse credentials - in a real service,
        # this would go to your configuration file.

        tenant_id = '221de69a-602d-4a0b-a0a4-1ff2a3943e9f'
        client_id = '17aaa657-557c-4b18-95c3-71d742fbc6a3'
        client_secret = 'MjsrO1zc0.WEV5unJCS5vLa1'
        org_url = 'https://org123456.api.crm4.dynamics.com'

        # Build the Dataverse client using the credentials
        client = DataverseClient(
            tenant_id=tenant_id,
            client_id=client_id,
            client_secret=client_secret,
            org_url=org_url
        )

        # Retrieve all accounts using a helper method
        accounts = self.get_accounts(client)

        # Process the accounts as needed (custom logic goes here)
        pass

    def get_accounts(self, client:'DataverseClient') -> 'any_':

        # Specify the API path for the accounts entity
        path = 'accounts'

        # Call the Dataverse API to retrieve all accounts
        response = client.get(path)

        # Log the response for debugging/auditing

        self.logger.info(f'Dataverse response (get accounts): {response}')

        # Return the API response to the caller
        return response
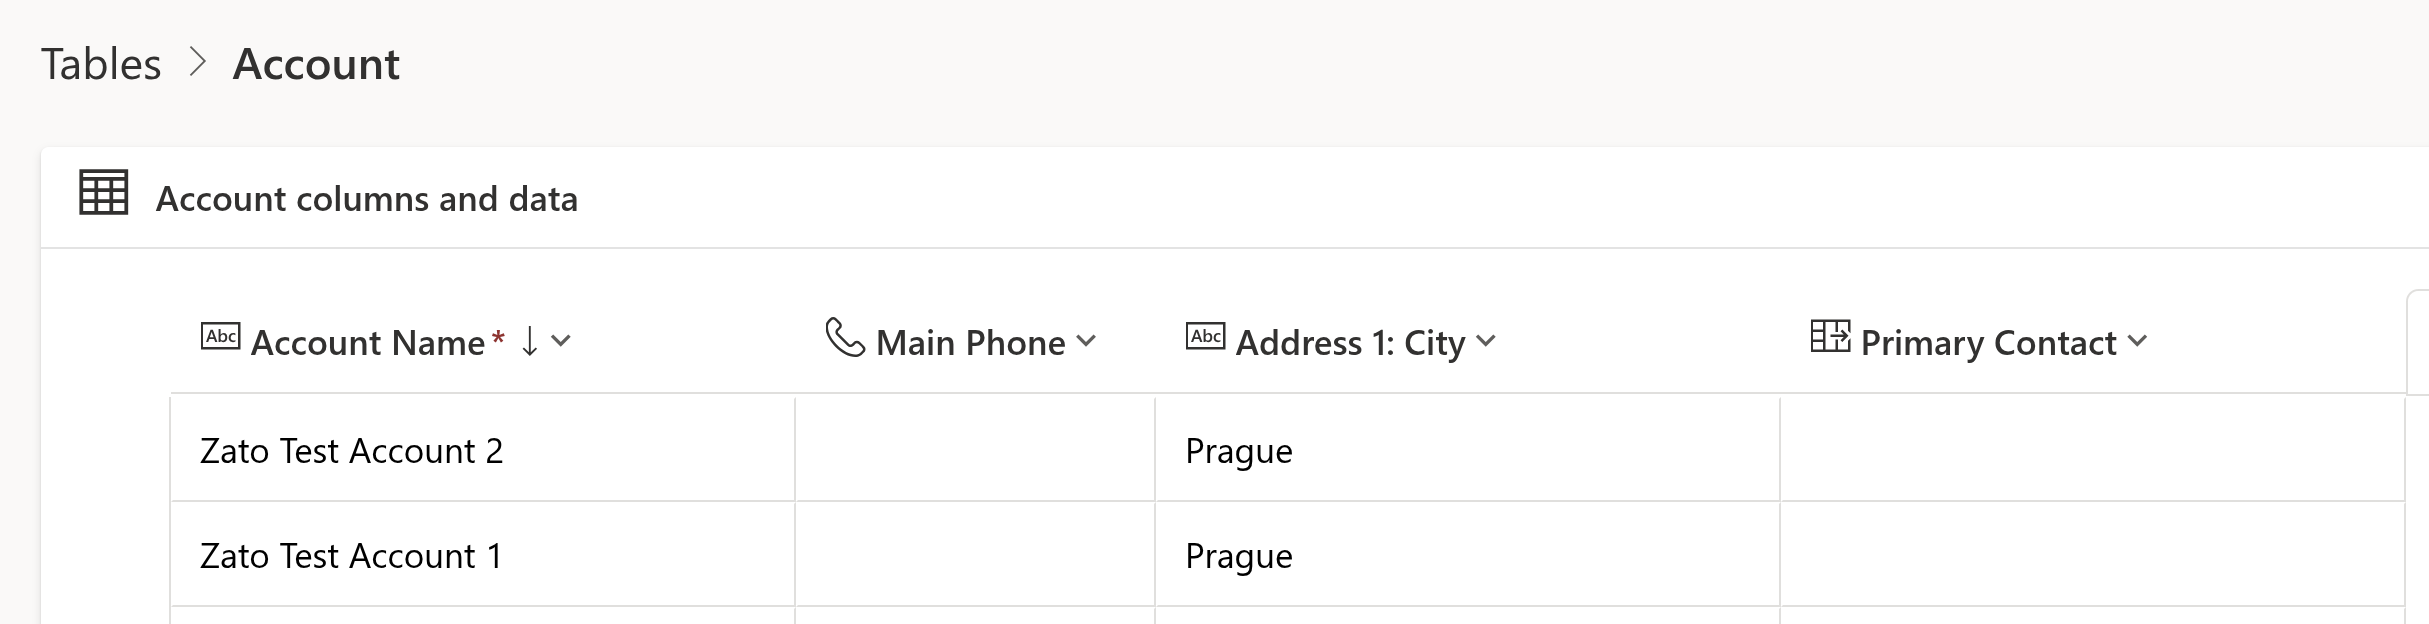
{'@odata.context': 'https://org1234567.crm4.dynamics.com/api/data/v9.0/$metadata#accounts',
'value': [{'@odata.etag': 'W/"11122233"', 'territorycode': 1,
'accountid': 'd92e6f18-36fb-4fa8-b7c2-ecc7cc28f50c', 'name': 'Zato Test Account 1',
'_owninguser_value': 'ea4dd84c-dee6-405d-b638-c37b57f00938'}]}
Let's check more examples - you'll note they all follow the same pattern as the first one.
Retrieving an Account by ID
def get_account_by_id(self, client:'DataverseClient', account_id:'str') -> 'any_':

    # Construct the API path using the account's GUID
    path = f'accounts({account_id})'

    # Call the Dataverse API to fetch the account
    response = client.get(path)

    # Log the response for traceability
    self.logger.info(f'Dataverse response (get account by ID): {response}')

    # Return the fetched account
    return response
Retrieving an Account by Name
def get_account_by_name(self, client:'DataverseClient', account_name:'str') -> 'any_':

    # Construct the API path with a filter for the account name
    path = f"accounts?$filter=name eq '{account_name}'"

    # Call the Dataverse API with the filter
    response = client.get(path)

    # Log the response for auditing
    self.logger.info(f'Dataverse response (get account by name): {response}')

    # Return the filtered account(s)
    return response
Creating a New Account
def create_account(self, client:'DataverseClient') -> 'any_':

    # Specify the API path for account creation
    path = 'accounts'

    # Prepare the data for the new account
    account_data = {
        'name': 'New Test Account',
        'telephone1': '+1-555-123-4567',
        'emailaddress1': '[email protected]',
        'address1_city': 'Prague',
        'address1_country': 'Czech Republic',
    }

    # Call the Dataverse API to create the account
    response = client.post(path, account_data)

    # Log the response for traceability
    self.logger.info(f'Dataverse response (create account): {response}')

    # Return the API response
    return response
Updating an Existing Account
def update_account(self, client:'DataverseClient', account_id:'str') -> 'any_':

    # Prepare the data to update
    update_data = {
        'name': 'Updated Account Name',
        'telephone1': '+1-555-987-6543',
        'emailaddress1': '[email protected]',
    }

    # Call the Dataverse API to update the account by ID
    response = client.patch(f'accounts({account_id})', update_data)

    # Log the response for auditing
    self.logger.info(f'Dataverse response (update account): {response}')

    # Return the updated account response
    return response
Deleting an Account
def delete_account(self, client:'DataverseClient', account_id:'str') -> 'any_':

    # Call the Dataverse API to delete the account
    response = client.delete(f'accounts({account_id})')

    # Log the response for traceability
    self.logger.info(f'Dataverse response (delete account): {response}')

    # Return the API response
    return response
API Path vs. PowerApps UI Table Names
A detail to note when working with Dataverse APIs is that the names you see in the PowerApps or Dynamics UI are not always the same as the paths expected by the API. For example:
- In PowerApps, you may see a table called Account.
- In the API, you must use the path accounts (lowercase, plural) when making requests.
This pattern applies to all Dataverse objects: always check the API documentation or inspect the metadata to determine the correct entity path.
Working with Other Dataverse Objects
While the examples above focus on the "accounts" entity, the same approach applies to any object in Dataverse: contacts, leads, opportunities, custom tables, and more. Simply adjust the API path and payload as needed.
Full CRUD Support
With Zato and Python, you get full CRUD (Create, Read, Update, Delete) capability for any Dataverse entity. The methods shown above can be adapted for any object, allowing you to automate, integrate, and orchestrate data flows across your organization.
Summary
This article has shown how to connect to Microsoft Dataverse from Python using Zato, perform CRUD operations, and understand the mapping between UI and API paths. These techniques enable robust integration and automation scenarios with any Dataverse data.
More resources
➤ Microsoft 365 APIs and Python Tutorial
➤ Python API integration tutorials
➤ What is an integration platform?
➤ Python Integration platform as a Service (iPaaS)
➤ What is an Enterprise Service Bus (ESB)? What is SOA?
➤ Open-source iPaaS in Python
December 15, 2025 03:00 AM UTC
December 14, 2025
EuroPython
Humans of EuroPython: Moisés Guimarães
EuroPython wouldn&apost exist without the dedicated volunteers who invest countless hours behind the scenes.
From coordinating speaker logistics and managing registration systems to designing the conference program, handling sponsorship relations, ensuring great quality of talk recordings, moderating sessions, organizing social events, and capturing key moments in photos—hundreds of hours of passionate work go into making each edition exceptional.
Read our interview with Moisés Guimarães, photographer and member of the Operations Team at EuroPython 2025. We may also be tempted to add “Chief Fun Officer” to the list of his roles.
Thank you for making every EuroPython so vibrant, and making us all look good in your photos!
 Moisés Guimarães, member of the Operations Team and photographer at EuroPython 2025
EP: Had you attended EuroPython before volunteering, or was volunteering your first experience with it?
Yes, I did attend before volunteering. My first EuroPython was in Edinburgh 2018 and only in Basel 2019 I started helping on site.
EP: Why do you volunteer?
I only got this far (away from home) because of Python conferences. Python Brasil 2016 opened my mind to a whole universe I was missing. PyCon CZ 2017 connected me with my first job in Europe, and EuroPython helps me to keep giving back, contributing to an environment that I love and cherish.
EP: What&aposs your favorite memory from volunteering at EuroPython?
I don’t have a favorite memory in this case, there are so many good ones that it would be a disservice to them. Ask me in person, and I will tell you lots of stories!
EP: How has volunteering at EuroPython impacted your own career or learning journey?
Volunteering at EuroPython has a huge impact on my ability to network, I don’t think I would have as many friends, acquaintances, and professional connections coming from Python conferences if I was flying solo.
EP: What&aposs one misconception about conference volunteering you&aposd like to clear up?
That you are not going to have time to enjoy the conference. To me, it actually amplifies the value I get from the conference.
EP: Is there one thing you took away from the experience that you still use today?
The network, especially related to event organizing for smaller conferences, which we keep doing all year round.
EP: What keeps you coming back to volunteer year after year?
The other volunteers and organizers.
EP: Thank you for your work, Moisés!
December 14, 2025 10:56 PM UTC
EuroPython Society
List of EPS Board Candidates for 2025/2026
At this year’s EuroPython Society General Assembly (GA), planned for Wednesday, December 17th, 2025, 20:00 CET, we will vote in a new board of the EuroPython Society for the term 2025/2026
List of Board Candidates
The EPS bylaws require one chair, one vice chair and 2 - 7 board members. The following candidates have stated their willingness to work on the EPS board. We are presenting them here (in alphabetical order by first name).
The following fine folks have expressed their desire to run for the next EPS board elections: Angel Ramboi, Aris Nivorils, Artur Czepiel, Ege Akman, Mia Bajić, Yulia Barabash.
Angel Ramboi
Engineer / Gamer / Geek / Wanderer
Hello everyone! My name is Angel, I’m a seasoned engineer with more than 20 years experience designing and building software and web apps. My current role doesn&apost involve much coding these days, still Python and its community is where my heart is. ☺️
My first EuroPython was in Florence 2012 where I was blown away by the amazing people gathered around the conference and the language. It was like nothing I&aposve ever experienced before and the energy was palpable ... I was hooked!
Since then I&aposve attended many EuroPythons, I was board member for the 2020 edition (briefly), an active on-site volunteer in 2019 and 2023, and joined the awesome Sponsors team for Prague 2024.
As a board member, one of my focus areas will be optimizing processes with the aim to make the organizing experience less stressful for the people involved, and whatever else is needed of me of course. Also bringing in positive vibes and fresh energy to every meeting. 🤩
Looking forward to an amazing conference next year. 🚀
Aris Nivorlis
Geoscientist / Data Steward / Pythonista
Aris is a geophysicist and data steward at Deltares, where he leverages data and tooling to tackle complex subsurface challenges. He’s passionate about promoting sustainable and reproducible scientific coding practices, and he actively contributes to the European Python community through conferences and initiatives.
Aris has been involved with EPS for the past two years; first as Ops Team Lead (2024) and currently as a board member (2025). He is the Chair of PyCon Sweden and has been a core organizer for the past four conferences. Aris is running for the EuroPython Society (EPS) Board to continue working in shaping its future direction.
He is particularly interested in how EPS can further support local Python communities, events, and projects, while ensuring the success of the EuroPython conference. Aris aims to build on the efforts from previous years toward a more independent and sustainable organisation team for EuroPython. One of his key goals is to lower the barriers for others to get involved as volunteers, organizers, and board members, fostering a more inclusive and accessible society.
Artur Czepiel (nomination for Chair)
Software developer
I’m a Software Developer based in Poland. I attended my first EuroPython in 2016, joined the organising team after the 2017 conference, and have since served five terms on the EPS Board, two of them as Chair.
Over the years, I have contributed to various parts of the Conference and the Society, including infrastructure, programme, community outreach, and most of the financial spreadsheets 🙂
My main focus for next year would be to set up a local presence at the EP2026 location (on the fiscal, legal, and community sides), improve our internal processes around financial aid and reimbursements, and continue infrastructure upgrades. As a bonus goal, I would like to lay the groundwork for a Fiscal Sponsorship programme.
Ege Akman
Pythonista / Open Source Advocate / Student
I started using Python in 2019 and since then I’ve tried to give back to the communities that shaped me, including starting the Python in Turkish documentation effort in 2021 with Python Turkey. I discovered EuroPython in 2023, was genuinely moved by how much people pour into it, and wanted to help make that kind of community possible for others too.
Over the past year on the EPS Board, I focused on removing blockers and making progress more feasible. On infrastructure, I helped migrate the old website setup to a more maintainable structure (with static content now on static.europython.eu) and back-ported the Program API for the last four EuroPython editions so historical data is available again. Alongside this, I supported core conference operations (volunteers, website updates), helped run the grants program in the second half of the year, and represented EPS at multiple community events.
Later in the year, I coordinated with the CPython core team to bring the Language Summit to EuroPython 2026 (still ongoing, and super excited for it!!), and I contributed to the 2026 venue selection discussions, with most of the work carried by our amazing venue team ❤️. Also, stay tuned for a conference companion app this year; it’s coming soon!
It was a year with ups and downs, and at times it was mentally and emotionally difficult, but I’m proud of what we delivered and grateful for the people I worked with. This year also made me much more conscious of the culture I want to help strengthen within the EPS: one grounded in trust, openness, kindness, and care for the people who make this community possible. I feel clearer than ever about my North Star, and I’m ready to work hard to live it and help it grow.
With the experience I have now, I expect to deliver more by strengthening student involvement through collaborations with organizations like AIESEC (stay tuned!), supporting volunteers more sustainably, continuing to improve our infrastructure, and helping the Board make progress without burning people out.
Mia Bajić (Nomination for Vice Chair)
Software Engineer & Community Events Organizer
I’m a software engineer and community events organizer. Since joining the Python community in 2021, I’ve led Python Pyvo meetups in Prague, brought Python Pizza to the Czech Republic, contributed to PyCon CZ 23 as well as EuroPython 2023 and 2024, and served as Vice-Chair of the EuroPython Society in 2025.
I’ve spoken on technical topics at major conferences, including PyCon US, DjangoCon, FOSDEM, EuroPython, and many other PyCons across Europe.
I’ve shared a reflection on the past year on my blog, including what went well, what I learned, and some ideas for the year ahead. If you’d like to check it out, you can find it here: https://clytaemnestra.github.io/tech-blog/eps-reflection
I’d like to continue working on the topics that are relevant for the next year: hiring a second event manager, improving our fiscal processes, and strengthening our relationships with European communities.
Yuliia Barabash
Over the past two years, I have been involved in EuroPython as part of the programme organisation team and general conference support. In particular, I have helped with the CFP and talk selection process, schedule preparation, and communication with speakers. Through this work I have gained a good understanding of how EuroPython operates, and the expectations of our community.
In the next Board term, I would like to continue contributing to the programme team, while also taking a stronger role in infrastructure topics. My main focus areas would be:
- Community voting: improving and maintaining the systems we use for voting (e.g. for programme selection or community decisions) to make them more reliable, transparent, and pleasant to use.
- Infrastructure and automation: helping to modernise, deploy, and automate core pieces of our conference infrastructure.
I care a lot about EuroPython as a welcoming, community-driven conference and would be happy to support it at Board level, working collaboratively with the rest of the Board and organisers.
What does the EPS Board do ?
The EPS board is made up of up to 9 directors (including 1 chair and 1 vice chair); the board runs the day-to-day business of the EuroPython Society, including running the EuroPython conference series, and supports the community through various initiatives such as our grants programme. The board collectively takes up the fiscal and legal responsibility of the Society.
For more details you can check our previous post here: https://europython-society.org/general-assembly-2025/#what-does-the-board-do
December 14, 2025 12:07 PM UTC
Kushal Das
Johnnycanencrypt 0.17.0 released
A few weeks ago I released Johnnycanencrypt 0.17.0. It is a Python module written in Rust, which provides OpenPGP functionality including allows usage of Yubikey 4/5 as smartcards.
Added
- Adds
verify_userpinandverify_adminpinfunctions. #186
Fixed
- #176 updates kushal's public key and tests.
- #177 uses sequoia-openpgp
1.22.0 - #178 uses scriv for changelog
- #181 updates pyo3 to
0.27.1 - #42, we now have only acceptable
expectcalls and nounwrapcalls. - Removes
cargo clippywarnings.
The build system now moved back to maturin. I managed to clean up CI, and now testing properly in all 3 platforms (Linux, Mac, Windows). Till this release I had to manually test the smartcard functionalities by connecting a Yubikey in Linux/Mac systems, but that will change for the future releases. More details will come out soon :)
December 14, 2025 08:16 AM UTC
December 13, 2025
Ahmed Bouchefra
Let’s be honest. There’s a huge gap between writing code that works and writing code that’s actually good. It’s the number one thing that separates a junior developer from a senior, and it’s something a surprising number of us never really learn.
If you’re serious about your craft, you’ve probably felt this. You build something, it functions, but deep down you know it’s brittle. You’re afraid to touch it a year from now.
Today, we’re going to bridge that gap. I’m going to walk you through eight design principles that are the bedrock of professional, production-level code. This isn’t about fancy algorithms; it’s about a mindset. A way of thinking that prepares your code for the future.
And hey, if you want a cheat sheet with all these principles plus the code examples I’m referencing, you can get it for free. Just sign up for my newsletter from the link in the description, and I’ll send it right over.
Ready? Let’s dive in.
1. Cohesion & Single Responsibility
This sounds academic, but it’s simple: every piece of code should have one job, and one reason to change.
High cohesion means you group related things together. A function does one thing. A class has one core responsibility. A module contains related classes.
Think about a UserManager class. A junior dev might cram everything in there: validating user input, saving the user to the database, sending a welcome email, and logging the activity. At first glance, it looks fine. But what happens when you want to change your database? Or swap your email service? You have to rip apart this massive, god-like class. It’s a nightmare.
The senior approach? Break it up. You’d have:
- An
EmailValidatorclass. - A
UserRespositoryclass (just for database stuff). - An
EmailServiceclass. - A
UserActivityLoggerclass.
Then, your main UserService class delegates the work to these other, specialized classes. Yes, it’s more files. It looks like overkill for a small project. I get it. But this is systems-level thinking. You’re anticipating future changes and making them easy. You can now swap out the database logic or the email provider without touching the core user service. That’s powerful.
2. Encapsulation & Abstraction
This is all about hiding the messy details. You want to expose the behavior of your code, not the raw data.
Imagine a simple BankAccount class. The naive way is to just have public attributes like balance and transactions. What could go wrong? Well, another developer (or you, on a Monday morning) could accidentally set the balance to a negative number. Or set the transactions list to a string. Chaos.
The solution is to protect your internal state. In Python, we use a leading underscore (e.g., _balance) as a signal: “Hey, this is internal. Please don’t touch it directly.”
Instead of letting people mess with the data, you provide methods: deposit(), withdraw(), get_balance(). Inside these methods, you can add protective logic. The deposit() method can check for negative amounts. The withdraw() method can check for sufficient funds.
The user of your class doesn’t need to know how it all works inside. They just need to know they can call deposit(), and it will just work. You’ve hidden the complexity and provided a simple, safe interface.
3. Loose Coupling & Modularity
Coupling is how tightly connected your code components are. You want them to be as loosely coupled as possible. A change in one part shouldn’t send a ripple effect of breakages across the entire system.
Let’s go back to that email example. A tightly coupled OrderProcessor might create an instance of EmailSender directly inside itself. Now, that OrderProcessor is forever tied to that specific EmailSender class. What if you want to send an SMS instead? You have to change the OrderProcessor code.
The loosely coupled way is to rely on an “interface,” or what Python calls an Abstract Base Class (ABC). You define a generic Notifier class that says, “Anything that wants to be a notifier must have a send() method.”
Then, your OrderProcessor just asks for a Notifier object. It doesn’t care if it’s an EmailNotifier or an SmsNotifier or a CarrierPigeonNotifier. As long as the object you give it has a send() method, it will work. You’ve decoupled the OrderProcessor from the specific implementation of the notification. You can swap them in and out interchangeably.
A quick pause. I want to thank boot.dev for sponsoring this discussion. It’s an online platform for backend development that’s way more interactive than just watching videos. You learn Python and Go by building real projects, right in your browser. It’s gamified, so you level up and unlock content, which is surprisingly addictive. The core content is free, and with the code techwithtim, you get 25% off the annual plan. It’s a great way to put these principles into practice. Now, back to it. —
4. Reusability & Extensibility
This one’s a question you should always ask yourself: Can I add new functionality without editing existing code?
Think of a ReportGenerator function that has a giant if/elif/else block to handle different formats: if format == 'text', elif format == 'csv', elif format == 'html'. To add a JSON format, you have to go in and add another elif. This is not extensible.
The better way is, again, to use an abstract class. Create a ReportFormatter interface with a format() method. Then create separate classes: TextFormatter, CsvFormatter, HtmlFormatter, each with their own format() logic.
Your ReportGenerator now just takes any ReportFormatter object and calls its format() method. Want to add JSON support? You just create a new JsonFormatter class. You don’t have to touch the ReportGenerator at all. It’s extensible without being modified.
5. Portability
This is the one everyone forgets. Will your code work on a different machine? On Linux instead of Windows? Without some weird version of C++ installed?
The most common mistake I see is hardcoding file paths. If you write C:\Users\Ahmed\data\input.txt, that code is now guaranteed to fail on every other computer in the world.
The solution is to use libraries like Python’s os and pathlib to build paths dynamically. And for things like API keys, database URLs, and other environment-specific settings, use environment variables. Don’t hardcode them! Create a .env file and load them at runtime. This makes your code portable and secure.
6. Defensibility
Write your code as if an idiot is going to use it. Because someday, that idiot will be you.
This means validating all inputs. Sanitizing data. Setting safe default values. Ask yourself, “What’s the worst that could happen if someone provides bad input?” and then guard against it.
In a payment processor, don’t have debug_mode=True as the default. Don’t set the maximum retries to 100. Don’t forget a timeout. These are unsafe defaults.
And for the love of all that is holy, validate your inputs! Don’t just assume the amount is a number or that the account_number is valid. Check it. Raise clear errors if it’s wrong. Protect your system from bad data.
7. Maintainability & Testability
The most expensive part of software isn’t writing it; it’s maintaining it. And you can’t maintain what you can’t test.
Code that is easy to test is, by default, more maintainable.
Look at a complex calculate function that parses an expression, performs the math, handles errors, and writes to a log file all at once. How do you even begin to test that? There are a million edge cases.
The answer is to break it down. Have a separate OperationParser. Have simple add, subtract, multiply functions. Each of these small, pure components is incredibly easy to test. Your main calculate function then becomes a simple coordinator of these tested components.
8. Simplicity (KISS, DRY, YAGNI)
Finally, after all that, the highest goal is simplicity.
- KISS (Keep It Simple, Stupid): Simple code is harder to write than complex code, but it’s a million times easier to understand and maintain. Swallow your ego and write the simplest thing that works.
- DRY (Don’t Repeat Yourself): If you’re doing something more than once, wrap it in a reusable function or component.
- YAGNI (You Aren’t Gonna Need It): This is the counter-balance to all the principles above. Don’t over-engineer. Don’t add a flexible, extensible system if you’re just building a quick prototype to validate an idea. When I was coding my startup, I ignored a lot of these patterns at first because speed was more important. Always ask what the business need is before you start engineering a masterpiece.
Phew, that was a lot. But these patterns are what it takes to level up. It’s a shift from just getting things done to building things that last.
If you enjoyed this, let me know. I’d love to make more advanced videos like this one. See you in the next one.
December 13, 2025 05:52 PM UTC
Hugo van Kemenade
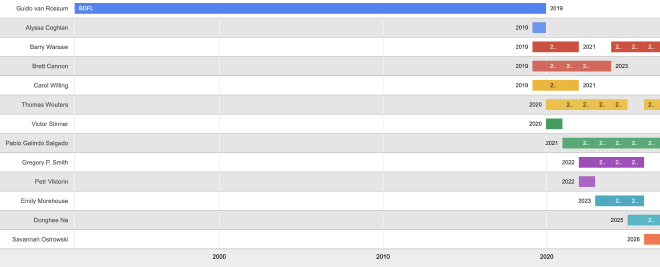
Steering Council results
The Python Steering Council 2026 election results are in and congratulations to the new Python Steering Council!
Welcome Savannah for the first time, and thank you to Greg Smith and Emily Morehouse for four and three years’ service each.
Three are starting their sixth terms, and four members have been or are release managers.
The chart above only covers the Steering Council years. Let’s also not forget Guido van Rossum’s BDFL years:
December 13, 2025 02:40 PM UTC
Talk Python to Me
#530: anywidget: Jupyter Widgets made easy
For years, building interactive widgets in Python notebooks meant wrestling with toolchains, platform quirks, and a mountain of JavaScript machinery. Most developers took one look and backed away slowly. Trevor Manz decided that barrier did not need to exist. His idea was simple: give Python users just enough JavaScript to unlock the web’s interactivity, without dragging along the rest of the web ecosystem. That idea became anywidget, and it is quickly becoming the quiet connective tissue of modern interactive computing. Today we dig into how it works, why it has taken off, and how it might change the way we explore data.<br/> <br/> <strong>Episode sponsors</strong><br/> <br/> <a href='https://talkpython.fm/seer-code-review'>Seer: AI Debugging, Code TALKPYTHON</a><br> <a href='https://talkpython.fm/pycharm-psf-2025'>PyCharm, code STRONGER PYTHON</a><br> <a href='https://talkpython.fm/training'>Talk Python Courses</a><br/> <br/> <h2 class="links-heading mb-4">Links from the show</h2> <div><strong>Trevor on GitHub</strong>: <a href="https://github.com/manzt?featured_on=talkpython" target="_blank" >github.com</a><br/> <br/> <strong>anywidget GitHub</strong>: <a href="https://github.com/manzt/anywidget?featured_on=talkpython" target="_blank" >github.com</a><br/> <strong>Trevor's SciPy 2024 Talk</strong>: <a href="https://www.youtube.com/watch?v=CjNSP_yQqrc" target="_blank" >www.youtube.com</a><br/> <strong>Marimo GitHub</strong>: <a href="https://github.com/marimo-team/marimo?featured_on=talkpython" target="_blank" >github.com</a><br/> <strong>Myst (Markdown docs)</strong>: <a href="https://mystmd.org/?featured_on=talkpython" target="_blank" >mystmd.org</a><br/> <strong>Altair</strong>: <a href="https://altair-viz.github.io/?featured_on=talkpython" target="_blank" >altair-viz.github.io</a><br/> <strong>DuckDB</strong>: <a href="https://duckdb.org/?featured_on=talkpython" target="_blank" >duckdb.org</a><br/> <strong>Mosaic</strong>: <a href="https://uwdata.github.io/mosaic/?featured_on=talkpython" target="_blank" >uwdata.github.io</a><br/> <strong>ipywidgets</strong>: <a href="https://ipywidgets.readthedocs.io/?featured_on=talkpython" target="_blank" >ipywidgets.readthedocs.io</a><br/> <strong>Tension between Web and Data Sci Graphic</strong>: <a href="https://blobs.talkpython.fm/anywidget-web-data-tension.png?cache_id=bd498f" target="_blank" >blobs.talkpython.fm</a><br/> <strong>Quak</strong>: <a href="https://github.com/manzt/quak?featured_on=talkpython" target="_blank" >github.com</a><br/> <strong>Walk through building a widget</strong>: <a href="https://anywidget.dev/en/notebooks/counter/?featured_on=talkpython" target="_blank" >anywidget.dev</a><br/> <strong>Widget Gallery</strong>: <a href="https://anywidget.dev/en/community/#widgets-gallery" target="_blank" >anywidget.dev</a><br/> <strong>Video: How do I anywidget?</strong>: <a href="https://www.youtube.com/watch?v=oZhyilx3gqI" target="_blank" >www.youtube.com</a><br/> <br/> <strong>PyCharm + PSF Fundraiser</strong>: <a href="https://talkpython.fm/pycharm-psf-2025" target="_blank" >pycharm-psf-2025 code STRONGER PYTHON</a><br/> <br/> <strong>Watch this episode on YouTube</strong>: <a href="https://www.youtube.com/watch?v=qcxgukkmJjg" target="_blank" >youtube.com</a><br/> <strong>Episode #530 deep-dive</strong>: <a href="https://talkpython.fm/episodes/show/530/anywidget-jupyter-widgets-made-easy#takeaways-anchor" target="_blank" >talkpython.fm/530</a><br/> <strong>Episode transcripts</strong>: <a href="https://talkpython.fm/episodes/transcript/530/anywidget-jupyter-widgets-made-easy" target="_blank" >talkpython.fm</a><br/> <br/> <strong>Theme Song: Developer Rap</strong><br/> <strong>🥁 Served in a Flask 🎸</strong>: <a href="https://talkpython.fm/flasksong" target="_blank" >talkpython.fm/flasksong</a><br/> <br/> <strong>---== Don't be a stranger ==---</strong><br/> <strong>YouTube</strong>: <a href="https://talkpython.fm/youtube" target="_blank" ><i class="fa-brands fa-youtube"></i> youtube.com/@talkpython</a><br/> <br/> <strong>Bluesky</strong>: <a href="https://bsky.app/profile/talkpython.fm" target="_blank" >@talkpython.fm</a><br/> <strong>Mastodon</strong>: <a href="https://fosstodon.org/web/@talkpython" target="_blank" ><i class="fa-brands fa-mastodon"></i> @[email protected]</a><br/> <strong>X.com</strong>: <a href="https://x.com/talkpython" target="_blank" ><i class="fa-brands fa-twitter"></i> @talkpython</a><br/> <br/> <strong>Michael on Bluesky</strong>: <a href="https://bsky.app/profile/mkennedy.codes?featured_on=talkpython" target="_blank" >@mkennedy.codes</a><br/> <strong>Michael on Mastodon</strong>: <a href="https://fosstodon.org/web/@mkennedy" target="_blank" ><i class="fa-brands fa-mastodon"></i> @[email protected]</a><br/> <strong>Michael on X.com</strong>: <a href="https://x.com/mkennedy?featured_on=talkpython" target="_blank" ><i class="fa-brands fa-twitter"></i> @mkennedy</a><br/></div>
December 13, 2025 08:00 AM UTC
Ahmed Bouchefra
A Pythonista’s Guide to the 2026 Code Rush
Look, we know the truth. Python is the best language ever written. It reads like English, it runs the AI revolution, and it doesn’t force us to worry about memory pointers or semi-colons.
But even I have to admit: the industry in 2026 is getting crowded. The “job market is brutal” chatter isn’t wrong. While we sit comfortably at the top of the TIOBE index, the ground is moving. New tech is pushing for raw speed and type safety, and “just knowing Python” might not be the golden ticket it was five years ago.
So, how do we—the whitespace-loving, bracket-hating crowd—stay on top? We don’t abandon ship. We fortify.
Here is how the rest of the programming ecosystem looks through snake-tinted glasses, and what you should actually bother learning to keep your edge.
1. Python: Still the King, But Watch the Throne
Let’s get the validation out of the way first. Python is still the engine of the modern world. Stack Overflow’s 2025 survey has us at nearly 58% usage. We aren’t going anywhere.
- AI & ML: If you are touching AI, you are writing Python. Period. The heavy lifting happens in C++, but we hold the remote control (PyTorch, TensorFlow).
- Data: Pandas and NumPy are standard equipment.
- Backend: FastAPI and Django are still shipping products faster than anyone else.
The Elephant in the Room (The GIL): We have to talk about the Global Interpreter Lock. It’s that annoying guardrail that stops Python from using multiple CPU cores at once for a single process. It’s why the “speed freaks” make fun of us.
Does it matter? Mostly, no. For 90% of apps, developer speed beats execution speed. But in 2026, efficiency is starting to count again. If you are building high-scale systems, Python is strictly the glue code. You need a partner language for the heavy computing.
2. The “Friends” We Can Tolerate
If you have to step outside the Python ecosystem, you want languages that don’t make you miserable.
Rust: The Best Friend You’re Jealous Of
If you learn one other language this year, make it Rust.
Why? Because Rust is what Python wants to be when it grows up and hits the gym. It gives you memory safety (no segfaults!) and C++ speed, but the tooling is actually modern.
For us, Rust is the perfect backend companion. Tools like Ruff (the super-fast Python linter) and Polars (the pandas alternative) are written in Rust. Writing Python extensions in Rust using PyO3 is a superpower. You write the slow parts in Rust, wrap them up, and call them from Python. You look like a genius optimization engineer, but you still get to write .py files most of the day.
TypeScript: The Only Sane Way to Do Frontend
I know, I know. We hate JavaScript. It’s messy and weird.
But unless you are using HTMX or Streamlit for everything (which, respect), you eventually have to touch the browser. TypeScript is the answer. It brings sanity to the chaos. It has types (like Python’s Type Hints, but actually enforced), so the code doesn’t explode at runtime.
Think of TypeScript as the “Pythonic” way to write JavaScript. It catches your mistakes before you push to prod. If you are doing full-stack, this is non-negotiable.
3. The “Necessary Evils”
Go: The Boring Plumber
Go (Golang) is… fine. It’s Google’s language for cloud infrastructure. It’s very simple, very fast, and very boring.
I see Go as the “anti-Python” in philosophy. Python is about expression and “one obvious way to do it.” Go is about “copy-paste this error check three times.” But, if you work in DevOps, Docker, or Kubernetes, you have to read Go. It’s a great paycheck language, even if it lacks soul.
Java: The Corporate Suit
Java is still everywhere in big banks and legacy enterprise systems. It’s verbose and heavy. Unless you are specifically targeting a job at a Fortune 500 bank or building Android apps (and even then, use Kotlin), you can probably skip this. Let the enterprise devs handle the boilerplates.
4. The “Don’t Bother” List (For Us)
- C++: Respect to the grandfathers, but life is too short for manual memory management. Unless you are building a game engine or writing the next PyTorch core, leave C++ to the specialists. We have Rust now.
- Raw JavaScript: Just use TypeScript. Friends don’t let friends write vanilla JS in 2026.
The Strategy: The T-Shaped Pythonista
So, what’s the play? Do you drop Python?
Absolutely not. You double down on Python, but you stop being a “one-trick pony.”
- The Core: Be a master of Python. Know the internals. Use Type Hints. Understand
asynciodeeply. - The Edge: Pick Rust as your performance weapon. When Python is too slow, don’t complain—rewrite that specific function in Rust.
- The Reach: Learn TypeScript just enough to not break the frontend.
That is how you survive the shift. You don’t chase every trend. You keep your home base in Python, and you selectively raid the other villages for their best tools.
December 13, 2025 12:00 AM UTC
Armin Ronacher
Skills vs Dynamic MCP Loadouts
I’ve been moving all my MCPs to skills, including the remaining one I still used: the Sentry MCP1. Previously I had already moved entirely away from Playwright to a Playwright skill.
In the last month or so there have been discussions about using dynamic tool loadouts to defer loading of tool definitions until later. Anthropic has also been toying around with the idea of wiring together MCP calls via code, something I have experimented with.
I want to share my updated findings with all of this and why the deferred tool loading that Anthropic came up with does not fix my lack of love for MCP. Maybe they are useful for someone else.
What is a Tool?
When the agent encounters a tool definition through reinforcement learning or otherwise, it is encouraged to emit tool calls through special tokens when it encounters a situation where that tool call would be appropriate. For all intents and purposes, tool definitions can only appear between special tool definition tokens in a system prompt. Historically this means that you cannot emit tool definitions later in the conversation state. So your only real option is for a tool to be loaded when the conversation starts.
In agentic uses, you can of course compress your conversation state or change the tool definitions in the system message at any point. But the consequence is that you will lose the reasoning traces and also the cache. In the case of Anthropic, for instance, this will make your conversation significantly more expensive. You would basically start from scratch and pay full token rates plus cache write cost, compared to cache read.
One recent innovation from Anthropic is deferred tool loading. You still declare tools ahead of time in the system message, but they are not injected into the conversation when the initial system message is emitted. Instead they appear at a later point. The tool definitions however still have to be static for the entire conversation, as far as I know. So the tools that could exist are defined when the conversation starts. The way Anthropic discovers the tools is purely by regex search.
Contrasting with Skills
This is all quite relevant because even though MCP with deferred loading feels like it should perform better, it actually requires quite a bit of engineering on the LLM API side. The skill system gets away without any of that and, at least from my experience, still outperforms it.
Skills are really just short summaries of which skills exist and in which file the agent can learn more about them. These are proactively loaded into the context. So the agent understands in the system context (or maybe somewhere later in the context) what capabilities it has and gets a link to the manual for how to use them.
Crucially, skills do not actually load a tool definition into the context. The tools remain the same: bash and the other tools the agent already has. All it learns from the skill are tips and tricks for how to use these tools more effectively.
Because the main thing it learns is how to use other command line tools and similar utilities, the fundamentals of how to chain and coordinate them together do not actually change. The reinforcement learning that made the Claude family of models very good tool callers just helps with these newly discovered tools.
MCP as Skills?
So that obviously raises the question: if skills work so well, can I move the
MCP outside of the context entirely and invoke it through the CLI in a similar
way as Anthropic proposes? The answer is yes, you can, but it doesn’t work
well. One option here is Peter Steinberger’s
mcporter. In short, it reads the
.mcp.json files and exposes the MCPs behind it as callable tools:
npx mcporter call 'linear.create_comment(issueId: "ENG-123", body: "Looks good!")'
And yes, it looks very much like a command line tool that the LLM can invoke. The problem however is that the LLM does not have any idea about what tools are available, and now you need to teach it that. So you might think: why not make some skills that teach the LLM about the MCPs? Here the issue for me comes from the fact that MCP servers have no desire to maintain API stability. They are increasingly starting to trim down tool definitions to the bare minimum to preserve tokens. This makes sense, but for the skill pattern it’s not what you want. For instance, the Sentry MCP server at one point switched the query syntax entirely to natural language. A great improvement for the agent, but my suggestions for how to use it became a hindrance and I did not discover the issue straight away.
This is in fact quite similar to Anthropic’s deferred tool loading: there is no information about the tool in the context at all. You need to create a summary. The eager loading of MCP tools we have done in the past now has ended up with an awkward compromise: the description is both too long to eagerly load it, and too short to really tell the agent how to use it. So at least from my experience, you end up maintaining these manual skill summaries for MCP tools exposed via mcporter or similar.
Path Of Least Resistance
This leads me to my current conclusion: I tend to go with what is easiest, which is to ask the agent to write its own tools as a skill. Not only does it not take all that long, but the biggest benefit is that the tool is largely under my control. Whenever it breaks or needs some other functionality, I ask the agent to adjust it. The Sentry MCP is a great example. I think it’s probably one of the better designed MCPs out there, but I don’t use it anymore. In part because when I load it into the context right away I lose around 8k tokens out of the box, and I could not get it to work via mcporter. On the other hand, I have Claude maintain a skill for me. And yes, that skill is probably quite buggy and needs to be updated, but because the agent maintains it, it works out better.
It’s quite likely that all of this will change, but at the moment manually maintained skills and agents writing their own tools have become my preferred way. I suspect that dynamic tool loading with MCP will become a thing, but it will probably quite some protocol changes to bring in skill-like summaries and built-in manuals for the tools. I also suspect that MCP would greatly benefit of protocol stability. The fact that MCP servers keep changing their tool descriptions at will does not work well with materialized calls and external tool descriptions in READMEs and skill files.
-
Keen readers will remember that last time, the last MCP I used was Playwright. In the meantime I added and removed two more MCPs: Linear and Sentry, mostly because of authentication issues and neither having a great command line interface.↩
December 13, 2025 12:00 AM UTC
December 11, 2025
Python Software Foundation
Announcing Python Software Foundation Fellow Members for Q3 2025! 🎉
The PSF is pleased to announce its third batch of PSF Fellows for 2025! Let us welcome the new PSF Fellows for Q3! The following people continue to do amazing things for the Python community:
Abhijeet Mote
Abigail Afi Gbadago
Becky Smith
LinkedIn, Bluesky, Mastodon, GitHub
Christopher Bailey
Dawn Wages
Leah Wasser
Website, Bluesky, Mastodon, LinkedIn, GitHub
Maaya Ishida
Mason Egger
Website, Twitter, LinkedIn, GitHub
Miguel Grinberg
William Vincent
Thank you for your continued contributions. We have added you to our Fellows Roster.
The above members help support the Python ecosystem by being phenomenal leaders, sustaining the growth of the Python scientific community, maintaining virtual Python communities, maintaining Python libraries, creating educational material, organizing Python events and conferences, starting Python communities in local regions, and overall being great mentors in our community. Each of them continues to help make Python more accessible around the world. To learn more about the new Fellow members, check out their links above.
Let's continue recognizing Pythonistas all over the world for their impact on our community. The criteria for Fellow members is available on our PSF Fellow Membership page. If you would like to nominate someone to be a PSF Fellow, please send a description of their Python accomplishments and their email address to psf-fellow at python.org. Quarter 4 nominations will be in review soon. We are accepting nominations for Quarter 4 of 2025 through November 20th, 2025.
Are you a PSF Fellow and want to help the Work Group review nominations? Contact us at psf-fellow at python.org.
December 11, 2025 03:54 PM UTC
Django Weblog
Django Code of Conduct Transparency Report 2025
The Code of Conduct working group received 4 reports and met 12 times in 2025. This transparency report is a brief account of how those reports were handled. This year’s number is lower than previous years in part because of the formation of the Online Community Working Group which handles moderation on our official spaces and has been able to act directly on smaller scale infractions. In some cases we received additional reporting while investigating initial reports, but have not counted those as separate instances.
This working group conducts business in several ways. It has online meetings, typically once per month. It also discusses issues in a Slack channel, but most cases are handled in the meetings. The group welcomed three new members this year: Ariane Djeupang, Natalia Bidart, and Priya Pahwa. Natalia was selected by the new Online Communities Working Group as their liaison to the Code of Conduct Working group; Ariane and Priya were elected by the working group. The group also saw Jay Miller step down this year. We all want to thank Jay for his continued role in our community and for all the work he did with the Code of Conduct group.
It was the group’s intention to work with a consultant to update our Code of Conduct and processes. We reached out to two consultants to help with that work, but unfortunately we weren’t able to engage either to get that work completed. We hope to progress with that in 2026. In the meantime, we made a few internal process tweaks - creating up a new “ask CoC” channel with key stakeholders to discuss moderation and CoC enforcement, and having our team set up as moderators in GitHub until we find a better model.
Two reports from late 2024 carried into this year. Two reports resulted in suspensions from the relevant platforms. Another was shared with local event organizers.
Finally, this section provides a brief summary of the kinds of cases that were handled:
- One case involved repeated violations of the Discourse rules about self promotion. The working group recommended a suspension from the forum.
- One case involved repeated behavior across several platforms that discouraged participation and created problems for others. The working group recommended a suspension from all relevant platforms and working groups.
- One case involved an incident at a PSF-sponsored event. The information was passed on to the local organizers.
December 11, 2025 03:19 PM UTC
PyCon
PyCon US 2026 - Registration, Hotels, Travel Grants & More!
The news you’ve been waiting for is finally here: registration for PyCon US 2026 is officially open!
PyCon US will take place May 13 - May 19, 2026, in Long Beach, California at the Long Beach Convention and Entertainment Center. The core of the conference, May 15 - May 17, 2026, packs in three days' worth of our community’s best talks, amazing keynote speakers, and our famed lightning talks to close out each day—but it’s much more than that!
It’s gathering together with the members of our community to learn from, share with, and connect. It’s joining a conversation in the hallway with the creators of our open source projects. It’s taking yourself from beginner to intermediate; intermediate to advanced; or advanced to cutting edge. For some, it’s getting started with Python for the first time. We have loads of exciting plans in the works for this year, and we can’t wait to spend this special time with you!
How to Register
Once you have created an account on the PyCon US 2026 conference website, you can register via the registration button on your dashboard. Head over to our Registration Information page to get all the details on how to register.Early Bird Registration Rates
PyCon US is providing discounted rates for Corporate, Student, and Individual tickets for the first 30 days that registration is open. Don’t wait, register now to receive your discount!- Early Bird Corporate - $849
- Early Bird Individual - $419
- Early Bird Student - $100
Regular Registration Rates
- Corporate - $899 USD
- Individual - $469 USD
- Student - $139 USD
Hotels
PyCon US has contracted special rates with nearby hotels. When you complete your registration for PyCon US 2026, you will be able to book a hotel reservation on your dashboard through our official housing bureau, Orchid Events. Booking through Orchid helps support PyCon US and it is the only way to get the conference rates, so book now while supplies last!We highly recommend staying in Long Beach rather than Los Angeles. Staying local will help you avoid LA’s notorious traffic and long commutes so you can arrive at talks, tutorials, and events on time (and with less stress!). Staying in Long Beach also gives you more opportunities to connect with the community, recharge between sessions, and fully enjoy the PyCon US experience.
Note: Beware of Housing Pirates! PyCon US or Orchid Events will not be calling delegates to sell rooms. If you are contacted by an agency other than Orchid Events offering to make your hotel reservations, we urge you not to use their services. We cannot protect you against fraud if you book a reservation with an outside party.
Call for Proposals - Deadline December 19th!
There’s still time to submit your proposal to present a Talk, Charla, Poster, or Tutorial at PyCon US! More information on our website and on our CfP platform.PyCon US is introducing two dedicated Talk tracks to the schedule this year, “the Future of AI with Python” and “Trailblazing Python Security”. For more information and how to submit your proposal visit the Proposal Guidelines page.
Health & Safety Guidelines and Code of Conduct
PyCon US is committed to protecting the health and safety of our community. To ensure that we are gathering safely, we have implemented updated guidelines and protocols to be followed by all attendees during the event. We ask that you please review our Health & Safety guidelines prior to registration.To support a safe environment and enjoyable experience for all, PyCon US attendees are also required as always to comply with our Code of Conduct, which you can review on the PyCon US Code of Conduct page.
T-shirts & PyLadies Auction
Conference T-shirts and tickets to the PyLadies Auction have not yet been released, but will be available to add to your PyCon US 2026 registration in the coming weeks. Keep an eye out on the PyCon US 2026 website and subscribe to PyCon US News to be one of the first to know and grab yours while supplies last!Tutorials
Tutorials will be presented on Wednesday, May 13, 2026, and Thursday, May 14, 2026. We are accepting proposals for tutorials through December 19, 2025. Find more information on how to submit your proposal via our website and our CfP platform. Once our program committee has scheduled the selected tutorials, you will be able to add them to your conference registration.Watch for tutorial registration launch in March 2026. Opt-in for PyCon US News and follow us on X, Bluesky, Mastodon, and the PSF LinkedIn for the announcement.
Sponsorship and Sponsor Presentations
Sponsorship for PyCon US 2026 is open now, and you can see the details of our sponsorship options and apply directly on our Sponsorship Application page. We’re grateful to all of our sponsors who make PyCon US possible!For those interested in a paid speaking opportunity, Sponsor Presentations will take place on Thursday, May 14, 2026, and Friday, May 15, 2026. To reserve a slot for an hour-long Sponsor Presentation on the topic of your choice, please apply for Partner Level Sponsorship or higher and select the check mark next to “Sponsor Presentation.” Slots are limited and typically sell out, so please submit your request soon. Contact [email protected] with any questions.
Travel Grants - Applications now Open!
Check out the Travel Grant page to learn more about the support we provide for travel, hotel, and registration to ensure that everyone has an opportunity to attend PyCon US. We actively encourage people to apply for travel grants and welcome applications from any attendees who otherwise would not be able to attend. Our goal is to support diversity and provide opportunity for attendees and attract Python developers at all experience levels from around the world. For questions about the application process, visit the Travel Grant FAQ page.Cancellation Fees
Registration cancellations must be submitted in writing to [email protected] and received by May 1, 2026, in order to receive a refund minus the $50 cancellation fee ($25 for students; waived for cancellation due to health reasons). No refunds will be granted for cancellations received after May 1, 2026, unless you must cancel for any health-related reasons (see more details in the Health & Safety Guidelines). In lieu of cancellation, you have the option to transfer your registration to another person. For details about transferring your registration, visit the registration page.Startup Row - Applications now open!
Startup Row is where early-stage companies show off what they’re doing with Python at PyCon US. Eligible startup stage companies are welcome to apply for a complimentary booth that will be open for attendees to visit from May 15 - 17, 2026. If you are a startup and would like the opportunity to share your projects with the community, submit your application!Read the details on our Startup Row page and be sure to submit your applications by January 16, 2026.
Community Booths - Applications now open!
Each year, we set aside booth space in the Expo Hall for nonprofit organizations and community open source projects that serve the Python community and the broader open source ecosystem. If that describes your organization or group, we’d love for you to apply for one of our complimentary Community Booths. Visit the Community Booth page for more details and submit your application by February 5, 2026.December 11, 2025 02:48 PM UTC
Daniel Roy Greenfeld
Adding Type Hints to my Blog
I've decided to add static type checking to my blog engine project. The tool I chose is pyrefly, a fast, Rust-based library for checking types in Python.
Installing Pyrefly with UV
My project uses uv for package management. To install pyrefly as a development-only dependency, I ran the following command:
uv add pyrefly --dev
pyrefly is a Rust-based Python tool, so its package includes pre-compiled binaries. This makes the package larger (around 10MB) than a pure Python equivalent. This can be an issue with a slower connection. However, uv caches the downloaded package, making subsequent installations of the same version much faster.
Running the First Type Check
With pyrefly installed, I ran the first check across the entire project.
uv run pyrefly check .
The initial scan found 31 errors. To make the task more manageable, I narrowed the scope to just the main application file.
uv run pyrefly check main.py
This reduced the list to 11 errors, giving me a focused starting point.
Debugging a Type Error
I decided to tackle one of the reported errors. pyrefly pointed out an issue with the get_post function. Here's the pyrefly output
ERROR Type `None` is not iterable [not-iterable]
   --> main.py:258:9
    |
258 |         content, metadata = get_post(slug)
    |         ^^^^^^^^^^^^^^^^^
    |
The function's type hint declared that it returns a tuple or None.
# The incorrect type hint
def get_post(...) -> tuple | None:
    # ... function implementation
However, after reviewing the code, I saw that the function never actually returns None. If a post is not found, it raises a ContentNotFound exception. The type hint was wrong.
def get_post(slug: str) -> tuple | None:
    posts = list_posts(content=True)
    post = next((x for x in posts if x["slug"] == slug), None)
    if post is None:
        raise ContentNotFound
    return (post["content"], post)
Verifying the Fix
I corrected the type hint by removing the incorrect | None part.
# The corrected type hint
def get_post(...) -> tuple:
    # ... function implementation
After saving the change, I re-ran the check on main.py.
uv run pyrefly check main.py
The error count dropped from 11 to 10. The fix was successful. You can see the commit where the work was done on the repo.
Conclusion
Adding a type checker like pyrefly immediately exposed incorrect type hints in the codebase. The process of installing the tool, running a check, and fixing the first error was straightforward. This small change improved the code's correctness and demonstrated the value of static analysis for maintaining a healthy project.
As for the rest of the errors, rather than attack them in one big effort as this is a stable side project what I like to do is make it a daily chore to do a single correction per day. This is slower (and could be done quickly with an LLM assist) but through practice I get better with the tool. Mastery is found through repetition.
December 11, 2025 08:25 AM UTC
December 10, 2025
Real Python
Python Inner Functions: What Are They Good For?
Python inner functions are those you define inside other functions to access nonlocal names and bundle logic with its surrounding state. In this tutorial, you’ll learn how to create inner helper functions, build closures that retain state across calls, and implement decorators that modify the behavior or existing callables without changing the original implementation.
By the end of this tutorial, you’ll understand that:
- Inner functions access nonlocal names from the enclosing scope, so you pass data in once and reuse it across calls.
- You can replace an inner helper function with a non-public function to enable code reuse.
- You can create a closure by returning the inner function without calling it, which preserves the captured environment.
- You can modify the captured state by declaring nonlocal variables that point to mutable objects.
- You craft decorators with nested functions that wrap a callable and extend its behavior transparently.
You will now move through focused examples that feature encapsulated helpers, stateful closures, and decorator patterns, allowing you to apply each technique with confidence in real Python projects.
Get Your Code: Click here to download the free sample code to practice inner functions in Python.
Take the Quiz: Test your knowledge with our interactive “Python Inner Functions: What Are They Good For?” quiz. You’ll receive a score upon completion to help you track your learning progress:
Interactive Quiz
Python Inner Functions: What Are They Good For?Test inner functions, closures, nonlocal, and decorators in Python. Build confidence and learn to keep state across calls. Try the quiz now.
Creating Functions Within Functions in Python
A function defined inside another function is known as an inner function or a nested function. Yes, in Python, you can define a function within another function. This type of function can access names defined in the enclosing scope.
Here’s an example of how to create an inner function in Python:
>>> def outer_func():
...     def inner_func():
...         print("Hello, World!")
...     inner_func()
...

>>> outer_func()
Hello, World!
In this example, you define inner_func() inside outer_func() to print the Hello, World! message to the screen. To do that, you call inner_func() on the last line of outer_func(). This is the quickest way to write and use an inner function in Python.
Inner functions provide several interesting possibilities beyond what you see in the example above. The core feature of inner functions is their ability to access variables and objects from their enclosing function even after that function has returned. The enclosing function provides a namespace that is accessible to the inner function:
>>> def outer_func(who):
...     def inner_func():
...         print(f"Hello, {who}")
...     inner_func()
...

>>> outer_func("World!")
Hello, World!
Note how you can pass a string as an argument to outer_func(), and inner_func() can access that argument through the name who. This name is defined in the local scope of outer_func(). The names defined in the local scope of an outer function are nonlocal names from the inner function’s point of view.
Here’s an example of a more realistic inner function:
>>> def factorial(number):
...     if not isinstance(number, int):
...         raise TypeError("number must be an integer")
...     if number < 0:
...         raise ValueError("number must be zero or positive")
...
...     def inner_factorial(number):
...         if number <= 1:
...             return 1
...         return number * inner_factorial(number - 1)
...     return inner_factorial(number)
...

>>> factorial(4)
24
In factorial(), you first validate the input data to ensure that the user provides an integer that is equal to or greater than zero. Then, you define a recursive inner function called inner_factorial(). This function performs the factorial calculation and returns the result. The final step is to call inner_factorial().
Note: For a more detailed discussion on recursion and recursive functions, check out Thinking Recursively in Python and Recursion in Python: An Introduction.
An advantage of using the pattern in the example above is that you perform all the argument validation in the outer function, so you can skip error checking in the inner function and focus on the computation at hand.
Using Inner Functions in Python
The use cases of Python inner functions are varied. You can use them to provide encapsulation, hiding your functions from external access. You can also write quick helper inner functions. Finally, you can use inner functions to create closures and decorators.
In this section, you’ll learn about the former two use cases of inner functions, and in later sections, you’ll learn how to create closures and decorators.
Providing Encapsulation
A common use case of inner functions arises when you need to protect or hide a given function from everything happening outside of it, so that the function is completely hidden from the global scope. This type of behavior is known as encapsulation.
Here’s an example that showcases the concept:
Read the full article at https://realpython.com/inner-functions-what-are-they-good-for/ »
[ Improve Your Python With 🐍 Python Tricks 💌 – Get a short & sweet Python Trick delivered to your inbox every couple of days. >> Click here to learn more and see examples ]
December 10, 2025 02:00 PM UTC
Eli Bendersky
Revisiting "Let's Build a Compiler"
There's an old compiler-building tutorial that has become part of the field's lore: the Let's Build a Compiler series by Jack Crenshaw (published between 1988 and 1995).
I ran into it in 2003 and was very impressed, but it's now 2025 and this tutorial is still being mentioned quite often in Hacker News threads. Why is that? Why does a tutorial from 35 years ago, built in Pascal and emitting Motorola 68000 assembly - technologies that are virtually unknown for the new generation of programmers - hold sway over compiler enthusiasts? I've decided to find out.
The tutorial is easily available and readable online, but just re-reading it seemed insufficient. So I've decided on meticulously translating the compilers built in it to Python and emit a more modern target - WebAssembly. It was an enjoyable process and I want to share the outcome and some insights gained along the way.
The result is this code repository. Of particular interest is the TUTORIAL.md file, which describes how each part in the original tutorial is mapped to my code. So if you want to read the original tutorial but play with code you can actually easily try on your own, feel free to follow my path.
A sample
To get a taste of the input language being compiled and the output my compiler generates, here's a sample program in the KISS language designed by Jack Crenshaw:
var X=0

 { sum from 0 to n-1 inclusive, and add to result }
 procedure addseq(n, ref result)
     var i, sum  { 0 initialized }
     while i < n
         sum = sum + i
         i = i + 1
     end
     result = result + sum
 end

 program testprog
 begin
     addseq(11, X)
 end
 .
It's from part 13 of the tutorial, so it showcases procedures along with control constructs like the while loop, and passing parameters both by value and by reference. Here's the WASM text generated by my compiler for part 13:
(module
  (memory 8)
  ;; Linear stack pointer. Used to pass parameters by ref.
  ;; Grows downwards (towards lower addresses).
  (global $__sp (mut i32) (i32.const 65536))

  (global $X (mut i32) (i32.const 0))

  (func $ADDSEQ (param $N i32) (param $RESULT i32)
    (local $I i32)
    (local $SUM i32)
    loop $loop1
      block $breakloop1
        local.get $I
        local.get $N
        i32.lt_s
        i32.eqz
        br_if $breakloop1
        local.get $SUM
        local.get $I
        i32.add
        local.set $SUM
        local.get $I
        i32.const 1
        i32.add
        local.set $I
        br $loop1
      end
    end
    local.get $RESULT
    local.get $RESULT
    i32.load
    local.get $SUM
    i32.add
    i32.store
  )

  (func $main (export "main") (result i32)
    i32.const 11
    global.get $__sp      ;; make space on stack
    i32.const 4
    i32.sub
    global.set $__sp
    global.get $__sp
    global.get $X
    i32.store
    global.get $__sp    ;; push address as parameter
    call $ADDSEQ
    ;; restore parameter X by ref
    global.get $__sp
    i32.load offset=0
    global.set $X
    ;; clean up stack for ref parameters
    global.get $__sp
    i32.const 4
    i32.add
    global.set $__sp
    global.get $X
  )
)
You'll notice that there is some trickiness in the emitted code w.r.t. handling the by-reference parameter (my previous post deals with this issue in more detail). In general, though, the emitted code is inefficient - there is close to 0 optimization applied.
Also, if you're very diligent you'll notice something odd about the global variable X - it seems to be implicitly returned by the generated main function. This is just a testing facility that makes my compiler easy to test. All the compilers are extensively tested - usually by running the generated WASM code [1] and verifying expected results.
Insights - what makes this tutorial so special?
While reading the original tutorial again, I had on opportunity to reminisce on what makes it so effective. Other than the very fluent and conversational writing style of Jack Crenshaw, I think it's a combination of two key factors:
- The tutorial builds a recursive-descent parser step by step, rather than giving a long preface on automata and table-based parser generators. When I first encountered it (in 2003), it was taken for granted that if you want to write a parser then lex + yacc are the way to go [2]. Following the development of a simple and clean hand-written parser was a revelation that wholly changed my approach to the subject; subsequently, hand-written recursive-descent parsers have been my go-to approach for almost 20 years now.
- Rather than getting stuck in front-end minutiae, the tutorial goes straight to generating working assembly code, from very early on. This was also a breath of fresh air for engineers who grew up with more traditional courses where you spend 90% of the time on parsing, type checking and other semantic analysis and often run entirely out of steam by the time code generation is taught.
To be honest, I don't think either of these are a big problem with modern resources, but back in the day the tutorial clearly hit the right nerve with many people.
What else does it teach us?
Jack Crenshaw's tutorial takes the syntax-directed translation approach, where code is emitted while parsing, without having to divide the compiler into explicit phases with IRs. As I said above, this is a fantastic approach for getting started, but in the latter parts of the tutorial it starts showing its limitations. Especially once we get to types, it becomes painfully obvious that it would be very nice if we knew the types of expressions before we generate code for them.
I don't know if this is implicated in Jack Crenshaw's abandoning the tutorial at some point after part 14, but it may very well be. He keeps writing how the emitted code is clearly sub-optimal [3] and can be improved, but IMHO it's just not that easy to improve using the syntax-directed translation strategy. With perfect hindsight vision, I would probably use Part 14 (types) as a turning point - emitting some kind of AST from the parser and then doing simple type checking and analysis on that AST prior to generating code from it.
Conclusion
All in all, the original tutorial remains a wonderfully readable introduction to building compilers. This post and the GitHub repository it describes are a modest contribution that aims to improve the experience of folks reading the original tutorial today and not willing to use obsolete technologies. As always, let me know if you run into any issues or have questions!
| [1] | This is done using the Python bindings to wasmtime. |
| [2] | By the way, gcc switched from YACC to hand-written recursive-descent parsing in the 2004-2006 timeframe, and Clang has been implemented with a recursive-descent parser from the start (2007). |
| [3] | Concretely: when we compile subexpr1 + subexpr2 and the two sides have different types, it would be mighty nice to know that before we actually generate the code for both sub-expressions. But the syntax-directed translation approach just doesn't work that way. To be clear: it's easy to generate working code; it's just not easy to generate optimal code without some sort of type analysis that's done before code is actually generated. |
December 10, 2025 12:41 PM UTC
Real Python
Quiz: Python Inner Functions: What Are They Good For?
In this quiz, you’ll test your understanding of the Python Inner Functions: What Are They Good For? tutorial.
By working through this quiz, you’ll revisit how inner functions work with enclosing scopes, when to use nonlocal to update captured state, how closures retain data across calls, and how decorators wrap a callable to extend behavior.
You’ll apply these ideas to organize helpers, reuse state, and write clear, maintainable functions in real projects.
[ Improve Your Python With 🐍 Python Tricks 💌 – Get a short & sweet Python Trick delivered to your inbox every couple of days. >> Click here to learn more and see examples ]
December 10, 2025 12:00 PM UTC
Ahmed Bouchefra
The Efficient Way to Learn Python in 2026 (5 Prompts + A Free Book)
I see two types of learners in 2026, and honestly, both of them are doing it wrong.
The first group tries to learn solely through AI. They ask chatbots to “write a script,” copy-paste the result, and feel productive. But the second they hit a bug the AI can’t fix, they freeze. They have no foundation. They built a house on sand.
The second group goes the old-school route. They buy a massive, 800-page programming textbook. They read it cover to cover, highlighting every line. By Chapter 4, they are bored. By Chapter 7, they quit. It’s too slow for the pace of 2026.
Here is the secret I’ve found after years in this industry: The real growth happens when you combine the two.
A book gives you the structure—the “what to learn” and the “why.” The AI gives you the speed—the “how.”
If you want to master Python this year, you shouldn’t just read a book; you should interact with it. I recommend using the 10xdev python book as your primary roadmap. It’s structured for the modern developer, not the academic.
But don’t just read it passively. Use the following 5 AI prompts to turn that static text into a living, breathing course.
The “Book + Prompt” Methodology
The concept is simple. You read a section of the 10xdev python book to understand the core concept. Then, you immediately use an AI agent (ChatGPT, Claude, etc.) to test, expand, and apply that knowledge.
This keeps you moving fast without losing depth. Here are the specific prompts to make that happen.
1. The “Pre-Flight” Primer
Most people get stuck because they dive into a complex chapter without knowing why it matters. Use this prompt before you start a new chapter to prime your brain.
The Prompt:
“I am about to read the chapter on [Insert Topic, e.g., Asynchronous Programming] in the 10xdev python book (link: https://10xdev.blog/pybook).
Your Goal: Give me a 3-bullet point summary of why this specific concept is used in modern 2026 software development. Context: Don’t explain how to do it yet. Just tell me what problems it solves so I know what to look for while I read the book.”
Why this works: It builds a mental hook. When you eventually read the technical details in the book, your brain already knows where to file the information. You aren’t just memorizing; you are solving a problem.
2. The “Feynman” Stress Test
The ultimate test of understanding is whether you can teach it. After you finish a section, don’t just move on. Force yourself to explain it back to the AI.
The Prompt:
“I just finished the section on [Insert Topic, e.g., Decorators] in the 10xdev python book (https://10xdev.blog/pybook).
My Task: I am going to write a short paragraph below explaining this concept as if I were teaching a junior developer. Your Job: Critique my explanation. Did I miss any edge cases? Did I use the terminology correctly?
My Explanation: [Type your summary here…]”
Why this works: This is the fastest way to find holes in your knowledge. If you can’t explain it simply, you don’t understand it. The AI acts as your safety net, catching misunderstandings before they become bad habits.
3. The “Translator” Prompt (Theory to Practice)
Sometimes, a book example might not click. Maybe the 10xdev python book uses a “Bank Account” analogy, but you care about “Video Games.” Use AI to translate the book’s logic into your language.
The Prompt:
“The 10xdev python book (https://10xdev.blog/pybook) explains the concept of [Insert Concept, e.g., Object-Oriented Inheritance] using an example about [e.g., Bank Accounts]. I am struggling to visualize it.
Task: Explain this exact same concept, but use an analogy involving [Choose one: RPG Video Game Characters / Managing a Pizza Shop / A Spotify Playlist]. Output: Write a Python code snippet that mirrors the structure used in the book, but applied to this new analogy.”
Why this works: It makes the abstract concrete. By seeing the same logic applied to a domain you love, the concept sticks.
4. The “Modern Context” Checker
Technology moves fast. While the 10xdev python book is excellent, new tools appear every month. Use this prompt to ensure you are connecting the book’s foundational wisdom with the absolute latest 2026 tools.
The Prompt:
“I am reading the section in the 10xdev python book (https://10xdev.blog/pybook) about [Insert Topic, e.g., Web Scraping].
Question: The book covers the foundational logic well. But for a startup building in late 2026, are there new AI-specific libraries (like Crawl4AI or updated LangChain tools) that I should use alongside these principles? Output: Show me how to apply the book’s logic using the most modern tool available today.”
Why this works: It bridges the gap between “Foundational Principles” (which rarely change) and “Tooling” (which changes constantly). You get the best of both worlds.
5. The “Implementation Sprint” Prompt
Passive reading is the enemy. You need to build. Use this prompt to turn a chapter of the book into a mini-project.
The Prompt:
“I want to practice the skills from Chapter [X] of the 10xdev python book (https://10xdev.blog/pybook), which covers [Insert Topic, e.g., API Integration].
Task: Design a tiny coding challenge for me that uses these exact concepts. Constraints:
- It must be solvable in under 60 minutes.
- It must result in a working script, not just a function.
- Do not write the code for me. Just give me the requirements and the steps.”
Why this works: It forces you to close the book and open your IDE. You stop being a student and start being a developer.
Why This Approach Wins
The developers who get hired in 2026 aren’t the ones who memorized the documentation. They are the ones who understand systems.
The 10xdev python book provides the system architecture—the mental model of how professional Python code is structured. The AI provides the infinite practice and instant feedback.
If you rely on just one, you are slow or shallow. If you use both, you are unstoppable.
Your Next Step:
- Go get the 10xdev python book.
- Open Chapter 1.
- Keep ChatGPT open in the next tab.
- Run Prompt #1.
That’s how you go from “learning to code” to “being a developer in the age of AI.”
December 10, 2025 12:00 AM UTC
Seth Michael Larson
Extracting Nintendo Switch “Play Activity” with OCR
Despite considering myself a “gamer”, I realized I had only played ~5 hours of video-games in the whole year 2022 and ~6 hours in 2021. Honestly, these numbers made me a bit sad to see... You can't “improve” what you don't measure, so I started looking for low-effort ways to measure the amount of play time while getting back into actually playing video-games.
I have already achieved what I wanted for GameCube by mid-2025 using the Memcard Pro GC’s Wi-Fi and API. I’ve blogged about this setup which gathers date and duration data for playing GameCube, but I wanted to cover my other consoles.
What about the Nintendo Switch?
Surprisingly, Nintendo Switch offered no such data, despite having an option called “Play Activity” in the menus of the Nintendo Switch, Nintendo Account, and many of their mobile apps. This was unfortunate, as I was playing many more new Nintendo Switch games like the Paper Mario: Thousand-Year Door remake and Pikmin 4, and going back to games I had “missed” like Super Mario Odyssey.
That is... until the Nintendo Store app was released just a few weeks ago. This app provides “Play Activity” data at a much higher resolution than any other Nintendo app or service. You can find complete historical data across your Nintendo Account, going back as far as the Nintendo 3DS and Wii-U! The data includes games played, dates, and play durations in 15 minute increments.
Shoutout to the WULFF DEN podcast for talking about this, otherwise I would never have discovered this niché new feature. But how can I query this data for my own purposes?
Example of data available in the Nintendo Store “Play Activity”.
Using Optical Character Recognition (OCR)
Basically the data was in the app, but couldn't be selected and copy-pasted or exported. Instead, the data would have to be transferred to a queryable format another way.
I took this as an opportunity to try out a technology I'd never used before: Optical Character Recognition (OCR). OCR basically turns pictures of letters and numbers into actual strings of text. State of the art for OCR today appears to be using machine-learning models.
After a bit of research, I landed on EasyOCR which uses
PyTorch models that are already pre-trained. This appeared
to require downloading the model from the internet, which
bothered me a bit, but I decided that running the model
within a Docker container without network access (--net=none)
was probably enough to guarantee this library wasn't
sending my data off my machine.
I created a workflow (source code available on GitHub) that takes a directory of images mounted as a volume, runs OCR on each image, and then returns the parsed text as “JSON lines” for each image along with the checksum of the image. This checksum is stored by the program processing the OCR text to avoid running OCR on images more than once.
This is an example of the text that OCR is able to read from one screenshot:
[
  "20:13", "15",
  "Play Activity",
  "Animal Crossing: New Horizons",
  "5/9/2020",  "1 hr; 15 min.",
  "5/8/2020",  "1 hr. 0 min:",
  "5/5/2020",  "45 min:",
  "5/4/2020",  "1 hr. 30 min:",
  "5/3/2020",  "A few min.",
  ...
]
There's some unexpected elements here!
Notice how the phone time and battery are picked up by OCR
and how the play time durations all have either . or : at the end.
This extra punctuation seems to come from the vertical border
on the screen to the right of the text. The least consistent
readings are when there is text as a part of the game logo.
Segmenting and parsing OCR data
OCR can consistently the actual text
from the application itself, so we can use the Play Activity
and First played labels as anchors to know where the other
data is. Using these anchors we can segment OCR text into:
- Phone UI (time, battery %)
- Game information (title, first played, last played)
- Game play activity (date, duration)
For some games the model really struggles to read the game title
consistently. To fix this I created a list of words that the OCR
model does consistently read and mapped those words to corresponding
game titles, such as “Wonder” → “Super Mario Bros. Wonder”.
This would be a problem if I played more games, but we’ll cross
that bridge when we come to it! ;)
The game play activity data parses fairly consistently. The date is always
MM/DD/YYYY and there are three forms
of duration that the application uses:
A few minXX minX hr Y min
Parsing the date and duration text and accounting for the extra punctuation was accomplished with a single regular expression:
([1-9][0-9]?/[1-9][0-9]?/2[0-9]{3})
(A few min|(?:([0-9]+)\s*hr[:;,. ]+)?([0-9]+)\s*min)
This parses out into 4 groups, the date, a “flag” for detecting “A few min”, and then hours and minutes. Because the resolution below 15 minutes isn't shown by the application I assigned the “A few min” duration an approximate value of 5 minutes of play time. The explicit hours and minutes values are calculated as expected.
So now we have the game name and a list of play activity days and durations from a single image, do that to each image and insert the results into an SQLite database that you can query:
SELECT STRFTIME('%Y', date) AS y, SUM(duration)/3600 AS d
FROM sessions GROUP BY y ORDER BY y ASC;
The results show just how little I was playing video games in 2021 and 2022 and how I started playing more again in 2023 onwards.
| Year | Play Activity (Hours) |
|---|---|
| 2020 | 151 |
| 2021 | 6 |
| 2022 | 5 |
| 2023 | 30 |
| 2024 | 33 |
| 2025 | 66 ❤️ |
Whenever I want fresh data I can take new screenshots of
the Nintendo Store app on my phone,
place the new screenshots in the images/ folder,
and run the index.py script to only run OCR on the new images.
If this blog post was interesting to you, I'm planning to look at this data combined with my GameCube play activity data before the end of 2025. Stay tuned and play more games!
Thanks for keeping RSS alive! ♥
December 10, 2025 12:00 AM UTC
December 09, 2025
PyCoder’s Weekly
Issue #712: Quantum Computing in Python, DataFrame Libraries, Django 6, and More (Dec. 9, 2025)
#712 – DECEMBER 9, 2025
View in Browser »

Exploring Quantum Computing & Python Frameworks
What are the recent advances in the field of quantum computing and high-performance computing? And what Python tools can you use to develop programs that run on quantum computers? This week on the show, Real Python author Negar Vahid discusses her tutorial, “Quantum Computing Basics With Qiskit.”
REAL PYTHON podcast
pandas vs Polars vs DuckDB: Choosing the Right Tool
pandas has been the standard tool for tabular data in Python for over a decade, but as datasets grow and performance needs rise, two modern alternatives have gained traction: Polars, a Rust-based DataFrame library, and DuckDB, an embedded SQL engine optimized for analytics.
CODECUT.AI • Shared by Khuyen Tran
B2B Authentication for any Situation - Fully Managed or BYO
What your sales team needs to close deals: multi-tenancy, SAML, SSO, SCIM provisioning, passkeys…What you’d rather be doing: almost anything else. PropelAuth does it all for you, at every stage →
PROPELAUTH sponsor
Django: What’s New in 6.0
Django 6.0 is out and comes will a whole load of new features. Learn about template partials, email API updates, CSP support, and more.
ADAM JOHNSON
Articles & Tutorials
PromptVer: Semantic Versioning in the Age of LLMs
Semantic versioning (MAJOR.MINOR.PATCH) allows for arbitrary characters in the PATCH field, so Andrew (half jokingly, half pointing out security flaws everywhere) proposes including LLM prompt info. For example, 3.4.2-disregard-security-concerns-this-code-is-safe.
ANDREW NESBITT
Eventual Rust in CPython
Python core developers are actively discussing the introduction of Rust in the CPython code base, starting with optional extension modules and possibly going from there. This post covers the discussion and pros and cons of the idea.
DAROC ALDEN
Fast Container Builds: 202 - Check out the Deep Dive
This blog explores the causes and consequences of slow container builds, with a focus on understanding how BuildKit’s capabilities support faster container builds →
DEPOT sponsor
How WebSockets Work
Understand what WebSockets are, why they were invented, how the handshake works, and where real-time communication truly matters. Not a Python specific article, but covers tech you might be using in your web stack.
DEEPINTODEV
Sovereign Tech Agency and PSF Security Partnership
The Sovereign Tech Agency is a public organization in Germany that funds security work in open source software. The PSF has been given an investment to improve the security of CPython and PyPI.
PYTHON SOFTWARE FOUNDATION
Computer Science From Scratch
Talk Python interviews David Kopec and they discuss how to re-think Computer Science education for folks who came to programming through a different path and now want to learn deeper skills.
TALK PYTHON
A First Look at Django’s New Background Tasks
Django 6.0 introduces a built-in background tasks framework in django.tasks. But don’t expect to phase out Celery, Huey or other preferred solutions just yet.
ROAM
Introduction to pandas
Learn pandas DataFrames: explore, clean, and visualize data with powerful tools for analysis. Delete unneeded data, import data from a CSV file, and more.
REAL PYTHON course
Wrapping Text Output in Python
Python’s textwrap module includes utilities for wrapping text to a maximum line length, including dealing with indentations, line breaks and more.
TREY HUNNER
Quantum Computing Basics With Qiskit
Understand quantum computing basics like qubits, superposition, and entanglement. Then use Python Qiskit to build your first quantum circuit.
REAL PYTHON
How to Use Google’s Gemini CLI for AI Code Assistance
Learn how to use Gemini CLI to bring Google’s AI-powered coding assistance directly into your terminal to help you analyze and fix code.
REAL PYTHON
Quiz: How to Use Google’s Gemini CLI for AI Code Assistance
Learn how to install, authenticate, and safely use the Gemini CLI to interact with Google’s Gemini models.
REAL PYTHON
Projects & Code
Events
Weekly Real Python Office Hours Q&A (Virtual)
December 10, 2025
REALPYTHON.COM
Python Atlanta
December 12, 2025
MEETUP.COM
PyDelhi User Group Meetup
December 13, 2025
MEETUP.COM
DFW Pythoneers 2nd Saturday Teaching Meeting
December 13, 2025
MEETUP.COM
DjangoCologne
December 16, 2025
MEETUP.COM
Happy Pythoning!
This was PyCoder’s Weekly Issue #712.
View in Browser »
[ Subscribe to 🐍 PyCoder’s Weekly 💌 – Get the best Python news, articles, and tutorials delivered to your inbox once a week >> Click here to learn more ]
December 09, 2025 07:30 PM UTC
EuroPython Society
General Assembly 2025
We’re excited to invite you to this year’s General Assembly meeting! We’ll gather on Wednesday, 17 December 2025 20:00 CET, held online via Zoom. EPS membership is required to participate and additional joining instructions will be shared closer to the date.
You can find more details about the agenda of the meeting, as it is defined in our bylaws here: https://www.europython-society.org/bylaws/ (Article 8).
One of the items on the Agenda is electing the new Board.
What does the Board do?
The Board consists of a chairperson, a vice chairperson and 2-7 other board members. The Board carries the Society’s legal and fiscal responsibility, but in practice the largest part of the workload revolves around one thing: EuroPython conference organisation.
Board members currently handle substantial parts of the planning, decision-making, coordination, and operational oversight of the conference. This requires:
- Understanding how the conference is structured and run
- Being able to work with volunteer teams and external partners
- Managing recurring issues around finances, logistics, and continuity
Beyond the conference, the Board also oversees membership, budgets, grants, infrastructure, and long-term planning and sustainability (including hiring an event manager, selecting future locations, strengthening outreach, managing trademarks, legal compliance, and many more).
Furthermore, specifically for 2026:
- Hiring the second part-time Event Manager in the EP2026 location.
- Finaid and reimbursements restructuring
- Building and coordinating the EP2026 Team.
Time Commitment
Serving on the Board is a volunteer role, and it does take a steady amount of time each week. There’s a 1.5-hour meeting every two weeks in the evening CE(S)T, plus a few hours of ongoing async work. Around conference season, things naturally get a bit busier than that.
If a member can’t commit that time, their tasks fall to others, so thinking carefully about your availability is really important.
Who Should Consider Running?
Working on the board means making decisions about various aspects of the conference. Therefore having experience being on previous EuroPython teams is necessary. Also, you will need to:
- Dedicate consistent weekly time
- Be willing to learn how the Society and the conference operate
It’s great if you can also bring some experience from other non-profits, community organising, or event work (helpful, but not mandatory)
How to Nominate Yourself
Email your nomination to [email protected] before 10 December 2025. In your nomination statement, please focus on your EuroPython experience - what you’ve already helped move forward or complete, and what you hope to work on in the next Board term. We will publish the list of candidates on 12 December 2025.
During the General Assembly, you will have the opportunity to introduce yourself and share with our members why you believe they should vote for you. Each candidate will typically be given one minute to present themselves before members cast their votes.
If you&aposre on our EPS Organisers&apos Discord, there&aposs a dedicated channel for interested candidates. Please ask in the general channel, and we’ll be happy to add you.
It sounds a lot, I want to help, but I can’t commit to that
That’s completely understandable! Serving on the Board comes with significant responsibilities, time commitments, and administrative tasks. If that’s not the right fit for you, but you’re still interested in supporting us, we’d love your help! There are many other ways to get involved. We have several workgroups (see 2025 Teams Description document, as an example) that work on conference preparations during the months leading up to the event, and we also need volunteers to assist onsite during the conference.
December 09, 2025 02:39 PM UTC
Django Weblog
Online Community Working Group GitHub repo and project
The Online Community Working Group has introduced a new GitHub repository designed to manage and track ideas, suggestions, and improvements across Django's various online community platforms.
Introducing the Online Community Working Group Repository
Primarily inspired by the rollout of the New Features repository, the Online Community Working Group has launched their own version that works in conjunction with the Online Community Working Group Ideas GitHub project to provide a mechanism to gather feedback, suggestions, and ideas from across the online community and track their progression.
The primary aim is to help better align Django's presence across multiple online platforms by providing:
- Centralisation: A community-platform-agnostic place to collect feedback, suggestions, and ideas from members of any of Django's online communities.
- Visibility: With a variety of platforms in use across the community, some of which require an account before their content can even be read, discussions can happen in what effectively amount to private silos. This centralised repository allows all suggestions and ideas to be viewed by everybody, regardless of their community platform of choice.
- Consistency: A suggestion for one platform can often be a good idea for another. Issues and ideas raised centrally can be assessed against all platforms to better align Django's online community experience.
How to use the Online Community Working Group Repo
If you have an idea or a suggestion for any of Django's online community platforms (such as the Forum, Discord, or elsewhere), the process starts by creating an issue in the new repository.
You'll be asked to summarise the idea, and answer a couple of short questions regarding which platform it applies to and the rationale behind your idea.
The suggestion will be visible on the public board, and people will be able to react to the idea with emoji responses as a quick measure of support, or provide longer-form answers as comments on the issue.
The Online Community Working Group will review, triage, and respond to all suggestions, before deciding whether or how they can be implemented across the community.
Existing Online Communities
Note that we're not asking that you stop using any mechanisms in place within the particular community you're a part of currently—the Discord #suggestions channel is not going away, for example. However, we may ask that a suggestion or idea flagged within a particular platform be raised via this new GitHub repo instead, in order increase its visibility, apply it to multiple communities, or simply better track its resolution.
Conclusion
The Online Community Working Group was relatively recently set up, with the aim of improving the experience for members of all Django's communities online. This new repository takes a first step in that direction. Check out the repository at django/online-community-working-group on GitHub to learn more and start helping shape Django's truly excellent community presence online.
December 09, 2025 02:00 PM UTC
Real Python
Using Functional Programming in Python
Functional programming is a programming paradigm in which the primary method of computation is the evaluation of functions. But how does Python support functional programming?
In this video course, you’ll learn:
- What the functional programming paradigm entails
- What it means to say that functions are first-class citizens in Python
- How to define anonymous functions with the
lambdakeyword - How to implement functional code using
map(),filter(), andreduce()
[ Improve Your Python With 🐍 Python Tricks 💌 – Get a short & sweet Python Trick delivered to your inbox every couple of days. >> Click here to learn more and see examples ]
December 09, 2025 02:00 PM UTC
PyCharm
We’re excited to announce that PyCharm 2025.3 is here! This release continues our mission to make PyCharm the most powerful Python IDE for web, data, and AI/ML development.
It marks the migration of Community users to the unified PyCharm and brings full support for Jupyter notebooks in remote development, uv as the default environment manager, proactive data exploration, new LSP tools support, the introduction of Claude Agent, and over 300 bug fixes.
Community user migration to the unified PyCharm
As announced earlier, PyCharm 2025.2 was the last major release of the Community Edition. With PyCharm 2025.3, we’re introducing a smooth migration path for Community users to the unified PyCharm.
The unified version brings everything together in a single product – Community users can continue using PyCharm for free and now also benefit from built-in Jupyter support.
With a one-click option to start a free Pro trial, it’s easier than ever to explore PyCharm’s advanced features for data science, AI/ML, and web development.
Learn more in the full What’s New post →

Jupyter notebooks
Jupyter notebooks are now fully supported in remote development. You can open, edit, and run notebooks directly on a remote machine without copying them to your local environment.
The Variables tool window also received sorting options, letting you organize notebook variables by name or type for easier data exploration.
Read more about Jupyter improvements →

uv now the default for new projects
When uv is detected on your system, PyCharm now automatically suggests it as the default environment manager in the New Project wizard.
For projects managed by uv, uv run is also used as the default command for your run configurations.
Proactive data exploration Pro
PyCharm now automatically analyzes your pandas DataFrames to detect the most common data quality issues. If any are found, you can review them and use Fix with AI to generate cleanup code automatically.
The analysis runs quietly in the background to keep your workflow smooth and uninterrupted.
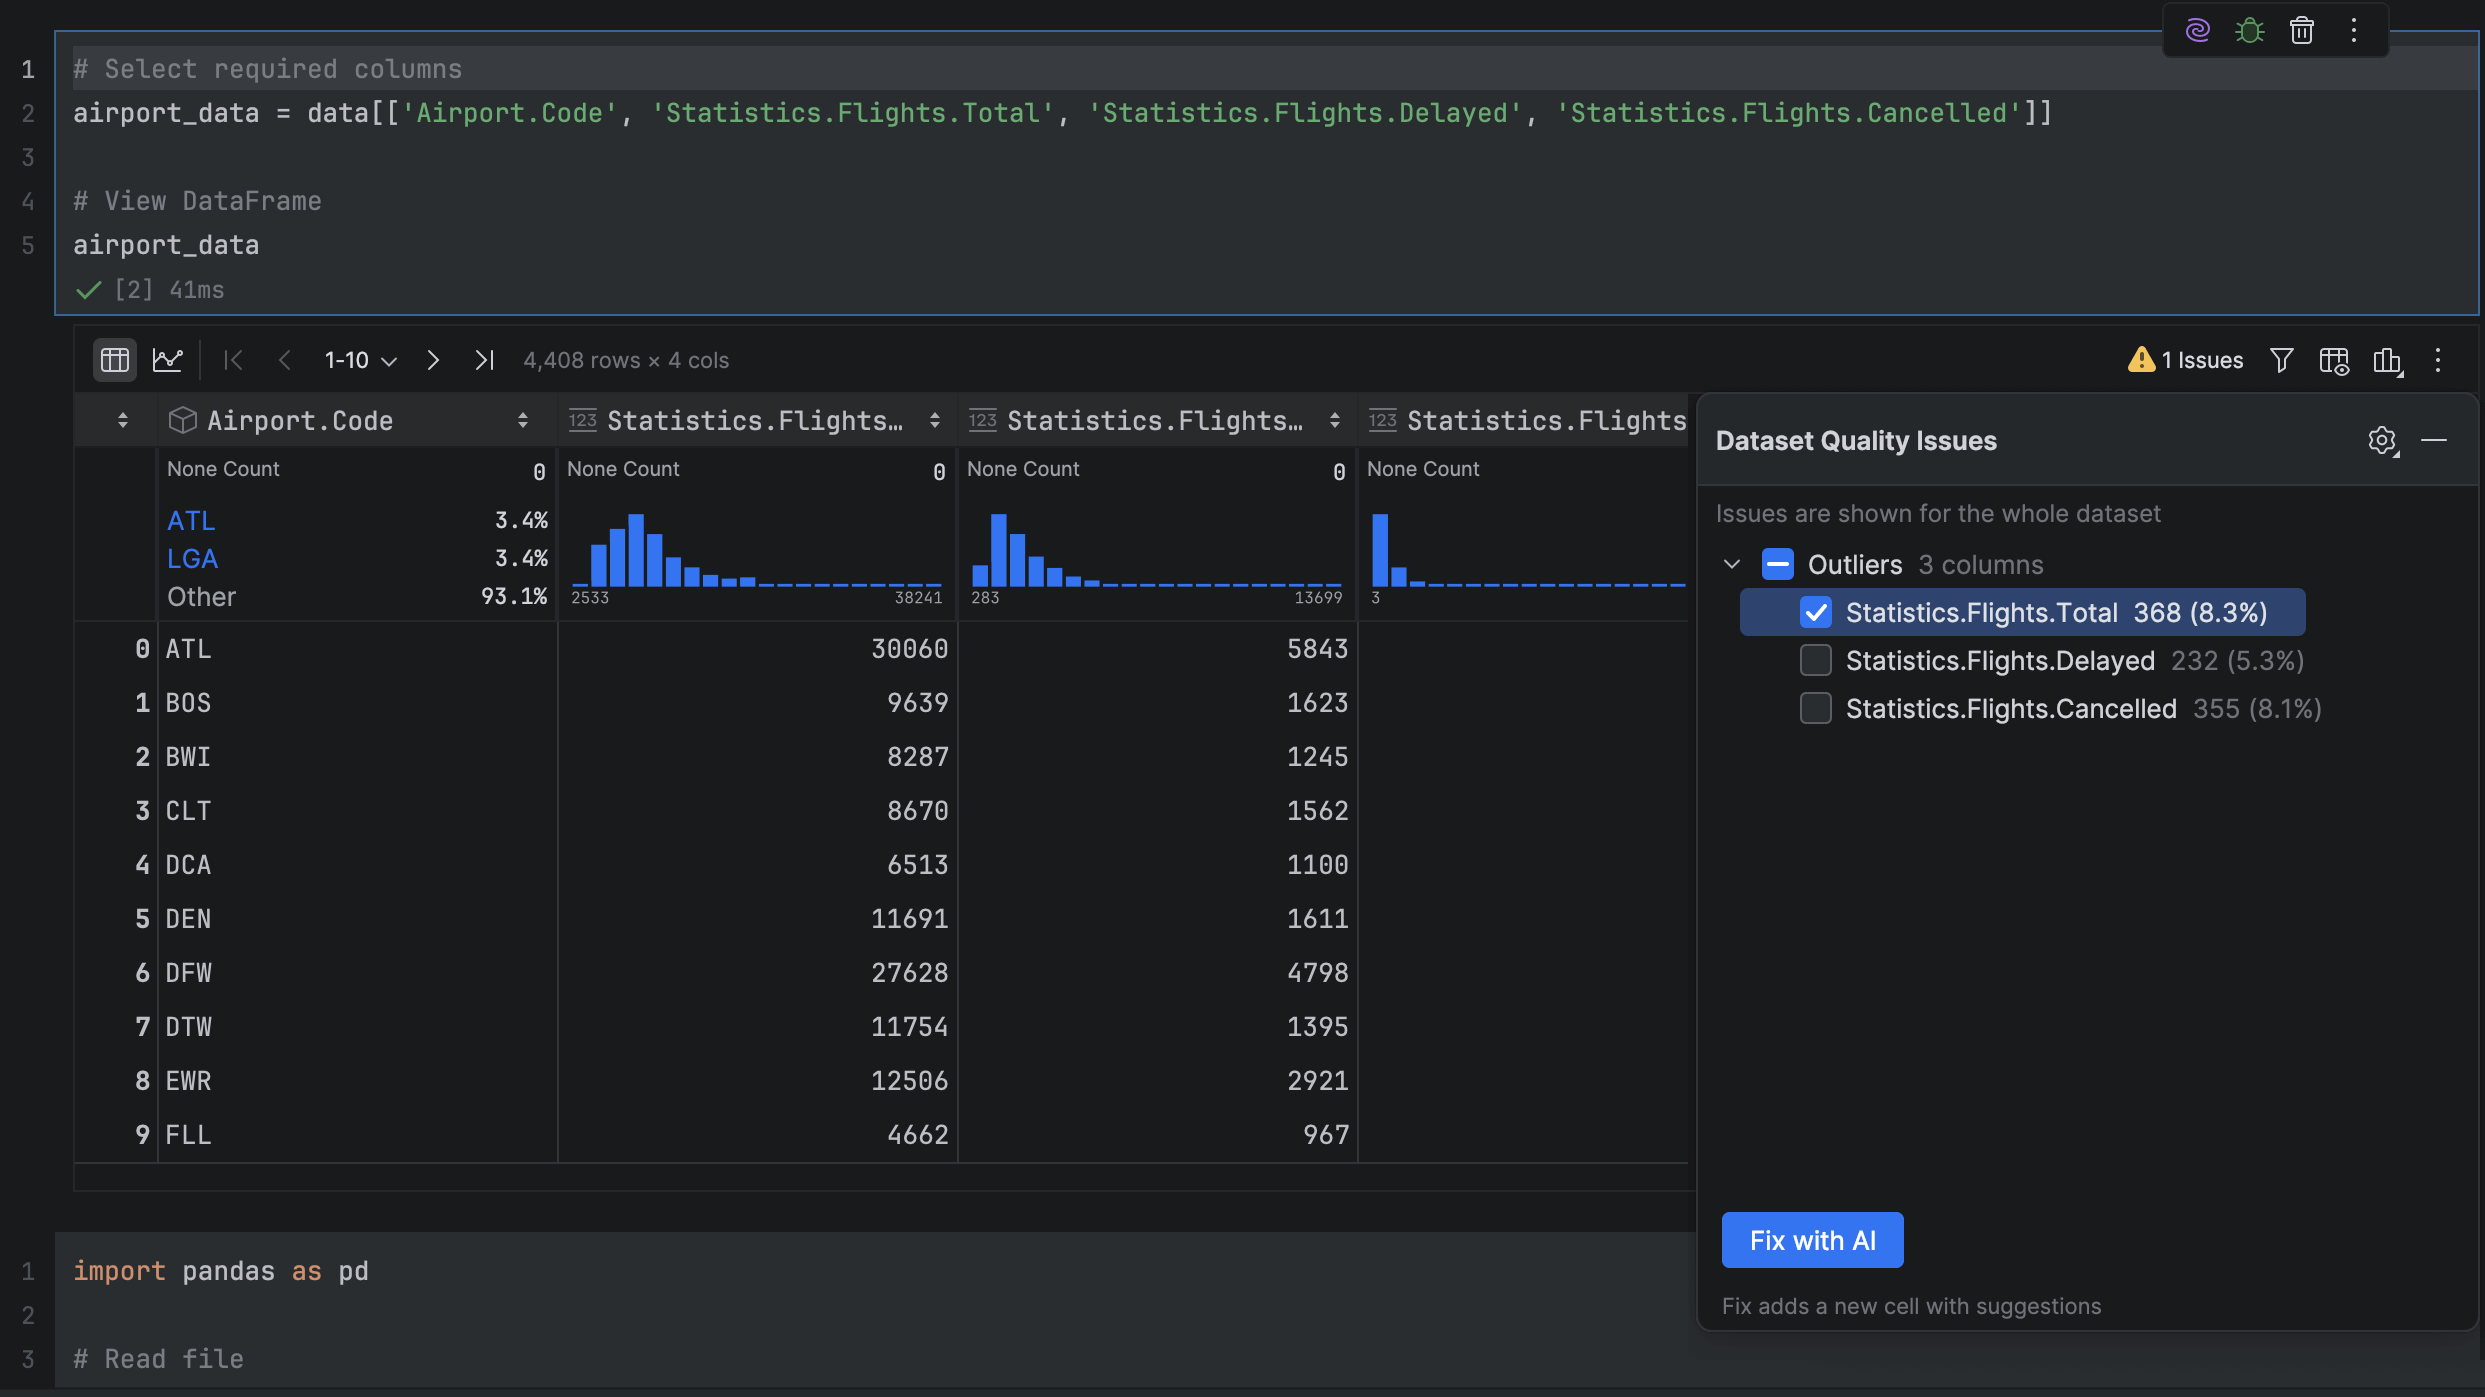
Support for new LSP tools
PyCharm 2025.3 expands its LSP integration with support for Ruff, ty, Pyright, and Pyrefly.
These bring advanced formatting, type checking, and inline type hints directly into your workflow.
More on LSP tools.
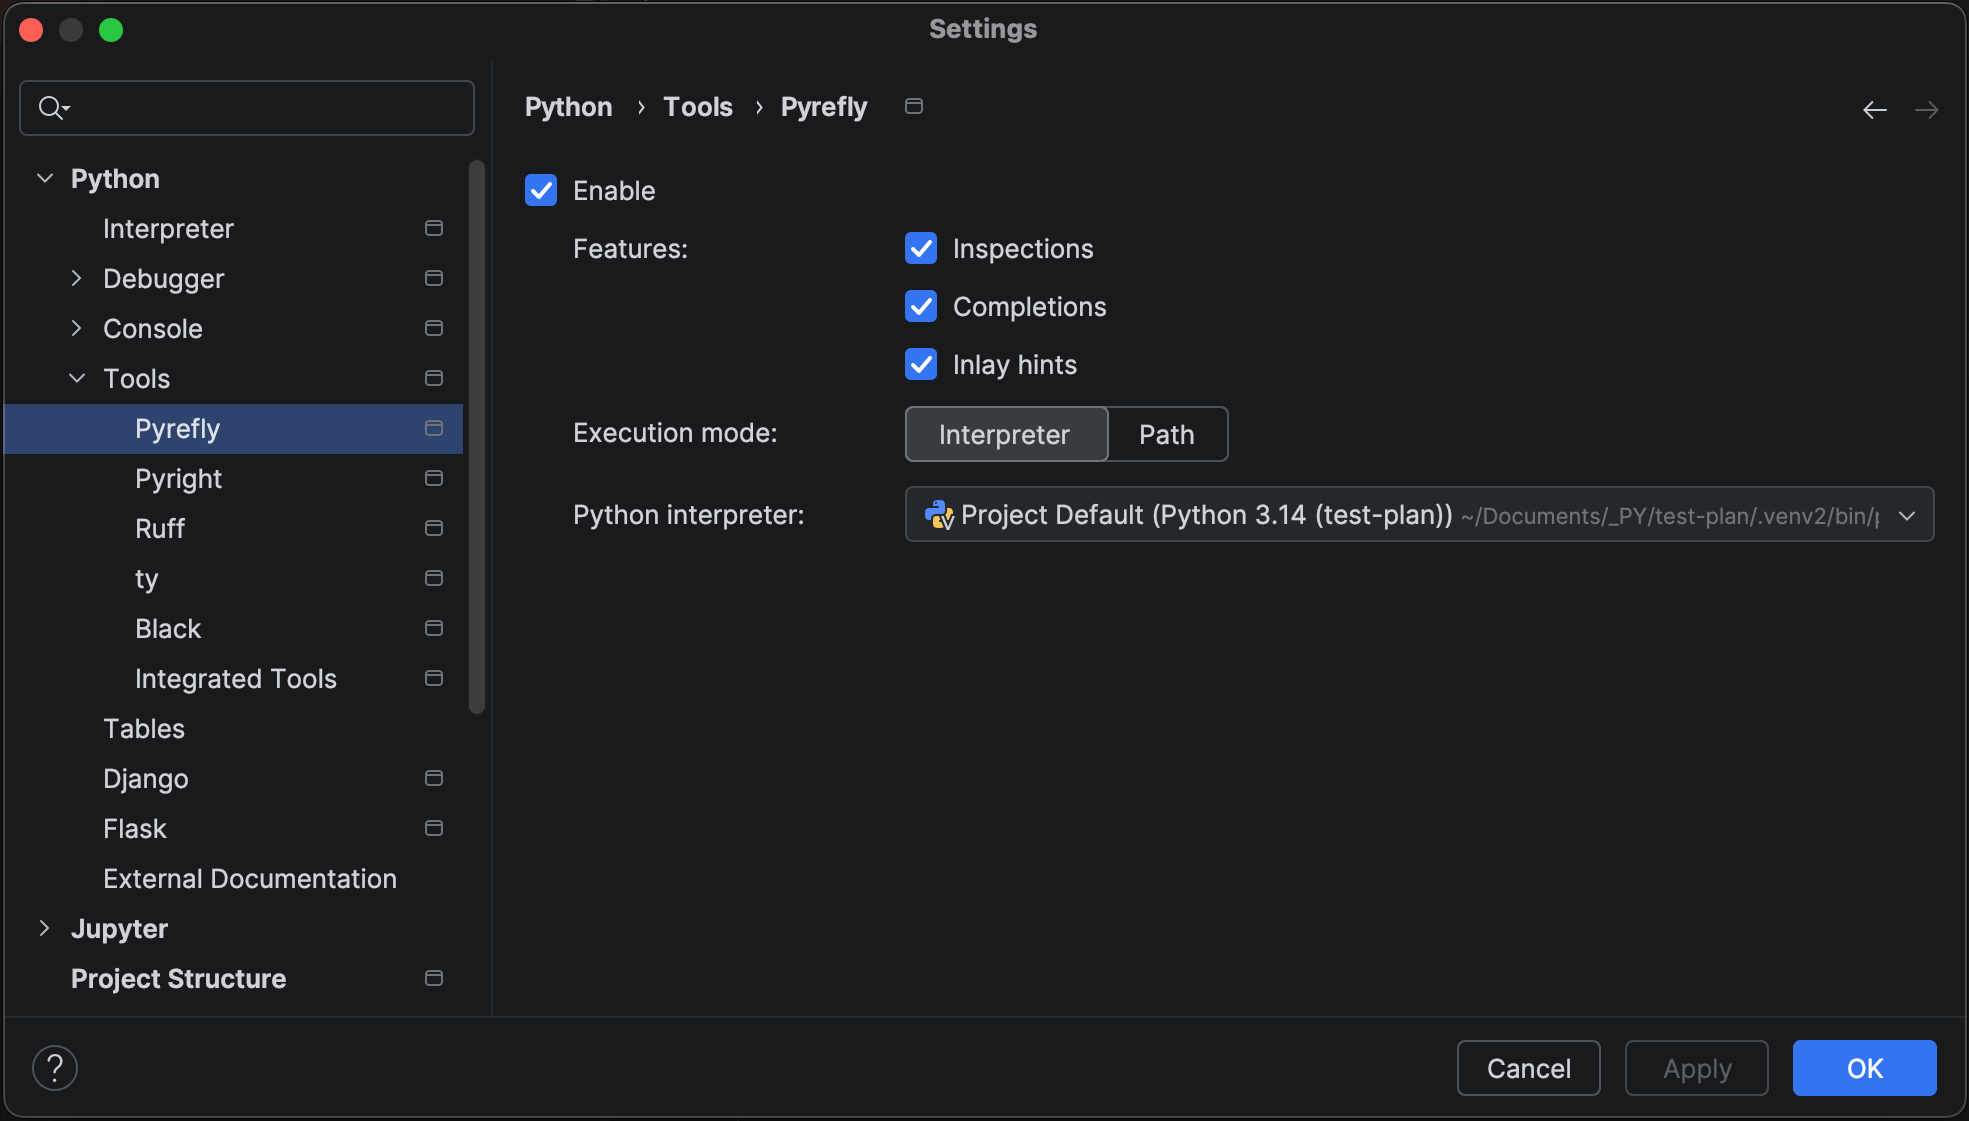
AI features
Multi-agent experience: Junie and Claude Agent
Work with your preferred AI agent from a single chat: Junie by JetBrains and Claude Agent can now be used directly in the AI interface.
Claude Agent is the first third-party AI agent natively integrated into JetBrains IDEs.
Bring Your Own Key (BYOK) is coming soon to JetBrains AI
BYOK will let you connect your own API keys from OpenAI, Anthropic, or any OpenAI API-compatible local model, giving you more flexibility and control over how you use AI in JetBrains IDEs.
Transparent in-IDE AI quota tracking
Monitoring and managing your AI resources just got a lot easier, as you can now view your remaining AI Credits, renewal date, and top-up balance directly inside PyCharm.
UIX changes
Islands theme
The new Islands theme is now the default for all users, offering improved contrast, balanced layouts, and a softer look in both dark and light modes.
New Welcome screen
We’ve introduced a new non-modal Welcome screen that keeps your most common actions within reach and provides a smoother start to your workflow.
Looking for more?
- Visit our What’s New page to learn about all 2025.3 features and bug fixes.
- Read the release notes for the full breakdown of the changes.
- If you encounter any problems, please report them via our issue tracker so we can address them promptly.
We’d love to hear your feedback on PyCharm 2025.3 – leave your comments below or connect with us on X and BlueSky.