Summary of Arduino / Raspberry Pi Internet Radio
This project integrates an Arduino microcontroller with a Raspberry Pi to build an Internet Radio. The Raspberry Pi handles internet streaming and audio output via mpd and ALSA, while the Arduino manages user input and display feedback using nanpy, a Python-Arduino communication library. It aims to teach mpd/mpc usage, Arduino-Pi interfacing with nanpy, and practical embedded system implementation. This collaborative setup efficiently combines high-level processing and low-level control for interactive IoT applications, making it ideal for intermediate users familiar with Linux environments.
Parts used in the Arduino / Raspberry Pi Internet Radio:
- Raspberry Pi single-board computer
- Arduino microcontroller (e.g., Arduino Uno)
- USB cable for Arduino-Pi connection
- Audio output device (speakers or headphones via Jack or HDMI)
- Buttons for playback control
- Display module for radio station text output
- Nanpy Python library
- MpD (Music Player Daemon) software
- ALSA sound system
Arduino / Raspberry Pi Internet Radio
This project represents an engaging integration between the Arduino microcontroller and the Raspberry Pi single-board computer to construct a functional Internet Radio. The project is best suited for individuals at an intermediate skill level, particularly those who already have some experience with Linux-based environments. While the technical requirements are not overly complex, having prior exposure to Linux commands or access to someone familiar with the system will significantly ease the implementation process.
In this setup, the Raspberry Pi serves as the backbone for streaming and audio processing, while the Arduino functions as an input/output interface, handling display feedback and playback control. This division of labor highlights the efficiency of combining a high-level computational unit with a low-level microcontroller for seamless interactive systems.
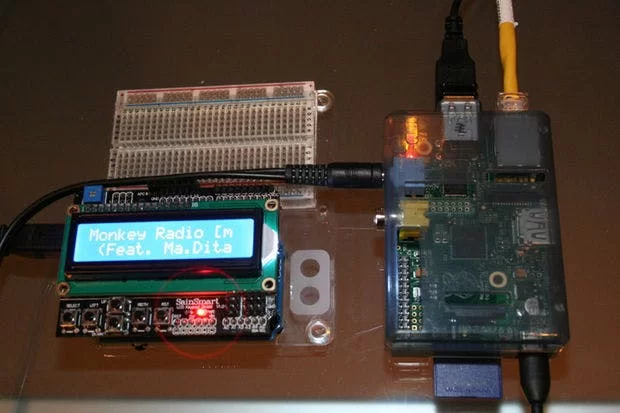
Raspberry Pi runs mpd music player daemon to receive and decode the internet radio stream.
ALSA running on the Raspberry Pi provides the sound through either the Jack Socket or the HDMI output.
Arduino runs a nanpy interface code to interface with Python, providing Text output of the Radio Station playing and Button inputs to control Playback.
Objectives:
- Learn how to use the mpd/mpc on the Raspberry Pi
- Learn how to use the nanpy library for Python to interface the Pi to the Arduino
- Make a Cool Internet Radio
Install the Required Packages for mpd/mpc
The first thing we have to do is update Raspbian and install the required packages. Make sure you’re logged in (obviously), and you have an Internet connection.
1. Update Raspbian to the latest packages
$ sudo apt-get update
2. Install the mpd / mpc packages
$ sudo apt-get install mpc mpd
This installs the Music Player Daemon (mpd) and it’s client mpc.
You use the mpc client to configure mpd to add radio streams to the playlist, start and stop the player etc.
Install the Required Packages for Python-nanpy
We want to be able to talk to Arduino from Python running on the Pi.
To do that, we need to install the nanpy library for Python and the nanpy firmware for Arduino.
1. Install Arduino packages to build the nanpy firmware for Arduino
$ apt-get install arduino
2. Get the nanpy library for Python and extract
from /home/pi
$ wget http://pypi.python.org/packages/source/n/nanpy/nanpy-v0.7.tar.gz$ tar xvf nanpy-v0.7.tar.gz
3. Get setuptools for Python (a dependancy for nanpy) and extract
$ wget http://pypi.python.org/packages/source/s/setuptools/setuptools-0.6c11.tar.gz#md5=7df2a529a074f613b509fb44feefe74e$ tar xvf setuptools-0.6c11.tar.gz
4. Get pyserial for Python (a dependancy for nanpy) and extract
$ wget http://pypi.python.org/packages/source/p/pyserial/pyserial-2.6.tar.gz$ tar xvf pyserial-2.6.tar.gz
5. Go to the setuptools directory and install Python setuptools
$ cd setuptools-0.6c11$ sudo python setup.py install
6. Go to the nanpy directory and install the Python nanpy library
$ cd ../nanpy$ sudo python setup.py install
7. Go to the serial directory and install the Python serial library
$ cd ../pyserial-2.6 $ sudo python setup.py install
Now we’ve got the files we need let’s put the nanpy firmware on the Arduino.
Put the nanpy Firmware on the Arduino
nanpy allows a Python program runing on the raspberry Pi to operate the Arduino using conventional Arduino-Sketch syntax e.g. the Python program to read an analogue input from Arduino might read:
int val = Arduino.analogRead(14)
nanpy has two components:
i) a library for Python that allows Arduino commands to be written in a familiar syntax and communicate with Arduino;
ii) firmware that runs on Arduino, communicating with Python on the Pi
We installed the Python part of nanpy, and downloaded the Arduino part of nanpy on the Pi in the last step.
Now we need to upload the nanpy firmware to Arduino.
Plug Arduino into the USB of the Raspberry Pi.
1. Go to the nanpy firmware directory and upload to Arduino
$ cd ../nanpy/firmware$ export BOARD=uno$ make$ make upload
If you get a report that the device is not found on /dev/ttyACM0 , plug the Arduino into the other USB port.