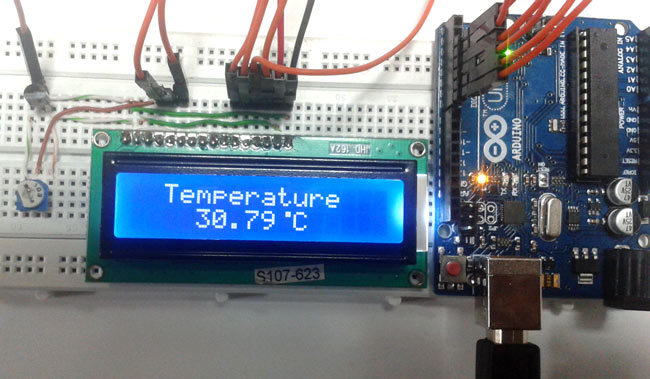
A precision Digital Thermometer using Arduinoand LM35 temperature sensor that displays real-time temperature readings on a 16x2 LCD display. Perfect for home, office, and industrial temperature monitoring applications.
This Arduino-based digital thermometer provides accurate temperature measurements by combining three main components:
- Temperature Sensing: LM35 sensor detects ambient temperature
- Signal Processing: Arduino converts analog signals to digital temperature values
- Display Output: 16x2 LCD shows temperature readings in Celsius
Original Project Tutorial: Digital Thermometer using Arduino - Circuit Digest
| Component | Quantity | Purpose |
|---|---|---|
| Arduino Uno | 1 | Main microcontroller |
| LM35 Temperature Sensor | 1 | Temperature detection |
| 16x2 LCD Display | 1 | Temperature display |
| Breadboard | 1 | Circuit connections |
| Connecting Wires | As needed | Wiring |
| 9V/12V Power Adapter | 1 | Power supply |
| 10kΩ Potentiometer | 1 | LCD contrast adjustment |
- Temperature Range: -55°C to +150°C
- Accuracy: ±0.5°C at room temperature
- Resolution: 0.1°C
- Update Rate: 1 second
- Power Supply: 9V or 12V DC adapter
- Display: 16x2 character LCD
| LM35 Pin | Function | Arduino Pin |
|---|---|---|
| Pin 1 (Vcc) | +5V Power | 5V |
| Pin 2 (Output) | Analog Output | A0 |
| Pin 3 (GND) | Ground | GND |
| LCD Pin | Function | Arduino Pin |
|---|---|---|
| VSS | Ground | GND |
| VDD | +5V Power | 5V |
| V0 | Contrast | 10kΩ Pot |
| RS | Register Select | Pin 7 |
| EN | Enable | Pin 6 |
| D4 | Data Bit 4 | Pin 5 |
| D5 | Data Bit 5 | Pin 4 |
| D6 | Data Bit 6 | Pin 3 |
| D7 | Data Bit 7 | Pin 2 |
| A | Backlight Anode | 5V |
| K | Backlight Cathode | GND |
- Temperature Detection: The LM35 sensor generates 10mV per degree Celsius
- Analog to Digital Conversion: Arduino reads the analog voltage using ADC
- Temperature Calculation: Converts ADC value to temperature using the formula:
Temperature = (Analog_Value × 5.0 / 1023.0) × 100 - Display: Shows temperature on LCD with custom degree symbol
/*-----------Arduino LM35 Code-------------*/
/*-----------Digital Thermometer Using Arduino-------------*/
#include<LiquidCrystal.h>
LiquidCrystal lcd(7,6,5,4,3,2);
#define sensor A0

byte degree[8] = {
  0b00011,
  0b00011,
  0b00000,
  0b00000,
  0b00000,
  0b00000,
  0b00000,
  0b00000
};

void setup() {
  lcd.begin(16,2);
  lcd.createChar(1, degree);
  lcd.setCursor(0,0);
  lcd.print(" Digital ");
  lcd.setCursor(0,1);
  lcd.print(" Thermometer ");
  delay(4000);
  lcd.clear();
  lcd.print(" Circuit Digest ");
  delay(4000);
  lcd.clear();
}

void loop() {
  /*---------Temperature-------*/
  float reading = analogRead(sensor);
  float temperature = reading * (5.0/1023.0) * 100;
  delay(10);

  /*------Display Result------*/
  lcd.clear();
  lcd.setCursor(2,0);
  lcd.print("Temperature");
  lcd.setCursor(4,1);
  lcd.print(temperature);
  lcd.write(1);
  lcd.print("C");
  delay(1000);
}-
Hardware Assembly:
- Connect components according to the pin connection table
- Ensure proper power connections
- Adjust LCD contrast using the potentiometer
-
Software Setup:
- Install Arduino IDE
- Connect Arduino Uno via USB
- Upload the provided code
- Open Serial Monitor (optional for debugging)
-
Testing:
- Power on the system
- Observe temperature readings on LCD
- Verify accuracy with a reference thermometer
| Problem | Solution |
|---|---|
| LCD display blank | Check power connections and adjust contrast potentiometer |
| Incorrect temperature readings | Verify LM35 connections and calibrate if needed |
| Erratic readings | Ensure stable power supply and proper grounding |
| No display output | Check LCD pin connections and code upload |
To improve accuracy, compare readings with a known accurate thermometer and add/subtract offset in code:
float temperature = reading * (5.0/1023.0) * 100 + OFFSET_VALUE;- Wireless Connectivity: Add ESP8266/ESP32 for IoT capabilities
- Data Logging: Store temperature data on SD card
- Alarm System: Add buzzer for temperature alerts
- Multiple Sensors: Monitor multiple locations
- Mobile App: Create smartphone interface
- Fahrenheit Display: Add temperature unit conversion
// Add for WiFi connectivity
#include <WiFi.h>
#include <ThingSpeak.h>

// Send data to cloud
ThingSpeak.writeField(channelNumber, 1, temperature, myWriteAPIKey);- Temperature Controlled LED using LM35
- IoT Digital Thermometer using NodeMCU
- Digital Thermometer using PIC Microcontroller
- Arduino Projects
Q: What's the accuracy of this thermometer? A: The LM35 provides ±0.5°C accuracy at room temperature, suitable for most general applications.
Q: Can I use a different temperature sensor? A: Yes, you can use DS18B20, DHT11, DHT22, or thermistors with appropriate code modifications.
Q: What's the temperature range? A: LM35 operates from -55°C to +150°C, covering most environmental and industrial applications.
Q: How do I add wireless capabilities? A: Replace Arduino Uno with ESP32 or add an ESP8266 module for WiFi connectivity.
This project is open-source and available under the MIT License. Feel free to modify and distribute.
Contributions are welcome! Please feel free to submit issues, feature requests, or pull requests.
For questions or support, refer to the original tutorial: Circuit Digest - Digital Thermometer Project
Keywords: Arduino, Digital Thermometer, LM35, Temperature Sensor, LCD Display, DIY Electronics, IoT, Home Automation