Image

Attach A Full Size Lens To A Tiny Camera

The Kodak Charmera is a tiny keychain camera produced by licencing out the name of the famous film manufacturer, and it’s the current must-have cool trinket among photo nerds. Inside is a tiny sensor and a fixed-focus M7 lens, and unlike many toy cameras it has better quality than its tiny package might lead you to expect. There will always be those who wish to push the envelope though, and [微攝 Macrodeon] is here to fit a lens mount for full-size lenses (Chinese language, subtitle translation available).

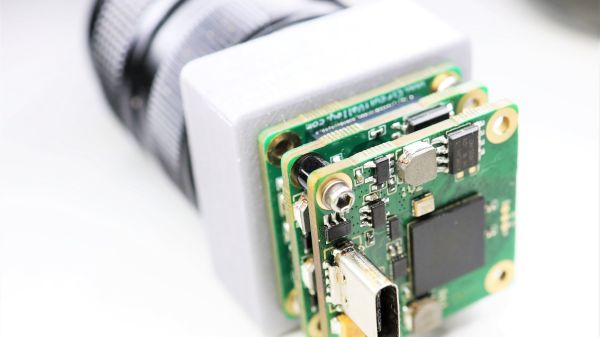
The hack involves cracking the camera open and separating the lens mount from the sensor. This is something we’re familiar with from other cameras, and it’s a fiddly process which requires a lot of care. A C-mount is then glued to the front, from which all manner of other lenses can be attached using a range of adapters. The focus requires a bit of effort to set up and we’re guessing that every lens becomes extreme telephoto due to the tiny sensor, but we’re sure hours of fun could be had.

The Charmera is almost constantly sold out, but you should be able to place a preorder for about $30 USD if you want one. If waiting months for delivery isn’t your bag, there are other cameras you can upgrade to C-mount.

Continue reading “Attach A Full Size Lens To A Tiny Camera”

Image

Broken Phone To Cinema Camera With A Lens Upgrade

The advent of the mobile phone camera has caused a revolution in film making over the last couple of decades, lowering the barrier to entry significantly, and as the cameras have improved, delivering near-professional-grade quality in some cases. Mobile phone manufacturers hire film makers to promote their new flagship models and the results are very impressive, but there is still a limitation when it comes to the lenses. [Evan Monsma] has broken through that barrier, modifying an iPhone to take C-mount cinema lenses.

It’s likely many of us have one or two broken mobile phones around, and even if they aren’t flagship models they’ll still have surprisingly good camera sensors. This one is an iPhone that’s seen better days, with a severely cracked glass back and a dislodged lens cover on one of its cameras. Removing the back and the lens cover reveals the sensor. The video below the break has a lot of woodwork and filing away of the phone, as he modifies a C-to-CS ring to serve as a C-mount. In reality the flange distance makes it a CS mount so his C-mount lenses need an adapter, but as anyone who’s used a Raspberry Pi camera will tell you, that’s no hardship.

The final camera has a thick plywood back with a tripod mount installed, the other two cameras work with their Apple lenses, and the C-mount gives great results with a cinema lens. We’re concerned that the Super Glue he uses to fix it all together might not hold up to the weight of bigger lenses, but we’re here for this project and we love it.

Continue reading “Broken Phone To Cinema Camera With A Lens Upgrade”

Image

Build Your Own 6K Camera

[Curious Scientist] has been working with some image sensors. The latest project around it is a 6K camera. Of course, the sensor gives you a lot of it, but it also requires some off-the-shelf parts and, of course, some 3D printed components.

An off-the-shelf part of a case provides a reliable C mount. There’s also an IR filter in a 3D-printed bracket.

Continue reading “Build Your Own 6K Camera”

Image

Scratch-Built Industrial Camera’s Modular Design Really Stacks Up

The news here isn’t so much that [Guarav Singh] built this high-quality industrial digital camera from scratch, but it’s in the way it was accomplished. That plus the amount of information that’s packed into the write-up, of course. And the excellent photography.

Modularity was one of [Guarav]’s design goals, with the intention of being able to swap out the sensor as the technology changes. To that end, [Guarav] came up with a stack of three PCBs. The middle board of the stack contains a Lattice FPGA chip along with two 16-MB RAMs and the FPGA config flash. The sensor board lies on one side of the FBGA board, while the USB 3.0 board is on the other. Each six-layer board is a masterpiece of high-density design, and the engineering that went into interfacing them and getting everything squeezed into a 3D-printed case with an integrated aluminum C-mount ring is pretty impressive.

[Guarav]’s write-up goes into a great deal of detail on processing the sensor data on the FPGA. Also, there’s quite a bit of practical information on implementing MIPI (Mobile Industry Processor Interface) and the CSI (Camera Serial Interface) specification. We’ve delved into this world before, but this project is a great hands-on explanation that might really help move your MIPI project along.

Thanks for the tip, [STR-alorman].

Image

Giving A 4k Webcam Special Eyes

It’s a problem as old as photography: your camera is only as good as your lens. As cameras shrink, so do lenses, and so do the options for upgrading to a better lens. And forget about switching to a different focal length or aperture — it’s often just not an option. Unless you make it an option by adding a CS lens mount to a high-end webcam.

We’ll stipulate that at 4k resolution and packed with all sorts of goodies, the Logitech Brio Pro is a heck of a nice camera. And the lens isn’t bad either, as you’d hope for a camera with almost 9 megapixels at its disposal. But with an optical field of view optimized for video conferencing, it’s hard to use this premium camera for much else. [Saulius] fixed that by taking the camera apart and adding a new case with a built-in C- and CS-mount, resulting in literally thousands of lens choices. [Saulius]’ post has valuable teardown information, which includes exposing the CCD sensor completely. The new case is sold as a kit, but it looks like a 3D-printed case would be pretty easy to whip up.

[Salius] sure seems to love those optical hacks, whether they be a budget microscope camera, high-resolution LIDAR, or capturing license plates at great distances.