Image

3D Printing And Metal Casting Are A Great Match

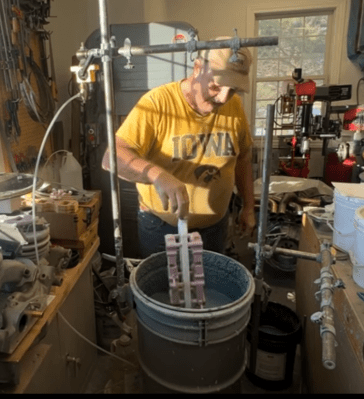
[Chris Borge] has made (and revised) many of his own tools using a combination of 3D printing and common hardware, and recently decided to try metal casting. Having created his own tapping arm, he tries his hand at aluminum casting to create a much more compact version out of metal. His video (embedded below) really shows off the whole process, and [Chris] freely shares his learning experiences in casting his first metal tool.

The result looks great and is considerably smaller in stature than the 3D-printed version. However, the workflow of casting metal parts is very different. The parts are much stronger, but there is a lot of preparation and post-processing involved.

Image
Metal casting deals with molten metal, but the process is otherwise very accessible, and many resources are available to help anyone with a healthy interest.

The key to making good castings is mold preparation. [Chris] uses green sand (a mixture of fine sand and bentonite clay – one source of the latter is ground-up kitty litter) packed tightly around 3D printed parts inside a frame. The packed sand holds its shape while still allowing the original forms to be removed and channels to be cut, creating a two-part mold.

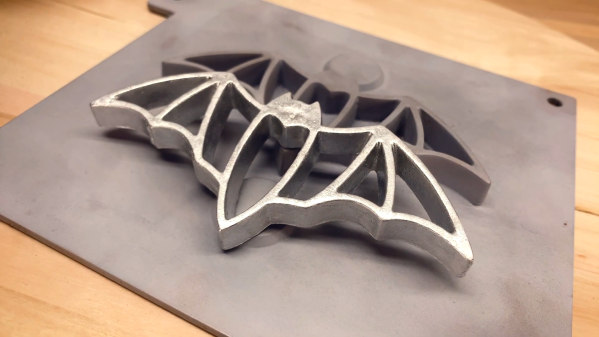
His first-time castings have a rough surface texture, but are perfectly serviceable. After some CNC operations to smooth some faces and drill some holes, the surface imperfections are nothing filing, filler, and paint can’t handle.

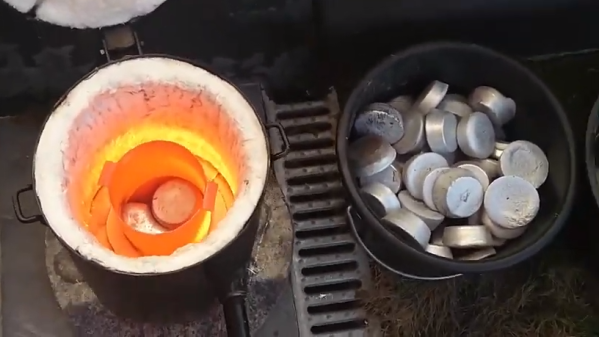
To cast molten metal, there really isn’t any way around needing a forge. Or is there? We have seen some enterprising hackers repurpose microwave ovens for this purpose. One can also use a low-temperature alloy like Rose’s Metal, or eschew molten liquid altogether and do cold casting, which uses a mixture of resin and metal powder instead.

The design files for [Chris]’s tapping arm are available from links in the video description, and he also helpfully provides links to videos and resources he found useful. Watch it in the video, embedded just below.

Continue reading “3D Printing And Metal Casting Are A Great Match”

Image

Massive Aluminum Snake Casting Becomes Water Cooling Loop For PC

Water cooling was once only the preserve of hardcore casemodders and overclockers. Today, it’s pretty routinely used in all sorts of performance PC builds. However, few are using large artistic castings as radiators like [Mac Pierce] is doing. 

ImageThe casting itself was inspired on the concept of the ouroboros, the snake which eats its own tail if one remembers correctly. [Mac] built a wooden form to produce a loop approximately 30″ tall and 24″ wide, before carving it into the classic snake design. The mold was then used to produce a hefty sand cast part which weighed in at just over 30 pounds.

The next problem was to figure out how to create a sealed water channel in the casting to use it as a radiator. This was achieved by machining finned cooling channels into the surface of the snake itself. A polycarbonate face plate was then produced to bolt over this, creating a sealed system. [Mac] also had to work hard to find a supply of aluminum-compatible water cooling fittings to ensure he didn’t run into any issues with galvanic corrosion.

The final product worked, and looked great to boot, even if it took many disassembly cycles to fix all the leaks. The blood-red coolant was a nice touch that really complemented the silvery aluminum. CPU temperatures weren’t as good as with a purpose-built PC radiator, but maxed out at 51 C in a heavy load test—servicable for [Mac]’s uses. The final touch was to simply build the rest of the PC to live inside the ouroboros itself—and the results were stunning.

We’ve featured a few good watercooling builds over the years. If you’ve found your own unique way to keep your hardware cool and happy, don’t hesitate to notify the tipsline!

A man in black glasses and a black t-shirt has his arms resting on a grey workbench. Between his opened hands are the two halves of a copper ice press. They are fist-sized copper cylinders. The lower half has large spiraling grooves to aid in the release of excess water from the ice being formed as it melts.

Make Ice Spheres In A Copper Press

Perfectly clear ice spheres are nifty but can be a bit tricky to make without an apparatus. [Seth Robinson] crafted a copper ice press to make his own.

Copper is well-known for its thermal conductivity, making it a perfect material for building a press to melt ice into a given shape. Like many projects, a combination of techniques yields the best result, and in this case we get to see 3d printing, sand casting, lost PLA casting, lathe turning, milling, and even some good old-fashioned sanding.

The most tedious part of the process appears to be dip coating of ceramic for the lost PLA mold, but the finished result is certainly worth it. That’s not to say that any of the process looks easy if you are a metal working novice. Taking over a week to slowly build up the layers feels a bit excruciating, especially compared to 3D printing the original plastic piece. If you’re ever feeling discouraged watching someone else’s awesome projects, you might want to stick around to the end when [Robinson] shows us his first ever casting. We’d say his skill has improved immensely over time.

If you’re looking for something else to do with casting copper alloys, be sure to checkout this bronze river table or [Robinson’s] copper levitation sphere.

Thanks to [DjBiohazard] for the tip!

Continue reading “Make Ice Spheres In A Copper Press”

Image

Lost Foam Aluminium Alloy Casting

[Kelly Coffield] makes intake manifolds for old Ford throttle bodies for fun, demonstrating an excellent technique for making such things in the small shop. The mould patterns are CNC machined from a solid polystyrene block, with all the necessary gates to feed the aluminium into the mould. The principle is to introduce aluminium from a large central runner into the mould structure, which feeds the gates into the mould parts. The various foam mould components are then glued with an extra brace bar at the bottom to strengthen it.

Image
Dip coating with a refractory slurry

The complete structure is then sprayed with surfactant (just plain old soapy water) and dip-coated in a refractory slurry. The surfactant adjusts the coating’s surface tension, preventing bubbles from forming and ruining the surface quality produced by this critical coating step.

Once a satisfactory coating has been applied and hardened, the structure is placed inside a moulding pan fitted with a pneumatic turbine vibrator, to allow sand to be introduced. The vibrations ease the flow of sand into all the nooks and crannies, fully supporting the delicate mould structure against the weight of the metal, and gases produced as the foam burns away. A neat offset pouring cup is then added to the top of the structure and packed in with more sand to stabilise it. It’s a simple setup that can easily be replicated in any hackerspace or backyard for those motivated enough. [Kelly] is using A356 aluminium alloy, but there’s no reason this technique won’t work for other metals.

It was amusing to see [Kelly] demould by just dumping out the whole stack onto the drive and throwing the extracted casting into a snow bank after quenching. We might as well use all that free Midwest winter cooling capacity! After returning to the shop, [Kelly] would typically perform any needed adjustments, such as improving flatness in the press, while the part was in the ‘as cast temper’ condition. We’ll gloss over the admission of cutting the gates off on the table saw! After these adjustments, the part is artificially aged to a T5-like specification, to give it its final strength and machinability properties. There are plenty more videos on this process on the channel, which is well worth a look.

Aluminium casting is nothing new here, here’s a simple way to cast using a 3D printed pattern. But beware, casting aluminum can be hazardous, it does like to burn.

Continue reading “Lost Foam Aluminium Alloy Casting”

Image

The Die Is Cast!

We all know the basics of how metal casting works, a metal is heated up to melting point and the resulting liquid metal is poured into a mold. When the metal sets, it assumes the shape of the mold. It’s a straightforward way to reliably replicate a metal item many times over, and the basics are the same whether the metal is a low-temperature alloy in a silicone mould or a crucible of molten steel poured into a sand mould.

The mould is black sand in a cast iron box, and the pattern piece is half submerged in it
A sand mould being formed around a pattern. Lukas Stavek, CC BY-SA 3.0 .

What we all understood as casting in our conversation was sand casting. Sand is packed around a pattern of the piece to be cast, and then the pattern is removed leaving a cavity in its shape which becomes the mould. There are refinements to this process and the mould is frequently formed in two halves, but it’s something that’s even practical to do in a hackerspace level setting.

A refinement of sand casting is so-called lost-wax casting, in which a hollow wax model of the piece to be cast is packed around with sand, and when the metal is poured onto the top of it the wax melts and the wax is melted out before pouring the metal in to take its place. A variation on this appears here from time to time, so-called lost-PLA casting, where the wax model is replaced with a PLA 3D print.

Injection Molding For Metals

Diagram of a die casting machine
A die casting machine. Ahmed elbhje, Public domain.

Where our confusion crept in was with die casting. We could recognise a die-cast piece, but just what is die-casting, and how is a die-casting made? The answer there lies in mass-production, because a snag with sand casting is that  a sand mould can be labour intensive to produce. Much better to come up with a quick-turnaround process that re-uses the same mould over and over, and save all that time!

Enter the die-casting, to metalwork what injection moulding is to polymers. The die is a mould made out of metal, usually with liquid cooling, and the casting is done not by pouring but by forcing the molten metal into the mould under pressure. The whole process becomes much quicker, meaning that it can become a piece of process machinery spitting out castings rather than a labour-intensive individual task. The metals used for die-casting are the lower temperature ones such as aluminium, zinc, and their alloys, but  you will find die-castings in all conceivable places.

It’s obvious that Hackaday editors are not experienced foundrymen even if some of us grew up around metalwork, but we know that among our readers lie genuine experts in all sorts of fields. If that’s you and you operate a die-casting machine, please take a moment to tell us about it, we really would like to know more!

Header: Constantin Meunier, Public domain.

Image

Cast Metal From Prints To Solidify Childhood Memories

As far as the hacker’s toolbox goes, the 3D printer is way up there in terms of utility. Sure, it takes time to learn the ins and outs of designing, slicing, and extruding, but after that, the world is pretty much your additive oyster. Follow those design dreams, or use it to replace the things that break. The icing on the cake? You can chase those dreams into other materials, because 3D prints can be used to cast metal.

Image[RetroTech Journal] wanted to fry up some rosette cookies, a Scandinavian delight from his youth that look a lot like fancy, personal funnel cakes. They’re made with special aluminium irons that shape the dough while it fries, as opposed to the jumbled chaos that is funnel cake.

Rosette irons come in a few traditional shapes, but once you get tired of those, it’s up to you to cast them in aluminium. And how would you go about doing that? By creating a firmly-packed sand mold using a mounted 3D print.

In the endlessly entertaining video after the break, [RetroTech Journal] takes you through the entire process from CAD to cookies. It has everything you could possibly want: LEGO stop-motion, claymation, a little bit of cooking, and a whole lot of knowledge. We can’t wait to see what comes next.

We’ve seen quite a few sand casting projects over the years, but this lathe is among the most useful.

Continue reading “Cast Metal From Prints To Solidify Childhood Memories”

Image

Watch A Sand-Cast Slingshot Made, From Start To Finish

ImageSand-casting metal parts is a technique that has been around for a very long time, but it can be educational to see the process from start to finish. That’s exactly what [Frederico] shows us with his sand-cast slingshot of his own design, and it’s not bad for what he says is a first try!

First, [Frederico] makes a two-part green sand mold of the slingshot body. Green sand is a sand and clay mix, and is only green in the sense that it is wet or “raw” and not further processed. After the mold is made, it’s time to melt aluminum in the propane-powered furnace, and the molten aluminum is then poured into the mold.

After cooling, [Frederico] breaks up the sand to reveal the rough cast object. There is post-processing to do in the form of sprues to cut and some flashing around the seams to remove, but overall it looks to have turned out well. You can watch the whole process in the video, embedded below.

Continue reading “Watch A Sand-Cast Slingshot Made, From Start To Finish”