Will guide you to get started with Wokwi to simulate the first Arduino project.
Wokwi is an awesome online simulator that lets you create and test Arduino projects without needing any physical hardware. Perfect for learning, prototyping, and debugging! Here’s a fun and detailed guide to help you get started with Wokwi for Arduino simulation.
Step 1: Sign Up and Sign In 📝
- Visit the Wokwi Website: Go to Wokwi.
- Sign Up: If you don’t have an account, click on the “Sign Up” button and fill in your details.
- Sign In: If you already have an account, click on “Sign In” and enter your credentials.

Get PCBs for Your Projects Manufactured
You must check out PCBWAY for ordering PCBs online for cheap!
You get 10 good-quality PCBs manufactured and shipped to your doorstep for cheap. You will also get a discount on shipping on your first order. Upload your Gerber files onto PCBWAY to get them manufactured with good quality and quick turnaround time. PCBWay now could provide a complete product solution, from design to enclosure production. Check out their online Gerber viewer function. With reward points, you can get free stuff from their gift shop. Also, check out this useful blog on PCBWay Plugin for KiCad from here. Using this plugin, you can directly order PCBs in just one click after completing your design in KiCad.
Step 2: Create a New Project 🛠️
- Start a New Project: Once logged in, click on “New Project”.

- Select Arduino Board: Choose the Arduino board you want to simulate, such as Arduino Uno, Mega, or Nano.

Step 3: Add Components 🔌

- Add Components: Click on the purple “+” symbol to add components like LEDs, resistors, buttons, sensors, etc.

- Drag and Drop: Drag and drop the components onto the workspace. For example, to add an LED and a resistor:
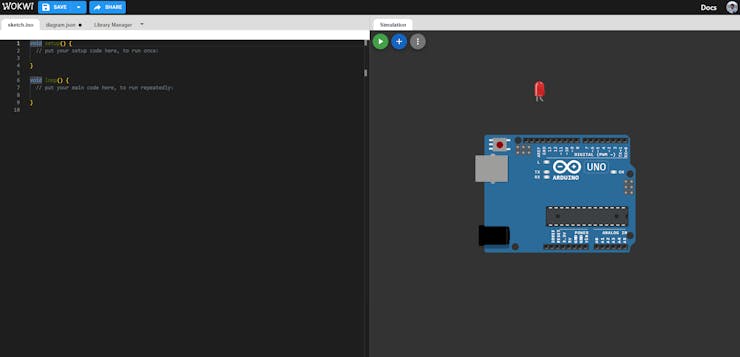
Step 4: Connect Components 🔗
Wiring: Connect the components using wires. For example:
- Connect the LED's anode (long leg) to a digital pin (e.g., pin 13) on the Arduino.
- Connect the cathode (short leg) of the LED to one end of the resistor.
- Connect the other end of the resistor to the ground (GND) pin on the Arduino.

Step 5: Write the Code 💻
- Write Your Code: Write the Arduino code to control your components. For example, to blink an LED:
void setup() {
  pinMode(13, OUTPUT); // Set pin 13 as an output
}

void loop() {
  digitalWrite(13, HIGH); // Turn the LED on
  delay(1000); // Wait for a second
  digitalWrite(13, LOW); // Turn the LED off
  delay(1000); // Wait for a second
}

Step 6: Run the Simulation ▶️
- Start Simulation: Click on the “Start Simulation” button to run your project.
- Observe: Watch the simulation to see if your components behave as expected. For example, the LED should blink on and off.

Step 7: Debug and Iterate 🔄
- Debugging: If your project doesn’t work as expected, check your wiring and code for errors.
- Iterate: Make necessary adjustments and re-run the simulation until you achieve the desired outcome.
Conclusion 🎯
Wokwi is a powerful tool for simulating Arduino projects, making it easier to learn and prototype without physical hardware. By following these steps, you can quickly get started with your own Arduino simulations and bring your ideas to life.
Happy simulating! 🎉 If you have any questions or need further assistance, feel free to ask. 😊
