How to Change the Screen Resolution on Raspberry Pi
On recent Linux versions, the screen resolution should be detected automatically, and the system should set it to the appropriate value. But it doesn’t mean it works all the time, and maybe you want to use a different resolution than the default one. Here is how to do this on your Raspberry Pi.
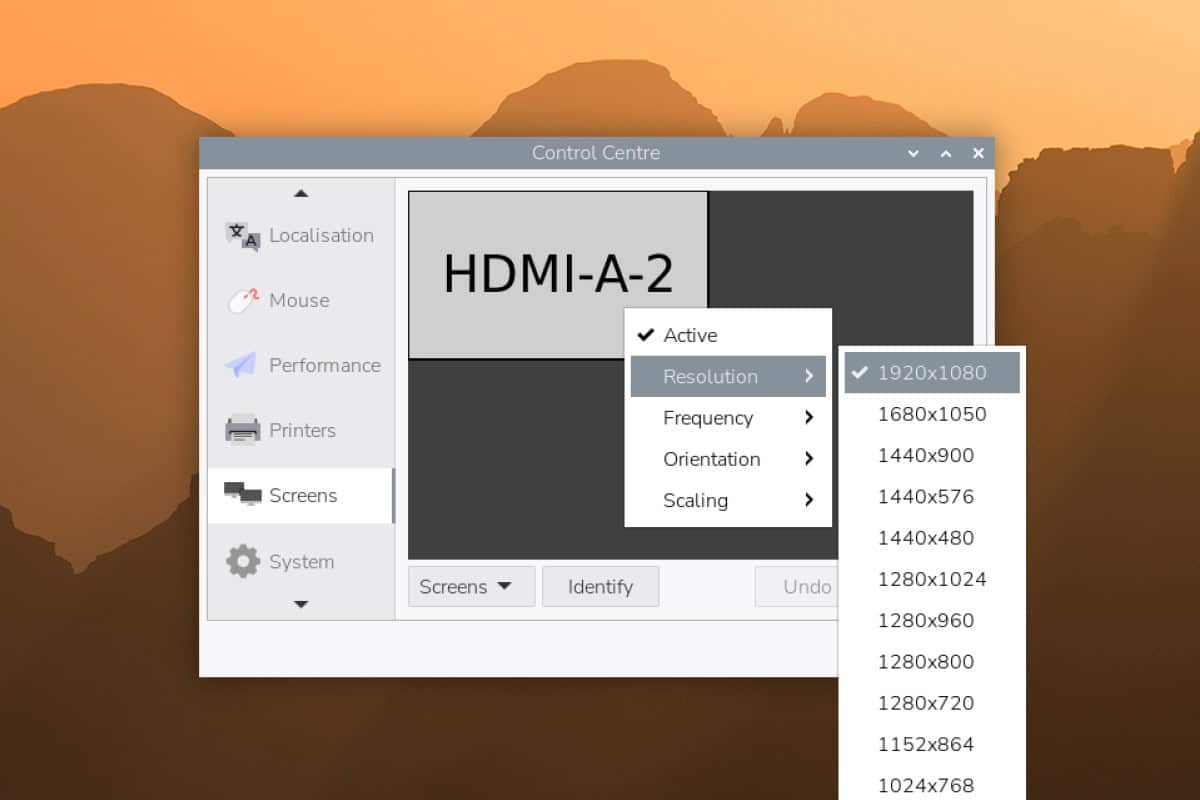
On Raspberry Pi OS Desktop, the screen resolution can be changed from the main menu, via the “Control Centre” tool under the “Screens” submenu. Right-clicking on the corresponding monitor gives options to choose the resolution from a list.
I will give you the step-by-step process to easily change the screen resolution, and also answer various questions about the screen configuration because a lot has changed on this topic since Raspberry Pi OS “Bullseye”, and I noticed most tutorials online are now outdated.
If you’re feeling lost in all the Raspberry Pi jargon, I’ve got something to help you out. I’ve created a free glossary that explains all the essential terms and abbreviations in a way that’s easy to understand. It’s a great resource to have by your side. Get your free copy here.
Change the Raspberry Pi Resolution with the GUI Tool
The easiest way to change the display resolution on Raspberry Pi OS (with desktop), is to do it from the “Control Centre” utility. It’s installed by default and is available in the Preferences menu.
In fact, it’s almost the only way to change the screen resolution. The Linux kernel is now in charge of detecting and setting up the resolution, it’s no longer done by the firmware, so options like editing the /boot/config.txt or using raspi-config no longer work.
Anyway, here is how to change the resolution if you have access to the desktop interface:
If you are lost in all these new words and abbreviations, request my free Raspberry Pi glossary here (PDF format)!
Download now
- Click on the Raspberry Pi icon in the top-left corner to open the main menu.
- Scroll to “Preferences” and find the “Control Centre” utility:

- Scroll down to the ‘Screens’ tab:

It shows your current configuration, so if you have two monitors, you may have two squares (HDMI-1 and HDMI-2). By the way, you can move the squares around if you use two monitors, to revert left and right displays for example. - From here, you can right-click on the square representing the monitor to configure (HDMI-A-2 in my case). You’ll get a list of options you can use to change the default values:
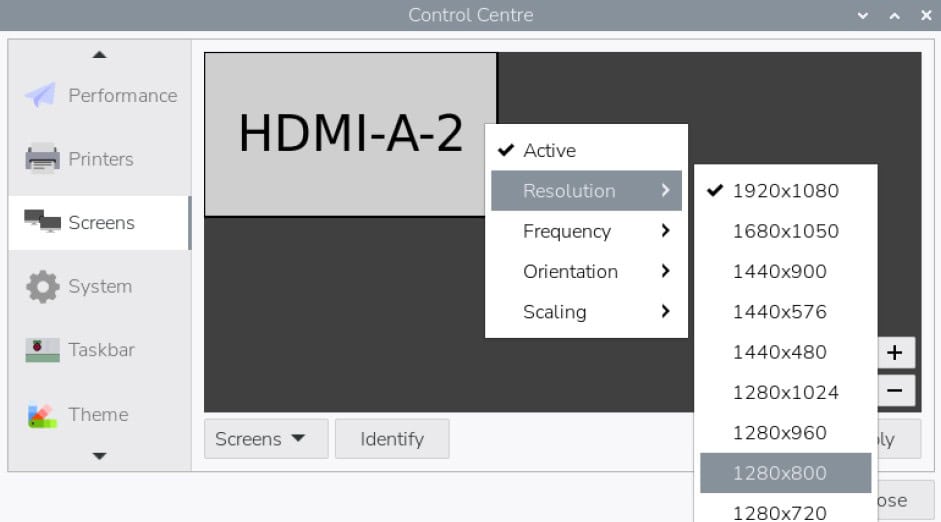
- Pick the resolution you want, then click the ‘Apply’ button.
- A confirmation message will show up to make sure the new resolution works:
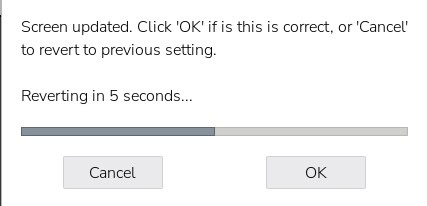
Click “OK” if it seems fine.
If it looks weird or if you lose the display completely, the configuration will revert to the previous version after 10 seconds. So, it’s safe to test various resolutions, even if your monitor doesn’t support it.
In most cases, this tool should be enough to adjust the screen resolution. You can also use it to change the frequency or orientation if needed.
Note: If for any reason the right-clicking configuration is not comfortable on your setup, you can use the “Screens” menu at the bottom to manually select your monitor and see the same configuration options.
If you use another distribution on your Raspberry Pi, you’ll generally find similar options in the system settings. Distributions like Ubuntu, Manjaro or Fedora have a great control center with all the settings in one place, including the display configuration.
Change the Raspberry Pi Resolution from the Terminal
Note: As of this update, this method won’t work on Raspberry Pi OS (trixie) because X has been replaced by the Wayland display server.
This method will only work on Bullseye and older releases.
Since Raspberry Pi OS Bullseye, the only way to change the resolution from the terminal is to use the “xrandr” command directly. The option has been removed from raspi-config, and the custom parameters in config.txt don’t apply anymore.
This is normal, and shouldn’t be an issue in most cases. I tried many things, as I know some of you will be looking for ways to change the resolution with a command line.
Well, here is the only way I found to work with the current release:
If you are lost in all these new words and abbreviations, request my free Raspberry Pi glossary here (PDF format)!
Download now
- Open a terminal.
- Use the xrandr command like:
xrandr -s <resolution>So, for example:xrandr -s 1920x1080
The display will turn off, and then turn on again with the new resolution. The resolution needs to be in the list of available sizes (the same as in the GUI tool).
You might also like: Need a clear GPIO pinout diagram? Here's mine.
If you are still using an outdated version of Raspberry Pi OS, you can try raspi-config (under Advanced options) or play with the /boot/config.txt parameters. But according to my tests (and the theory that Linux now handles everything automatically), it no longer works on the latest version.
Are you a bit lost in the Linux command line? Check this article first for the most important commands to remember and a free downloadable cheat sheet so you can have the commands at your fingertips.
If this project doesn’t work as expected on your setup, don’t worry. You can get help directly from me and other Pi users inside the RaspberryTips Community. Try it for $1 and fix it together.
Raspberry Pi Resolution FAQ
What is “underscan” on Raspberry Pi?
Note: As of this update, the ‘underscan’ option has been removed for the new Raspberry Pi OS (trixie).
The instructions below are for Bookworm or older releases only.
Download the free PDF, keep it open, and stop wasting time on Google.
Download now
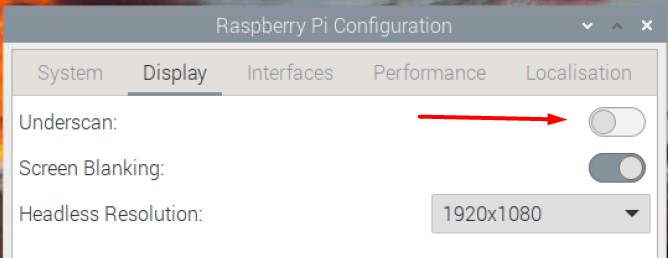
The “underscan” feature on Raspberry Pi OS allows you to make sure the image fits the visible area of the monitor.
In some cases, the image can be truncated (a few pixels missing on each side) or, inversely, you could have black borders on your screen. Enabling or disabling the “underscan” option in the Raspberry Pi configuration tool can help to fix this.
On old versions of Raspberry Pi OS, it was named “overscan”, but it’s the same idea.
Note: You can also change this via the raspi-config tool. It might be useful if you can’t see the whole screen on the desktop interface.sudo raspi-config
How to change the VNC resolution on Raspberry Pi OS?
VNC is a remote-desktop application, to control a Raspberry Pi from another computer (more details here). By default, VNC will use the system resolution (either set automatically on boot or changed via the screen configuration tool).
When the Raspberry Pi is started without a monitor (headless), you might have difficulties accessing the desktop environment with VNC, or at least get a bad resolution (I think it’s 720×480 or something similar by default).
Download the free PDF, keep it open, and stop wasting time on Google.
Download now
To fix this, you can change the “headless resolution” in the Raspberry Pi configuration tool (or raspi-config too). In my previous screenshot, it’s set to 1920×1080, which means I’ll get this resolution via VNC if I start the Raspberry Pi without any monitor.
How to make the icons and fonts bigger on Raspberry Pi OS?
On older versions of Raspberry Pi OS, there was a “pixel doubling” option in the configuration tool. This option will make all the icons and texts bigger, and easier to read or use. It’s no longer available on Trixie, but you can still tweak this in the “Control Centre” utility.
- In the main menu, open Preferences > Control Centre.
- Go to the Defaults tab, where’ you’ll find options for large, medium, or small screens.
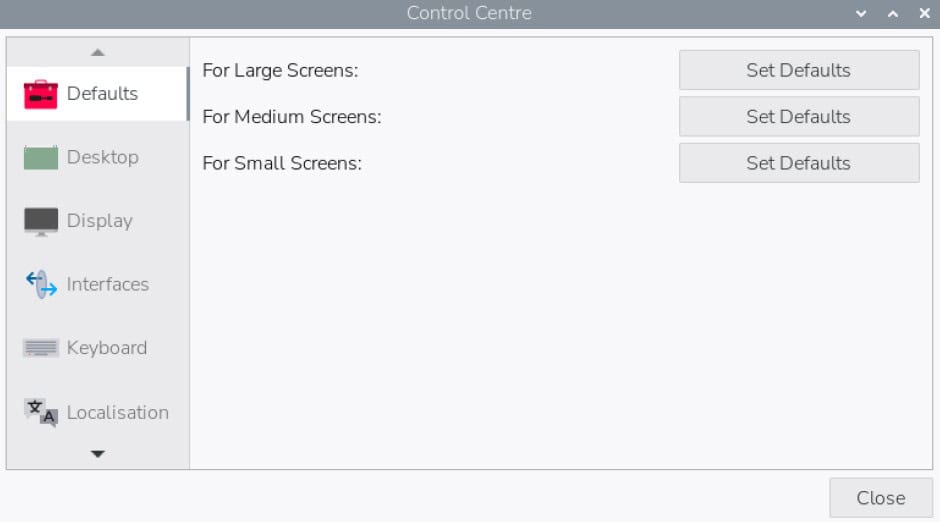
- Click on each one to try different configurations.
It’s not necessarily intuitive. I have a small screen (10″) but if I click on “Small Screens” it will make everything smaller. If I try “Large Screens,” then everything will be bigger, which can be more comfortable to read. So, just try the different options and keep the one you prefer.
You can then go into the ‘Taskbar’ and ‘Theme’ tabs to adjust the icon sizes, system font and the mouse cursor (a reboot might be required to apply some of the changes).
I go into more detail about the Raspberry Pi OS appearance in this article if you need more guidance.
Whenever you’re ready, here are other ways I can help you:
Test Your Raspberry Pi Level (Free): Not sure why everything takes so long on your Raspberry Pi? Take this free 3-minute assessment and see what’s causing the problems.
The RaspberryTips Community: Need help or want to discuss your Raspberry Pi projects with others who actually get it? Join the RaspberryTips Community and get access to private forums, exclusive lessons, and direct help (try it for just $1).
Master your Raspberry Pi in 30 days: If you are looking for the best tips to become an expert on Raspberry Pi, this book is for you. Learn useful Linux skills and practice multiple projects with step-by-step guides.
Master Python on Raspberry Pi: Create, understand, and improve any Python script for your Raspberry Pi. Learn the essentials step-by-step without losing time understanding useless concepts.
You can also find all my recommendations for tools and hardware on this page.