Can You Install FreeNAS On Raspberry Pi? (+ Alternatives)
The Raspberry Pi is the perfect device to build a cheap NAS server at home. It doesn’t require more resources for a few users, and you can use large SD cards or external hard drives to store enough data for personal use. There are several ways to build that kind of server, and in this article, I will explore the options that are supported on Raspberry Pi, starting with FreeNAS (now rebranded as TrueNAS).
FreeNAS (or TrueNAS) requires an Intel or AMD 64-bit CPU. These are not ARM architectures, and so the Raspberry Pi is not supported. But other options, like OpenMediaVault, can be used on Raspberry Pi to get a similar result.
In this article, I will give you more details about this issue, and how you can still use a Raspberry Pi for a home server, even without using FreeNAS.
If you’re looking for inspiration for your next Raspberry Pi project, I’ve put together a list of 75+ ideas with full descriptions, difficulty ratings, and links to tutorials. Whether you’re a beginner or more advanced, there’s something here for you. Grab the list for free here!
Can you install FreeNAS on Raspberry Pi?
The Raspberry Pi is a tiny computer, and we tend to use it as a server for almost the same projects as on a standard server or PC. But there are some major differences, like the processor architecture, that make us use different strategies for some projects.
The minimum hardware requirement to install TrueNAS (ex FreeNAS) is a 2-Core Intel 64-Bit or AMD x86_64 Processor. As no Raspberry Pi model uses that kind of CPU (all based on the ARM architecture), TrueNAS can’t be installed on it.
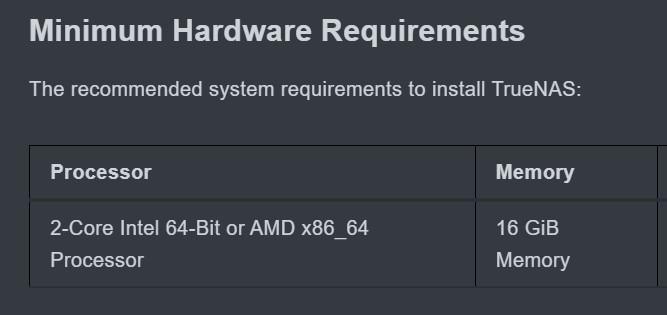
TrueNAS also requires at least 16 GiB of RAM, and there currently isn’t a Raspberry Pi available with that much RAM.
These two reasons make it impossible to plan using FreeNAS on a Raspberry Pi. But don’t worry, it doesn’t mean your project is impossible.
FreeNAS/TrueNAS is just an interface to manage services that are available on Raspberry Pi. You won’t be able to use the same interface, but you can still install the different packages and configure them in order to receive a similar result. I will even give you a web interface that does almost the same thing and works fine on Raspberry Pi.
Need some inspiration for your next Raspberry Pi project? Get access to my personal list here!
Download now
Best alternatives to FreeNAS on Raspberry Pi
The main goal of FreeNAS is to share files and folders on a local network. There are many additional features built-in, but first, we need to use a service to share a folder from the Raspberry Pi.
I will give you two options: one where you do all the configuration yourself, and the other one with a web interface, similar to what you get with FreeNAS/TrueNAS.
The traditional way: use Samba to share files
Basically, the main service behind FreeNAS is Samba. Samba is a typical service you can install on Linux, mostly to share files and folders with other users on the same network.
The manual configuration can be touchy for beginners, but in fact, there isn’t much to change for home-usage. You just need to install the packages and create a basic shared folder.
At home, if you don’t have critical files, you don’t even need to bother too much with user management, permissions, and security in general. Even an open shared folder might be enough if you just want to use it for temporary files (like to send a file to another device or watch a movie on your TV).
I have a complete tutorial on how to create a file server on Raspberry Pi, so I won’t give you too many details here, but basically, it’s a simple project in 5 steps:
- Install Raspberry Pi OS or a similar distribution (a minimal version is enough).
- Create a new folder, that you’ll then share on the network.
- Install Samba, the main service to share files.
- Edit the Samba configuration file to define the share folder location and permissions.
- Restart the service and access the shared folder from the other computers.
If you know how to use the command line, and have some experience with configuration files, it shouldn’t be that complicated for you. But for more complex configurations or if you are still new to this, it’s probably not the easiest option.
Need some inspiration for your next Raspberry Pi project? Get access to my personal list here!
Download now
The second alternative I have for you should be easier for beginners, and also more comfortable for advanced users, as you can install everything in a few commands and then manage it from a web interface.
Are you a bit lost in the Linux command line? Check this article first for the most important commands to remember and a free downloadable cheat sheet so you can have the commands at your fingertips.
With a web interface: use OpenMediaVault
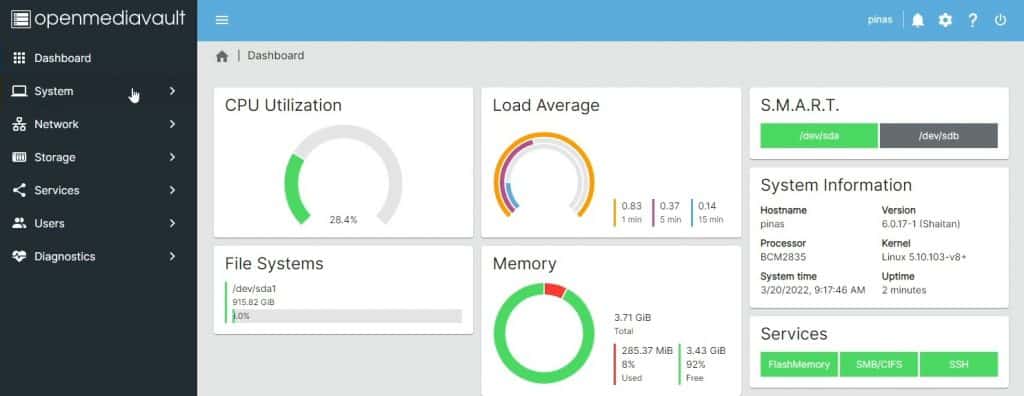
The best alternative to the manual configuration of Samba on Raspberry Pi is to use an app named OpenMediaVault.
OpenMediaVault is software that can be installed on any Debian-based distribution, like Raspberry Pi OS (Lite is enough). It can be used to host and configure a file server via a web interface in a few clicks.
There are many similarities with FreeNAS, they are “competitors” on PC, but only one is available on Raspberry Pi, so there is no competition on this device.
The installation is straightforward (they have a script that will do the work for you), and then you can install the web interface to configure everything: system, network, storage, services, and users.
Advanced configurations are supported (like using RAID for your data storage, or complex permissions setups with different groups and users), and you can keep an eye on everything with the nice dashboard they have on the home page.
Download the free PDF, keep it open, and stop wasting time on Google.
Download now
If you want to give it a try, you can find my beginner guide for OpenMediaVault on Raspberry Pi here. I explain each step in detail, so you can use the software on your Raspberry Pi and easily create your file share at home.
For years, I used this tool as a distribution on servers at work, to manage file servers for 30 to 100 users, with complex permissions and linked to an LDAP server/Active Directory. So, I can definitely recommend it.
If you prefer watching videos instead of reading tutorials, you’ll love the RaspberryTips Community. I post a new lesson every month (only for members), and you can unlock them all with a 7-day trial for $1.
Other tips to build a NAS at home with a Raspberry Pi
If your goal is to host a file server on your Raspberry Pi at home—for convenience or to save money—there are a few tips that I want to give you to avoid the main issues that go with that kind of project.
Use an external hard drive
My first tip would be to use an external drive. You can definitely create your shared folder on the same SD card as your operating system, but a good practice is to use a different drive.
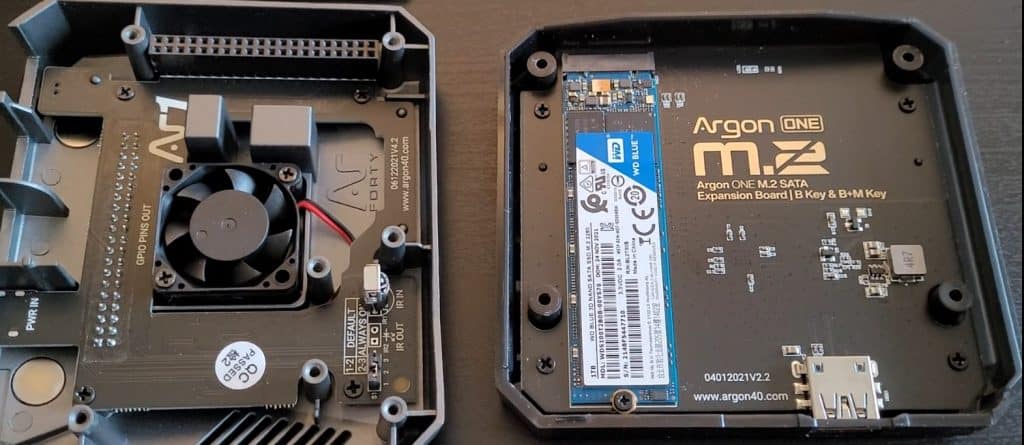
This way, you can install another distribution, or just upgrade/mess around with it without risking losing the files on your shared folder. I personally use the Argon One M2 case, where you can “hide” an M2 SSD inside:
You might also like: Pi5 vs. Pi4: I tested them, here's the result
SSDs are faster and tend to also be more reliable than SD cards, so it’s a great choice if you can afford it. But even a USB key that you plug on your Raspberry Pi is already better than keeping everything on the same SD card (I use these USB keys from SanDisk for your information).
If you are using OpenMediaVault, the new drive will be automatically detected, and you just need to format and mount it to use it for your shared folder. The manual alternative (when not using OpenMediaVault) is a bit more tricky, but I have a tutorial for you: How to mount a USB drive on Raspberry Pi.
Create backups
Download the free PDF, keep it open, and stop wasting time on Google.
Download now
Backups are essential for any project, but especially for this one. If the idea is to store important files on your Raspberry Pi, you need a backup plan.
Obviously, if it’s just a temporary folder to watch movies on your TV, it doesn’t matter, but for anything else, I highly recommend thinking of your backups before using your Raspberry Pi as a file server:
- Can I afford to lose the files I store in this folder?
- Are they stored somewhere else if the Raspberry Pi drive is corrupted?
- What kind of backup can I set up to avoid any issues?
Maybe you just sync the shared folder on your computer once a week, it doesn’t need to be that complicated. But at least take a few minutes on this point before moving on. If you don’t set this up directly at the beginning, you’ll forget to do it later on.
Also, make sure to check regularly that your backups are working and that you can really recover your files with them (we tend to discover that backups don’t work anymore once the original files are lost!).
If you need further assistance on this point, I have a full tutorial to create good backups of your Raspberry Pi.
Check your device security
Finally, as you’ll have a Raspberry Pi server running 24/7 on your network, it’s probably a good idea to make sure it will be safe. I wouldn’t recommend opening it to the whole Internet, but even on a small network, there are some risks involved.
There are a few checks you can do to make sure your Raspberry Pi is safe. I list my top security tips here if you need them. You don’t necessarily need to apply all of them, but try to make sure at least the first ones are done.
Well, I hope that this article has been useful, and even if you can’t install FreeNAS or TrueNAS on your Raspberry Pi, you now have a better idea of what you can do to get a similar result.
Whenever you’re ready, here are other ways I can help you:
Test Your Raspberry Pi Level (Free): Not sure why everything takes so long on your Raspberry Pi? Take this free 3-minute assessment and see what’s causing the problems.
The RaspberryTips Community: Need help or want to discuss your Raspberry Pi projects with others who actually get it? Join the RaspberryTips Community and get access to private forums, exclusive lessons, and direct help (try it for just $1).
Master your Raspberry Pi in 30 days: If you are looking for the best tips to become an expert on Raspberry Pi, this book is for you. Learn useful Linux skills and practice multiple projects with step-by-step guides.
Master Python on Raspberry Pi: Create, understand, and improve any Python script for your Raspberry Pi. Learn the essentials step-by-step without losing time understanding useless concepts.
You can also find all my recommendations for tools and hardware on this page.