

How To Hack Wi-Fi on a Raspberry Pi with Kali Linux
If you combine 3 of my favorite tech topics: Linux, Raspberry Pi, and cybersecurity, you quickly end up playing with Kali Linux and some of its built-in tools, like the AirCrack-NG suite. With it, it’s possible to test the security of Wi-Fi networks around you.
A Raspberry Pi running Kali Linux is the perfect tool for pentesting. The default AirCrack-NG suite can monitor all wireless networks, capture authentication packets, and use them in brute force attacks to find the Wi-Fi password.
In this article, I’ll break the process into simple steps for you: installing Kali Linux and scanning nearby networks, to hacking passwords.
If you’re new to Raspberry Pi or Linux, I’ve got something that can help you right away!
Download my free Linux commands cheat sheet – it’s a quick reference guide with all the essential commands you’ll need to get things done on your Raspberry Pi. Click here to get it for free!
Requirements for Wi-Fi Security Testing on Raspberry Pi
Before we jump into it, let’s go over what you need to get started with Wi-Fi pentesting.
Disclaimer
A word of caution: Unauthorized access to wireless networks is illegal in many countries and can lead to severe consequences, including fines and imprisonment. This tutorial is strictly for educational purposes only. It is intended to help you understand how hackers operate, so you can better secure your networks.
You are solely responsible for your actions. Attempting these techniques on networks you do not own or without explicit permission from the network owner is against the law. RaspberryTips and its authors disclaim all liability for misuse of the information provided.
Please only try these methods on your networks, or with the owner’s permission.
Now that this is clear, let’s see how it works!
Hardware Requirements
The hardware required for this tutorial is pretty usual, but if you are just getting started, you need:
- Any Raspberry Pi model should work, but I recommend a Raspberry Pi 5 or a Raspberry Pi 4. They have two network adapters, so you can keep them connected to your network with a cable while using Wi-Fi for hacking.
- A Wi-Fi adapter – You can use the built-in Wi-Fi if your Pi has one, or if not, add a Wi-Fi USB adapter.
- An Ethernet cable: You can’t use the Wi-Fi for your local network, as you’ll use it for the hacking test. So, it’s better to plug your Raspberry Pi with a fast cable like this one. It isn’t possible in my home, so I’m using that kind of device to do it anyway. That might be something to consider.
- A micro-SD card or USB key: I use SD cards less and less, and use this USB drive from SanDisk instead for all my experiments. But if you want to use an SD card you can, I did a benchmark of the most popular SD cards here.
That’s it, once your hardware is ready we can move to the software part.
Software Requirements
OK, let’s get our base system up and running.
I highly recommend installing Kali Linux for this tutorial, as it’s a great Linux distribution, with everything you need preinstalled. That’s the system I’ll be using for this example.
System Installation
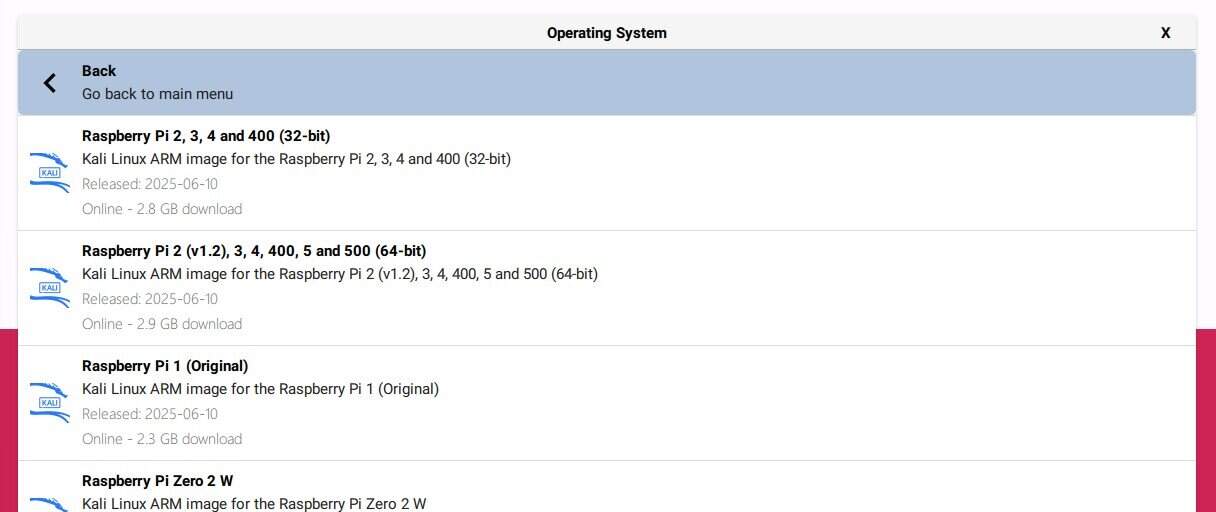
Kali Linux is now available directly in Raspberry Pi Imager (listed under “Other specific-purpose OS”), so installing it is as simple as installing Raspberry Pi OS on your Pi. But if you need more guidance, I have a full tutorial: How to Install Kali Linux on Raspberry Pi? (Complete Guide).
Download the free PDF, keep it open, and stop wasting time on Google.
Download now
But if you decide you want to stick with Raspberry Pi OS instead, you can also keep it and install the AirCrack-NG suite manually on it:sudo apt install aircrack-ng
Are you a bit lost in the Linux command line? Check this article first for the most important commands to remember and a free downloadable cheat sheet so you can have the commands at your fingertips.
First Boot with Kali Linux

When you first boot Kali Linux, connect your Pi to an Ethernet cable so it’ll get an IP address automatically. The username and password are also set by default, you can log in with:
- Login: kali
- Password: kali
You can either follow the next steps from the desktop interface or use SSH, which is also enabled by default (check my SSH tutorial here if you are new to this). You can use the techniques listed here to find the IP address if you don’t have a screen (I generally do a network scan).
I have found that even with the latest image from Raspberry Pi Imager, Kali Linux is far behind the latest package versions, so I recommend updating the system before anything else:sudo apt update
sudo apt upgrade -y
sudo reboot
Once you’re ready, you can move to the hacking procedure.
How to Hack a Wi-Fi Network with Kali Linux
As mentioned in the introduction, we’ll be using the AirCrack-NG suite in this tutorial, which includes everything we need to test the security of Wi-Fi networks: monitoring, attacking and, if possible, cracking their passwords.
In this section, I’ll show you how to:
- Turn your wireless card in monitor mode (mandatory for the next steps)
- Detect all Wi-Fi networks and devices nearby
- Target a specific network to capture authentication packets (handshakes)
- Use these handshakes packets to crack the password
Step 1: Enable Monitor Mode on Your Wi-Fi adapter
Note: You will need administrator privileges for most of the steps, so I recommend you go to the root prompt now and stay there until the end. You can do this with the command:sudo su
The first step is to turn your wireless card into monitor mode.
This mode allows you to see all networks around you and listen for handshakes.
- Use the airmon-ng command the first time to display your wireless card(s)
airmon-ng
wlan0 (Broadcom) is probably the built-in Wi-Fi adapter on your Raspberry Pi, but if you’re using a USB adapter instead, it’s probably called wlan1. - So, we can start airmon-ng with the interface name we just found, for example:
airmon-ng start wlan0 - You may get errors about processes interfering with the monitor mode.
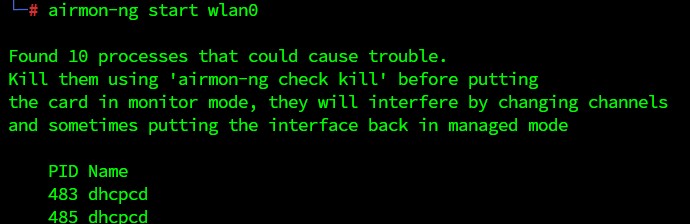
You have to kill them before moving forward.
Airmon-ng offers a command to kill them all easily:airmon-ng check kill
Then start again:airmon-ng start wlan0 - View your interfaces, and you should see a new one, like wlan0mon:
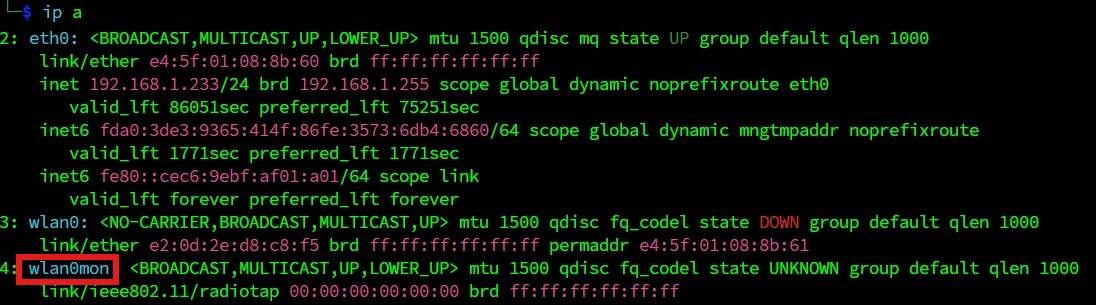
That’s it, the interface is ready to use with the other tools from the suite.
Download the free PDF, keep it open, and stop wasting time on Google.
Download now
Step 2: Scan for Wi-Fi Networks
Once your wireless card is active in monitor mode, we can move to the next tool: airodump-ng.
Airodump-ng allows you to scan Wi-Fi networks to find your target.
Reminder: The new monitoring interface, e.g., wlan0mon, will be used for the rest of the commands in this tutorial.
Start the scan, using the name of the new monitoring interface, with this command:airodump-ng wlan0mon
You’ll get a screen like this, that’s constantly getting refreshed:

Each line is a Wi-Fi network around you.
The first networks in the list are probably the closer ones, and you can see their channel in the CH column.
Below the Wi-Fi networks list, you can see the stations detected and which network they are connected to. To collect data about a target, we need some active stations.
The longer you let this tool run, the more data you’ll get, but it’s probably better to quickly focus on one target instead of listing everything.
Step 3: Pick a Target (Wi-Fi Network)
The first thing to do is to choose one target.
A target is a Wi-Fi network (one line in the list) with preferably a few active devices on it.
In this lesson, you will choose your own network—everything else is illegal.
For example, I’m going to select the “Kindle” network, which is a hotspot I have on my Raspberry Pi to connect my old Kindle reader that doesn’t support the main network :-).
To filter the list to display only one Wi-Fi network, follow these steps:
- Stop the scan networks command with CTRL+C.
- Scan a specific network and write data to a file:
airodump-ng wlan0mon --bssid XX:XX:XX:XX:XX --channel X --write <filename>
Replace XX:XX with the BSSID MAC address, X with the channel number, and any filename you like to use to store handshakes.
In my case, I’m using:airodump-ng wlan0mon --bssid D8:3A:DD:D5:5B:3B --channel 11 --write Kindle - You’ll get a filtered list like this:

I now see only the target network, and the devices connected.
Now you have to wait for a device to reconnect to the Wi-Fi network. Since it’s your network, you can disconnect and reconnect your smartphone and see what happens.
Download the free PDF, keep it open, and stop wasting time on Google.
Download now
In my screenshot, you can see that I already got a handshake (top right) because I turned on the Kindle after starting the capture.
In real life, hackers send packets to force a device to reconnect.
You can do this with aireplay-ng like this:aireplay-ng wlan0mon --deauth 10 -a XX:XX:XX:XX:XX
Replace the XX:XX with the BSSID of the network you wish to target.
You’ll have to run this command in another terminal (or another SSH session) because you don’t want to stop the airodump command, or else you won’t capture a result.
If everything goes well, you’ll see a “WPA Handshake” message at the top of your scan window.
If you get this message, your attack is successful. You now have at least one handshake in the file, which is enough to try to crack the password.
A handshake sample is like an encrypted password.
You can’t decrypt a password hash, but you can encrypt words to see if the result is the same encrypted hash.
In the next steps, we’ll try to find a password by doing this.
Step 4: Download Password Dictionaries
Once upon a time, when I was a student playing with this on a poorly secured network, it was possible to find the password used in the handshake directly. Hopefully, this is no longer the case, and handshakes now only contain an encrypted password.
The only way to find it is to use dictionaries, encrypting as many words as possible, and see if there is a match.
You can create dictionary files yourself, but an easier way is to get one from this list of links:
Beware, some are large, so make sure you have a large enough SD card or drive on your Raspberry Pi to store their uncompressed version.
To download them, you can use wget, for example:wget https://mirrors.edge.kernel.org/openwall/wordlists/passwords/password.gz
Then you need to extract them, depending on the extension, with gzip, unzip or unrar. For example:gunzip password.gz
Download the free PDF, keep it open, and stop wasting time on Google.
Download now
Sometimes, you can also generate your own dictionary (I think John The Ripper offers this feature).
Depending on the SSID name, you can probably guess what type of password is set by default (each ISP/router has its default format).
Tip: Most of the time, people don’t change the default password.
Step 5: Crack the Password
The last step is to try cracking the password with aircrack-ng and your dictionaries.
- You now have to use this command to start cracking the Wi-Fi password:
aircrack-ng <filename>.cap -w password
Use the file previously generated by airodump with the WPA Handshake, and the password file you just downloaded.
The filename is the one you chose in the previous step, followed by a number, like <filename>-01.cap. In my case, it’s:aircrack-ng Kindle-01.cap -w password - Then aircrack-ng will try all the passwords from the file:

- If you have a strong password, aircrack-ng won’t find it.
You can change the password to one in the list, or add it to the dictionary file to see what happens when it’s found:
If you want to try larger dictionaries, transfer the .cap file to a more powerful computer or server (e.g. using SFTP) and crack it from there; it’ll be much faster than on the Raspberry Pi.
But for the experiment, I did everything on the Pi and it didn’t take that long using a simple password.
If this project doesn’t work as expected on your setup, don’t worry. You can get help directly from me and other Pi users inside the RaspberryTips Community. Try it for $1 and fix it together.
Key Lessons Learned & What to Do Next
If you’ve read (or better yet, tested) this tutorial to this point, you now know how hackers can crack a Wi-Fi network in minutes if it has poor security or a simple password.
Having a strong password of 20 characters or more is the best security tip I can give you.
And it doesn’t have to be impossible to remember, with special characters everywhere and varying capitalization. My favorite type of password is a non-obvious phrase like:
- LookingForAWiFiConnection: 25 characters
- MyWiFiPasswordIsSoStrong!: 25 characters including a special one
- etc.
I’ve even created a tool to generate such passwords. Combining several words makes it easy to remember and hard enough to crack.
Keep in mind that once they have the .cap file from your Wi-Fi, hackers with supercomputers can crack it for weeks or months if you are a large company they are interested in. That’s why, even if you have a long enough password, it’s important to change it often or use enterprise features like user login and password.
To learn more about Kali Linux, you can read my tutorial here with an introduction to many tools you’ll find on it.
Whenever you’re ready, here are other ways I can help you:
Test Your Raspberry Pi Level (Free): Not sure why everything takes so long on your Raspberry Pi? Take this free 3-minute assessment and see what’s causing the problems.
The RaspberryTips Community: Need help or want to discuss your Raspberry Pi projects with others who actually get it? Join the RaspberryTips Community and get access to private forums, exclusive lessons, and direct help (try it for just $1).
Master your Raspberry Pi in 30 days: If you are looking for the best tips to become an expert on Raspberry Pi, this book is for you. Learn useful Linux skills and practice multiple projects with step-by-step guides.
Master Python on Raspberry Pi: Create, understand, and improve any Python script for your Raspberry Pi. Learn the essentials step-by-step without losing time understanding useless concepts.
You can also find all my recommendations for tools and hardware on this page.


Patrick,
I’ve tried this several times now and even went so far as to re-installing Kali [Linux]. I get the same error at the same place:
airodump-ng wlan0mon – bssid XX:XX:XX:XX:XX – channel X – write airodump
I get the following error after substituting my bssid and channel number
“airodump-ng –help” for help.
I’m thinking, that Aircrack-ng has changed since you posted this tutorial. Any help would be appreciated.
This type of software really interests me in identifying any security holes in my home network.
Hi Paul,
I will check this soon.
Thanks for your feedback.
I have tested it recently, without noticing any issue with this tutorial.
Please share with us the solution/cause if you resolve this problem.
Had the same problem. If you notice in the help file, the commands are with (two) hyphens “–”
–channel
–write
–bbssid
When i cam across that message I changed single hyphen commands to double, and it worked.
I never get the “wlan0mon” interface. Using the Pi 400, the internal wifi doesn’t seem to work, so I am using an Edimax USB wifi dongle, but it never shows up with the correct interface when I run “airmon-ng”.
Could it be Kali Linux or maybe this Edimax dongle isn’t fully supported?
I have read some just right stuff here. Certainly value bookmarking for revisiting. I surprise how much attempt you place to make this type of excellent informative website.
I really appreciate this post. I¡¦ve been looking all over for this! Thank goodness I found it on Bing. You have made my day! Thank you again
works for me