Installing Arch Linux On Raspberry Pi: A Complete Guide
Arch Linux is a rolling-release distro that lets you tweak your system to your heart’s content and do almost anything you want with a computer. If you were to try installing Arch on your Raspberry Pi, you’d run into a roadblock: Arch only supports x86-64 processors, commonly found in Intel or AMD desktop PCs. Since your Pi runs on an ARM processor, how do you overcome this obstacle?
It’s possible to use Arch Linux on a Raspberry Pi by downloading and installing Arch Linux “ARM” instead of the main distribution. It’s built for ARM processors and can run on all recent Raspberry Pi models.
The Arch installation process has a reputation for being daunting, but it’s not as difficult as it seems. By following my installation guide, you’ll learn more about how Linux works, and by using Arch, you’ll gain a deeper understanding of computer systems. Read on to find out how to make your very own ArchPi.
If you’re new to Raspberry Pi or Linux, I’ve got something that can help you right away!
Download my free Linux commands cheat sheet – it’s a quick reference guide with all the essential commands you’ll need to get things done on your Raspberry Pi. Click here to get it for free!
What You’ll Need To Install Arch Linux on Raspberry Pi
Hardware
The parts below include standard peripherals you probably already use for your Pi. What’s notably different is that you’ll also need a USB flash drive.
- Supported Pi model: The models currently supported by Arch are Raspberry Pi 4, Pi 3, Pi 2, and Pi Zero 2. Arch requires a minimum of 512MB memory, and these supported models all have enough RAM. I recommend a standard model, like the Raspberry Pi 4B or 3B+ for more computing power.
- Power Adapter: Use the official Raspberry power supply to avoid undervoltage issues.
- Keyboard & Mouse: I plugged in a standard USB keyboard and mouse. If you need one, you can find my recommended keyboards here.
- Micro SD card: An 8GB SD card is enough for Arch, but with prices decreasing, I recommend 32GB, 64GB, or more. Here’s my current favorite SD card, with my benchmark results listed.
- USB flash drive: You’ll be booting your Pi from a USB drive. This frees up your SD card to install Arch on it.
Software
- Raspberry Pi OS: A Linux environment is needed to install Arch, and Raspberry Pi OS will provide the tools to get it done.
- Raspberry Pi Imager: The tool we normally use to install Raspberry Pi OS. For this tutorial, we’ll use Imager to create a bootable USB drive.
- Arch Linux ARM: Installing this operating system is your ultimate goal. Sometimes referred to as ALARM, this Linux distro is an Arch variant that supports the Pi’s processor.
Related: What CPU Does the Raspberry Pi Use?
1. Pre-Installation: Making a Bootable USB With Raspberry Pi OS
The easiest way to install Arch Linux is to do it from Linux. So, in this first step, we’ll create a bootable USB flash drive that contains Raspberry Pi OS. This way, you can boot to a Linux environment while freeing up your SD card for Arch.
Check this: 15 Easy Projects for Raspberry Pi Beginners
There is nothing special for this installation, so if you already have a USB drive with Raspberry Pi OS on it, you can boot on it and skip this step.
Note: It’s easier to use a USB flash drive for this guide. However, if you don’t have one, you can connect an SD card reader + an extra micro SD card to your Pi instead.
1.1 Create a Bootable USB Drive
Creating a Bootable USB From Raspberry Pi OS
Download & Install Raspberry Pi Imager
Most of the installation process will require using the command line, so open a terminal and get comfortable.
- Update your system first:
sudo apt update
sudo apt full-upgrade - Download & install Raspberry Pi Imager:
sudo apt install rpi-imager - Run it:
rpi-imager - Plug your USB flash drive into your Pi.
If you’re new to the Linux command line, this article will give you the most important Linux commands to know, plus a free downloadable cheat sheet to keep handy.
Raspberry Pi Imager Settings
Next, you’ll write Raspberry Pi OS onto your USB drive, which makes it bootable. Choose settings like in the example image below.
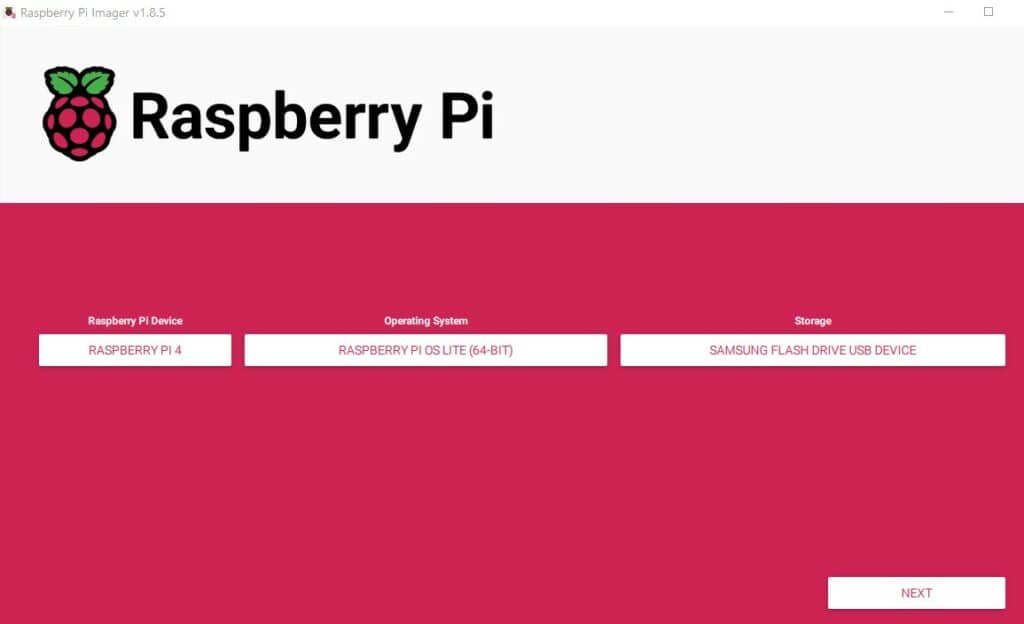
- Device: select the Pi model you own. In this example, mine is Raspberry Pi 4.
- Operating System: Raspberry Pi OS Lite. We won’t need a full GUI, so choosing Lite will save you download and install time.
- Storage: select the USB flash drive you’ve plugged into your Pi.
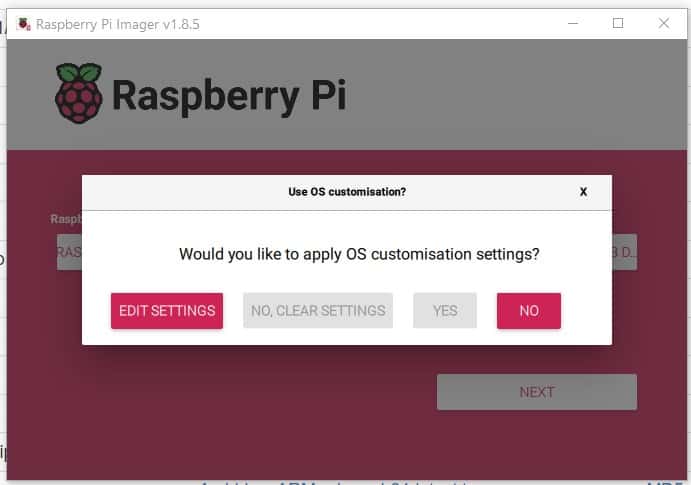
When you hit Next, you’ll be asked about OS customization. Choose No to continue with easy defaults. However, if you’re using Wi-Fi instead of Ethernet, hit Edit Settings to set up your connection.
Write the USB Drive
Proceed to write the USB drive. You’ll know Raspberry Pi Imager is done when this message pops up: “You can now remove the SD card from the reader” (even though it was a USB drive). Unplug your USB drive until the next step.
You might also like: Yes, you can access your Pi from anywhere. Here's how.
Creating a Bootable USB From Windows
You can make a bootable USB drive from Windows instead if you’d rather. Just plug your USB drive into your PC and follow the same steps as above.
1.2 Enable USB Booting for Your Pi
The steps to make your Pi boot from USB depend on which board you have. Find your model and skip down to the appropriate subsection below.
Enabling USB Boot for Raspberry Pi 3B+
The Pi 3B+ already boots to USB out of the box. Skip to the next section: Boot from USB.
Download the free PDF, keep it open, and stop wasting time on Google.
Download now
Enabling USB Boot for Raspberry Pi 3B, Pi 3A+, Pi 2B, & Pi Zero 2W
You must enable USB host boot mode and program the board boot from USB for these models.
Warning: Making this change is permanent because it programs your board.
- Enable USB host mode:
echo program_usb_boot_mode=1 | sudo tee -a /boot/firmware/config.txt - Reboot:
sudo reboot now - Verify changes:
vcgencmd otp_dump | grep 17: - Success: If you see 0x3020000a in the output, your board has been successfully programmed.

- Remove command from config file:
sudo sed -i 's/program_usb_boot_mode=1//g' /boot/config.txt
Now that you’re done, skip to the next section: Boot from USB.
Enabling USB Boot for Raspberry Pi 4B
The Pi 4B needs a firmware update and the boot order needs to be modified to boot from USB.
You might also like: Looking for a fun challenge? Start building your first Raspberry Pi robot!
Update Firmware
- If you haven’t already updated the system above, you should do so here:
sudo apt update
sudo apt full-upgrade - Update your Pi’s firmware:
sudo rpi-eeprom-update -a
Change Boot Order
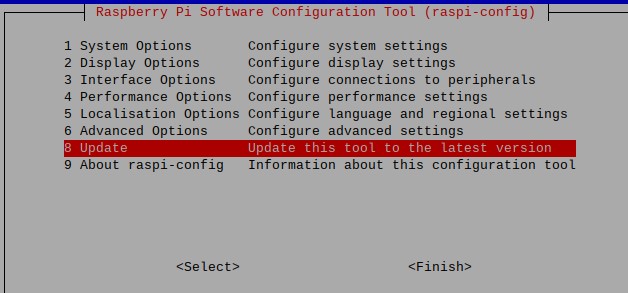
- Load the Pi’s config tool:
sudo raspi-config - Update the tool just in case:
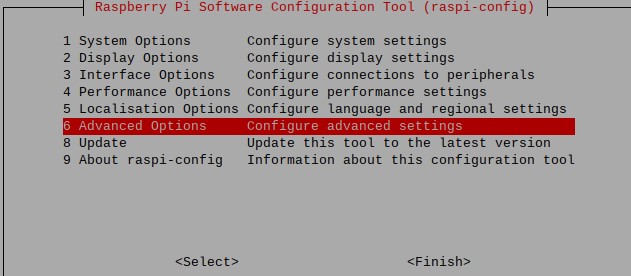
- Go to Advanced Options -> Boot Order:
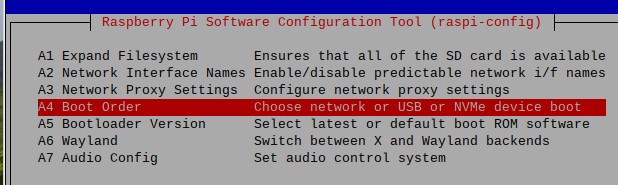
- Choose Boot From USB:

- Plug your USB drive into your Pi to get ready.
- Hit Finish. Raspi-config will ask you if you’d like to reboot. Choose Yes to reboot.
Note: I highly recommend you reboot from inside raspi-config when prompted. Doing so saves your boot order. If you instead reboot manually and something goes wrong, raspi-config often reverts these settings without telling you.
1.3 Boot From USB
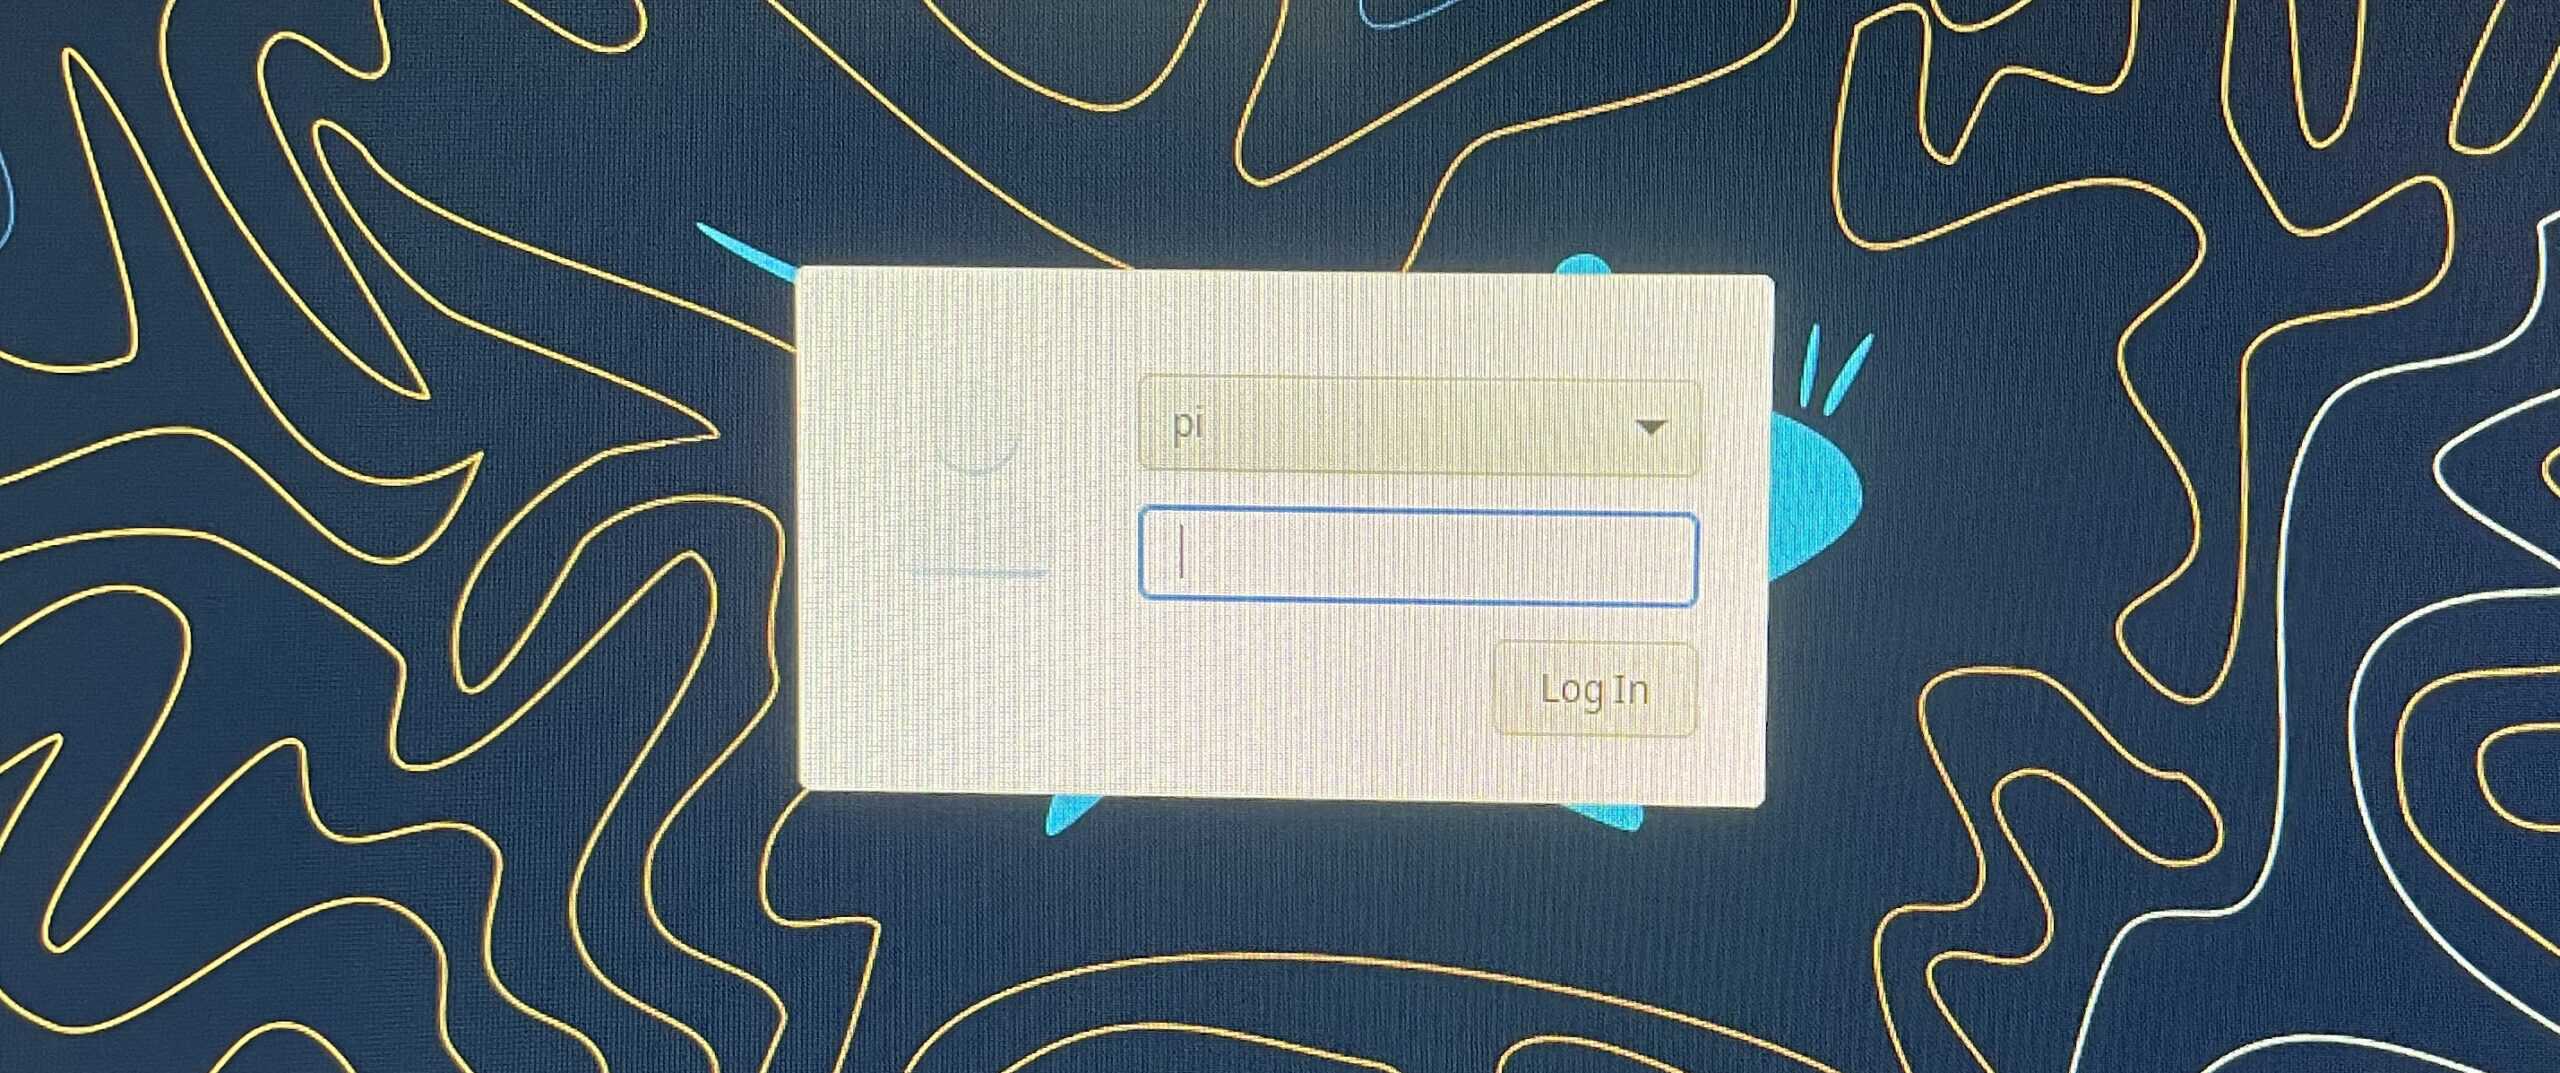
- Reboot your system with the USB flash drive plugged in. You’ll know you’ve booted to USB successfully when your login screen is a simple text prompt.
- Login using the default credentials: username = pi | password = raspberry.
Pat yourself on the back—you’ve made it past the first hurdle. You’re now running Raspberry Pi OS directly from a USB drive. This means you now have a Linux environment needed for the Arch installation process, and your SD card is free to accept a new operating system.
2. Pre-Installation: Prepping Your SD Card for Arch
Now that you’re running from a USB drive, you’re ready to prepare the SD card for Arch Linux. In this next step, you’ll:
- Identify the SD card volume.
- Format it to create a new partition table.
- Mount partitions so we can copy files onto it.
Related article: How to Format an SD Card from a Linux Terminal (CLI)
2.1 Determine Your SD Card’s Name
Your SD card is assigned a device name automatically by the operating system. Let’s figure out what it is using fdisk:sudo fdisk -l

The name of the device follows /dev/, so in my example above, the device name is: mmcblk0 (that’s the default in most cases).
We want the name of the entire device, so we do NOT want mmcblk0p1 or mmcblk0p2 because these refer to its partitions.
You might also like: Do this to keep a full backup of your Raspberry Pi
2.2 Clear Existing Partitions
- With the device name handy, you can now edit your SD card’s partition table using this command:
sudo fdisk /dev/mmcblk0
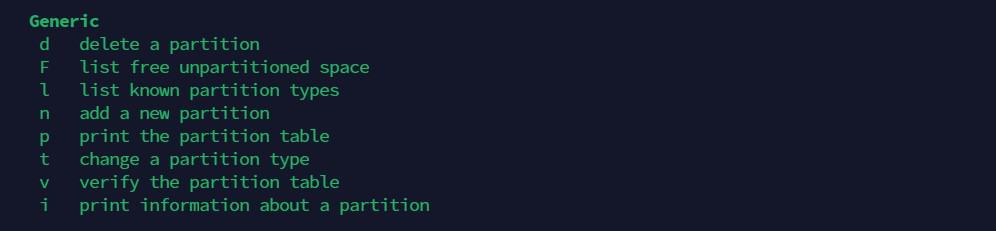
Make sure to change the device name if you have something different. - Now that you’re inside the fdisk utility, preview all of its commands: m.
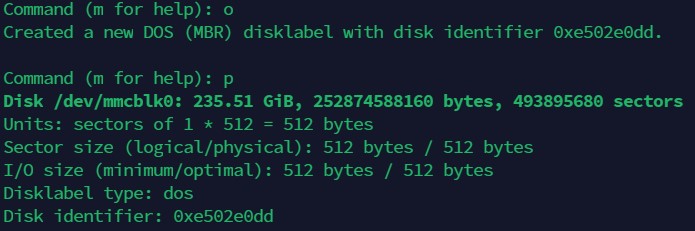
- Delete the SD card’s partition table to get a clean slate: o.
- List all existing partitions, and now you should see none: p
.
2.3 Create New Partitions
Now that you have a clean slate, you’ll continue using fdisk to create two new partitions.
Partition #1: Boot
The first partition you’ll make is the boot partition. It will contain the boot loader responsible for starting Arch.
Create Boot Partition
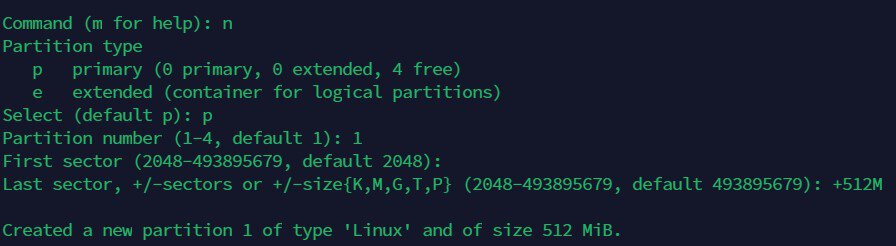
- Create a new partition: n.
- Make its type primary: p.
- Make it the first partition: 1.
- When prompted for “First sector”: Enter (This accepts the default).
- When prompted for “Last sector”: +512M.
This will make your boot partition 512MB. I recommend this larger value to avoid problems later on and for a better Arch experience overall. If you can’t spare the storage space, you can go with the minimum +200M or something in between like +350M.
Change Filesystem To FAT32
- Change filesystem type: t.
- Set it to W95 FAT32: c (This format provides easy compatibility with bootloaders).

Partition #2: Root
The second partition you’ll create is the root partition. It’s the main drive meant to hold the operating system files and all of your user files.
Create Root Partition
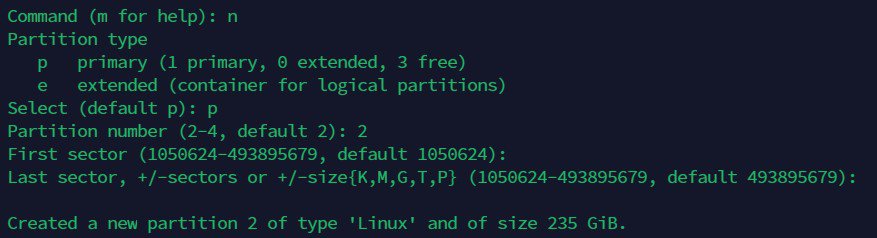
- Create a new partition: n.
- Make its type primary: p.
- Make it the second partition: 2.
- When prompted for “First sector”: Enter. This default starts the 2nd partition where your 1st partition ended.
- When prompted for “Last sector”: Enter. This default means to use all of the remaining space on your SD card.
Change Filesystem to Linux
You won’t have to set the type this time. This partition needs to be a Linux-type partition, and fortunately, that’s already the default.
Download the free PDF, keep it open, and stop wasting time on Google.
Download now
Write Partition Changes
- Review your proposed changes: p.
It should look similar to the image below, except the device name and storage sizes will match your SD card.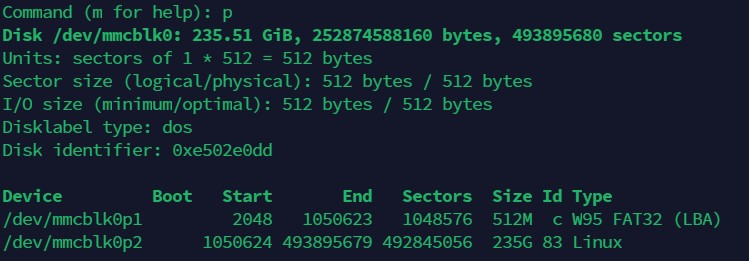
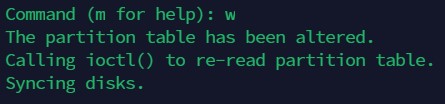
- Write to finalize your changes: w.
- Check that it was written properly: sudo fdisk -l.

Two partitions—boot and root—just like we wanted. It’s all going according to plan.
2.4 Mount Filesystems
Installing Arch Linux ARM is different from the process for other operating systems: there won’t be an installer program that walks you through. Instead, you’ll be manually copying the operating system files over.
To prepare for this process, you’ll be mounting the partitions you’ve just created. This is a complicated way of saying that you’ll be gaining access to the SD card to get files onto it.
Format and Mount the Boot Partition
- Make a FAT32 filesystem on your SD card’s boot partition:
sudo mkfs.vfat /dev/mmcblk0p1 - Make a temporary directory for mounting:
mkdir boot - Mount the boot partition onto that directory:
sudo mount /dev/mmcblk0p1 boot
Related article: How to Mount a USB drive on Raspberry Pi.
Format and Mount the Root Partition
You’ll repeat similar steps to mount the root partition, except you’ll be making an ext4 filesystem this time. The ext4 filesystem is a robust Linux default for user files.
- Make an ext4 filesystem:
sudo mkfs.ext4 /dev/mmcblk0p2
Note: if your system seems to hang on “Creating Journal,” be patient—it’s still processing. Wait until it says “done” and returns you to the command line.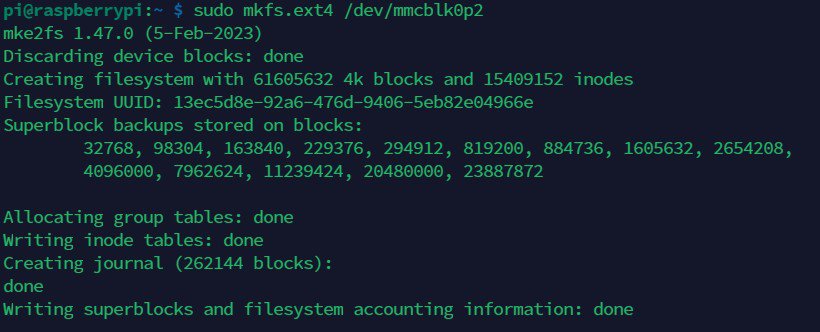
- Make a temporary directory for mounting:
mkdir root - Mount your SD card’s root partition onto that directory:
sudo mount /dev/mmcblk0p2 root
Success! Now that you’ve created and mounted partitions, you can install Arch.
3. Installing Arch Linux ARM onto Your Pi
Now that you’ve formatted your SD card with the proper partitions, it’s time to install Arch. In this step, you:
- Download the Arch Linux ARM operating system.
- Extract its files directly onto your Pi’s SD card.
- Activate the bootloader.
3.1 Download Arch Linux ARM
Which ALARM Release Should I Get For My Pi?
Check out this download list to get an idea. The link you’ll want depends on which Pi model you own. My example that follows will be using directions for a Raspberry Pi 4.
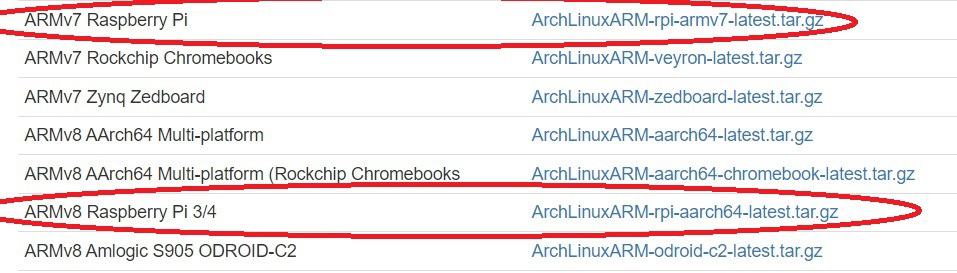
- For Raspberry Pi 4, Pi 3, and Pi Zero 2: you’ll want the ARMv8 file.
- For Raspberry Pi 2: you’ll want the ARMv7 file.
- For Raspberry Pi 5: this model is not officially supported as of this writing, but it may be coming soon. Check the updated list here.
Download From The Command Line
Download the release you chose above using wget [link]. The example below is for my Pi 4.
- Download Arch Linux ARM release:
wget http://os.archlinuxarm.org/os/ArchLinuxARM-rpi-aarch64-latest.tar.gz
3.2 Extract Arch Linux ARM Archive
You’ll need access to the bsdtar command, which isn’t included by default, to unzip the archive with proper attributes.
- Install bsdtar:
sudo apt install libarchive-tools - Elevate to root user:
sudo su
(The default password is: raspberry).
Note: You need to run bsdtar as the root user to preserve extended file attributes. Unfortunately, your current environment has the root user disabled by default. The easiest workaround is sudo su. It’s not a practice I would encourage normally, but it should be fine for this part of the installation, - Extract the file using bsdtar:
bsdtar -xpf ArchLinuxARM-rpi-aarch64-latest.tar.gz -C root
Tip: Press ‘Tab’ to autocomplete filenames as you type.
Note: Be patient—it might seem like your system has frozen, but it’s just extracting files silently in the background. You’ll know it’s finished when it sends you back to the command line. - Commit changes:
sync
3.3 Make the Bootloader Active
Move Boot Files
Since everything was extracted to a single directory, we’ll need to move the boot files to their proper partition.
- Move boot files:
sudo mv root/boot/* boot
Check Your Fstab For Proper Booting
Fstab is a system file that instructs Arch on how to mount specific partitions at boot.
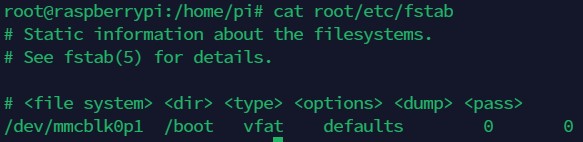
The Problem: Arch needs to be told explicitly by fstab where your boot partition is.
The Solution:
- fstab for Raspberry Pi 3 & Pi 2: fstab is already correct by default. Skip to the next part, Shut Down Safely To Prep For Your First Boot.
- fstab for Raspberry Pi 4 & Pi Zero 2: your SD card will be assigned a slightly different device number when you reboot into Arch for the first time. For example: if your boot partition is currently /dev/mmcblk0p1, it will be reassigned to /dev/mmcblk1p1 by Arch. Thus, you’ll have to edit fstab to fix this problem.
Fix Fstab for Raspberry Pi 4 & Pi Zero 2
Important: if you don’t make the changes below to fstab for the Pi 4 and Pi Zero 2, Arch will fail to boot and send you into emergency mode.
- View the current fstab:
cat root/etc/fstab - Modify the file:
sed -i 's/mmcblk0/mmcblk1/g' root/etc/fstab - Review changes:
cat root/etc/fstab

3.4 Shut Down Safely To Prep For Your First Boot
- Unmount partitions to reboot safely:
sudo umount boot root - Shutdown:
sudo shutdown now - Remove the USB flash drive: wait until the shutdown process is done, and the screen goes blank. Now unplug your USB drive. You won’t need it for the rest of this guide.
Download the free PDF, keep it open, and stop wasting time on Google.
Download now
If you’ve made it this far, take a bow. In the next section, you’ll be booting into Arch for the first time.
4. First Boot With Arch Linux on Your Pi
Now that you’ve installed the operating system, you can boot into Arch. What’s your next goal? To activate your system and configure it for your use. In this step, you’ll:
- Log in for the first time.
- Connect to the Internet.
- Configure your local settings.
- Initialize the Arch package manager.
- Change the default user accounts.
4.1 Login
Power your system on again. You’ll see your Pi searching for a USB drive, and when it doesn’t find one, it will boot into Arch from your SD card.
Login as the default user:
- Default user login & password:
alarm / alarm - Default root login & password:
root / root
4.2 Connect to the Internet
Ethernet
If you’re using an Ethernet cable, your internet connection probably works already. Test it out: ping archlinux.org
If you get responses, you’re online.
Wi-Fi
If you need to use a Wi-Fi connection, you’ll have to set it up first: wifi-menu
Select your network and hit Enter. Hit Enter again to assign the connection a default name. Next, you’ll be prompted for your Wi-Fi password. When that’s done, you should be connected. Test it: ping archlinux.org
If you get responses, you’re online.
Read next: 15 Easy Projects for Raspberry Pi Beginners
4.3 Configure Localization
You’ll want to configure your Arch system so it understands your language, time zone, and other local settings.
Keyboard Layout
The default keyboard is us. If you need to change your keyboard layout, start by searching for your keymap: localectl list-keymaps | grep -i [yourlanguage]
- Search for your language (example for French):
localectl list-keymaps | grep -i fr - Set your keymap (substitute us with the keymap you chose above):
loadkeys us
Time Zone
To set your clock, you’ll have to tell Arch what your local time zone is.
- Search for available zones using that kind of command:
timedatectl list-timezones | grep -i europe
- Take note of which one matches your location.
- Set the time zone with the one you chose:
timedatectl set-timezone Europe/London - Check your new time zone:
timedatectl status
User Locale
Setting your locale is important for displaying your language, currency, symbols, and other standards specific to your country.
- Open the list of locales:
nano /etc/locale.gen - Choose your locale:
- Scroll down to find your language-country-charset. When in doubt, go with UTF-8 for the character set.
- Uncomment the line: delete the # symbol in front to uncomment the line. In the example below, I’ve chosen English-USA-UTF8.
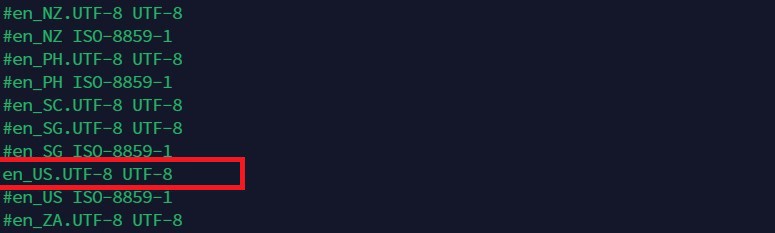
- Save: Ctrl+X to exit. Y to confirm. Enter to save.
- Generate:
locale-gen - Review change:
locale -a
4.4 Initialize Arch’s Package Manager: Pacman
Arch’s package manager, pacman, is how you’ll install the software. Pacman downloads and installs packages from a repository—in this case, the Arch Linux ARM repo. The steps below will activate pacman and ensure that you get signed packages.
- Elevate to root first:
su - Initialize pacman:
pacman-key --init
pacman-key --populate archlinuxarm
4.4 Change Default Accounts for Security
You’ll want to change the default login details to protect your system. To complete the steps below, log in directly as root. Use the exit command to log out. You might have to do this twice until you return to the login screen. Now login as root.
Change Root Password
- Change your root password:
passwd
Change Default User Account
- Change default username using usermod -l [new_username] [old_username]:
usermod -l pi alarm - Change the user’s password:
passwd pi - Change home directory using usermod -d /home/[newuser] -m [newuser]:
usermod -d /home/pi -m pi
Give Sudo Privileges to Your User
Download the free PDF, keep it open, and stop wasting time on Google.
Download now
You’ll want your user account to have admin rights so that you can update the system and install new packages. This is achieved by granting your user sudo privileges.
- Install the sudo package:
pacman -S sudo - Edit the /etc/sudoers file using a special command:
EDITOR=nano visudo - Add your user:
- Scroll down to “User privilege specification”
- Add your username underneath the “root” entry. Match the rest with the “root” entry.
- The example below shows sudo privileges being given to the user ‘pi’
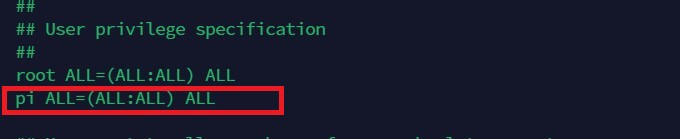
- Save: Ctrl+X, Y, Enter.
- Log in as your new user: exit until you return to the login screen. Login as your new username, and the sudo command should work for you.
4.5 Finishing Up
- Reboot:
systemctl reboot now
Welcome to your working Arch system. Read on to learn how to get new software and install a desktop environment.
5. Post-Installation: Getting New Packages & Desktop Environment
Now that you’re done configuring your system, what’s left to do? To get the most out of Arch, you’ll want to get new programs using pacman. In this step, I’ll show you how to update your system, install packages, and set up a graphical desktop environment.
5.1 Using Pacman: Command Cheat Sheet
- Update everything:
pacman -Syu - Install a package:
pacman -S <pkgname> - Search for a package name:
pacman -Ss <yourkeyword> - Uninstall a specific package:
pacman -Rsc <pkgname>
5.2 Update System Packages
Let’s start by getting a list of packages and updating our existing packages: sudo pacman -Syu
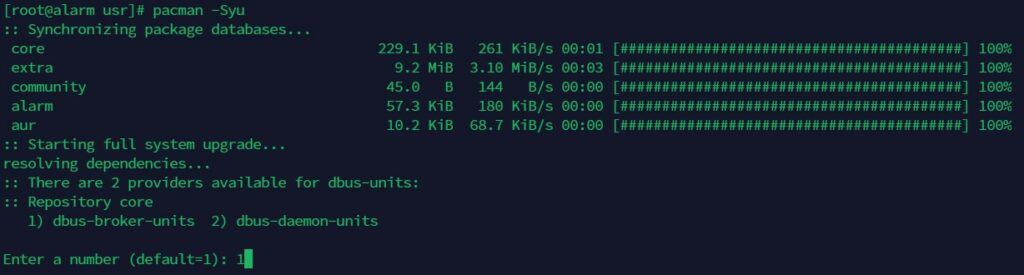
Tip: the first time you run pacman, you might get a confusing prompt asking you to choose a provider. The default is best for new users.
Confirm, Y, to proceed with the installation. You’ll now see all of your packages downloading and updating.
Note: During the first update, you might see warnings about missing firmware modules. That’s okay; these warnings are common to Arch, but they relate to hardware not used by your Pi.
5.3 Install New Packages
To find out what programs and utilities are available, search the repo using sudo pacman -Ss <keyword>. Here’s an example:
- Search for package:
sudo pacman -Ss neofetch - Install the package:
sudo pacman -S neofetch
Other packages you might want to install:
- wget: downloads files from the command line.
- udiskie: automatically mounts removable media, such as USB flash drives.
- zip: compresses files into zip archives.
- unzip: extracts compressed zip archives.
- unrar: extracts compressed rar archives.
- yay: lets you install third-party packages from AUR (Arch User Repository).
5.4 Install Desktop Environment
Since Arch doesn’t come with a graphical user interface (GUI), you’ll need to install your own. In Linux terms, a GUI is referred to as a desktop environment (DE). There are many DEs officially supported by Arch, so choose your favorite one.
The installation process for each may be slightly different, but here are the overall steps:
- Install the DE’s metapackage: A metapackage installs many other packages to give you a full-featured desktop experience.
- Install a display manager: A graphical display manager makes it so that you’ll automatically boot into the desktop with a GUI login. Don’t forget that you’ll need to enable the display manager after installing it.
- Install a terminal emulator: A command prompt that works inside the DE.
- Install a web browser: Chromium, Firefox, and others let you surf the web.
- Reboot and log in.
5.5 Example Desktop Environment Installation: XFCE
I often lean toward recommending my favorite desktop environments: Cinnamon and KDE Plasma. Unfortunately, I had issues with them crashing—issues I haven’t experienced on other hardware/distros. Instead, for my example below, I’ll show you how to install a popular and lean desktop environment: XFCE.
- Install XFCE metapackage:
sudo pacman -S xfce4 xfce4-goodies
- Install LightDM display manager & enable it:
sudo pacman -S lightdm lightdm-gtk-greetersudo systemctl enable lightdm - Install network manager (if you need Wi-Fi):
sudo pacman -S networkmanager network-manager-applet - Install terminal emulator: xfce4-terminal is already installed by the metapackage above.
- Install web browser:
sudo pacman -S chromium - Reboot:
systemctl reboot now
If you see the graphical display manager prompting you to log in, success!
If you enjoy learning about Raspberry Pi, you’ll feel right at home in the RaspberryTips Community. It’s a friendly group of makers helping each other grow. Join us today for $1 and see what it’s like inside.
Closing Thoughts
Congratulations, you’re now running Arch on your Raspberry Pi! If you have hardware issues with Bluetooth, onboard sensors, or I/O pins, check out the Arch Linux ARM wiki specifically for Pi. If you need further support, the venerable Arch Wiki will have answers to many problems that others have already solved. Lastly, if you want more ideas, check out my other Linux tutorials.
Go forth and enjoy the power of your new ArchPi. With it, you can accomplish almost anything you can dream of. Now you too can say, “I use Arch btw.”
Whenever you’re ready, here are other ways I can help you:
Test Your Raspberry Pi Level (Free): Not sure why everything takes so long on your Raspberry Pi? Take this free 3-minute assessment and see what’s causing the problems.
The RaspberryTips Community: Need help or want to discuss your Raspberry Pi projects with others who actually get it? Join the RaspberryTips Community and get access to private forums, exclusive lessons, and direct help (try it for just $1).
Master your Raspberry Pi in 30 days: If you are looking for the best tips to become an expert on Raspberry Pi, this book is for you. Learn useful Linux skills and practice multiple projects with step-by-step guides.
Master Python on Raspberry Pi: Create, understand, and improve any Python script for your Raspberry Pi. Learn the essentials step-by-step without losing time understanding useless concepts.
You can also find all my recommendations for tools and hardware on this page.