

How to Install Fail2Ban on Your Raspberry Pi?
If you use a Raspberry Pi in a company or when you open up ports, it’s a good idea to think a little about security. You might not be worried about a Pi going rogue, but it can become a door to compromise your entire network. Fail2Ban is a software that detects malicious login attempts and blocks them.
Fail2Ban can be installed with APT, just like any Raspberry Pi OS package. The configuration files are found in /etc/fail2ban. Editing these files will allow defining rules for each service hosted on the Raspberry Pi.
In this post, I will show you exactly how to get Fail2Ban up and running. I’ll cover everything from its working principles to configuring the services you can monitor with it.
If you’re new to Raspberry Pi or Linux, I’ve got something that can help you right away!
Download my free Linux commands cheat sheet – it’s a quick reference guide with all the essential commands you’ll need to get things done on your Raspberry Pi. Click here to get it for free!
An Introduction to Fail2Ban
Fail2Ban is mainly an intrusion prevention tool. It works by scanning service log files for patterns of malicious activities.
For example, it can check the SSH log file to list bad login and password attempts, and then block those IP addresses in your firewall. Everything is done automatically, with a list of things to monitor and actions to take depending on how many log lines there are in the file.
But it’s not just for SSH. You can detect intrusion on any service, like Apache, Postfix or Asterisk.
If there’s a log file where you can spot attacks, you can manage it with Fail2Ban.
At my work, I install it each time I prepare a new Linux server, as even with the default configuration, Fail2Ban can do a decent job. But it becomes a compelling tool when you know exactly what to configure on it 🙂
Download the free PDF, keep it open, and stop wasting time on Google.
Download now
I will introduce it to you in this post, but don’t forget there is no limit.
Install Fail2Ban on Raspberry Pi OS
Let’s start with installing Fail2Ban on Raspberry Pi. As I said in the introduction, it’s easy, but I will take the time in this part to also show you the configuration path and the commands you need to know.
Install RPI OS on Raspberry Pi
As it often goes, the first step to getting Fail2Ban on your Raspberry Pi is to install Raspberry Pi OS on it. I’m using Raspberry Pi OS Lite, and you can install it by following this tutorial if needed.
But I don’t think the Raspberry Pi OS version will change anything about this post. You can also use another distribution if you prefer, as Fail2Ban is available on most Linux distros.
After the first boot (or if you already have Raspberry Pi OS installed), make sure to do these steps before going further:
- Change the default password: you can’t worry about security and leave the default password 🙂
passwd - Update your system: same reason, make sure to be up-to-date:
sudo apt update && sudo apt upgrade - Enable SSH:
sudo service ssh start
OK, you can now move on to the Fail2Ban installation.
Are you a bit lost in the Linux command line? Check this article first for the most important commands to remember and a free downloadable cheat sheet so you can have the commands at your fingertips.
Download the free PDF, keep it open, and stop wasting time on Google.
Download now
Install the Fail2Ban Package
Fail2Ban is available in the official repository. To install it, use this command:sudo apt install fail2ban
That’s all 🙂
Fail2Ban will start automatically with the default configuration.
Check the Configuration
To complete this part, know that the configuration files are located at:
/etc/failban
Here you’ll find all the default configuration files:

We’ll go into details later, but for now, here’s what you need to know:
Download the free PDF, keep it open, and stop wasting time on Google.
Download now
Also: 25 project ideas you can try at home with Raspberry Pi
- fail2ban.conf: It’s the main configuration file with default options for the Fail2Ban service. You’ll probably never change this.
- jail.conf: In this file, you’ll find the things you want to monitor (Fail2Ban calls these “jails”). Basically, you define the service, port, and log files in here.
- jail.d folder: In here you’ll create a new file for each log to monitor, with specific options like IP whitelist and ban duration.
- filter.d folder: In this folder, you create or edit a filter for each service to monitor. A filter is the definition of what to look for in the service log files.
It’s hard to give you an overview without giving more details, but it’s an important step before the configuration part where we’ll look at this in detail 🙂
Use These Commands to Manage Fail2Ban
Here are a few commands to know about Fail2Ban:
- sudo service fail2ban start | stop | restart | status | reload : Manage the Fail2Ban service.
- sudo fail2ban-server start | stop | restart | status | reload : Same thing, but the status command gives you additional information like the current jails enabled.
- sudo fail2ban-client <COMMAND> : I can’t list all the options available here, but you can use this command to get or set the configuration. To learn more, type:
man fail2ban-client
That’s all for the basic information. Fail2Ban is easy to install, but there are many things you can do with it.
Edit the Fail2Ban Configuration Files
Now that you know about its basic files and commands, I’ll teach you how to use Fail2Ban. I’ll start with a basic example and then give you ideas about other things you can secure with Fail2Ban.
SSH Configuration with Fail2Ban
The first thing I always use Fail2Ban for on my servers is its SSH protection. If your Raspberry Pi is open to the internet or even on a large network, basic security tips about SSH are not always enough to prevent attacks.
Fail2Ban can help you to detect excessive login attempts and block the IP addresses of bad actors. By default, it’s enabled as soon as you install Fail2Ban. But it’s a good exercise to check what they have done in the configuration.
- In jail.conf
- There are default values for bantime, findtime, and maxretry.
You can find an explanation of each one in the screenshot below.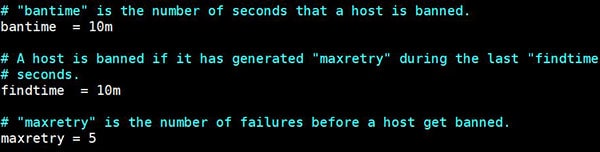
You can change it at the beginning of the file to apply them to all jails, or specify them for each jail if needed. - The name of the SSH configuration is “sshd”.
It fits in 3 lines :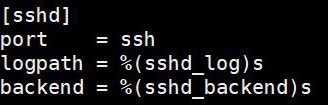
For a basic configuration with all parameters, you just need to specify port to check, logpath, and backend.
- There are default values for bantime, findtime, and maxretry.
- For a new custom jail, you can set logpath and backend variable to the path-common.conf file, or simply use the entire path here.
- To enable it, create a new file in jail.d, or add it to the default one (/etc/fail2ban/jail.d/defaults-debian.conf)
Upon installation, you’ll just have the sshd jail here:
- I will not include it here because it’s too long, but the regular expressions to look for is available in the filter.d/sshd.conf file.
So for a custom check, you have to use a file from filter.d/ or add a new one.
That’s everything you need to know about a basic configuration.
Download the free PDF, keep it open, and stop wasting time on Google.
Download now
Read next: Yes, you can access your Pi from anywhere. Here's how.
Other Services You Can Configure on Fail2Ban
Once you understand how Fail2ban works, you can try to enable or implement it for other services.
I recommend to check directly in the jail and filter folder, as there are already many existing files you can use to get started:
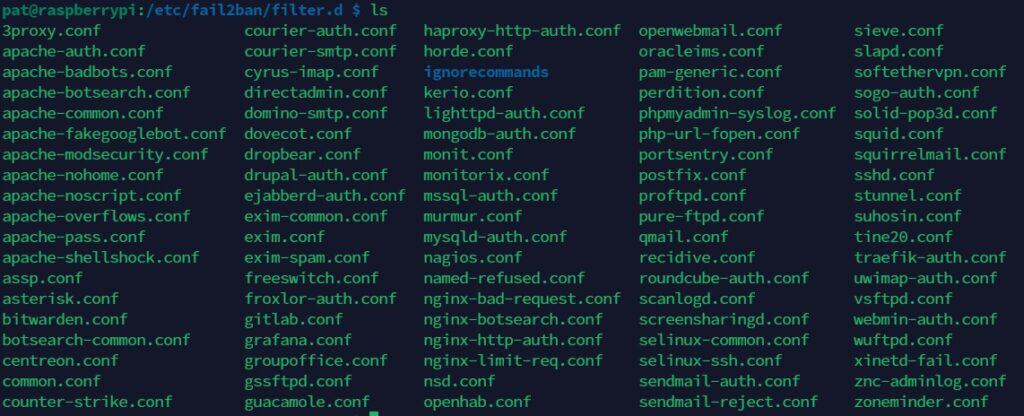
Unless you have a very specific service you want to add, most of the time you’ll find what you need already here (NginX, Asterisk, FTP server, etc.)
You can also check the web for specific ideas other people may have already done and shared.
For example, you can find HOWTO guides on the Fail2Ban wiki for many additional services .
You can also find more help about Fail2Ban on this wiki.
If you enjoy learning about Raspberry Pi, you’ll feel right at home in the RaspberryTips Community. It’s a friendly group of makers helping each other grow. Join us today for $1 and see what it’s like inside.
Conclusion
That’s the end of my introduction about Fail2Ban. As with many services on Linux and Raspberry Pi, you’ll need to try it out to know exactly how it works. Afterwards, you can add more services to scan to gain more experience.
If security is an important topic for you (on Raspberry Pi or Linux), I also recommend checking out my 17 security tips to secure Linux systems.
Whenever you’re ready, here are other ways I can help you:
Test Your Raspberry Pi Level (Free): Not sure why everything takes so long on your Raspberry Pi? Take this free 3-minute assessment and see what’s causing the problems.
The RaspberryTips Community: Need help or want to discuss your Raspberry Pi projects with others who actually get it? Join the RaspberryTips Community and get access to private forums, exclusive lessons, and direct help (try it for just $1).
Master your Raspberry Pi in 30 days: If you are looking for the best tips to become an expert on Raspberry Pi, this book is for you. Learn useful Linux skills and practice multiple projects with step-by-step guides.
Master Python on Raspberry Pi: Create, understand, and improve any Python script for your Raspberry Pi. Learn the essentials step-by-step without losing time understanding useless concepts.
You can also find all my recommendations for tools and hardware on this page.


Thank you for pointing me to fail2ban! Although it would be great if at the beginning you made clear immediately if _defaults_ after installation are already OK, meaning enabled with sensible default parameters (raspi 4 here, Raspbian OS, SSH main concern as well as any possible entry the OS might have).
fail2ban is good “out of the box”. SSH is the only permitted service, maxretries is 3 in some places and 6 in others, I prefer 3. Default bantime is -1 which means forever. I suggest cp jail.conf to jail.local (in same directory) and edit jail.local as needed, I understand fail2ban checks jail.conf first and then jail.local if it exists.