Installing LibreELEC on Raspberry Pi: A Complete Guide
I’ve tried a bunch of ways to turn my Raspberry Pi into a media center over the years, but LibreELEC really stands out. It’s super lightweight and built just for running Kodi. If you want to get it set up quickly and easily, I’ll walk you through everything step by step.
LibreELEC is available in Raspberry Pi Imager, so it can be installed easily on an SD card using this tool. However, to get the latest version, it’s recommended to download the image manually from the official website.
Let’s start with a recap of everything you’ll need. Then I’ll explain the installation steps, and give you a few tips to get started.
If you’re new to Raspberry Pi or Linux, I’ve got something that can help you right away!
Download my free Linux commands cheat sheet – it’s a quick reference guide with all the essential commands you’ll need to get things done on your Raspberry Pi. Click here to get it for free!
Prerequisites to Run LibreELEC on Raspberry Pi

Are you new to what it means to host your own media server? If so, check out: Raspberry Pi as a Media Center: Complete Guide for Beginners!
Once you get acquainted, below is what you’ll need to install LibreELEC for your media center.
Hardware
LibreELEC is a lightweight distribution, with a minimal OS that is just enough to run Kodi, so you don’t need a specific Pi model or hardware. Here’s a summary of what you should have before getting started:
Check this: Need a clear GPIO pinout diagram? Here's mine.
- A compatible Raspberry Pi: You can find a LibreELEC version for most models, but a recent model is recommended to install the latest version. When I say “recent”, I mean Raspberry Pi 3, 4 / 400, or 5 / 500. I’ll be using my Raspberry Pi 4 for this, but use what you have available.
- A fast and large SD card: Having enough storage is important, however. If you plan to store a ton of pictures or movies on it, I recommend starting with a big SD card, so you won’t have to worry about running out of storage too soon. My favorite brand is SanDisk (tested here), and for this project, I would recommend this SD card on Amazon (fast, reliable, affordable and has enough storage to last for a while).
- A good power supply: as with all Raspberry Pi projects, especially when using recent models, make sure to use a compatible power supply. Using a USB cable or phone charger isn’t recommended, as you won’t want your movie to stop in the middle. I always recommend the official power supply if possible. You can find out why in this article if needed.
- (Optional) A remote: for a media center project, a remote control to easily navigate the menus is nice to have. It’s not mandatory, but I generally recommend the Flirc remote USB adapter + any universal remote (like the Harmony one here).
But it’s fine if you are okay with using your mouse and keyboard on your sofa while watching movies (I use this keyboard with a touchpad).
Software
As explained in the introduction, you have basically two ways to install LibreELEC on your Raspberry Pi:
- (Easy way) Raspberry Pi Imager: LibreELEC is now available in Raspberry Pi Imager directly, so you can simply install it like Raspberry Pi OS or any other system. Just know that the version listed here is generally a bit outdated. It’s not a big deal, you can update it after the installation to get the latest features. You can download it here if you don’t have it yet.
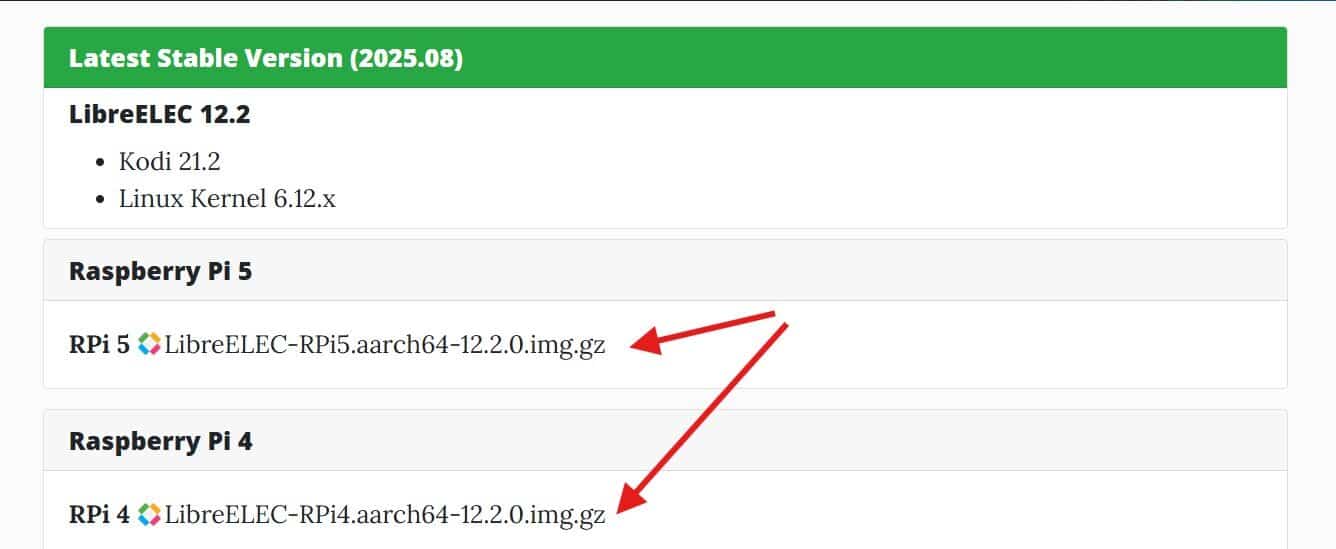
- (Recommended) Download the latest version from the official site: Here’s the the download page. Just make sure to get the image corresponding to your Raspberry Pi model.
- (Third option) You can download the LibreELEC USB creator tool from the official website. But it’s only available on Windows and Mac, and doesn’t add much compared to Imager.

Note: If you need Wi-Fi, you should choose the Recommended method above because the default image on Imager is older, and as of this update, contains a bug which won’t connect to Wi-Fi networks correctly.
Download the free PDF, keep it open, and stop wasting time on Google.
Download now
By the way, I have a whole series of videos for community members on this topic. If you’re just getting started or want to take your media setup to the next level, you might want to check it out.
How to Install LibreELEC on Raspberry Pi
Now that you have everything you need, here are the next steps to install LibreELEC on your Raspberry Pi:
- Use Raspberry Pi Imager to flash the image to a new SD card.
- Insert the SD card into the Raspberry Pi, and boot it up.
- Follow the instructions for the initial configuration.
- Access the full Kodi interface to do anything from there!
Let’s see this in detail, and I’ll give you a few additional tips once the system is installed.
Writing the LibreELEC Image
Whether you download the LibreELEC image or want to use Raspberry Pi Imager directly, the steps to install it on your SD card are almost the same:
- Launch Raspberry Pi Imager.
- Click Choose OS.
If you downloaded the latest image, scroll to the bottom of the list, click Use Custom and select the file you downloaded.
If you prefer using the version included in Raspberry Pi Imager, go to Media Player OS > LibreELEC, and pick the version corresponding to your Raspberry Pi model: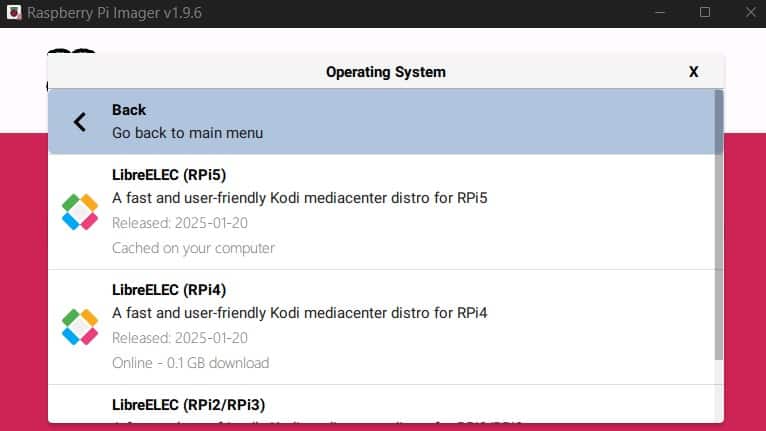
- Click Choose Storage and select your micro SD card for the installation.
It will show up once inserted into your computer. You’ll probably need an SD adapter (like this) or even a USB adapter if your computer doesn’t have an SD slot. - Click Next to start the installation.
After a few seconds, the files are written onto the SD card, and we can move on.
(If you need more guidance, I have a full guide about Raspberry Pi Imager here.)
The LibreELEC image is very light, so even with a slow connection, it should be pretty quick to install it on your SD card.
Setting Up the Raspberry Pi
Once the SD card is ready, it’s time to use the Raspberry Pi:
Download the free PDF, keep it open, and stop wasting time on Google.
Download now
- Plug it into your screen or TV with the proper HDMI cable (try to avoid adapters if possible, especially for a media center).
- Insert the SD card into the SD card slot.
- Plug in the other accessories (I guess you at least have a keyboard or remote).
- Only then plug in the power supply to boot it up.
Wait a few seconds for the Raspberry Pi to start, and you should quickly see something on your screen.
First Boot with LibreELEC
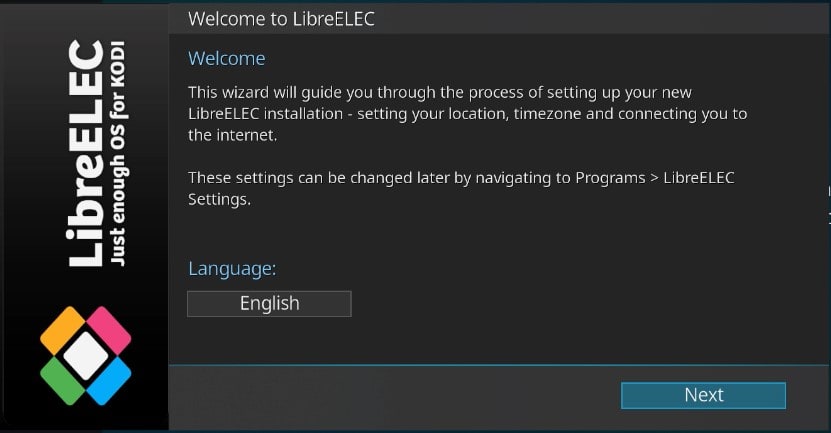
When you start LibreELEC for the first time, a welcome wizard will guide you through the first steps:
- The first step is to change the language (if needed), and click Next:
- The next step allows you to change the hostname. You can probably keep the default unless you plan to have several LibreELECs on the same network.
- After that, you’ll be invited to configure the Wi-Fi network.
This is important if you don’t have an Ethernet cable next to your TV. I’m using a cable for the test, but connect it to your Wi-Fi from there if needed: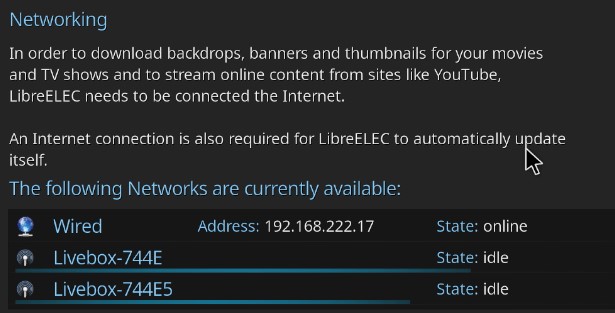
- You can then enable SSH and Samba if needed.
I recommend enabling at least Samba, so you can send media files directly from your computer to the Raspberry Pi.
- Click Next to finish the initial configuration.
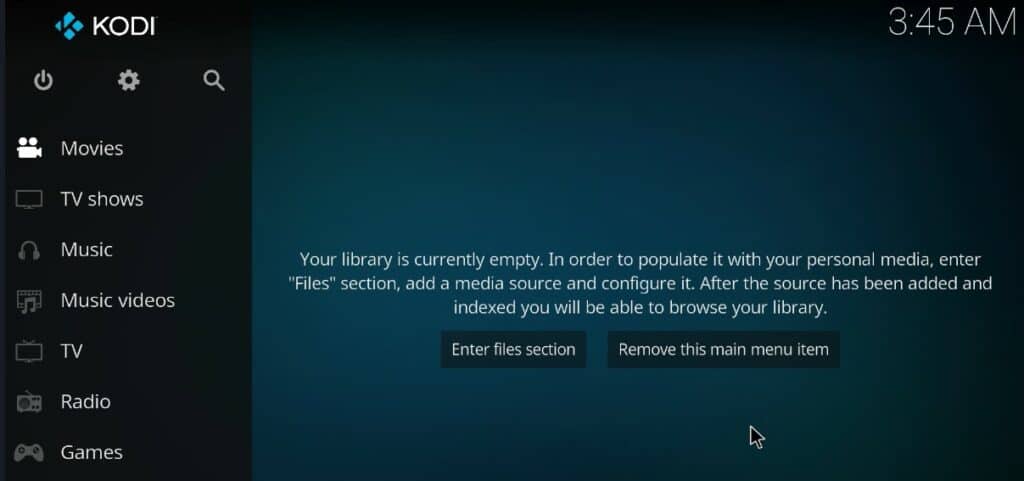
You’ll now have access to the full Kodi interface, where you can do everything else.
First Steps with LibreELEC on Raspberry Pi
I’ll now give you a few tips to get started quickly with LibreElec, but to be clear, these are tips for Kodi. LibreELEC is just the OS running in the background, which starts Kodi on boot. Whether it’s LibreELEC, OSMC or Raspberry Pi OS running Kodi, the first steps are the same.
Note: Want to see the differences between Kodi on Raspberry Pi OS vs. LibreElec vs. OSMC? I have a video on this topic just for community members. Join here to watch, and get access to 30+ other lessons for Raspberry Pi along with many other benefits!
Basic Settings
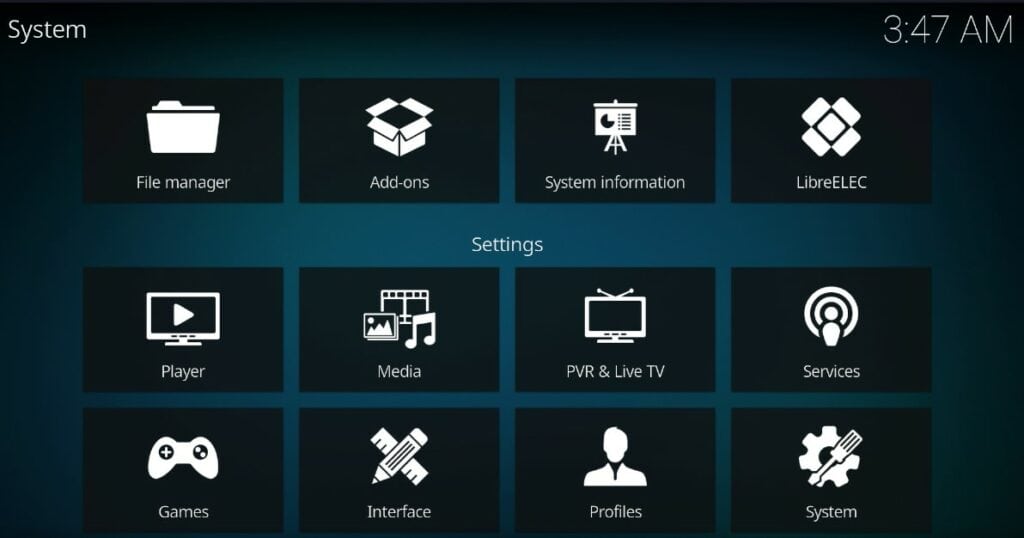
I suggest you start by taking a look at the system settings. You can access them by clicking on the settings gear at the top of the left menu.
All settings are listed here, and sorted by category, so you should quickly find what you’re looking for:
Download the free PDF, keep it open, and stop wasting time on Google.
Download now
For example, if you click on “System”, you’ll have access to all basic settings, like “Display”, “Audio”, “Input”, etc.
In the Interface settings, you’ll find the regional configuration (language and time zone) and can customize the interface if needed.
Those are the two most important categories at this point, but feel free to explore the other menus to see what is available.
Installing Add-Ons
By default, LibreELEC is a very light distribution, but once you get access to Kodi, you can easily install add-ons to fit your needs. Think of add-ons like the apps you install on your phone: you can install services like Spotify, YouTube, or Netflix this way.
To try it, go to the Add-ons section in Settings, or directly go to “Add-ons” in the main menu.
You might also like: I tried to replace my main PC with a Pi 5, here's what happened.
There are two methods to install add-ons:
- Install from repository: like on most Linux distributions, you can download packages from a remote server, and install the add-ons directly. There is an official repository configured by default, but other ones can be added if needed.
- Install from zip file: you’ll sometimes find interesting add-ons online, that can be downloaded on your Raspberry Pi and installed manually. By the way, this method is often used to add access to new repositories.
If you go to Add-ons and then “Install from repository”, you’ll see a list of categories.
Pick one, and browse through the list of add-ons listed. When you select one, you’ll then have access to more details, and an option to install it:
Download the free PDF, keep it open, and stop wasting time on Google.
Download now
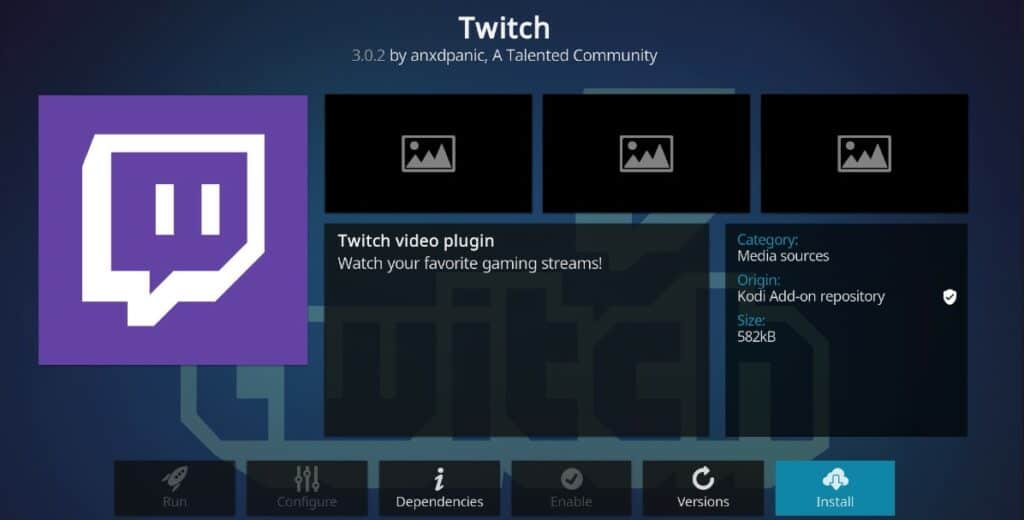
For example, Twitch is available under All repositories > Video Add-ons and can be installed in one click from there. Once installed, it’ll be available directly from the main menu, under “Add-ons”, so you can watch streams on LibreELEC.
Note: For some add-ons, it’s not necessarily that easy, as API tokens are often required (ex: YouTube, Twitch, Spotify, etc.). But at least the add-on installation is not more complicated than on traditional distributions.
If you need more details or inspiration, I have other articles on the topic:
- How to Use YouTube API Keys with the Kodi add-on?
- How to watch Netflix and other streaming services on Kodi?
- How to Use Spotify on Your Raspberry Pi?
If you enjoy learning about Raspberry Pi, you’ll feel right at home in the RaspberryTips Community. It’s a friendly group of makers helping each other grow. Join us today for $1 and see what it’s like inside.
Related Questions
What’s the difference between LibreELEC and OSMC?
Overall, LibreELEC and OSMC have the same goal: running Kodi on a Raspberry Pi. LibreELEC is a minimal system, just for Kodi, while OSMC is based on Debian, offering more options to host other services.
If you seek a simple media center, go for LibreELEC. If you think you might use the Pi for other projects later, OSMC might be a better choice, as you can install anything else on it (access to the Debian repositories).
I explain the differences in more detail in this article: OSMC vs LibreElec: What’s the Best Media Center System?
What’s the default user and password for LibreElec?
If SSH is enabled, you can connect to your LibreELEC system by using:
username = root
password = libreelec
SSH can be enabled in the welcome wizard or in the system settings. It’s generally not that useful, as LibreELEC is a minimal system, you can’t do much even with access to the terminal. It might just help with some maintenance tasks, but you probably won’t need it.
Whenever you’re ready, here are other ways I can help you:
Test Your Raspberry Pi Level (Free): Not sure why everything takes so long on your Raspberry Pi? Take this free 3-minute assessment and see what’s causing the problems.
The RaspberryTips Community: Need help or want to discuss your Raspberry Pi projects with others who actually get it? Join the RaspberryTips Community and get access to private forums, exclusive lessons, and direct help (try it for just $1).
Master your Raspberry Pi in 30 days: If you are looking for the best tips to become an expert on Raspberry Pi, this book is for you. Learn useful Linux skills and practice multiple projects with step-by-step guides.
Master Python on Raspberry Pi: Create, understand, and improve any Python script for your Raspberry Pi. Learn the essentials step-by-step without losing time understanding useless concepts.
You can also find all my recommendations for tools and hardware on this page.