
How to Learn to Program in Python With a Raspberry Pi?
Learning Python is an important step to using a Raspberry Pi efficiently. But it’s not straightforward to learn if you start from scratch. I’m a web developer who’s proficient at coding, so today I’ll share with you some tips for getting started quickly with Python.
Raspberry Pi OS includes an IDE to code in Python, the basic libraries are pre-installed, and the GPIO pins are perfect for experimentation. There are a few steps to follow to understand the Python code, but it’s not so complicated.
I will try to write this article to help both programming beginners and beginners in Python (but who already know other languages). It’s up to you to adapt the rhythm of reading to your level. If you already code with other languages, the snippets may be enough to catch the syntax.
If you’re like me and sometimes mix up syntax between programming languages, I’ve got just the thing for you. I’ve put together a Python cheat sheet with all the essential syntax in one place, so you can keep it handy and avoid any confusion. Download it here for free!
The Link Between Python and Raspberry Pi
Python Introduction
Python is a high-level language to program all kinds of software (like C, C++, or others).
It’s similar to a bash script because you can run it directly.
Most Python source code has a .py filename extension, and you can run it using the “python file.py” command.
The conception of the Python language started in the 80s, and it’s still an active language, with a big community.
Most major companies are using Python in their apps, like Google, Facebook, Netflix or Spotify.
So, it’s not an outdated language, learning it now could help you with your career or future projects.
In fact, it’s one of the most widely used programming languages in the world:

Find more statistics at Statista
You also use other languages like C++ on your Raspberry Pi, but in general, Python is the preferred option.
The Python Philosophy
Tim Peters wrote the Python philosophy in twenty aphorisms like these:
Beautiful is better than ugly.
Explicit is better than implicit.
Simple is better than complex.
Complex is better than complicated.
Flat is better than nested.
Sparse is better than dense.
Readability counts.
It gives you an idea of what to expect when using Python.
One of the main goals is to keep it fun to use.
You can find the complete philosophy on the official Python website.
Python and Raspberry Pi
The goal of the Raspberry Pi Foundation is to help young students to learn how to code.
The Raspberry Pi foundation sent a lot of Raspberry Pi into UK schools, and also created clubs to teach children how to code.
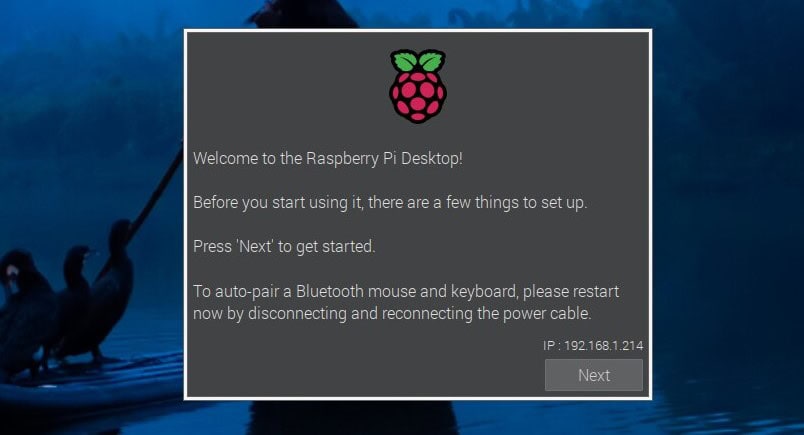
As you may have noticed, Raspberry Pi OS comes with Python by default and with a complete IDE already installed (in the Desktop version). So if you have a Raspberry Pi and want to learn how to program, using Python is the natural way to do this.
By the way, it’s not mandatory to have a Raspberry Pi to learn Python. So don’t buy a Raspberry Pi only to learn Python. You can do the same on any operating system, as Python is a cross-platform language. You only need to find an editor to fit your needs on your current operating system.
Learn more about this story by reading this article: Why Is Python Used On Raspberry Pi? (3 Huge Reasons).
Software Requirements for Python
To run Python on Raspberry Pi, you’ll need to install an operating system and then software to write your code.
Install an Operating System
If you haven’t already done so, you need to install an operating system on your Raspberry Pi.
I recommend using Raspberry Pi OS Desktop, which comes with anything you need by default.
But any distribution can do the job if you prefer another one.
Read my article on installing Raspberry Pi OS if you’re not sure how to do this.
If you don’t have a good workspace with your Raspberry Pi, I recommend enabling SSH and maybe installing XRDP or VNC to remotely connect to your Raspberry Pi.
It may be more comfortable to read this article and to type code from your usual computer.
Once everything is fine with your installation, continue on to the next step.
Software to Code in Python
You have two main possibilities to code with Python on a Raspberry Pi.
Check this: Pi5 vs. Pi4: I tested them, here's the result
Python IDE
On Raspberry Pi OS Desktop, the Thonny Python IDE is installed by default.
If like me, you always mix the languages syntax, download my cheat sheet for Python here!
Download now
Thonny is a basic interface to write your code, save and run it, and see what happen in an integrated shell output. Here’s what you’ll get on the first start:

This clean interface is intuitive. In the top menu, you’ll find the most useful icons for creating a file, save or load it, launch it, as well as shortcuts for formatting the code. Advanced actions are all hidden in the menu, to not disturb beginners.
The top text area is for your script, and the bottom is a console to see what happens when you run your script (output or errors).
If you’re just starting with Python or programming, I recommend working with Thonny. You’ll save time, and if you need something better later, it’s not a big deal to switch to another editor.
Any Text Editor
As I said in the introduction, Python code can be run from the command line like this:python myscript.py
So, you can create a Python script file with any editor, from Nano to Eclipse if you want.
There are also more advanced editors meant for coders. For beginners, I think that they will only add other issues and questions, but for big projects, a powerful interface can be really useful.
The most popular interfaces to code in Python are :
- Code editors like Sublime Text, Visual Studio Code, or Notepad++
- IDEs like Eclipse with PyDev, PyCharm, or Spyder
- Specific Python editors like SPE
Any editor can do the job. You have the choice 🙂
If you are just getting started with Linux commands, you might be interested in this related article: How To Create A New Python File In Terminal On Raspberry Pi.
Basic Code Examples With Python
Let’s start with your first lines of code. In this section, you’ll learn the basic language syntax of Python. This is not specific to the Raspberry Pi. It will work anywhere.
Note: If you want to see all these steps in action, I have a video lesson available for the community members. You can join here and watch it directly if you are interested (with 20+ other lessons for Raspberry Pi and many other benefits).
Hello World
This is a tradition when you study a new programming language, so we need to start here.
How do we display the famous “Hello World!” in Python?
You might also like: I tried to replace my main PC with a Pi 5, here's what happened.
It’s this simple:print('Hello World!')
In the Thonny IDE, you should get something like this when you run it:

As you can see in the Shell area, the script displayed precisely what you put in the print function.
Print is a primary function in Python that displays some text. It’s already built-in to the language, so you can use it directly.
The quotes around the text are a syntax convention, to identify strings in a line of code.
Variables
In any language, variables are used to store values locally and temporarily.
For example, you could ask the username at the beginning of your script and display it later in your code. To achieve this, you need to define a variable and use it to store the username in it.
In Python, here’s what this might look like:username='Raspberry'
print('Hello '+username)
In the first line, we set the username variable with the ‘Raspberry’ string.
In most languages, you first need to create a variable, setting its type (a string, an integer, an array), before using it in the code. In Python, however, there is no command to declare a variable. You can use it immediately.
In the second line, we use the same print function as seen before.
I introduce a new syntax element with the ‘+’ used to concatenate strings.
When we ask Python to display ‘Hello ‘+username, it will display ‘Hello Raspberry’ instead.
The variable value is used as another string to display, stuck to the first part.
You might also like: The 5 fastest web browsers for Raspberry Pi — tested and ranked!
If you’ve been keeping up, you might have noticed that this is not exactly the example I promised 🙂
Here’s how to ask the username and display dynamically depending on the user response:
If like me, you always mix the languages syntax, download my cheat sheet for Python here!
Download now

The input function asks for an input value from the user and sets it in the username variable.
Then you can display the variable as in the previous example.
We use a backslash to tell Python that the following apostrophe is not to close the string.
It might be easier to use double quotes to avoid this:input("What's your name? ")
Conditions
The next step is to learn what conditions are and how to use them in Python.
Theory
A condition allows you to do something different depending on an expression. For example:
- If the input string is empty, display an error
- If the button is pressed, turn on the LED
- If the password is correct: do the action, else: ask again
In most languages there are three conditions you can use, in this order:
- If : first case
- Elseif : other cases, tested only if the previous cases evaluate as false
- Else : default case if none of the conditions are true
For if or elseif, you need to define the condition associated and the code to execute if it’s true.
These are called boolean statements. They evaluate as true or false depending on your variables.
Else applies to all other cases, not handled by if or elseif.
It will be easier to understand with an example in Python.
Python Usage
In Python, you’ll find similar conditional statements—except elseif is called elif.
value=input("Value?")
if value == 'a':
    print("a")
elif value == 'b':
    print("b")
else:
    print("Anything else")
For each condition, the syntax is to use the main word (if, elif, or else).
For if and elif, you’ll find the boolean statement just after (value == “a”). It’s True if the value contains “a” or it’s False otherwise.
The else line doesn’t set any conditions: it will execute the code below it if the value is anything other than “a” or “b.”
The colon (:) at the end of each line is used here to indicate the end of the condition.
When you run this code, you can try to enter a, b or any other value when asked and see what happen.
Unlike the example in the previous paragraph, the display will be different depending on the input value you type.
Going Further
The elif and else statements are optional.
If you have only one value to test, you could remove one part, like this:
value=input("Password?")
if value == '1234':
   print("Access granted")
else:
   print("Try again")
If you have more than two values to test you can add as many elif conditionals as necessary:
value=input("Value?")
if value == 'a':
   print("a")
elif value == 'b':
   print("b")
elif value == 'c':
   print("c")
elif value == 'd':
   print("d")
else:
   print("Error")
When a condition is matched, the code below it executes. But after that, the script skips the rest of the conditional group. It will not test the other conditions.
Here’s an example of how that process works using Thonny:

If you start today learning code, take time to digest this because the following is even more complicated 🙂 It’s a logic to learn, more than a language. Don’t hesitate to make some tests on your side to be sure you understand this part.
Loops
Theory
The last concept I want to introduce is loops.
Loops are a way to execute the same code portion several times.
For example:
- As long as the password entered is not the correct one, ask it again and again.
- For each file in a folder, do something.
- Do the same thing every X minutes (infinite loop).
This concept will allow us to have dynamic code depending on something else.
It also avoids us having to repeat identical pieces of code, or to execute the script too often.
Python Usage
In Python, you have only two ways to create loops:
- For: Execute the code for each item in a sequence (list, range, string, etc.).
- While: As long as your condition is True, the code will be executed.
For those who’re coming from other language, there is no “foreach” instruction in Python. You have to write a custom “for” block instead.
You might also like: No screen? No problem! Here's how to setup a Pi without one.
While
I will start with “while” because it’s very close to the conditional you’ve seen before.
As I said, it will run your code until the Boolean statement becomes False.
Download the free PDF, keep it open, and stop wasting time on Google.
Download now
Here is the same password example, except using a loop this time:
password=input("What's your password?")
while password!="1234":
  print("Error")
  password=input("What's your password?")

print("Password correct")
You’re already familiar with almost everything in this code.
We start by asking the password.
Then there are two cases:
- The password is correct:
- The script will never enter the while loop because the condition is False.
- In this case, it acts the same way as an if statement.
- The password is incorrect:
- The script will enter the while loop.
- It displays an error and asks again for the password.
- After that, the script comes back to the while line and tries the same Boolean again.
- This loop will never stop until the password is correct.
Don’t forget to change the variables in the while condition inside the loop. Otherwise, you will create an infinite loop.
The execution of this script in Thonny, when the user commits two password errors, looks like this:

For
For is something a little different.
You’ll use it for an already defined sequence of things, not depending on user input or something that evolves over time.
Here’s one example:
Check this: 7 Surprising Uses for a Raspberry Pi
alphabet= ["a", "b", "c"]
for letter in alphabet:
  print(letter)
On the first line, I introduce a new type of variables. It’s a list of elements (like an array in other languages).
The “for” syntax creates a new variable with the current item of your list (I call it “letter”).
Then you can use this variable in the loop code.
Coded in Thonny, you’ll get something like this:
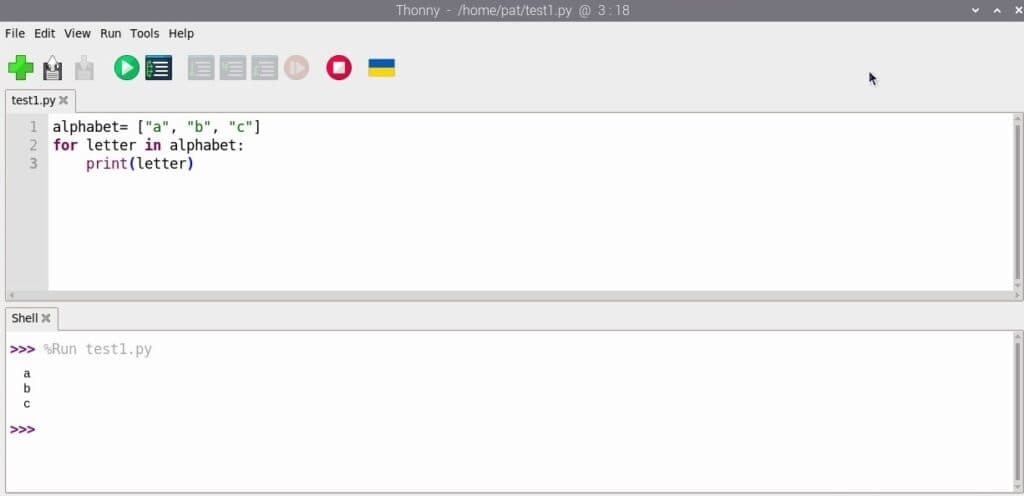
As you can see, the code is executed three times, once for each letter. I wrote only one line of code in the for loop as an example, but there’s no limit—it could be 300 lines.
Going Further
I only went over the basics to introduce loops. There are many other variable types and functions you could use to fit your needs with loops.
For example:
- range(0,10): to execute a loop from 0 to 10
- range(0,100,3): to execute a loop from 0 to 100 but incrementing by 3 each time
- string: to browse letters from a string
You can find more information on for loops in the official Python wiki.
I don’t want to lose everyone here, but there’s one last thing that you may need with loops.
I suggested creating an infinite loop with a clock in the introduction, but I didn’t explain to you how to wait a certain amount of time at each run.
You might also like: Need a clear GPIO pinout diagram? Here's mine.
Here’s how to do this:
import time;

password=input("What's your password?")
while password!="1234":
  print("Error")
  time.sleep(10)
  password=input("What's your password?")

print("Password correct")
As you can see, it’s the same example as above with the password. Except this time, we introduce a 10s wait time before asking for another password (for security reasons for example).
To code this we need to use a Python library and call it with the import syntax.
Libraries provide you with new functions you can use in your script. And so, we use time.sleep in the loop, to wait an extra 10s before asking for a new password.
There are many Python libraries you can use like this one. We’ll see some of them in the next section, but don’t forget to research them before running code that someone else made.
Python Code for Raspberry Pi
Ok, now that we have covered the basics of Python programming, we’ll be able to focus on our main goal: Raspberry Pi projects we can try with some basic Python skills.
Control Cameras With Python
If you have a camera on the camera port of your Raspberry Pi, you can try to control it with Python.
There is a library named “picamera” that allows you to use your camera in a Python script.
Here’s a basic sample including the main functions:
import picamera
with picamera.PiCamera() as camera:
    camera.start_preview()
    camera.capture('/home/pat/Pictures/python.jpg')
    camera.stop_preview()
This script will take one snapshot each time it runs and save the picture in the specified folder.
Download the free PDF, keep it open, and stop wasting time on Google.
Download now
Don’t forget to import the picamera library at the beginning of the script. Then you can use start_preview to start the camera, capture to shoot the picture, and stop_preview to stop the camera.
I made an entire article about cool things to do with a camera on Raspberry Pi. Feel free to read it if you want other examples.
Interact With GPIO Pins Using Python
Another great feature from the Raspberry is the GPIO pins you’ll find on the board. These pins allow you to create an electronic circuit with components like LEDs, buttons or whatever.
You can control GPIO pins and circuits by using Python.
I’m not an expert on this kind of stuff, so I’ll give you a short example using the GPIO Zero library. If you want to learn more about it, you can check out my dedicated guide on the topic.
from gpiozero import LED
from time import sleep

led = LED(17)

while True:
    led.on()
    sleep(1)
    led.off()
    sleep(1)
At the beginning of the script, we import two libraries (gpiozero, for LED management, and time, for the sleep function we learned about earlier).
Then, using the led variable, wet set which GPIO pin to use for the next stage of the script. Finally, we create an infinite loop which makes the LED blink every second.
This entire example doesn’t use many more concepts than those seen in this article.
There are other libraries similar to gpiozero you could use, like pigpio or wiringPi.
To get started, gpiozero may be simpler to understand how it works.
Prerequisites
To start on this kind of electronics project, you’ll need some components to create your circuit.
I recommend getting a kit like this one on Amazon with all the needed stuff. Even if you think that there are too many things in it, it’s so inexpensive that you could use it on your next projects 🙂
If you don’t have a Raspberry Pi yet, Canakit also offers a kit with the Raspberry Pi and some components to get started with electronic circuits. It might be a good deal to start with (check the price on Amazon).
Play With Robot Kits Using Python
Robotics is a great way to learn Python while having fun with your Raspberry Pi. A lot of great robot kits are available on Raspberry Pi (check the link for my favorites). You’ll not only use the camera and GPIO pins, but also various sensors (distance, colors, etc.) and make them move by using various motors.
If you’re confident you can reach a basic level in Python, I highly recommend giving it a try. It’s one of the most fun projects for any Raspberry Pi user. And even if you think Python is hard, most kits have a way to make things work with easier languages, like Scratch and similar visual languages, or even smartphone apps.
Here we are at the end. I hope you learned many things about Python and what you can do with it on Raspberry Pi.
Coding requires practice. If you start learning how to program today, you’ll not be able to make something perfect the first time. You have to try things, learn other and especially do not stop there. If you do nothing in Python in the two next weeks, you will forget everything :/
If you need more ideas to experiment with your new Python skills, I have a good list on this page.
If you prefer watching videos instead of reading tutorials, you’ll love the RaspberryTips Community. I post a new lesson every month (only for members), and you can unlock them all with a 7-day trial for $1.
Related Questions
Why is Python used on Raspberry Pi?
Python is the favored language on Raspberry Pi because everything is already included. As soon as you install your system, you get all Python prerequisites installed, an IDE, and all the needed libraries for your Raspberry Pi.
Should I learn Python as my first coding language?
There are more or less complicated languages to master. Python is one of the easiest to learn. So, it’s not a bad choice. You’ll also learn the basics of algorithmic logic that will help you learn other languages next.
Can you code with other languages on Raspberry Pi?
If your main goal is to develop things on your Raspberry Pi, there are many other languages you could use on it. All languages able to compile on the ARM chip can be used (C, C++, Scratch). You could also take a look at web languages (such as HTML, PHP, or JavaScript).
Whenever you’re ready, here are other ways I can help you:
Test Your Raspberry Pi Level (Free): Not sure why everything takes so long on your Raspberry Pi? Take this free 3-minute assessment and see what’s causing the problems.
The RaspberryTips Community: Need help or want to discuss your Raspberry Pi projects with others who actually get it? Join the RaspberryTips Community and get access to private forums, exclusive lessons, and direct help (try it for just $1).
Master your Raspberry Pi in 30 days: If you are looking for the best tips to become an expert on Raspberry Pi, this book is for you. Learn useful Linux skills and practice multiple projects with step-by-step guides.
Master Python on Raspberry Pi: Create, understand, and improve any Python script for your Raspberry Pi. Learn the essentials step-by-step without losing time understanding useless concepts.
You can also find all my recommendations for tools and hardware on this page.


Nice article as always.
May I also make a few suggestions?
There are tons of free “Learn Python” apps for Android that allow for daily 10 minute exercises.
Also a very popular site with online courses has some excellent courses for Python beginners.
And if you are like me, that is if you hate studying, you can always pick a course that seems interesting and learn Python as a side skill. For example, Python goes very well with simple ethical hacking courses. In no time you learn Linux and Python basics by focusing on something else.