

57 Best Raspberry Pi Commands You Should Know
If you’re new to Raspberry Pi or Linux, I’ve got something that can help you right away!
Download my free Linux commands cheat sheet – it’s a quick reference guide with all the essential commands you’ll need to get things done on your Raspberry Pi. Click here to get it for free!
File Management
The Linux files organization is a tree, starting at the root: /
Each subfolder created under it is accessible starting with /.
For example: /var/log ⇒ log is a subfolder of /var, var is a subfolder in /.

I have a complete article on RaspberryTips giving you more details about this:
How Does the Raspberry Pi File System Work?
Download the free PDF, keep it open, and stop wasting time on Google.
Download now
- cd <path>: Changes directory, go to the specified folder in the files tree.
cd /home/pat - ls: Lists the files and directory in the current or specified folder.
ls /home/pat
ls -latr /home/pat
- mkdir <folder>: Creates a new subfolder in the current or specified folder.
mkdir myfolder
mkdir /home/pat/myfolder - cp <file> <destination>: Copies a file or a directory to another location (to copy a complete directory you need to add the -r parameter for “recursive”).
cp test.txt /home/pat/Documents/
cp /home/pat/test.txt /home/pat/Documents/
cp -r /home/pat/test/ /home/pat/Documents/ - mv <source> <destination>: Moves a file or a directory to another location.
mv /home/pat/test.txt /home/Documents/
mv /home/pat/test/ /home/Documents/ - cat <file>: Displays all the content of the specified file.
cat /home/pat/README.txt - more <file>: Displays the content of the specified file, page per page (enter or space to continue, q to quit).
more /var/log/syslog - tail <file>: Tail allows you to display the end of a file, it’s useful to check new entries in a log file.
tail /var/log/syslogYou can specify the number of lines to display with -n.tail -n20 /var/log/syslogAnd finally, my favorite is the option -f to displays new lines in real-time.tail -f /var/log/syslog - head <file>: It’s the same as tail but to display the beginning of a file.
head /home/pat/file.txt
head -n20 /home/pat/file.txt - grep <string>: Grep is a powerful tool to search string in a text. You can use it to search something in a file or to filter the output of another command or script.
Basic usage:grep dhcp /var/log/syslog
As I say, you can use it on a file or a script output:cat /var/log/syslog | grep dhcp
/home/pat/myscript.sh | grep error
ls -latr | grep php
And finally, there are a lot of options to use with grep, like regular expressions or options to display lines before (-B), after (-A) or around (-C) the search string.
You can also use -v to display everything except the input string.grep 'dhcp|dns' /var/log/syslog
grep -A2 -B4 'Fatal error' /var/log/apache/error.log
grep -v 'Notice' /var/log/apache/error.log
If you like this tool, I recommend you read the man page to know exactly what you can do with it.man grep
And you can also read my dedicated article about grep here. - nano <file>: Nano is text editor. It would need an entire article to go into detail (I have done it since, click here to read more about it ^^).
It allows you to edit a file, and save your changes with (CTRL + O, Enter, CTRL + X).nano /home/pat/myscript.shYou’ll find all actions available at the bottom of the screen.
- rm <file>: Deletes a file. For a folder, add option -rf (recursive and force)
rm monscript.sh
rm -rf /home/pat/scripts/
Be really careful if you are using sudo with this command. Using it on system folders will delete everything without any warning message, and can break your system in a few seconds. - tar -c: You can use tar to store files into an archive. It’s often used with gzip to compress files.
tar -cvfz archive.tar.gz /home/pat/Documents/mydirectory-c: create an archive
Check out my full article on tar here.
-v: verbose
-f: filename of the archive follow
-z: compress files with gzip - tar -x: It’s the same command but to extract files.
tar -xvfz archive.tar.gz
-x: extract an archive - find: As the name suggests, find is useful to locate files on your Raspberry Pi.
find /home/pat -iname *.tar.gzThere are many options to help you find the good file (size, last modification date, …). And if you want to learn options to quickly find a file on Raspberry Pi, you can also read this other article on the topic.
- pwd: Pwd lets you see in which directory you are.
pwd - tree: Another great tool to analyze your current location in the file tree. It will show you the entire lower tree (see the example below).
tree
pat@rpitips:/var/log $ tree
   .
   |-- alternatives.log
   |-- alternatives.log.1
   |-- alternatives.log.2.gz
   |-- apt
   | |-- eipp.log.xz
   | |-- history.log
   | |-- history.log.1.gz
   | |-- history.log.2.gz
   | |-- term.log
   | |-- term.log.1.gz
   | `-- term.log.2.gz
Network Commands
Network Configuration
- ip address: Displays your current network configuration, mainly your IP address if connected.
ip a
That’s the easiest way to find the Raspberry Pi address, but there are other solutions when you don’t have access to it (as I explain in this article). - ping <ip>: Sends a ping packet to another IP on the network to check if the host is alive.
ping 192.168.1.1 - ip link set <interface> up: Enables the specified interface.
sudo ip link set eth0 up - ip link set <interface> down: Disables the specified interface. Can be useful to disable Wi-Fi if you are already connected by cable for example.
sudo ip link set wlan0 down
By the way, it’s a great idea to disable the Wi-Fi interface if you don’t use it. You can find more permanent solutions in this article, but this command is a quick way to do this.
File Transfer and Remote Connection
System Updates
Download the free PDF, keep it open, and stop wasting time on Google.
Download now
- apt update: Downloads the last repository version for each one you have in your configuration (/etc/apt/sources.list).
sudo apt update
- apt upgrade: Updates all installed packages if needed.
sudo apt upgrade - rpi-update: Only use this if you know what you’re doing.
This command will update everything on your Raspberry Pi (firmware, packages, etc.) and can potentially break something.rpi-update
Package Management
- apt install <package>: Installs the specified package(s).
sudo apt install phpmyadmin
sudo apt install vim htop - apt remove <package>: Removes a previously selected package.
sudo apt remove vim - apt search <search>: Searches for a package name in the packages list (repository).
sudo apt search myadmin
sudo apt search php
- dpkg -l: Lists all installed packages on your system. You can use grep to find a specific package.
dpkg -l
dpkg -l | grep myadmin
Note: If you want to see all these commands in action, I have a video lesson available for the community members. You can join here and watch it directly if you are interested (with 30+ other lessons for Raspberry Pi and many other benefits).
System Management
Download the free PDF, keep it open, and stop wasting time on Google.
Download now
- reboot: As the name says, this command will restart the Raspberry Pi immediately.
sudo reboot - shutdown -h now: This is to stop the Raspberry Pi immediately.
sudo shutdown -h nowYou can replace “now” by a specific time (shutdown -h 12:05). Don’t use the power switch to stop your Raspberry, you should do it properly by using this command or one of the other methods explained here and there.
- service <servicename> <action>: This command allows you to start or stop services.
service apache2 start
service apache2 stop
Sometimes there are other options, depending on the service, for example:service apache2 reload
service apache2 restart
Don’t type any action to see all those available:service apache2
For information, you can also use systemctl to do the same thing, on Raspberry Pi OS you have the choice, but on some systems it’s only systemctl. - update-rc.d <service> <action>: On Debian, this command allows you to manage the service start or stop on the system boot.
To start a service on boot:sudo update-rc.d ssh enableTo disable start of the service:sudo update-rc.d -f ssh removeThe -f option is here to force the symbolic link deletion. This command is only for service. To start other scripts or commands on boot, you have to edit the /etc/rc.local file.sudo nano /etc/rc.local - ps: This command displays all running process on your Raspberry Pi.
The basic command is this one to display everything:ps auxYou can also display process started by a specific user:ps -u pi
This will give you a list like this:
The process ID (PID) can be useful for other commands, to stop it for example (next command). - kill <pid>: The kill command allows you to terminate a process. You’ll need the process ID to do this (see the previous command).
kill 12345Sometime you may need to use the -9 option to force all related commands to stop.
For example, if you run 20 commands in a script and kill it, it’ll continue to the next line, not exit the program, except if you use the -9 option.kill -9 12345You can also use killall to stop all occurrences of a program.
killall phpThis command will stop all PHP scripts.
Be aware that this command will immediately stop the process asked, no matter what was going on. It isn’t a clean stop.You don’t know what the script is doing so it can damage data or corrupt files.
This should be used as a last step, and if possible on the non-critical process.
Check my full guide about the “kill” command here. - htop: This tool is an alternative to top. It’s more user-friendly than top, with colors and dynamic load bars.
htop - df: Displays the partition list, with the disk space used and available for each one.
df
df -h
-h option is for the human-readable format.
- vcgencmd measure_temp: You may not remember it, but this command displays the current CPU temperature.
vcgencmd measure_temp
Raspberry Pi OS Commands
- raspi-config: This tool allows you to manage all the configuration from a terminal or an SSH connection.
sudo raspi-config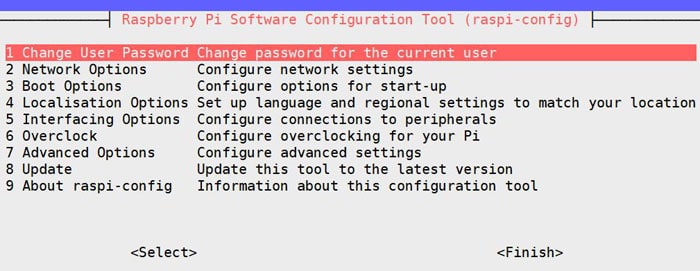
Check out my full guide on raspi-config here. - rpicam-still: If you have a camera plugged in the camera module, this command takes a shot and saves it as an image file.
rpicam-still -o image.jpg
Note: On older Raspberry Pi OS versions, the commands were libcamera-still or raspistill. For the next command, the old commands were libcamera-vid and raspivid. - rpicam-vid: It’s the same command but it captures video from the camera.
rpicam-vid -o video.h264 -t 10000-t parameter is the time of the capture in milliseconds.
Note: The commands raspividyuv / raspiyuv have also been replaced by rpicam-vid. So to get a raw YUV video stream, you’d need a command like this:rpicam-vid -t 10000 --codec yuv420 -o test.data - raspi-gpio: This command allows you to manage the Raspberry Pi’s GPIO pins, which are often used with accessories. You can either set or get a value.
raspi-gpio get
raspi-gpio get 20
raspi-gpio set 20 a5
raspi-gpio set 20 op pn dh - rpi-update: Only use this if you know what you are doing. This will update everything on your Raspberry Pi (firmware, packages, …) and can potentially break something.
sudo rpi-update
Misc Commands
- history: Linux store any command you type in an archive file. History is the command to use to display this list.
history
You can also clear all the history.history -cOr clear one specific entry.history -d 12
Read my guide about the “history” command here for more details and all the options. - crontab: Cron is a tool to schedule tasks on a Raspberry Pi. Crontab is the file where you enter lines for each task to run.
crontab -lcrontab -e-l option to display lines.
-e option to edit lines.You can use sudo before to schedule tasks to run with root privileges.
I have an entire tutorial on this topic if you need more information. - screen: This tool allows you to let something run in the background even if you close your session.
screen -s <name>screen -r <name>-s option to start a new screen with the following name.
Need more? The ‘screen’ Command on Linux: A Beginner’s Guide
-r option to resume a running screen with this name.
You can forget the name if you want, an ID will be generated, use screen -r to find it and screen -r <ID> to resume it.
With only one screen running, screen -r will resume it directly.
If this project doesn’t work as expected on your setup, don’t worry. You can get help directly from me and other Pi users inside the RaspberryTips Community. Try it for $1 and fix it together.
Warrior Commands
Download the free PDF, keep it open, and stop wasting time on Google.
Download now
Check this: 15 Easy Projects for Raspberry Pi Beginners
history | awk '{CMD[$2]++;count++;}END { for (a in CMD)print CMD[a] " " CMD[a]/count*100 "% " a;}' | grep -v "./" | column -c3 -s " " -t | sort -nr | nl | head -n10
- How To Mount a USB Drive On The Raspberry Pi (3 ways)
- Install Bitwarden on Raspberry Pi: The ultimate guide
- How to Install MariaDB on Raspberry Pi? (MySQL Server)
Whenever you’re ready, here are other ways I can help you:
Test Your Raspberry Pi Level (Free): Not sure why everything takes so long on your Raspberry Pi? Take this free 3-minute assessment and see what’s causing the problems.
The RaspberryTips Community: Need help or want to discuss your Raspberry Pi projects with others who actually get it? Join the RaspberryTips Community and get access to private forums, exclusive lessons, and direct help (try it for just $1).
Master your Raspberry Pi in 30 days: If you are looking for the best tips to become an expert on Raspberry Pi, this book is for you. Learn useful Linux skills and practice multiple projects with step-by-step guides.
Master Python on Raspberry Pi: Create, understand, and improve any Python script for your Raspberry Pi. Learn the essentials step-by-step without losing time understanding useless concepts.
You can also find all my recommendations for tools and hardware on this page.


Might be nice to title this so that it’s specific to Linux / Raspbian (I understand some of these commands are not exclusive to Raspbian though) — this is a really nice article, but really useless on my Win 10 IoT install. 🙂
why are you on a site called raspberrytips.com looking for windows 10 IOT articles anyway Alex?
great but i need help..
https://i.imgur.com/NzQr2RT.png
how to fix
You’re using Arch Linux. It doesn’t use apt-get, it uses pacman. Check arch Linux wiki for help. (Search there for “sudo” to get help with the sudoers file as well)
What about adding to “Misc” part ability to execute command from history list by typing “!123” for example which will execute history line 123 without the need to re-type or copy/paste ? That is neat feature.
Is there a command or path that will allow to change the monitor timeout? I have searched the web from end to end and everything i have found does not work
Thank you
Do these also work on NanoPi M4?
I would like to know, how l can define the location where the data has to be stored
It is a RPi B+, os raspbian-stretch, mysql / mariaDB, sdb2 is a usb ssd 240G mounted (/dev/media/pi/)
After several reading literature and tests, I’m not able to find the way to declare the storage location
Hello Max,
To my knowledge you have two options
1/ datadir option in mariadb configuration:
– stop mysql
– move the /var/lib/mysql files to the new location
– edit the configuration file: sudo nano /etc/mysql/mariadb.conf.d/50-server.cnf
– find the datadir line and replace “datadir = /var/lib/mysql” with the new path
– start mysql
2/ symbolic link
– stop mysql
– mv the /var/lib/mysql folder to the new location
– delete the /var/lib/mysql folder
– create a symbolic link to the new location (with ln -s)
– start mysql
If the first is not working, the second could be an option
Did you already tried both?
Quite a nice guide! Some commands I never encountered before that seem very useful.
Thanks, Peter 🙂