Raspberry Pi Pico vs Arduino: Which One Should You Use?
I’ve worked on tons of IoT projects, and every time we need a microcontroller, the same debate comes up: Raspberry Pi Pico or Arduino? In this article, I’ll break down the key differences and share what I’ve learned from using both.
The Raspberry Pi Pico and Arduino are both affordable microcontrollers, but they differ in power and flexibility. Raspberry Pi Pico offers more power, RAM, and MicroPython support, while Arduino excels in low-power use and a mature, beginner-friendly ecosystem.
That was just a short answer. In the sections below, I am going to expound on each point and also give you a decision tree that will help you in selecting the right microcontroller for your project.
If you’re feeling lost in all the Raspberry Pi jargon, I’ve got something to help you out. I’ve created a free glossary that explains all the essential terms and abbreviations in a way that’s easy to understand. It’s a great resource to have by your side. Get your free copy here.
Raspberry Pi Pico vs Arduino: Key Differences
Both the Raspberry Pi Pico and Arduino are popular choices for microcontroller projects. To give you a better understanding of how they differ, I’ll walk you through what sets them apart. From processing power and connectivity options to the programming languages they use.
Processor & Performance
For this section, I will start with the Raspberry Pi Pico since currently, there aren’t many models out there compared to the Arduino.
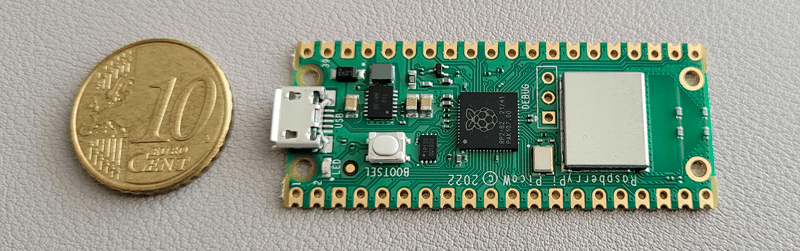
One thing you need to note is that there are a total of four primary variants for the Raspberry Pi Pico: the original Raspberry Pi Pico, its successor, Raspberry Pi Pico 2, and their respective wireless versions, Pico W and Pico 2W. Additional options include the Pico H and Pico WH, which are the original Pico and Pico W with pre-soldered pin headers for easier use.
When it comes to processors, the original Raspberry Pi Pico and Raspberry Pi Pico 2 use different processors.
The Raspberry Pi Pico uses the RP2040 processor. A custom-designed dual-core ARM Cortex-M0+ chip running at up to 133 MHz. It comes with 264 KB of SRAM and 2 MB of onboard flash storage.
The Raspberry Pi Pico 2, on the other hand, boasts even more impressive features. It offers higher clock speeds, increased memory, enhanced security, and improved interface capabilities compared to the original Pico.
The Raspberry Pi Pico 2 features the RP2350 processor, which offers selectable dual-core ARM Cortex-M33 or RISC-V cores, 520 KB of RAM, and 4 MB of flash memory.

To better understand the difference between the Raspberry Pi Pico series and the Arduino, I want you to take note of the figures like RAM, processor speed, and storage. If you find that quite hard, you can refer to the comparison table where I have summarised everything for you.
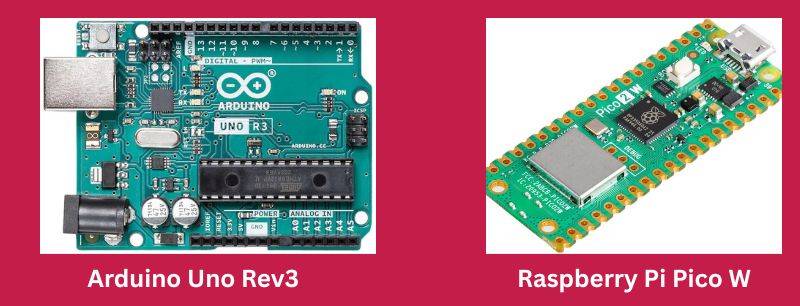
Unlike the Raspberry Pi Pico, Arduino comes in many different models.
Older and more popular Arduino models – like the Uno – run on Atmel chips such as the ATmega328P, an 8-bit microcontroller running at 16 MHz with just 2 KB of SRAM and 32 KB of flash storage. It’s nowhere near today’s high-speed standards, but it’s a proven, rock-solid chip that powers countless Arduino projects.
Newer Arduinos have started moving to ARM processors. Boards like the Nano 33 use 32-bit Arm Cortex-M0 chips, and at the very top of the line, the Portenta H7 boasts a dual-core Arm Cortex-M7 + M4 running up to 480 MHz with 1 MB of RAM and 2 MB of flash. It’s a powerhouse—but it also costs over $100, which is way more than most hobbyists need for basic projects.
You might also like: Looking for a fun challenge? Start building your first Raspberry Pi robot!
| Feature | Raspberry Pi Pico | Raspberry Pi Pico 2 | Arduino Uno | Arduino Portenta H7 |
| Processor | RP2040 (Dual-core ARM Cortex-M0+) | RP2350 (Dual-core ARM Cortex-M33 or RISC-V) | ATmega328P (8-bit AVR) | Dual-core ARM Cortex-M7 + M4 |
| Clock Speed | Up to 133 MHz | Up to 150 MHz | 16 MHz | Up to 480 MHz |
| RAM | 264 KB SRAM | 520 KB SRAM | 2 KB SRAM | 1 KB SRAM |
| Flash Storage | 2 MB | 4 MB | 32 KB | 2 MB |
When you look at this table, it’s evident that the Raspberry Pi Pico series clearly outperforms entry-level Arduino boards in raw power, memory, and speed while remaining affordable. However, high-end Arduinos like the Portenta H7 push performance even further, though at a much higher cost.
Connectivity
Whenever you are working on any project, the first thing I will advise you on is that you should always check what connectivity options you intend to use. And here, I am mainly referring to the two most popular wireless connections – Bluetooth and WiFi.
The original Raspberry Pi Pico doesn’t include any built-in wireless features. However, Raspberry Pi later introduced the Raspberry Pi Pico W and Raspberry Pi Pico 2W, both of which come with onboard Wi-Fi (2.4 GHz) using the Infineon CYW43439 chip. These models make it incredibly easy to connect your projects to the internet without needing any extra hardware.
If you are lost in all these new words and abbreviations, request my free Raspberry Pi glossary here (PDF format)!
Download now
Now, that is the same case with Bluetooth support. The original Raspberry Pi Pico and Pico H do not include Bluetooth support. However, Raspberry Pi Pico W, Pico WH, and Raspberry Pi Pico 2 W include the Infineon CYW43439 wireless chip, which supports Bluetooth 5.2.
But one thing you need to note is that although some Raspberry Pi Pico boards don’t include built-in Bluetooth, you can still add it using an external Bluetooth module like the HC-05 or HM-10 Bluetooth modules. These are connected through the Pico’s UART (TX/RX) pins.
Arduino boards, on the other hand, are not much different from the Raspberry Pi Pico in that some boards support various connectivity options (Bluetooth & WiFi), while others don’t.
The Arduino Uno (including the standard R3 version), for example, has no built-in wireless connectivity. That means, no Wi-Fi, no Bluetooth, and no Ethernet by default.
Check this: 15 Easy Projects for Raspberry Pi Beginners
If you want wireless capabilities on the Uno, you have to use:
- A Wi-Fi or Bluetooth shield.
- A Bluetooth module (like HC-05 or HM-10).
However, modern Arduino boards, such as the Arduino Nano 33 IoT and Arduino Portenta H7, come with both Wi-Fi and Bluetooth capabilities right out of the box. Some advanced Arduino boards, such as the Arduino MKR GSM 1400 and Arduino MKR WAN 1310, come with built-in cellular and LoRa connectivity.
You can also add Ethernet support using accessories like the MKR ETH Shield.
Input / Output (GPIO & Interfaces)
The next feature that we will look at is how these tiny boards come to life is how they interact with the physical world. Whether you’re reading data from a sensor, driving a motor, or lighting up an LED display, it all comes down to input and output.
Both the Raspberry Pi Pico and Arduino are well-equipped for this kind of work.
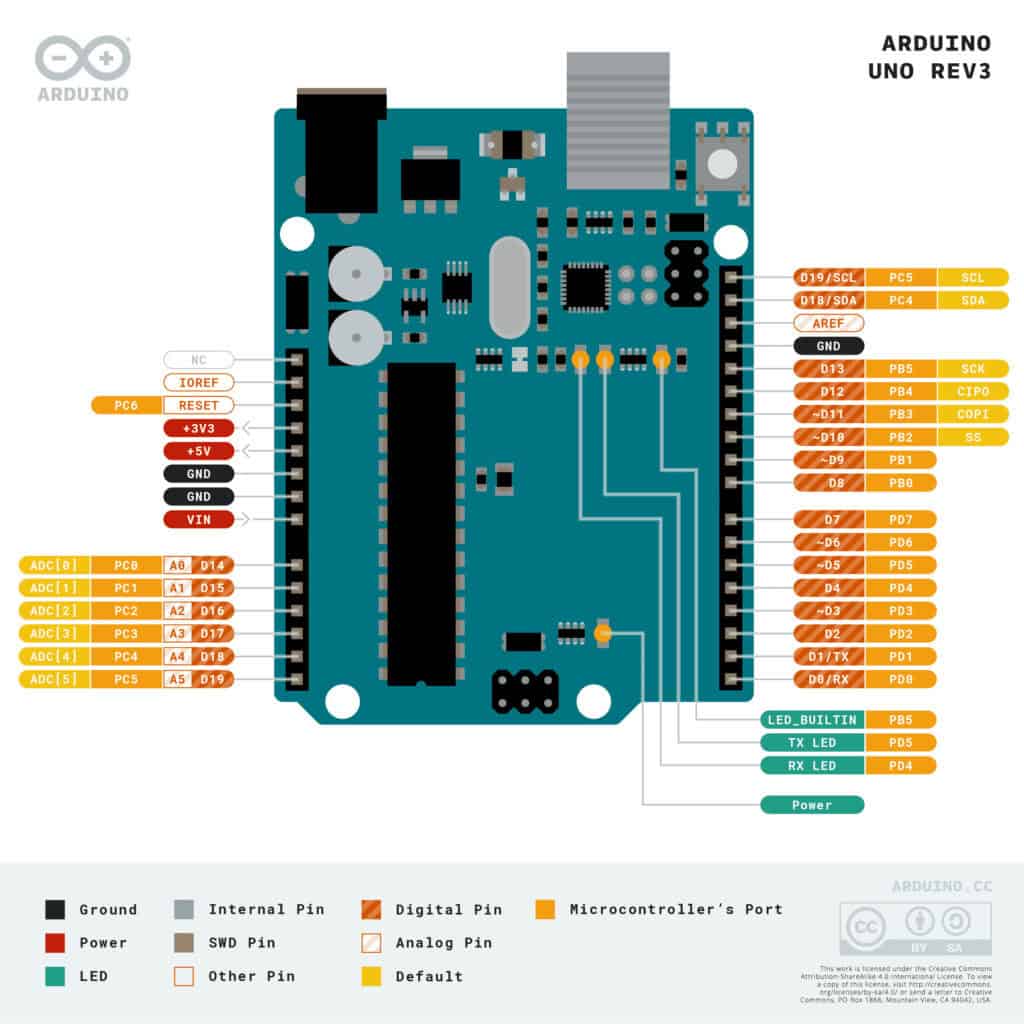
Starting with the Arduino Uno, it operates at 5V logic and comes with 14 digital pins (6 of which support PWM output) and 6 analog input pins for reading sensors or variable signals. It’s simple, predictable, and works great with the vast ecosystem of Arduino-compatible sensors and shields out there.
Now, when you look at the Raspberry Pi Pico pinout diagram, things get a bit more exciting. It operates at 3.3V logic and gives you access to a whopping 26 GPIO pins. Out of these, 3 can be used as analog inputs and up to 16 can output PWM signals, which gives you a lot more flexibility when controlling devices like motors, LEDs, or servos.
Another thing I really like about the Pico is its 12-bit ADC resolution, compared to the 10-bit resolution on the Uno. This means the Pico can measure analog signals with finer precision, and it also samples them much faster (around 500 kHz versus 125 kHz on the Uno).
In terms of serial communication, both boards support UART, I²C, and SPI, so you can connect all sorts of external components. However, the Pico gives you more channels for each of these protocols, making it a better choice if your project involves multiple peripherals that need to talk to each other at the same time.
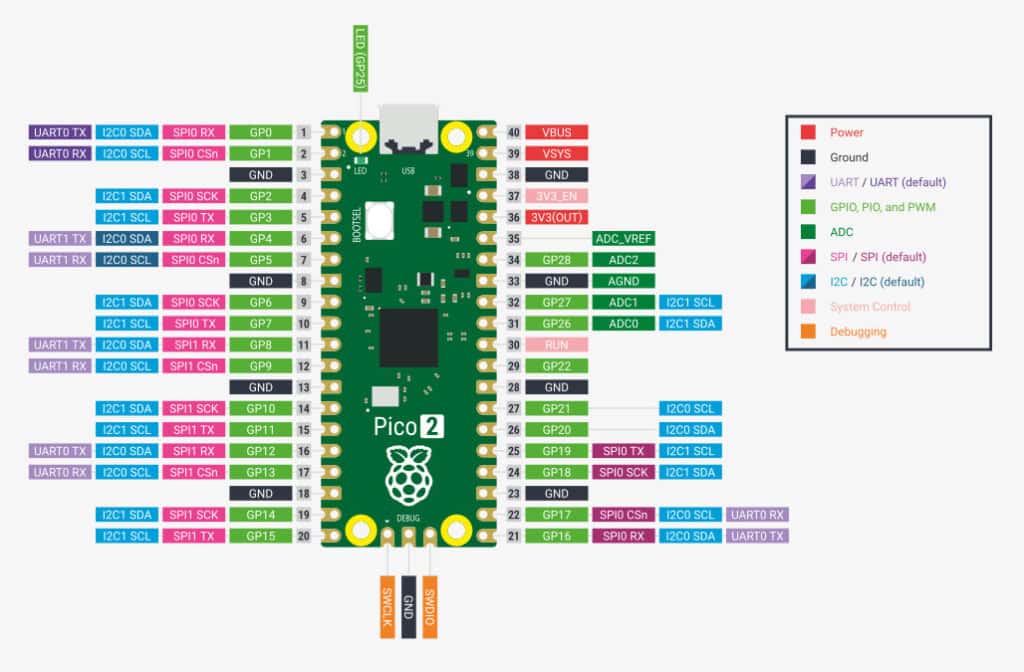
But what really sets the Pico apart, and this is something you won’t find on an Arduino Uno, is its Programmable I/O (PIO) feature. It comes with eight independent state machines that can be programmed to handle custom communication protocols or timing-critical tasks. You can use these to offload work from the main processor, or even do advanced things like generating video signals or controlling unusual sensors that don’t have standard interfaces.
So, if you’re planning a project that needs more flexibility, precision, or advanced control, the Raspberry Pi Pico gives you a lot more room to grow. But if you just want something straightforward and widely supported, the Arduino Uno still does a great job.
Power & Power Modes
Power is one of those things you don’t think about much until your board suddenly resets in the middle of a project. I’ve been there. The good news is, both the Arduino Uno and the Raspberry Pi Pico give you a few different ways to keep things running smoothly.
If you are lost in all these new words and abbreviations, request my free Raspberry Pi glossary here (PDF format)!
Download now
Let’s start with the Uno. It can be powered directly through the USB port (5 V), or you can use a barrel jack for external power anywhere from 7 V to 12 V. The board automatically switches between the two depending on what’s plugged in, so you don’t have to worry about damaging it.
It also has an onboard voltage regulator, which steps things down cleanly to the levels the microcontroller needs. This article talks more about various ways you can use to power your Arduino board.
The Pico, on the other hand, is more flexible when it comes to power options but requires a bit more care. You can power it through the micro-USB port or directly via the VSYS pin (1.8 V – 5.5 V). That means it can run from batteries, power banks, or even a regulated 3.3 V source.
And if you’re going for low-power projects, the Pico really shines. It supports different sleep modes where you can drastically cut power consumption, ideal for sensors or IoT nodes that spend most of their time idle.
However, keep in mind that the Uno doesn’t support deep sleep natively. At least not in the way the Pico does. You can use code tricks to save a bit of energy, but it’s not built with ultra-low-power in mind. The Pico’s RP2040 chip, on the other hand, can go down to microamp-level currents when sleeping, which makes it perfect for battery-powered setups.
Tip: If your project plugs into the wall or a stable USB source, the Uno’s simplicity wins. But if you’re thinking about portable or power-sensitive designs, the Pico gives you way more control over how much juice you use.
Coding Raspberry Pi Pico vs Arduino
When it comes to coding, this is where you’ll probably notice the biggest difference between the Raspberry Pi Pico and Arduino boards.
If you’ve ever used an Arduino board before, you already know how beginner-friendly the Arduino IDE is. You write your code (called a “sketch”), click Upload, and the IDE compiles and flashes it to your board. Everything happens seamlessly. That is actually one of the reasons Arduino is still one of the best choices for beginners.
The Raspberry Pi Pico, on the other hand, gives you more flexibility. You can program it in C/C++ (using the official SDK) or MicroPython, depending on your comfort level. Personally, I like MicroPython for quick prototyping.
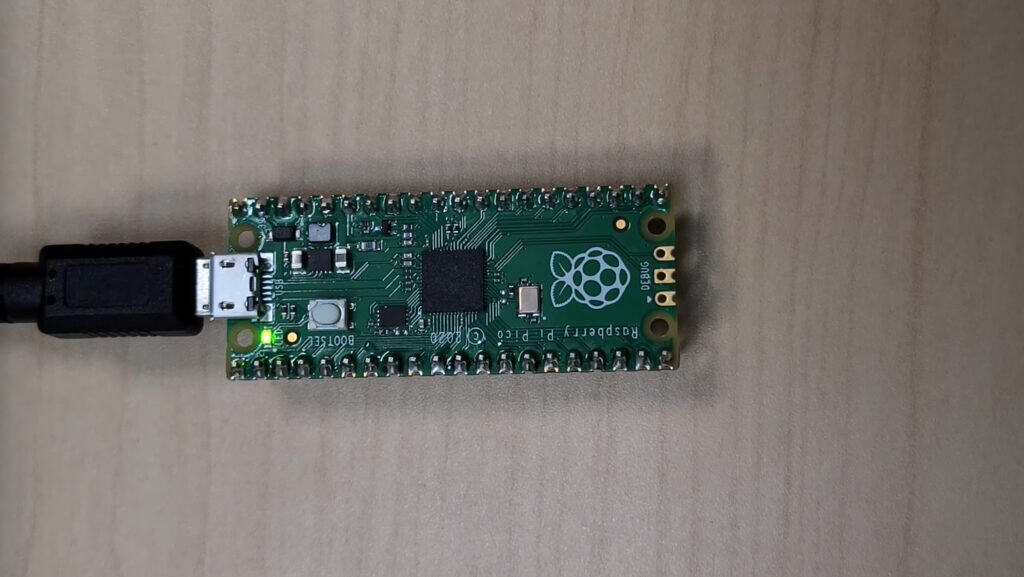
You just plug in the Pico, open Thonny IDE, and start writing code interactively. You don’t even need to compile or flash manually; it’s as simple as saving your file to the board. You can check out our article on getting started with Raspberry Pi Pico, where we guide you through the normal setup and writing your first script using MicroPython to blink the onboard LED, as shown below.

But here’s where things get interesting. If you want maximum performance and speed, for example, handling time-critical tasks or working with the PIO state machines, then C/C++ is the way to go. It’s more complex to set up, but you get finer control over the hardware.
Arduino also now supports MicroPython on some boards, but it’s not as polished or widely used as the traditional Arduino IDE workflow.
Add-Ons and Compatibility
One of the best things about using boards like the Raspberry Pi Pico or Arduino is how easily you can expand what they do. Once you get the basics running, you’ll almost always find yourself adding sensors, displays, motors, or even wireless modules, and that’s where compatibility really starts to matter.
Let’s start with Arduino.
Arduino boards have been around for years, which means there’s a massive ecosystem of shields (add-on boards that stack right on top of your Arduino). Whether you want to add Wi-Fi, GPS, motor control, or a touchscreen display, there’s almost always a shield for that.
And the best part? Most of them are plug-and-play. You just attach the shield, include a library, and you’re good to go. The image below shows an Arduino board with stacked-up shields.
Download the free PDF, keep it open, and stop wasting time on Google.
Download now
Also: 25 project ideas you can try at home with Raspberry Pi

The Raspberry Pi Pico, being newer, doesn’t use shields in the same traditional sense. Instead, it relies on add-on boards, HATs, or expansion modules that connect via the pin headers or through breadboards.
You’ll find everything from motor driver boards to sensor kits and even tiny displays designed specifically for the Pico. It’s very breadboard-friendly, which makes it a great option if you like prototyping and experimenting with different setups.
When it comes to third-party support, both platforms are well-covered. But I’d say Arduino still has a slight advantage — simply because it’s been around longer, and almost every sensor or module you’ll find online has an Arduino example to get you started.
That said, the Raspberry Pi Pico’s community is catching up fast, and there’s now a growing collection of MicroPython and C/C++ libraries for it.
If you prefer official accessories, Arduino has its own line of official shields and expansion boards. The Raspberry Pi Pico also has official add-ons, such as the Pico Debug Probe and the Pico Display Pack. Still, most of its expansion ecosystem is community-driven, meaning you’ll often find creative, affordable, and open-source options from third-party makers.
How much do they cost?
When it comes to price, the Raspberry Pi Pico is definitely the more budget-friendly option. The original Raspberry Pi Pico usually goes for around $4, while the Pico W (with built-in Wi-Fi) costs a few dollars more. Even the newer Raspberry Pi Pico 2W, which adds more power and Bluetooth 5.2, still stays well under $10.
Arduino boards, on the other hand, can vary quite a bit in price. The classic Arduino Uno costs around $20, while smaller boards like the Arduino Nano can be found for a bit less. If you’re looking at advanced models like the Portenta H7 or MKR series, expect prices to climb above $70–$100, depending on the features you need.
In short, if you’re on a budget or just getting started, the Raspberry Pi Pico series gives you incredible value for money. But if you need long-term ecosystem support, more add-ons, and official hardware reliability, Arduino boards might justify the higher price tag.
Note: Prices mentioned are approximate and can vary depending on availability, supplier, or region. During periods of supply shortages, such as the COVID-19 pandemic, Raspberry Pi boards experienced significant price increases, sometimes doubling or even tripling in cost.
Community & Learning Resources
If you’ve ever gotten stuck in a project (and trust me, you will at some point), the strength of the community can make a huge difference.
Arduino has been around for well over a decade, and that means an enormous community of makers, hobbyists, teachers, and engineers. You’ll find thousands of tutorials, YouTube guides, and ready-to-use code examples covering almost any project you can think of.
Plus, most sensors and modules you buy online already come with Arduino code examples, so you can get things working fast.
The Raspberry Pi Pico, on the other hand, is much newer, but it’s growing fast. The Raspberry Pi Foundation has done an amazing job with official documentation and MicroPython examples, and you’ll find plenty of active discussions on forums like Reddit and the Raspberry Pi community page.
Still, some very niche sensors or modules may not have as many Pico-specific examples yet, so you might have to adapt Arduino code manually (which is often pretty simple).
Want even more ideas? I put together a free resource with over 75 Raspberry Pi project ideas, each with a quick description, tutorial link, and hardware requirements. Whether you’re just starting out or looking for something to do this weekend, this list will keep you busy for a while. Just click here to get instant access.
If this project doesn’t work as expected on your setup, don’t worry. You can get help directly from me and other Pi users inside the RaspberryTips Community. Try it for $1 and fix it together.
7 Tips to Help You Choose Between Raspberry Pi Pico and Arduino
Download the free PDF, keep it open, and stop wasting time on Google.
Download now
At this point, you’ve probably realized there’s no single “best” board. It all depends on what you’re building and what you value most. Here are a few things I always consider before picking one over the other.
1. Connectivity
If you need built-in Wi-Fi or Bluetooth, the Raspberry Pi Pico W or Pico 2W makes it simple and affordable.
Arduino also offers wireless models (such as the Nano 33 IoT), but they’re pricier.
If you’re using something like the Arduino Uno, you’ll need an external shield or module for wireless features.
2. Power Consumption
For battery-powered projects, the Raspberry Pi Pico is the clear winner. It supports deep sleep and ultra-low-power modes that Arduino boards don’t natively offer.
But if your project stays plugged into a wall or USB power, an Arduino Uno is perfectly fine.
3. Performance
If your project involves more demanding tasks — like real-time control, multiple sensors, or complex logic — go with the Raspberry Pi Pico 2. It has a dual-core processor, more RAM, and better speed than most Arduinos in its price range.
However, if you need serious performance (and have the budget), the Arduino Portenta H7 is a beast.
4. Programming Style
If you love Python, you’ll feel right at home with the Raspberry Pi Pico and MicroPython.
If you prefer C++ or want to stick to the Arduino IDE for its simplicity, Arduino is still unbeatable for beginners.
5. Expansion and Add-Ons
If you plan to use ready-made shields (Wi-Fi, motor drivers, displays, etc.), Arduino has a huge head start.
If you prefer breadboarding and experimenting with sensors and wires, the Pico is more flexible and cheaper to tinker with.
6. Budget
If cost is a major factor, the Raspberry Pi Pico is almost impossible to beat. It’s small, powerful, and sells for around $4–$7, while most Arduino boards start at around $20.
7. Community and Learning
If you want tons of tutorials, code examples, and help online, Arduino still has the larger community. It’s been around longer and is beginner-focused.
That said, the Pico community is growing fast, and Raspberry Pi’s official documentation is some of the best I’ve seen.
Overall, when you look at these two boards (Raspberry Pi Pico and Arduino), they are both great options for electronic projects. However, they tend to cater to slightly different needs. For example, the Pico offers more processing power and flexibility for those who enjoy coding in MicroPython or C/C++, while Arduino boards still shine in their simplicity and long-standing beginner-friendly community.
But if you have been an active Raspberry Pi user, you can say with certainty that its community has also grown rapidly. Nowadays, there are countless tutorials, libraries, and active forums — making it nearly as beginner-friendly as Arduino today.
Before starting any project, you can try to analyze your project’s needs and aims. For example, if you need Wi-Fi, Bluetooth, or more advanced control, the Pico W or Pico 2W are fantastic low-cost choices, while the Arduino Uno or Nano remain solid picks for quick, straightforward projects. In this article, we have listed some of the best Raspberry Pi Pico projects you can get started with.
Whenever you’re ready, here are other ways I can help you:
Test Your Raspberry Pi Level (Free): Not sure why everything takes so long on your Raspberry Pi? Take this free 3-minute assessment and see what’s causing the problems.
The RaspberryTips Community: Need help or want to discuss your Raspberry Pi projects with others who actually get it? Join the RaspberryTips Community and get access to private forums, exclusive lessons, and direct help (try it for just $1).
Master your Raspberry Pi in 30 days: If you are looking for the best tips to become an expert on Raspberry Pi, this book is for you. Learn useful Linux skills and practice multiple projects with step-by-step guides.
Master Python on Raspberry Pi: Create, understand, and improve any Python script for your Raspberry Pi. Learn the essentials step-by-step without losing time understanding useless concepts.
You can also find all my recommendations for tools and hardware on this page.