How to Set Up the Raspberry Pi TV HAT: A Step-by-Step Guide
I recently tested the Raspberry Pi TV HAT and thought I would share my story with you. It didn’t all go as smoothly as I expected, but I finally have a good setup. I will tell you everything you need to know about this nice little add-on for your Pi.
As the name suggests, the Raspberry Pi TV HAT is an expansion card for all Raspberry Pi models that allows access to live TV streams. It can be configured to work with Raspberry Pi, but it’s recommended to use it with more specialized distributions such as LibreElec.
We’ll start with some theory, and then I’ll show you my current setup so you can easily replicate it at home. We’ll end with a Q&A if you want to try other things, as there are many options. Let’s do it!
If you’re new to Raspberry Pi or Linux, I’ve got something that can help you right away!
Download my free Linux commands cheat sheet – it’s a quick reference guide with all the essential commands you’ll need to get things done on your Raspberry Pi. Click here to get it for free!
What is the Raspberry Pi TV HAT?
Before being too technical, let’s introduce the product, what you need to begin and what to expect.
Overview

The TV HAT is manufactured by the Raspberry Pi Foundation and was released in October 2018. Like all Raspberry Pi HATs, it can be plugged into the GPIO pins of any Raspberry Pi model to add TV reception capabilities to your device.
It’s affordable (check the current price here) and easy to plug. It connects to a TV antenna cable to receive and watch TV channels directly on your Raspberry Pi.
You might also like: Turn your Raspberry Pi into a money-making machine
As a side note, you can obviously receive and view television on the Raspberry Pi directly (I’ll show you how), but it can also be used to stream it to other devices on your network (other computers and mobile devices).
The Raspberry Pi TV HAT is not a new product, I’m late reviewing it, but I wanted to review it for my best Raspberry Pi HATs article, and I had a small need: I wanted to see if I could still use my wall antenna to stream TV before buying a new TV (I haven’t had one in years, so no TV box).
If you want to give it a try, there are a few things you need to know.
Download the free PDF, keep it open, and stop wasting time on Google.
Download now
Compatibility & Requirements
As all products shipped by the Raspberry Pi manufacturer itself, you can expect excellent compatibility with all Raspberry Pi models. It’s not plug-and-play, but it’s not far off.
The TV HAT has a form factor that is half the size of most other HATs, which means it fits perfectly on Raspberry Pi Zero boards. So whether you want to connect it to a Pi Zero or more traditional models (like my Pi 5 below), it should work fine and have a compact design.

If you plan to watch TV directly on the Raspberry Pi, I recommend using a newer model like a Raspberry Pi 4 or Raspberry Pi 5. Even though we’ll use a lightweight operating system, it needs some processing power to stream smoothly.
If you only stream to other devices, a Pi Zero 2 is probably good enough.
Other than that, you don’t need much, a typical setup will do: a good power supply, a decent SD card for the system, and a display cable to connect the Pi to your monitor or TV. You can check my current recommendations for all of this here if you need anything.
Supported Regions: One important thing to know is that the TV HAT only supports DVB-T broadcast transmission standards. That means the TV HAT works in Europe, Africa, Australia, and most parts of Asia.
However, other TV broadcast standards aren’t supported. Generally, the TV HAT will NOT work in places like North America, South America, or China. See map below.

How to Set Up the Raspberry Pi TV HAT the Right Way
As mentioned in the introduction, I’ve tested a few solutions for watching TV on my Raspberry Pi. The best setup I’ve found is to start with LibreELEC, using Kodi to install the necessary plugins and watch TV smoothly from its intuitive interface. I’ll show you how to set this up the same way in a few steps.
Note: It’s possible to use the Raspberry Pi TV HAT directly on Raspberry Pi OS, with a web interface. Configuration steps will be the same, but I didn’t have a good experience, so I won’t talk about it. If you want to use Raspberry Pi OS, check out the documentation for the tvheadend package online.
Download the free PDF, keep it open, and stop wasting time on Google.
Download now
Setting Up LibreELEC
When building a media center with a Raspberry Pi, LibreELEC is now my default choice. It is super lightweight, does everything you need, and of course, works well with the TV HAT.
I won’t go through all the installation steps here, as I have a dedicated tutorial on how to install LibreELEC on your Raspberry Pi, but basically, it’s now available in the Raspberry Pi Imager, so you can flash it in a few clicks like most other supported distributions.
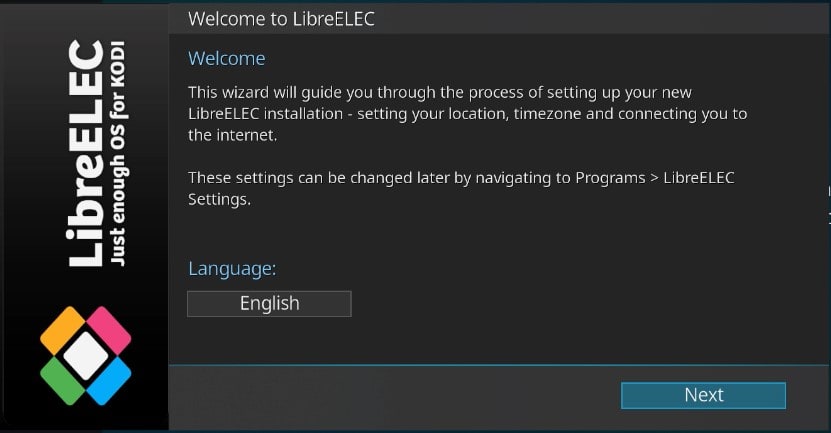
Start by installing it, configuring the main settings, and most importantly, making sure you have Internet access to it, as we’ll need to download and install a few add-ons. Once done, you can keep reading this guide.
Installing LibreELEC Add-ons
LibreELEC is installed with the minimum requirements (basically: nothing), so the TV HAT won’t be natively detected, and you’ll need to install two add-ons to make it work in Kodi.
Note: Want to see how to customize Kodi with add-ons and bonus repositories? I have a video on this topic just for community members. Join here to watch, and get access to 30+ other lessons for Raspberry Pi along with many other benefits!
The first thing you need is a PVR client working with the TV HAT, here is the one I used:
- Go to “Settings” (the wheel icon at the top of the left menu).
- Go to “Add-ons” and click on “Install from repository“.

- Select the “LibreELEC Add-ons” repository, and open the category “PVR Clients“.
- Find “TVheadend HTSP Client” and install it.

The second add-on you need is the server part. It’s almost the same steps, but it’s in the “Services” category instead of “PVR Clients”. Find “Tvheadend Server 4.3” (or an updated version) and install it.

Configuring TVHeadend
Maybe you’re too young to remember, but back in the day, TVs weren’t as plug-and-play as they are today. You had to plug in the antenna cable and then begin the slow process of searching for channels in your area.
Download the free PDF, keep it open, and stop wasting time on Google.
Download now
Well, that’s exactly what we need to do now.
Make sure the antenna cable is connected to your Raspberry Pi TV HAT (typically from a wall outlet or other compatible antenna), and then follow these steps to scan for available channels:
- From a computer on the same network as the Raspberry Pi, open a web browser, and visit this URL:
http://IP:9981You can check this guide to find the Raspberry Pi current IP address.
I’m unsure if there is a way to do it directly on the Pi, but I found it pretty easy to do it from another computer. - A web interface shows up, with a welcome wizard we’ll follow for the initial configuration.
The first step is to choose a language for the web interface. Pick on and click “Next” to continue.
The web page will reload with the chosen language used from there. - The next step is some security settings you can use to protect your installation.
You can restrict access to part of your network, and define administrator and user logins and passwords.
I skipped this step, as it was a test installation, but it might be a good idea to set an admin password to protect your configuration. Click “Next” once done. - After that, there is an important step to select your sources for the channels to configure.
Even if all 3 network forms look the same, the TV HAT is only listed in the network 3 part (“DVB-T Network”). So make sure to select it there:
- Once the network configuration is done, you can use some predefined tables to help with the search (I think), it will take a long time anyway, so I’m not sure how useful this is, but it doesn’t cost anything to select your area in the list:

- Only when you click “Save & Next” will the scan process start.

It may take a while, but you should start to see results below the progress bar, giving you an idea of how many channels are being detected, and thus whether the TV HAT is working properly. - Once the scan is complete, you can choose to let the service map all services for you (check the appropriate box) or skip this step and do it manually later.

I recommend checking the “Map all services” box unless you have a lot of results and want to customize which channels are available, as the process of doing this manually for dozens of channels is a bit tedious. - That’s it! Your scan is completed, and you should now have a list of channels available.

Once this welcome wizard is complete, you should see the list of available channels directly in your web browser, and you can even try playing some of them to make sure it’s working:

We won’t be using this interface, but before we get back to Kodi (LibreELEC), make sure it works there. You may have to play around with the live player to find the right settings (I only had audio by default), but if you get something working, that’s enough to move forward.
Test Live TV Playback
Well done, you did the tricky part! The system is installed, add-ons are configured, and you should now be able to watch live TV directly from the Kodi interface.
You just need to open the “TV” menu on the left, where you should now see your channels and channel groups listed:

Click on “All channels” or any group you created in the web interface to see the list and start watching one of them:

That’s it, enjoy! You can now watch any channel as if it were local media on your Raspberry Pi. And if you need more guidance on how to use Kodi, feel free to check my other articles on the topic:
- How to watch Netflix and other streaming services on Kodi?
- Ultimate guide to NordVPN on Raspberry Pi (Kodi & Raspbian)
- The Ultimate Guide to Install Kodi on Raspberry Pi (OSMC)
If you prefer watching videos instead of reading tutorials, you’ll love the RaspberryTips Community. I post a new lesson every month (only for members), and you can unlock them all with a 7-day trial for $1.
Going Further With Raspberry Pi TV HAT
Download the free PDF, keep it open, and stop wasting time on Google.
Download now
There is a lot more to say and a lot of things you can do or configure for a better experience. The point of this article was mostly to give you the right tools and show you how to install everything, but I’ll answer a few other questions you might have at this point.
Check this: Don't buy a new SD card until your read this.
Can I use the TV HAT with other applications? (Plex, Kodi, etc.)
The Raspberry Pi TV HAT can be used with Kodi on any operating system (so OSMC is fine), Plex, or most Linux distributions with the right drivers and applications.
Keep in mind that using Kodi on LibreELEC is the easiest solution I’ve found, and using it with apps like Plex will be trickier, as it requires a compatible backend to handle the streaming and share it with Plex.
Can I record TV programs with the TV HAT?
It’s not the TV HAT itself that does the recording, but the application you’re using. But yes, it’s possible to record TV shows directly using TVheadend or any other compatible application to handle this more easily.
Keep in mind that recordings can quickly take up space on your Raspberry Pi, so make sure you have a large enough SD card or external drive, and erase the recordings when you’re done watching them.
Are there better alternatives to the TV HAT?
As far as I know, there is no exact alternative to the official Raspberry Pi TV hat, but you can try USB TV tuners to get a similar experience.
They can probably ship with better and newer features (since the TV HAT is pretty old), but keep in mind that the TV HAT is built for the Pi, by the Pi manufacturer, so compatibility is excellent.
I haven’t tried any USB alternatives, but I think making them work on Raspberry Pi OS or LibreELEC might be trickier.
Whenever you’re ready, here are other ways I can help you:
Test Your Raspberry Pi Level (Free): Not sure why everything takes so long on your Raspberry Pi? Take this free 3-minute assessment and see what’s causing the problems.
The RaspberryTips Community: Need help or want to discuss your Raspberry Pi projects with others who actually get it? Join the RaspberryTips Community and get access to private forums, exclusive lessons, and direct help (try it for just $1).
Master your Raspberry Pi in 30 days: If you are looking for the best tips to become an expert on Raspberry Pi, this book is for you. Learn useful Linux skills and practice multiple projects with step-by-step guides.
Master Python on Raspberry Pi: Create, understand, and improve any Python script for your Raspberry Pi. Learn the essentials step-by-step without losing time understanding useless concepts.
You can also find all my recommendations for tools and hardware on this page.