Remote Python Development on Raspberry Pi: 5 Easy Setups
Coding directly on my Raspberry Pi is not the greatest. The lag, tiny screen, and weird keyboard make even small projects more complicated than they need to be. To solve this problem, I began exploring options to code from my main computer instead. After trying everything, I found a few methods that work, and I’ll walk you through them.
Remote Python development on Raspberry Pi can be done using tools like VS Code, PyCharm, and Jupyter Notebook, allowing code to be written and executed from another device.
In this guide, you will discover different setups and learn how one of these approaches could transform the way you develop Raspberry Pi projects. Whether you are a beginner or an experienced user, you will find tools that can save you time and reduce frustration.
If you’re like me and sometimes mix up syntax between programming languages, I’ve got just the thing for you. I’ve put together a Python cheat sheet with all the essential syntax in one place, so you can keep it handy and avoid any confusion. Download it here for free!
VS Code – Remote SSH Extension
Pros & Cons
Visual Studio Code (VS Code) is a highly versatile IDE that can be used for developing Python programs. If you’re already incorporating VS Code into your workflow, this is the best approach for you. VS Code includes a Remote SSH Extension that allows you to develop Python programs for your Raspberry Pi remotely.
Setup
To set up your workflow using VS Code, follow these steps:
- Make sure SSH is enabled on your Raspberry Pi. If you are not familiar with this, you can follow our guide to SSH first.
- Verify that your SSH is working using the following command on your Windows command prompt:
ssh <Username>@<Hostname or IP>
- You will be prompted to enter the password for the user.

- If your SSH is working correctly, you will be welcomed to the Raspberry Pi prompt:

- Now, download & install VS Code on your PC.
- Run VS Code.

- Go to Extensions (Ctrl + Shift + X) and search for and install “Remote SSH”.

- Once the extension is installed, open the Command Palette (F1 or Ctrl + Shift + P).

- Type and select the following entry/ command:
Remote-SSH: Connect to Host…
- Enter the credentials you used earlier to verify the SSH connection.

- A new window will open.
- Enter the password.

- Once the bottom left shows SSH:<hostname>, you have successfully connected to your Raspberry Pi.

That is it, we are all set up to use VS Code to develop Python programs on our Raspberry Pi remotely.
You might also like: The 5 fastest web browsers for Raspberry Pi — tested and ranked!
Note: Make sure your Raspberry Pi is up to date and the latest version of Python is already installed.
How to Use
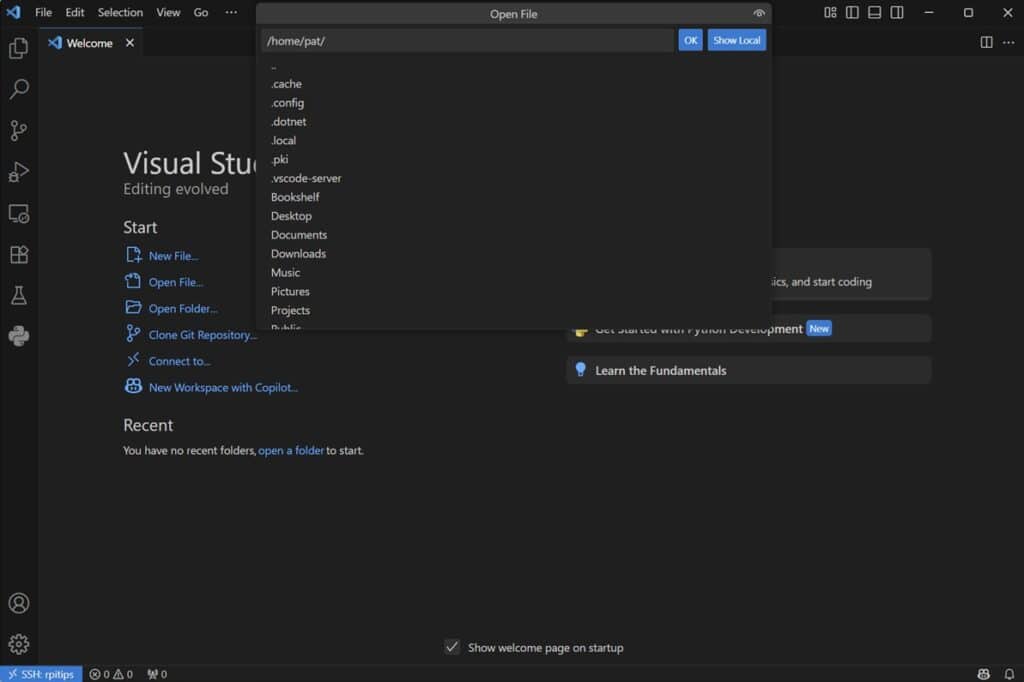
VS Code with the Remote SSH extension allows you to work as if you were working natively on your Raspberry Pi. For example, clicking on “Open File” will display the files and folders on your Raspberry Pi.
Furthermore, once you have written your program, you can compile and execute the program on your Raspberry Pi (not on the host PC). To do so, you can click on the arrow button towards the top right of the interface.

Notice how the output of the above program is shown in your Raspberry Pi prompt.
You can also open the terminal using the keyboard shortcut Ctrl + '. Or by navigating to View -> Terminal. This terminal is equivalent to the SSH prompt of your Raspberry Pi, and you can use it to navigate your Raspberry Pi and execute commands on it.
If like me, you always mix the languages syntax, download my cheat sheet for Python here!
Download now
You can also use it to install and update libraries, set up a virtual environment, or edit environment variables, among other tasks.
VS Code with the SSH Extension is a highly versatile and convenient way to program your Raspberry Pi remotely. Once it’s set up, it operates seamlessly from your desktop PC.
PyCharm Professional with Remote Interpreter
Pros & Cons
If you are more accustomed to PyCharm and do not want to switch to VS Code, PyCharm offers similar functionality in its professional edition as well. You can set up a remote interpreter in PyCharm via SSH connection to your Raspberry Pi.
Note: You need the professional version of PyCharm for this functionality to work.
Setup
To set up PyCharm for remote programming, follow these steps:
- Make sure SSH is enabled and properly configured on your Raspberry Pi.
- Download and install PyCharm on your PC.
- Run PyCharm.
- Navigate to File -> Settings or use the hotkey (Ctrl + Alt + S).

- Navigate to Project -> Python Interpreter -> Add Interpreter -> On SSH.

- Enter the hostname and username of your Raspberry Pi and click “Next”.

- Enter the password of your Raspberry Pi and click “Next”.

- Click “Next”.

- Verify the virtual environment and base interpreter paths (default paths are usually okay).

- Edit and set the Sync folders correctly. Ideally, you should sync your local <Project root> with the path to the projects directory on your Raspberry Pi. PyCharm will automatically sync files between the two directories.

- Once everything is configured, click “Create” and then “OK” on the settings menu to close the dialogue.
- You will see your configured remote interpreter selected in the bottom right of the main window.

That is it, we have successfully configured PyCharm to use the remote interpreter on your Raspberry Pi.
How to Use
PyCharm does not work as seamlessly as the VS Code-based solution. For example, you cannot directly open or interact with files on your Raspberry Pi using the regular open and save functions.
While working on PyCharm, you will save your project files in a dedicated folder (Project root) on your PC, and these files will automatically get synced with the folder that you had selected during the configuration of the interpreter.
You can edit these settings by navigating to Settings -> Build, Execution, Deployment -> Deployment.

The processes of programming, debugging, and executing work seamlessly. You can program directly in PyCharm, and when you click the Run or Debug button, it will execute the code on your Raspberry Pi, displaying the output on your PC.
If like me, you always mix the languages syntax, download my cheat sheet for Python here!
Download now

You can also get access to the SSH terminal of your Raspberry Pi by navigating to Tools -> Start SSH Session… and selecting the remote interpreter that you want to open the SSH session to.

Unlike VS Code, the SSH terminal in PyCharm operates as a separate entity. It is similar to opening an independent command prompt and starting an SSH session there. It does not inherit settings such as virtual environments and environment variables when executing code.
In PyCharm, the virtual environment settings are configured when setting up the remote interpreter only.
In summary, the PyCharm-based solution is not as seamless and convenient as the workflow offered by VS Code. Furthermore, it requires purchasing the professional version of the software. However, if you’re accustomed to using PyCharm and feel uncomfortable with the VS Code IDE, it can still serve as a suitable alternative for you.
Jupyter Notebook
Pros & Cons
Suppose you are looking for an option that runs natively on your Raspberry Pi and does not necessitate the installation of separate software on your PC. In that case, Jupyter Notebook is an excellent option. Jupyter Notebook is a fantastic tool for Python experimentation and lightweight data projects.
Setup
To set up Python with Jupyter Notebook on your Raspberry Pi, follow these steps:
You might also like: Want to install Windows 11 on your Pi? Here's how
- Make sure your system is up to date:
sudo apt update && sudo apt full-upgrade
- Install Python and pip:
sudo apt install python3 python3-pip
- Create a virtual environment:
python3 -m venv ~/.virtualenvs/jupyter
- Shift to the virtual environment:
source ~/.virtualenvs/jupyter/bin/activate
- Install Jupyter Notebook:
pip3 install notebook
- Set password:
jupyter notebook password
- Run Jupyter Notebook server:
jupyter notebook --no-browser --ip=0.0.0.0
- Now you can run Jupyter Notebook on any PC connected to the same network as your Raspberry Pi by opening the following link in any browser:
http://<hostname>:8888/
- Enter the password that you configured to access the dashboard.

By following these steps, you have successfully installed and configured Jupyter Notebook on your Raspberry Pi.
Are you a bit lost in the Linux command line? Check this article first for the most important commands to remember and a free downloadable cheat sheet so you can have the commands at your fingertips.
How to Use
Unlike the previously mentioned options, such as VS Code and PyCharm, which run on your PC and use an SSH session to connect to a remote Python interpreter, Jupyter Notebook operates natively on your Raspberry Pi as a server. You can access its interface from a web browser on any PC that is connected to the same network as your Raspberry Pi.
Jupyter works slightly differently from conventional IDEs. Instead of creating .py files and executing them as a whole, you typically start with a notebook and make code cells in that. You can then execute individual cells to get the output of the command.

Jupyter is more geared towards data analysis and simulations, and less so towards software development, and is not suitable for creating stand-alone Python scripts.
Download the free PDF, keep it open, and stop wasting time on Google.
Download now
Although you can turn the complete notebook into a Python script (.py file) using the File -> Save and Export Notebook As -> Executable Script option. However, this will download the script to your PC (not Raspberry Pi).

Jupyter Notebook is recommended for browser-based Python development, particularly for learning, experimentation, and lightweight data projects, as it eliminates the need for a full IDE or desktop interface.
However, it is not recommended for large-scale applications or web development.
Remotely Access Raspberry Pi File System and Use Your Favourite IDE
Pros & Cons
Another simple method to start programming your Raspberry Pi remotely from the comfort of your PC is to make all the files and folders on your Raspberry Pi accessible over the network using SFTP or Samba Share, and then program using the IDE of your choice.
Setup
To set it up, we need to establish a file sharing between your Raspberry Pi and your PC. Follow these steps to do so:
If you are running Linux/ macOS on your PC
- Install SSHFS on your PC using the command:
sudo apt install sshfs
Or if you are using macOS:brew install sshfs
- Create a mount point on your PC using the command:
mkdir ~/my_raspberryPi
- Mount the Raspberry Pi file system using the command:
sshfs <Username>@<IP or Hostname>:/ ~/my_raspberryPi
If you are running Windows on your PC
- Install Samba on your Raspberry Pi using the command:
sudo apt install samba samba-common-bin -y
- Change the Samba password using the command:
sudo smbpasswd - a <Username>
- Restart the Samba service using the command:
sudo systemctl restart smbd - Now, on your Windows PC, open the run prompt and enter the following address:
\\<IP or Hostname>\
- Enter the username and password that you configured for your Samba share (if prompted).
- You will get access to the shared folders from your Raspberry Pi.

How to Use
This method is as simple as it sounds. What we are effectively doing is creating a local folder on your PC that is a link to the file storage on your Raspberry Pi. Any files you modify in the folder on your PC will be written to your Raspberry Pi.
Now we can continue programming in any IDE that we prefer, as if we were working on files locally.

The only downside of this setup is that you do not have any straightforward access to your Python interpreter from your Raspberry Pi. Any programs that you execute in this environment will get executed using your PC’s Python interpreter.
A simple workaround for this is to use an SSH shell to test your program. You can do so by opening any command prompt or terminal and connecting to your Raspberry Pi using SSH.

Overall, it is a much simpler approach that does not limit the IDE that you use to work. It will work with whatever IDE you are comfortable with. Setting it up also gives you a much more granular understanding of the inner workings of other approaches.
Download the free PDF, keep it open, and stop wasting time on Google.
Download now
I’d recommend this approach for anyone who prefers using a custom IDE and is comfortable with the Linux command line, especially if they don’t mind spending a lot of time in the SSH terminal.
If you enjoy learning about Raspberry Pi, you’ll feel right at home in the RaspberryTips Community. It’s a friendly group of makers helping each other grow. Join us today for $1 and see what it’s like inside.
GitHub Codespaces
Pros & Cons
Another bonus non-conventional setup is to use GitHub Codespaces. GitHub Codespaces allows you to use all the git functionality from your browser. You can finalize your script in your browser, and once ready, you can push the changes to your Raspberry Pi.
Setup
No special setup is required for this; make sure that Git is installed on your Raspberry Pi using the command:sudo apt install git -y

How to Use
To use GitHub Codespaces on your PC, follow these steps:
- Go to the GitHub website and log in using your ID.
- Click on New Repository.

- Configure the repository as shown below:

- On your repository page, click on the green Code -> Codespaces -> Create Codespace on Main.

- This will open a VS Code environment in a separate tab in your browser.

- Click on the Create a new file button and name it something.py.

- Type your code and click on the Run button to execute the code.

As you can see from this example, the code that you run or execute on GitHub Codespaces gets executed in the cloud using the Codespace interpreter and not on your Raspberry Pi.
To push this code to your Raspberry Pi and execute it there, you can follow these steps:
- Go to the Source Control tab, enter your message, and commit changes.

- Now click on Sync Changes to push the changes.

- On your Raspberry Pi, clone the repository using the git clone command:

- Run the program using the local Python interpreter:

GitHub Codespaces cannot be used to natively access your Raspberry Pi files or execute using your Raspberry Pi interpreter. However, it can be used to develop remotely and then, once everything is ready, push the changes to your Raspberry Pi.
While this approach would not be considered as remote development on your Raspberry Pi (because technically we are developing on GitHub Codespace and then copying files to your Raspberry Pi later).
However, if you are collaborating with a team, then this can be a great approach. This method enables teamwork and leverages Git’s robust version control features.
Remote development on a Raspberry Pi doesn’t have to be painful. Whether you’re a casual hobbyist or working on a serious project, there’s a method here that can fit your workflow and make coding on the Pi far more enjoyable. Try a few out — and stick with the one that keeps you coding comfortably from your main machine.
Here is a quick summary/comparison to help you decide which method is best for you:
| Remote Interpreter | Seameless Remote File Access | Free to Use | |
| VS Code + Remote SSH Extension | ✅ | ✅ | ✅ |
| PyCharm + Remote Interpreter | ✅ | ❌ | ❌ |
| Jupyter Notebook | ❌ | ✅ | ✅ |
| SFTP or Samba Share | ❌ | ✅ | ✅ |
| GitHub Codespaces | ❌ | ❌ | ✅ |

Whenever you’re ready, here are other ways I can help you:
Test Your Raspberry Pi Level (Free): Not sure why everything takes so long on your Raspberry Pi? Take this free 3-minute assessment and see what’s causing the problems.
The RaspberryTips Community: Need help or want to discuss your Raspberry Pi projects with others who actually get it? Join the RaspberryTips Community and get access to private forums, exclusive lessons, and direct help (try it for just $1).
Master your Raspberry Pi in 30 days: If you are looking for the best tips to become an expert on Raspberry Pi, this book is for you. Learn useful Linux skills and practice multiple projects with step-by-step guides.
Master Python on Raspberry Pi: Create, understand, and improve any Python script for your Raspberry Pi. Learn the essentials step-by-step without losing time understanding useless concepts.
You can also find all my recommendations for tools and hardware on this page.