Python: 5 Ways to Send Notifications from Your Raspberry Pi
When you run projects on a Raspberry Pi, it doesn’t take long before you realize it needs a way to keep you in the loop. Maybe it’s a sensor that spots motion, a script that finishes a backup, or a temperature spike you want to know about. Over the years, I’ve tested different ways to make my Pi “speak up,” and some methods are surprisingly easy.
A Raspberry Pi can send notifications through email, SMS, chat apps, push services, or even a simple LED or speaker. Each option has its own pros and cons, and Python makes it simple to set up whichever method works best for different projects.
In this guide, I’ll walk you through five practical ways to send notifications from your Pi. You’ll see code examples and learn about the tools you need. If you’ve ever wished your Pi could ping you when something happens, keep reading — this is precisely what you need.
If you’re like me and sometimes mix up syntax between programming languages, I’ve got just the thing for you. I’ve put together a Python cheat sheet with all the essential syntax in one place, so you can keep it handy and avoid any confusion. Download it here for free!
Local Notifications (LED, Sound, Display)
Blink, beep, or flash — the Pi’s most straightforward way to talk to you.
The simplest way for your Raspberry Pi to notify you is by creating a local notification. It can be something subtle, like changing the status of some LEDs, or something more attention-grabbing, like sounding an alarm.
LEDs can be connected to your Raspberry Pi using its GPIO pins. You can then control the LEDs connected to your Raspberry Pi using the GPIO Zero library. It is straightforward to set up, and you can use multiple LEDs, each for a separate indication/ notification.

If you want your notifications to be a bit more expressive and not just binary indications, you can even consider connecting a small display with your Raspberry Pi. For example, these 1602 LCDs can be connected to your Raspberry Pi via the I2C interface.
Since it uses the I2C interface, wiring is pretty straightforward. Connect the SDA to GPIO2 and SCL to GPIO3 (in addition to Vcc and GND).

Once connected, you can enable I2C using raspi-config and then use the RPLCD library to control the LCD with Python.

However, using either the LED or LCD for notification means that you will have to look for it for the notification to be visible actively.
To make critical notifications more attention-grabbing, consider combining this with an audio alarm.
The Raspberry Pi 4 comes with a 3.5 mm audio jack. This means you can connect a speaker with your Raspberry Pi 4 using an aux wire.
Unfortunately, Raspberry Pi 5 and Raspberry Pi 400 do not come with a 3.5 mm audio jack. Nonetheless, you can use either a USB or Bluetooth speaker with your Raspberry Pi to achieve the same effect.
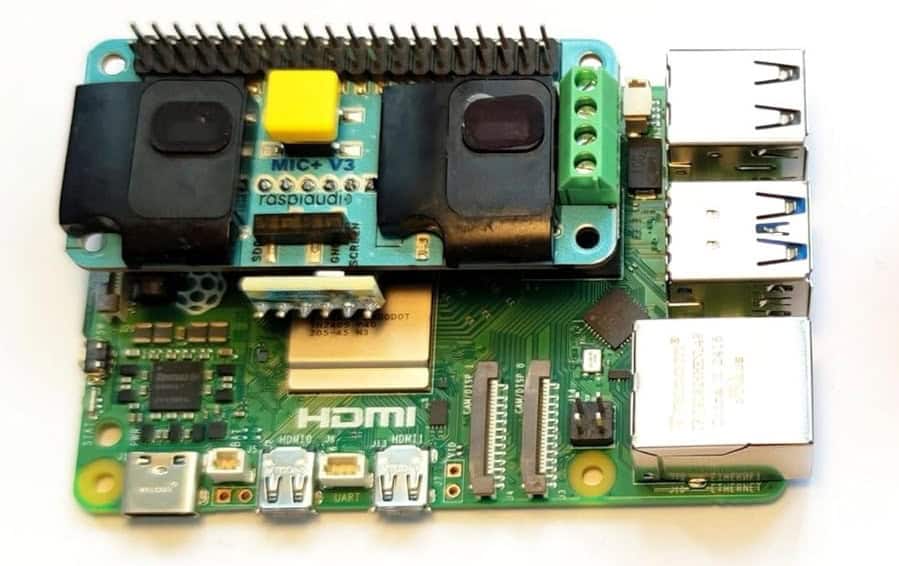
However, if you don’t want to rig external speakers with your Raspberry Pi and are looking for something more compact, consider these sound card HATs from RaspiAudio, which have built-in speakers that can be installed on any Raspberry Pi.
If like me, you always mix the languages syntax, download my cheat sheet for Python here!
Download now
Once you have configured your preferred type of speakers with your Raspberry Pi, you can use the playsound or pygame libraries to play alarm sounds through Python.
If you need local notifications for your Raspberry Pi while operating in headless mode, using LEDs in conjunction with audio alerts for critical notifications is a straightforward and reliable solution.
Email Notifications with Python
Sending alerts straight to your inbox.
Suppose you want your Raspberry Pi to be able to notify you even when you’re not at home. Then, the simplest method is to have the Raspberry Pi send you an email that contains the notification content.
The only requirement for this method is to have a consistent and active internet connection.
Before setting this up, we need to decide on the email ID that our Raspberry Pi will use.
You can use one of your existing email IDs or create a new one (recommended).
You might also like: Do this to keep a full backup of your Raspberry Pi
Once you have set up your email ID, you need to generate an app password for that email address. If you’re using Google, you can follow these steps to create an app password:
- Ensure that two-factor authentication is enabled for your ID.
- Go to your Google Account Settings.
- Enter a name for your app, and it’ll automatically generate a password and show it to you.
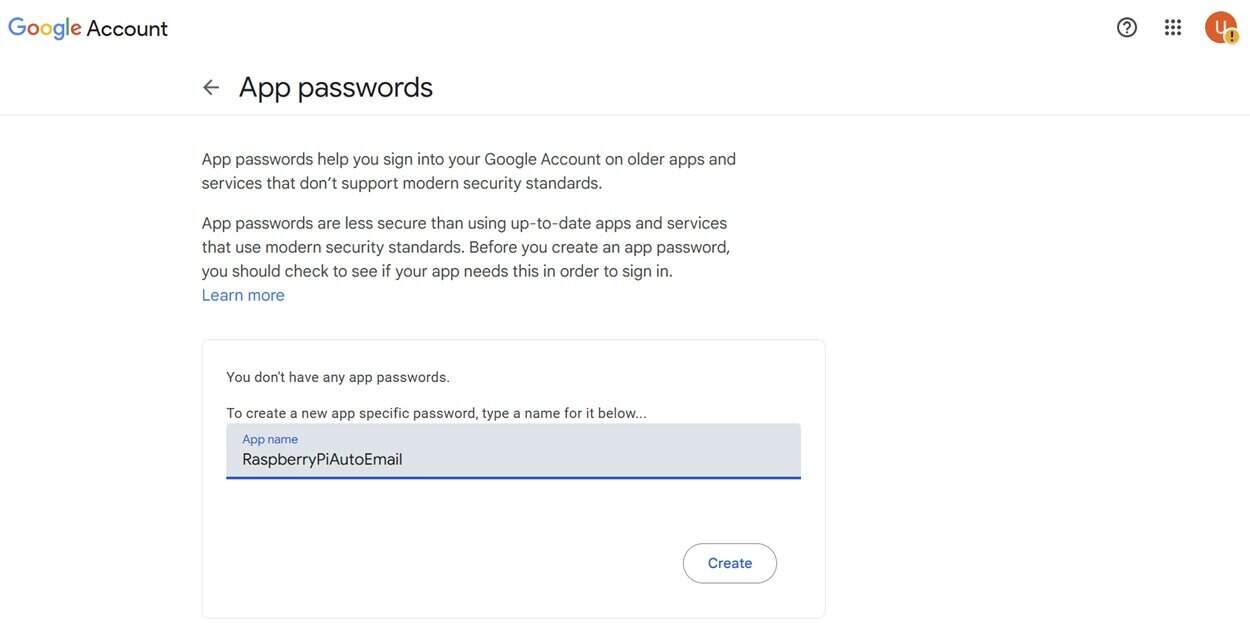
- Note down this password (you will not be able to see it again).
You can use a similar methodology for different email services, like Outlook or Yahoo, as well.
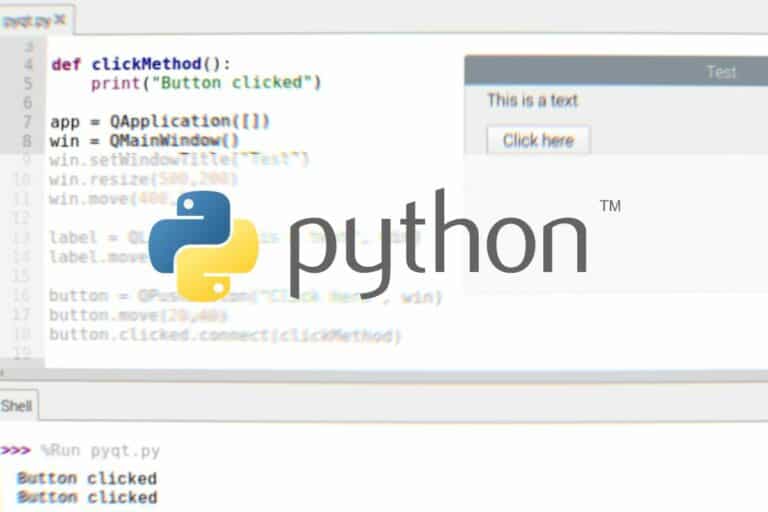
Now that we have the app password, we can set up our Raspberry Pi to send emails using this ID. We only need Python and the smtplib module (built in) for this, so we don’t need to install anything new.
Create a new Python script using your favourite text editor and enter this code:
import smtplib
from email.message import EmailMessage
SMTP_SERVER = "smtp.gmail.com"
SMTP_PORT = 587 # TLS
FROM = "[email protected]" # <-- change this
TO = "[email protected]" # <-- change this
PASSWORD = "your_16_char_app_password" # <-- change this
msg = EmailMessage()
msg["From"] = FROM
msg["To"] = TO
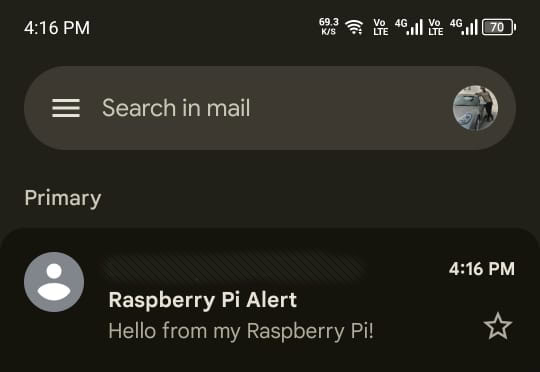
msg["Subject"] = "Raspberry Pi Alert"
msg.set_content("Hello from my Raspberry Pi!")
with smtplib.SMTP(SMTP_SERVER, SMTP_PORT, timeout=30) as s:
s.ehlo()
s.starttls()
s.ehlo()
s.login(FROM, PASSWORD)
s.send_message(msg)
print("Email sent.")Ensure that you update the configurable variables to match your specific setup.
Then, you can check your recipient’s email ID to see that the email has been received.
The key advantage of this method is that, in addition to sending simple notifications, you can also attach files to your emails. For example, besides notifying of an event, you can also make your Raspberry Pi attach all relevant logs associated with that program.
You might also like: No screen? No problem! Here's how to setup a Pi without one.
To attach a log file, all you need is to add this line before sending your email:
If like me, you always mix the languages syntax, download my cheat sheet for Python here!
Download now
with open("/home/pi/logs/system.log", "rb") as f:
    file_data = f.read()
    file_name = f.name
msg.add_attachment(file_data, maintype="text", subtype="plain", filename=file_name)
If all you need are occasional notifications from your Raspberry Pi while you are away, then email notifications are an excellent option. These are simple to set up and require no hardware modifications.
Chat App Notifications (Slack, Telegram, Discord)
Get pings where you already spend most of your time.
Suppose you are not accustomed to using email and prefer that your Raspberry Pi send you notifications in your preferred chat app. In that case, this can also be implemented easily using webhooks or bot tokens.
Two methods can be used to send notifications to a chat app:
- Webhooks: A webhook is a simple URL provided by the app that allows you to post messages directly into a channel — it’s a one-way communication channel ideal for quick alerts.
- Bot tokens: A bot token, on the other hand, gives your script full access as a “bot user,” which means you can not only send messages but also respond to commands, read chats, and integrate more advanced features.
Each chat app allows either option or both. For this guide, we will only demonstrate how to set up Webhooks for Discord. But it is easily recreatable for other chat apps or by using bot tokens.
First, we need to set up a channel and obtain its webhook URL. To do so, follow these steps:
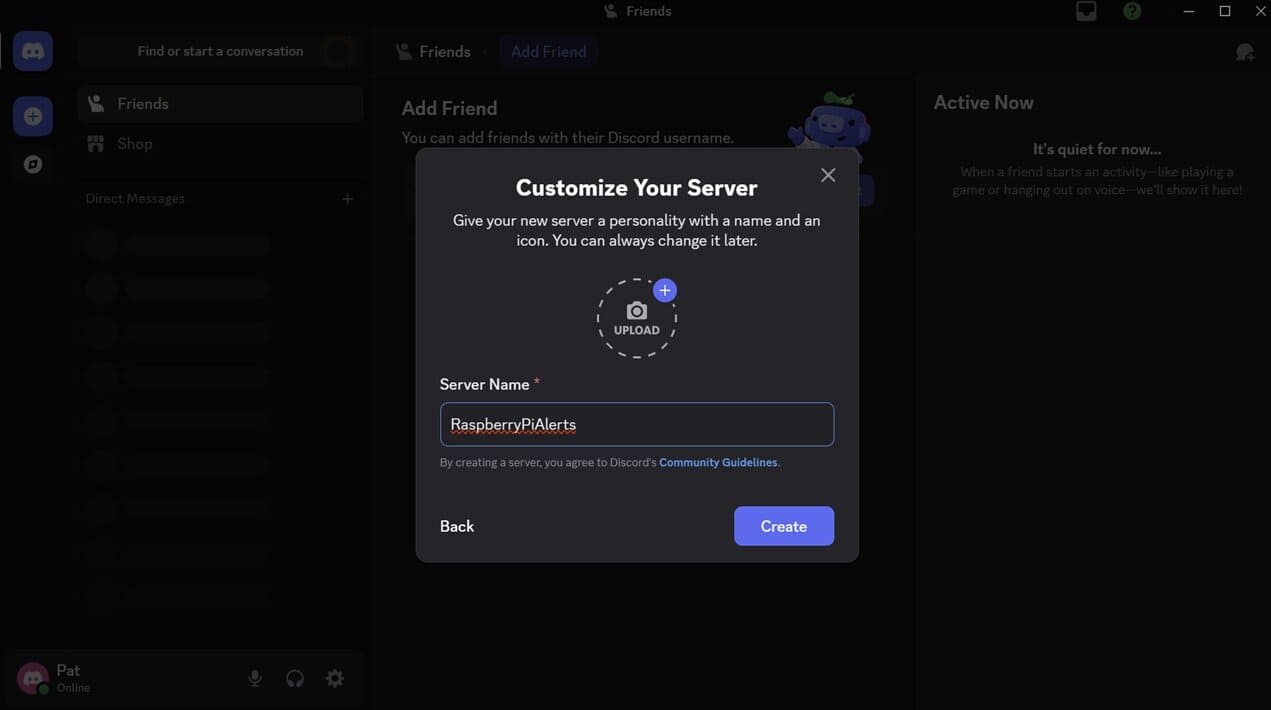
- Create a new Server on your Discord ID.
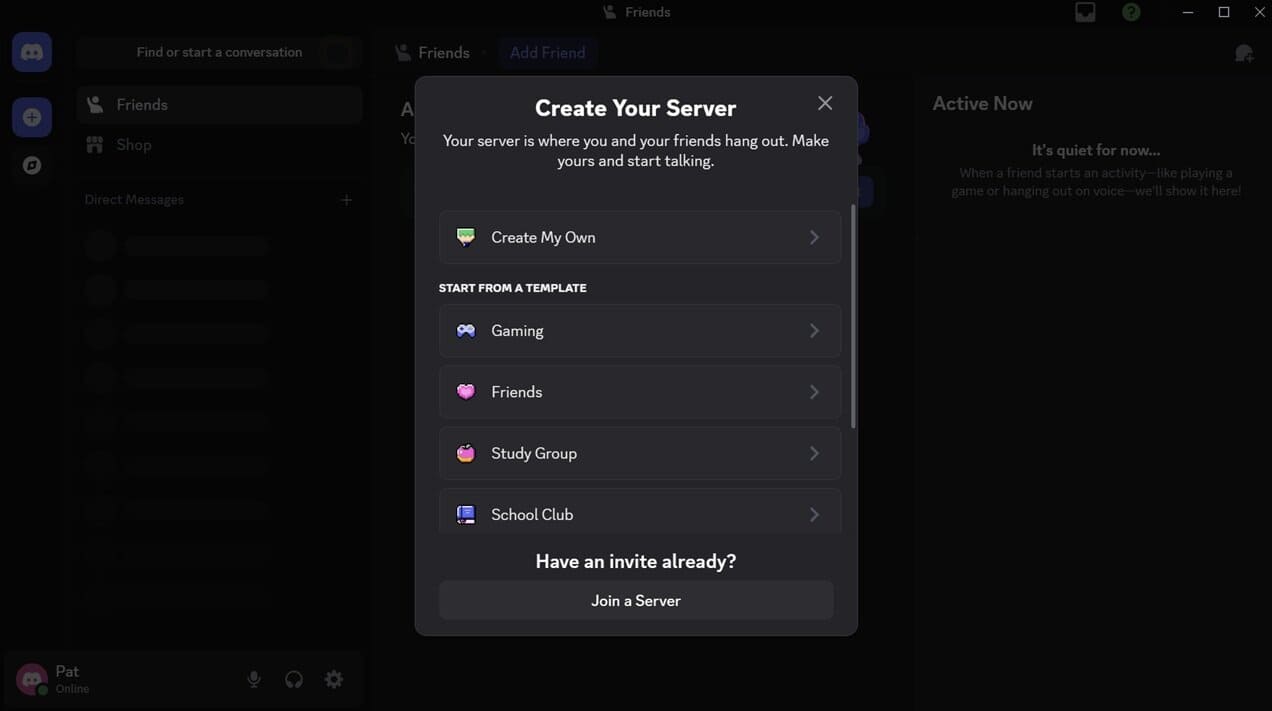
- Give it an appropriate name.
- Once inside your channel, navigate to Edit Channel -> Integrations -> Create Webhook.
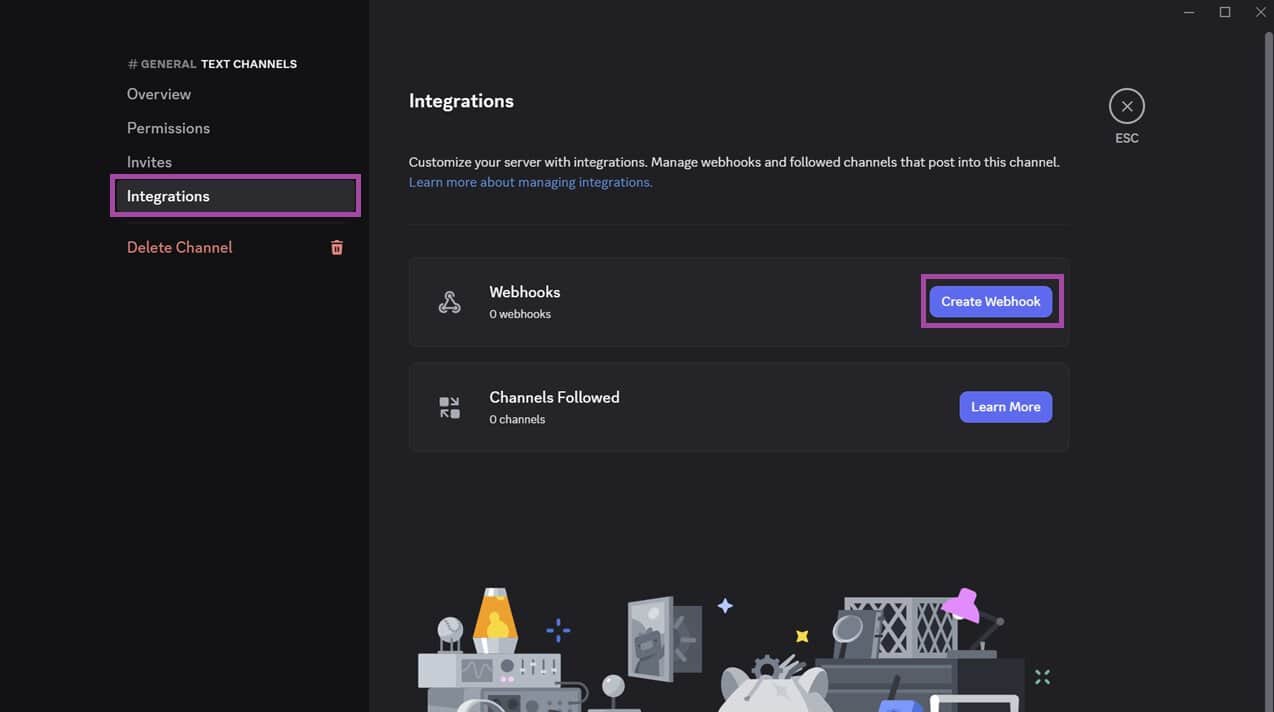
- Once created, you can rename it.
- Click on the webhook, then click Copy Webhook URL.
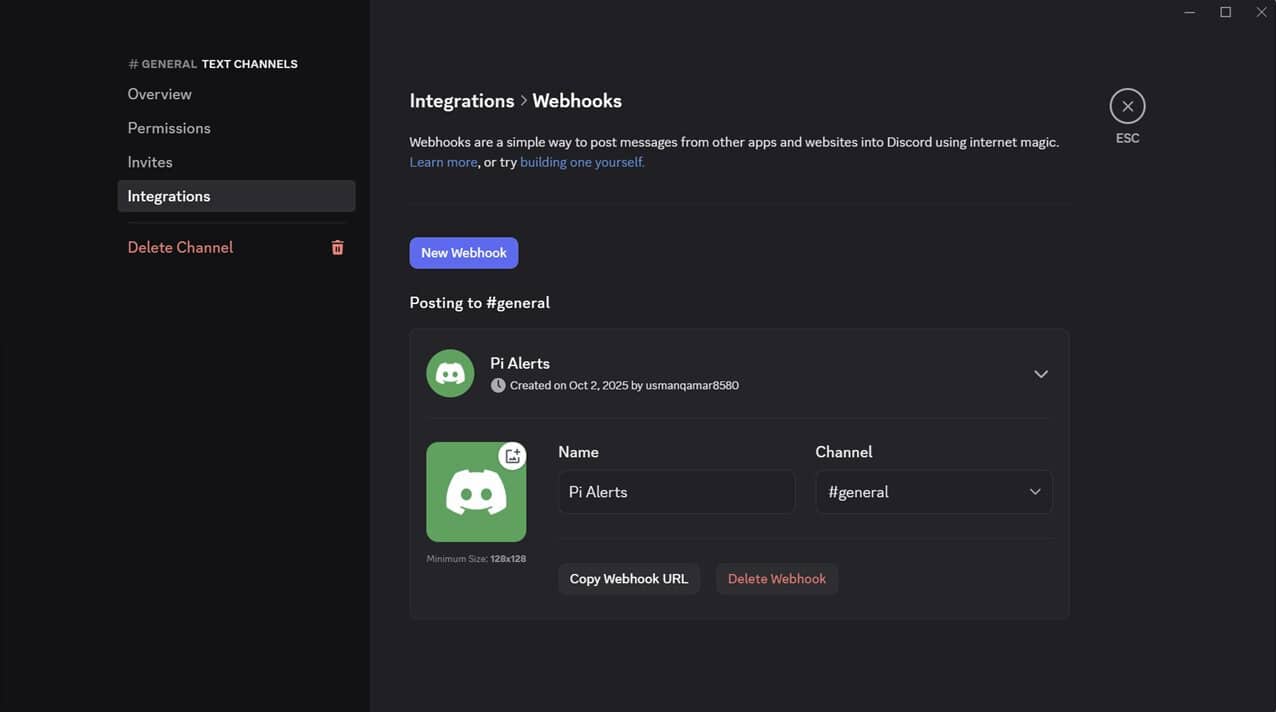
- Save the URL somewhere.
I directly saved it in an environment variable on my Raspberry Pi using the command:echo 'export DISCORD_WEBHOOK_URL="<My URL Here>"' >> ~/.bashrc && source ~/.bashrc
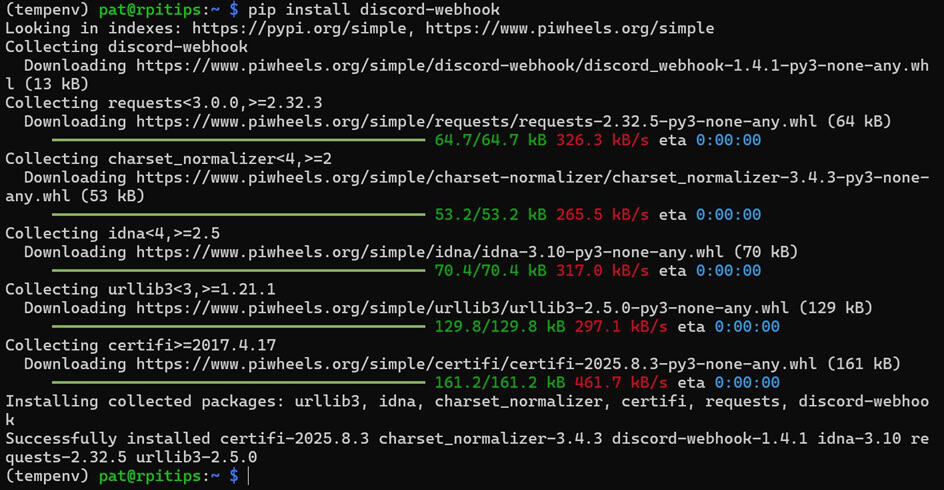
Once you have configured your webhook URL, we can proceed to our Raspberry Pi and begin writing the Python script. For this script, we need the discord-webhook library. You can install it using the pip command:pip install discord-webhook
A virtual environment is often required on Raspberry Pi (click on the link if you need a guide).
Create a Python script as shown below:
from discord_webhook import DiscordWebhook

# Replace this with your own webhook URL from Discord
WEBHOOK_URL = "https://discord.com/api/webhooks/XXXX/XXXX"

# Create the webhook object with your message
webhook = DiscordWebhook(
    url=WEBHOOK_URL,
    content="✅ Raspberry Pi: test notification sent!"
)

# Execute (send) the message
response = webhook.execute()
Save it and execute it. As soon as you execute it, you will receive a notification in the Discord channel that you just configured.

If you have Discord installed on your smartphone, it will also display notifications simultaneously.
You can use a similar method for other chat apps, such as Slack and Telegram, as well.
Overall, if you are already using a specific chat app, then this can be an excellent method for your Raspberry Pi to notify you. It is very similar to the email method in that it only requires your Raspberry Pi to have an internet connection to work.
Want even more ideas? I put together a free resource with over 75 Raspberry Pi project ideas, each with a quick description, tutorial link, and hardware requirements. Whether you’re just starting out or looking for something to do this weekend, this list will keep you busy for a while. Just click here to get instant access.
You might also like: Tired of Raspberry Pi OS? Level up with these top-rated systems.
Push Notifications to Mobile Devices
Nudge your phone or desktop with instant alerts.
Download the free PDF, keep it open, and stop wasting time on Google.
Download now
Another method for your Raspberry Pi to notify you is to send pop-up notifications directly to your smartphone or desktop PC. For this, we can use a service like Pushbullet.
Pushbullet is an application that enables you to share data across various platforms. One of its key features is that it allows notifications from one device to be displayed on another device. It is available for Android, Windows, as well as Chrome and Firefox extensions.
Before configuring our Raspberry Pi, we need to generate an access token for our Pushbullet account. You can do so by navigating to your Account Settings in a web browser and clicking on Create Access Token.

Save the access token in a secure location (preferably in an environment variable).
Now, proceed to your Raspberry Pi and install the pushbullet.py library using the command:pip install pushbullet.py

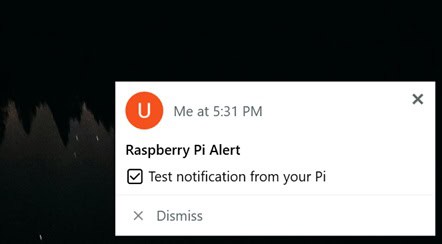
Next, create a Python script as shown below:
import os
from pushbullet import Pushbullet

API = os.environ["PUSHBULLET_API_TOKEN"]
pb = Pushbullet(API)

# Simple note push (goes to all your devices by default)
push = pb.push_note("Raspberry Pi Alert", "✅ Test notification from your Pi")

print("Sent! Push ID:", push.get("iden", "OK"))
When you save and run this program, you will see notifications on all devices linked to your Pushbullet account.

If you have installed the Pushbullet program on your PC, you will also see a notification there.
Pushbullet is highly versatile; you can choose the specific devices to which you want to send notifications. You can also attach files, such as logs, along with your notification, which can then be downloaded.
Personally, I prefer Pushbullet over email or the chat app methods mentioned above. It is incredibly versatile and customizable, and the Python library for this is user-friendly and intuitive to use. The Pushbullet API is also well-documented, and I have a chapter about it in “Master Python on Raspberry Pi“.
If this project doesn’t work as expected on your setup, don’t worry. You can get help directly from me and other Pi users inside the RaspberryTips Community. Try it for $1 and fix it together.
SMS Notifications (API or GSM HAT)
Reliable text messages, either through the cloud or your own SIM card.
If you want to receive notifications from your Raspberry Pi even when you don’t have good internet connectivity, you can use SMS notifications. SMS notifications require extremely minimal bandwidth.
There are multiple methods to achieve this; the simplest method is to use a service such as Twilio. Twilio is a cloud communication platform. It provides various solutions. One of its products provides the API to send SMS to any phone number.
First, you will need to sign up for Twilio. They also offer a free trial period.

Download the free PDF, keep it open, and stop wasting time on Google.
Download now
A similar service that you can use to send SMS to yourself is Vonage (previously known as Nexmo). It offers similar features to those of Twilio.

Unfortunately, I was not able to try either of the services due to telecom limitations in my country of residence. However, user reviews that I found online showed that both are reliable services.
Both are paid services. However, both of these offer free trials that you can use to test them out.
You can use the Twilio API using its Python library:pip install twilio
Or you can install the Vonage library instead:pip install vonage
Once you have the relevant library installed, you can write a simple program as shown below:
You might also like: I tried to replace my main PC with a Pi 5, here's what happened.
import os
from twilio.rest import Client

sid   = os.environ["TWILIO_ACCOUNT_SID"]
token = os.environ["TWILIO_AUTH_TOKEN"]
from_ = os.environ["TWILIO_PHONE_NUMBER"]
to    = os.environ["ALERT_TO"]

client = Client(sid, token)

msg = client.messages.create(
    body="✅ Raspberry Pi: test SMS notification!",
    from_=from_,
    to=to
)

print("Sent. Message SID:", msg.sid)
Once you run this script, you will receive an SMS on your phone containing the notification’s content.
Overall, it can be an excellent method for sending small notifications, ensuring you receive them even in regions with poor internet connectivity.
But what if your Raspberry Pi has poor internet connectivity as well?
In this case, you can use a GSM HAT, like this one from Waveshare, to enable GSM connectivity on your Raspberry Pi as well.
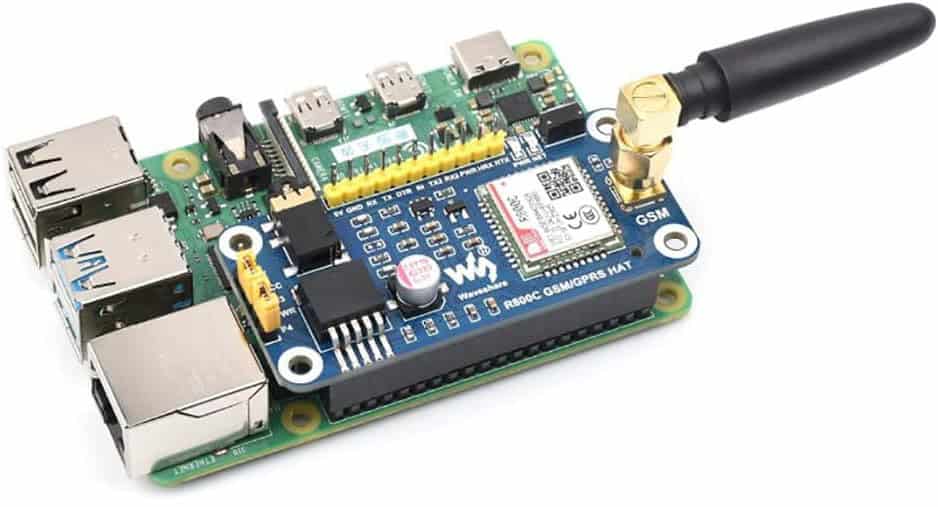
This HAT connects to your Raspberry Pi through the serial interface on your GPIO. They have excellent documentation that guides you on how to connect it to your Raspberry Pi and how to use it to send SMS messages or make phone calls.
This HAT turns your Raspberry Pi into a cellular phone, allowing you to send notifications to your phone even when either device is outside the range of Wi-Fi or Internet connectivity.
If you are looking for an option that enables sending notifications without having access to nearby Wi-Fi or the Internet. In that case, I believe this is the only feasible option for sending remote notifications.
You might also like: I've tested hundreds of Linux apps, here are the ones I recommend.

Whether you prefer visual alerts, emails, chat messages, or text notifications, there’s a Python solution that fits your Raspberry Pi project. Each method has its strengths, and once you try them, you’ll realize how easy it is to make your Pi truly interactive. With just a few lines of code, your Pi can keep you informed no matter where you are.
Whenever you’re ready, here are other ways I can help you:
Test Your Raspberry Pi Level (Free): Not sure why everything takes so long on your Raspberry Pi? Take this free 3-minute assessment and see what’s causing the problems.
The RaspberryTips Community: Need help or want to discuss your Raspberry Pi projects with others who actually get it? Join the RaspberryTips Community and get access to private forums, exclusive lessons, and direct help (try it for just $1).
Master your Raspberry Pi in 30 days: If you are looking for the best tips to become an expert on Raspberry Pi, this book is for you. Learn useful Linux skills and practice multiple projects with step-by-step guides.
Master Python on Raspberry Pi: Create, understand, and improve any Python script for your Raspberry Pi. Learn the essentials step-by-step without losing time understanding useless concepts.
You can also find all my recommendations for tools and hardware on this page.