

What Is the SSH Password for Raspberry Pi?
If you want to access your Raspberry Pi from a remote computer, you can use SSH and get a terminal as if you were on the Raspberry Pi directly. But, you’ll need the IP address and the SSH password in order to do it. So, what is the default SSH password of the Raspberry Pi?
Raspberry Pi OS no longer provides a default login and password (it used to be “pi” / “raspberry”). Instead, a setup wizard appears on first boot to help create the user’s credentials. In addition, the SSH service is not enabled by default and needs to be activated.
In this article, you’ll learn about other important points on SSH connections to a Raspberry Pi, including what SSH is, how to enable SSH on a Raspberry Pi, how to make the SSH service start automatically at each reboot, which IP address to use and which port to connect to, and how to log into SSH without having to type a password.
If you’re feeling lost in all the Raspberry Pi jargon, I’ve got something to help you out. I’ve created a free glossary that explains all the essential terms and abbreviations in a way that’s easy to understand. It’s a great resource to have by your side. Get your free copy here.
What Is SSH?
SSH stands for Secure SHell. It’s a cryptographic network protocol that is mostly used to connect to another computer on a network securely.
In general, SSH will allow you to access the shell (terminal) of your Raspberry Pi from another PC.
This solution can be convenient if you want to install things from your main PC (and copy/paste commands) or is even essential if you don’t use a screen with your Raspberry Pi.
In the next paragraphs, we will discuss how to set it up, step by step, starting with the basics, and then adding a bit of comfort.
I want to keep this short, but I have an entire article dedicated to SSH on Raspberry Pi, that you can read if you want to know more about this very useful protocol. If you do so, you can probably skip the next sections of this article.
How to Connect to Raspberry Pi With SSH?
Note: If you want to see all these steps in action, I have a video lesson available for the community members. You can join here and watch it directly if you are interested (with 10+ other lessons for Raspberry Pi and many other benefits).
From Windows
If you use Microsoft Windows on your main PC, you will probably install and use a third-party tool to use SSH, like Termius or Putty, for example.
On Windows 11, the ssh command is available from the command prompt, but it’s bare bones. Full client programs like Termius or Putty are often better.
Putty is one of the most used software programs to access SSH hosts on Windows, and if you start it will be perfect. Download the file matching your computer specifications. And depending on the version chosen, install it or not (there is a portable edition), then launch it.
If you are lost in all these new words and abbreviations, request my free Raspberry Pi glossary here (PDF format)!
Download now
Putty looks like this:
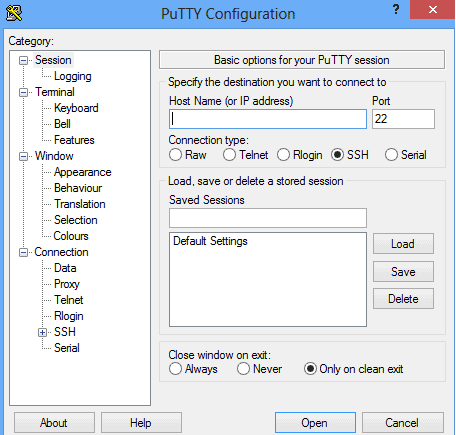
To log in, type the IP address in the “Host Name” field and click on “Open”.
If you need help with this, here’s how to find the current IP address of Raspberry Pi.
Or if you prefer an easier way with your phone, install the RaspberryTips Android App, and it will automatically find your Raspberry Pi’s IP address for you!
As a reminder, the default SSH login and password on older Raspberry Pi OS versions are:
– Login: pi
– Password: raspberry
On the latest version of Raspberry Pi OS, you had to create a username/ password on first boot.
If you have changed your Raspberry Pi username and/or password, use the same credentials as when you open your session directly on the Raspberry Pi. And if you don’t remember the one you set, you can use this guide to reset a forgotten password.
If the connection doesn’t work for now, don’t worry. I’ll explain what to do later.
From Linux or Mac
If you use a Unix-based system, i.e., any Linux distribution or even macOS, you can use the “ssh” command directly to connect from a terminal.
Depending on your system, you might need to install it. For example, on a distribution based on Debian:sudo apt update
sudo apt install ssh
The command to connect to your Raspberry Pi will be something like this: ssh USER@IP
For example:ssh [email protected]
Are you a bit lost in the Linux command line? Check this article first for the most important commands to remember and a free downloadable cheat sheet so you can have the commands at your fingertips.
Replace USER with your username, and IP with the local address of your Raspberry Pi.
If you need help with this, here’s how to find the current IP address of Raspberry Pi.
Or if you prefer an easier way with your phone, install the RaspberryTips Android App, and it will automatically find your Raspberry Pi’s IP address for you!
If you are lost in all these new words and abbreviations, request my free Raspberry Pi glossary here (PDF format)!
Download now

As a reminder, the default SSH login and password on the Legacy edition of Raspberry Pi OS are:
– Login: pi
– Password: raspberry
On recent versions, you should’ve created a different user and password, use that one.
If your attempt to connect failed, don’t worry, I’ll explain why and what to do next.
How to Enable SSH on a Raspberry Pi
As mentioned in the introduction, the SSH protocol is not enabled by default on Raspberry Pi OS (for security reasons).
Whether you use Raspberry Pi OS Desktop or Lite edition, the first thing you need to do is to enable SSH.
From the Desktop Interface
If you have a desktop environment, you need to enable it yourself by going to the main menu > Preferences > Raspberry Pi Configuration.
Go to the “Interfaces” tab and enable SSH:

From a Terminal
The same idea applies from a terminal: you need to start the SSH service manually.
To do this, type the following command:sudo systemctl start ssh
You might also like: I tried to replace my main PC with a Pi 5, here's what happened.
You can also check the service status by typing:sudo systemctl status ssh

By the way, if you want to enable SSH directly on a fresh install, you can check this tutorial on how to do a headless installation (no screen/keyboard required).
How to Auto-Start SSH on Boot?
You will quickly realize that the SSH service when enabled manually from the command line, does not load automatically on startup. So, you have to find a way to force it to start.
Download the free PDF, keep it open, and stop wasting time on Google.
Download now
There are a couple of achieves you achieve this. For example, you could just run this command:sudo systemctl enable ssh
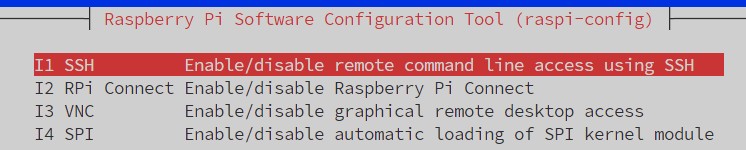
Another option that might be easier for some of you, is to enable it with raspi-config (Interface options > SSH). It will start the service immediately, and also automatically enable it on boot.
Which IP Address and Port to Connect?
By default, the SSH service is open on port 22. You must, therefore, connect to the IP of the Raspberry Pi on port 22.
When connecting from another Linux PC, port 22 is tried by default when no port is specified:ssh [email protected]
But if you changed it, you can specify the port with the -p option:ssh [email protected] -p 2222
Replace 2222 with the port you’ve chosen.
As mentioned above, if you do not know the current IP address of the Raspberry Pi, do not hesitate to take a look at my post on the subject where I explain how to find it easily. This post will also tell how to set it static, so you do not have to search for it every time you want to log in again.
If you enjoy learning about Raspberry Pi, you’ll feel right at home in the RaspberryTips Community. It’s a friendly group of makers helping each other grow. Join us today for $1 and see what it’s like inside.
How to Connect SSH Without a Password
You now know how to activate the SSH service on your Raspberry Pi and how to connect to it.
That’s great, but if you have to use it as often as I do, typing the password every time will quickly become tiresome.
Instead, there’s a way to create an SSH key to log in and no longer have to use the password.
I will explain how to set this up according to your operating system.
Of course, the password connection will still be possible if you lose the key or use another computer.
From Windows
First thing, on Windows you will need the full suite of Putty, with PuttyGen and Pagaent.
So if you downloaded only the SSH client in the portable version, you have to install everything.
Download the free PDF, keep it open, and stop wasting time on Google.
Download now
You might also like: Need a clear GPIO pinout diagram? Here's mine.
You will also need a tool to transfer a file to your Raspberry Pi. WinSCP is a good choice.
Then follow these steps:
- Create your SSH Keys with PuttyGen:
- Start PuttyGen.
- Select RSA as the type of key.
- Enter 4096 as the number of bits.
- Click Generate.
- Let all other options by default, no passphrase.
- Save the keys where you want.
- Transfer the public key to the Raspberry Pi with WinSCP.
- Add a new site with our Raspberry Pi IP and credentials.
- Connect to this site.
- On the left side, go to the folder where you saved your keys.
- On the right side, go to the /home/pi folder.
- Transfer the public key to the Raspberry (drag & drop).
- Allow this key on the Raspberry Pi.
- Connect to the Raspberry Pi with Putty.
- Add the public keys just transferred to the allowed keys:
cat /home/pi/your_key.pub >> ~/.ssh/authorized_keys - Close putty.
- Try to connect again with Putty.
This test should not require you to type a password and log in directly.
If you still need a login, enter pi@IP in the “Hostname” field by replacing IP with the IP address of the Raspberry Pi. You can also use the name directly if you have set your hostname correctly as explained here.
Note: If you are a premium member in the community, I have an entire lesson about SSH, where I show you how to do this, step-by-step, in a video format. I highly recommend watching it if you can, as it’s way easier to understand with a visual support.
From Linux or Mac
To create an SSH key on Linux, the procedure is slightly different, but the steps are the same:
- If you don’t already have one, create your SSH keys with this command:
ssh-keygen -t rsa
Just press Enter for each question, default path and no passphrase. - Copy the public key file to your Raspberry Pi:
scp ~/.ssh/id_rsa.pub pat@IP:/home/pat/your_key.pub
Replace ‘pat’ with your username and also in the path (/home/pat).
Replace IP with your Raspberry Pi’s IP address.
You can name the key however you want.
- Add this key to the allowed keys by using this command on the Raspberry Pi:
cat /home/$USER/your_key.pub >> ~/.ssh/authorized_keys - Finally, let’s try to connect again:
ssh pat@IP
This time, you should be able to log in directly without being required to type a password.
Here you are, at maximum comfort, to use SSH from this PC.
And that’s it, you now know:
– What is SSH?
– How to activate SSH on a Raspberry Pi.
– How to make the SSH service start automatically at each reboot.
– Which IP address and which port to connect to.
– How not to have to type a password to log in to SSH.
You are now ready to tackle more fun projects on your Raspberry Pi, here are a few ideas:
- 15 Easy Projects for Raspberry Pi Beginners (With Links)
- Step-by-step Guide to Install WordPress on a Raspberry Pi
- The 11 Best Raspberry Pi Robots Kits for Beginners
If you have any other questions or are stuck somewhere, do not hesitate to ask for help in the community.
Whenever you’re ready, here are other ways I can help you:
Test Your Raspberry Pi Level (Free): Not sure why everything takes so long on your Raspberry Pi? Take this free 3-minute assessment and see what’s causing the problems.
The RaspberryTips Community: Need help or want to discuss your Raspberry Pi projects with others who actually get it? Join the RaspberryTips Community and get access to private forums, exclusive lessons, and direct help (try it for just $1).
Master your Raspberry Pi in 30 days: If you are looking for the best tips to become an expert on Raspberry Pi, this book is for you. Learn useful Linux skills and practice multiple projects with step-by-step guides.
Master Python on Raspberry Pi: Create, understand, and improve any Python script for your Raspberry Pi. Learn the essentials step-by-step without losing time understanding useless concepts.
You can also find all my recommendations for tools and hardware on this page.


I tried to connect my laptop to my nes 4pi but was not able to get it to work. Now that I am trying to play on my tv it s saying the password was not changed and that I need to run raspberry pi configuration. however, this was not the case before I tried connecting my laptop. I do I get the system back to normal where I can just plug into my tv, turn it on and start playing?