Start Coding with Raspberry Pi: Tools, Tips, and Resources
I was a programmer for years before discovering the Raspberry Pi. Since then, I’ve helped thousands of readers and students use it to learn the basics of coding, get back into it or do more with it. Want to join the party? Let me help you figure out the next step!
The Raspberry Pi was designed with programming students in mind, making it the perfect device for this. It has all the tools you need, and plenty of resources for all levels and languages.
I’ve written many tutorials on RaspberryTips about Python and other tools you can use on your Raspberry Pi, but I understand it can be hard to find what you should learn next. That’s why I’m writing this article, think of it as your battle plan where you can quickly identify your next step, and start working on it.
If you’re like me and sometimes mix up syntax between programming languages, I’ve got just the thing for you. I’ve put together a Python cheat sheet with all the essential syntax in one place, so you can keep it handy and avoid any confusion. Download it here for free!
Why Raspberry Pi is Perfect for Coding
I alluded to this in the intro, but this is exactly why the Raspberry Pi was created in the first place: to provide a cheap alternative to traditional PCs for young students in the UK so they can get familiar with IT, particularly programming.
You can read more about the original story of the Raspberry Pi in this article, but what’s important to remember is that it was created with this goal in mind, which means it’s perfect for you if you have any plan to spend more time programming (and I guess you have if you’re reading this).
More specifically, here are some good reasons to use a Raspberry Pi for coding:
- Beginners-friendly tools: I’ll talk more about this later, but it comes preinstalled with text editors for all levels.
- Ready to code: Many requirements are also already included in the standard operating system, so if you plan to use one of the supported languages, you don’t have to worry about installing complicated ones.
- Budget-friendly: It’s one of the cheapest computers you can find, and to be honest, you don’t need more to code.
- Community and online resources: As many Raspberry Pi users have the same goals as you, you’ll easily find help online, whatever projects you may have.
- Practical application: Unlike a traditional computer, it’s easy to extend your Raspberry Pi to use hardware like sensors, LEDs, etc. This feels less abstract and provides a better learning experience.
Anyway, if you’ve stumbled upon this article, I think you’re already at least half-convinced that Raspberry Pi is a good choice for your programming endeavours, so I’ll keep it short.
If you need help deciding which hardware you need, how to install a system, or get more comfortable with it, click the links. But for now, let’s talk a bit about your options in terms of programming languages.
Related: Do You Really Need Programming Skills for Raspberry Pi?
Programming Languages to Start with
While technically the Raspberry Pi generally runs a Linux operating system and can be used for any programming language, some have been specifically selected by the manufacturer, making them a better choice.
Let’s talk about those first, but I’ll also mention other options. In the end, the choice is yours.
Scratch
In my experience, the hardest part of teaching code to students is getting them to understand the logic. Add complicated syntax and abstract concepts, and it’s the typical beginner’s nightmare.
Scratch was created to avoid this problem by focusing on the logic and visual result of what you create, making it a better experience for beginners.
You might also like: Don't buy a new SD card until your read this.
If like me, you always mix the languages syntax, download my cheat sheet for Python here!
Download now
In short, Scratch is a visual programming language, meaning you don’t type lines of code but instead use blocks that snap together like a puzzle. It looks like this:

Each of these blocks is available in a list on the left menu, you drag it to the middle of the editor to use it. And on the right, you’ll have a visual overview of what your “code” is doing:

We have a full tutorial on using Scratch on Raspberry Pi, so I won’t go into the details here. But if you’ve never coded before, it might be a good idea to play around with Scratch.
I know it looks like kid’s stuff, but it’s powerful, and probably the best way to understand the logic of some abstract concepts that programmers love to use.
If you’re running Raspberry Pi OS, Scratch is either already installed or available for one-click installation from the “Recommended Software” list. Give it a try and let me know how it goes.
Python
The main language chosen by the Raspberry Pi manufacturer and included by default in the Raspberry Pi OS is Python, mainly because of its simplicity and readability.
Good news: Python is also the most popular programming language in the world right now!
Thanks to its versatility, it can also be used for advanced projects and has been pushed to new heights with the rise of AI. This means that learning Python won’t be a waste of time, you can use it on any platform (not just Raspberry Pi), and it’s a great line to add to your resume.

Python code doesn’t have all the complex syntax and rules that some other popular languages have, which makes it great for beginners because you can start writing as soon as you know a few instructions.
On Raspberry Pi, Python is particularly used for controlling hardware, using the GPIO pins to interact with LED, reading data from external sensors, managing HATs (add-on cards) and more.
Many libraries are preinstalled on Raspberry Pi OS, and many more are available in the default repository, or by using PIP to install almost anything in a few commands.
And you’ll also find most of the text editors that can be used for Python, with some already preinstalled (more on that later).
I highly recommend starting with Python before trying other languages (unless you’re already familiar with one of them). And if you want to do that, here are some great reads for you:
If like me, you always mix the languages syntax, download my cheat sheet for Python here!
Download now
- Should You Learn Linux or Python first?
- How to Learn to Program in Python With a Raspberry Pi?
- Why Is Python Used On Raspberry Pi? (3 huge reasons)
- 15 Fun Raspberry Pi Projects to Experiment with Python
I also wrote a full book covering Python on Raspberry Pi (you can get it there). Once you’re convinced that Python is the right choice, it’s probably worth investing a little to get a step-by-step guide to getting from your current level to where you want to be, so you don’t waste time getting lost in all those tutorials.
Other languages
Now, if you have experience with other programming languages, you can still use a Raspberry Pi with them, no need to re-learn things you already know, it will just take a bit more setup to get started.
For example, C/C++ and Java are great languages that are easy to use on Raspberry Pi, even with the default text editors. On Raspberry Pi OS, you have access to most Debian packages, so it’s easy to find the compilation requirements and other libraries for your projects.
I don’t recommend these languages for beginners, as the syntax is more intimidating (and stricter), but if it works for you, here are some articles you can check out for more details:
- How to Code in Java on Raspberry Pi (Easy Guide)
- Getting Started With Node.js On Raspberry Pi (With examples)
- Getting Started with C++ on Raspberry Pi (Guide & examples)
Some electronics kits (like most SunFounder kits) provide examples for C/C++ in their documentation, so you can easily use GPIO accessories with them. It may be more difficult with other languages, but there is always a way.
Getting Started: What You Need
I know I’ve hinted that you don’t need much to get started and that in most cases everything is ready to go, but let’s take a minute to summarize what you need before creating your first program.
Basic setup: hardware & system
In terms of hardware, almost any Raspberry Pi model will do, I would recommend a recent one if you intend to use a desktop interface. So ideally, you’ll have something like that:
- A Raspberry Pi 4/400 or 5/500: One of these will give you more than enough processing power to write code and run your programs. Older models will work, but everything will be slower. Not sure which Raspberry Pi model to get? Click on the link for the full explanation.
- A good power supply: This may seem like a small detail, but it’s important to get a stable system. Even though you can power a Pi with any USB cable, using an official power supply makes all the difference (learn more here).
- An SD card: I know it’s obvious, but I recommend having a dedicated SD card for your coding projects or learning phase. Here are the best SD cards for Raspberry Pi if you need new ones.
- (Optional) A monitor: You can use a TV, a computer monitor, or one made specifically for Raspberry Pi (like this one), it doesn’t matter. But it’s always a good idea to have a way to see what’s going on unless you’re using remote access to control your Pi.
In terms of software, I highly recommend starting with Raspberry Pi OS, especially if you plan to use Python or Scratch. Everything is ready to go, that would be the easiest way. But if you’re attached to another distribution, feel free to install whatever you’re comfortable with.
If you need help setting this up, check out my Raspberry Pi OS installation guide here. And if you want to try something else, here are some great Linux distributions I recommend on Raspberry Pi.
Applications & text editors
When I was a developer, deciding the best text editor was a running joke. Everyone would have a different answer and make fun of other developers’ choices. I won’t go down that road, so I’ll leave you free to test and decide what works best for you.
In the end, it doesn’t matter which editor you use, as long as you’re comfortable with it and it works on your device (just try to avoid Eclipse or Pycharm on a Pi Zero typically).
Now, if you are just getting started, you might need some recommendations. I think it’s fine to start with what’s already installed on Raspberry Pi OS:
- Thonny: for most beginners and simple projects, using Thonny is fine. The default view shows a simplified interface with only the features you need in the beginning.

- Geany: Also included by default and available on all distributions, Geany is a great editor I use a lot, even on complex projects at work. It’s a solid choice for when things get more serious.

- VS Code: Visual Studio Code is the editor I generally use for all my projects, whether on Raspberry Pi or my laptop. It’s now included in the “recommended software” in Raspberry Pi OS, so it’s a one-click install. I highly recommend it.

Download the free PDF, keep it open, and stop wasting time on Google.
Download now
Apart from these 3, which are good starting points for most Raspberry Pi users, you can use almost anything, from a terminal-based editor like Nano to a powerhouse like Eclipse. I wrote a list of my favorite text editors here if you want more ideas, but the most popular editors can be installed on Raspberry Pi.
Note: Of course, if you’ve decided to start programming with Scratch first, you won’t need any of these. The only application you’ll be using is Scratch itself.
Beginner-friendly Projects to Try
Now that your setup is ready, what will you do first? My advice is to find something concrete you can do in the next few days, even if it’s basic, but don’t get lost in the abstract concepts or you’ll give up quickly.
Let me give you some examples of projects you can start right now. I’ll focus on Python because it’s what I think most of you will be using, but the same ideas apply to other languages.
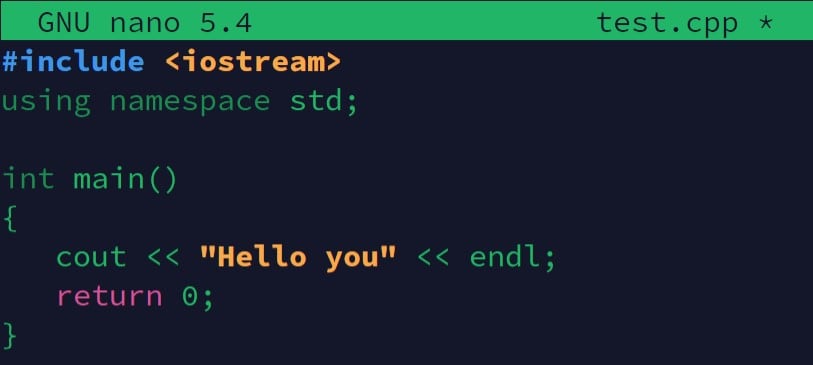
Start simple (Hello world)
If you’ve never written a line of code in your life, or not in your chosen language on Raspberry Pi, always start with something simple.
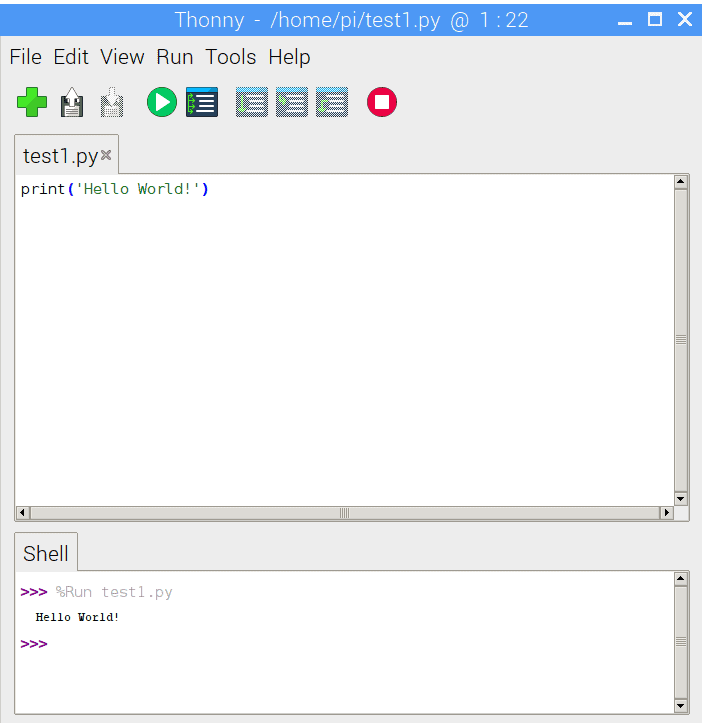
If you’re a complete beginner, it may just be the typical “hello world” program (displaying text on your screen), or if you’re more experienced, it may be finding the equivalent syntax to what you’re used to in other languages.
Take your time, it’s not a race, and there’s no point in trying more advanced projects until you’ve mastered the basics. If you need help, check out my Python beginner’s guide here, or find a similar tutorial for your language of choice.
Build your skills from this basic script. Add variables, conditions, and loops as you learn how to use them. You’ll need these in most projects, so start familiarizing yourself with the syntax now.
Sense HAT
If you want to use the features of a Raspberry Pi to code something in the real world, you will quickly be attracted to the GPIO pins that all models have. But I wouldn’t necessarily start playing with wires and LEDs right away, as you’ll need more equipment and learn a bit about electronics.
Instead, you can try plugging in some simple Raspberry Pi HATs, which will give you similar benefits (extra features, sensors, display, etc.) without worrying about wiring.
My favorite for a beginner project is to get a Sense HAT. It’s sold by the makers of Raspberry Pi. It also gives you a lot of sensors (temperature, humidity, etc.), an LED matrix for display, and even a joystick for user input.

You can find my tutorials on how to use it here:
- Setting Up Sense HAT on Raspberry Pi: A beginner’s guide
- Programming the Sense HAT on Raspberry Pi with Python
Download the free PDF, keep it open, and stop wasting time on Google.
Download now
By doing this, you’ll learn a lot about Python concepts, and basic syntax but also using libraries and testing your code with visible output on the board itself. I think it’s great for a first project if you can afford it.
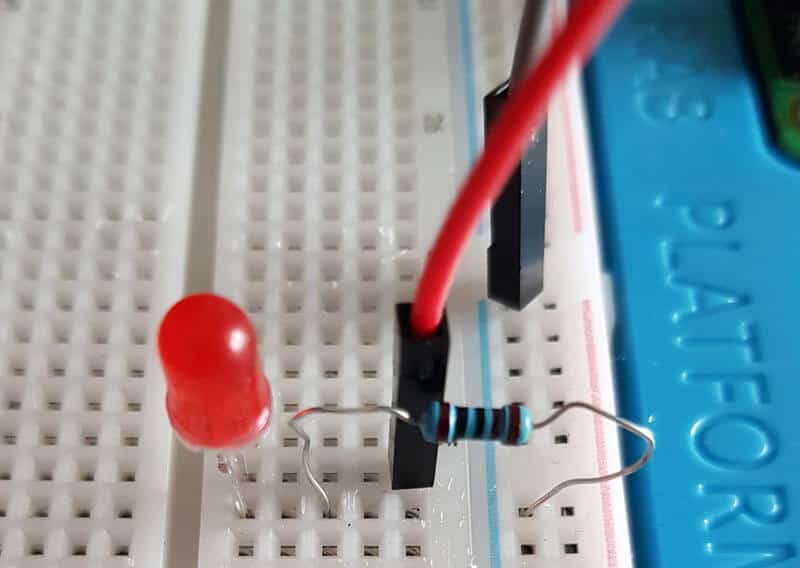
Blink a LED
Now, the typical beginner’s project with Python on Raspberry Pi is to connect a few wires, a resistor, and a lot of GPIO pins to make it blink.
This is fine if you’re interested in electronics, but it’s not required. There are a lot of other things you can do with Python that don’t require extra equipment or electronics skills. Personally, I prefer writing apps to playing with stuff like this, but I understand that the Raspberry Pi is almost built for it.
If you want to try it, you’ll need a starter kit like this one from SunFounder (with everything you need: wires, LEDs, resistors and many other gadgets). And you can read my GPIO beginner’s guide here to learn how to connect and use everything.
I also have many related tutorials you might be interested in:
- The Raspberry Pi GPIO Pinout: Diagram & Explanation
- How To Connect and Code a Motion Sensor with Raspberry Pi
- Python on Raspberry Pi: The Top 5 Libraries for Every Developer
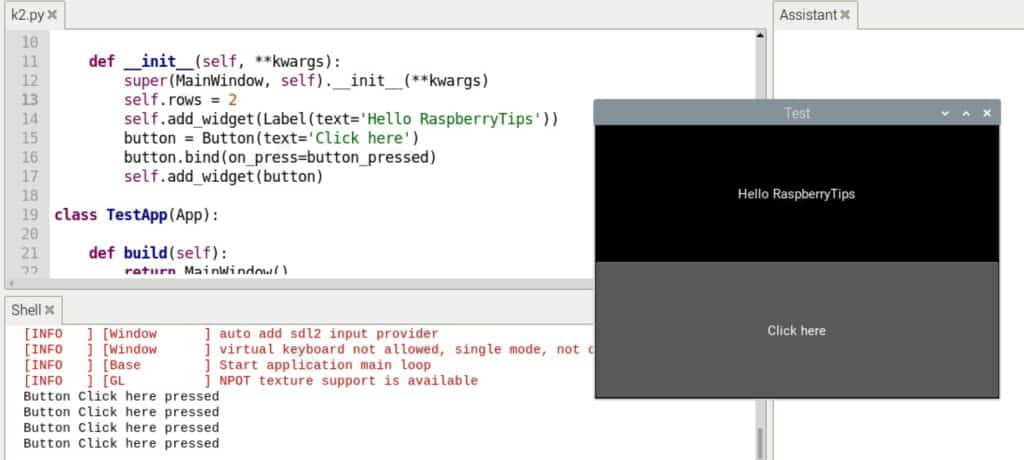
Try adding a GUI
On most projects I tend to be lazy and do the minimum in terms of interface, maybe you are too. However it is possible to improve the visual appearance of your application, and it’s not that complicated.
Some libraries allow you to generate a traditional window for your program, where you can have text, buttons and things like that, so it doesn’t look like a bash script.
I have listed the easiest ones to use on Raspberry Pi here, and you can find more details about some of them in dedicated tutorials:
- Kivy on Raspberry Pi: Installation and First Steps in Python
- Getting Started With Python Games On Raspberry Pi (Pygame)
- Get Started With Matplotlib On Raspberry Pi (Easy install)
This could be a nice project to hone your skills while building it on top of an existing project so you can keep improving it as you learn.
More project ideas
These were just the beginning, with simple projects or tasks to get you started, but the project ideas using Python on Raspberry Pi are almost endless. Here are a few more resources you can check out once you understand the basics:
- 15 Fun Raspberry Pi Projects to Experiment with Python
- 5 Easy AI Projects on Raspberry Pi for Beginners
- The 10 Best Raspberry Pi Robot Kits for Beginners in 2025
- Python: Send Emails From Your Raspberry Pi (no server)
If this project doesn’t work as expected on your setup, don’t worry. You can get help directly from me and other Pi users inside the RaspberryTips Community. Try it for $1 and fix it together.
Going further
I hope this page helped you figure out your next steps to start with Python, get better or find interesting projects to play with.
Remember: if you need more guidance, I have a full book (Master Python on Raspberry Pi) that will get you from beginner to pro in a few days, focusing only on the important syntax (and skipping the useless and abstract concepts).
If you prefer videos or have specific questions, feel free to join the RaspberryTips community, where you can access forums with over 500 other users, exclusive content, and more.
Whenever you’re ready, here are other ways I can help you:
Test Your Raspberry Pi Level (Free): Not sure why everything takes so long on your Raspberry Pi? Take this free 3-minute assessment and see what’s causing the problems.
The RaspberryTips Community: Need help or want to discuss your Raspberry Pi projects with others who actually get it? Join the RaspberryTips Community and get access to private forums, exclusive lessons, and direct help (try it for just $1).
Master your Raspberry Pi in 30 days: If you are looking for the best tips to become an expert on Raspberry Pi, this book is for you. Learn useful Linux skills and practice multiple projects with step-by-step guides.
Master Python on Raspberry Pi: Create, understand, and improve any Python script for your Raspberry Pi. Learn the essentials step-by-step without losing time understanding useless concepts.
You can also find all my recommendations for tools and hardware on this page.