Middleware in Django acts as lightweight components placed between the web server and the views. They process requests and responses globally, helping manage common tasks without complicating view code.
- Wrap reusable functionality, such as CSRF protection, into separate components.
- Apply automatically to all incoming requests and outgoing responses.
- Support both class-based and function-based middleware styles.
- Handle cross-cutting tasks like authentication, security headers, and session management.
- Useful for global operations such as enforcing HTTPS, compressing responses, or logging performance.
Working of Middleware
Django integrates middleware at multiple stages of the request-response cycle:
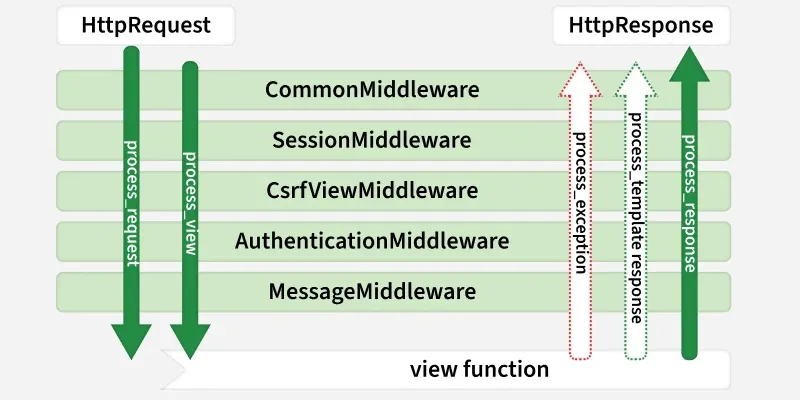 Django Middleware
1. Request Phase: The request passes through each middleware in the order defined in the MIDDLEWARE setting (top-to-bottom). Middleware can:
- Inspect or modify the request.
- Short-circuit processing by returning an HttpResponse early.
- Return None to continue processing.
2. URL Resolution and View Processing: After passing the middleware stack, the request reaches Django's URL resolver, which executes the matched view function or class-based view to generate a response.
3. Response Phase: The response passes back through the middleware stack in reverse order (bottom-to-top). Middleware can:
- Modify the response (e.g., add headers).
- Return a modified response upstream.
4. Exception Handling (Optional):
If an exception occurs during view processing, a process_exception hook in middleware can intervene before the response phase.
This structure ensures that middleware can inject functionality at multiple points in the request-response lifecycle while remaining modular, reusable, and decoupled from individual views.
Middleware Hooks in Django
Hooks are special methods in Django middleware that are called at specific points during the request-response cycle. They allow inspection, modification, or short-circuiting of requests and responses in a modular and reusable way.
- process_request(request): Runs before the view executes. Can inspect or modify the request. Returning an HttpResponse here stops further processing.
- process_view(request, view_func, view_args, view_kwargs): Runs after URL resolution but before the view executes. Useful for performing view-specific checks or modifications.
- process_template_response(request, response): Runs after the view returns a TemplateResponse. Allows adjustments to the template or context before rendering.
- process_exception(request, exception): Invoked if a view raises an exception. Can handle the exception and return a custom response.
- process_response(request, response): Runs after the view has returned a response (or after process_exception). Allows final modifications before sending the response back to the client
Types of Middleware in Django
Django's middleware can be divided into 2 types: built-in and custom.
Built-in Django Middleware
Django includes a robust set of built-in middleware classes, enabled by default in new projects. Below is a comprehensive overview including their purposes and key settings:
| Middleware Class | Purpose | Key Settings |
|---|
| SecurityMiddleware | Adds security headers (e.g., HSTS, X-Content-Type-Options); redirects HTTP to HTTPS. | SECURE_HSTS_SECONDS, SECURE_SSL_REDIRECT. Use in production. |
| SessionMiddleware | Enables session handling; attaches session data to requests. | Requires SESSION_ENGINE; place before AuthenticationMiddleware. |
| CsrfViewMiddleware | Protects against CSRF attacks by validating tokens in POST/PUT/DELETE requests. | CSRF_TRUSTED_ORIGINS; exempt views with @csrf_exempt. |
| XFrameOptionsMiddleware | Prevents clickjacking by setting X-Frame-Options header. | X_FRAME_OPTIONS (e.g., 'DENY'). |
| CommonMiddleware | Handles ETags for conditional GETs, redirects for trailing slashes/www, and gzip compression hints. | APPEND_SLASH, USE_ETAGS. Place before GZipMiddleware. |
| AuthenticationMiddleware | Populates request.user; requires sessions. | Place after SessionMiddleware. |
| MessageMiddleware | Attaches messages (e.g., from messages.success()) to requests for display. | Works with django.contrib.messages. |
| FetchFromCacheMiddleware | Retrieves responses from cache if available (pairs with UpdateCacheMiddleware). | Requires caching backend. |
| UpdateCacheMiddleware | Caches responses post-view. | Place at ends of MIDDLEWARE for full coverage. |
| ConditionalGetMiddleware | Supports HTTP 304 (Not Modified) for ETag/Last-Modified checks. | Enhances performance. |
| GZipMiddleware | Compresses responses for clients that support gzip. | Place after CommonMiddleware. |
| LocaleMiddleware | Enables i18n by setting request.LANGUAGE_CODE from URL/path/cookie. | Requires USE_I18N=True. |
| StaticFilesMiddleware | Serves static/media files in development (use collectstatic in production). | Only for DEBUG=True; place last. |
The default MIDDLEWARE in settings.py includes most of these. Customize as needed, but maintain order for dependencies (e.g., sessions before auth).
Example:
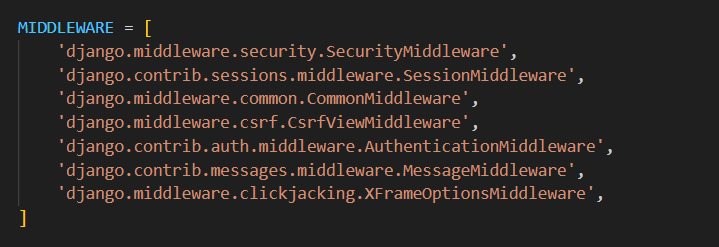 Sample middleware already included in 'setting.py'
Custom Middleware
Custom middleware allows the implementation of application-specific logic that isn’t covered by Django’s built-in middleware. Django supports two approaches for creating custom middleware:
1. Class-based Middleware
- Typically inherits from MiddlewareMixin or implements the required hooks directly.
- Provides clear structure with multiple hooks for process_request, process_view, process_exception, and process_response.
- Ideal for more complex or reusable middleware components.
2. Function-based Middleware
- A simple callable that accepts a get_response argument and returns a response.
- Suitable for lightweight or one-off processing tasks
Implementation Steps:
- Create a middleware.py file inside your Django app.
- Define the middleware class or function with the desired logic.
- Add the middleware to the MIDDLEWARE list in settings.py at the appropriate position in the stack.
Create Custom Middleware in Django
Suppose a Django project has three types of users: Teacher, Student, and Principal. The goal of the middleware is to redirect users to their respective home pages after login:
- Teacher: Redirected to the teacher’s homepage
- Student: Redirected to the student’s homepage
- Principal: Redirected to the principal’s homepage
Setting up the Project
Consider a project named 'projectmiddleware' having an app named 'testapp'.
Creating Necessary Files
In views.py:
Python
from django.contrib.auth import authenticate, login, logout
from django.shortcuts import render, redirect
from django.contrib.auth.forms import UserCreationForm
from testapp.forms import CustomUserCreationForm
from django.contrib.auth import get_user_model
User = get_user_model()
def login_view(request):
    if request.method == 'POST':
        username = request.POST['username']
        password = request.POST['password']
        user = authenticate(request, username=username, password=password)
        if user is not None:
            login(request, user)
            # Redirect to home page after login
            return redirect('home')
    return render(request, 'login.html')

def home_view(request):
    return render(request, 'home.html')

def logout_view(request):
    logout(request)
    # Redirect to login page after logout
    return render(request, 'home.html')

def signup_view(request):
    if request.method == 'POST':
        print(request.POST['username'])
        print(request.POST['password1'])
        print(request.POST['role'])
        form = CustomUserCreationForm(request.POST)
        print(form.data)
        print(form.errors)
        if form.is_valid():
            print("Valid")
            form.save()
            return redirect('login')

    else:
        form = CustomUserCreationForm()
        print("HI")
    return render(request, 'signup.html', {'form': form})
def teacher_home(request):
    print("Welcome Teacher")
    return render(request, 'teacher.html')

def student_home(request):
    print("Welcome Student")
    return render(request, 'student.html')

def principal_home(request):
    print("Welcome Principal")
    return render(request, 'principal.html')
This file manages user authentication, user registration, and user-specific homepages, acting as the central component for handling user interactions.
- Functions for login and registration
- Views for teacher_home, student_home, and principal_home
- Logic to display content based on the logged-in user type
In models.py:
Python
from django.contrib.auth.models import AbstractUser
from django.db import models
class CustomUser(AbstractUser):
    ROLE_CHOICES = (
        ('teacher', 'Teacher'),
        ('student', 'Student'),
        ('principal', 'Principal'),
    )

    role = models.CharField(max_length=10, choices=ROLE_CHOICES)

    def __str__(self):
        return self.username
This file defines a custom user model, CustomUser, which extends Django’s AbstractUser. It adds a role field to categorize users as teacher, student, or principal, enabling role-based behavior and access control within the application.
Python
from django import forms
from django.contrib.auth.forms import UserCreationForm
from .models import CustomUser

class CustomUserCreationForm(UserCreationForm):
    role = forms.ChoiceField(choices=CustomUser.ROLE_CHOICES, required=True)

    class Meta:
        model = CustomUser
        fields = UserCreationForm.Meta.fields + ('role',)
This Django file defines a custom user creation form, CustomUserCreationForm, which extends UserCreationForm. It includes a role field, allowing users to select their role (teacher, student, or principal) during registration. This ensures consistency with the role-based functionality of the custom user model.
In custom_middleware.py:
Python
from django.utils.deprecation import MiddlewareMixin
from django.shortcuts import redirect
from testapp import views
from django.contrib.auth import get_user_model

User = get_user_model()

class CustomMiddleware(MiddlewareMixin):
    def process_request(self, request):
        # Check if the request is for the login or logout views
        if request.path == '/login/':
            # Handle login logic
            print("Login Request")
            # You can perform any additional actions related to login here

        elif request.path == '/logout/':
            # Handle logout logic
            print("Logout Request")
            # You can perform any additional actions related to logout here
        elif request.path == '/admin/' :
            print("Admin")
        elif request.user.is_authenticated:
            role = request.user.role
            print(role)
            if role == 'teacher' and not request.path.startswith('/teacher_home'):
                return redirect('teacher_home')
            elif role == 'student' and not request.path.startswith('/student_home'):
                return redirect('student_home')
            elif role == 'principal' and not request.path.startswith('/principal_home'):
                return redirect('principal_home')

        # Continue processing the request
This Django middleware, CustomMiddleware, injects custom logic into the request-processing flow. It intercepts requests for login, logout, and the admin panel, handling them appropriately. For authenticated users, it redirects them to their designated home page based on their role (teacher, student, or principal), ensuring a role-specific navigation experience.
In admin.py:
Python
from django.contrib import admin
from django.contrib.auth.admin import UserAdmin

from .models import CustomUser

class CustomUserAdmin(UserAdmin):
    list_display = (
        'username', 'email', 'first_name', 'last_name','role'
        )

admin.site.register(CustomUser, CustomUserAdmin)
This Django admin configuration manages the CustomUser model within the admin panel. It customizes the displayed fields and registers the model, allowing administrators to efficiently manage users and their roles.
In urls.py:
Python
from django.contrib import admin
from django.urls import path, include
from testapp import views

urlpatterns = [
    path('admin/', admin.site.urls),
    path('login/', views.login_view, name='login'),
    path('home/', views.home_view, name='home'),
    path('logout/', views.logout_view, name='logout'),
    path('signup/', views.signup_view, name='signup'),
    path('teacher_home/', views.teacher_home, name='teacher_home'),
    path('student_home/', views.student_home, name='student_home'),
    path('principal_home/', views.principal_home, name='principal_home'),
]
This Django URL configuration maps incoming URLs to the appropriate view functions within the testapp application. It defines routes for admin access, user authentication, and role-based home pages, ensuring that each URL points to its corresponding view logic.
Setting up GUI
home.html: This is a homepage created in HTML.
HTML
<!DOCTYPE html>
<html lang="en">
<head>
    <meta charset="UTF-8">
    <meta name="viewport" content="width=device-width, initial-scale=1.0">
    <title>Welcome to Gfg</title>
    <style>
        body {
            font-family: Arial, sans-serif;
            margin: 0;
            padding: 0;
            background-color: #f5f5f5;
            display: flex;
            justify-content: center;
            align-items: center;
            height: 50vh;
        }
        h1 {
            font-size: 24px;
            color: green;
            text-align: center;
            padding: 50px;
            border: 10px solid #ddd;
            background-color: #fff;
            box-shadow: 0px 2px 4px rgba(0, 0, 0, 0.1);
        }
    </style>
</head>
<body>
    <h1>Welcome to Gfg</h1>
</body>
</html>
login.html: This is the login page which is used to collect the credentials from the user and then pass them to the backend.
HTML
<!DOCTYPE html>
<html>
<head>
    <title>Login</title>
</head>
<body>
    <h1>Login</h1>
    <form method="post">
        {% csrf_token %}
        <label for="username">Username:</label>
        <input type="text" name="username">
        <label for="password">Password:</label>
        <input type="password" name="password">
        <button type="submit">Login</button>
    </form>
</body>
</html>
signup.html: This is the signup page which is used to collect the credentials from the user and then register the user.
HTML
<!DOCTYPE html>
<html>
<head>
    <title>Sign Up</title>
</head>
<body>
    <h2>Sign Up</h2>
    <form method="post">
        {% csrf_token %}

        <!-- Username Field -->
        <div>
            <label for="{{ form.username.id_for_label }}">Username:</label>
            {{ form.username }}
        </div>

        <!-- Password Fields -->
        <div>
            <label for="{{ form.password1.id_for_label }}">Password:</label>
            {{ form.password1 }}
        </div>
        <div>
            <label for="{{ form.password2.id_for_label }}">Confirm Password:</label>
            {{ form.password2 }}
        </div>

        <!-- Role Field -->
        <div>
            <label for="{{ form.role.id_for_label }}">Role:</label>
            {{ form.role }}
        </div>

        <button type="submit">Sign up</button>
    </form>
</body>
</html>
student.html: This is the homepage for student.
HTML
<!DOCTYPE html>
<html>
<head>
    <title>Student Home</title>
</head>
<body>
    <h2>Welcome, Student!</h2>
    <p>This is the student's home page.</p>
</body>
</html>
teacher.html: This is the homepage for Teacher.
HTML
<!DOCTYPE html>
<html>
<head>
    <title>Teacher Home</title>
</head>
<body>
    <h2>Welcome, Teacher!</h2>
    <p>This is the teacher's home page.</p>
</body>
</html>
principal.html: This is the homepage for principal.
HTML
<!DOCTYPE html>
<html>
<head>
    <title>Principal Home</title>
</head>
<body>
    <h2>Welcome, Principal!</h2>
    <p>This is the principal's home page.</p>
</body>
</html>
urls.py: This Django URL configuration maps URLs to view functions within the testapp application. It defines routes for admin access, user authentication, and role-based home pages, connecting specific URLs to corresponding view functions.
Python
from django.contrib import admin
from django.urls import path, include
from testapp import views

urlpatterns = [
    path('admin/', admin.site.urls),
    path('login/', views.login_view, name='login'),
    path('home/', views.home_view, name='home'),
    path('logout/', views.logout_view, name='logout'),
    path('signup/', views.signup_view, name='signup'),
    path('teacher_home/', views.teacher_home, name='teacher_home'),
    path('student_home/', views.student_home, name='student_home'),
    path('principal_home/', views.principal_home, name='principal_home'),
]
Deploying the Project:
Apply migrations to set up the database:
python manage.py makemigrations
python manage.py migrate
Start the development server:
python3 manage.py runserver
This will launch the Django application locally, allowing you to access it via the default URL http://127.0.0.1:8000/.
Output Video:
Explore
Python Fundamentals
Python Data Structures
Advanced Python
Data Science with Python
Web Development with Python
Python Practice