Render Django Form Fields Manually
Last Updated :
19 Nov, 2025
Rendering Django form fields manually allows full control over how each input element looks and behaves in the HTML.
- Each field is written separately in the template, giving complete control over layout and styling.
- Django provides built-in methods to render form fields automatically when customization is not required.
- Manual rendering is useful when applying custom CSS, special UI designs, or specific HTML structures.
- Offers flexibility for creating forms that match a project’s design needs.
A form provides three built-in methods to render fields:
These methods automatically generate HTML for the form, making quick form rendering straightforward.
Consider a project named 'geeksforgeeks' having an app named 'geeks'. In the geeks app, create a new file called forms.py to hold all form. In forms.py:
Python
from django import forms

# creating a form
class InputForm(forms.Form):

    first_name = forms.CharField(max_length = 200)
    last_name = forms.CharField(max_length = 200)
    roll_number = forms.IntegerField(help_text = "Enter 6 digit roll number")
    password = forms.CharField(widget = forms.PasswordInput())
- The left side (e.g., first_name) is the name of the form field.
- The right side defines the type of field and its attributes (e.g., CharField, IntegerField, widget, help_text).
- Field syntax: Field_name = forms.FieldType(attributes)
- Example attributes: max_length, help_text, widget, required, etc.
- PasswordInput() widget ensures that the password is hidden when entered.
To render this form in a view, in views.py, create a home_view:
Python
from django.shortcuts import render
from .forms import InputForm

# Create your views here.
def home_view(request):
    context ={}
    context['form']= InputForm()
    return render(request, "home.html", context)
In the view, create an instance of the form class defined in forms.py.
Edit templates/home.html to render the form and display it to users:
html
<form action = "" method = "post">
    {% csrf_token %}
    {{form }}
    <input type="submit" value="Submit">
</form>
Visit: http://localhost:8000/
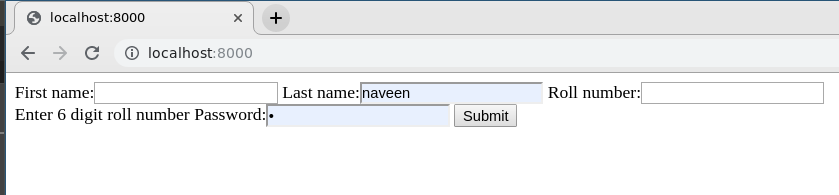
The form works correctly, but the default visuals may be basic. To enhance the appearance, form fields can be rendered manually in the template. Each field is available as an attribute of the form using {{ form.field_name }}, and it will be rendered appropriately in a Django template.
Non-field errors can be displayed as follows:
HTML
{{ form.non_field_errors }}
<div class="fieldWrapper">
    {{ form.subject.errors }}
    <label for="{{ form.subject.id_for_label }}">Email subject:</label>
    {{ form.subject }}
</div>
Visually appealing form using Bootstrap 4 and custom CSS:
HTML
<html>
<head>
    <link
     rel="stylesheet"
     href="https://stackpath.bootstrapcdn.com/bootstrap/4.4.1/css/bootstrap.min.css">
    <style>
        .i-am-centered {
            margin: auto;
            max-width: 300px;
            padding-top: 20%;
        }
    </style>
</head>

<body>
    <div class="i-am-centered">
        <form method="POST">
            {% csrf_token %}
            <div class="form-group">
                <label>First Name</label>
                {{ form.first_name }}
            </div>
            <div class="form-group">
                <label>Last Name</label>
                {{ form.last_name }}
            </div>
            <div class="form-group">
                <label>Roll Number</label>
                {{ form.roll_number }}
            </div>
            <div class="form-group">
                <label>Password</label>
                {{ form.password }}
            </div>
            <button type="submit" class="btn btn-primary">Submit</button>
        </form>
    </div>
</body>
</html>
- Manual rendering allows full control over the HTML structure.
- Bootstrap classes (form-group, btn, btn-primary) improve the visual design automatically.
- Custom CSS (.i-am-centered) centers the form on the page and adjusts spacing.
- Each form field ({{ form.field_name }}) maintains validation and widgets defined in Django.
Visit: http://localhost:8000/ and check modified form.

The previous example showed basic styling using Bootstrap. Form fields can be customized further using various CSS techniques and methods to achieve advanced layouts and effects. Each field in a Django template is represented as a BoundField, which provides several useful attributes:
1. {{ field }}: Renders the form field as HTML.
2. {{ field.label }}: The label of the field, e.g., Email address.
3. {{ field.label_tag }}: The field’s label wrapped in the appropriate HTML tag, including the form’s label_suffix. Example:
<label for="id_email">Email address:</label>
4. {{ field.id_for_label }}: The ID used for the field (id_email in the example above). Useful for manually constructing labels or inline JavaScript without hardcoding the ID.
5. {{ field.value }}: The current value of the field, e.g., [email protected].
6. {{ field.html_name }}: The name attribute used in the input element. It respects the form prefix if one is set.
7. {{ field.help_text }}: Any help text associated with the field.
8. {{ field.errors }}: Outputs a <ul class="errorlist"> containing validation errors for this field.
{% for error in field.errors %}
<div class="error">{{ error }}</div>
{% endfor %}
9. {{ field.is_hidden }}: Returns True if the field is hidden, False otherwise. Useful for conditional checks
{% if field.is_hidden %}
{# Handle hidden fields differently #}
{% endif %}
10. {{ field.field }}: The Field instance from the form class that this BoundField wraps. It allows access to field attributes.
{{ char_field.field.max_length }}
Explore
Python Fundamentals
Python Data Structures
Advanced Python
Data Science with Python
Web Development with Python
Python Practice