Selenium WebDriver is one of the most widely used tools for automating web applications. When conducting tests, debugging an issue, or simply capturing visual evidence of your tests, screenshots are an essential part of the process when the test cases fail or something issue occurs.
Firstly, set up Selenium WebDriver with Java. Here are the steps to perform how to take a screenshot in Selenium WebDriver:
Step 1. Setting Up Your Selenium Project
Create maven project and initialize the WebDriver into the BaseTest class.
BaseTest.java
package io.learn;

import org.openqa.selenium.WebDriver;
import org.openqa.selenium.chrome.ChromeDriver;
import org.testng.annotations.AfterMethod;
import org.testng.annotations.BeforeMethod;

public class BaseTest {

    protected WebDriver driver;

    // Set up the ChromeDriver
    @BeforeMethod
    public void setup() {
        // Set the path to your chromedriver executable
        System.setProperty("webdriver.chrome.driver", "C:\\Users\\change the path for Chrome-Driver\\chromedriver.exe");

        // Initialize the ChromeDriver
        driver = new ChromeDriver();
    }

    // Close the browser after each test
    @AfterMethod
    public void teardown() {
        if (driver != null) {
            driver.quit();
        }
    }
}
This BaseTest class will initialize the ChromeDriver before each test and close the browser afterward.
Step 2: Capturing Screenshots in Selenium
There are two primary types of screenshots you might need to capture:
- Full Page Screenshot: Capture the entire page displayed in the browser.
- WebElement Screenshot: Capture a specific element on the page, such as a button, header, or form.
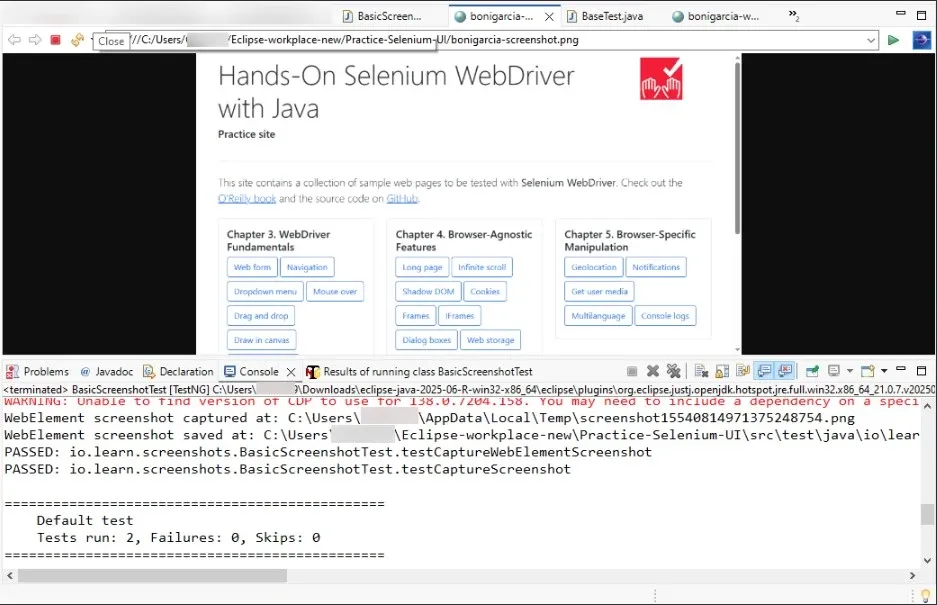
Step 3: Taking a Full Page Screenshot
To capture a full-page screenshot, we use the TakesScreenshot interface provided by Selenium.
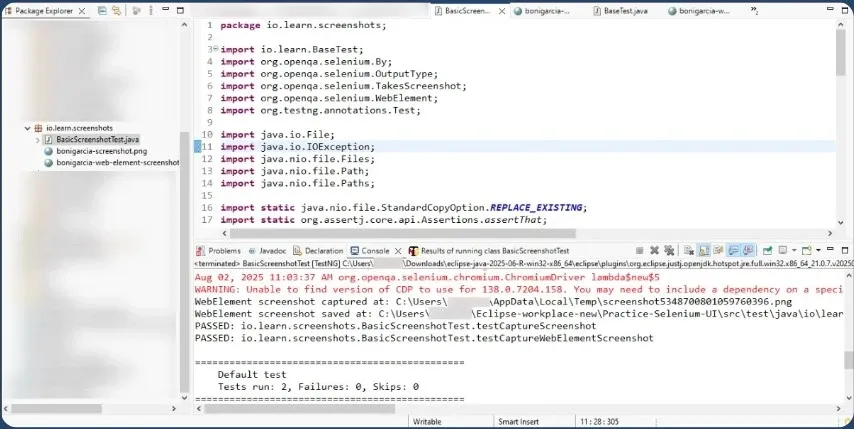
BasicScreenshotTest.java
package io.learn.screenshots;

import io.learn.BaseTest;
import org.openqa.selenium.By;
import org.openqa.selenium.OutputType;
import org.openqa.selenium.TakesScreenshot;
import org.openqa.selenium.WebElement;
import org.testng.annotations.Test;

import java.io.File;
import java.io.IOException;
import java.nio.file.Files;
import java.nio.file.Path;
import java.nio.file.Paths;

import static java.nio.file.StandardCopyOption.REPLACE_EXISTING;
import static org.assertj.core.api.Assertions.assertThat;

public class BasicScreenshotTest extends BaseTest {

    // Test for capturing a full page screenshot
    @Test
    void testCaptureScreenshot() throws IOException {
        // Open the page
        driver.get("https://bonigarcia.dev/selenium-webdriver-java/");

        // Capture screenshot using WebDriver's TakesScreenshot interface
        TakesScreenshot ts = (TakesScreenshot) driver;
        File screenshot = ts.getScreenshotAs(OutputType.FILE);  // Capture the screenshot as a file
        System.out.println("Screenshot captured at: " + screenshot.getAbsolutePath());

        // Define the destination path for saving the screenshot
        Path destination = Paths.get("C:\\path to save the screenshot\\bonigarcia-screenshot.png");

        // Move the screenshot to the desired location
        Files.move(screenshot.toPath(), destination, REPLACE_EXISTING);  // Move the screenshot file to the destination
        System.out.println("Screenshot saved at: " + destination);

        // Assert that the screenshot file exists at the destination
        assertThat(destination).exists();
    }

    // Test for capturing screenshot of a specific WebElement
    @Test
    void testCaptureWebElementScreenshot() throws IOException {
        // Open the page with a specific element to capture
        driver.get("https://bonigarcia.dev/selenium-webdriver-java/");

        // Find a specific web element (in this case, a header on the page)
        WebElement header = driver.findElement(By.tagName("h1"));

        // Capture screenshot of the specific web element
        File screenshot = header.getScreenshotAs(OutputType.FILE);  // Capture the screenshot of the header element
        System.out.println("WebElement screenshot captured at: " + screenshot.getAbsolutePath());

        // Define the destination path for saving the screenshot
        Path destination = Paths.get("C:\\path to save the screenshot\\bonigarcia-web-element-screenshot.png");

        // Move the screenshot to the desired location
        Files.move(screenshot.toPath(), destination, REPLACE_EXISTING);  // Move the screenshot file to the destination
        System.out.println("WebElement screenshot saved at: " + destination);

        // Assert that the screenshot file exists at the destination
        assertThat(destination).exists();
    }
}
Here we did:
- TakesScreenshot Interface: This interface allows you to capture a screenshot.
- File Handling: After capturing the screenshot, we move it to the desired directory.
- WebElement: In this example, we capture the header element (
<h1>). You can replace it with any other element on the page, such as buttons or images. - The screenshot is captured only for the specified WebElement, not the entire page.
Step 4: Running the Tests
You can run them using TestNG or any other test runner that you prefer.
Alternatively, if you're using Maven, you can run the following command:
mvn testOutput:
Step 5: Validating and Handling Screenshots
We ensure that the screenshot file is saved correctly on the specific path:
1. bonigarcia-screenshot.png
2. bonigarcia-web-element-screenshot.png
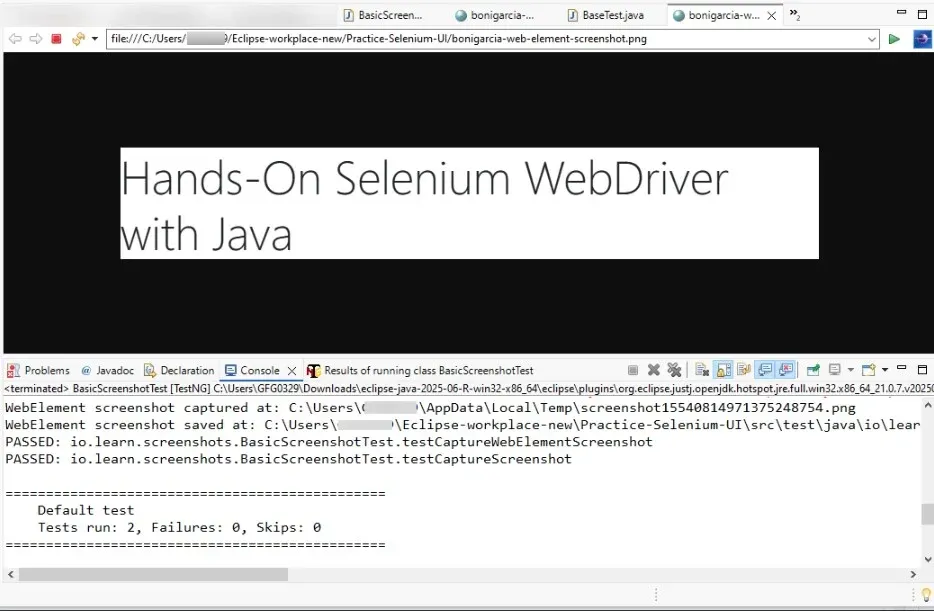
By saving these screenshots to the appropriate location, you can use them for visual validation, debugging, or documentation purposes.