Dependency injection has now become the first class citizen in ASP.NET Core. It helps us to build loosely coupled, easily readable and maintainable code. In this tutorial, we will learn the basics of the dependency injection by building a simple application.
Table of Contents
Introduction to dependency injection in ASP.NET Core
The Dependency injection is now part of the ASP.NET Core. All the Framework services are now injected as services wherever you need them.
But before going further, we need to understand why dependency injection is needed in the first place.
Consider the following controller action method. Which gets the list of products from the ProductService.
1 2 3 4 5 6 7 8 9 10 | public class HomeController : Controller { public IActionResult Index() { _productService = new ProductService(); return View(_productService.getAll()); } } |
The Index action method has a dependency on the ProductService. Hence it creates an instance of it and invokes its getAll method to get a list of Products.
The ProductService is now tightly coupled to the Index Action method of the HomeController class.
What if we created a betterProductService and wanted to replace the old ProductService with the betterProductService.
1 2 3 4 5 6 7 | public IActionResult Index() { _productService = new BetterProductService(); return View(_productService.getAll()); } |
We need to do this in every controller, service, where we used ProductService.
What if we wanted to use testProductService and wanted to use it only in the testing and use the productService in the Production. No easy solution here.
Consider the case where ProductService depends on another service, which depends on yet another service. It is not uncommon that such a chain of dependencies to exist in our application.
The Dependency Injection system solves all these problems.
What is dependency injection
Dependency injection (also known as DI) is a design pattern in which an object does not create it dependent classes, but asks for it.
Let’s change our HomeController a bit.
1 2 3 4 5 6 7 8 9 10 11 12 13 14 15 16 | public class HomeController : Controller { private IProductService _productService; public HomeController(IProductService productService) { _productService = productService; } public IActionResult Index() { return View(_productService.All()); } } |
The difference between the above code and here is that we are not creating the instance of ProductService in the Index action method. We are asking for it in the constructor of the HomeController.
The problem is still not solved right?. Someone has to create the instance of the ProductService and pass it to the HomeController.
This is where the ASP.NET Cores Dependency injection framework comes in. The Responsibility of creating the ProductService is now rests with the framework. The object that does this is called DI Container or Ioc Container.
Dependency injection is a design pattern. Dependency injection framework implements that design pattern. There are many frameworks are available like Autofac, Unity etc. which you can use with the ASP.NET Core.
DI Container
DI Container is the object, which is responsible for creating the dependencies (productService) and pass it to the object that requests (HomeController) it.
How does DI Container know which object create?
We need to configure DI Container with the classes that you want to participate in dependency injection. This we do it in the startup class under the ConfigureServices method as shown below.
1 2 3 4 5 6 7 | public void ConfigureServices(IServiceCollection services) { services.AddMvc(); services.AddTransient<IProductService, ProductService>(); } |
The second line of code registers the ProductService to the service collection using the method AddTransient. The other two methods available are AddSingleton & AddScoped. The three methods define the lifetime of the services. We will discuss this in the next tutorial.
Example of Dependency Injection System
Create an ASP.NET Core project using the empty template and name it DependencyInjection. Add the HomeController with index method. You can follow these tutorials
Creating the View Model
Create the Models folder and create the following viewModel.
1 2 3 4 5 6 7 | public class ProductViewModel { public int Id { get; set; } public string Name { get; internal set; } } |
Adding the Service
Create the folder Services and add a class with the name ProductService.cs.
1 2 3 4 5 6 7 8 9 10 11 12 13 14 15 16 17 18 19 20 21 22 23 24 25 26 27 28 | using DependencyInjection.Models; using System.Collections.Generic; namespace DependencyInjection.Service { public interface IProductService { List<ProductViewModel> getAll(); } public class ProductService : IProductService { public List<ProductViewModel> getAll() { return new List<ProductViewModel> { new ProductViewModel {Id = 1, Name = "Pen Drive" }, new ProductViewModel {Id = 2, Name = "Memory Card" }, new ProductViewModel {Id = 3, Name = "Mobile Phone" }, new ProductViewModel {Id = 4, Name = "Tablet" }, new ProductViewModel {Id = 5, Name = "Desktop PC" } , }; } } } |
First, we added the IProductService interface, and then ProductService which implements that Interface.
The ProductService returns the list of Products. The Product List is hardcoded into the service. In real life, you go into the database to fetch the product List.
Using the Service in Controller
Next, Open the HomeController and add the following code.
1 2 3 4 5 6 7 8 9 10 11 12 13 14 15 16 17 18 19 20 21 22 | using DependencyInjection.Service; using Microsoft.AspNetCore.Mvc; namespace DependencyInjection.Controllers { public class HomeController : Controller { private IProductService _productService; public HomeController(IProductService productService) { _productService = productService; } public IActionResult Index() { return View(_productService.getAll()); } } } |
The constructor of the HomeController asks for ProductService and stores the instance in local variable _productService.
The index method calls the view with the list of products by invoking the getAll method.
View
The View just displays the list of Products as shown below.
1 2 3 4 5 6 7 8 9 10 11 12 13 14 | @model List<DependencyInjection.Models.ProductViewModel>; @{ ViewData["Title"] = "Index"; } <h2>Index</h2> @foreach (var product in Model) { <p>@product.Id @product.Name</p> } |
Register the Service
The last step is to register the service in the Dependency Injection container.
Open the startup.cs and goto to ConfigureServices method. This is where all services are configured for dependency injection.
1 2 3 4 5 6 7 | public void ConfigureServices(IServiceCollection services) { services.AddMvc(); services.AddTransient<IProductService, ProductService>(); } |
We have registered the ProductService using the AddTransient method. The other method available is AddScoped & AddSingleton. You will learn about these methods in Dependency Injection Lifetime: Transient, Singleton & Scoped tutorial
Now, run the application and you should be able to see the list of products.
How Dependencies are injected
The following image shows how ProductService was injected into the HomeController.
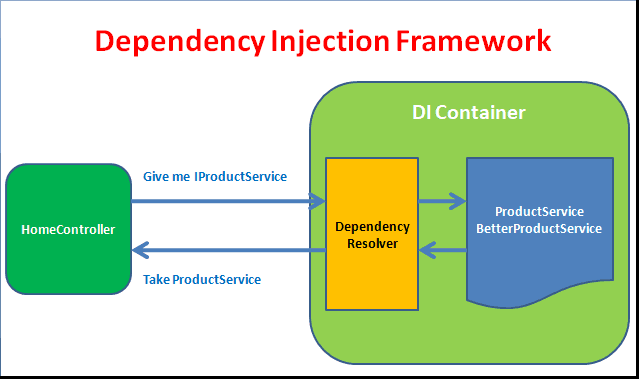
When the new HomeController is requested, the MVC asks the Dependency injection framework to provide an instance of the HomeController class. The DI Container inspects the constructor of the HomeController and determines its dependencies. It then searches for the dependencies in the services registered in the service collection and finds the matching service and creates an instance of it. Then it creates the HomeController and passes the dependencies in its constructor.
Creating the BetterProductService
Now, let us build another service called BetterProductService and want to use this service instead of the ProductService.
1 2 3 4 5 6 7 8 9 10 11 12 13 14 15 | public class BetterProductService : IProductService { public List<ProductViewModel> getAll() { return new List<ProductViewModel> { new ProductViewModel {Id = 1, Name = "Television" }, new ProductViewModel {Id = 2, Name = "Refrigerator" }, new ProductViewModel {Id = 3, Name = "IPhone" }, new ProductViewModel {Id = 4, Name = "Laptop" }, }; } } |
All you have to do is to go to ConfigureServices and change the ProductService to BetterProductService.
1 2 3 4 5 6 7 8 | public void ConfigureServices(IServiceCollection services) { services.AddMvc(); services.AddTransient<IProductService, BetterProductService>(); } |
You do not have to go to each controller & services and change the reference. You can manage it from one central location.
Similarly, you can create the TestProductService use it for testing
Changing the service based on the environment
For Example, you can use the environment and switch between the various services as shown below.
In the constructor of the startup class, ask for IHostingEnvironment service as shown below.
1 2 3 4 5 6 7 | IHostingEnvironment _env; public Startup(IHostingEnvironment env) { _env = env; } |
Next, in the configureServices check the environment. The following code configures the BetterProductService in Production and ProductService in all other environments.
1 2 3 4 5 6 7 8 9 10 11 12 13 14 15 | public void ConfigureServices(IServiceCollection services) { services.AddMvc(); if (_env.IsProduction()) { services.AddTransient<IProductService, BetterProductService>(); } else { services.AddTransient<IProductService, ProductService>(); } } |
To change the environment select the Project, Right click and go to properties. Select the debug tab. Change the ASPNETCORE_ENVIRONMENT to whatever you want it to be.
Constructor Injection vs Action injection
You can inject the services in the controller in two ways.
- Construction Injection
- Action Injection
Constructor Injection
When the dependency is injected through the constructor then the method is known as constructor injection.
1 2 3 4 5 6 7 8 9 10 11 12 13 14 15 16 | public class HomeController : Controller { private IProductService _productService; public HomeController(IProductService productService) { _productService = productService; } public IActionResult Index() { return View(_productService.All()); } } |
Action Injection
If the dependencies are injected to an action method, then the method is known as Action Injection.
The Action Injection is done using the [FromServices] attribute to an argument in an action method as shown below. Use this method, if the service is used only in a single action method.
1 2 3 4 5 6 7 8 9 10 11 12 13 | public class HomeController : Controller { public HomeController() { } public IActionResult Index( [FromServices] IProductService productService) { return View(_productService.All()); } } |
Benefits of Dependency injection
- Dependency injection facilitates loose coupling of software components
- The Code is clean and more readable
- Improves the testability and maintainability of the applications
- Allows you to change your implementations without having to change the classes
Summary
In this tutorial, we learned the basics of the ASP.NET Core dependency injection system. In the next tutorial, we learn how to manage the lifetime of the services using AddTransient, AddSingleton & AddScoped.


Greate article, very clear!
What if you don’t inject the dependency? Is it null or is an error thrown?
This is really awesome, and everything is explained very well. Thanks.
I have read a lot of articles, but I understand the topic from this article, thank you very very much
thanks my basic knowledge is more clear.
Thanks, Suraj
—————————–
…
Let’s change our HomeController a bit.
public class HomeController : Controller
{
private IProductService _productService;
public HomeController(IProductService productService)
{
_productService = productService;
}
public IActionResult Index()
{
_productService = new ProductService(); <<<<<<<<<<<<<<<<<<<<
return View(_productService.All());
}
}
The difference between the above code and here is that
we are not creating the instance of ProductService in the Index action method. <<<<<<<<<<<<<<<<
We are asking for it in the constructor of the HomeController.
…..
———————————–
yes, you DO creating…
Thanks for the correction.