In this tutorial, we will show you how to build the first Mobile App with the NativeScript application from scratch. We will be building HelloWorld Example App with Angular. The NativeScript apps can be built using plain javascript, Angular or by using Vue.js. This tutorial uses the Angular to build the App. If you are new to Angular, then head over to Angular Tutorial. The NativeScript example app, which we will build should get you started on your journey to develop Native Mobile Apps using NativeScript.
Table of Contents
- Installing NativeScript
- NativeScript CLI
- Building the First NativeScript Application
- Adding Package.Json
- Setting the Application Id
- Adding Dependencies to package.json
- Installing the dependencies using tns install
- Configuration files
- App_Resources folder
- Create the App
- Running the App
- Connect to another device
- Summary
Installing NativeScript
You need to install NativeScript CLI & related dependencies. If you have not done so, then click on How to Install NativeScript in Windows. You also need to create Android Virtual Devices, which you can learn from the tutorial setting up Android Virtual Devices in Android studio.
NativeScript CLI
The NativeScript CLI is the command-line tool that lets us create, build and deploy NativeScript based Apps on iOS & Android Devices. It comes with many commands. Here are the few common commands used
| Command | Remark |
|---|---|
| tns create | Creates a new project |
| tns platform | Have Options to add/remove platforms, list platforms, etc. |
| tns Install | Similar to npm install. Installs the dependencies from the package.json. Also installs the platform-specific files |
| tns run | Runs the project in the connected device or emulator |
| tns debug | Debugs the project in the connected device or emulator |
| tns test | Runs the unit test |
| tns build | Builds the Project |
We have already installed the NativeScript CLI. Now let us build the NativeScript App, Which displays the “Hello NativeScript” Message.
Building the First NativeScript Application
We will not use the ready to use templates provided by the NativeScript. Instead, we will build the app from scratch. In this way, you will learn and understand each part of the application better.
Open the command prompt and create the HelloWorld folder and cd into it.
1 2 3 4 | md HelloWorld cd HelloWord |
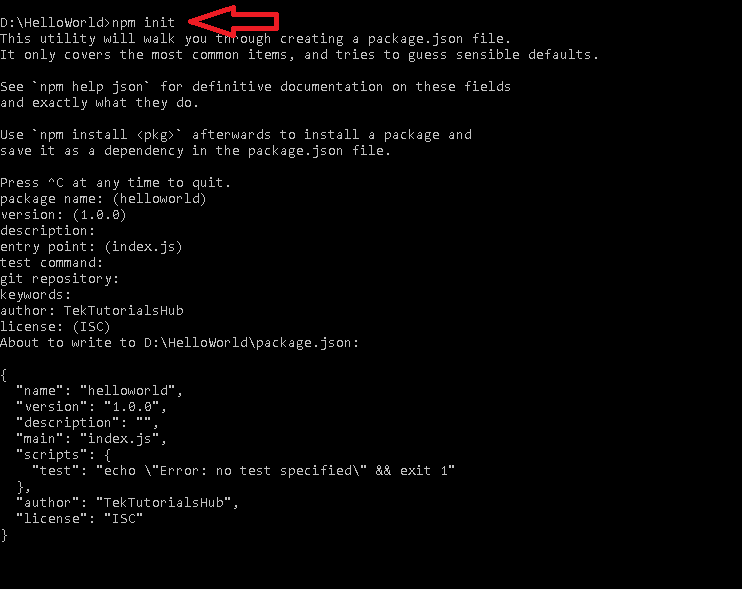
Adding Package.Json
Run npm init to add the package.json file to the project. Accept the defaults
Setting the Application Id
Every Android app must have a unique application ID This ID is used to identify the app in the google play store.
The AppID looks like the domain name but in the reverse order. For Example, the MyApp of TekTutorialsHub.com will look like com.tektutorialshub.myapp.
Now Open the package.json file using Visual Studio Code and add the following
1 2 3 4 5 | "nativescript": { "id": "com.tektutorialshub.helloworld" } |
We have named our AppID as com.tektutorialshub.helloworld.
Adding Dependencies to package.json
Next, we need to install Angular, Typescript, RxJs, etc. Hence we add them to the package.json. The final package.json looks like this.
1 2 3 4 5 6 7 8 9 10 11 12 13 14 15 16 17 18 19 20 21 22 23 24 25 26 27 28 29 30 31 32 33 34 35 36 37 38 39 40 | { "name": "helloworld", "version": "1.0.0", "description": "", "main": "index.js", "scripts": { "test": "echo \"Error: no test specified\" && exit 1" }, "author": "", "license": "ISC", "nativescript": { "id": "com.nativescript.helloworld" }, "dependencies": { "@angular/animations": "~8.2.0", "@angular/common": "~8.2.0", "@angular/compiler": "~8.2.0", "@angular/core": "~8.2.0", "@angular/forms": "~8.2.0", "@angular/platform-browser": "~8.2.0", "@angular/platform-browser-dynamic": "~8.2.0", "@angular/router": "~8.2.0", "@nativescript/theme": "~2.2.0", "nativescript-angular": "~8.20.0", "reflect-metadata": "~0.1.12", "rxjs": "^6.4.0", "tns-core-modules": "~6.2.0", "zone.js": "~0.9.1" }, "devDependencies": { "@angular/compiler-cli": "~8.2.0", "@ngtools/webpack": "~8.2.0", "nativescript-dev-webpack": "~1.3.0", "typescript": "~3.5.3" } } |
The current version of Angular is 8.2. The packages starting with @angular belongs to the Angular.
tns-core-modules is the core of the NativeScript package. The current version is 6.2.0
nativescript-angular package integrates the Angular with NativeScript.
@nativescript/theme adds some default theme to the app.
We also have reflect-metadata, rxjs & zone.js
Under devDependencies, we have Angular-CLI to compile Angular code. TypeScript as we are using it. The NativeScript has started to use Webpack for bundling, Hence we have nativescript-dev-webpack & @ngtools/webpack packages
Installing the dependencies using tns install
The next step is to install the dependencies.
We use the tns install command to install the dependencies. The tns install calls the npm install and also configures the project to use NativeScript. Let’s do that.
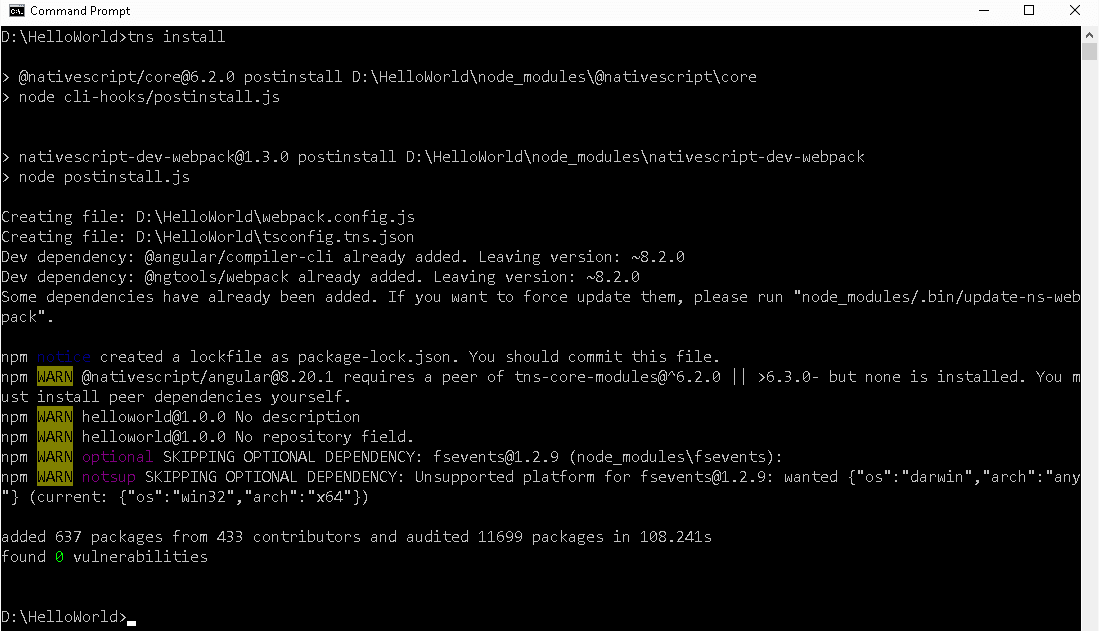
tns install has added node_modules, hooks folder and webpack.config.js,tsconfig.tns.json files to the project.
The node_modues is added by the npm package manager, where it saves all the download packages.
webpack.config.js is the configuration file for the webpack module bundler.
hooks folder
The hooks folder contains the javascript files, which run before or after a specific event. For example when you issue a tns prepare command, first all the script files in the hooks/before-prepare/ folder run, then the prepare command is run. Once the prepare command is finished the scripts in the hooks/after-prepare folders are executed.
Configuration files
Next, we need to create three configuration files. One each for Angular, Typescript & NativeScript.
angular.json
Create the angular.json file in the root folder and copy the content below.
The angular.json is the workspace configuration file for Angular. It provides the project-specific configuration defaults to build Angular Apps using Angular CLI.
If you have named your project other than the helloworld, then ensure that you make necessary changes in the file.
1 2 3 4 5 6 7 8 9 10 11 12 13 14 15 16 17 18 19 20 | { "$schema": "./node_modules/@angular/cli/lib/config/schema.json", "version": 1, "newProjectRoot": "projects", "cli": { "defaultCollection": "@nativescript/schematics" }, "projects": { "helloworld": { "root": "", "sourceRoot": "src", "projectType": "application", "prefix": "ns" } }, "defaultProject": "helloworld" } |
nsconfig.json
The nsconfig.json is a NativeScript configuration file. The appPath and appResourcesPath points to the src and App_Resources folders.
1 2 3 4 5 6 | { "appResourcesPath": "App_Resources", "appPath": "src" } |
tsconfig.json
tsconfig.json is a Typescript configuration file. Create and copy this file to the root folder of the project.
1 2 3 4 5 6 7 8 9 10 11 12 13 14 15 16 17 18 19 20 21 22 23 24 25 26 27 28 29 30 31 | { "compilerOptions": { "module": "commonjs", "target": "es5", "experimentalDecorators": true, "emitDecoratorMetadata": true, "noEmitHelpers": true, "noEmitOnError": true, "skipLibCheck": true, "lib": [ "es6", "dom", "es2015.iterable" ], "baseUrl": ".", "paths": { "~/*": [ "src/*" ], "*": [ "./node_modules/*" ] } }, "exclude": [ "node_modules", "platforms" ] } |
App_Resources folder
This folder contains the Android & iOS subfolders. Each of these folders contains the specific resources related to the platform it represents, It contains the icons, configuration files, etc.
You can download it from this GitHub link and copy it under the app folder.
Create the App
We have completed the tasks to get the project started. Now, time to create the app which just displays the “Hello NativeScript”
src folder
Create the src folder under the root. This is where the code of the app goes. Under the src folder create two files. One is main.ts & the other one is app.css
main.ts: The Application entry point
The main.ts is the Application entry point of an Angular application.
1 2 3 4 5 | import { platformNativeScriptDynamic } from "nativescript-angular/platform"; import { AppModule } from "./app/app.module"; platformNativeScriptDynamic().bootstrapModule(AppModule); |
In Angular main.ts we import the platformBrowserDynamic library from the @angular/platform-browser-dynamic library. The platformBrowserDynamic is the module, which is responsible for loading the Angular application in the desktop browser. You can refer to how bootstrapping works in Angular for more details.
The platformNativeScriptDynamic library is responsible for loading the NativeScript application and it is imported from the nativescript-angular/platform
The platformNativeScriptDynamic takes care of initializing the global nativeScript object, setting the CSS Rules and runs the Angular related initialization.
Next, we import the app.module and then load the app module using the bootstrapModule method of the platformNativeScriptDynamic library.
Styles for the App
Now, add the app.css under the src folder. We are using the default styles from the @nativescript/theme package.
1 2 3 4 | @import "~@nativescript/theme/css/core.css"; @import "~@nativescript/theme/css/default.css"; |
package.json
Next, we need to let NativeScript know that the main.ts is our entry point. This is done in the package.json file. The file must be created under the folder src folder.
Create the package.json file under the folder app and add the following code.
1 2 3 4 5 6 7 8 9 | { "android": { "v8Flags": "--expose_gc", "markingMode": "none" }, "main": "main.js" } |
The line "main": "main.js" sets the main.js file as the entry point of our app.
app folder
Now, create the app folder under src folder.
App Component
The app.component.ts. is going to be our root component just like in Angular. You can read more about components from Introduction to Angular Component. Create app.component.ts under the app folder. It is a simple Angular Component with no NativeScript related Code.
1 2 3 4 5 6 7 8 | import { Component } from "@angular/core"; @Component({ templateUrl: "./app.component.html" }) export class AppComponent { } |
Next, create app.component.html.under app folder.
1 2 3 | <page-router-outlet></page-router-outlet> |
page-router-outlet
The page-router-outlet is the equivalent of Angular’s router-outlet. It serves as a placeholder for native mobile navigations
Home Component
Create home.component.ts under the app folder
1 2 3 4 5 6 7 8 9 | import { Component } from "@angular/core"; @Component({ templateUrl: "./home.component.html", }) export class HomeComponent { } |
Next, home.component.html
1 2 3 4 5 6 | <ActionBar title="NativeScript"></ActionBar> <StackLayout> <Label text="Hello NativeScript !!!"></Label> </StackLayout> |
ActionBar
The action bar appears at the top of each screen in an app. It helps to display a title, Link to Menu, Icon, etc. The above code just displays “NativeScript” at the top of the screen.
StackLayout
A layout defines the structure of the user interface. The NativeScript supports several types of layouts. The elements like labels are placed inside the Layout. You can read more about layouts from here.
The StackLayout Stacks the elements one after the other either horizontally or vertically. Our Label element is now placed inside the StackLayout.
Label
The <label> looks similar to HTML label. The label caption is specified using the text attribute.
Root Module
The Angular App must contain at least one Module, which is the first module loaded by the Angular. It is called as Root Module. It is conventionally named as AppModule
Under the app folder, create the file app.module.ts. Copy the following code
1 2 3 4 5 6 7 8 9 10 11 12 13 14 15 16 17 18 19 20 21 22 23 24 25 26 27 28 29 30 31 32 33 34 35 36 | import { NgModule, NO_ERRORS_SCHEMA } from "@angular/core"; import { NativeScriptModule } from "nativescript-angular/nativescript.module"; import { NativeScriptRouterModule } from "nativescript-angular/router"; import { Routes } from "@angular/router"; import { AppComponent } from "./app.component"; import { HomeComponent } from "./home.component"; const routes: Routes = [ { path: "", redirectTo: "/home", pathMatch: "full" }, { path: "home", component: HomeComponent }, ]; @NgModule({ bootstrap: [ AppComponent ], imports: [ NativeScriptModule, NativeScriptRouterModule,NativeScriptRouterModule.forRoot(routes) ], declarations: [ AppComponent, HomeComponent ], providers: [ ], schemas: [ NO_ERRORS_SCHEMA ] }) export class AppModule { } |
Apart from the regular Angular Module, we are using the NativeScriptModule Module from the nativescrpit-angular library. This module brings in the NativeScript related code into our project.
1 2 3 | import { NativeScriptModule } from "nativescript-angular/nativescript.module"; |
We also need to add it into our imports array
1 2 3 4 5 | imports: [ NativeScriptModule, ], |
Define Routes
The Routes are defined using the NativeScript NativeScriptRouterModule, which is a wrapper around the Angular Router Module.
1 2 3 4 5 6 | const routes: Routes = [ { path: "", redirectTo: "/home", pathMatch: "full" }, { path: "home", component: HomeComponent }, ]; |
We register the route in the import array using NativeScriptRouterModule.forRoot method as shown below
1 2 3 4 5 | imports: [ NativeScriptModule, NativeScriptRouterModule , NativeScriptRouterModule.forRoot(routes) ], |
Running the App
Open the command window and goto the HelloWorld folder and run the tns run android command as shown below
1 2 3 | tns run android |
The tns run command starts the Android Emulator, which you can see in the background. The emulator looks for the AVD (android virtual device) and starts the device
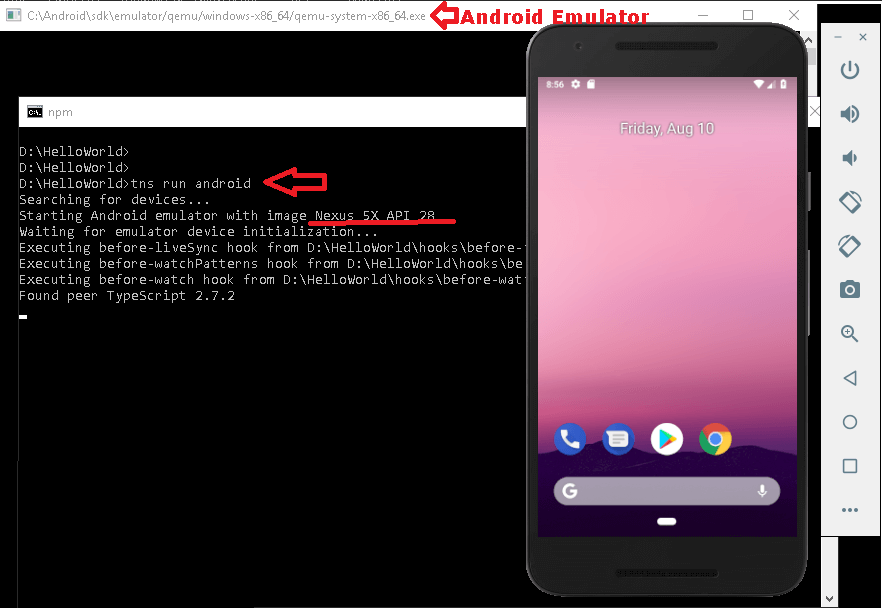
The command takes a little while to compile and update the device.
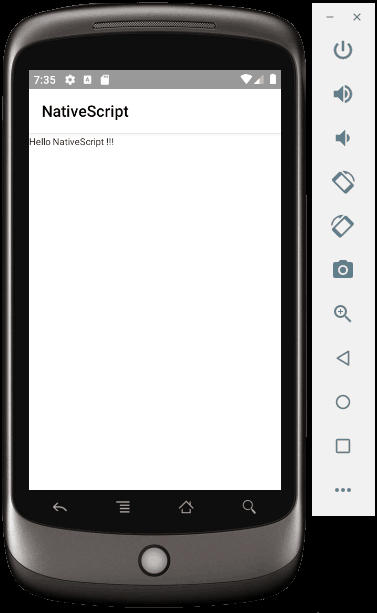
After a while, you should be able to see the Hello NativeScript on the device as shown below.
platforms/android folder
The platforms/android & platforms/ios folders are created, when you run the app for the first time. Each platform gets a subfolder under the platforms folder. They are also created when we add the platforms to the NativeScript by using the tns platform add <platformname> command
When the application is built, the compiler copies the relevant files to this folder.
There is no need to edit or modify anything in these folders.
package.json
The tns platform add command also updates project.json file with the version no of the tns android component. Open the package.json and look under the section nativescript.
1 2 3 4 5 6 7 8 | "nativescript": { "id": "com.tektutorialshub.helloworld", "tns-android": { "version": "6.2.0" } }, |
Connect to another device
Now open the android studio and create another device. You can refer to the tutorial on how to create and manage AVD to do that.
Now come back to command prompt and run the command to find out available devices as shown below.
1 2 3 | tns device android --available-devices |
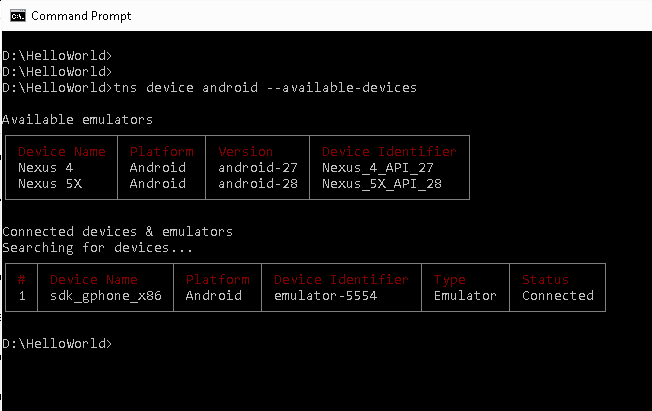
The first table shows the list of devices registered with the Android Emulator. The second table shows the list of emulators connected and running.
From the first table note down the new device name “Nexus_4_API_27” and close the emulator.
Now run the command
1 2 3 | tns run Android --device Nexus_4_API_27 |
The new device starts and you should see “Hello NativeScript”.
Summary
We just built our First Mobile App using NativeScript and Angular. The App displayed Hello World in the Android Emulator.
It looks little bit older way of implementation. CLI can do a lot now.
Nicely explained, thanks for this article. It looks like native script just adds on top of angular for mobile app building, I have used only ionic before but I will use this for next project.
Hi there,
This is Hatef Tehrani, I am learning NativeScript and seeing your tutorial videos on Youtube I thought that you may help me to find out the solution for this problem:
https://stackoverflow.com/questions/64194045/borderradius-on-parent-reveals-hidden-parts-of-children
or
https://github.com/NativeScript/NativeScript/issues/8929
Thanks in advance
Check this. https://github.com/NativeScript/NativeScript/issues/2274