This will be another work-in-progress post, a rough draft.
It is released early and will receive frequent edits and additions.
I have just begun to exchange information with two individuals, with the intended possible outcome resulting in providing Vibe coded scripts for GIMP or free online generators to automate the desired separations.
“Vibe coding” is an approach where an AI generates code from natural language prompts.
The goal is to include and consider punchcard machine users, meeting the limitations of stitch width where motifs must fit together within the 24-stitch limit, so individually they must be composed of factors of that number: 1, 2, 3, 4, 6, 8, 12, and 24.
Each card height, to feed properly, requires a minimum of 36 rows punched for continuous designs. Cards not on rolls are a standard 60 rows in height, multiple cards may be joined together if needed.
Needle selection is centered and fixed on the needle bed.
Added info is found in Brother KMs: punchcards and their use.
I learned about machine knitting from what others presented during international and local seminars at the height of the craft, or published in magazines and hardbound editions. Stitch Painter with BitKnitter and DAK were at their inception.
Susanna Lewis has always been a personal favorite and a huge influence.
As time went on, I became interested in processing much larger files using whatever tools I became aware of in image processing or paint programs to generate patterns for producing the fabric I wanted to knit.
As a machine knitter, any charts or files I shared often began with numbering on the right and from the bottom up in Excel.
Row numbering on the right was a convention in blank punchcards and published charts; transfer lace passes added numbers and symbols on the left.
An added consideration in charting: while in 2-needle hand knitting, the work is turned over upon completion of each row, so charts are read in turn from the right and then from the left when purl rows are included in the chart. Knitting on the machine is fixed unless there is hand manipulation, ie, with a garter bar, and the knitter’s view is only of the purl side. In automated punched or downloadable patterns, every row is commonly represented, including punched holes with blank squares or black and white pixels.
Electronic models have a double-height button; in punchcard models, the card lock lever can be pushed back to the long triangle position.
I avoid elongation in long pieces, finding it easier to track unraveled rows to return to the proper program row and color when any errors or stitch mishaps occur.
Although the majority of my designing is now using ArahPaint, Gimp became my early go-to as a companion to spreadsheet programs, first Excel, then Mac Numbers.
Presently I have returned to using Gimp 2.10, finding the later 2 updates unpredictable when working with 8-bit images.
There are added baseline considerations in color separations, for example, the initial file must contain an even number of rows.
Experiments are beginning with black and white indexed images, and the goal is to conclude the process with PNGs in that same mode.
Mosaic color separations are different from those for DBJ.
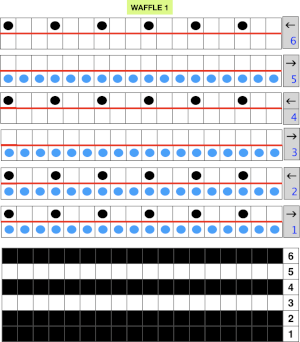
The knit, also known as floatless fair isle to machine knitters, aims to have floats usually no wider than 2 stitches and for only one color, as opposed to 2 with each pass of the carriage in fair isle.
It is executed with color changes every two rows and cam buttons set to the tuck or slip stitch setting in both directions.
Two classic references: hand knitting  for 24 and 40 stitch machines.
  In mosaics and maze conversion, the original file is not rendered double height before being separated. In other knit structures, the original file is commonly doubled in height before the separation, solving by default the even # row requirement.
Aside from the automatic color separation and what comprises the original file input, ie, indexed BW mode and an even number of rows, depending on the manual separation, the actual file on completion of the separation may need to be altered again before knitting, doubled in height.
The last double height can be achieved by altering the separated PNG before downloading it to electronic models. Symbols for that vary depending on machine or model year, in this case, 910 houses and trees, #4.  The 950i uses ships, but the button placements are in the same positions, and perform the same tasks,
  or the placement of the card lock lever in punchcard machines.
  I prefer punching or programming repeats that do not require the built-in elongation selections. Returning to specific rows after interruptions in knitting or correcting patterning errors during it are easier to track.
Whether the color separations are performed manually or with automated tools, the prerequisite is that the input file aligns properly when tiled. Often, published designs have added rows that will double when drawn in repeat, solved by cropping rows at the top and at one side, as addressed in other blog posts.
Using Gimp color invert.
A starting file, used repeatedly in previous posts on mosaic knitting, 12X18. A brief review of DIY steps involved, taken for granted when performed unseen by software, follows.
The expected results can be visualized by tiling the repeat in Gimp using Filters> Map> Tile, and entering a multiple of the design, accepting the default ratio 120X180, or breaking the chain and entering a second number, ie, 126. 
 The view of a magnified segment.
  When working with Gimp, rectangle select, the aspect ratio can be set to the width of the repeat, 12, and 1 for the height of the selection.
Hold down the shift key to process the whole image beginning at the top left and continuing on every odd-numbered row.
The handles and dotted lines appear as one moves down toward the bottom. If a selection error is made moving down, while still pressing on the shift key, select edit, undo to remove the selection.  The reversal takes place by choosing Colors > Invert only on selected rows after release of the shift key.
  With every other odd-numbered row selected and inverted, the 3 images on the left show the separation, and the last on the right shows the separated file scaled to double height, which is actually needed to knit the mosaic successfully.
  When selectively scaling, ie, only for height, check that the chain is broken, and interpolation is selected/ changed to None. The change can be made permanent by altering the Tool Options default interpolation in program settings.
  The 12X36 file is ready to knit and is also shared in repeat. The first preselection row is from right to left, and the color changer.

 This repeat for a larger design, 38X34,
 was separated using the custom filter, with the knit-ready result, 38X68, obtained in a single step


 A design that combines the mosaic grid work with the straight horizontal design found in mazes began with a 26X26 repeat,
 followed by rotations and additions of a 26X20 partial repeat
 resulted in a 66X24 PNG
  that, when viewed tiled on the screen, looked OK
  the single repeat, separated using the script,66X48, was swatched using the slip stitch setting.
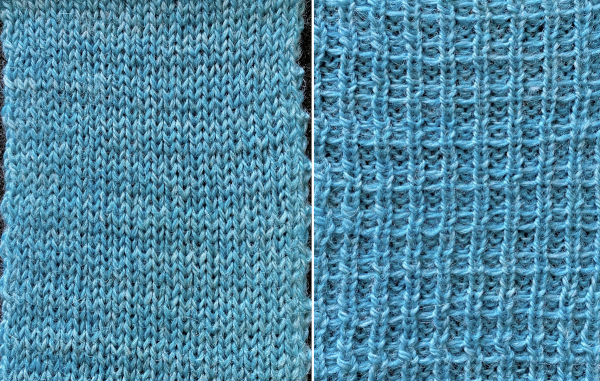
 Both tuck and slip shorten the end knit along the all knit stitches beside them, which in this case form wide horizontal stripes. Those stripes in turn become distorted, seen here at the top and bottom of the swatch; the degree of 3D effect depends on the ratio of slip or tuck counts to knit stitches.
The repeat adjusted to a slightly different alignment if I were to personally use it in a final piece, 66X26, 
 separated to 66X52
 The question then becomes whether more is less.
The original 26X26 design, separated to 26X52,  shown drawn in repeat X3, 78X52,
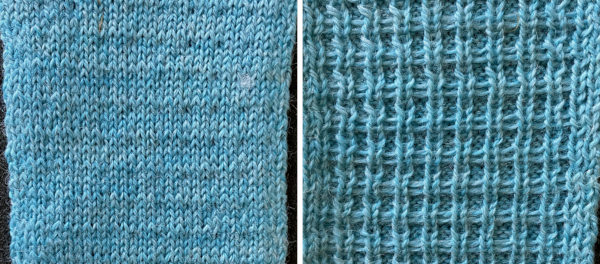
  was test-knit using the tuck setting. The yarns used are Silk City wool crepe purchased as seasonal remnants decades ago. Its fiber content is typically 80% wool and 20% manufactured fiber like rayon or viscose. The surface of the swatch is far more 3D than its slip stitch relative.
  Returning to a 2015 post on working with online generated mazes, and the selection
  with the isolated repeat, 14X34
 rendered in BW
  the script “mosaic” separation, 14X68
 color inverted for knitting using either tuck or slip stitch setting.
 The sample, knit in tuck stitch for 134 rows, measures 9.25 inches in height.
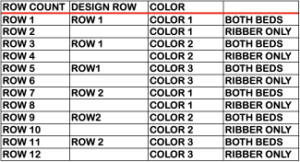
DOUBLE JACQUARD
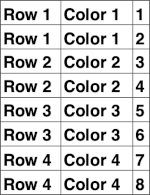
The abridged view of the same steps in the separation for knitting the original 12X18 row design as DBJ, where each color in each design row knits twice.
 The final file is composed of pairs of identical rows.
The process begins with the original image doubled in height, in this instance, to 12X36. 
 Every alternate row is color-inverted, and then doubled in height for knitting to 12X72
 12X72
12X72 The first preselection row is from right to left, toward the color changer in Japanese KM models.
Because each color in each design row knits twice, the design is very elongated, even when knit with birdseye backing. The random color choice was not the best in the related sample.  If the goal then becomes to have each color knit only once to reduce aspect ratio distortion, or if other knit stitch structures and combinations are planned, additional processing is required.
For strictly 2-color knitting, with BW starting images, electronic knitting machines automate each pixelated BW row for knitting each color only once per row with the flick of a button, generally labeled KRC.
The starting side for the preselection row is from left to right.
The 2 rows for the first color are split between the top and bottom of the programmed repeat.
The actions performed automatically: 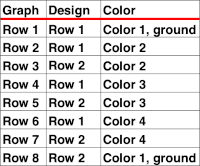 In the post ArahPaint in knit design 6: color separation, this suggested method proved faulty when tested here.
 The result shows the dramatic difference in scale when each color in each row knits only once, but there are noticeable white stitches that are breaking vertical red lines, not intended and not the result of a programming error.
  Analyzing the result: the first and last row of the design are unaffected by the separation, and when knitting lengths, that same design row will repeat twice.
This proposed method shifts the first design row to the top, maintaining the 12X36 dimensions, and is then color-inverted, rendering a 12X36 file that is ready to knit. The first preselection row is from right to left toward the color changer.
regrouping, 12X36  with the bottom row shifted to the top,
  the separation, also 12X36
 The steps in the separation
1: the original image, 12X18
2: the original doubled in height, 12X36
3: move the bottom row to the top of the repeat, still 12X36
4: as an optional guide, a column was added on the right, increasing the width to 13 pixels, marking pairs of rows to be inverted. The added pixels were originally red; when color inversion was used, they were also converted to blue pixels
5: number 4 with the blue and white pixel column removed, the ready-to-knit repeat, also 12X36.  The swatch is knit using birdseye backing, an added technique that helps to maintain the aspect ratio of the original design.
The visible extra white loops on the side are due to yarn feeds in mast issues that have gotten added to my list of “well, I have not run into this before!”

Duplicating the KRC model, with added changes, but the same result: the hand-selection method to illustrate the color invert steps, from left to right: the 8X8 PNG start,
rendered double height to 8X16,
with the bottom row moved to the top,
the separation illustrated with marks for the placement of the inverted rows in blue,
and the knittable final repeat, 8X16
 Sample color separated using a Vibe-Coded script to obtain the 8X16 result:
the goal is to knit each color in each design row only once, matching the electronic automated electronic KRC selection, with a critical difference: the preselection row is from the right, followed by color changes every 2 rows. 
 Testing a larger design repeat, 43X44
 color separated to 43X88
 knit with birdseye backing, with preselection starting from the right
More to ponder: the method used to have each design row knit twice produces files that can be altered again in double bed work for other stitch structures, or used as they are in single bed slip stitch that knits carrying one color at a time for 2 rows.
Reviewing charts for different separations, including use of more than 2 colors: depending on the published source, sometimes letters are assigned, others numbers, and they sometimes differ in identification sequences.
Continuing with Double bed separations, the longest to execute manually, while considering different stitch structures:
 Combining tuck stitches with lace 2 (automating them), the arrow points to operator error, both from 2015
 Lace meets weaving on Brother Machines 1, 2020
  Lace meets weaving on Brother Machines 2, 2020
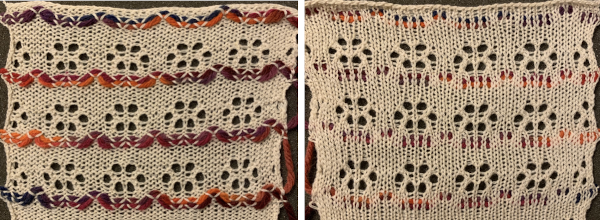 Lace meets tuck on Brother machines , 2020
 2025
2025 Though the repeat could be shorter, it was tested in a 40 row height, 16X40
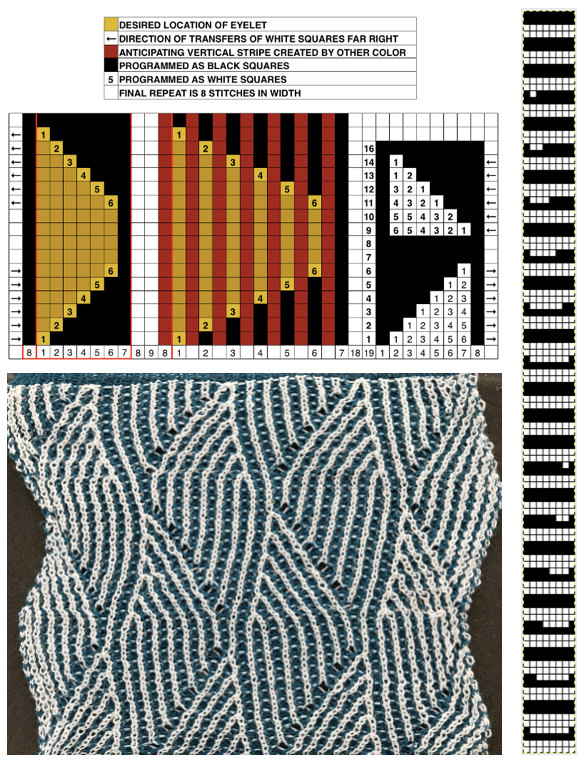
 as hand transfers are made, emptied needles and the remainder of each group of 5 must be in or returned to the work D, or E position to form eyelets amid kit stitches on the next pass. Watch that empty needles are not accidentally brought back into work.
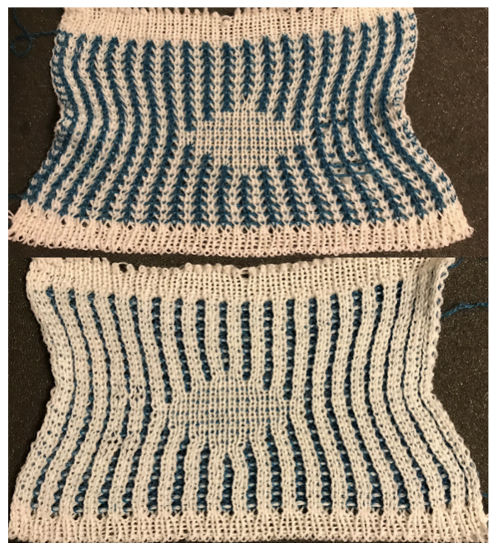
  Vertical lace columns and rib:
 Programmed repeat, 38X12
 All transfers were made toward the center stitch, beginning consistently with the stitch on the left. The yarn used initially was a 2/20 silk/wool blend, which lost surface texture and flattened permanently with steaming and light pressing.
  The same proved true with a slightly different design using the same needle setup but with transfers on alternating sides.
  Using 100% wool yarn produced designs with a more defined texture. These knits narrow considerably when off the machine, and wool has spring back that may be diminished but not eliminated with blocking.
 The repeat for the second test was changed to bring the eyelets a row closer together,

 The main bed is programmed, set to slip both ways after the first preselection row.
 followed by float formation when only the top bed knits
 The resulting grid may be used as a guide for hand techniques off the machine in isolated areas or all over.
 Needle arrangements may be varied to accommodate thicker yarns or alter the texture by varying both the number of knit rows and circular ones.


 These are advanced, complex fabrics. The repeats for 2 colors can grow exponentially in length.


 Translating Passap model book pattern/use on Brother 1
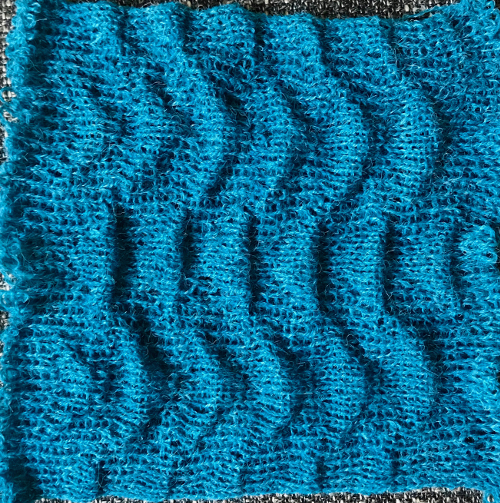


