Search the Community
Showing results for tags 'plugin'.
-
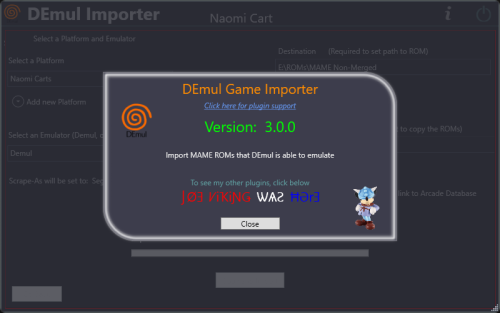
Version 3.0.0
687 downloads
Import games for use with Demul (Sega * Emulator). Purpose: This purpose of this plugin is to import only the MAME machines that can be emulated in Demul. A sort of MAME machine ‘filtered’ importer to supplement LaunchBox’s Import Tool. Why: LaunchBox can already import these machines (games) for you using the built-in Tools - Import - MAME Arcade Full Set. All you need to do is un-check the skip games unplayable in MAME checkbox. The concern is this results in over 6000 additional entries imported (even more if you uncheck any other boxes and include clones). And as in most cases, more is NOT always better. Alternatively you can also simply drag-and-drop the roms into LaunchBox. Which is great when you already have them sorted out. Included Systems: The list of machines included for this plugin was generated by running the command “demule.exe –listroms” using Demul v0.7 (Apr 28, 2018). The systems included are Naomi, Naomi 2, Atomiswave, Hikaru, Gaelco, Cave3rd (CV1000) and System SP. (Sega Dreamcast, though emulated, is not included in the list. [It’s not a MAME machine]) Naomi and Naomi 2 are each broken into 2 separate systems: Cartridge System (rom only) and GDROM (chd). Requirements: LaunchBox v13.19 or newer DEmul already set up as an emulator in LaunchBox What this plugin will do: Import games for a selected system. Import into an existing Platform or create a new one. When creating a new Platform, assigns “Scrape as” per the associated system. Attempt to automatically detect/select your Demul emulator. (Required to exist as an emulator) (optional) Copy ROMs to a new location for the games you’re importing. What this plugin won’t do: Add DEmul as a new emulator. Add the required command line to the emulator (**see below). Feature added v3.0 ‘Bulk’ import into separate Platforms. Add metadata and media to the imported games. If copying ROMs (optional), only the games main rom file is copied. It will not look for nor copy any required BIOS, Device or chd files. Installing the plugin: After downloading the zip file, extract the contents of the zip into your \LaunchBox\Plugins\ folder. e.g. D:\LaunchBox\Plugins\DemulImporter\ If updating from a version prior to 3.0, "DemulGames.xml" is no longer needed and can be deleted from the plugins folder. Using the plugin: Click Tools and select Demul game Importer Select a system This will populate a list of all the games for that system. (optional) Check View Parent ROMs Only When checked, only the parents ROMs will be imported When you select a game, a "globe" and the ROMs filename will appear Click the globe to navigate to the Arcade Database for the selected game Click Import Games Select a platform to import the games into You can select an existing platform from the dropdown list or click on Add New Platform to create a new one. Select an emulator The plugin will attempt to automatically select your DEmul emulator. If it isn’t already selected, look for it in the dropdown list. Select the folder where your ROMs are located (or will be if you select Copy) This is required to set each games Application Path (optional) Check Copy ROMs to another location Browse to the folder [Source Folder] where they’re located. (optional) Check Add Additional App with link to Arcade Database (New v3.0) The Additional App will be a hyperlink to the Arcade Database for that game Select Import (or Copy and Import) to complete the process NOTES: **Default Command-Line Parameters System Command Line Parameter Naomi -run=naomi -rom= System SP -run=naomi -rom= Gaelco -run=gaelco -rom= Atomiswave -run=awave -rom= Hikaru -run=hikaru -rom= Cave -run=cave3rd -rom= Medalusion -run=alien -rom= Once import is completed, simply select the newly imported games and click Tools, Download Metadata and Media.... Information on getting these systems to run in Demul can be found here: https://forums.launchbox-app.com/topic/30622-sega-naomi-demul-in-launchbox/ After importing into a newly created platform, be sure to Edit the platform and check "Disable ROM Auto-Import". Disclaimer: I personally only have a few of these games on my cab. So I’m not very familiar with the systems mentioned here. Also, I have no idea if DEmul is even “the best” emulator for these systems. -
SteamLauncher View File SteamLauncher A LaunchBox plugin designed to allow roms/emulators to easily be launched with Steam, directly from the LaunchBox/BigBox interface, without any complicated setup or technical know-how. Simply enable SteamLauncher and all LaunchBox/BigBox game/rom launches will be intercepted and launched via Steam. This will provide access to the Steam overlay, custom controller configurations, and will display the game/rom your are currently playing to any of your Steam friends. Features Here are a few of the features provided by SteamLauncher: Allow LaunchBox to do what its good at - be the sole organizer and maintainer of your rom/game collection, without having to duplicate its functionality in Steam (something it was not designed for). Keep the Steam library clean and uncluttered by hundreds of emulator/rom shortcuts. Get all of the benefits of Steam's excellent overlay system while playing any rom or emulator. Take advantage of Steam's infinitely customizable controller configuration (bindings) for both the Steam Controller and nearly all other DirectInput/XInput controllers. Use per-rom/per-emulator/per-game controller configurations that are automatically remembered between gaming sessions (without having to create convoluted Steam shortcuts for every rom). Bypass or improve upon many emulators' extremely limited controller bindings and hotkey options. Share the game/rom currently being played with Steam friends (ex: JohnDoe is currently playing 'Super Metroid (SNES)'). Requirements .NET Core 3.1 Steam for Windows LaunchBox/BigBox Getting Started Installation Download the latest plugin release from the LaunchBox forum plugin download page. This GitHub repository is meant as more of a resource for developers. While test builds and other pre-release packages may occassionally be posted on GitHub, the latest public release builds will always be posted on the LaunchBox forum plugin download page first: LaunchBox Plugin Download: https://forums.launchbox-app.com/files/file/972-steamlauncher/ Extract the 'SteamLauncher' directory from the compressed package into your LaunchBox plugins directory. Example: If LaunchBox is located at 'C:\LaunchBox', you would copy the 'SteamLauncher' directory to 'C:\LaunchBox\Plugins'. This would result in 'SteamLauncher.dll' and any additional files being inside the directory 'C:\LaunchBox\Plugins\SteamLauncher'. How to Use Note: Obviously, Steam must be running to launch games via Steam so one can either manually start Steam before opening LaunchBox/BigBox or SteamLauncher will automatically launch Steam when needed. To launch a game/rom/emulator in LaunchBox/BigBox via Steam: Ensure SteamLauncher is enabled by using 1 of the 2 following methods: Selecting the 'Tools' menu item and clicking 'Use SteamLauncher'. When SteamLauncher is enabled the menu item will be labeled '(ON)'. This menu item can also be found in BigBox. Selecting the 'Tools' menu item and clicking 'SteamLauncher Settings', resulting in the SteamLauncher settings dialog being displayed. By then checking the checkbox labeled 'Enable SteamLauncher' and clicking the 'Save' button, SteamLauncher will be enabled. The SteamLauncher settings dialog cannot be accessed in BigBox. Once SteamLauncher is enabled, all games/roms/emulators will be intercepted by SteamLauncher and launched through Steam. Customize Platform Names When games/roms are launched with SteamLauncher enabled, the title and platform of the game/rom will be displayed in one's Steam status in the format of: 'Game Title (Platform Name)'. Example: Super Mario Bros. (Nintendo Entertainment System) Friends on Steam will see this title in one's status whenever a particular game/rom is being played. If desired, the platform name displayed can be customized. For example, the platform 'Nintendo Entertainment System' can be changed to 'NES'. This customization can be performed by navigating to the 'Platform Names' tab in the SteamLauncher settings dialog. Note: To entirely omit a platform name from one's Steam status, leave the 'Custom Platform Name' entry blank (as seen in the 'Windows' entry in the screenshot below). Selective Use The 'Selective Use' feature allows one to precisely customize the circumstances under which SteamLauncher will be enabled/disabled. The settings for this feature can be found in the 'Selective Use' tab in the SteamLauncher settings dialog. Filter Mode 'Filter Mode' defines how the entries in the 'Filter List' will be applied. Blacklist: SteamLauncher will always be enabled except when a matching filter is found. Whitelist: SteamLauncher will always be disabled except when a matching filter is found. Off: Disable the 'Selective Use' feature entirely. Filters List The 'Filters List' is a list of user defined filters that control when SteamLauncher will be enabled/disabled. Enable: This checkbox must be checked for a particular filter list entry to be enabled. If not checked, it will be completely ignored. Description: Used purely as a means of helping the user describe what the filter list entry does. It is entirely optional and has no impact on the actual functionality of the entry. Filter String: This is the string which is matched against the target 'Filter Type', dictating whether or not this entry matches a particular game title, platform name, etc. The filter string is not case sensitive and it supports 2 types of wildcards: '*' Wilcard: matches one or more of any character. '?' Wildcard: matches any single character. Filter Type: Dicates what field the 'Filter String' is compared against. The 'Filter Type' options are: Game Title: Title of the game or rom (ex: Celeste, Super Mario World, Donkey Kong Country, etc). Platform Name: Name of the platform (ex: Windows, Nintendo 64, Sony Playstation, etc). Emulator Title: Title of the emulator (ex: Retroarch, Dolphin, Cemu, etc). Exe Path: The path of the game or emulator EXE file (ex: 'C:\PC_Games\GOG\*', 'D:\*', '*\DOSBox\*', etc). Additional Application Name: Name of an 'Additional App' (a LaunchBox feature which allows you to specify additional commands to run for a game). Status: A field in LaunchBox's metadata for games (right click game, 'Edit' -> 'Edit Metadata') which specifies what platform/launcher/store a game was imported from (ex: '*Xbox*', '*Microsoft Store*', '*GOG*', etc). Ignore Custom Fields: Enabling this feature causes SteamLauncher to ignore all 'SLEnabled' custom field entries. What are 'SLEnabled' custom field entries? Right click on a game in LaunchBox, click 'Edit' -> 'Edit Metadata', and then select the 'Custom Fields' menu item. By adding a new entry named 'SLEnabled' and setting its value to '1' or '0', SteamLauncher can be made to always be enabled for this game (1) or always be disabled for this game (0). This custom field value will always take precedent over all other filtering features (filter strings, filter modes, etc). The only exception to this is when 'Ignore Custom Fields' is enabled (which will cause all 'SLEnabled' custom field entries to be ignored). VTables 'Automatic Online Updates' 'Automatic Online Updates' of vtables definitions can be enabled/disabled in the 'Miscellaneous' tab of the SteamLauncher settings dialog. For SteamLauncher to properly work it has to access internal Steam features that are not meant to be accessed by developers outside of Valve. To access these undocumented, unexported functions, SteamLauncher uses a set of definitions which define what these functions are, their function signatures (their parameters, return values, and how to call them), and where to find them within the Steam client DLL. These definitions can change whenever Valve releases a new Steam update and if they change significantly, they can cause SteamLauncher to stop working correctly. In order for SteamLauncher to continue working properly, without the author manually patching the plugin and releasing a new SteamLauncher update every time this happens, an online database was created that can be updated when one of these changes happens, allowing SteamLauncher to continue functioning normally. If 'Automatic Online Updates' is enabled, SteamLauncher will automatically check for new updates every time LaunchBox/BigBox is launched. If new definitions are available, it will silently update and continue working normally. If automatic updates are not enabled, one can manually check for new updates by clicking the 'Force Update' button. Support If you have ANY problems with the plugin, I want to know about them. If you need help with any technical issue (see 'Logs'), want to suggest a new feature (I'm very open to any ideas), just want to chat, or anything else related to the plugin, visit the support thread at the link below. I am also available to chat on Steam for any urgent issues or if more direct help is needed. Plugin Support Thread: https://forums.launchbox-app.com/topic/43142-steamlauncher/ Logs To provide help with any technical problems or to investigate a bug, I will need a copy of the debug log that is generated whenever 'Log Level' is set to 'Verbose'. To enable and collect 'Verbose' debug logs, do the following: Open the SteamLauncher settings dialog. Click the dropdown box under 'Log Level' and select 'Verbose'. Click the 'Save' button. Restart LaunchBox/BigBox. Now simply repeat whatever behavior was causing the issue and/or bug, and after you're sure you've replicated the behavior, close LaunchBox/BigBox. Look inside of the SteamLauncher directory for a file named 'debug.log' (there may be more than one sequentially named log file if there was an enormous amount of output but this is unlikely if verbose logging was turned on just briefly). Open this 'debug.log' file in a text editor, copy its entire contents, and paste/upload it to pastebin.com. In the SteamLauncher support thread, provide the PasteBin URL, the details of the problem you encountered, and the particulars of your setup (Windows version, 32-bit or 64-bit, LaunchBox version, Steam version, SteamLauncher plugin version, etc). The more information the better. Contact Information Alias: Lahma Email: [email protected] Steam Alias: lahma0 Friend me on Steam: You can click on my alias above or you can copy/paste the following URL into your address bar: steam://friends/add/76561198237461630 GitHub Project URL: https://github.com/lahma0/SteamLauncher LaunchBox Community Forums Profile: https://forums.launchbox-app.com/profile/89710-lahma/ Plugin Support Thread: https://forums.launchbox-app.com/topic/43142-steamlauncher/ Credits ChippiHeppu: Logo m4dengi: steamclient_tracker (unfortunately, no longer updated) cammelspit: Help with developing the idea and direction for the project Nielk1: Initial inspiration for the project and just a talented programmer to bounce ideas off of Helpful members of the LaunchBox community: The_Keeper86, JedExodus, FromLostDays, HTPCei, Corgana, Benuno, Neil9000 (sorry for anyone I'm forgetting) Known Issues MAME Compatibility Fix It has been observed that MAME crashes when launched through a non-Steam shortcut. This problem is not directly related to SteamLauncher, but since SteamLauncher relies on non-Steam shortcuts, launching MAME via SteamLauncher was no longer working. After a lot of investigation and tinkering by some dedicated users on the LaunchBox forums (cammelspit and JedExodus), a fix was eventually found for the issue. Whether launching MAME directly via a non-Steam shortcut or via SteamLauncher using LaunchBox/BigBox, the fix is simply to modify the launch parameters to include the following: -joystickprovider xinput -keyboardprovider win32 If one of these parameters already exists when modifying MAME within LaunchBox, you will obviously need to replace it (don't just add a 2nd instance of '-joystickprovider' or '-keyboardprovider'). You can safely ignore any popups/warnings that LaunchBox displays about pause screen compatibility. Legal Stuff ©2022 Valve Corporation. Steam and the Steam logo are trademarks and/or registered trademarks of Valve Corporation in the U.S. and/or other countries. Submitter Lahma Submitted 02/11/2018 Category Third-party Apps and Plugins
-

Version 1.0.1
3,279 downloads
DISCLAIMER: Use at your own risk! Please read and understand Youtube's terms of service. I will not be held liable for any misuse of any product or service. Overview: This plugin makes use of the open source and unlicensed application yt-dlp (forked from youtube-dl) in conjunction with ffmpeg to download game videos. It first downloads videos from the link provided in the metadata from LaunchBox, skipping videos longer than a specified duration, and then searches for videos for missing games based on input search terms. It is intended for modern Windows games, as this was my need initially. Requirements: Launchbox 13.19 or newer. (Use version 0.5.1 for older Launchbox installations) ytdlp (included in .zip) ffmpeg (included in .zip) Installation Instructions: Extract the contents of the .zip folder and place it in your LaunchBox plugins folder. Usage Instructions: Select a game or multiple games, right-click, and select "Download Video Snap." Select desired quality. Adjust the maximum duration if desired. The "Get Missing Videos" checkbox sets whether or not to search for videos of games that don't have URL's in their metadata. The "Trim videos" checkbox sets whether or not to trim videos after they have been downloaded. Enter desired search terms for missing videos. Click "Start" to start the download process. Games will download asynchronously. Resuming downloads is also supported natively. Other: PLEASE NOTE: I AM NOT A DEVELOPER! I know very little about C# and programming in general, so I probably won't be able to address many issues that you may face. That being said, I will try and fix things where I can. I've provided the spaghetti source code for anyone to modify, improve, etc. (it seems you need to unblock the forms in the "Resources" folder -> RMB->properties->unblock.) As of now, I'm more comfortable with the usability of the plugin; however, there are still probably many issues. Any comments to provide insight/improvement to the code, etc. would be much appreciated. Thanks to @srxz for his source of Youtube Scraper, on which this is based. Credits: @srxz @JoeViking245 @C-Beats maikeru86 -
 Chadmando's Super Pause Menu! Please scroll down for further information, the latest updates, as well as installation instructions. Thank you! Latest version can be downloaded here: https://forums.launchbox-app.com/files/file/5240-super-pause-menu/ Introducing Chadmando's Super Pause Menu... A feature rich pause menu plugin for launchbox. Features: Ability to add up to 20 additional custom menu items Highly customizable By default, nice large text for large monitors and television screens No autohotkey coding neccesary if simply needing to send keys (Auto detection of keys) AutoHotkey injection option Clock Multiple save states (up to 100 if wanted!), with accompanied timestamps and screenshots Manual launched internally and saves your page within current play session thanks to xpdf tools, UnRar and 7za. Support for PDFs, TXT and images within a folder or a CBR, CBZ, ZIP, 7Z and RAR archive. (Takes a few seconds to load upon first launch, then instantly after that) Multiple strategy guides supported, pages will automatically be bookmarked for the current, or even the next play session. Support for PDFs, TXT and images within a folder or a CBR, CBZ, ZIP, 7Z and RAR archive. Currently compatible with launchbox version 13.19 Preloaded with suggested settings for Demul, Dolphin 5.0, Sega Model 2, ePSXe, Mame, Mednafen, PCSX2 (v1.6.0) Project 64, Retroarch, SNES9x, Sega Model 2, Supermodel 3, Visual boy advance-M and Visual boy advance-M Git, plus any you want to add in manually with easy setup using default settings. Theme profile switcher. Great for multi-platform emulators such as retroarch. Ability to use animated gif backgrounds. Includes a controls menu when a controller image is found within the folders- Super pause menu\Images\Controls\[Platform]\ or Super pause menu\Images\Controls\[Platform]\[Game Name]\ Game controls images override platform control images. Screenshots: Quick install and setup: -Download the latest Pause menu compressed zip file from the top of the post. -Once downloaded right click on the zip file, go to properties and click on the box "Unblock" then click "apply" and close the dialog. -Next right click on the file again and choose: Extract All.. when the browse menu pops up choose your launchbox directory and click extract. A dialog will pop up asking you you to merge the plugins folder, choose "Yes". You will now have a new folder in the launchbox directory labeled Super pause menu, and a dll file in the Plugins folder named Super Pause Menu.dll Installation is complete. -Quick Setup/Change default hotkeys If your emulator is on the list it is enabled by default with the default menu hotkeys, and the given default hotkeys of the emulator. Launch pause menu (quick press): Shift or Xbox Guide button Navigate pause menu: Up down arrows, or Up down on player 1 Xinput's D pad controller Menu select item: Enter, or A on player 1 Xinput's D pad controller Back: Backspace, or B on player 1 Xinput's D pad controller Menu navigation keys are universal and shared among all emulators. You may need to change your video settings within the emulator itself for the pause menu to work. If Launchbox's pause menu already works with the specified emulator, so should this. The best video settings are borderless window mode using a direct3d plugin. For dolphin specifically you'll probably need to match this. See the notes section in my settings program for my recommended settings. Some settings may not work for your system/graphics card in which you will want to play with the "Emulator Settings" page of my Settings program. I personally tested my settings on a nvidia gtx 970 card. The same settings don't all work using my sons computer with a AMD card, but I was able to tweak some minor settings and had them all working. If you would like to change the default menu navigation keys or any other settings, a new menu item is now added into launchbox. Open up launchbox, click on the settings icon-> Tools-> Super Pause Menu Settings Once the menu is loaded click on the checkboxes to enable/ disable any of the default emulator settings. If the emulator selection box come up blank try and hit the Refresh List button. Next, double click on emulator of choice to change settings. The emulator name and executable will show up at the top when loaded. Click on the "Menu keys" button on the left side. Double click on the hotkey form (white square) to change the desired hotkey. When the menu pops up hold down your key of choice and click on the "submit" box. ***If using an Xbox controller ensure to use the "Xinput" choice or it will not work properly** The pause menu is Xbox guide button compatible and I highly recommend it. The program is designed to be launched with a quick press of button, so that if you decided to use an Xbox button you can turn off the controller without activating the menu. Once you are happy with your menu keys, click on save. When you are done with the settings you can close the window. Start a game with Bigbox or launchbox, let it run for a few seconds (the program needs a few seconds to initialize) and quick press your chosen pause key, the menu should now pop up! Pressing the pause key again, or selecting "Resume" will bring you back to the game. Customization:There are several customization options available, feel free to play around with them. One thing you may find weird is I made all my sizings based on on percent of your screen width and height. This is because I wanted the pause menu to be compatible with any resolution, to look the same no matter which monitor you are using. If the pause menu is not looking right/ any scaling issues you can force a specific resolution on the "Emulator Scaling/DPI Settings" page. Update Log: ------------------------------------------------------------- What's New in Version V2.4.0 UPDATE Feb. 23/25 - 2.4.0 Added a strategy guide menu! Place any amount of strategy guide files within the strategy guide game folder and a new menu item will be added to the main pause screen called "Strategy Guides". The last open strategy guide page will automatically be bookmarked, available to be recalled during, or even on the next play session. Supported file types are image files including jp2 files within a folder OR a .zip, .cbz, .7z, .cbr, .rar, .pdf, even .txt. The strategy guide filename (minus extension) will be the name used on the Strategy guide menu. The default strategy guide folder will be located in Launchbox\super pause menu\Strategy Guides\[Platform]\[Game Title] or Launchbox\super pause menu\Strategy Guides\[Platform]\[Rom Filname (minus .ext)]. The strategy guide root folder and the sizing attributes can be changed on page 6 of the "Customize Menu" option in the Super pause menu settings (Located in tools -> Super Pause Menu Settings in Launchbox). The conversion process can take a bit of time, the quickest method would be to use non-jp2 images in a folder, rather than an archive. The longest loading time would be an archive file containing a bunch of Jp2 images. .txt conversion can take a bit of time as well (converting it to a multi-"page" image). Added sqlite3 dll to help store more complex information, such as the strategy guide bookmarks. Included imagemagick convert program in resources to convert jp2 images to regular .jpg images that Super Pause Menu can handle. Added folder, .zip, .7z, .rar, .txt support for manuals. Changed the default "Back" menu key to escape, instead of delete to avoid incidental deletion of anything. Added some basic emulator settings for Yuzu emulator (Nintendo Switch). Added some emulator settings for Daphne emulator Added some extra .bat support. If launchbox/bigbox runs a .bat file for an emulator, which then in turns launches an emulator executable (such as may be needed for Daphne), super pause menu will wait 10 seconds for the emulator to launch after the .bat file. Enabled forceful activation to EPSXE emulator Changed the font sizing to all custom profiles so it can fit in "Strategy Guides". Changed font size handling on the main menu to avoid any single menu item taking up multiple lines Super Pause Menu will now delete the temp folder it creates after a play session in the super pause menu folder Added a "Loading..." animation to the Strategy guide and manual selection. UPDATE Jan. 08/25 - 2.3.0: -Added CBR and CBZ support for manuals Updated settings program, now has "alternative manual root folder" selection. Will be used for launchbox and attract-mode for CBZ, CBR manuals. Can be used in conjunction with launchbox's pdfs. Updated launchbox dll plugin from .net core 3.1 to 6. Can now push game filepath to the pause menu Updated default emulator profile for mame for the default hotkeys for v 0.273. Ensure your command line parameters for mame are "-keyboardprovider dinput" inside of Launchbox. For attract-mode (and +) Command arguments in would be [name] -keyboardprovider dinput Added a folder in \Super pause menu\Emulators for older emulator hotkey configs. Called "Older and alt emulator configs" Changed the pause/unpause button in mame to F5 to match the new mame default keys. If a game were to be closed externally while the pause menu screen was up, there is potential for the game to be muted on next launch. I added some logic to unmute on the next launch if that were the case. Removed manual folder path option in the attract mode plugin menu, can change the setting in the settings.exe 2.2.0: Added a highlight border for around the selection menu. This can be disabled enabled or disabled on page three of the Customize menu settings in Tools->Super Pause Menu Settings. The border can be used independently of the highlight bar. Pre-loaded sounds into memory to speed up the menu Passed on the new custom hotkeys items to the preview launcher. Added a plugin for attract-mode and attract mode + compatibility. Super Pause menu.nut is now included in the plugins folder, but is not needed for LaunchBox/Bigbox, it can be deleted. Included a Manual file named "Super Pause Menu Manual.pdf" in the Super Pause Menu Folder. Created a new default profile theme with a different background image. The original profile can still be used if wanted, renamed "LB Classic". v2.1.0 Added a highlighted menu selection bar to more closely match the look of launchbox default menus. The bar is added by default, but can be disabled, or you can change the color if wanted in Tools->Super Pause Menu Settings->Customize menu (page 3). Disabled the highlight bar in my arcade theme. I prefer the look without it. Changed the color of the highlighted font of my gameboy theme to accomodate the selection bar. Changed the color of the highlighted font of my PS1 theme to accomodate the selection bar. Changed the color of the highlighted font of my PS2 theme to accomodate the selection bar. Changed the font size of the default theme to 40 Fixed Y alignment issue on main page with more than 7 items (Old limit) If you want to update from v2.0.0 you can just copy and replace over Super Pause Menu\Super Pause Menu.exe and Super Pause Menu\Settings.exe from the zip file into the Launchbox\Super Pause\ Menu folder. If you want my updated themes copy over whichever .ini files you want from the zip file Super pause menu\Profiles\ into Launchbox\Super pause menu\Profiles\. v2.0.0 Fixed a controls menu issue. Added the ability for the user to add their own menu items to the main menu. When the menu item is selected it will execute a customized AutoHotkey script. v1.9.9 Fixed a font sizing issue between saving/loading and the main menu Added some limited support for attract mode front end emulator v1.9.8 Added the ability to add up to 20 custom pictures anywhere on any custom profile, or to use some of launchbox's resources if wanted instead. Launch super Pause Menu Settings from launchbox's tools, when the settings program opens choose your emulator of choice, click on "Customize Menu", you will find Additional Images drop down menu to select an existing or new (blank) image for the profile, then click on the EDIT/ADD/Remove button Added an alignment calculator to get more precise image alignments in both the main menu, and also in the additional images menu. When launched from the additional images menu it will grab the current profile's background image's width and height, as well as the current custom selected image sizing attributes. You can use this to help make more pixel precise alignment measurements, using the pixel sizing of the background image to convert your custom image measurements into a percentage (so it will look the same on different resolutions). This program is independent of the settings program and you can launch as many as needed. Cleaner layout on the "Customize menu" options in the settings program. Updated all my default profiles to include images except for the arcade profile Changed font for gameboy advance emulator Re-fixed menu flickering by adding double buffering Updated the addons .DLL to include more Launchbox/Bigbox images Tested on launchbox/bigbox 13.14 on windows 11 v1.9.7 Fixed Dinput joystick support, added XY axis input for dinput analog sticks. Added anti-lockup measures to suspended emulators. If the emulator is unable to resume after a suspension, the pause menu will force kill the emulator after 5 seconds. Tweaked the behavior of the pause menu to resume games for better compatibility. Tested in launchbox/BigBox version 11.11. v1.9.6 Changed the way the menu launches for better compatibility. Re-compiled the .dll, should have fixed issue where the settings program sometimes would not launch from the tools menu of launchbox. Tested in launchbox version 11.11. v1.9.5 Added multiple monitor support! The pause menu will now detect whichever monitor your emulator is running (if it is the active application) and will automatically open up on that monitor. This came with much more hurdles to overcome with font scaling issues, but I am pleased with the end result. Added a mute emulator option in the settings program under the "Emulator Settings" page. The Pause menu is now more bigbox/launchbox aware, when opened with these launchers it will ignore and not latch on to any external running emulators. Semi-fixed a weird issue where the menu would not launch if the a game was launched twice. I think this is a restriction with of how launchbox handles opening applications before starting a game. Since I am not so saavy with visual basic, I opted for a workaround. The menu will now remain silently open after closing a game. If it detects another launch of the same emulator it will assume it is that same game and reload itself with the same profile, images , layout, etc. From my limited testing so far I have had no issues with the menu not opening anymore. This comes with the added bonus of launching the manual instantly on the second launch. Added context menu items for the pause menu icon in the notification area. Reload, and Settings. Added a Launch/reload Pause menu button to the settings program for testing out new layouts/hotkeys. v1.9.0 Added the ability to simultaneously use the keyboard and joystick to control the menu! The "Menu Keys" menu within the settings program is now separated into two sections. The default joystick mapping is Xinput controller 1, the pause key is the guide button, up and down on the D pad for navigation, A for select and B is for back. Added a sounds option within Customize Menu to disable/enable navigation sounds, and added a new profile theme for gameboy advance, where it uses the gameboy screen for the save/load screenshots. The background image is not my own creation, just wanted to add something new. I added the new theme to retroarch and visualboy advance emulators. I think I finally ironed out all the DPI/Scaling issues. Since I have a 4K monitor myself I wanted to make sure it looks the same in 4K as it did in any other resolution. The pause menu should now detect the dpi settings of the monitor of the active window, and adjust accordingly. While testing out I was able to switch resolutions/text scaling on the fly and the menu looked the same after every launch. v1.8.0 Added a controls menu! When an image exists, a new Controls item will be added to your pause menu. The menu will look for images placed in \LaunchBox\Super pause menu\Images\Controls\[Platform Name]\ or \LaunchBox\Super pause menu\Images\Controls\[Platform Name]\[Game Name]\ . The images can be any filename with a png, gif, jpg, or jpeg extension. If multiple images exist within the same folder, one will be selected at random. This new setting can be disabled within the settings program. I have personally found the best look is to have a transparent background. I also added a new option to use the Cart/Disk 3D or 2D image to replace the menu title. v1.7.1 Fixed some clock flickering issues that were really bad with 4k resolutions, changed the Default background to Default.png for better consistency, fixed a window sizing issue at the launch of the menu. v1.7.0 Added sounds to the menu navigation to give it a little more life. The sounds folder is located in Launchbox/Super pause menu/Sounds/Default. Currently the three sound files are for Back, Move, and select. You can replace these files if you like, or if you prefer to have no sounds you can delete this folder altogether. I plan on adding some settings options for this feature in the future. v1.6.0 Added animated gif support to backgrounds using activeX IE plugin, requested by Krakerman a while back. Semi-fixed broken platform image title option in "Customize menu -> Replace menu title with image if it exists". When used it will look for your platforms clear logo image in \LaunchBox\Images\Platforms\[Platform Name]\Clear Logo\[Platform Name].png, jpeg, or jpg. v1.5 Fixed Super Pause Menu wasn't working at all in Launchbox 11.9, but was working in the 11.10-2 beta. The new dll in this version works for both versions of Launchbox. v1.5 Added Customized Menu profile switcher V1.4 New update, Super Pause Menu V1.4. Changed it so the menu keys are now universal and not on a per emulator basis. Once updated make sure to change your menu keys settings, as they will be set to the default settings. Also, as requested, I added a new game/platform background setting in the "Customize menu" section that is enabled by default. If this settings is enabled, any platform images, (no matter the filename) placed in the "Launchbox/Super pause menu/Backgrounds/<PLATFORM NAME>/" will randomly be used as the background image. Likewise with game titles placed in the folder "Launchbox/Super pause menu/Backgrounds/<PLATFORM NAME>/<GAME TITLE>". Game title images (if any exists), will take priority over platform image, and platform image will take priority over any other chosen background. The folder names for the game titles need to not have any special characters (such as ":") and are typically replaced with underscores. To assist the user having try and type out and convert the folder names themselves, a new folder is created for both the platform and game title every time the pause menu is launched, as long as the emulator is enabled in the pause menu settings. ------------------------------------------------------------- Older versions: V1.50 and newer can be found on the new download page: https://forums.launchbox-app.com/files/file/2842-super-pause-menu/ Super pause menu V1.4.zip Super pause menu V1.3.zip Even older versions here: https://forums.launchbox-app.com/topic/48306-chadmandos-super-pause-menu-for-windows-update-v10-released/
- 92 replies
-
- 14
-

-

-

-
- pause menu
- addon
- (and 2 more)
-
Version 2.0.1
262 downloads
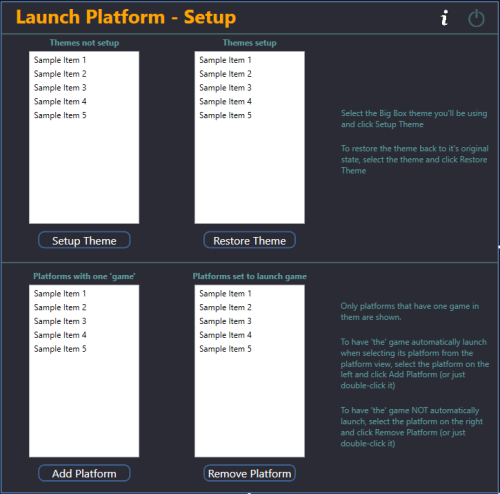
This is a Big Box plugin that allows you to launch a game/application directly from the Platform Wheel View level. For use with platforms that only have one game/application. New in v2.0, now works in Hybrid views (if available). Hybrid Views are available in the Default theme in LaunchBox v13.22-beta-1 and newer. Example Use Case: You have a platform called "Music Box Alpha" which contains only one "game", the Music Box Alpha application. To launch it: Select the platform Select the [only] "game" Select "Play". Using this plugin (once you've setup the Theme and added the platform via Launch Platform Setup in the Tools menu), to launch the application: Select the platform (That's it) Installing: Open the zip file and copy the contents into your ../LaunchBox/Plugins/ folder e.g. D:\LaunchBox\Plugins\LaunchPlatform\LaunchPlatform.dll If updating from a previous version, remove any existing .dll files first from the /LaunchPlatform/ subfolder. Setup: Click Tools and select Launch Platform Setup (You may first want to create a backup of the themes' folder you will be using for Big Box. You shouldn't need it, but never a bad idea.) Note: The Default theme is excluded. To use it, make a copy of the Default folder. e.g. /LaunchBox/Themes/Default - Copy/ In the Themes Not Setup list will be all your Big Box themes. (Excluding Default) Click on the one you will be using use then click Setup Theme. This will now be listed in Themes Setup. At any time you can undo the changes made by selecting the setup Theme and click Restore Theme. Select the Platform (Music Box Alpha) in the Platforms with one game List and click Add Platform (or you can just double-click it). This will move it to the list on the right. When you are done, close the plugin. Using: Start Big Box. If you just finished setting it up in LaunchBox, you can press Ctrl+B to switch to Big Box. Set the theme to the one you setup earlier (if it's not the current theme already). Scroll through your Platforms wheel until you find a platform you've added (Music Box Alpha) and select it. What's actually happening when you "Setup" a theme: (a behind the scenes look) @jayjay is the brains behind getting this to work, and I'm the one that threw it all together. So credit goes to where credit is due. (you decide ) If something's not working right, go ahead and post here and it'll get looked at. And possibly even get resolved. -
Hello! I was wondering if something even remotely similar to this option available in Batocera is possible within LB/BB? Maybe there's plugins but I couldn't find anything. That would be an amazing addition if not.
-

Version 1.2
516 downloads
Missing Games Checker (MGC) is a LaunchBox plugin designed to help users identify missing games in their collection based on platform metadata. It provides an easy-to-use interface that lets you view owned and missing games, and export the results. v1.2 is out! NEW and IMPROVED! Enhanced for stability and usability! Instructions for Using the Missing Games Checker (MGC): Requirements: This plugin in the LaunchBox Plugin folder. The latest version of LaunchBox (there could be an issue with this plugin in older versions of LaunchBox where it's not being detected). Installation and Usage: 1. Install the Plugin: Download the latest release of the MGC plugin from this page. Make sure LaunchBox is closed. Unblock the downloaded zip file (Right-click on the zip -> Select Properties -> Click or Check "Unblock" if available) For help on Unblocking files, check out this article. Open the zip file and place the `LBMissingGamesCheckerPlugin.dll` file into your LaunchBox\Plugins folder (example R:\LaunchBox\Plugins). 2. Access the Plugin: Launch LaunchBox, then access the Tools menu and find Missing Games Checker. 3. Using the Plugin: Select a platform from the dropdown menu and click the Confirm Selection button. MGC will display a list of games owned and a list of games missing from your collection based on the LaunchBox metadata. You can export the list of missing games to a CSV file for easy reference. 4. Options/Features: Filter games by Released status if you only want to check released titles. Sort columns by clicking on the column header. Filter select columns by clicking on the filter icon in the column header. If the filtered column has multiple values (ie. North America, Japan) the row will still show if any of the filters are not applied. All values need to be unchecked in the filter to hide the row. *Note: Filtering one column works well. Multiple column filtering may produce incorrect results. Export to CSV if you need to apply better filtering *Will enhance in a future release Window resizing (Right edge only) Click on the highlighted cell data for links to video URLs, Wikipedia links, and the game on the LaunchBox DB (where available). Extra Notes: The Owned Games list is pulled from YOUR collection. If fields are missing information, make sure your collections metadata is up to date. Check out this LaunchBox Video on how to do that. The Missing Games list is pulled from the local metadata.xml file. If you find information is missing, visit the LaunchBoxDB website to see how you can contribute! I've worked HARD to make the plugin as robust and efficient as I can. That being said, some computers may experience delays in processing the metadata at the start, processing any large collections' of games, and filtering/sorting large lists. Please be patient! Once you begin a process, it will complete! But the UI may become unresponsive during processing. As mentioned, filtering works well on one column at a time. Filtering one column, then another may have incorrect data shown. You can click the Reset button in the filter panel to reset the list, or just "Check It!" again to refresh the list again. NO data is modified in this plugin. Data is compared from the local metadata.xml (which updates automatically by LaunchBox) and your collection data reported from LaunchBox. Troubleshooting/Updates: New to v1.2 - DebugLog Click on the "Bug" to open the debug log. If you have issues, provide the relevant debug log here for review. If you've confirmed the above and are still having issues, please provide the following: Click the "Export to CSV" button for the Missing Games table and save the .CSV file. Attach the .CSV file to a post here. (Optional) Attach a screenshot of the app with the error message. I'll review the information and post a fix/suggestion as soon as possible. Also, if you would like to have MGC perform additional tricks, let me know!! I do appreciate the feedback and will enhance the plugin over time based on your findings/suggestions. Special Thanks A huge thanks to the LaunchBox team and their API documentation for making this project possible, as well as Jason's helpful video tutorial. Check out the source code on GitHub if you're interested. Cheers! 🍻 -

Version 6.1.0
3,322 downloads
Use this plugin to filter and import MAME Software Lists into LaunchBox. New - version 6.0 Requires LaunchBox 13.3 or newer* Slightly different look. Same old features. A lot of (behind the scenes) code improvement. This update has been rewritten in .NET 6.0 to “keep up with the times”. *If you’re using LaunchBox version 13.2 or older, download version 4.5 of the plugin. (For now, at least) v4.5 will still work with LaunchBox 13.3 and newer. Features: Import MAME Console/Computer ROMs into a new or existing Platform Import clones as Additional Apps, separately or not at all (Option) Skip Prototypes (Option) Skip Non-Supported ROMs Adds the Platform and Command-line Parameter to the selected MAME emulator (ex. Atari 2600 a2600 -cart) (Option) Copy ROMs to a new folder during importing Imported games tagged as not supported by MAME will be marked as "Broken". (Option) Import only games that exist in your ROMs Source Folder (Option) Ignore games that only have a Title change (when updating) Version information found inside parenthesis in a Games Title will be added to the games "Version" (metadata) Audit Feature: Compare your existing softlist console/Platform against the MAME hash.xml. Will cross check Title and Rom names. - Select the respective hash.xml and Platform - Click Audit (last page) - Any differences along with a brief description will be shown. - Option to select files (if any) and have them removed from your LaunchBox Platform. - Will check main Titles as well as Additional Apps (if you imported them that way). This does NOT check rom integrity. That's between you and Clrmamepro (or related utility). What's needed: (1) dll file included in the zip. MAME Software List hash files (located in the "hash" sub folder of your Mame's main folder) MAME Software List ROMs* and BIOS files (only if you want to actually play them) *The rom set needs to be either a Split set or a Non-Merged set for a full import If you plan to not import clones, any type set will work. What it won't do: Filter/Sort by Region (it's a MAME hash file limitation) Determine if/what BIOS files are needed Import Metadata and Media (just use the built in LaunchBox Tool) To remove extra information from the games titles [Example "(Jpn)"], select Yes, download and replace all existing metadata and media when running the tool.) How to: - Copy the "ImportMameSoftwareLists" folder from the zip file to your ..\LaunchBox\Plugins folder. - Navigate to that folder and unblock the .dll file. (Right click, Properties, and click Unblock) - Start LaunchBox. Click on "Tools" and select "Import MAME Software Lists". - Navigate through the wizard. - After running the plugin, right-click your new platform and select Edit. Set Scrape-as to whatever your platform is and save. Notes: ROM Folder Locations (screen): The Destination Folder is required even if you don't plan to copy the files. It's needed to set up the Application Path for the ROMs when Importing. Copy and/or Import (screen): To add Version info (if it exists in the Games Title) to an existing console (Platform), run the plugin and DO NOT CHECK Ignore games that only have a Title change (when updating) Selecting an emulator: The main intent of this plugin is to import consoles and computers using MAME softlist ROMs and set the games "proper" Title and application path. It will also attempt to add the appropriate Command-line Parameter for the platform in MAME’s Associated Platforms. If you prefer to use an emulator that can load MAME ROMs other than MAME (or a variant there-of), go for it. It’s recommended to select MAME while using the importer, and then change the Default Emulator when done importing. You can select the 'other' emulator in the plugin, and it will be set as the default for the platform. But it will also have the default command line parameters for the associated platform set using MAME parameters. So be sure to adjust as necessary. Importing: (optional) "Import games that only exist in the ROMs Source Folder" If using a Merged softlist set, clones will not get imported using this option. But if you have a curated Split set, this can be handy. (optional) "Ignore games that only have a Title change (when updating)" If you manually renamed your game titles, check this box. Updating: If you’ve updated your MAME emulator and MAME softlist ROMs, simply run the importer and point to the updated hash file and select your existing platform. When updating, this plugin will NOT remove any games from your collection that MAME has removed from the hash file(s). You can use Audit to compare your collection to the MAME hash file and manually remove games from your collection that don't exist in the hash file (if you so desire). Downloading Metadata: After running the plugin, right-click your new platform and select Edit. Set Scrape-as to whatever your platform is and save. When downloading metadata and Media, choose "Yes, download and replace all existing metadata and media". This will remove the Version info from the games Title. After updating the metadata, if some, but not all games got updated, restart LaunchBox and try the bulk metadata downloader again. Auditing: When auditing, if a game originally had the version info in its Title and you have ran the Download Metadata and Media wizard selecting "Yes, download and replace all existing metadata and media", you WILL see games marked as Missing. * MESS xml * Other Notes: (things I've learned) - Software List folder/file locations: - *Associated Platform Command line parameters - MAME and CDROMS -
.thumb.png.c9faf450e4d2b690a819048b18173f61.png)
Version 5.1.0
491 downloads
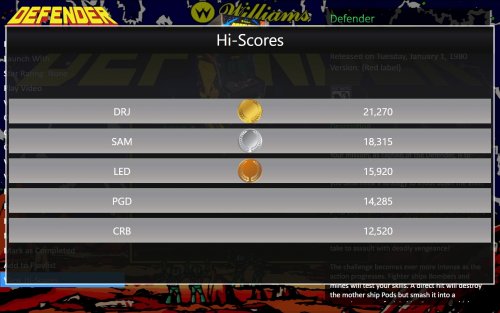
MAME Hi-Score Display - A plugin for BigBox Use this plugin to view a games high scores from BigBox’s Game Menu. Features Creates a menu item called “View Hi-Scores” that allows you to display high scores for most games in your Arcade platform directly in BigBox. What's needed (3) files that are included in the downloaded zip file (the plugin) Version 3.0 - One file that is included in the downloaded zip file (the plugin) 2 lines of text added to the "TextGamesView.xaml" file for your current BigBox Theme MAME configured to save high scores Saved high score files (These are automatically generated by MAME once it’s configured to save them in the "hi" and/or “nvram” subfolders of your MAME emulator) What it won't do Show high scores for games using emulators other than MAME. Show high scores for games in LaunchBox. MAME is not built to save high scores the same way (or at all) for all arcade machines, so not all games are supported by this plugin Contributors @jayjay – The one who came up with the idea and did all the hard stuff. @JoeViking245 – The one who helped with all the easy stuff. @fromlostdays – The one who made these instructions easier to follow. A HUGE Special Thanks goes to GreatStone’s utility “hi2txt”. This utility converts MAME’s high score files into a readable format which ultimately makes this plugin possible!! http://greatstone.free.fr/hi2txt/index.html Installation and setup instructions: Step 1: Installing the Plugin Step 2: Editing your BigBox Theme to add support for the Plugin Step 3: Making sure MAME is set up to save high scores Installing the Plugin: Download the plugin, Mame_Hi_Scores (v5.0.0).7z from the LaunchBox download section (If not using 7zip) After you’ve downloaded the zip file, be sure to unblock it in Windows by right clicking it, selecting Properties, and clicking Unblock Open the zip file and extract/copy the "Hi_Scores" folder into ..\LaunchBox\Plugins i.e. D:\LaunchBox\Plugins\Hi_Scores\Mame_Hi_Scores.dll Editing Your BigBox Theme to add support for the Plugin: As of version 5.0.0, this step is no longer required. If you are updating from a version PRIOR to v5.0.0, you will need to UNDO THE CHANGES made to your TextGamesView.xaml file!!! (just delete the 2 lines that were added, and save.) Setting up MAME to save high scores: Using a recent official MAME release – If you have an older release of MAME, you may need to do the following steps instead. Congrats! You’re all setup! Now that you’ve setup the plugin, why not give it a try? How to use: Start BigBox Go into the "Arcade" Platform Select a game Near the bottom of the Menu (if the selected game has a high score file saved) you'll see "View Local Hi-Scores" Select "View Local Hi-Scores" to see your high scores for that game! To close the Hi-Scores window (options): (new v5.1.0) Press the button you have mapped for your controller to Back Press the key you have mapped for your keyboard to Back- 50 comments
-
- 13
-
-
-

-
-
- mame
- high scores
- (and 2 more)
-
Version 1.0.0
71 downloads
MAME Curated Platform Softlist Importer for LaunchBox (v1.0.0) Have you ever wanted to import your MAME Software Lists (softlists) into LaunchBox in a clean, organized, playble, and automated way? This plugin is designed to do just that, acting as a powerful companion to tools like mess-curator. It goes beyond simple importing by using a highly-configurable YAML file to intelligently map MAME systems and softlists to the correct LaunchBox platforms, apply the right emulator settings, mark games as broken if there is relevant metadata, and even handle complex scenarios like clones and importing artwork. This plugin, when importing using my MAME 0.278 system-softlist YAML preset, will add 106 Platforms and ~16k games to your Launchbox collections, all ready to play, or at least those that I tried :-) Important Plugin Note Note: This is NOT a successor nor replacement for the amazing MAME Software Lists Import Tool - plugin 6.0.2 that is developed by @JoeViking245 that also serve the purpose to import MAME softlist into Launchbox. The original tool is perfect for users who want a simple, direct way to import softlist games using the MAME hash XMLs. If that's your goal, I strongly recommend using it. This plugin, however, was inspired by it and was born from my own OCD needs and is designed for a more complex, automated workflow. It excels at creating highly customized "curated" platforms that can contain a mix of different softlist media, obscure systems, and custom launch commands—all managed through a central configuration file that simplifies maintenance for future MAME updates. The curated list (system-softlist YAML) used by this plugin is also maintained by me and is readily available as preset by this plugin. Perhaps that list will be contributed by the communities if it is able to gain some attention 🙂 Release Note 2025.07.11 - Initial release to the public community Launchbox forum Motivation While there exist other tools can import MAME Software Lists such as MAME Software Lists Import Tool by @JoeViking245, they often fall short when dealing with the complexity and quirks of MAME's database. This plugin was created to solve common frustrations: Platform Clutter: MAME often has multiple system drivers and media types (cassette, floppy, cartridge) for a single real-world platform. Other importers can create a messy platform list (e.g., "Amstrad CPC (Cassette)", "Amstrad CPC (Floppy)"). This tool intelligently maps them all to a single, clean platform like "Amstrad CPC". Manual Emulator Configuration: Getting softlist titles to run correctly often requires specific command-line arguments for each game or media type. This tool automates that process entirely based on a flexible configuration file. Complex System Mapping: What about systems that have no softlists but are still desirable to import, like JAKKS Pacific Plug & Play devices? This tool allows you to map them to the correct platform, ensuring they are not overlooked. Or even better, having a mixture of systems and softlist titles under one single platform, e.g. some JAKKS Pacific Plug & Play devices has pluggable soft keys. Fine-Grained Control: The import process is driven by a powerful YAML file, giving you complete control to override default settings, define custom command lines for specific games, and handle exceptions gracefully. In short, this plugin was built for curators who want their MAME softlist collection in LaunchBox to be not just imported, but correctly and cleanly organized with minimal manual effort. What's best is that job is already done for you by me, which I also maintained a template here. Key Features Wizard-Style Interface: An easy-to-use, step-by-step wizard to guide you through the import process. Intelligent Platform Mapping: Uses a YAML configuration to map multiple MAME systems and softlists to a single, clean LaunchBox platform (e.g., mapping a2600, a2600_cass, etc., all to "Atari 2600"). Automatic Emulator Configuration: Sets the correct MAME driver and command-line parameters for each game, ensuring they are immediately playable. Advanced Clone Handling: Choose how to handle clone ROMs: Import as Additional Apps (Recommended). Import as separate, standalone games. Skip them entirely. Artwork & Manuals Importing: Automatically finds and copies associated artwork (Gameplay, Title, Select Screens) and manuals from your MAME extras folders. Game Health Status: Automatically flags games as "Broken" in LaunchBox if they are marked as supported="no" or status="preliminary" in MAME's database. Detailed Progress Reporting: See real-time updates on which platform and file is being processed. Cleanup Options: Can remove all existing games from a platform before import to ensure a fresh start. How It Works The importer relies on three main sources of information: Your Curated ROMs Folder: It scans a folder where your ROMs are organized by platform, system, and softlist. This structure is essential for the importer to understand the context of each file. MESS's XML Database (mess.xml): This file provides the ground truth for all machine information, software details, and parent-clone relationships. YAML Configuration (system_softlist.yml): This is the heart of the importer. It defines how a system or softlist titles is mapped to LaunchBox platforms, which emulator to use, what custom command-line arguments are needed, and more. This file gives you complete control over the final import. The YAML Configuration (system_softlist.yml) can be automatically generated using my mess_curator tool. The tool processes this information to create perfectly configured game entries in LaunchBox, complete with metadata, artwork, and the correct launch commands. Dependencies To use this importer plugin, you must first organize your MAME softlist ROMs using a companion tool, mess-curator CLI/UI that I developed. The importer relies on the specific folder hierarchy and metadata references created by mess-curator's system_softlist.yml configuration. You can either use a preset system_softlist.yml provided by mess-curator or generate your own. Prerequisites Before you begin, you will need: 1. MAME Curated Softlist Importer Launchbox Plugin Download and place the MAMECuratedSoftlistImporter.dll file into Launchbox\Plugins\MAMECuratedSoftlistImporter folder. 2. Curated ROMs Folder A folder containing your MAME softlist ROMs, organized in a specific structure. My mess-curator companion tool can generate this structure for you via mess-curator copy-roms subcommand. - Your_Base_Roms_Folder/ <-- e.g., "roms" - platform-friendly-display-name/ <-- e.g., "jakks-pacific-tv-game" - mame_system_name/ <-- system without any softlist titles, e.g., "jak_batm" - system.zip <-- e.g., matches the mame_system_name (zip file), should only have one single zip file - mame_system_name/ <-- system with softlist titles, e.g., "jak_dora" - softlist_name/ <-- e.g., "jakks_gamekey_nk" - softlist_game1.zip <-- e.g., "dora.zip" - softlist_game2.zip <-- e.g., "popsnow.zip" - softlist_game3.zip <-- e.g., "volbird.zip" Steps Download the latest release from mess-curator Releases page. Run python src\mess_curator.py and go through the initial setup wizard until you reach the point where it download the mess.xml for your matching MAME romset version. Refer here for the initial setup. Run python src\mess_curator.py copy-roms to start copying roms from your MAME romset adhering to the system/softlist structure defined in the system_softlist.yml file. Check your output rom folder, profit! 3. MAME/MESS XML File An XML file containing metadata for non-arcade systems that matches your MAME ROMset version, downloadable from https://www.progettosnaps.net/mess/repository. E.g. for MAME 0.278, download https://www.progettosnaps.net/download/?tipo=mess_xml&file=/mess/packs/xml/mess278.zip. 4. system_softlist.yml YAML Config File This is the most important file that defines the metadata for the rom files detected during import configurations. You can use a pre-defined template that is selectable in Step 1 Setup Wizard with my mess-curator tool. This file is critical. It tells the importer how to handle each system and softlist titles. Here is an example snippet with explanations: # This is a single entry for the Amstrad CPC system. amstrad_cpc: # A list of all MAME system/driver names that should be mapped to this platform. mame_system_names: - cpc464 - cpc664 - cpc6128 # ... and so on. # The final, user-friendly name for the platform in LaunchBox. platform_name: Amstrad CPC # A list of all MAME softlist names that belong to this platform. softlist_names: - cpc_cass - cpc_flop # (Optional) The category for this platform in LaunchBox. platform_category: Computer # (Optional) Defines the emulator and command-line parameters. emulator: # The name of the Emulator entry in your LaunchBox setup. name: MAME (Cartridge) # {mame_system_name} and {media_type} are placeholders that the importer will fill in. default_command_line_parameters: '{mame_system_name} {media_type}' See my mess-curator repo README here for more information. 5. MAME (MESS) Emulator Create an emulator named as MAME (MESS) and configure it to point to your mame.exe emulator. The emulator name is not hard coded in the plugin itself, and is lookup from the system_softlist.yml, and MAME (MESS) is the default emulator name specified in that file. Usage: Step-by-Step The importer is designed to be run from within LaunchBox (Tools > MAME Curated Softlist Importer). Step 1: Configure Paths Set the paths to your ROMs, MAME hash folder, MAME XML file, and the system softlist YAML file. For the system softlist YAML file, you can also automatically select a template matching your MAME ROMset version from my mess-curator repo. Step 2: Select Platforms Choose which platforms (as defined in the system softlist YAML file) you want to import or update. You can select by category and see a list of platforms that belonged to that category. Step 3: Import Options Configure how clones and unsupported games are handled. You can also choose to remove existing games in the platform before importing to ensure all rom paths are up to date. Step 4: Import Artwork & Manuals Select which types of artwork and manuals you want to copy over from your MAME extras folders. Ideally you want all since Launchbox database might not have the snaps for all of these softlist titles. The plugin will intelligently mapped each artwork type to the right Launchbox artwork folder for each selected platform. Step 5: Processing & Summary The tool will now process all selected platforms, providing real-time progress updates. Once complete, it will display a detailed summary of the import session. The screenshot above shows the output for all 105 platforms (took ~5 minutes). Import complete! Games Removed: 3254 Imported: 16542 games Updated: 0 games Skipped (already existed): 462 games Clones Added as Additional Apps: 4365 games Platforms Created: 68 platforms --- Metadata Details --- Used MAME System Description Fallback: 1054 games Metadata Not Found (used filename): 1 games --- Health Status --- Marked as Broken (Unsupported/Preliminary): 3828 games --- Artwork & Manuals Summary --- Title Screens Copied: 6886 Gameplay Snaps Copied: 7583 Select Screens Copied: 117 Manuals Copied: 424 A Note on Saving: After the import is finished, LaunchBox needs to save all the changes to its database. For very large imports (100+ platforms), this can take several minutes. The UI may appear to hang during this time—this is normal. Please be patient and let it complete the save. Just for reference, this is what a fresh Launchbox collections will looked like after importing all 106 platforms for MAME 0.278 ROMset, using my preset 0.278 system-softlist YAML file. FAQ Q: Why create per-game custom command lines instead of using a universal LUA script? A: Simplicity and reliability. This method ensures that every game has a self-contained, correct launch command without relying on external scripts that can sometimes fail or require complex setup. It's the most straightforward way to guarantee playability out of the box. For advanced users who want to automate complex sequences (like loading from a tape, entering commands, etc.), MAME's autoboot_script feature is the ideal solution. You can find excellent examples of such scripts at RandoMame's autoboot_script repository. As a matter of fact, I'm also working on a separate project to provide these autoboot scripts. Stay tuned! Future Work Automatically assign newly added Platform to the Platform Categories from system-softlist YAML file Even though the system-softlist YAML file already defined various Platform Categories for the Platforms, I couldn't find any reference in the Launchbox Plugin API that mention how to assign multiple Platform Categories for a Platform. So for now you have to add them manually. Disclaimer This tool modifies your LaunchBox database (LaunchBox.xml and other files). Please back up your LaunchBox Data folder before running a large import for the first time. The author is not responsible for any data loss. Use at your own risk. -
 Missing Games Checker Plugin View File Missing Games Checker (MGC) is a LaunchBox plugin designed to help users identify missing games in their collection based on platform metadata. It provides an easy-to-use interface that lets you view owned and missing games, and export the results. v1.2 is out! NEW and IMPROVED! Enhanced for stability and usability! Instructions for Using the Missing Games Checker (MGC): Requirements: This plugin in the LaunchBox Plugin folder. Installation and Usage: 1. Install the Plugin: Download the latest release of the MGC plugin from this page. Make sure LaunchBox is closed. Unblock the downloaded zip file (Right-click on the zip -> Select Properties -> Click or Check "Unblock" if available) For help on Unblocking files, check out this article. Open the zip file and place the `LBMissingGamesCheckerPlugin.dll` file into your LaunchBox\Plugins folder (example R:\LaunchBox\Plugins). 2. Access the Plugin: Launch LaunchBox, then access the Tools menu and find Missing Games Checker. 3. Using the Plugin: Select a platform from the dropdown menu and click the Confirm Selection button. MGC will display a list of games owned and a list of games missing from your collection based on the LaunchBox metadata. You can export the list of missing games to a CSV file for easy reference. 4. Options/Features: Filter games by Released status if you only want to check released titles. Sort columns by clicking on the column header. Filter select columns by clicking on the filter icon in the column header. If the filtered column has multiple values (ie. North America, Japan) the row will still show if any of the filters are not applied. All values need to be unchecked in the filter to hide the row. *Note: Filtering one column works well. Multiple column filtering may produce incorrect results. Export to CSV if you need to apply better filtering *Will enhance in a future release Window resizing (Right edge only) Click on the highlighted cell data for links to video URLs, Wikipedia links, and the game on the LaunchBox DB (where available). Extra Notes: The Owned Games list is pulled from YOUR collection. If fields are missing information, make sure your collections metadata is up to date. Check out this LaunchBox Video on how to do that. The Missing Games list is pulled from the local metadata.xml file. If you find information is missing, visit the LaunchBoxDB website to see how you can contribute! I've worked HARD to make the plugin as robust and efficient as I can. That being said, some computers may experience delays in processing the metadata at the start, processing any large collections' of games, and filtering/sorting large lists. Please be patient! Once you begin a process, it will complete! But the UI may become unresponsive during processing. As mentioned, filtering works well on one column at a time. Filtering one column, then another may have incorrect data shown. You can click the Reset button in the filter panel to reset the list, or just "Check It!" again to refresh the list again. NO data is modified in this plugin. Data is compared from the local metadata.xml (which updates automatically by LaunchBox) and your collection data reported from LaunchBox. Troubleshooting/Updates: New to v1.2 - DebugLog Click on the "Bug" to open the debug log. If you have issues, provide the relevant debug log here for review. If you've confirmed the above and are still having issues, please provide the following: Click the "Export to CSV" button for the Missing Games table and save the .CSV file. Attach the .CSV file to a post here. (Optional) Attach a screenshot of the app with the error message. I'll review the information and post a fix/suggestion as soon as possible. Also, if you would like to have MGC perform additional tricks, let me know!! I do appreciate the feedback and will enhance the plugin over time based on your findings/suggestions. Special Thanks A huge thanks to the LaunchBox team and their API documentation for making this project possible, as well as Jason's helpful video tutorial. Check out the source code on GitHub if you're interested. Cheers! 🍻 Submitter AgentJohnnyP Submitted 09/07/2024 Category Third-party Apps and Plugins
 -
 MAME Curated Softlist Importer View File MAME Curated Platform Softlist Importer for LaunchBox (v1.0.0) Have you ever wanted to import your MAME Software Lists (softlists) into LaunchBox in a clean, organized, playble, and automated way? This plugin is designed to do just that, acting as a powerful companion to tools like mess-curator. It goes beyond simple importing by using a highly-configurable YAML file to intelligently map MAME systems and softlists to the correct LaunchBox platforms, apply the right emulator settings, mark games as broken if there is relevant metadata, and even handle complex scenarios like clones and importing artwork. This plugin, when importing using my MAME 0.278 system-softlist YAML preset, will add 106 Platforms and ~16k games to your Launchbox collections, all ready to play, or at least those that I tried :-) Important Plugin Note Note: This is NOT a successor nor replacement for the amazing MAME Software Lists Import Tool - plugin 6.0.2 that is developed by @JoeViking245 that also serve the purpose to import MAME softlist into Launchbox. The original tool is perfect for users who want a simple, direct way to import softlist games using the MAME hash XMLs. If that's your goal, I strongly recommend using it. This plugin, however, was inspired by it and was born from my own OCD needs and is designed for a more complex, automated workflow. It excels at creating highly customized "curated" platforms that can contain a mix of different softlist media, obscure systems, and custom launch commands—all managed through a central configuration file that simplifies maintenance for future MAME updates. The curated list (system-softlist YAML) used by this plugin is also maintained by me and is readily available as preset by this plugin. Perhaps that list will be contributed by the communities if it is able to gain some attention 🙂 Release Note 2025.07.11 - Initial release to the public community Launchbox forum Motivation While there exist other tools can import MAME Software Lists such as MAME Software Lists Import Tool by @JoeViking245, they often fall short when dealing with the complexity and quirks of MAME's database. This plugin was created to solve common frustrations: Platform Clutter: MAME often has multiple system drivers and media types (cassette, floppy, cartridge) for a single real-world platform. Other importers can create a messy platform list (e.g., "Amstrad CPC (Cassette)", "Amstrad CPC (Floppy)"). This tool intelligently maps them all to a single, clean platform like "Amstrad CPC". Manual Emulator Configuration: Getting softlist titles to run correctly often requires specific command-line arguments for each game or media type. This tool automates that process entirely based on a flexible configuration file. Complex System Mapping: What about systems that have no softlists but are still desirable to import, like JAKKS Pacific Plug & Play devices? This tool allows you to map them to the correct platform, ensuring they are not overlooked. Or even better, having a mixture of systems and softlist titles under one single platform, e.g. some JAKKS Pacific Plug & Play devices has pluggable soft keys. Fine-Grained Control: The import process is driven by a powerful YAML file, giving you complete control to override default settings, define custom command lines for specific games, and handle exceptions gracefully. In short, this plugin was built for curators who want their MAME softlist collection in LaunchBox to be not just imported, but correctly and cleanly organized with minimal manual effort. What's best is that job is already done for you by me, which I also maintained a template here. Key Features Wizard-Style Interface: An easy-to-use, step-by-step wizard to guide you through the import process. Intelligent Platform Mapping: Uses a YAML configuration to map multiple MAME systems and softlists to a single, clean LaunchBox platform (e.g., mapping a2600, a2600_cass, etc., all to "Atari 2600"). Automatic Emulator Configuration: Sets the correct MAME driver and command-line parameters for each game, ensuring they are immediately playable. Advanced Clone Handling: Choose how to handle clone ROMs: Import as Additional Apps (Recommended). Import as separate, standalone games. Skip them entirely. Artwork & Manuals Importing: Automatically finds and copies associated artwork (Gameplay, Title, Select Screens) and manuals from your MAME extras folders. Game Health Status: Automatically flags games as "Broken" in LaunchBox if they are marked as supported="no" or status="preliminary" in MAME's database. Detailed Progress Reporting: See real-time updates on which platform and file is being processed. Cleanup Options: Can remove all existing games from a platform before import to ensure a fresh start. How It Works The importer relies on three main sources of information: Your Curated ROMs Folder: It scans a folder where your ROMs are organized by platform, system, and softlist. This structure is essential for the importer to understand the context of each file. MESS's XML Database (mess.xml): This file provides the ground truth for all machine information, software details, and parent-clone relationships. YAML Configuration (system_softlist.yml): This is the heart of the importer. It defines how a system or softlist titles is mapped to LaunchBox platforms, which emulator to use, what custom command-line arguments are needed, and more. This file gives you complete control over the final import. The YAML Configuration (system_softlist.yml) can be automatically generated using my mess_curator tool. The tool processes this information to create perfectly configured game entries in LaunchBox, complete with metadata, artwork, and the correct launch commands. Dependencies To use this importer plugin, you must first organize your MAME softlist ROMs using a companion tool, mess-curator CLI/UI that I developed. The importer relies on the specific folder hierarchy and metadata references created by mess-curator's system_softlist.yml configuration. You can either use a preset system_softlist.yml provided by mess-curator or generate your own. Prerequisites Before you begin, you will need: 1. MAME Curated Softlist Importer Launchbox Plugin Download and place the MAMECuratedSoftlistImporter.dll file into Launchbox\Plugins\MAMECuratedSoftlistImporter folder. 2. Curated ROMs Folder A folder containing your MAME softlist ROMs, organized in a specific structure. My mess-curator companion tool can generate this structure for you via mess-curator copy-roms subcommand. - Your_Base_Roms_Folder/ <-- e.g., "roms" - platform-friendly-display-name/ <-- e.g., "jakks-pacific-tv-game" - mame_system_name/ <-- system without any softlist titles, e.g., "jak_batm" - system.zip <-- e.g., matches the mame_system_name (zip file), should only have one single zip file - mame_system_name/ <-- system with softlist titles, e.g., "jak_dora" - softlist_name/ <-- e.g., "jakks_gamekey_nk" - softlist_game1.zip <-- e.g., "dora.zip" - softlist_game2.zip <-- e.g., "popsnow.zip" - softlist_game3.zip <-- e.g., "volbird.zip" Steps Download the latest release from mess-curator Releases page. Run python src\mess_curator.py and go through the initial setup wizard until you reach the point where it download the mess.xml for your matching MAME romset version. Refer here for the initial setup. Run python src\mess_curator.py copy-roms to start copying roms from your MAME romset adhering to the system/softlist structure defined in the system_softlist.yml file. Check your output rom folder, profit! 3. MAME/MESS XML File An XML file containing metadata for non-arcade systems that matches your MAME ROMset version, downloadable from https://www.progettosnaps.net/mess/repository. E.g. for MAME 0.278, download https://www.progettosnaps.net/download/?tipo=mess_xml&file=/mess/packs/xml/mess278.zip. 4. system_softlist.yml YAML Config File This is the most important file that defines the metadata for the rom files detected during import configurations. You can use a pre-defined template that is selectable in Step 1 Setup Wizard with my mess-curator tool. This file is critical. It tells the importer how to handle each system and softlist titles. Here is an example snippet with explanations: # This is a single entry for the Amstrad CPC system. amstrad_cpc: # A list of all MAME system/driver names that should be mapped to this platform. mame_system_names: - cpc464 - cpc664 - cpc6128 # ... and so on. # The final, user-friendly name for the platform in LaunchBox. platform_name: Amstrad CPC # A list of all MAME softlist names that belong to this platform. softlist_names: - cpc_cass - cpc_flop # (Optional) The category for this platform in LaunchBox. platform_category: Computer # (Optional) Defines the emulator and command-line parameters. emulator: # The name of the Emulator entry in your LaunchBox setup. name: MAME (Cartridge) # {mame_system_name} and {media_type} are placeholders that the importer will fill in. default_command_line_parameters: '{mame_system_name} {media_type}' See my mess-curator repo README here for more information. 5. MAME (MESS) Emulator Create an emulator named as MAME (MESS) and configure it to point to your mame.exe emulator. The emulator name is not hard coded in the plugin itself, and is lookup from the system_softlist.yml, and MAME (MESS) is the default emulator name specified in that file. Usage: Step-by-Step The importer is designed to be run from within LaunchBox (Tools > MAME Curated Softlist Importer). Step 1: Configure Paths Set the paths to your ROMs, MAME hash folder, MAME XML file, and the system softlist YAML file. For the system softlist YAML file, you can also automatically select a template matching your MAME ROMset version from my mess-curator repo. Step 2: Select Platforms Choose which platforms (as defined in the system softlist YAML file) you want to import or update. You can select by category and see a list of platforms that belonged to that category. Step 3: Import Options Configure how clones and unsupported games are handled. You can also choose to remove existing games in the platform before importing to ensure all rom paths are up to date. Step 4: Import Artwork & Manuals Select which types of artwork and manuals you want to copy over from your MAME extras folders. Ideally you want all since Launchbox database might not have the snaps for all of these softlist titles. The plugin will intelligently mapped each artwork type to the right Launchbox artwork folder for each selected platform. Step 5: Processing & Summary The tool will now process all selected platforms, providing real-time progress updates. Once complete, it will display a detailed summary of the import session. The screenshot above shows the output for all 105 platforms (took ~5 minutes). Import complete! Games Removed: 3254 Imported: 16542 games Updated: 0 games Skipped (already existed): 462 games Clones Added as Additional Apps: 4365 games Platforms Created: 68 platforms --- Metadata Details --- Used MAME System Description Fallback: 1054 games Metadata Not Found (used filename): 1 games --- Health Status --- Marked as Broken (Unsupported/Preliminary): 3828 games --- Artwork & Manuals Summary --- Title Screens Copied: 6886 Gameplay Snaps Copied: 7583 Select Screens Copied: 117 Manuals Copied: 424 A Note on Saving: After the import is finished, LaunchBox needs to save all the changes to its database. For very large imports (100+ platforms), this can take several minutes. The UI may appear to hang during this time—this is normal. Please be patient and let it complete the save. Just for reference, this is what a fresh Launchbox collections will looked like after importing all 106 platforms for MAME 0.278 ROMset, using my preset 0.278 system-softlist YAML file. FAQ Q: Why create per-game custom command lines instead of using a universal LUA script? A: Simplicity and reliability. This method ensures that every game has a self-contained, correct launch command without relying on external scripts that can sometimes fail or require complex setup. It's the most straightforward way to guarantee playability out of the box. For advanced users who want to automate complex sequences (like loading from a tape, entering commands, etc.), MAME's autoboot_script feature is the ideal solution. You can find excellent examples of such scripts at RandoMame's autoboot_script repository. As a matter of fact, I'm also working on a separate project to provide these autoboot scripts. Stay tuned! Future Work Automatically assign newly added Platform to the Platform Categories from system-softlist YAML file Even though the system-softlist YAML file already defined various Platform Categories for the Platforms, I couldn't find any reference in the Launchbox Plugin API that mention how to assign multiple Platform Categories for a Platform. So for now you have to add them manually. Disclaimer This tool modifies your LaunchBox database (LaunchBox.xml and other files). Please back up your LaunchBox Data folder before running a large import for the first time. The author is not responsible for any data loss. Use at your own risk. Submitter dsync89 Submitted 07/11/2025 Category Third-party Apps and Plugins
 -

Version 2.1.0
266 downloads
Visual Pinball X VideoSnap Creator (Playfield Recorder) Use this plugin to create videosnaps of the Visual Pinball X tables on your PC/Cab. This will record any VPX table at any orientation and from any monitor. Why record your own? There already exists a lot of video snaps of most every Visual Pinball Table. You can even find vertically oriented (portrait) ones for your pincab. The issue is they may not be recordings of the actual version of the table you use. Or you simply can’t find one for a particular Original. Or you just don’t like the one(s) you found. Features: This will automatically ‘find’ your table’s playfield view so there’s no need to set up which monitor to look at or set any scale, resolution or aspect ratio. Your VPX default monitor settings will be displayed for your reference. (new v2.0) Record the backglass at the same time as the playfield. (optional) (new v2.0) Record the DMD (3rd screen) at the same time as the playfield. (optional) (new v2.0) Record the tables gameplay sounds along with the playfield video. (optional) (new v2.1) Add the tables Clear Logo to the end of the video. (optional) Included is an AutoHotkey script that the plugin uses to quickly bypass the VPinMAME window when loading a table. (Should reduce loading time by approximately 4 seconds per table) (This also works well if added to your Running AutoHotkey Script tab for your VPX emulator ) Record durations can be set between 5 seconds and 3 minutes. If your playfield is in portrait mode, the saved output video can be rotated for proper viewing. (Options are 0º (default), 90º, 180º, -90º) You can set the video to record at 60 FPS (Depreciated v2.1) All video will be recorded at 30 FPS Videos are automatically saved to the default folder (/Plugins/VPXVideoCreator/CreatedVideos/) or you can change it to be placed directly into your /LaunchBox/Videos/Visual Pinball/ folder. Installing: Download and unblock the zip file. (right click the file, select properties and check the Unblock check box and click OK) Copy the VPXVideoCreator folder (from inside the zip) into your /LaunchBox/Plugins/ folder. If updating to 2.0, overwrite the existing file. Quick Start: Start LaunchBox (always a good place to start) Right click one of the tables in your Visual Pinball platform and select Create VPX video. Set how long you want your final recording to be. Click Capture Video. The default save location is in the plugins’ subfolder, “CreatedVideos”. Setting up to record audio: (new v2.0) (optional) You will need to register “audio_sniffer-x64.dll”** (included with the plugin) with Windows. Basically what this does is makes all your audio output accessible in one place. Think of it as a Frontend for all your audio output devices. This “frontend” will be labeled “virtual-audio-capturer”. 2 ways to register/unregister audio_sniffer are: The easy way: Run the included batch file (located in the plugins AudioSniffer subfolder). You need to run this as administrator. The batch file can also be used to unregister it. Follow the prompts. Old school: Open the command prompt [as administrator] in the “AudioSniffer” subfolder. To Register: type in then press enter: regsvr32 audio_sniffer-x64.dll.1 To Unregister: type in then press enter: regsvr32 /u audio_sniffer-x64.dll.1 **NOTE: The file is named "audio_sniffer-x64.dll.1" (with a “.1” at the end). Otherwise LaunchBox will try to load it as a plugin, which will cause errors. Source code for audio_sniffer can be found here: https://github.com/rdp/virtual-audio-capture-grabber-device Using the plugin: Set Delay: This is the delay time between clicking Capture Video and the video actually starting to record. Set to bypass (in the recording) the VPX editor loading the table. Default is 12 seconds. Options are from 5 to 30 seconds. Record Duration: Set to how long you want your video snaps to be. Default is 30 seconds. Options are from 5 to 180 seconds (3 minutes). Video Rotation: If you play on a rotated monitor (or TV), you will want to set this to the direction your monitor/TV is rotated. Default is 0º. Options are 0º, 90º, 180º and -90º. Include Audio: (new v2.0) Check this box to include the tables playfield sounds with the recording (needs to be configured). Record Backglass: (new v2.0) Check this box to record the Backglass at the same time as recording the Playfield. This will be saved to a separate file that is saved in the “/VPXVideoCreator/CreatedVideos/Backglass/” folder. The backglass is typically on a 2nd monitor, but (if setup) will get recorded separately no matter which monitor it’s on (single or otherwise). The file will be saved as [the-games_Title]_BG.mp4 Record DMD: (new v2.0) Check this box to record the Dot Matrix Display (DMD) at the same time as recording the Playfield. This will be saved to a separate file that is saved in the “/VPXVideoCreator/CreatedVideos/Backglass/” folder alongside the backglass video. The DMD is typically on a 3nd monitor, but (if setup) will get recorded separately no matter which monitor it’s on (single or otherwise). The file will be saved as [the-games_Title]_DMD.mp4 Add Clear Logo to the end of the video: (new v2.1) Check this box to add the tables Clear Logo (if one exists) to the end of the video. The logo will fade in as the video fades out during the last 2 seconds of the recording. This feature is automatically disabled if no Clear Logo for that table exists. 60 FPS Option removed (v2.1) Experimental. Check this box to record at 60 frames per second. Default is 30 FPS (un-checked). Depending on your video card (and probably some other factors too), this may or may not even be worthwhile. Change Save Location: The default save location is in /LaunchBox/Plugins/VPXVideoCreator/CreatedVideos/. The video filename will be saved as the ‘games’ Title in LaunchBox with .mp4 file extension. You can save them anywhere you want. Reset to Default: This will reset the Save Location, Delay, Duration and Rotation to their default values. Save Settings: This will save the Save Location, Delay, Duration and Rotation values you set and will load these next time you run the plugin. Save settings before video capture This is checked by default and will save any changes made when you click Capture Video and before launching VPX. Capture Video: This will launch the table you selected to open the plugin with. At the same time, the AutoHotkey script “vpxBypassPinMAME.ahk” will start. This runs in the background and waits for the VPinMAME popup window to appear and then ‘hits the spacebar’ to make it go away (sooner). The script will exit after it see the popup, or 15 seconds. Whichever comes first. After the amount of Delay time has passed, recording will begin and will continue for the set Duration. When done, VPX closes and the video gets converted. The video is saved to “_tempVideo.mkv” (in the CreatedVideos subfolder) and then gets converted to an mp4 file. After conversion, _tempVideo.mkv will be deleted. Keep temp video when done: By default, “_tempVideo.mkv” will be deleted after the video has been converted. If you want to see what the video looks like before converting, check this box. After your video is complete, go to the CreatedVideos folder to view it. Note: this file gets overwritten each time you click Create Video if you have the checkbox checked. View Saved Video Click this to view the converted video. This is the video file shown in Saved Video Location. VPX Playfield This shows the default playfield monitor settings you have setup for your Visual Pinball installation. These get read from your Registry settings: HKEY_CURRENT_USER\SOFTWARE\Visual Pinball\VP10\Player\Display The Monitor # listed may not be the same as what your Windows Display Settings says. So if it’s “wrong”, ignore it. The Image Scale (W and H) shown will be correct. If the VPX display settings cannot be retrieved from the registry, monitor #1’s information will be displayed with an asterisk (*) after the monitor number. (Monitor #: 1*) Some notes: When you click Capture Video, probably don’t click anything else until recording is complete. However once the table is loaded, feel free to drop in a coin, hit start and play until ‘your time is up’. Just don’t click on another window. Backglass and DMD recordings only work with B2S Backglass Server (which is what most of them are). PinUPPlayer windows are not supported. Designed for LaunchBox v11.3 and higher. Special Thanks! Special thanks to gtxjoe’s PBX Recorder on VPForums and Carny_Priest’s post on GameEx Forum for paving the way to figuring out an excellent approach to creating your own Visual Pinball table videosnaps. Huge thanks to @sundogak for convincing me (though it didn't take much once I saw it in action) and showing me how to add video fade and attaching Clear Logos to the videos. Also for all the testing done and invaluable insight! Future releases and enhancements: If there’s enough interest in this plugin (as in, it’s actually useful and would get used), I will look at adding: Option to record the table’s audio in with the video. (added v2.0) Ability to select multiple tables for ‘bulk recording’. Record backglass videos??? (added v2.0) Any REASONABLE request. As always, any and all feedback is welcome! -
MAME Software Lists Import Tool - plugin View File Use this plugin to filter and import MAME Software Lists into LaunchBox. New - version 6.0 Requires LaunchBox 13.3 or newer* Slightly different look. Same old features. A lot of (behind the scenes) code improvement. This update has been rewritten in .NET 6.0 to “keep up with the times”. *If you’re using LaunchBox version 13.2 or older, download version 4.5 of the plugin. (For now, at least) v4.5 will still work with LaunchBox 13.3 and newer. Features: Import MAME Console/Computer ROMs into a new or existing Platform Import clones as Additional Apps, separately or not at all (Option) Skip Prototypes (Option) Skip Non-Supported ROMs Adds the Platform and Command-line Parameter to the selected MAME emulator (ex. Atari 2600 a2600 -cart) (Option) Copy ROMs to a new folder during importing Imported games tagged as not supported by MAME will be marked as "Broken". (Option) Import only games that exist in your ROMs Source Folder (Option) Ignore games that only have a Title change (when updating) Version information found inside parenthesis in a Games Title will be added to the games "Version" (metadata) Audit Feature: Compare your existing softlist console/Platform against the MAME hash.xml. Will cross check Title and Rom names. - Select the respective hash.xml and Platform - Click Audit (last page) - Any differences along with a brief description will be shown. - Option to select files (if any) and have them removed from your LaunchBox Platform. - Will check main Titles as well as Additional Apps (if you imported them that way). This does NOT check rom integrity. That's between you and Clrmamepro (or related utility). What's needed: (1) dll file included in the zip. MAME Software List hash files (located in the "hash" sub folder of your Mame's main folder) MAME Software List ROMs* and BIOS files (only if you want to actually play them) *The rom set needs to be either a Split set or a Non-Merged set for a full import If you plan to not import clones, any type set will work. What it won't do: Filter/Sort by Region (it's a MAME hash file limitation) Determine if/what BIOS files are needed Import Metadata and Media (just use the built in LaunchBox Tool) To remove extra information from the games titles [Example "(Jpn)"], select Yes, download and replace all existing metadata and media when running the tool.) How to: - Copy the "ImportMameSoftwareLists" folder from the zip file to your ..\LaunchBox\Plugins folder. - Navigate to that folder and unblock the .dll file. (Right click, Properties, and click Unblock) - Start LaunchBox. Click on "Tools" and select "Import MAME Software Lists". - Navigate through the wizard. - After running the plugin, right-click your new platform and select Edit. Set Scrape-as to whatever your platform is and save. Notes: ROM Folder Locations (screen): The Destination Folder is required even if you don't plan to copy the files. It's needed to set up the Application Path for the ROMs when Importing. Copy and/or Import (screen): To add Version info (if it exists in the Games Title) to an existing console (Platform), run the plugin and DO NOT CHECK Ignore games that only have a Title change (when updating) Selecting an emulator: The main intent of this plugin is to import consoles and computers using MAME softlist ROMs and set the games "proper" Title and application path. It will also attempt to add the appropriate Command-line Parameter for the platform in MAME’s Associated Platforms. If you prefer to use an emulator that can load MAME ROMs other than MAME (or a variant there-of), go for it. It’s recommended to select MAME while using the importer, and then change the Default Emulator when done importing. You can select the 'other' emulator in the plugin, and it will be set as the default for the platform. But it will also have the default command line parameters for the associated platform set using MAME parameters. So be sure to adjust as necessary. Importing: (optional) "Import games that only exist in the ROMs Source Folder" If using a Merged softlist set, clones will not get imported using this option. But if you have a curated Split set, this can be handy. (optional) "Ignore games that only have a Title change (when updating)" If you manually renamed your game titles, check this box. Updating: If you’ve updated your MAME emulator and MAME softlist ROMs, simply run the importer and point to the updated hash file and select your existing platform. When updating, this plugin will NOT remove any games from your collection that MAME has removed from the hash file(s). You can use Audit to compare your collection to the MAME hash file and manually remove games from your collection that don't exist in the hash file (if you so desire). Downloading Metadata: After running the plugin, right-click your new platform and select Edit. Set Scrape-as to whatever your platform is and save. When downloading metadata and Media, choose "Yes, download and replace all existing metadata and media". This will remove the Version info from the games Title. After updating the metadata, if some, but not all games got updated, restart LaunchBox and try the bulk metadata downloader again. Auditing: When auditing, if a game originally had the version info in its Title and you have ran the Download Metadata and Media wizard selecting "Yes, download and replace all existing metadata and media", you WILL see games marked as Missing. * MESS xml * Other Notes: (things I've learned) - Software List folder/file locations: - *Associated Platform Command line parameters - MAME and CDROMS Submitter JoeViking245 Submitted 09/08/2019 Category Third-party Apps and Plugins
-

Version 2.3.0
932 downloads
***** Now Supporting Random Startup Videos ***** Startup Video Manager: A plugin to manage Startup videos for the user through a clean, simple interface. About the Plugin This plugin provides a menu item that will open a window to allow users to manage their startup videos, and optionally, to activate random startup videos. Random startup videos will be switched out as LaunchBox closes and Big Box opens. New and Returning Features: Reads from a "Startups" folder in LaunchBox\Videos to let the user select their desired startup video. Clicking "Preview" will let the user preview the selected Startup video through a custom VLC player with options for play/pause/stop, forward and backward, volume control and full-screen viewing. Double-clicking the video will also take you to and from fullscreen viewing. Pressing Esc while in fullscreen will also take you back to the normal view. Another way to get back while in fullscreen is to move the mouse to the bottom of the screen where a menu with the video name and a back button will appear. Copies the selected video in LaunchBox\VIdeos\Startups to LaunchBox\Videos and renames it to startup.mp4 so that BigBox will recognize it. Before replacing your existing startup.mp4 file, it checks to see whether or not your current startup.mp4 exists in the Startups folder. If not, it will copy your current startup.mp4 to the Startups folder, adding the Unix timestamp to the filename, to make sure you do not lose any startup video you may not have backed up. New in 2.0.0: Optionally lets the user select Randomize Startup Videos to have the plugin randomly select a startup video and adjust the minimum startup duration each time Big Box is started from LaunchBox. New in 2.0.0: With my system, I found that I needed to slightly tweak the minimum startup time from the actual length of the video. If you find you need to do this as well, in PluginConfig.xml for this that will be covered below. New in 2.1.0: Optionally lets the user update a configuration setting to match their actual load time of Big Box so that random videos will be limited to videos that are at least that long (no looping video on startup). Installation Instructions If you have the old version, BigBoxStartupSelector, delete that folder and unzip the new folder into the LaunchBox\Plugins folder. Create a folder named Startups in the LaunchBox\Videos folder and move all of your startup videos there. You may rename the startup videos in this folder to whatever name you prefer to help you remember each video. Optional Configuration These optional configuration settings can be applied by opening the included PluginConfig.xml in your favorite text editor and changing the appropriate number. StartupTimeOffsetInSeconds: In my case, I found that when setting the Minimum Startup Video Duration to the actual length of the video, even for longer videos, caused the video to start to loop for about a couple seconds. To accommodate this, you can tweak the number of seconds being set as the minimum startup duration for videos through this configuration setting. I had to adjust mine by -2 seconds, but this is 0 by default, which will set the minimum startup duration to the actual length of the video. If you notice that after setting a video through this tool, the video either stops early or starts to loop, you can set this time to adjust all videos accordingly. ActualStartupTimeInSeconds: This setting only applies to randomly-selected videos. If you set this to something other than the default of 0, only videos with at least this startup time will be considered for random selection. How to find out your actual startup time? Get the stopwatch app on your phone ready, go into the Big Box options and set Minimum Startup Video Duration to "No Delay". Now go back to LaunchBox, and as soon as you click to switch back to Big Box mode, start the stopwatch. Stop the stopwatch as soon as Big Box has finished loading. That time, rounded to the nearest second, is the value you should put as your actual startup time. But again, this only applies to randomly-selected videos. If you leave it as the default of 0, all videos will be considered for randomization, but you may have looping if the randomly-selected video is shorter than your actual load time. Usage Instructions Open LaunchBox or BigBox and browse to the Startup Video Manager plugin. Choose the Startup Video you would like to set, then if desired, click Preview to watch the video and make sure that's the one you want. If you'd like random startup videos going forward, make sure to check Randomize Startup Videos in the bottom-left corner. Note: the random selection setting saves as soon as you check or uncheck it. You can click Cancel or close the window from there. The Save button is only if you want to manually select a video to set as your startup video. Once you've decided on a video, click Save and the magic will happen. Otherwise, click Cancel. Enjoy! Please let me know if you run into any issues. Special thanks to angelobodetti for the random startup video idea! Thanks, Jason, for providing your amazing software and thanks again to Jason, the LaunchBox staff and the community for your support in developing this plugin.- 28 comments
- 2 reviews
-
- 11
-
-
-
- plugin
- startup video
- (and 1 more)
-
Bulk Convert .cue/.bin (or files other than .bin) to .chd View File Bulk Convert .cue/.bin (or files other than .bin) to .chd Using MAME’s chdman.exe (“Compressed Hunks of Data (CHD) Manager”, included with MAME), this plugin will convert CD based game files to a single .chd file in your selected Platform. Example: Before Loom (USA).cue Loom (USA).ccd Loom (USA).img Loom (USA).sub After Loom (USA).chd Before Arctic Thunder.cue Arctic Thunder.bin After Arctic Thunder.chd Why convert? You end up with just a single file per game A CHD file is, well… compressed. Resulting in less storage space requirements Arctic Thunder.cue + .bin = 601MB Arctic Thunder.chd = 466MB Spider-Man 2: Enter Electro = 684MB CHD format = 318MB Because we can and it's easy to do Requirements This plugin file chdman.exe (included with MAME) Game rom-sets that include a .cue file. (Loom (USA).cue, Arctic Thunder.cue etc.) What happens after converting? After successfully creating a CHD Image, the games application path will be changed to the new .chd file. Also, after the files have been converted you have the option to Leave the old files in place (default) Move the old files to a separate [backup] folder Delete the old files Installing the plugin Download the plugin Unblock “cue2chd (v1.00).zip” by right clicking the file and checking “Unblock” and clicking “OK”. Open the zip file and copy the contents (1 folder containing 1 file) into /LaunchBox/Plugins/ i.e. G:/LaunchBox/Plugins/cue2chd/cue2chd.dll Using the plugin Start LaunchBox Select Tools, Convert cue to chd Select a Platform Click Convert (Optional) Check Delete old files when complete This will permanently delete the old files (.cue, .bin, .img etc) after successfully converting them to .chd. Check Move old files when complete This will move the old files (.cue, .bin, .img etc) after successfully converting them to .chd to a folder you specify [for ‘backup’]. If you do not select Delete or Move, all files will remain in their current location along with the newly created .chd file. If you opt to delete the old files and later want/need to convert the CHD files back to .cue etc., you can use chdman.exe to "reverse the process". The command line is: chdman.exe extractcd -i “file_name.chd” -o “file_name.cue” Special thanks to @faeran for coming up with the idea for this plugin and his support and testing. As always, all comments and suggestions are welcome. Submitter JoeViking245 Submitted 04/02/2022 Category Third-party Apps and Plugins
-
 I created my first plugin that allows for me to list the "Game Size" in the Custom Fields area, as well as tiers, so they can be arranged by size. I have an enormous collection and Windows isn't great with paging folder sizes and such, so I built a tool that either grabs the ROM size, or if it's an MS-DOS or Windows game, it finds the parent folder and gets the size of the entire directory. For games that are installed in your system, this works a lot better than I thought it would. I created an optional game size tier system for easy numerical arranging. I am currently working on scraping "Required Space" for storefront games using a RAWG API. (which when I finish this part, the user will have to add their own API and could be subjected to rate limits, but it's free and pretty good, just sign up) -- WIP -- not finished yet, and I might abandon this feature completely, not sure yet. Realistically, we can always just offload the storefront games and see how large they are using their launchers, but the "portable" or directly installed Windows games WE ALL HAVE (let's be real) get accurate directory sizes and lists them well. So it's basically good to go. Anyway, I found this extremely helpful in cleaning up my drives, and I wanted to know if anyone else actually cares about something like this. If so, ill polish it up and release it. You can do entire platforms using the Tools dropdown Or you can select one or multiple files to only get the sizes for what you want using the right click menu THEN, youll see this that allows you to choose which Custom Fields to actually print (the RAWG fetch is still in development) It scrubs in the background, then a popup will let you know when it's finished. (listing errors if any) You can continue to use LaunchBox while the scrape is happening, Once finished, refresh, and it's updated. As you can see here ^ it doesn't just get the EXE size, it gets the directory (most of the time) I just wanted game size here, but I could also get Game Size Tier, Game Size Last Scanned (date) & hopefully soon the "Est. Required Space" from RAWG. If anyone wants this, let me know and ill finish it and release it. If you guys have any questions, ideas or critiques, LMK!
-
Add To Games DB View File *** Updated for Initial Support for LaunchBox v.Next *** AddToGamesDb: A plugin to help automate the process of submitting all of your game information and images from your collection to the LaunchBox Games Database. About the Plugin This plugin makes use of an application traditionally used in automated testing (Selenium) to automate the process of submitting games to the LaunchBox Games Database. It will open an instance of your default browser (provided that browser is either Chrome or Firefox. If some other browser is your default, it will try to open Chrome), and attempt to submit the selected game to the LaunchBox Games Database based on the information provided in your collection. If the game does not exist in the database, it will create a new game entry and submit it to the database. If you have added additional information or images to a game that already exists in the database, it will enter the title and platform, then pause to let you choose the existing game, then add any additional information from your collection to the LaunchBox Games Database. Installation Instructions Note: For this plugin to work, you will need to have either Chrome or Firefox installed. If you have both installed, it will use whichever you have set as your default browser. If you are using Firefox as your default browser and have enabled Firefox Profiles, please note that this will run under the default profile. For any and all other cases, Chrome is the preferred browser. Unzip everything to the Plugins folder. Usage Instructions Note: If, in editing your collection, you are prompted to download an update for the LaunchBox Games Database, afterward you will need to close and re-open LaunchBox for the plugin to detect the changes. Open LaunchBox and browse to a game that is either missing from the Games Database, has additional information not in the database, or has images not in the database -- right click that game, and select the appropriate option, it will show either: Add Game to LaunchBox Games Database Update Game in LaunchBox Games Database Add New Images to LaunchBox Games Database The first time you run the plugin, you may be prompted to login to LaunchBox Games Database. If so, the plugin will pause here to allow you to login as normal. Check "Remember Me" to skip this step going forward. Your login information is not read or stored in the code, it is stored in Chrome or Firefox's normal AppData cache on your system. If you do not login, the plugin will time-out after 5 minutes and close the browser. Depending on the game, you may be prompted with a screen that identifies similar titles and you will be asked to either select the correct title, or click the button to add a new game. If so, the plugin will pause here until you make your desired selection, then automation will resume for the remainder of the process. Logging By default, the logging is only set to a general "Info" level and up that contains generic start and submission successful messages, along with any errors encountered. If you continue to encounter an error somewhere along the way, please take the following steps: Browse to the plugin's folder -- LaunchBox\Plugins\AddToGamesDb Open NLog.dll.nlog in Notepad or another text editor. Scroll down to the bottom and find the <rules> section of the configuration. Find this line: <logger name="*" minlevel="Info" writeTo="file" /> And change it to this: <logger name="*" minlevel="Trace" writeTo="file" /> Try to submit the problem game, if it is a particular game causing the issue, or another game in general otherwise. Browse to the log file in the plugin's folder -- LaunchBox\Plugins\AddToGamesDb\log\AddToGamesDb.log Feel free to post the error and preceding trace either on the plugin's support page or PM me either the entire log or the part pertaining to the last issue, whichever is easier for you. From there, I'll investigate and make any updates necessary. Supported Fields Auto-population of the following fields is currently supported: Name/Title Platform Release Date ESRB Developers Publishers Genres Wikipedia URL Overview Max Players Cooperative Images Known Issues Context Menu (right-click menu) does not refresh on Audit window. If you update the information for a game in LaunchBox (clicking Edit from the right-click menu for the game), you will need to click away from the game (click some other game, for example), and then right-click on the updated game again for the context menu to update. Even without doing so, however, the correct process should run even though the text and icon on the menu haven't yet updated. A lot of work has gone into stabilizing the initial release and this latest release, but if you encounter any issues, please let me know and I will be glad to work with you to update the plugin accordingly. Thanks, Jason, for providing your amazing software and thanks again to Jason, the LaunchBox staff and the community for your support in developing this plugin. Submitter UnderwoodNC Submitted 05/20/2017 Category Third-party Apps and Plugins
-
 Hyperspin2LaunchboxPlaylist View File About: Use this plugin to quickly convert from a Hyperspin collection to a Launchbox playlist. Choose a Hyperspin database XML file and this program will compare the rom names for all games in the Hyperspin XML file to the rom names for all of your installed Launchbox games. Any games with matching rom names will be added to the new Launchbox playlist. Installation: 1. Copy RB_CreatePlaylistFromHyperspinXML.dll to the LaunchBox/Plugins folder. 2. Restart Launchbox. Usage: 1. In Launchbox, select Tools->"Create playlist from Hyperspin XML" from the dropdown system menu. 2. Select the Hyperspin XML file to import from. 3. Enter a name for the new Launchbox playlist. 4. Click "Create Playlist". Submitter superrob3000 Submitted 07/05/2021 Category Third-party Apps and Plugins
 -
Version 1.0.1
80 downloads
Redream Per-Game VMUs for LaunchBox Created by Saieno - @Lets_All_Game on Twitch and YouTube What it is A ready-to-use installer package for enabling per-game Virtual Memory Unit (VMU) save file management in Redream; fully integrated with LaunchBox Why use it Redream creates four VMU files, and by default all four are shared across all games. This tool creates a vmu0.bin dynamically per-game, while leaving vmu1–vmu3 shared and persistent. This allows each game to have its own memory card (vmu0.bin), preventing cross-game save data conflicts and minimizing space limitations. Requirements: LaunchBox 13.12+ (must be closed during installation) Standalone Redream (latest version) Redream configured with automated default settings in Launchbox Redream needs to be marked as your 'Default Emulator' for the platform More than one Emulator configured within Launchbox ROM filenames with single spaces only Windows 10/11 (not available on Android) What it does Installs a dynamic launcher (DCBoot.bat) and a minimized shortcut (DCBoot.lnk) Installs a custom AHK script (LaunchGameRedream.ahk) for handling VMUs Copies a blank vmu-default.bin into Redream Modifies Redream Emulator in LaunchBox to hook into the new launcher Installs a custom LaunchBox plugin (PerGameVMUName.dll) for consistent and clean VMU naming Bonus Full uninstaller included — reverts all changes and cleans up Everything self-contained, no manual file editing required Installer remembers paths via settings.conf for faster reinstalls/uninstalls VMU files are based on the name within LaunchBox for consistency Share and trade per-game VMUs easily from the Redream VMU_Games directory Before You Install If you already have save data in vmu0.bin, consider moving those saves to vmu1, vmu2, or vmu3 before installing. After installation, Redream will use a new game-specific VMU as vmu0.bin for each game. Once a game is launched, you can transfer your old saves from the shared VMUs (vmu1–3) onto the new per-game VMU within Redream itself. Known Issues Filenames with double spaces will not load properly into Redream. Please use a tool like Bulk Rename Utility to clean up ROM filenames before launching. If Redream is the only Emulator configured within LaunchBox, it can cause issues on install. -
Redream Per-Game VMUs View File Redream Per-Game VMUs for LaunchBox Created by Saieno - @Lets_All_Game on Twitch and YouTube What it is A ready-to-use installer package for enabling per-game Virtual Memory Unit (VMU) save file management in Redream; fully integrated with LaunchBox Why use it Redream creates four VMU files, and by default all four are shared across all games. This tool creates a vmu0.bin dynamically per-game, while leaving vmu1–vmu3 shared and persistent. This allows each game to have its own memory card (vmu0.bin), preventing cross-game save data conflicts and minimizing space limitations. Requirements: LaunchBox 13.12+ (must be closed during installation) Standalone Redream (latest version) Redream configured with automated default settings in Launchbox Redream needs to be marked as your 'Default Emulator' for the platform More than one Emulator configured within Launchbox ROM filenames with single spaces only Windows 10/11 (not available on Android) What it does Installs a dynamic launcher (DCBoot.bat) and a minimized shortcut (DCBoot.lnk) Installs a custom AHK script (LaunchGameRedream.ahk) for handling VMUs Copies a blank vmu-default.bin into Redream Modifies Redream Emulator in LaunchBox to hook into the new launcher Installs a custom LaunchBox plugin (PerGameVMUName.dll) for consistent and clean VMU naming Bonus Full uninstaller included — reverts all changes and cleans up Everything self-contained, no manual file editing required Installer remembers paths via settings.conf for faster reinstalls/uninstalls VMU files are based on the name within LaunchBox for consistency Share and trade per-game VMUs easily from the Redream VMU_Games directory Before You Install If you already have save data in vmu0.bin, consider moving those saves to vmu1, vmu2, or vmu3 before installing. After installation, Redream will use a new game-specific VMU as vmu0.bin for each game. Once a game is launched, you can transfer your old saves from the shared VMUs (vmu1–3) onto the new per-game VMU within Redream itself. Known Issues Filenames with double spaces will not load properly into Redream. Please use a tool like Bulk Rename Utility to clean up ROM filenames before launching. If Redream is the only Emulator configured within LaunchBox, it can cause issues on install. Submitter Saieno Submitted 03/20/2025 Category Third-party Apps and Plugins
-
Version 1.0.0
283 downloads
Installing this plugin adds "Shutdown Video" functionality when closing Big Box. How To Use This Plugin Download the plugin. Unzip to the plugins folder. Add a video to the LaunchBox\Videos folder named shutdown.mp4 (if you need a shutdown video, some of the startup videos work great for this as well) That's it. The next time you close Big Box, your shutdown video will play. Thanks for your time, thanks to the community, and I hope you enjoy. -
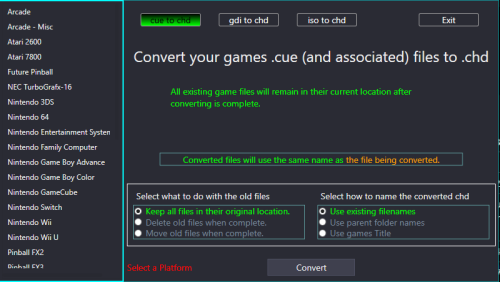
Version 1.0.0
1,652 downloads
Bulk Convert cue, gdi or iso ROMs to chd This plugin expands the capabilities of the existing Bulk Convert .cue to .chd plugin by adding the options to also convert gdi and iso formats to CHD. (For cue/bin files, the process is the exact same between the 2 plugins.) Using MAME’s chdman.exe (“Compressed Hunks of Data (CHD) Manager”, included with MAME), this plugin will convert CD based game files to a single .chd file in your selected Platform. Why convert? • You end up with just a single file per game • A CHD file is, well… compressed. Resulting in less storage space requirements • Most, if not all emulators now support .chd format • chdman applies lossless compression so there should no noticeable difference in load time. Requirements This plugin file chdman.exe (included with MAME) ROM sets that are in a .cue, .gdi or .iso format What happens after converting? After successfully creating a CHD Image, the games application path in LaunchBox will be redirected to the new .chd file. Also, after the files have been converted you have the option to • Leave the old files in place (default) • Move the old files to a separate [backup] folder • Delete the old files Installing the plugin 1. Download the plugin 2. Unblock “BulkConvert2CHD (v1.00).zip” by right clicking the file and checking “Unblock” and clicking “OK”. 3. Open the zip file and copy the contents (1 folder containing 1 file) into /LaunchBox/Plugins/ ../LaunchBox/Plugins/BulkConvert2CHD/BulkConvert2CHD.dll Using the plugin 1. Start LaunchBox 2. Select Tools, Bulk Convert To CHD 3. Select a Platform 4. Select the file format you’re converting from 5. Click Convert 6. (Optional) Check Delete old files when complete This will permanently delete the old files after successfully converting them to .chd. Check Move old files when complete This will move the old files after successfully converting them to .chd to the folder you specify. Troubleshooting: If you are getting errors while attempting to convert the files, make sure you are using chdman.exe that comes with the latest release of MAME. If you use multiple versions of MAME in LaunchBox, copy chdman,exe from your latest MAME release folder into the ../LaunchBox/Plugins/BulkConvert2CHD/ folder Special thanks to @faeran for the idea of the original Bulk Convert cue to chd. Without that, I probably never would have made this. As always, all comments and suggestions are welcome. -

Version 4.1
488 downloads
View MAME High scores in Game Details - A plugin for LaunchBox/BigBox Use this plugin to see a games top 3 high scores in the Game Details. Features Shows high scores for most games in your Arcade platform in the Game Details. After playing a MAME Arcade game that saves its' high scores [and is supported by the included hi2txt program], this adds a Custom Field called "Hi-Scores" to the game. It will store 1st, 2nd and 3rd place and appear in the Game Details when the game is selected. What's needed (3) files that are included in the downloaded zip file (the plugin) One file that is included in the Version 3.0 downloaded zip file MAME configured to save high scores Saved high score files (These are automatically generated by MAME [once configured to save them] in the "hi" and/or “nvram” subfolders of your MAME emulator) What it won't do Show high scores for games using emulators other than MAME. MAME does not save high scores for all arcade machines, so not all games are supported by this plugin. Contributors @jayjay and @JoeViking245 A HUGE Special Thanks goes to GreatStone’s utility “hi2txt”. This utility converts MAME’s high score files into a readable format which ultimately makes this plugin possible!! http://greatstone.free.fr/hi2txt/index.html Installation and setup instructions: Step 1: Installing the Plugin Step 2: Making sure MAME is set up to save high scores Installing the Plugin: Download the plugin, LB-BB_Hi_Scores_v1.0.zip, from the LaunchBox download section After you’ve downloaded the zip file, be sure to unblock it in Windows by right clicking it, selecting Properties, and clicking Unblock Open the zip file and extract/copy the "Hi_Scores" folder into ..\LaunchBox\Plugins e.g D:\LaunchBox\Plugins\ If you have previously installed “MAME Hi-Score Display - A plugin for BigBox”, you will only to copy the “HiScoreCustomField.dll” file into that same folder. Otherwise all 3 files are required. (Only one file is required with version 3.0) The 2 plugins will not conflict with each other. Setting up MAME to save high scores: Using a recent official MAME release – By default, plugins are enabled in MAME. You can verify this by looking at the “mame.ini” file located in the root MAME install folder. Open “mame.ini” and scroll down to (or press Control + F and search for) “Scripting Options”. “plugins” should be set to 1. If it’s 0 (zero), change it to 1. Next, open “plugin.ini” also located in MAME’s root directory and change “hiscore” to 1. If you have an older release of MAME, you may need to do the following steps. Go to this website: http://www.mameworld.info/highscore/download.htm and download a copy of the file hiscore.dat that corresponds to your version of MAME. The file (hiscoredat.zip) will need to be unzipped. Place the file hiscore.dat in your MAME/Plugins folder Open up your MAME.ini file in a text editor. In newer versions, this file will be in the same directory as the MAME.exe Press control + F and search for “Scripting Options” Next to the word Plugins, type “1” no quotes Next to the word Plugin, type “hiscore” no quotes It will look like this: How to use: Start LaunchBox or BigBox Go into the "Arcade" Platform Select a game, run it, then close it Now select a different game, then go back (poor man’s version to refresh the Game Details) If the game has saved high scores, they will now appear in that game’s Detail pane Depending on the BigBox theme you use, the amount of data shown in the Game Details may be limited. So you might need to go into Options, Game Details and deselect some of the Details. Be sure that “Custom Fields” is checked. -
 Hi folks. Been working on a plugin for 2 years to do various things, but main feature being per game/platform controls layouts. However, just recently hit a major blocking point. It seems each IPlatform has no unique identifier? I had been working around it historically, but I now need to map data against each launchbox (lb) IPlatform and thus need a unique identifier on the lb platform to ensure these are mapped correctly. However, I can find no unique identifier on the data object. I have scoped this out in VS and via the api ref here: https://pluginapi.launchbox-app.com/html/092c865d-74b6-4a39-e6d9-cda1235d8355.htm I did try getting a hash via IPlatform.GetHashCode, but this produces different Hash on each lb run without any discernible changes to the IPlatform data object Also tried examining the GUID via Iplatform.GetType(), but this returns the guid of the data object type, not the instance. Frustratingly, I see IGame and IEmulator both have an Id field, but cannot leverage the latter to form a unique ID in my plugin as there appears to be no link to the ascribed emulator for a platform via `IPlatform[] platforms = PluginHelper.DataManager.GetAllPlatforms();` So onto trying to generate a unique ID: Sadly, there also seems to be no 'created date' (i.e. when the IPlatform data object was created) which I could have leveraged for a unique ID. I also considered using ScrapeAs, Name or other such variable, but these of course can change and contain duplicates. So, in short, is there any way to get or generate a unique ID for each IPlatform function?