[SIGGRAPH Asia 2024 (Technical Communications)] StyleGaussian: Instant 3D Style Transfer with Gaussian Splatting
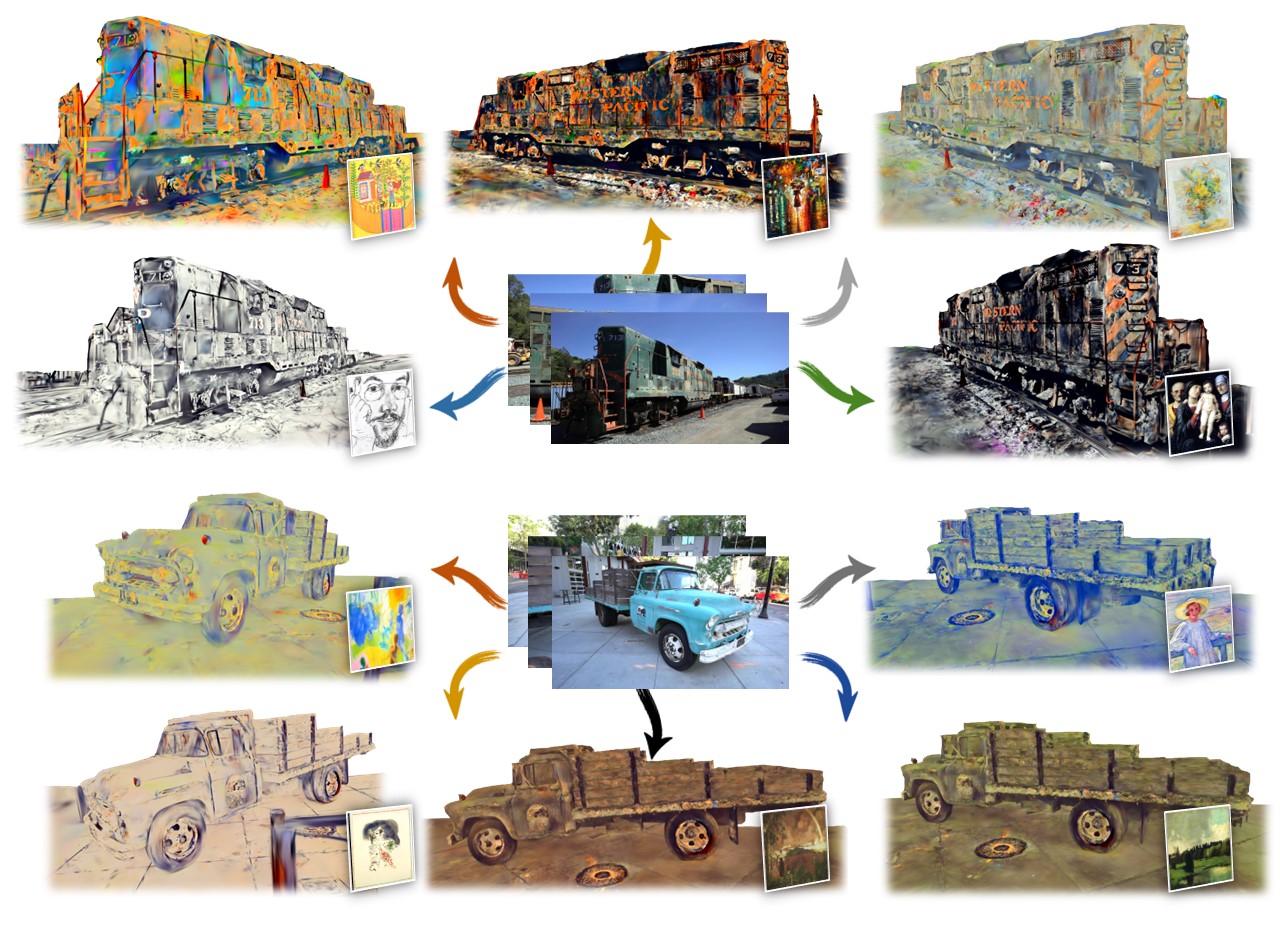
This repository contains a pytorch implementation for the paper: StyleGaussian: Instant 3D Style Transfer with Gaussian Splatting. StyleGaussian is a novel 3D style transfer pipeline that enables instant style transfer while preserving real-time rendering and strict multi-view consistency.
We use Mamba to manage the environment for its quick speed, while Conda can also be used.
mamba env create -f environment.yml -n stylegaussianDatasets and Checkpoints (Google Drive)
Please download the pre-processed datasets and put them in the datasets folder. We also provide the pre-trained checkpoints, which should be put in the output folder. If you change the location of the datasets or the location of the checkpoints, please modify the model_path or source_path accordingly in the cfg_args in the checkpoint folder.
train.mp4
Our interactive remote viewer is based on Viser. To start the viewer, run the following command:
python viewer.py -m [model_path] --style_folder [style_folder] --viewer_port [viewer_port]

# for example:
python viewer.py -m output/train/artistic/default --style_folder images --viewer_port 8080
where model_path is the path to the pre-trained model, named as output/[scene_name]/artistic/[exp_name], style_folder is the folder containing the style images, and viewer_port is the port number for the viewer. --style_folder and --viewer_port are optional arguments.
- Rendering Settings. Use the mouse to rotate the camera, and use the mouse wheel to zoom in and out. Use
WASDto move the camera,QEto move up and down. You can choose the viewpoint from the training views. ClickReset Viewto reset the up direction. You can also change the rendering resolution and image quality which affect the rendering speed as the refrasing speed is limited by the internet speed. - Style Transfer. The rendering will start once you specify the style image path in
Style Imagetext box and the style will be transferred instantly. TheRandom Stylebutton will randomly select a style image from the style folder. Click theDisplay Style Imagebutton to display the style image at the lower right corner. - Style Interpolation. You can interpolate between two style images by specifying the image paths of the two style images in
Style 1andStyle 2. The interpolation ratio can be adjusted by the slider. TheStyle 1image is displayed at the lower left corner and theStyle 2image is displayed at the lower right corner.
You can perform style transfer on a scene with a single style image by:
python render.py -m [model_path] --style [style_image_path]

# for example:
python render.py -m output/train/artistic/default --style images/0.jpg
where model_path is the path to the pre-trained model, named as output/[scene_name]/artistic/[exp_name], and style_image_path is the path to the style image. The rendered stylized multi-view images will be saved in the output/[scene_name]/artistic/[exp_name]/train folder.
You can perform style interpolation on a scene with four style images by:
python render.py -m [model_path] --style [style_image_path1] [style_image_path2] [style_image_path3] [style_image_path4]

# for example:
python render.py -m output/train/artistic/default --style images/0.jpg images/1.jpg images/2.jpg images/3.jpg
where model_path is the path to the pre-trained model, named as output/[scene_name]/artistic/[exp_name], and style_image_path1, style_image_path2, style_image_path3, style_image_path4 are the paths to the four style images. The rendered interpolated stylized visualizations will be saved in the output/[scene_name]/artistic/[exp_name]/style_interpolation folder.
We use the WikiArt Dataset as the style images dataset.
You can train the model from scratch by:
python train.py --data [dataset_path] --wikiartdir [wikiart_path] --exp_name [exp_name]

# for example:
python train.py --data datasets/train --wikiartdir datasets/wikiart --exp_name default
where dataset_path is the path to the training dataset, wikiart_path is the path to the WikiArt dataset, and exp_name is the name of the experiment. The training process will be saved in the output/[scene_name]/artistic/[exp_name] folder. --exp_name is an optional argument.
Alternatively, you can train the model step by step. StyleGaussian is trained in three steps: reconstruction training, feature embedding training, and style transfer training. These three steps can be trained separately by:
python train_reconstruction.py -s [dataset_path]

# for example:
python train_reconstruction.py -s datasets/train
The trained reconstruction model will be saved in the output/[scene_name]/reconstruction folder.
python train_feature.py -s [dataset_path] --ply_path [ply_path]

# for example:
python train_feature.py -s datasets/train --ply_path output/train/reconstruction/default/point_cloud/iteration_30000/point_cloud.ply
where dataset_path is the path to the training dataset, and ply_path is the path to the 3D Gaussians reconstructed from the reconstruction training stage, name as output/[scene_name]/reconstruction/[exp_name]/point_cloud/iteration_30000/point_cloud.ply. The trained feature embedding model will be saved in the output/[scene_name]/feature folder.
python train_artistic.py -s [dataset_path] --wikiartdir [wikiart_path] --ckpt_path [feature_ckpt_path] --style_weight [style_weight]

# for example:
python train_artistic.py -s datasets/train --wikiartdir datasets/wikiart --ckpt_path output/train/feature/default/chkpnt/feature.pth --style_weight 10
where dataset_path is the path to the training dataset, wikiart_path is the path to the WikiArt dataset, feature_ckpt_path is the path to the checkpoint of the feature embedding model, named as output/[scene_name]/feature/[exp_name]/chkpnt/feature.pth, and style_weight is the weight for the style loss. The trained style transfer model will be saved in the output/[scene_name]/artistic/[exp_name] folder. --style_weight is an optional argument.
You can save the training time of the style transfer training stage by initializing the model with the trained model of another scene by:
python train_artistic.py -s [dataset_path] --wikiartdir [wikiart_path] --ckpt_path [feature_ckpt_path] --style_weight [style_weight] --decoder_path [init_ckpt_path]

# for example:
python train_artistic.py -s datasets/train --wikiartdir datasets/wikiart --ckpt_path output/train/feature/default/chkpnt/feature.pth --style_weight 10 --decoder_path output/truck/artistic/default/chkpnt/gaussians.pth
where dataset_path is the path to the training dataset, wikiart_path is the path to the WikiArt dataset, feature_ckpt_path is the path to the checkpoint of the feature embedding model, named as output/[scene_name]/feature/[exp_name]/chkpnt/feature.pth, style_weight is the weight for the style loss, and init_ckpt_path is the path to the checkpoint of the trained model of another scene, named as output/[another_scene]/artistic/[exp_name]/chkpnt/gaussians.pth. The trained style transfer model will be saved in the output/[scene_name]/artistic/[exp_name] folder.
Our work is based on 3D Gaussian Splatting and StyleRF. We thank the authors for their great work and open-sourcing the code.
@article{liu2023stylegaussian,
  title={StyleGaussian: Instant 3D Style Transfer with Gaussian Splatting},
  author={Liu, Kunhao and Zhan, Fangneng and Xu, Muyu and Theobalt, Christian and Shao, Ling and Lu, Shijian},
  journal={arXiv preprint arXiv:2403.07807},
  year={2024},
}